Features of the arrangement of the winter water supply system
Uninterrupted water supply in the country is necessary, provided that the residence in the house will be year-round, and not temporary.
Sources of water:
- well;
- well.
Winter water supply in a country house is an autonomous water supply system that has both positive and negative features.
Pros:
- autonomy and the possibility of manual water intake;
- longevity of the water source;
- independent construction of a well;
- self-cleaning of the well.
Minuses:
- in case of violation of the rules for installing a water intake, freezing of system elements;
- changes in water level;
- the possibility of contaminated water ingress from the soil surface.
The winter version of water supply has a number of features:
- compulsory conservation system;
- installation under a slope;
- insulation of the water source.
The conservation system can be omitted if the residence is year-round and there is no need to periodically drain the water.
Video output and diagrams
As you can see, a large number of special materials for thermal insulation of a water supply system are presented on the construction market. You can find modern solutions to this problem or take advantage of older developments that will cost significantly less.
Take care of the arrangement of the water supply in advance and enjoy delicious drinking water in the winter cold!
Almost all communication technologies have become available today. So, many people decide to carry out a winter water supply in the country with their own hands. This measure allows you to comfortably stay in a country house at any time of the year.
It would be more correct to call such a system year-round, because it can be used at any time, and not only in winter. In this article, we will analyze the main properties of creating such a structure.
Such a system will ensure a comfortable stay in a country house at any time of the year.
Methods for arranging a winter water supply
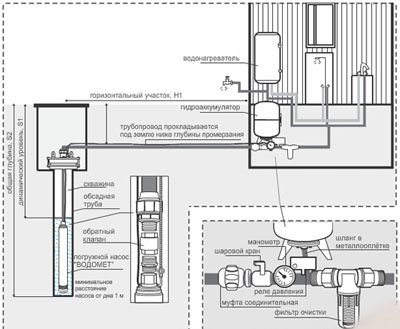
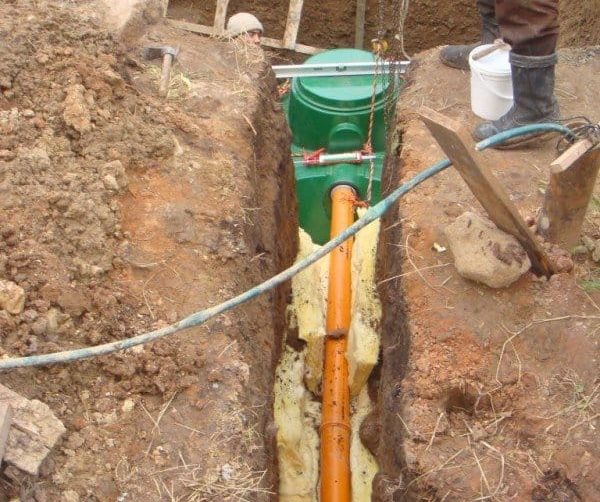
The installation of an underground pipeline should be well thought out. There are 3 ways to install year-round water supply: deepen the water supply system so that it does not freeze through, insulate the water supply system or deepen it with insulation elements. Preparation of a trench is required, into which the winter version of the water supply will be installed.
Below the depth of freezing
The freezing depth depends on the geographic location and climatic conditions. The pipe is laid below the freezing depth by an average of 0.3 m. Before determining the depth of the trench, one should study the statistical data of weather conditions for the last 5-10 years.
| Variety of material | Polypropylene | Metallic | Reinforced plastic |
| pros |
|
|
|
| Minuses |
|
|
|

Plumbing scheme in a private house.
During the design of winter water supply from a well or well, it must be borne in mind that the fewer joints in the pipeline, the less chances of a leak. If it is necessary to dock the parts, ensure the tightness of the connection.
Consequences of lack of tightness:
- inaccessibility of the problem area;
- excavation of a trench;
- in winter, a break is possible.
The diameter of the pipes is selected based on the volume of water consumption and the length of the structure.
Water pipe insulation
Not one installation method provides protection against freezing of the water supply system in winter, but if you follow simple rules, you can avoid additional problems. The depth of the water line is 0.6 m. The trench is laid out with bricks or concrete blocks.
Pipeline insulation methods:
- extruded polystyrene foam;
- Styrofoam;
- mineral wool;
- electrical wires.
| Type of material | Extruded polystyrene foam | Styrofoam | Mineral wool |
| pros |
|
|
|
| Minuses |
|
|
|
The wires that heat the water supply are located along its entire length. The sensor regulates the temperature regime. The heating cable is available from your specialist store.
Insulation of the pipeline.
Laying pipes below freezing depth
The depth of soil freezing will depend on the peculiarities of the local climate.
It is recommended to lay the pipeline in the ground without additional artificial heating when it freezes at a depth of 170 cm. Laying a winter water supply system with your own hands in the country is as follows:
- it is necessary to dig a trench 25 cm deeper than the freezing point;
- sand 10 cm thick is placed on its bottom;
- then a technical pipe is laid with a diameter larger than that of a water supply system, thermal insulation must fit in it;
- a water supply system is placed in it, wrapped in a special heat-insulating material;
- the ideal solution would be to use the pipeline without connections in hard-to-reach places, this will protect the owners from possible unplanned repairs and unnecessary financial costs.
Among the materials of the pipeline, metal, its various alloys can be used, however, low-pressure polyethylene is considered the most suitable. It does not corrode, freezes harder and clogs less.
Whenever possible, the wall thickness of the piping should be as large as possible. The depth of soil freezing is calculated based on the temperature regime of the coldest days in the last decade.
Organization of winter water supply
The installation of the water supply system takes place in several stages:
- Preparatory.
- Installation.
- Checking.
We insulate the pump for water supply
The water supply system completely needs insulation, including the pump.
The material for insulating equipment is the same as for insulating a water supply line:
- Extruded polystyrene foam.
- Styrofoam.
- Mineral wool.
Equipment need not be insulated if it is located below the freezing depth. The place where the water pipes and the pump join is also subject to insulation. The joint is called a pit. The pit is to be covered with bricks, and the floor is covered with a concrete screed.
We insulate the hydroaccumulator
A hydroaccumulator is a storage tank operating under pressure, the container must be tight. The inner shell of the hydroacamulator is an elastic membrane, a vulnerable element of the hydraulic system that cannot withstand sub-zero temperatures. The sheathing of the hydraulic system is made with insulation material.
Do-it-yourself thermal insulation of the accumulator.
Varieties of insulation for a hydroaccumulator:
- Extruded polystyrene foam.
- Styrofoam.
- Mineral wool.
- Basalt wool.
- Fine-mesh insulation.
We take care of water pipes
The elements of the water supply system should be selected of high quality, with a long service life.
We put the drain valve and pressure switch
The conservation system involves the installation of a drain valve. The ability to drain water from the supply system will save the water supply if it becomes necessary to be away for a long time in the winter.
The pressure switch is an element of the water supply system that regulates the uninterrupted operation of the hydraulic system. After the structure is completely filled with water, the relay automatically turns off the pump until the next use.
Boiling water application
Defrosting metal pipes with boiling water
If the water pipe is located in an open space, you can use hot water brought to a boil to defrost it. This applies to pipes located near the house, in the garage or in the summer kitchen, which does not have a heating system.
Find out the cost of heating
- The water is heated to boiling water, poured into a kettle or other container, and then poured directly onto the section of the pipe that needs to be defrosted.
- The process of heating the water supply system will be more effective if, before using hot water, the pipe is wrapped in a certain place with as much cloth as possible. This move will allow the water in the fibers of the material to maintain a high temperature for a longer time, so the pipe will defrost faster.
Defrosting with hot water
If the section of the pipe that needs to be heated is located in the soil, then the heating work can take a long time. In this case, you need to either be patient or use another faster method.
Repair of heating systems
Small installation tricks
Before starting work, a diagram or a project of a water supply system is drawn up. The diagram should include all elements of the system with the calculation of the diameter of the pipes used and the number of auxiliary parts (couplings, fittings, volume of insulation material). It is better to prepare a trench for the pipeline in dry and warm weather.
Step-by-step instructions for installation:
- Project preparation.
- Trench preparation.
- Preparation of the pump and hydraulic system, check of the complete set.
- Insulation and installation of pipes in the trench.
- Installation of water intake elements in the well (it must be remembered that you will have to drill concrete rings in the well to install the water intake element, therefore, you must have an impact drill or other powerful tool).
- Connection of all installed elements to each other.
- If the wiring in the house is installed in advance, then the system is immediately checked for leaks. If the supply of water is carried out without interruption, then the trench is subject to, if necessary, further warming and covering with soil.
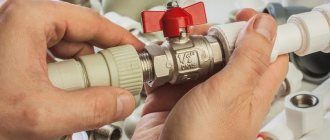
The tightness of the water supply structure at the joints is ensured with the help of a special silicone-based sealant.
The submersible device is lowered into the water. During water intake, the device should not be interfered with by the filtration elements used at the bottom of the well pit.
Insulation of the pipeline
Laying a winter water supply from our own water intake in the form of a well or a well, a trench half a meter deep will be enough. The pipeline should be placed in it in an insulated form.
To do this, a gutter is laid out at the bottom of a ditch made of bricks or other building materials, where a water pipe is placed wrapped in special construction thermal insulation.
From above, the gutter is covered with building material and covered with soil. It is necessary to provide for waterproofing of the gutter, which will increase the service life of the water supply system. Annual plants are planted on this site, allowing access to the gutter, if necessary.
There are two main types of insulation:
- special factory heat-insulating products for pipes corresponding to their diameter;
- insulating material produced in tapes or layers, which is used when wrapping the surface of pipes.
Methods for blowing pipes in the country without a compressor
In the absence of a powerful compressor, it is quite possible to make it yourself. For this purpose, you will need the minimum amount of necessary equipment and additional things:
- Durable polypropylene or Teflon canister;
- Drill;
- Step drill;
- FUM tape;
- Unnecessary bicycle or car camera;
- Tire pressure gauge (costs no more than 100 rubles in car and bicycle stores);
- Ball valve (required to shut off the air supply);
- Several flexible hoses for water supply;
- Unions with threaded connections for connection to the canister.
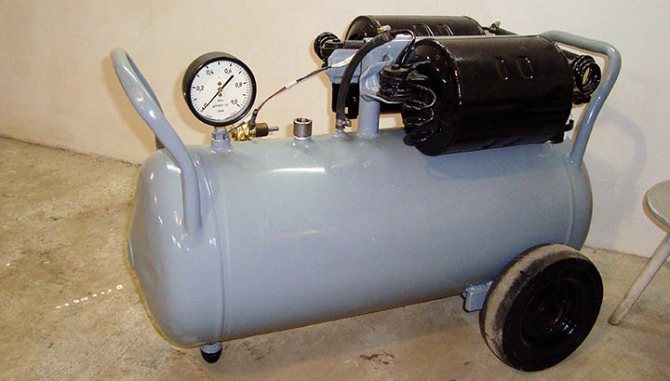
The process of creating the simplest compressor for blowing pipes
- Drill three holes in the side of the canister. Their diameter should be slightly larger than the fittings;
- Insert the fittings into the canister, make gaskets from the old chamber. And then tighten them securely with the bolts;
- You need to connect a simple foot pump to inflate the wheels or a small car compressor to one fitting;
- Connect the hose securely to the second fitting, then screw in the ball valve, and then again the flexible hose. Do not forget to seal all connections with FUM tape;
- A manometer is screwed into the third fitting to monitor the pressure in the canister.
How to restore water supply
This task is less troublesome. To resume the water supply, you need to do a simple job: close the drain valve (s) and open the tap on the supply water supply.
Of course, if you come to the dacha regularly in winter, and you will have to drain and fill the water repeatedly, you will have to be patient. But it really helps to keep the country water supply and heating in the cold and use them without problems when needed.
Do not despair: spring is coming soon, and it will be possible to start installing a new - modern, reliable and economical water supply system. And how to make it, what subtleties and nuances to take into account in the device, read in the following articles.
Drain the water! Tips while waiting for frost
30 Sep 2013
Listen
81681
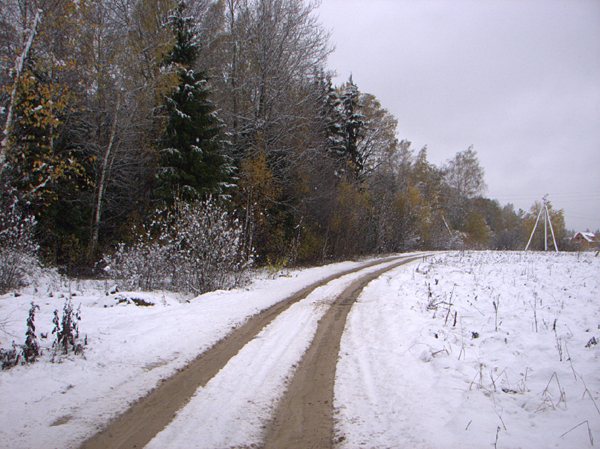
Summer always ends earlier than we would like. It seems that the grass is still green, and the leaves are not falling, but it is clear that very soon there will be the first frosts, and then there will be snow and cold.
Summer always ends earlier than we would like. It seems that the grass is still green, and the leaves are not falling, but it is clear that very soon there will be the first frosts, and then there will be snow and cold. The rest in the country is coming to an end and work begins on preparing it for winter. Quickly tint something according to the last sun, check (with the help of autumn rains) the condition of the roof, remove the grill, swing, trampoline placed all over the site in the barn ... And at the end of October drain the water from all the devices and devices in which it is located.
Sometimes even experienced owners who have a house for seasonal living make mistakes when preserving it for the winter. And if the owner of the house bought it in the spring, and this is his first winter, then he should prepare for it as carefully as Nansen for the drift on the ship "Fram" through the center of the Arctic.
Let's leave aside the option in which electric heaters, for example, warm floors, remain on to maintain a positive temperature in the house. Such a solution is fraught with fire in the event of a failure of electrical equipment or, which happens much more often, "defrosting" of everything that is filled with water in case of an emergency power outage. Let's carry out the "classic" preparation of the house for the winter.
Water pipes
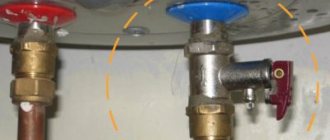
What should you pay attention to? What and where to drain? Let's walk around the house together and see. Obviously, first of all, you should take care of draining the water from the water pipes.The designs of the summer water supply system can be different for everyone, the material of the pipes and types of valves, the working pressure and the place of installation of the pump may also be different, but a properly made system should have several common properties: - The pipes are laid so that they have a slope towards the water source (for example, a well), which facilitates its drainage. - On the pipe, through which water is supplied to the house, there is a "check valve", which in the operating mode prevents it from draining. Depending on the length of this pipe and the depth of the well or well, the valve can be installed either in the well or in the house, next to the accumulator. The owner's task is to "neutralize" it and ensure that the water is drained back into the well (if a well is used), or into a specially arranged drain (if a well is used).
For this, a drain valve is mounted on the supply pipe, located between the check valve and the accumulator. If the crane is located in a well, it is supplied with a long pull handle, which allows it to be operated without going down. Instead of a manually operated valve, a so-called “normally closed” solenoid valve can be used. When voltage is applied to it, it opens, allowing the water to drain. The advantages and disadvantages of this solution are obvious - you can drain the water without leaving your home by simply pressing a button, but this requires either mains voltage or connection to alternative power sources.
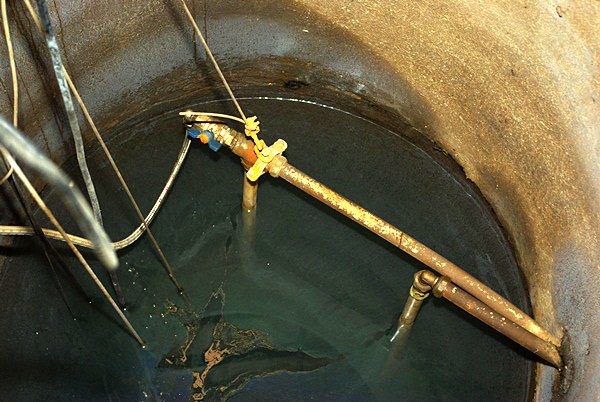
If the check valve is located in the house, near the accumulator, then everything is much simpler - in a properly mounted system, the section of the pipe equipped with such a valve is duplicated by a parallel pipe on which the drain valve is installed, and for manual control they do not need to climb into the well. If there is no such pipe with a tap, then you will have to disassemble the water supply unit, drain it manually. Some owners disassemble this unit sometimes in order to make sure that the accumulator is emptying, believing that the freezing of water residues in it can damage the rubber membrane. However, many years of experience in operating this device have shown that freezing a small amount of water in it does not lead to its destruction.
Having finished draining the water using the drain tap (by the way, the taps on the mixers should be open at the same time), you should make sure that it has left the pipes laid through the house. With proper installation of the system, tees with drain valves are installed at the lowest point of each branch of these pipes. However, for complete confidence in success, it will be useful to purge the system. But we will talk about this operation a little later.
Filters and pumps
As a rule, before and after the accumulator, filters are installed - mechanical coarse and fine cleaning, coal, ion-exchange and others - that bring water to the required parameters.
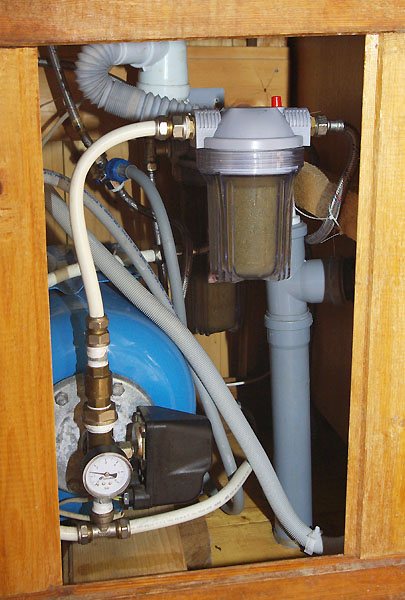
The coarse filter installed at the very entrance to the system, as a rule, is self-cleaning by backwashing, after which it should be left without water. The rest of the filters have replaceable cartridges. All of them, after draining the water, must be disassembled, cartridges, the shelf life of which has not expired, washed and stored (if their design allows a long stay without water).
The next element of the system that should be inspected is the pump. It can be in a well or a well, then there is nothing to worry about - in the Moscow region, wells do not freeze, at least they do not freeze to the depth where the pump is usually suspended. If the pumping station is installed in the house, then you should open the special drain plugs and make sure that there is no water left in the pump housing.
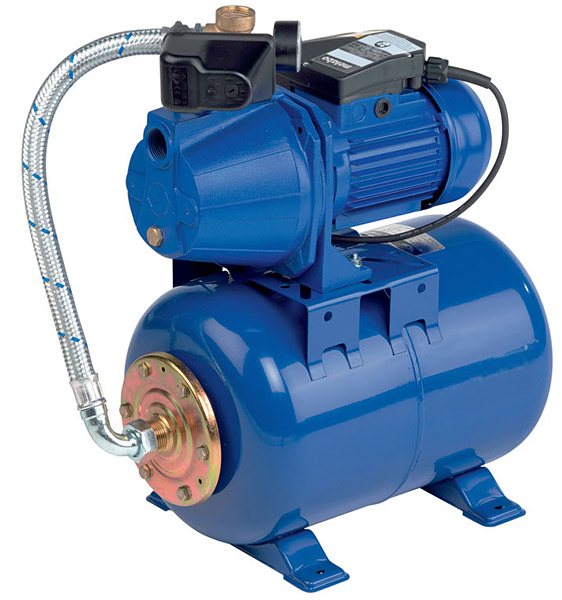
Sometimes it should be tilted to make sure the water drains out completely. This operation should be described in the pump manual.
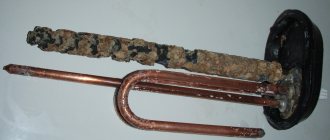
Water heaters
Now we should deal with water heaters. From flowing electric heaters
water leaves when the system is drained, although checking if this has happened will be the right decision.However, boiler-type storage heaters are more common. I am familiar with several "dacha owners" who at one time equipped houses with storage heaters, and after the first winter threw them out - they did not manage to drain the water properly. How can you avoid mistakes? First of all, it should be borne in mind that the pipe through which hot water is supplied to the mixer takes it from the top of the tank, and the cold water supply pipe should be used for draining. A safety valve is normally installed on it, the purpose of which is to exclude the possibility of heating elements operating without water in emergency situations, or to start discharging water when the operating pressure is exceeded. Formally speaking, through the safety valve, opening it manually, you can drain the water from the tank. However, this requires patience. It is recommended to place a tee equipped with a drain cock with a drain hose between the safety valve and the cold water inlet.
You can do without a tap,
but then every time you drain the water you will have to remove the safety valve and substitute, for example, a bucket. If the volume of the tank exceeds 40-50 liters, the drain valve, the hose from which is connected to the sewer, is the only way to quickly and conveniently release the heater. In this case, do not forget that if there is a septic tank, you cannot pour hot water into it - the microflora will not withstand this.
When draining water from the tank, allow air to enter it. It is best to disconnect the pipe supplying hot water to the mixer for this. As a rule, storage heaters are suspended from the upper part on the wall in such a way that their lower part only rests on it. When the water stops flowing out, you should shake the tank several times without removing it from the wall. Most likely, some more water will flow out of it. After that, you can safely leave it until spring.
Purging the system
After the water heaters are emptied and the pipes supplying them with water are disconnected (as a rule, such heaters are connected to the network using flexible hoses in a metal braid), the plumbing system will be divided into several fragments, in which a significant amount of water should no longer remain ... Now, for complete confidence in its absence, they can be blown out. For this, a special valve is used, to which a pump or compressor is connected to inflate car tires. The valve is screwed to the ends of pipes or flexible hoses released after draining the water from the heaters. By closing the mixer taps and opening the drain taps, the compressor is put into operation, and the pipes are freed from the remaining water. Sometimes such a valve is installed permanently in the system.
Since all valves in such systems are ball valves,
then it must be borne in mind that they have a cavity in which no water should remain in winter. This can happen if the ball valve on the pipe is closed before draining the water from the pipe. The same is true for one-handed mixers. Therefore, at the end of the pipe draining operation, open all mixer and drain valves and leave them in this position. The shower net, especially the one that is equipped with a mode switch, should be removed from the tube, poured (or even shaken out) the water, removed before spring.
Washing machine and dishwasher
Nowadays, you will not surprise your neighbors in the country with a washing machine and dishwasher. How to prepare them for winter?
The washing machine should be disconnected from the water supply and sewerage system and the ends of the hoses should be lowered into a vessel with low edges, for example, into a basin. Switch on drain mode. At the end of work - disconnect the machine from the power supply and unscrew the cover of the drain pump,
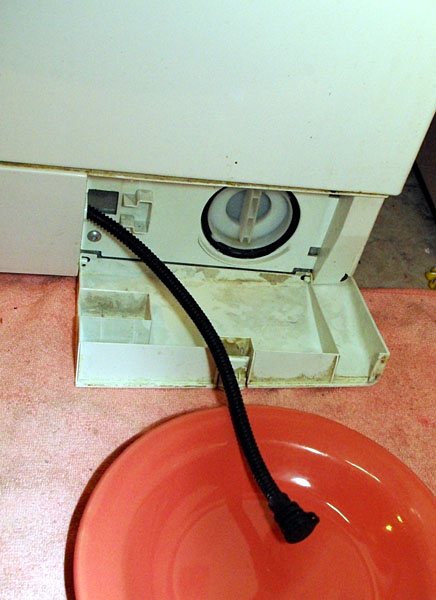
substituting some kind of small flat vessel. There is now a small amount of water left in the machine in the thick rubber hose connecting the tank to the drain pump.Freezing of this water is permissible, but sometimes it is advised to turn the car upside down and leave it until spring. Some machines are equipped with a special pipe for draining the remaining water.
The situation with dishwashers is less clear.
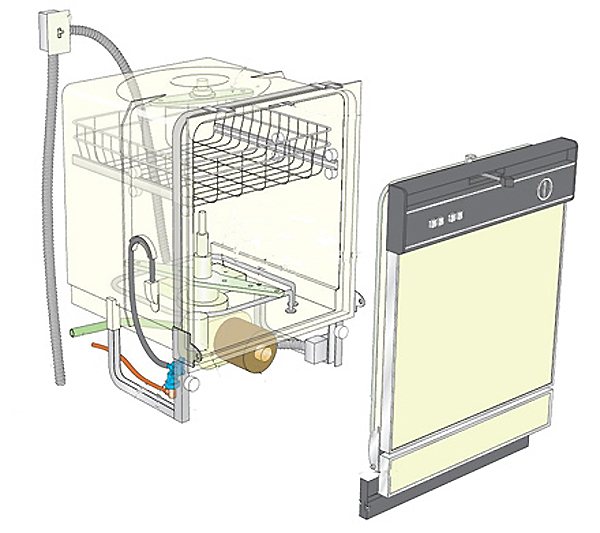
Their designs are very diverse, the paths of movement of water and the cavities in which it can remain differ depending on the manufacturer of the machine and its type - for example, floor and table machines have noticeable differences. If the instructions for the car do not directly indicate that it can be in an unheated room in winter and there is no algorithm for preparing it for this, then it is better not to risk it.
There are no trifles
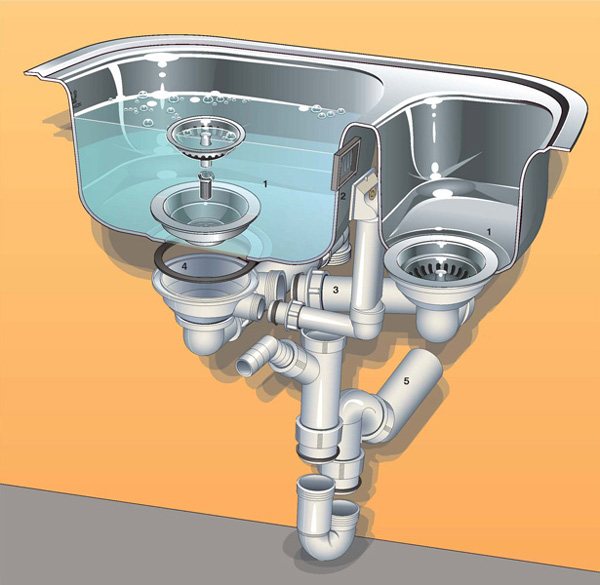
Let's not forget that in addition to the water supply system, we have a drainage system, and the water in it also has a place to freeze. At a minimum, you should disassemble the siphons under the sinks. If there is a toilet bowl, the water from the tank should be drained, and from the water seal - pumped out with a syringe, rubber bulb, etc. To prevent the house from being filled with the "aromas" of the septic tank after pumping out, antifreeze is poured into the water seal. In the spring, it is pumped out in the same way as water in the fall. Of course, you cannot drain antifreeze into a septic tank.
As a rule, in country houses there is another device that requires attention at the end of the season, although it has nothing to do with the water supply. This is a mobile air conditioner. Our "nervous", as meteorologists say, the climate forces us to purchase this device and actively use it in the summer for cooling, and in the rainy off-season - for heating and fighting dampness.
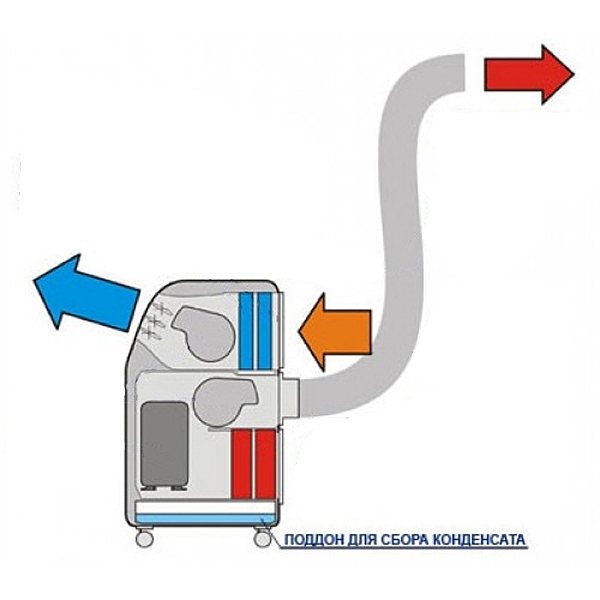
Do not forget that, unlike window air conditioners and split-systems, a floor-mounted mobile air conditioner does not have drainage pipes, and the water taken from the air during operation is accumulated in a special container. Some models have special pipes for draining water into a sump or basin during operation of the air conditioner, but even in this case, a noticeable amount of water may still remain inside it. Residual water should be removed by tilting the device towards the drain hole. In addition, it is highly advisable to turn the air conditioner on for winter storage for about an hour in ventilation mode in order to dry the heat exchanger.
*** Well, we have finished preparing the "water-containing devices" of a typical country house for winter. While we were doing this, a short autumn day came to an end, and the sky was strewn with bright October stars. We fiddled for a long time! Now we have to go home after dark ... It's good that we didn't have to service the solar water heater and the hydromassage shower.
But the main thing is that the job is done. And now you can calmly rest from the dacha until next spring.
Is it possible to cope faster?
Faster - it is possible, but in the case of an improved system. Therefore, this information will be useful to those who are going to rebuild or seriously alter their summer water supply system.
First of all, you can get rid of the main drain valve on the supply pipe, which was discussed at the beginning of our conversation and, accordingly, not waste time on manipulations associated with it. It is replaced by a drainage device of two types. The first, the most primitive option is a tiny (about 1 mm) hole in the wall of the supply pipe in the well, right after the check valve. The pump capacity is so high that the presence of such a hole does not affect the consumer qualities of the system, but when the pump is turned off and the mixer taps are open, water leaves the system rather quickly. A significant drawback of this method is that the water slowly leaves even with the taps closed, forcing the pump to constantly turn on to maintain the operating pressure in the system.
The second, very elegant from a technical point of view, is the installation in the same place of a non-volatile automatic drain valve that opens the drain hole when the pressure in the system drops to 0.2 atmospheres, that is, when the pump is turned off and all the taps are opened.
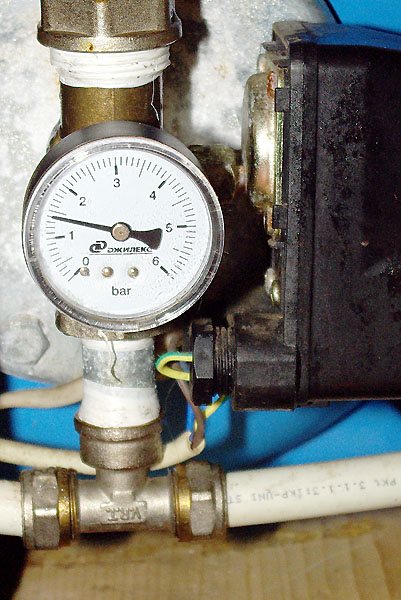
Above we talked about plumbing systems assembled from rigid pipes. As a rule, they use metal-plastic pipes and connecting elements for them, the choice of which is very large on the market, as well as polypropylene pipes.Such pipes are considered more resistant to freezing of water residues in them, since they have some elasticity. It is very convenient to connect them by welding, but for the summer water supply it is better to use special couplings - in this case, in the spring we can easily replace the burst section. The operating pressure in such systems is up to 3 atm., And the relay that controls the pump is usually set so that it turns off when the pressure reaches 3 atm., And turns on at 1.7 atm.
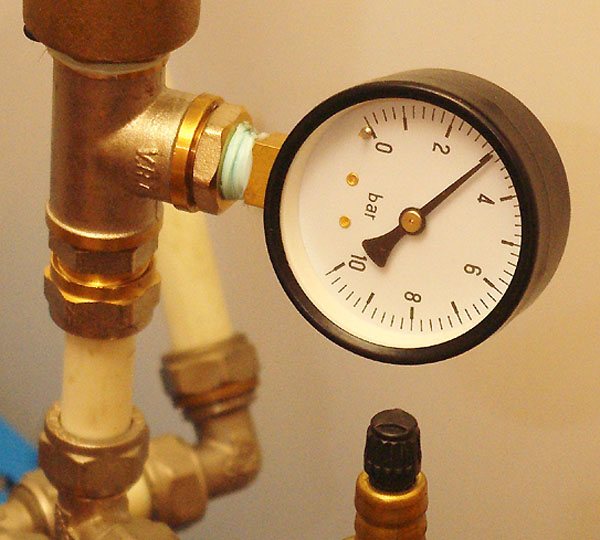
It is possible to radically change the complexity of servicing the system by using flexible hoses that are not afraid of water freezing in them on the site from the well to the house. There are hoses that can withstand high pressure - 3-6 atm., But you can use ordinary garden reinforced hoses. True, they will not withstand high pressure, and the relay will have to be adjusted so that the pump turns off at 1.7-1.8 atm., However, if 3-4 people permanently live in the house, and they do not open all the taps at the same time, then this pressure quite enough.
These hoses can safely survive severe frosts in the absence of the owners. They can be laid directly on the surface of the earth, used until late autumn, and at the last moment rolled up and removed. Even if we miss the moment, and the water in them will freeze before our arrival (and it will freeze earlier than in the pipes laid in the house), they can be safely left in their places until spring.
Even more useful information from the real estate world on our Youtube channel Real Estate +