Hot water availability in modern apartments and private houses has long become the norm. But not all residential areas and private buildings are connected to the central hot water supply, so the desire to equip an autonomous hot water supply system is understandable. The simplest solution to the problem is to install a boiler yourself. There is electricity in every house, unlike gas, and it is not difficult to install a water heater on your own.
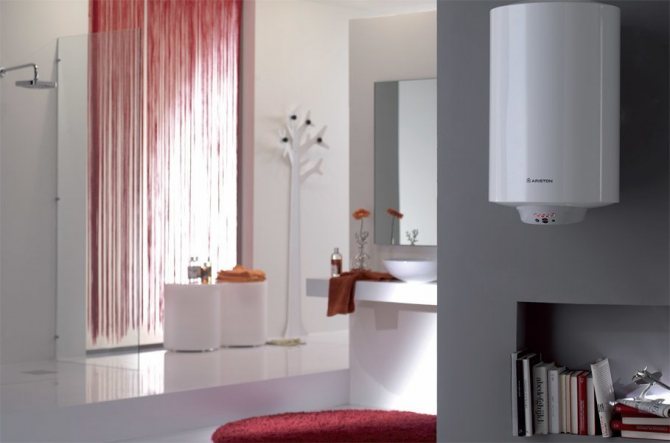
There is nothing difficult in installing a storage or flow-through electric boiler on your own.
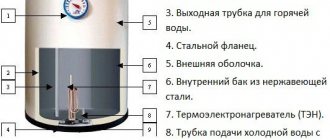
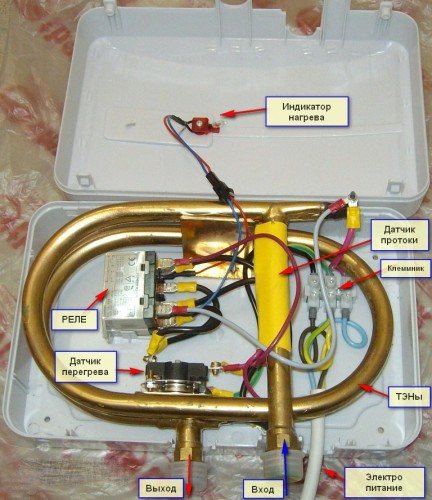
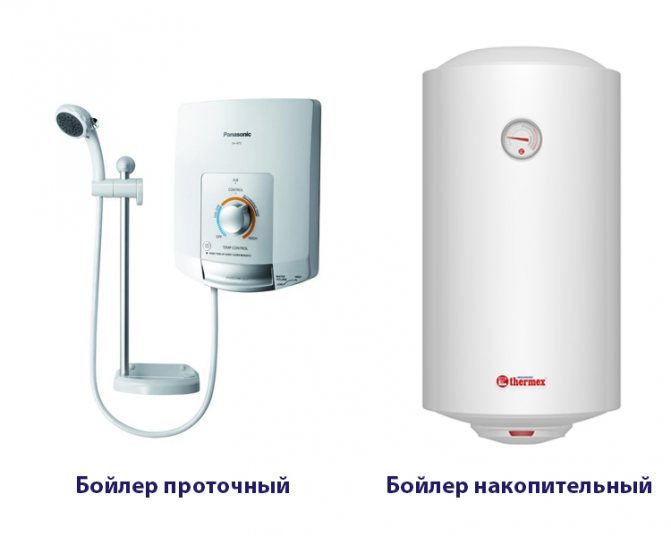
Boilers are divided into storage and instantaneous water heaters. These models have a different principle of operation, they consume electricity in different ways, therefore, before installation, it will not be superfluous to know the nuances of the installation and the principles of operation of the main units of the boilers. An instantaneous water heater heats the water, passing it in a constant flow through the heating element. The storage boiler heats up the water that is pre-filled into the tank.
In order to save money on the purchase, you should also know that a 10-15 liter boiler is capable of serving a small country house in which there is no bath or shower, no washing machine or dishwasher is installed. A house or apartment with a shower stall needs a water heater with a tank volume of up to 50 liters, and to ensure the operation of a bathroom - 80-100 liters. The place of installation is also important, and for this you need to know the dimensions of the device, see its design and understand the connection.
Features of using a flow type water heater
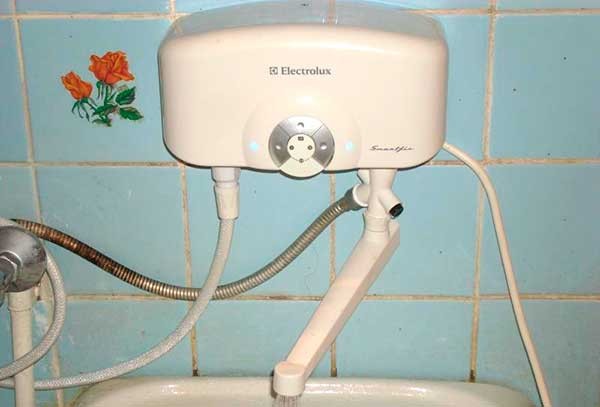
In the case of a stationary installation of an instantaneous water heater, a scheme of simultaneous supply and water intake is used. Installation is carried out in a parallel way to the water supply system of a private house or apartment. This method involves the installation of tees together with valves on each pipe. Due to this, if necessary, the flow-type heater can be completely excluded from the intra-apartment water supply system.
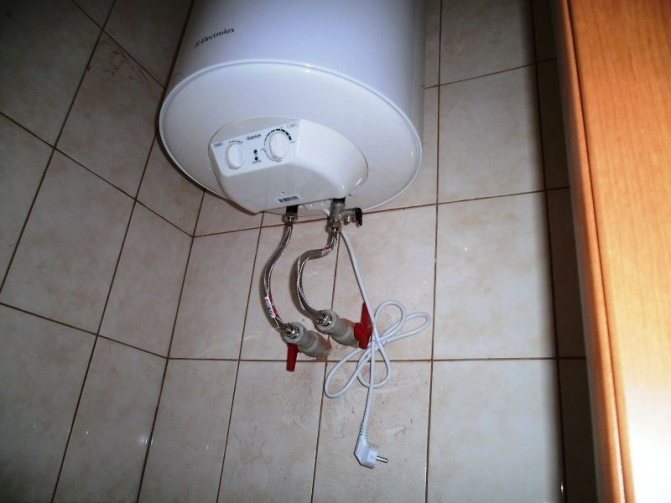
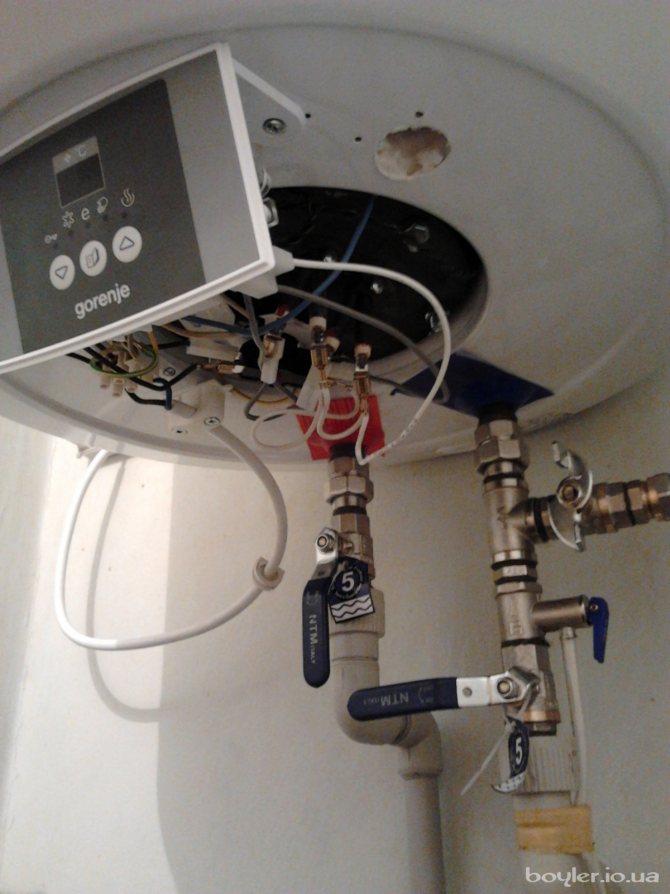
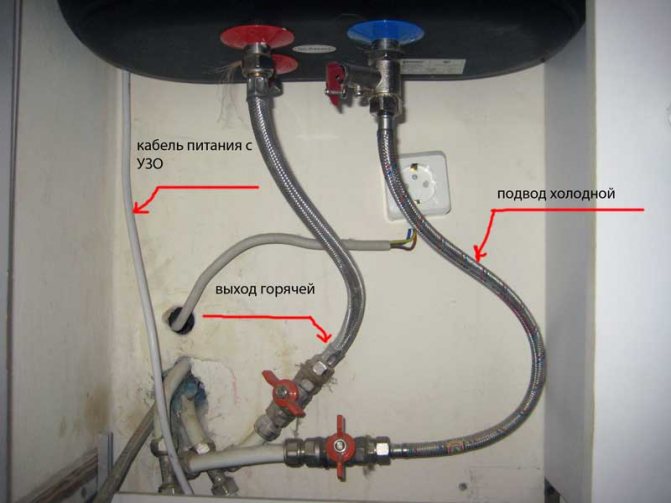
The cold water pipe is connected to the inlet of the boiler, and from the outlet of the device, it is connected to the hot pipe using a reinforced hose
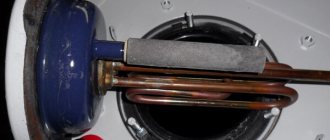
In the case of installing a water heater in an apartment building, it is important to turn off the hot water valve on the central riser in order to prevent the heated liquid from getting into the water supply of the neighboring apartment
As you can see, it is quite simple to install a boiler of both flow-through and storage type and, quite possibly, do it yourself. And if someone still has questions, then the article provides a detailed video on inserting a water heater into the water supply system and connecting to an AC network.
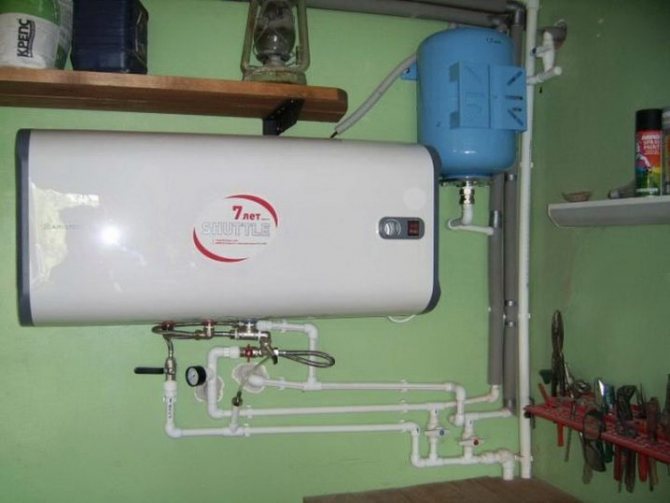
Installation of a storage type water heater
A storage water heater or boiler does not need increased wiring requirements, and in combination with an affordable price, it is an ideal option for small apartments with poor wiring. The choice of such devices is very large, so that it will satisfy the requirements of any buyer and any premises, from ordinary apartments to country houses with high water consumption. Do-it-yourself installation has already been described above. When contacting a special company, the installation of a storage water heater contains the same four points, although it will look much simpler:
- Fastening the heater (if it is necessary to dismantle the old one);
- Installation of special wiring, connection to the water supply system;
- Preparing for the first launch, checking the tightness;
- Network connection and functional check.
All work will be performed by professionals, the quality and reliability of which has already been tested by time, and the process itself is thought out to the smallest detail.
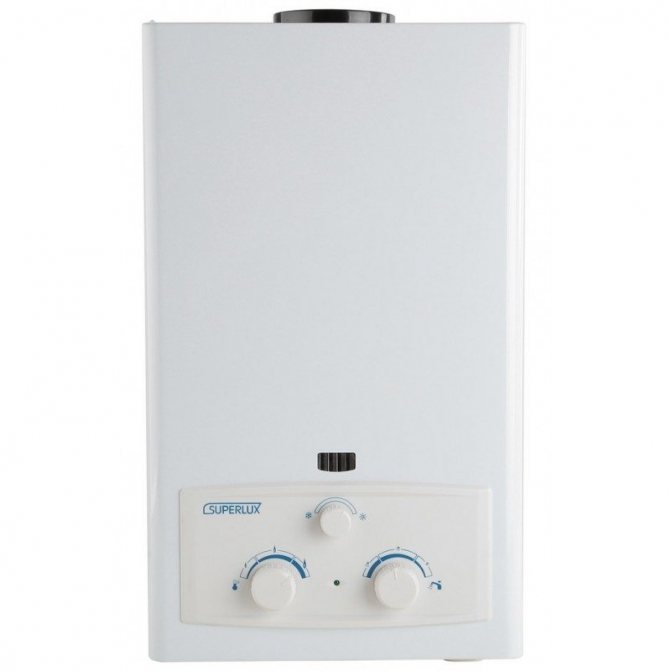
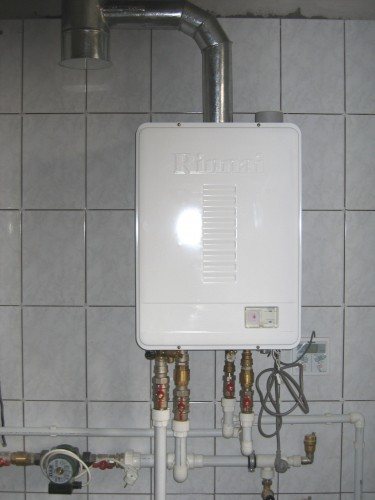
Installing a gas heater
Installing a horizontal gas water heater is more complicated than an electric one. In this matter, it is better to turn to professionals. But in the case of self-installation, you must clearly follow the instructions, designations and rules. The height of the ceilings should be at least two meters, and the area of the room should be more than 7.5 square meters. meters. In addition, the room must have a window, in addition, there must be a door in the room. Most often, such appliances are installed in the kitchen, next to the gas pipe.
A very good way to detect gas leaks is to install a gas analyzer. Such a device detects a propane leak and gives a warning signal. But ventilation is also required. For the gas water heater to work properly, a chimney must be connected to it. It can be included in the general system, or it can be brought out separately directly to the street. It should not have more than two right-angled bends, and its total length should not exceed three meters. When installing the equipment on a wooden wall, the chimney must not come into contact with it. It is imperative to lay thermal insulation, for example, from mineral wool.
You need to know that a gas water heater should not be placed on a load-bearing wall. The distance to the opposite wall must be at least one meter. Gas pipes cannot be installed in walls. But you also need to take into account that gas equipment cannot be placed above the stove. It is undesirable for the water heater to be constantly exposed to sunlight and overheat. In order to check the tightness of the gas pipes, you can use regular soap. It must be dissolved in a container of water, and then applied to the pipe joints with a brush. If bubbles appear, then there is a leak. And it must be urgently eliminated. Do not use fire to check pipes for leaks. This can lead to irreparable consequences.

Installation of a flow-through boiler
Due to the rapid heating of water, instantaneous boilers are equipped with rather powerful heating elements.
For this reason, special attention is paid to wiring. The cable cross-section must exceed 4 mm²
Be sure to find out the current strength of the machine, to which the electrical wiring is laid. The current strength for one water heater should be within 32-40 A.

The installation of an electric boiler provides for two connection methods:
- temporary;
- stationary.
The temporary method of installing the boiler involves using a regular shower hose. The algorithm for connecting a temporary water heater is as follows:
- a tee is cut into the pipe with cold water;
- a shut-off valve is being installed;
- a flexible hose connects the tap to the boiler inlet;
- the tap and water heater turn on;
- the boiler outlet opens;
- after 30-40 seconds hot water will pour out of it.
The stationary boiler installation scheme consists in a parallel water supply relative to the water supply system. The following steps are taken:
- two tees cut into a pipe with cold and hot water;
- cranes are being installed;
- for a high-quality device of all connections, fum tape or tow with paste is used;
- the boiler inlet is connected to the cold water supply pipe;
- the hot water outlet is connected to the stopcock;
- checking the tightness of the connections is carried out by opening the mixer and taps;
- if everything is in order, the water heater is connected to the electrical network.
Owners of an apartment in an apartment building must necessarily shut off the hot water riser. Otherwise, hot water will flow into the neighbors' plumbing system.
Installation of a storage water heater
Storage boilers are more common equipment. This is explained by the fact that they are cheaper and do not need to use powerful electrical wiring.
Do-it-yourself installation of a boiler begins with marking the place of its attachment. The distance between the mounting elements of the water heater is measured. It is transferred to the wall. 2 holes are drilled (depending on the boiler model, 4 holes may also be needed), dowels are inserted into them and hooks are twisted. The boiler is hung on hooks.
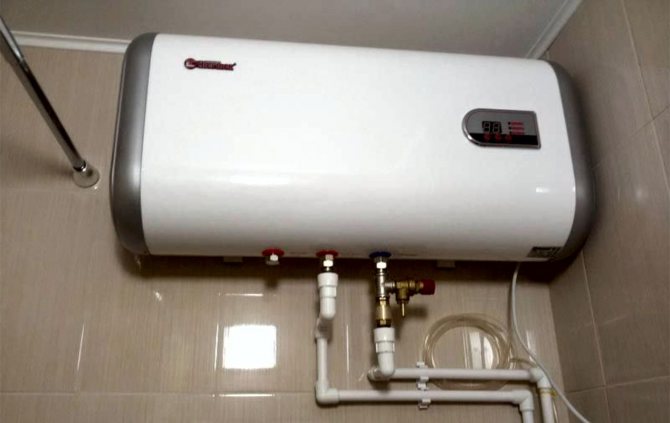
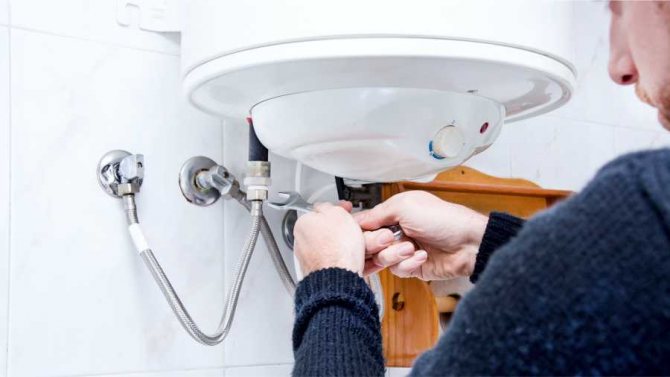
The connection of the boiler to the water supply system is carried out depending on whether the elements for connecting the pipes to the water heater are removed or not. If the connection point has already been prepared, then to connect the pipes to the inlet and outlet of the equipment, you can use flexible hoses, which are equipped with rubber gaskets.
The installation of a storage water heater involves the use of a valve, with the help of which the excess pressure in the system is reduced. It is recommended to use a T-piece that is located upstream of the shut-off valve. A tap is connected to the tee, which is designed to drain water during maintenance of the boiler.
In the absence of conclusions, they need to be drawn. In the presence of plastic pipes, the tie-in of the connecting elements is done for a maximum of 15-20 minutes. If the pipes are made of metal, then in addition to tees, a die will be needed, which should be the same size as the pipe diameter. In some cases, an adapter of the appropriate size will also be required.
The sequence of actions is as follows:
- the water supply is turned off;
- at the point of attachment of the tee, pipes are cut;
- using a die, a thread is cut;
- the thread is wrapped with tow;
- tees (or adapters) are connected to the pipe;
- cranes are being installed.
Having connected cold water, you need to connect the outlet of the boiler with a tap that will regulate the supply of hot water. By connecting the water supply, hot and cold water taps are opened. It is waited until all the air has escaped from the hot water tap and water starts to flow. All connections are immediately inspected for leaks.
After all the air has been vented, the boiler is connected to the electrical network. The source can be either an outlet or a separate machine. Normal voltage supply will be indicated by a sensor on the boiler. Temperature control is carried out according to the equipment operating instructions.
Boiler installation
After buying a water heater, the question of its correct installation naturally arises.
There are two options here: contacting specialists or doing this on your own. If you have no primary plumbing skills or if you are extremely limited in time and there is simply no way to do this, then there is usually only one solution - to order the installation from a special company. Experts will be happy to help you... But if you have already decided, or are still thinking of taking the initiative, then you need to know the basic rules.
Diy boiler installation
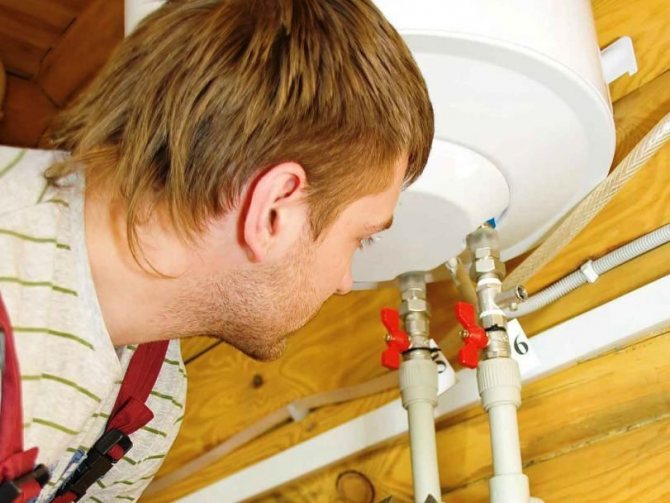
When installing the water heater yourself, first of all, you should choose the right place that will provide free access to the device. Next, make sure the wall can support the weight of the heater. The issue of wiring is also important. If the wiring is old, then in some cases, especially when installing instantaneous water heaters, it may not withstand the load of the network. This point also needs to be clarified. For an easier and most importantly high-quality installation, all pipes must be in good condition. Otherwise, it will be impossible to ensure reliable and safe operation. Immediately before installation, you must turn off the water and electricity in the apartment.
The installation procedure is as follows:
— Mark the place for the mount.Make the appropriate holes and fix the water heater on the wall.
— Connect the unit to the water supply system.
To do this, it is necessary to prepare a conclusion in advance, which is the main difficulty that it is customary to trust professionals. If the pipes are metal-plastic, the task is simplified - you just need to choose a suitable tee. If you are dealing with metal pipes, then you need a grinder and a die: cut the pipe, cut the thread with the die, install the tee. You may also need adapters of the required diameter. When installing on your own, you should dwell on this issue separately and study it in more detail - as required by a reliable and high-quality installation.
A shut-off valve is installed at the cold water inlet - usually included - to relieve excess pressure. It is also advisable to install a faucet in front of the valve - it will be easier to drain the water, and a second such faucet at the outlet - which will allow you to turn off the device if it is not used for a long time. Next, cold water is connected to the inlet of the water heater, the hot water tap is connected to its outlet. All joints must be sealed special tape, plumbing thread or linen. The hoses must have rubber seals.
Next you need open both taps and wait until all the air is out of the system - water should come from the tap. At the same time, check all the joints and the unit itself for leaks.
— The last point is connecting the power... Connect the appropriate phases and apply voltage. The indicator on the water heater should light up.
Each point of the installation must be coordinated with the heater operation manual., where, as a rule, there is a detailed description of this process.
Required tools for installing the storage heater
Any editing begins with the preparation of the instrumentation. If he is fully staffed, then the work will be done quickly and efficiently.
To install the boiler you will need:
- a drill with an impact mechanism or a hammer drill plus a set of drills for concrete;
- screwdriver;
- a grinder, if the water supply is assembled from metal pipes, or a pipe cutter - if made of plastic;
- a pair of gas wrenches or adjustable wrenches;
- building level;
- pliers.
Additionally, you may need a tool for installing pipe connections:
- for steel water supply: a welding machine and a set of dies for threading;
- for polypropylene: a heater for welding pipeline parts (it is called a soldering iron or iron);
- for metal-plastic: press tongs, if you intend to use press fittings, as well as calibration to align the end of the pipe before installing the fitting.
In addition to tools, you will need a sealing material to seal threaded connections between pipeline elements. For this, experienced craftsmen use tow or sanitary linen in combination with Unipak paste, while a beginner will find it easier to work with FUM-tape or special linen thread such as "Tanget Unilok".
Boiler installation tool
Let's look at how to install a storage water heater in your apartment. After you have decided on the installation site, do not forget that it can provide several points with hot water at once, you need to choose the tool that you will need during installation.
- Pliers, meter, adjustable wrench.
- Perforator.
- Plastic pipe and connecting hose.
- Fum tape (PTFE-based sealing tape), tow, electrical tape and linen threads.
- 5 taps and fittings.
- Pipe tee.
- Cable.
Installation procedure
The boiler installation process includes the following steps:
- hanging on the wall;
- connection to the water supply;
- power supply connection.
Floor-standing boilers are also produced, but in everyday life you most often have to deal with wall-mounted ones. When filled, the device has a lot of weight, so it can only be attached to a solid wall.
In this case, it is important to choose the right diameter and length of the fasteners:
Sizing table for anchor bolts taking into account the volume of the water heater and wall material
| Water heater volume, l | Pull-out load, kg | Base material (wall) | Recommended bolt diameter, M | Recommended bolt length, mm |
| 30-50 | 15-25 | Cinder block, brick | 8-10 | 80-100 |
| Concrete | 6-8 | 60-80 | ||
| 80-100 | 25-35 | Cinder block, brick | 10-12 | 100-120 |
| Concrete | 8-10 | 80-100 | ||
| 150-200 | 45-60 | Cinder block, brick | 12-14 | 120-150 |
| Concrete | 10-12 | 80-120 |
Anchor bolts with hooks are the most convenient - you just need to hang the boiler on them after screwing it into the wall. But some devices do not have hooks for hanging on such bolts - they will require anchor bolts with Phillips screwdriver or Allen heads.
Water heater connection diagram
On a thin brick wall (half or even a quarter brick thick) or folded from foam blocks, gypsum blocks, reinforced gypsum, the water heater must be fastened using ordinary bolts that must penetrate the wall through and through. A washer with a thickness of 1.5 - 3 mm is installed under the nut, the diameter of which should be the larger, the heavier the boiler is and the thinner the wall is.
When fixing devices with a volume of more than 100 liters, pieces of corners are placed under the nuts, with the help of which the load is distributed over a sufficiently large area.
Anchor bolts located at the same height should lie on a strictly horizontal line, therefore, markings for them should be applied using a building level.
The distance between the boiler nozzles and the water pipes must be sufficient to accommodate all the necessary fittings (they are listed below). Usually 30-50 cm is sufficient.
Types of boilers
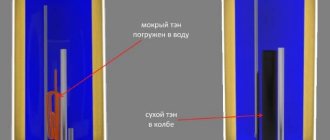
Modern boilers are of two types, significantly different from each other according to the principle of water heating:
- Flowing - heats the water as it is used. The volume of hot water produced by such a water heater is unlimited. At the same time, the power consumption is very high.
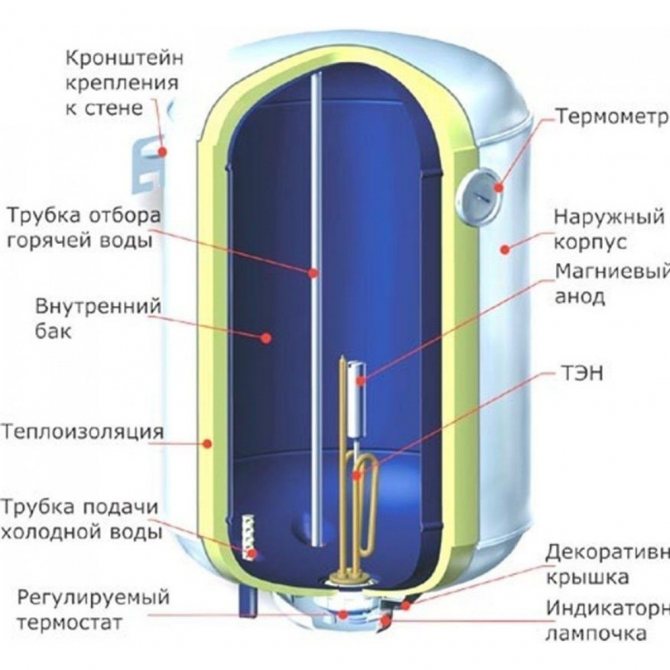
- Accumulative - have a reservoir in which water is heated by heating elements. The temperature of the water in the tank is maintained at a fixed level all the time.
The choice of a boiler with a different storage tank volume is based on several rules:
- 10-15 l - such a boiler will provide hot water for small household needs (for example, a washbasin);
- 50 l - this volume will be enough to supply hot water to a shower cabin;
- 80-100 liters - such a volume of hot water can satisfy all needs for it (bath, shower, kitchen sink).
In everyday life, storage boilers are more in demand. And this is quite justified, because they will provide several points with hot water at once. In addition, the house will always have a supply of water.
Water heater type
Comparison by economy
An electric storage water heater is the most uneconomical device for hot water supply to an apartment or private house. Don't believe me? Let's compare it to the main competitors:
- Gas column it loses out due to the much lower cost of heat generated by burning natural gas as compared to electricity. A kilowatt-hour of thermal energy from the column will cost 50-70 kopecks, the same amount of electricity - 5 rubles;
- In the case of an instantaneous water heater energy is not spent on maintaining the water temperature: power is supplied to the heating elements only when it is consumed. Meanwhile, the boiler periodically turns on for several minutes even when it is idle: it compensates for heat loss through the tank body.
Flow-through heater: the heating element is powered on when the pressure sensor in the heat exchanger is triggered.Power consumption when idle is zero.
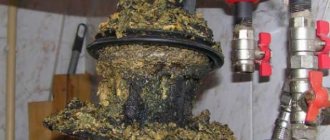
Reference: at least 2 kilowatt-hours of heat is lost daily through the walls of the boiler. Accordingly, the same amount of electricity is consumed to maintain the water temperature. The higher the temperature of the water in the tank, the more heat energy is lost and the more expensive it costs the owner to operate the water heater.
The thermal insulation of the tank does not provide absolute protection against heat leakage. The owner of the boiler is forced to pay for the useless heating of the air.
Cost comparison
The price of an inexpensive boiler with a tank volume of 50-80 liters is 5-6 thousand rubles. For comparison, the prices of competing solutions:
| Picture | Description and cost |
| Gas water heater with a capacity of 20 kW - from 5.5 thousand rubles |
| Flow heater with a power of 5 kW - from 2000 rubles |
At a price, the boiler is about the same as a gas water heater, but it loses to a flow-through electric heater in this regard.
Usability comparison
I strongly recommend purchasing a storage boiler, despite its relatively high cost and low efficiency. It outperforms both competitors in terms of at least an equally important parameter - ease of use.
The water at the outlet of the boiler has the same temperature until most of the contents of the tank have been consumed, and you can set the temperature of the water with a thermostat.
What's going on with your competitors?
Speaker: the water temperature is controlled by a thermostat that increases the gas flow to the burner as the water flows. The accuracy of the thermostat in inexpensive speakers is just awful. When trying to take a shower, the owner of the column is doomed to a continuous battle with the mixer taps: he constantly chooses between scalding boiling water and ice jets.
The gas water heater thermostat allows only a very coarse adjustment of the water temperature.
Flow heater:
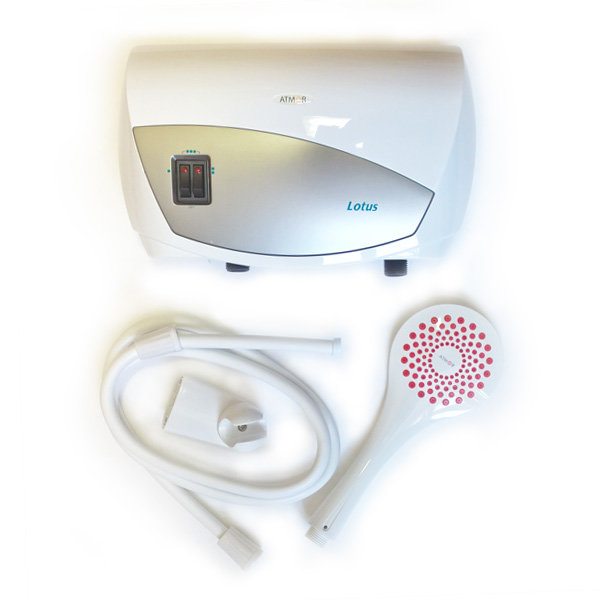
- The water temperature is regulated by a power step switch. For example, for a protochnik from the Israeli company Atmor with a rated power of 3.5 kW, you can choose an actual power of 1.5, 2 and 3.5 kilowatts. Fine adjustment of the temperature is performed by adjusting the water pressure: the more it passes through the heat exchanger per unit of time, the colder the flow at the outlet of the device;
- The outlet temperature at constant heating power is linearly dependent on the inlet water temperature. Therefore, a 3.5-kilowatt spout, which allows you to comfortably take a shower in summer, is practically useless in winter: the water in the main water supply cools down from 20-22 to 5-7 ° C in the cold season. At the heater outlet, it will cool down from +30 to +15 degrees.
Low-power flow pipes are often used during summer outages of hot water for the repair of heating mains. In winter, the water heater is idle.
Preparatory work
Connecting a boiler to a water supply system with your own hands is not a super difficult task that any self-respecting owner can cope with.
Preparatory work for connecting the boiler includes:
- Detailed study of the instructions attached to the boiler.
- Installing the boiler on the wall.
- Supply of water pipes to the boiler. If the boiler is located near the water supply system, and besides, it is open - the task is simplified, and this item can be omitted. Otherwise, the water supply must be connected to the boiler using metal-plastic or polypropylene pipes.
- Preparation of the necessary tools: tape measure, pipe cutter, soldering iron for plastic pipes or welding, adjustable wrench.
- Purchase of related materials: stopcocks, fittings, tees, pipes or flexible connecting hoses, American women, linen tow and fum tape.
Advice. When choosing accompanying fittings, keep in mind that cheap low-quality materials will not last long.
Tools and materials
To install a water heater, you need to have some kind of tool:
Helpful information:
- Infiltrator for septic tanks: volume, installation, work
- Installing a wooden window: all options
- Glass apron for the kitchen: selection and installation
- Installation of aluminum interior sills
- DIY sliding door installation
- Installation of sliding interior doors
- hammer drill or drill;
- adjustable wrench;
- roulette;
- Victorian tile drill;
- pencil.
From the materials you need to purchase:
- polypropylene or metal-plastic pipes;
- couplings for connections and tees;
- safety relief valve;
- transparent elastic tube.
List of required tools
Before you learn how to properly connect the boiler to the water supply in the apartment, you should start selecting the right tools for the job. It should be noted right away that for the installation it is not necessary to use high-quality and expensive tools, most often, most of the indicated materials are at hand for every owner. If there are none, they can be easily purchased at construction points of sale.
Fastening can be done using:
- construction and assembly gun;
- hammer drill or electric drill;
- metal hooks;
- dowels;
- high quality hose;
- screws;
- cable;
- special branch pipes;
- the unit itself.
Special steel hooks with a diameter of 10 mm or more and dowels are used as fasteners for the tank. All this is fixed with a construction and assembly gun, if there is none, then the holes for the fasteners are made using a drill or a perforator.
If there is a layer of finishing material on the wall, ten centimeter screws can be used, their plastic-based part should be at least eight centimeters.
Do not use flexible hoses or cheap products when supplying water to the unit. They deteriorate very quickly and need frequent replacement. It is better to spend a little more money once on quality materials and be calm while using the installation. It is also not recommended to use metal products; copper components are ideal for such work.
What's better
To take into account all the necessary details, it is recommended to entrust the installation to specialists. In this case, the cost of installing a storage boiler will be more expensive, but you will receive a guarantee that your device will not fail tomorrow.
However, the assignment of such a responsible matter to outsiders, even professionals, is not to everyone's liking. Therefore, more and more users prefer to install the boiler with their own hands: we have provided a video of such work in our article just below. In addition, in the instruction manual for the product, the manufacturer usually cites requirements for the correct installation of the boiler. Compliance with them step by step will allow you to do this difficult job successfully and get a number of advantages:
- Save time and money.
- Master the skills of installing a water heater, which will come in handy in case of repair work in the apartment or when servicing the water heater.
Not every boiler can be installed with your own hands: gas water heaters, for example, require only a professional approach. At the same time, the installation of an electric boiler is quite within the power of a beginner.
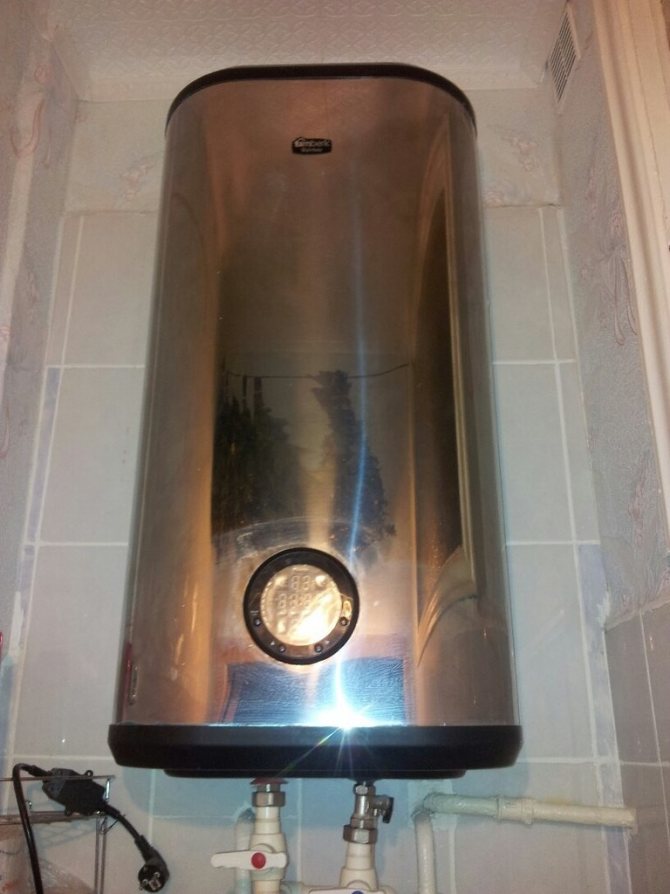
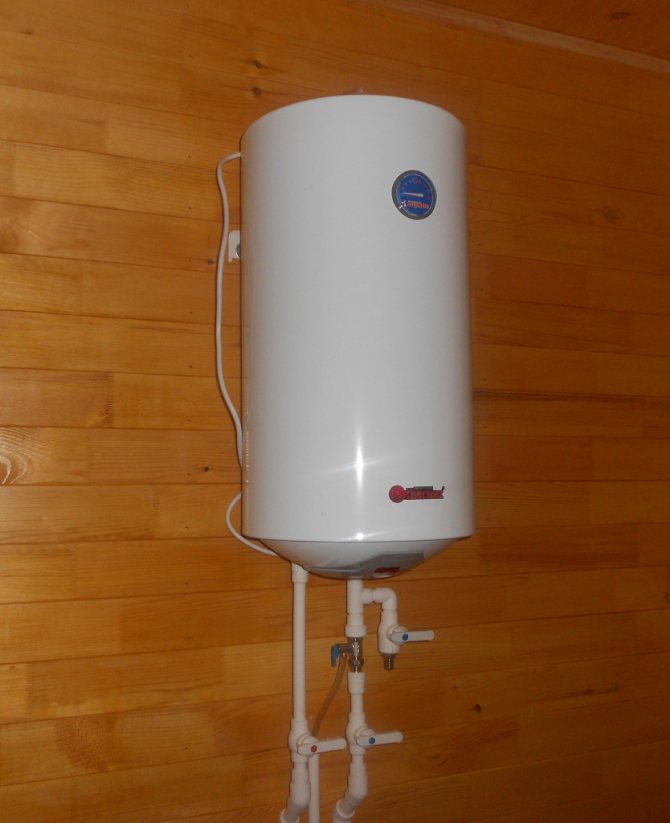
Boilers Termeks
Some Tips
- Before choosing a boiler, you should take into account not only the width and height of the wall to which the fastening will be made, but also how much the water heater will protrude forward. In addition, the installation of a boiler in an apartment, taking into account the specifics of the wall material, requires the selection of special fasteners.
- Horizontal water heaters should only be installed horizontally. Vertical ones do not need to be placed on the floor: at the bottom of the water heaters there are devices that ensure their operation.
- To connect the Termex water heater to the water supply system, it is recommended to use copper pipes in a plastic sheath. This is a more reliable option, in addition, during installation, such pipes look very neat.
- It is possible to connect Termex to the network only with a full tank. Otherwise, it may fail.
- It is not recommended to connect any other device in addition to the water heater to the same cable. In addition, the boiler must not be connected directly to the vending machine.
- Even if the water heater is not in use, it is undesirable to drain water from it.
Choosing a storage water heater.
First of all, we determine the volume of the tank. For our family of three, 30 liters are enough. True, it also happens that if someone decided to warm up a little and used more water, then the rest have to wait about 20 - 30 minutes until the next 30 liters are heated.
Now we choose the design, and in what version the water heater will be: vertical or horizontal, flat or round, elongated or square, classic white or any other suitable color.
But, again, in order to choose a design and performance, you need to decide on the location of the tank. Typically, a water heater is installed in the toilet above the toilet. However, if you have a combined bathroom, then place the tank so that it fits into the design of the bathroom, does not take up the necessary space and does not interfere.
Advantages and disadvantages of an instantaneous water heater
Installation of a water heater
Benefits
- Compact dimensions. The flow heater does not take up much space. At the same time, models of heaters are available for sale, complete with a mixer and a shower head, which allows additional savings.
- Fast heating. Unlike storage-type models, flow-through heaters begin to produce warm water already 30-60 seconds after starting.
- No restrictions on the volume of heated water. The user can get exactly as much hot water as he needs, in contrast to the storage tanks, the volume of which is limited.
- Relatively low price.
disadvantages
- Relatively high power consumption.
- Demanding wiring, machine and meter.
- Limited performance. This drawback is relevant only for low-power and compact budget models that can prepare hot water exclusively for the bathroom. If it is necessary to arrange the wiring and the kitchen, you will have to spend more money on the purchase of a more energy-intensive and dimensional model.
- Comparatively expensive operation due to significant electricity consumption.
Instantaneous water heaters are best suited for houses and apartments equipped with electric stoves. In this case, the meter and wiring will already comply with regulatory requirements.
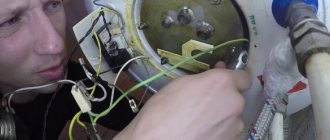
Connecting the storage water heater to the mains
After the work on connecting the electric water heater to the water supply is completed, you can proceed to connecting the device to the mains. If you have doubts in your abilities, you should entrust this work to specialists so as not to harm your health.
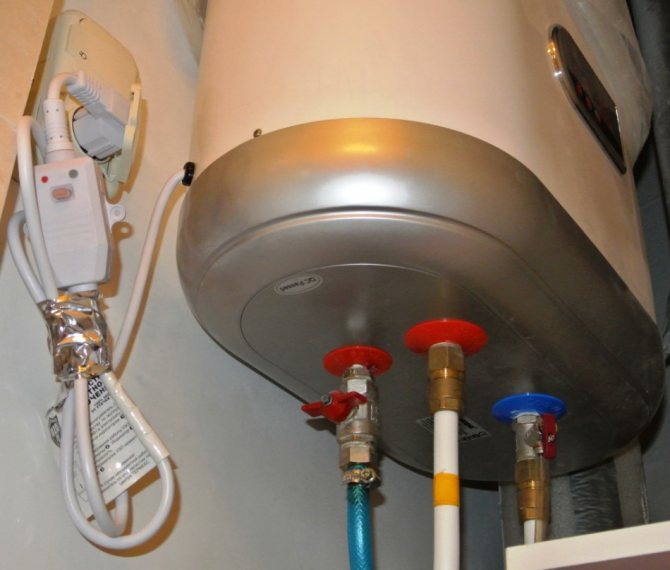
Powerful machines require separate wiring. This avoids power surges in the apartment and overheating of the wiring, which ensures comfortable operation of the tank. In this case, the cable connecting the device to the power source must be stripped from both sides. It is better to use a cable with a cross section of 2 * 2.5.When laying it, it is worth taking care of waterproofing in the bathroom, or the bathroom where the tank is installed.
The wires on one side of the cable must be separated in such a way as to connect them through a special machine to the tank terminals. There are special marks on the machine and terminals: for phase, for grounding and for zero in brown, yellow and blue, respectively. The second part of the cable is connected to the power source in the box without separating the wires.All connections must be insulated.
Low power water heaters, no more than 3 kW, can be connected to the outlet immediately. It is only important to remember here: the device operates on a grounded network, for this reason you cannot use extension cords, adapters, or turn on the device directly through a circuit breaker. Also, do not allow other electrical appliances to be connected to the same outlet with the boiler. The heater can be switched on only after filling it with water.
After completing all the work on connecting the device to the water supply system and the mains, you can start using the boiler. The main thing is that after installation, be sure to test the tank, pass water through it. If a problem is found somewhere, the error must be resolved before using the device. A high-quality device will last a long time and will provide the whole family with the necessary amount of hot water, regardless of the work of utilities, season, weather conditions.
Fixed or temporary installation?
stationary layout
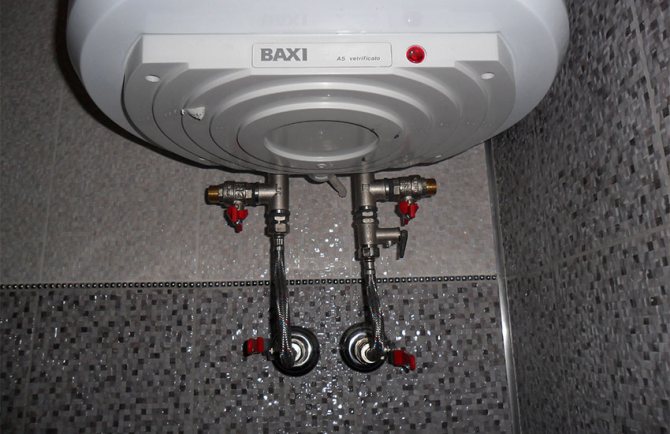
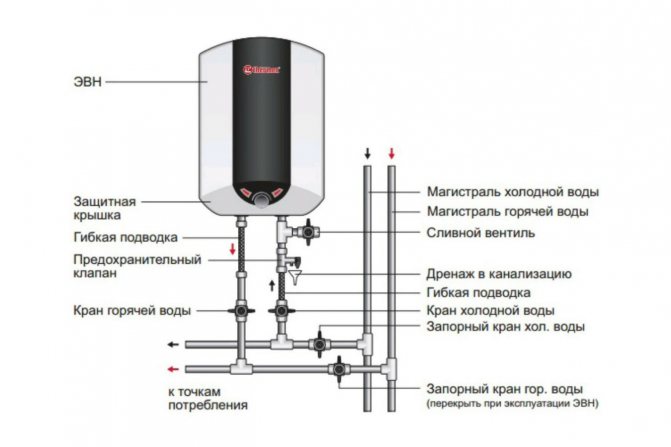
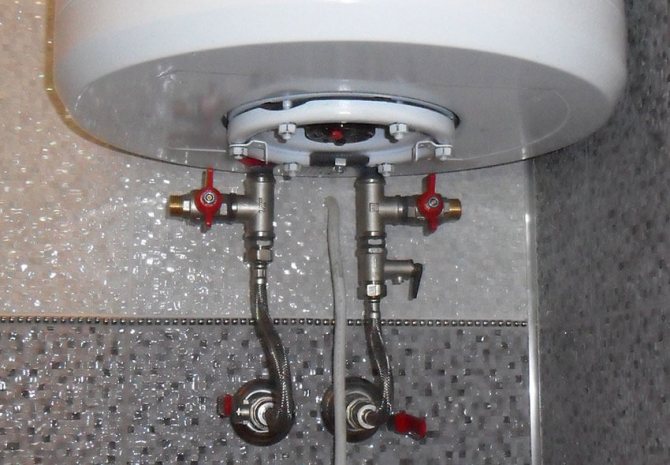
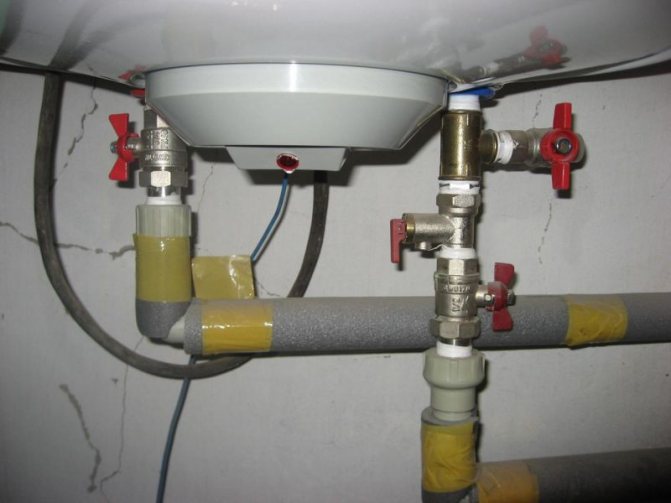
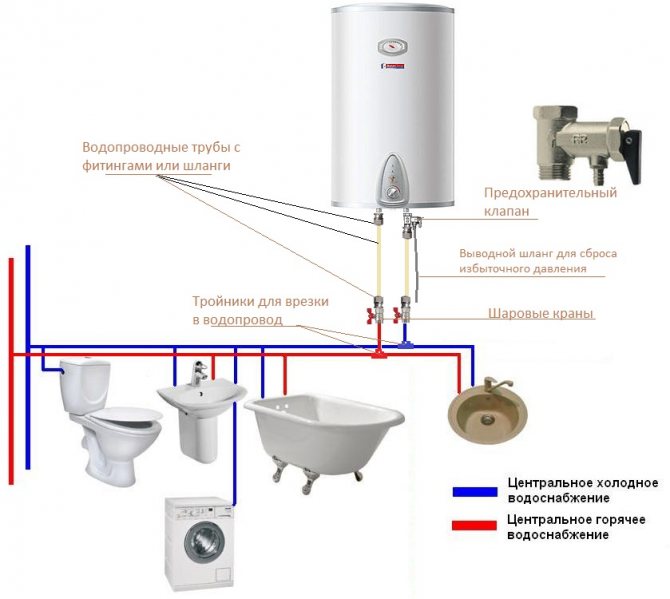
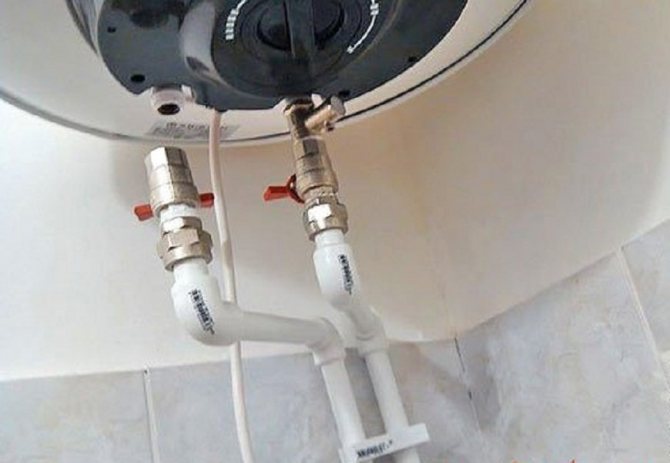
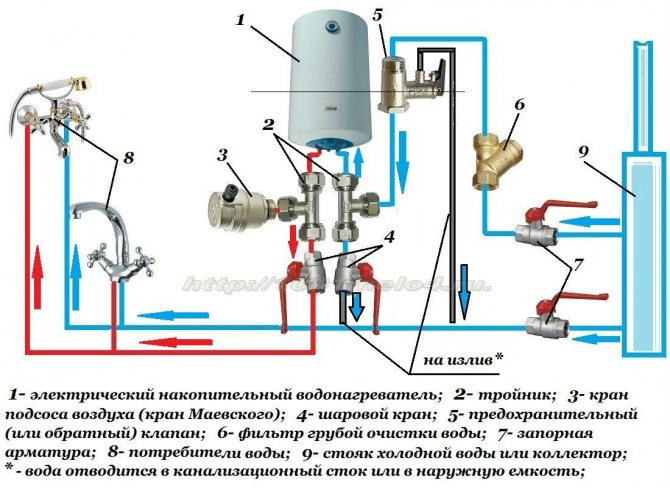
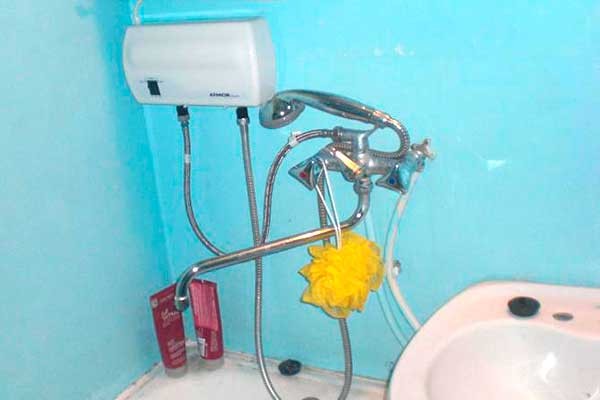
The stationary option for connecting an electric instantaneous or storage boiler is capable of providing simultaneous supply of cold and hot water. With this option, the work is performed simultaneously with the installation of the main water supply system. The essence of such an installation is to insert tees into the pipe and place valves on each of them. When using this method of connection, it is possible to avoid installing an electric boiler in the water supply system. A heating element is used to connect to a pipe with cold water, and hot water is discharged using a flexible reinforced hose or a metal-plastic pipe, which is connected to a shut-off valve.
Instantaneous water heater
As we have already noted, they are flowing and accumulative. In the previous paragraph, we talked about the principle of operation of a storage heater, as the most common type. The principle of operation of the flow-through device is somewhat different. It immediately heats the water passing through it using a heating element or gas.
In order to heat a powerful jet, such a unit, if it is powered by electricity, must have a very high power and standard wiring will not be able to ensure its normal operation. Therefore, it is necessary to run a separate thick cable, which, of course, complicates the installation. Therefore, the best and safest option in an ordinary city apartment would be an electric storage heater (boiler).

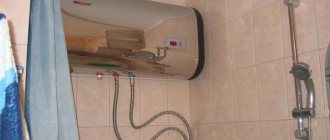
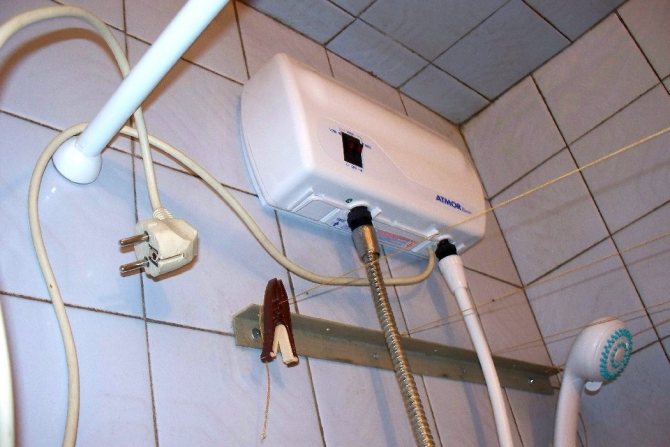
In the photo, the connection of the water heater
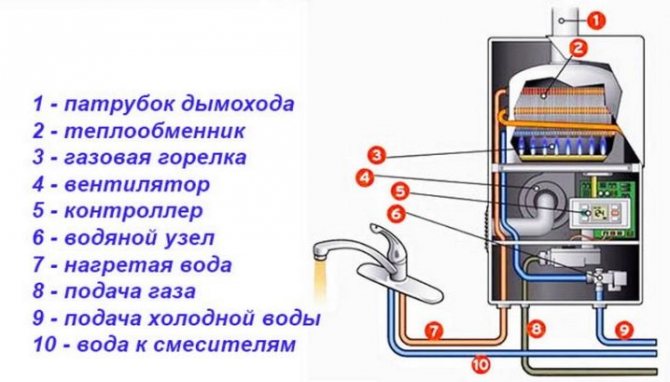
Installation of gas equipment
Naturally, it is forbidden to install a gas boiler from scratch. This should be done by employees of the gas service. You can independently replace a gas water heater when a meter is installed by representatives of the gas service.
When installing a gas water heater, the following work is performed:
- places for holes for dowels are marked;
- holes are drilled and hooks are mounted;
- a gas boiler is hung;
- the corrugation is attached, which removes carbon monoxide into the chimney;
- the gas pipe is connected to the hole through which gas enters the boiler;
- connections are checked;
- water is supplied to the boiler and the normal operation of the system is checked.
When installing the corrugation, one end of it must be tightly joined with the elements of the chimney. The other end of the corrugation is put on the outlet of the water heater. Before purchasing the corrugation, all measurements are carefully made. Its inner diameter must match the outer dimensions of the boiler hole.
A special rubber hose is used to connect the gas pipe to the inlet. After the hose is securely fixed, all joints are covered with soapy water.The gas supply valve opens.
While the gas is directed to the boiler, you need to carefully inspect the connections. If soap bubbles appear in some area, this indicates a gas leak. With the help of a key, the nuts are tightened in the "problem" areas. If the leak could not be eliminated, it is better to contact the gas service specialists.
After correctly connecting the gas to the boiler, you need to supply water to it. Flexible hoses are also used for this. The water supply to the gas water heater is carried out in the same order as the electric boiler is connected.
The sequence of elements is shown schematically as follows: "pipe — adapter — tap — pipe — hose — water heater". The cold water inlet is marked in blue, the hot outlet in red. To increase the operating period of the boiler, a salt filter is installed on the pipe that supplies cold water.
Hot and cold water taps are opening. We check all connections. If there are leaks, they should be repaired by tightening the nuts or using a new tow. Gas is supplied and the hot water tap opens. Hot water should come out of the mixer after 20-30 seconds.
Important nuances of installing a boiler
When proceeding with the installation of an electric water heater with your own hands, you should decide on the most suitable place for its placement and the conditions that must be met in order for the device to work correctly and safely.
Installation features
Do-it-yourself installation of a water heater should be done in such a way that it is easy to get to it and its operation control units and perform repairs or preventive maintenance of units. The place of installation of the water heater can only be a load-bearing wall or a partition that can cope with a double weight load
In other words, if the owner purchased a model with a capacity of 100 liters, then it must be designed for a weight of at least 200 kilograms. Attention should also be paid to the wiring in the room, which must cope with the full load. If work is carried out in an apartment where the wiring has not been changed for several decades, then it is advisable to bring a new cable of sufficient power to the water heater, taking care of its grounding
For example, if the capacity of the water heater is 2 kW, then you will have to lay a copper cable, the cross-sectional area of which should be 2.5 square meters. mm or it can be replaced with an aluminum wire with a cross section of 3.5 sq. mm. An inspection of the water pipes should be carried out to assess their condition. If damage is found, it is advisable to replace pipes by installing a metal-plastic pipeline even before installation.
Materials and tools
Even before starting work on installing a water heater with your own hands, you should take care of the availability of the necessary tools and materials:
- A hammer drill with a drill with a diameter of 10 mm, a tape measure, scissors for cutting metal-plastic pipes or a grinder.
- Wrench 24 x 27, 19 x 22, gas or adjustable wrench.
- Flat and Phillips screwdriver, pliers and wire cutters.
- Oiled tow, assembly paste or FUM tape.
- Shut-off valves - when installing a storage boiler, one will be enough, in the case of installing a flow-through one - two.
- Tees with a diameter of 0.5 inches - to make an accurate choice, the type of boiler installed should be considered. It is possible that during operation you will have to use adapters with a diameter of 0.5-0.75 inches.
- Flexible reinforced hoses.
- Reinforced-plastic pipe - to determine the length of the pipeline, one should proceed from the specific installation conditions.
You should also be ready to lay new wiring or power lines. To carry out these works you will need:
- Three-core cable, corrugated hose.
- Circuit breaker or electrical outlet.
After preparing the tools and materials, you can proceed to the installation of the water heater and the assembly of pipes and valves.
How to properly install a boiler with your own hands
Tools and materials
If you figured out the wiring and the selection of a place, prepare everything you need to work:
- roulette;
- perforator with a drill;
- adjustable wrenches and wrenches;
- pliers;
- screwdriwer set;
- hammer.
Additionally, you will need materials:
- tow;
- fum tape;
- tees;
- cranes;
- connecting hoses;
- metal-plastic pipes;
- RCD machine (if not included).
Installation of flow
If you want to connect an instantaneous water heater, see, it is portable and stationary. The portable one will perfectly fit in the country, suitable for use in the summer season. It comes with a hose with a shower head.
All you need is to choose a location near the pick-up point. Mark the fixings on the wall, drill holes and install the brackets. Hang the device, connect the attachment.
Do not forget to take into account the distance of the outlet, because the protochnik is connected to the network.
Stationary placement has some differences. Since the dimensions of the case are small, it can be fixed to the wall with ordinary dowels with a diameter of 6x60 mm. The body must be level, so measure the distance between the mountings on the tank rail with a tape measure. Then drill the appropriate holes in the wall. Insert the anchors and hang the heater on them.
Now it remains to connect the equipment to the network and water supply. Read the publication: "Connecting a boiler with your own hands."
Price for external installation
If, after studying the material on self-installation of the boiler, you still decide to trust the professionals, then the price range will vary depending on the required amount of work and the volume of the device:
- The basic installation of the device includes installation, sealing, connection to the network, as well as to the water supply, valve installation and safety instructions.
- Additional services include the installation of a tee, an automatic machine, taps and valves, as well as wall perforation and cable laying.
With the help of this list, you can understand that the cost of the service varies from the work done. Before making a decision, you need to weigh all the pros and cons, after which you may come to the idea of self-installation. The most important thing is that now you know how to properly install the boiler. You never know what you can do till you try!
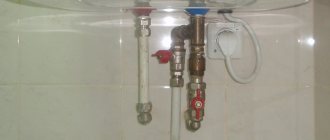
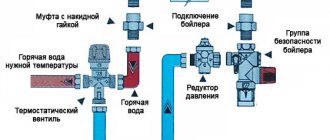
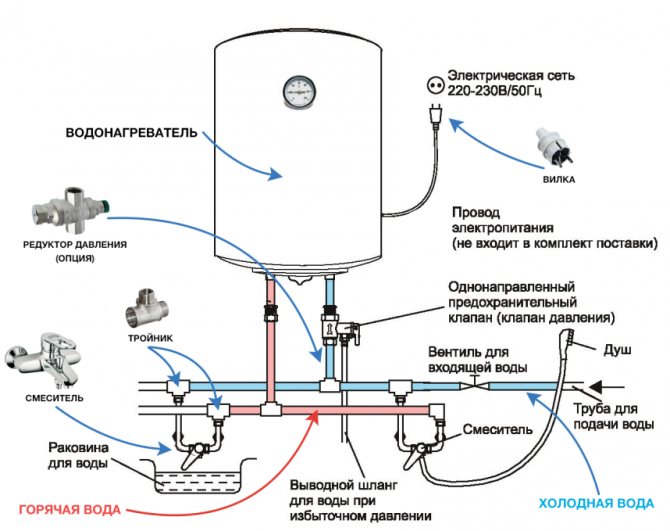
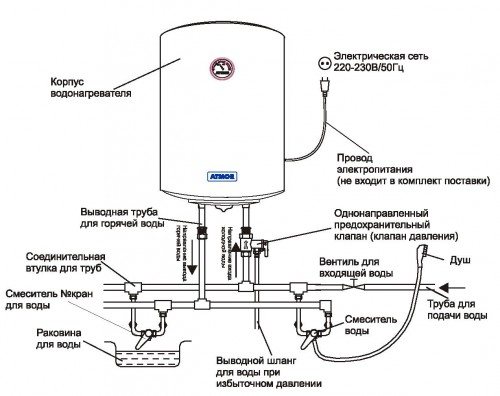
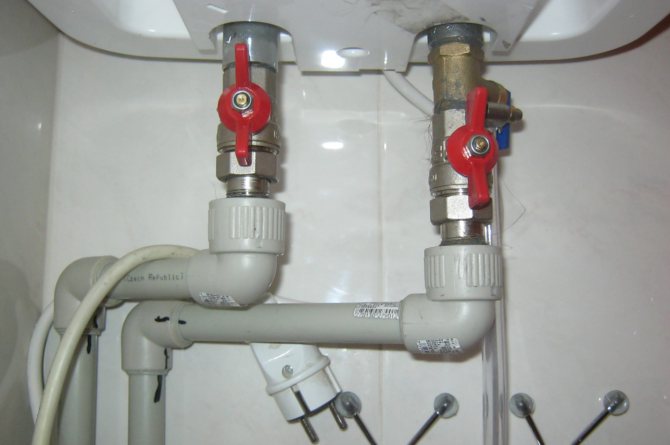
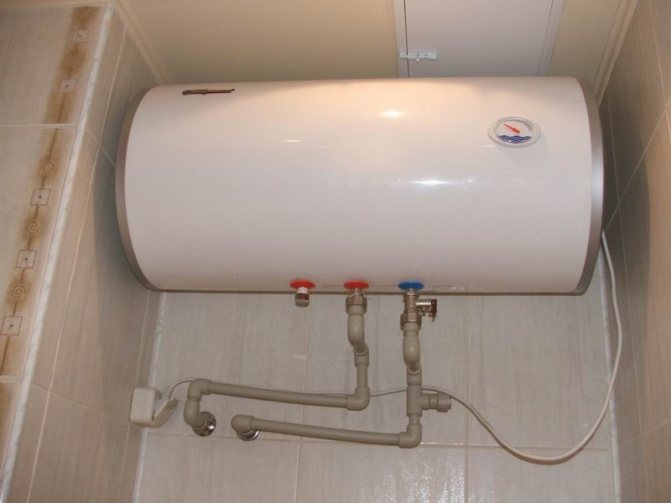
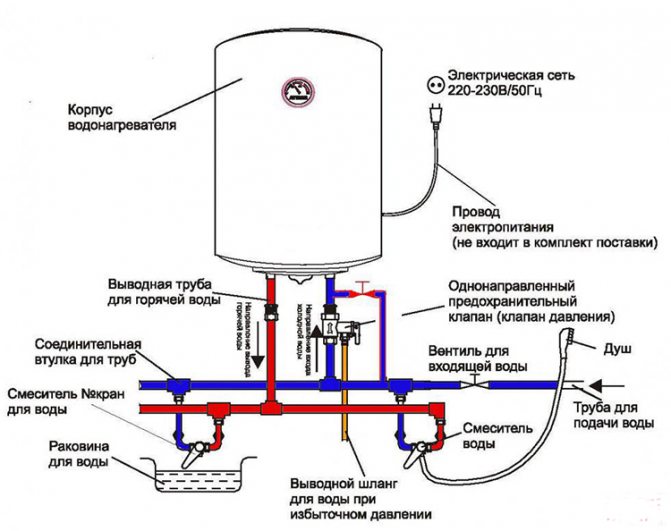
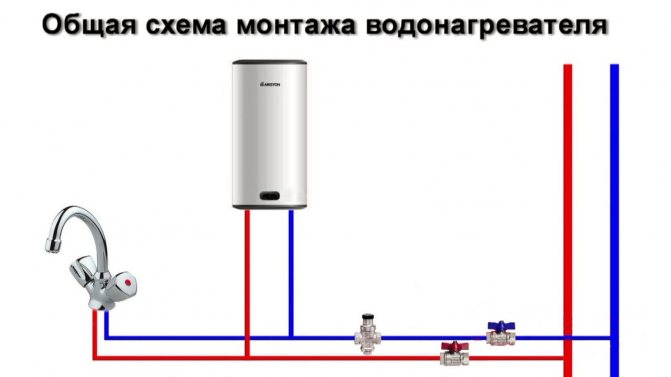
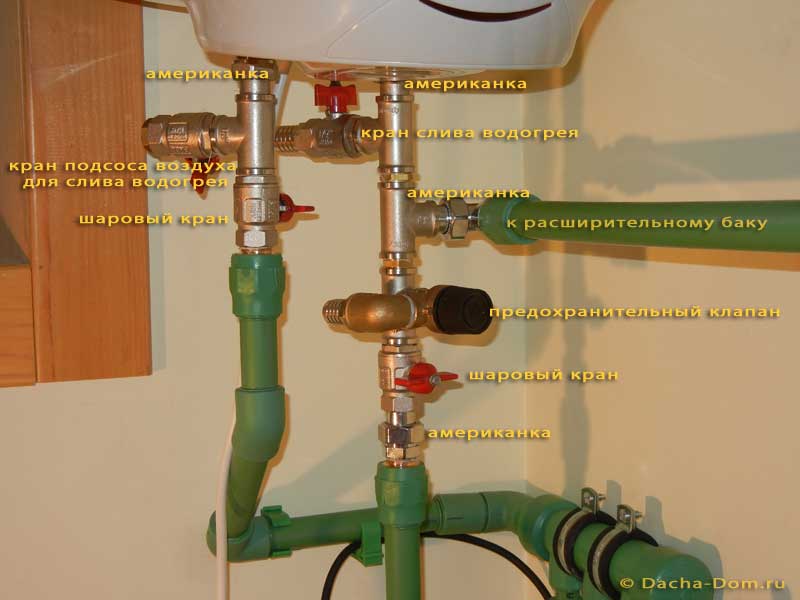
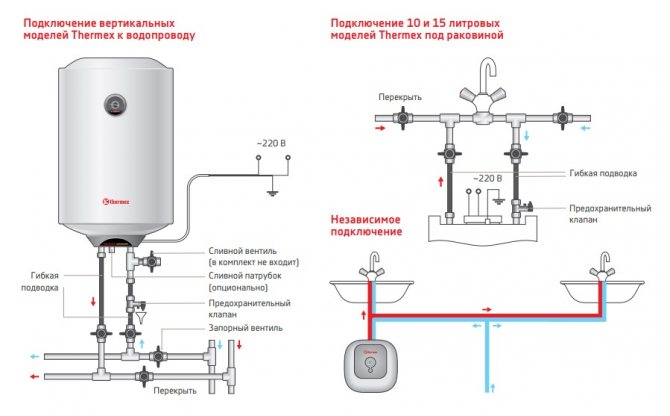
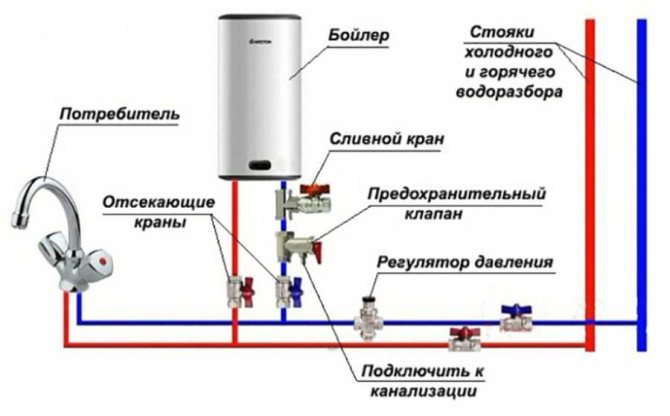
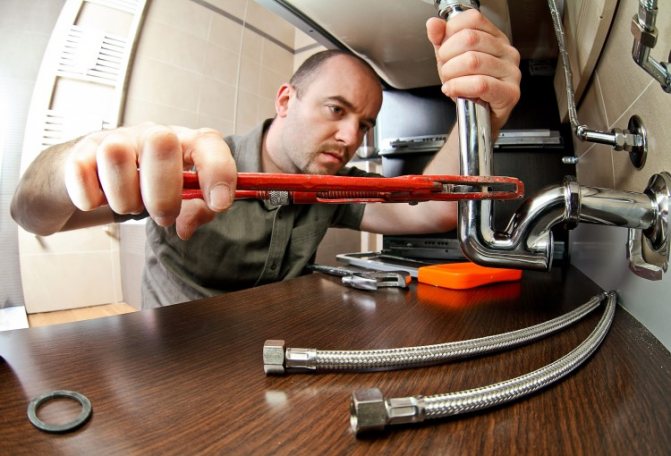
Cold water connection and hot water outlet
Ithaca, boiler selected, consumables purchased, instrument ready. Self-installation of a boiler does not require permits from utilities, drafting projects and other documentary evidence. In practice, the connection diagram of the boiler to the water supply system is simple. The water heater must be connected to the water supply after the water meter, for example, at the place where the valve is installed on the toilet cistern. Usually, when piping around an apartment, a ½ inch diameter is used. The insertion of the tee for connecting the boiler should be started only after the cold water has been shut off for the entire apartment.
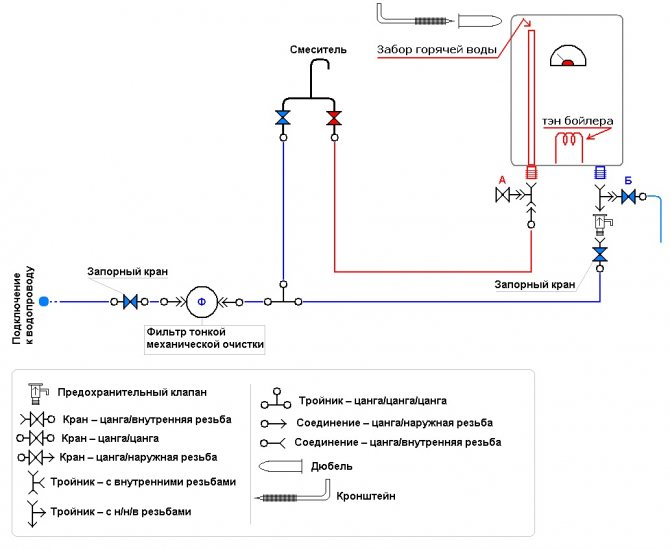
Diagram of connecting the boiler to the water supply.
To create a DHW line, a standard ½ ”fitting must be installed after the valve. All fittings, nuts and valves have a right-hand thread, that is, they must be tightened clockwise. For laying hot water, you can use ordinary fittings with a diameter of ½ "or ¾" - as you like, given the pipes already laid in the apartment. Practice shows that the average life of cheap fittings is 2-3 years, so it is better to buy high-quality fittings. For packing all threaded connections, linseed tow is used together with assembly paste or FUM tape.
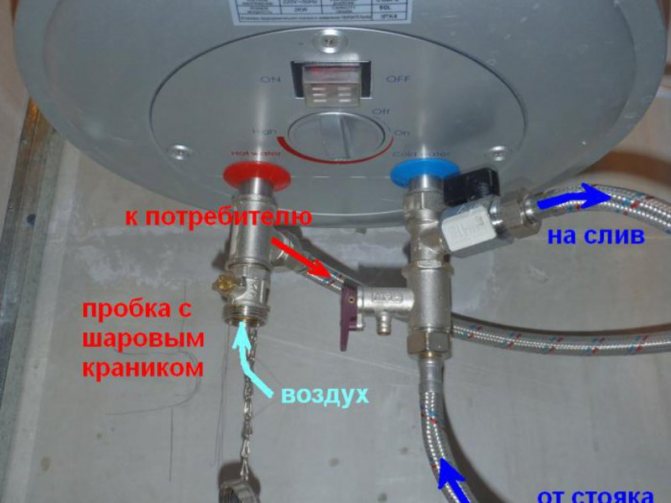
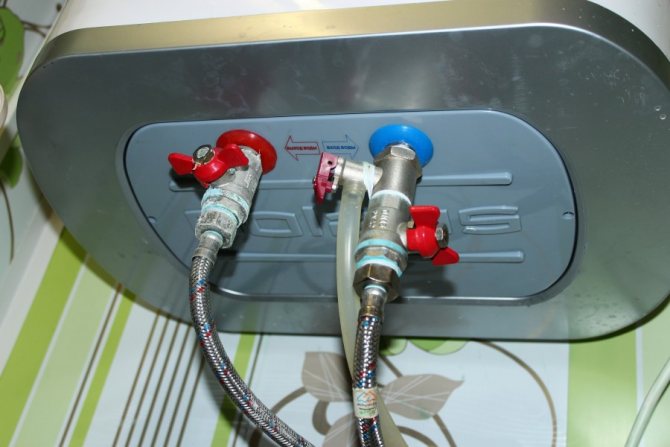

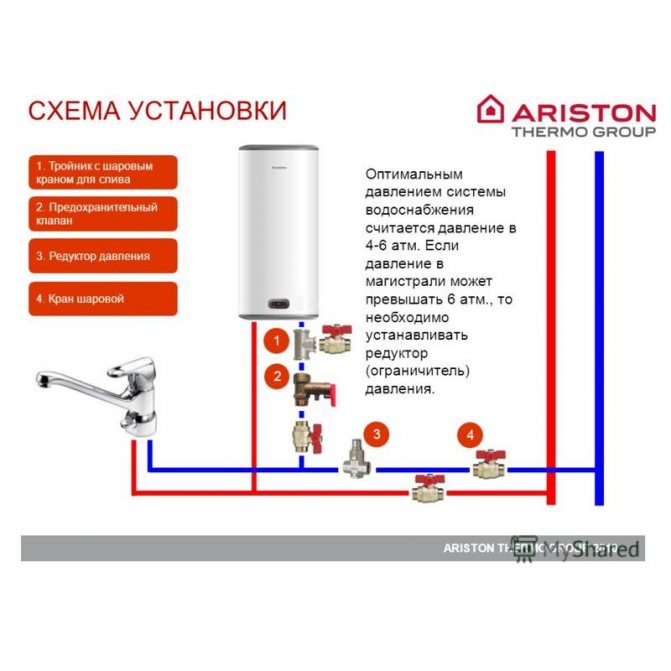
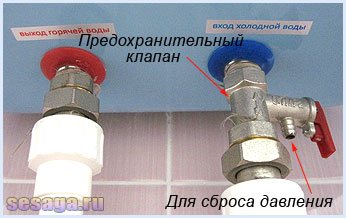
Both tow and FUM tape must be wound clockwise. Tow will be enough 3-4 turns, FUM tape - 15-20 turns, the excess will be squeezed out when twisting.Do not forget to install a non-return valve on the cold water inlet connection - it must be included with the boiler. The valve is screwed onto the coupling, and a fitting is screwed onto the outlet fitting to go to the inlet pipeline. In the same way, an adapter is placed on the outlet with hot water.
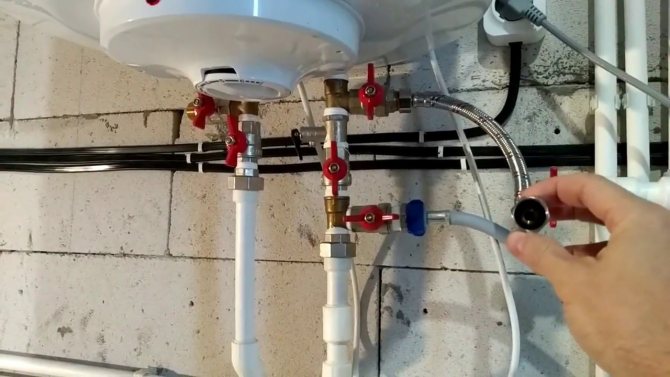
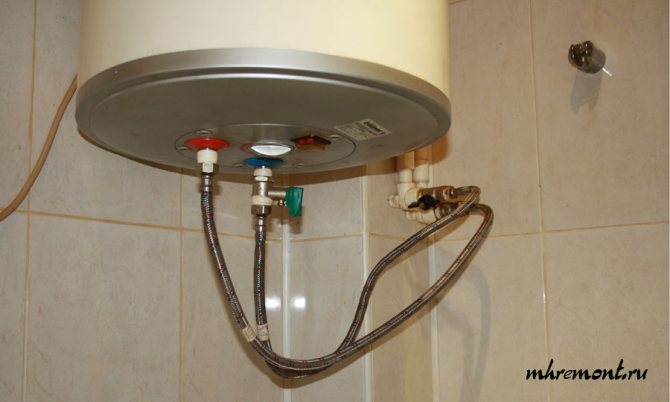
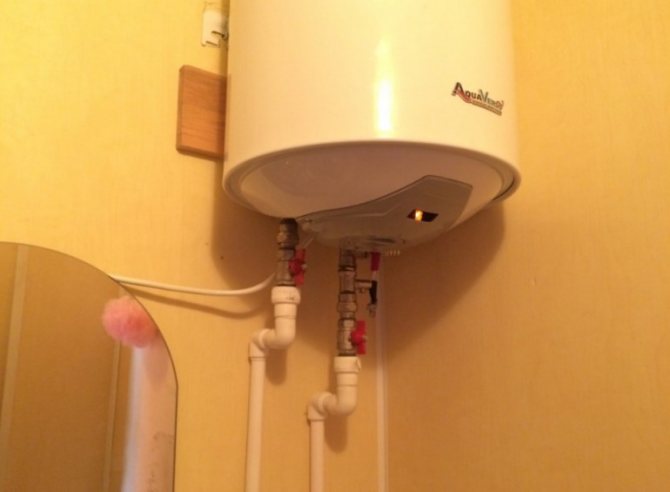
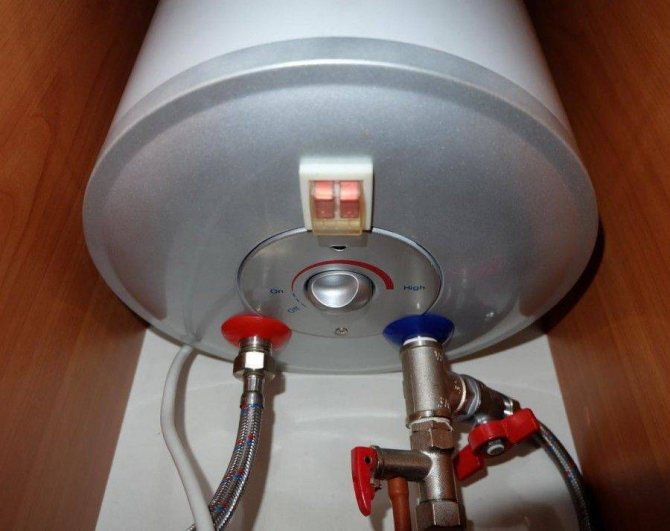
After installing the fittings, the boiler can be hung on the wall and the pipes for cold and hot water can be connected. Pipes are inserted into the fitting to the end; before this, the cut end must be flared a little. Do not use maximum force when tightening the nuts on the fitting, otherwise the non-ferrous metal nut may burst. When pressure testing (checking the water supply system under pressure), it is better to tighten the nuts later if undermining is found. For the entrance and exit of the boiler, ball valves are used, as they are more reliable in operation.
Connecting the water heater to the water supply.
We will consider two connection schemes: the first is when you make repairs, and the water heater is initially installed permanently. The second is when repairs are just taking place or are not expected in the near future, but you want hot water. By the way, according to the second scheme, the tank worked for me for almost 6 years, until the repair was finally made.
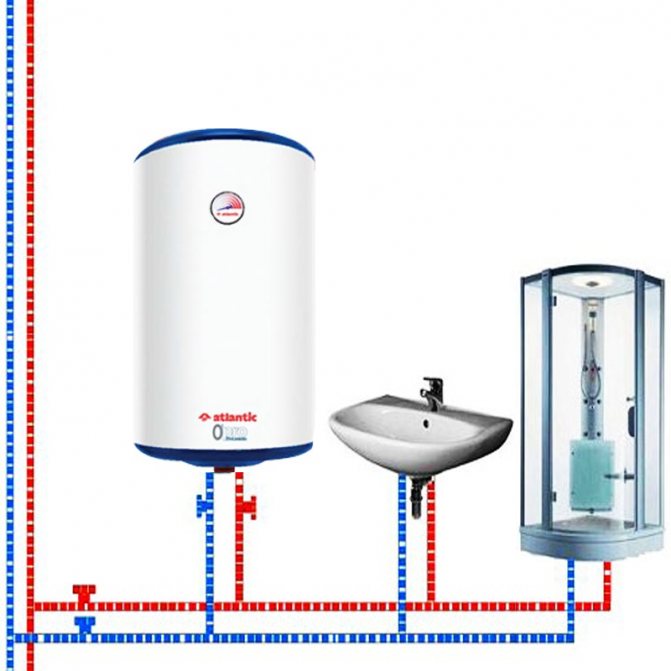
In general, the connection diagram for a water heater is very, very simple. It is connected in parallel to the domestic water supply system: inlet to a cold water pipe, and an outlet to a hot water pipe.
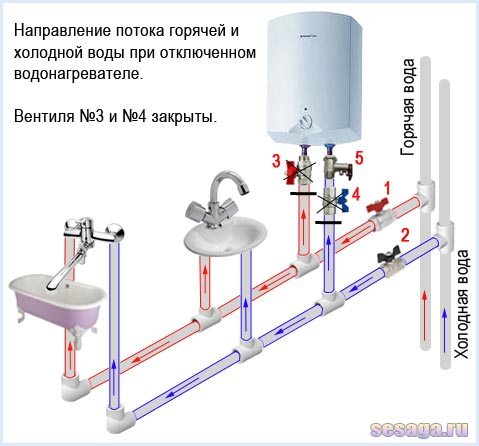
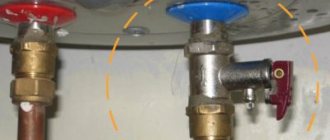
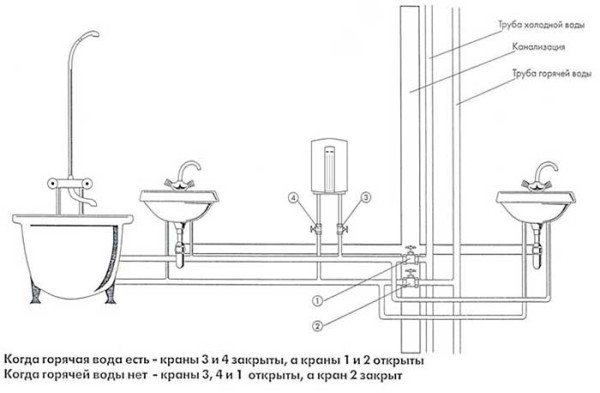
Let's take a look at the diagram. When to the apartment hot water comes in
- no water heater needed. It is cut off from the apartment water supply system by valves
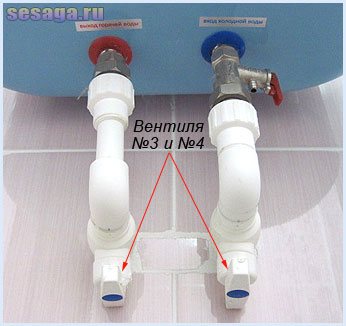
№3
and
№4
, that is, in normal operation, these valves are closed. Cold and hot water circulates through the pipes as expected.
Now we will consider the scheme when the central water supply is turned off, and hot water does not enter
to the apartment.
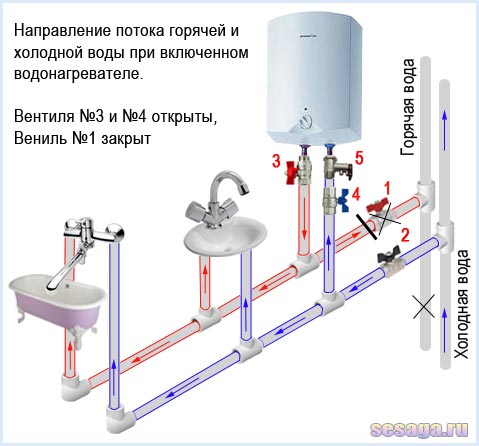
We turn on the water heater. For this close
inlet valve
№1
on hot water, and
we open
valve
№3
and
№4
... We supply 220 Volt power to the water heater, and wait about 40-50 minutes (depending on the capacity of the water heater) until the water in the tank heats up to the set temperature. As the water warms up, we use it as usual.
As hot water is used, the same amount of cold water enters the tank, where cold and hot water are mixed. When the amount of cold exceeds the amount of hot, the water in the tank will become warm, and you will have to wait a little for it to heat up.
Now consider temporary
water heater installation diagram. In this case, we need: 2 tees, 2 flexible hoses for connecting water, a fum tape and a plug with a cord. Cord to be enough to the nearest outlet.
First of all, we decide on the place of installation of the water heater. It can be fixed on the wall, or you can simply put it on the floor, or put it away somewhere. When we have decided on the installation site, we measure the length from the water heater fittings to the nearest mixer. We purchase two flexible hoses of approximately the same length.
We remove the mixer and screw tees in its place.
Wrap all threaded connections with fum tape.
.
Do no more than 3 turns
.
Now we install the mixer in place, but already in the tee. Well, we screw the hose from the water heater into the upper part of the tee. As you can see, everything is simple.
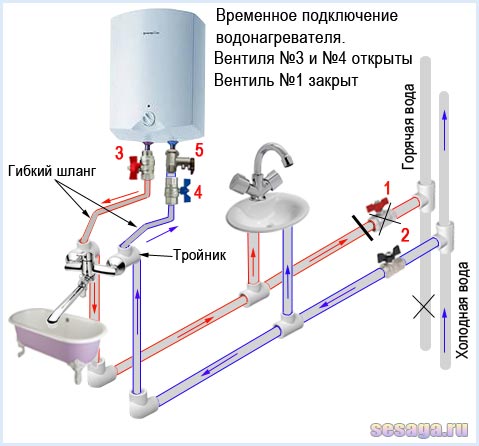
Advice
.
First, assemble the connection diagram to the tee in the store, so that later you do not run around and change an unsuitable part
.
When hot water is given, and if the tank bothers you, you can turn it off and remove it until the next time. And screw the plug into the vacant space in the tee.
I also need to say about safety valve
that comes with the tank. In the diagrams, it is indicated under
№5
... This is such a necessary element, without which it is impossible for a water heater to work.
As we know, water expands when heated.And since water is an incompressible medium, when heated, the water will expand, thereby creating pressure on the walls of the tank, as well as on the inlet and outlet pipes. The water has to go somewhere.
So, if there was no safety valve, then when a certain excess pressure is reached, the water would simply rupture the tank. When the valve is standing, the maximum allowable pressure created by water is released through this valve. The safety valve itself is set to a certain maximum pressure, upon reaching which it is triggered. Therefore, if you notice that water is dripping from the valve, do not be alarmed, this means that it dumps excess.