The heating systems with which our apartments and houses are equipped differ not only in their manufacturability and efficiency, but also in their reliability. The degree of reliability of heating systems depends on numerous factors, among which not the least is the practicality and functionality of the heating equipment included in the home heating kit. A water heat-insulated floor among the used heating systems is considered the most reliable. Thanks to the technology and design, such a heating scheme is very convenient to use. From the point of view of maintenance, a working water floor does not require special attention and special hassle.
Despite the high performance characteristics of the underfloor heating system, it may malfunction. Often, during the heating season, we ask ourselves why the floor in our house does not heat, the warm floor is broken or the accident is caused by other reasons. You can understand the essence of the problem either on your own or by inviting specialists - heating technicians to examine your heating system.
If you have an idea of how your heating system works, you can try to solve the problem yourself. Your underfloor heating does not work - this means that at some point during installation an error was made or one of the system elements failed. Let's find a way out of this situation together.
Getting to know the underfloor heating device
In order to know about the probable reasons due to which your home heating works intermittently or does not function at all, you need to know the principle of operation of the heating system and how the main parts and structural elements function. If your water floor does not heat well, not meeting the specified parameters, the main reasons lie on the surface. It's all about the technical flaws made during the installation of the water floor. Usually these are violations of the installation technology, the wrong consumables and additional equipment were selected.
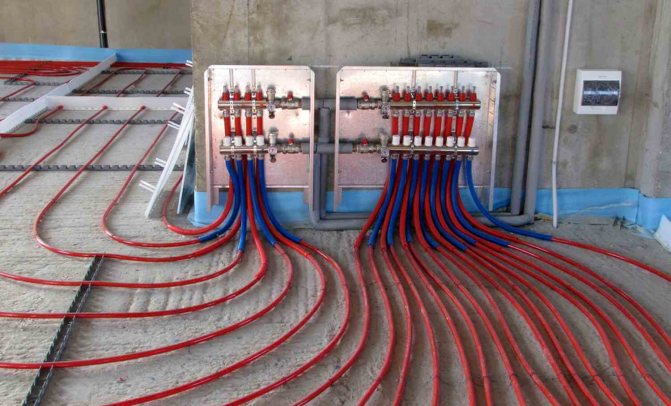
The specificity of the installation of equipment lies in how correctly the water circuit is laid and how the pipeline is correctly connected to the heating system. The lack of correct hydraulic calculations, incorrect adjustment of the mixing unit lead to the fact that the heating floor begins to flow into the pipeline intermittently, or its temperature is significantly lower than required.
When evaluating the entire structure, you can focus on the following structural elements of the heating system. Underfloor heating most often does not heat for the following reasons:
- the thermostat and temperature control sensor are out of order;
- the balancing valve is out of order;
- the circulation pump stopped working;
- the overhead thermostat-fuse has broken;
- the drives of the collector inlet pipes are out of order;
- the integrity of the water circuit has been violated;
- bypass problem.
Each of these elements can fail, making your underfloor heating not functional.
On a note: breakdown of the servo drive, temperature control sensors, there is a high probability of failure of the thermostat. The situation is similar with the balancing valve. A failed valve will not be able to provide a normal admixture of cooled water to the hot coolant. Accordingly, the water temperature in the water circuit will be insufficient for heating.
It is possible to enumerate for a long time the probable breakdowns of individual elements of the heating system.In each individual case, you will have to look for the immediate reason due to which the warm floor does not turn on or works intermittently.
Consider separately, the most common types of floor heating breakdowns.
The floor is not heating enough. Low coolant temperature
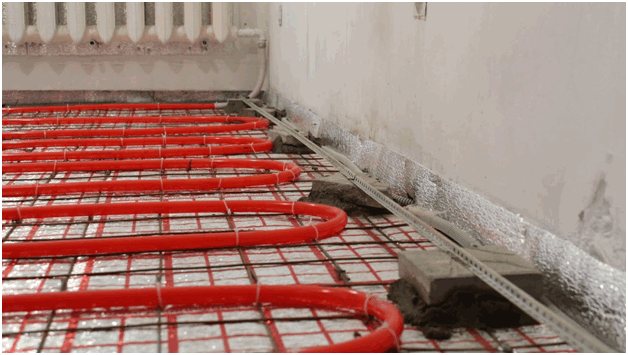
A typical and widespread problem that owners of city apartments and private houses are forced to face, complaining about the unsatisfactory performance of the warm floor, is uneven heating. During normal operation, the water circuit must completely and evenly heat the concrete screed or floor covering, creating the necessary conditions for heating the home.
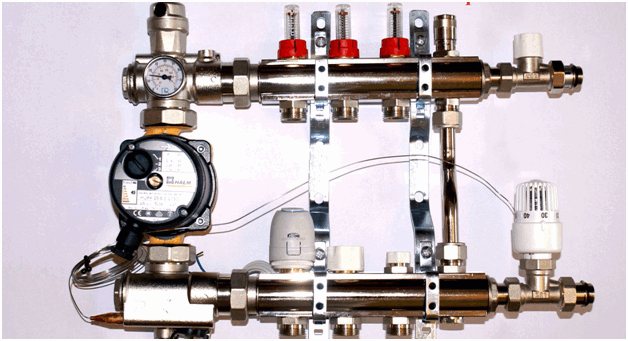
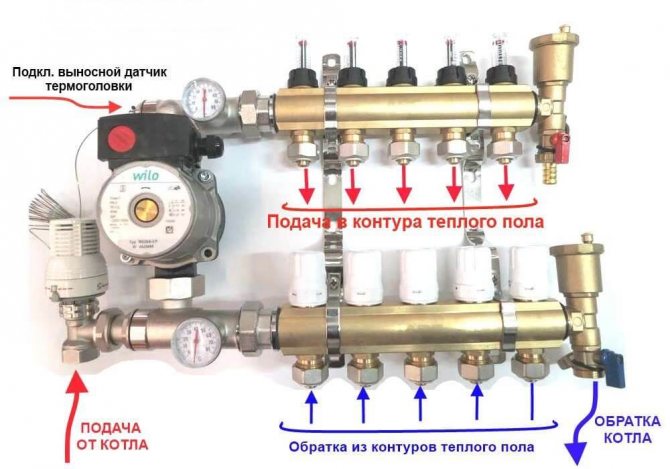
In this case, the problem is the uneven flow rate of the coolant along the water circuit. Due to the fact that the pipelines can have different lengths, due to the same intensity of the coolant supply, the degree of heating of each pipe is different. Usually, before starting in the manifold cabinet, the levels of the electric drives are set to the required position.
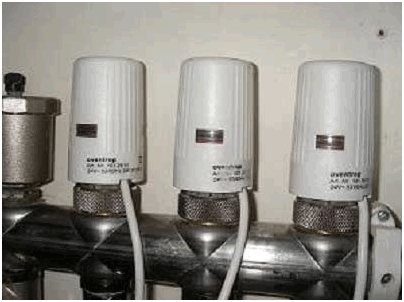
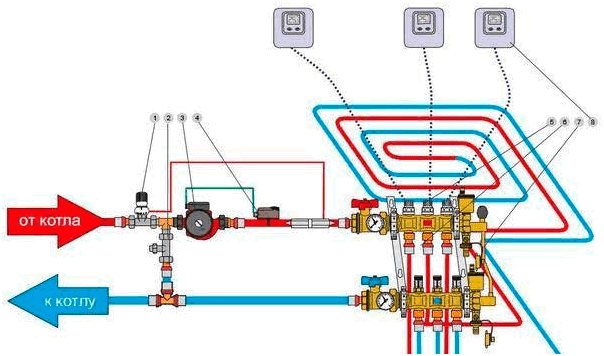
For reference: The electric drives are connected to a distribution block, which in turn is connected to an external thermostat. The signal from the thermostat arriving at the electric drives activates the rods, thanks to which the intensity of the coolant flow in each pipe is regulated.
Before starting the system, the optimal parameters are initially set, calculated for each circuit. By measuring the temperature of the coolant in each water circuit, the electric actuators are set to the appropriate position. Consequently, the heating temperature of the coolant in the system changes, and the degree of heating of the water circuit also changes.
The way out in this situation is as follows. We are looking for a water circuit in which the coolant does not heat the water floor in accordance with the set temperature, then manually increase the flow of boiler water.

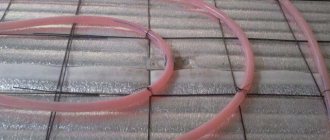
Damage to the water circuit
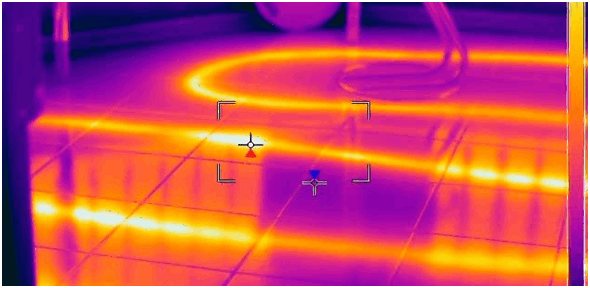
Pressure drops in the system can rupture the piping. A leak in this case is the most unpleasant factor, which will have to be eliminated urgently. A slight depressurization of the water wire causes a weakening of the intensity of the coolant flow. Accordingly, the floor warms up unevenly enough. The screed may collapse soon. There are several ways to determine the location of the leak. There is a mass of information material about the simplest options, using available means. The quickest and easiest way in this case is to use a thermal imager. This device will pinpoint the location of damage to the water pipe with high accuracy.
On a note: your floor is not working, then there is not enough coolant in the water circuit. To begin to eliminate the leak, it is necessary to turn off the supply of coolant through the manifold. Through the return pipe, water is drained from the water circuit.
Leakage technology depends on the pipes used.
For example: the installation of a water circuit from cross-linked polyethylene pipes is the most common and affordable option for laying a water floor. However, sometimes you have to pay for the cheapness of consumables during operation. At the slightest mechanical damage, the pipe loses its integrity. You can solve the problem by installing a fitting. The installation location of the fitting must be marked on the schematic diagram or at the installation location of the manifold cabinet.
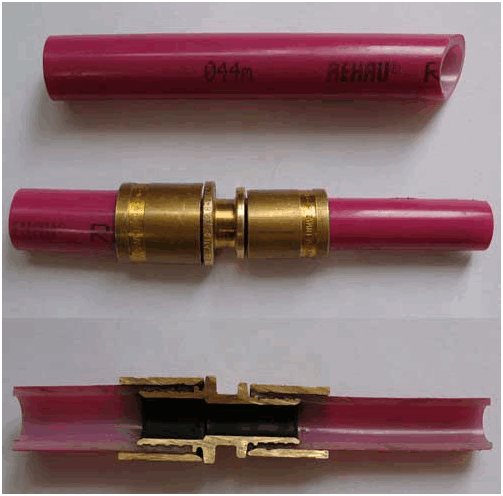
After fitting the fitting, the edges are crimped. If you turn on the coolant supply after repair work, you should wait two or three days to make sure the connection is reliable. Only after that the integrity of the screed and type-setting floor structure is restored.
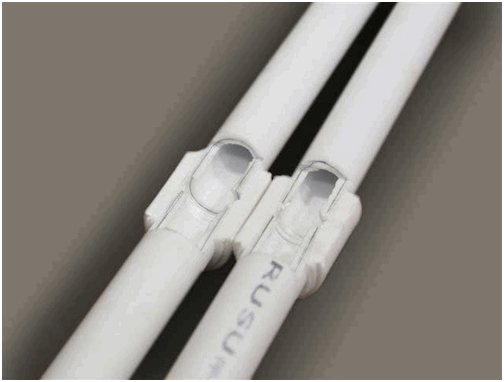
The option using PVC pipes looks preferable. Such consumables have the required strength.However, improper handling of construction tools during construction and repair work can easily damage the water circuit. Accident elimination is carried out according to a similar scenario. First, dismantle the old screed. Next, the damaged area is replaced with a whole piece of pipe. The work is carried out using a soldering iron and a repair sleeve.
Re-pouring the concrete screed is carried out only after checking the connection for leaks.
Why does the electric underfloor heating not work?
2 thermomatTVK-130 5 floor sets are installed, one is working, one is not. The indication on the thermo-regulators is the same. No drilling was carried out in the installation area. I tried to connect bypassing the regulator (contacts n1 + n3 and n2 + n4), but there is no heating. What is the possible reason?
You have probably already checked the presence of mains voltage. This means that the malfunction lies in one of the three elements of the underfloor heating: thermostat, temperature sensor or heating cable. We recommend that you check all three elements, even though you did not feel heating when connecting the cable directly.

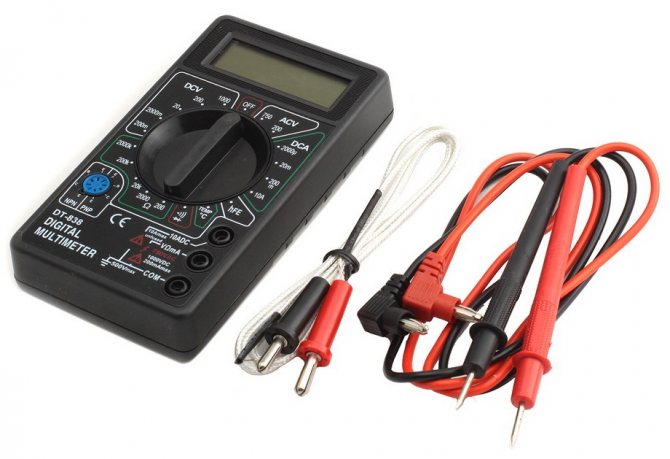
For initial diagnostics, you need a regular multimeter or megohmmeter
You can check the serviceability of the warm floor by measuring the electrical resistance of its individual elements one by one with a multimeter:
- The 640W ThermomatTVK-130 5 heating cable mat must have a resistance of 82.7 ohms. The difference between the passport and actual value should not exceed 15%. If the resistance is too high - there are breaks in the cable, low - the insulation is damaged, close to zero - a short circuit occurs. In many cases, it is possible to find a problem spot in a heating cable, but this will require scanning the entire floor surface with a thermal imager. With less accuracy and more labor costs, this can be done with an infrared thermometer. For such services, we recommend contacting a large company that sells, installs and maintains underfloor heating.
It is relatively easy to repair a heating cable, it is more difficult to find a defective spot
- The thermostat and temperature sensor are checked in the same way. However, it should be borne in mind that their electrical resistance will directly depend on the air temperature. The passport should indicate the range of values, the measurement results should be correlated with the temperature.
The sensor, if correctly installed, should be located in the hollow tube. This makes it possible to replace it without problems.
The sensor should only be laid in a hollow tube
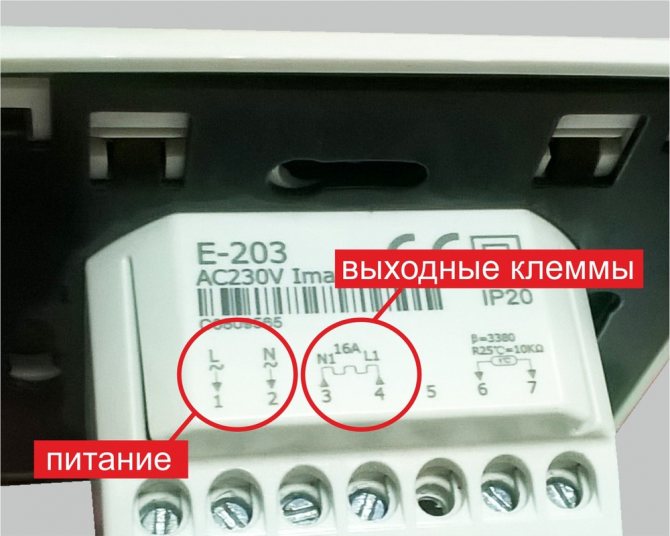
There is another way to check the thermostat: with the sensor connected and the heating cable disconnected, set the maximum temperature. In this case, voltage should appear on the terminals intended for connecting the cable. You can verify this with a multimeter or an ordinary light bulb. Then set the regulator to the minimum value. If the voltage disappears, the relay works.
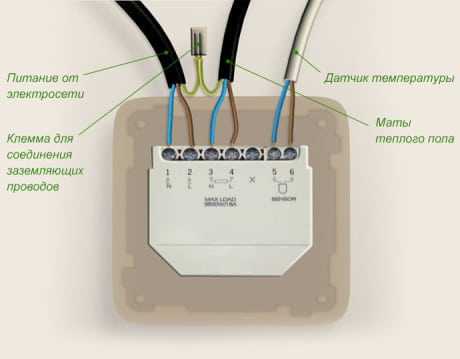
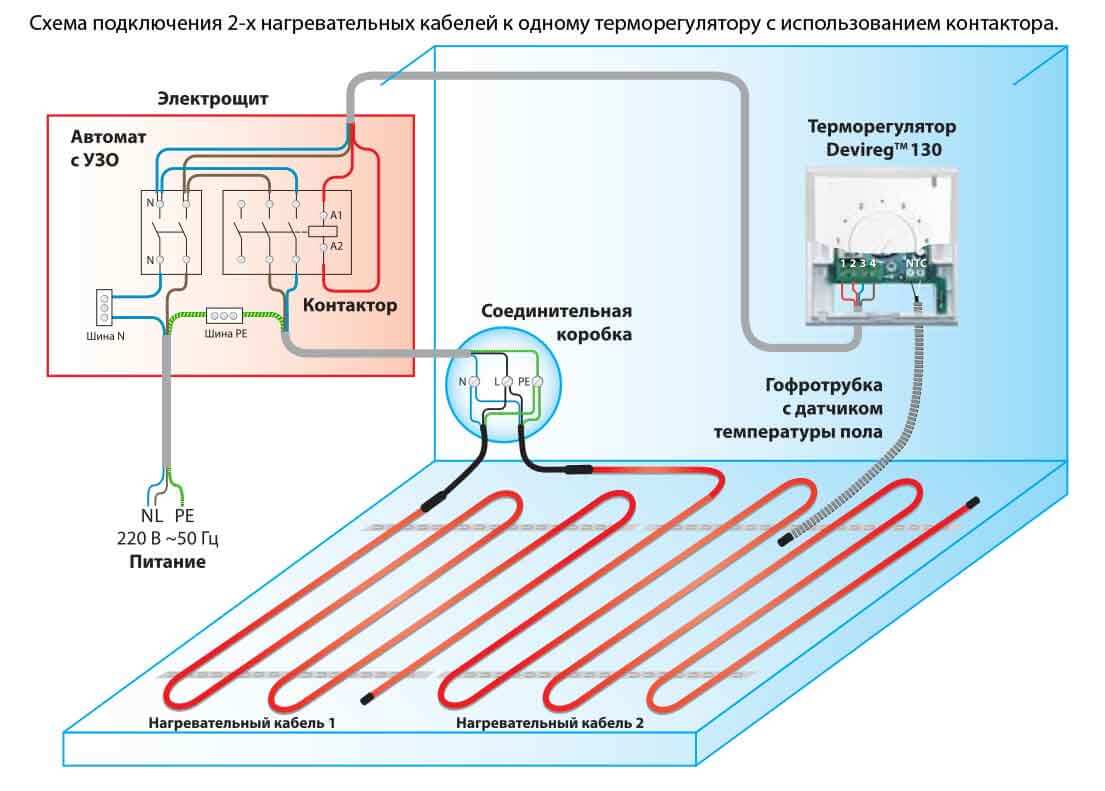
Just in case - thermostat connection diagram
Malfunctions of electrical equipment
The last important point that should be taken into account in case of malfunctions with a warm floor is the failure of electrical equipment. This includes all devices and units that are electrically powered. The main element in this group is the circulation pump, the thermostat, which is on the equipment of the mixing unit. Devices can fail due to lack of voltage in the electrical network.
Determine a serviceable pump or not, you can use the characteristic sound of operation, which is emitted by a running unit. You can identify problems with the thermostat as follows:
- with proper operation of the device, the moment of stem rotation is clearly visible. In the event of a breakdown, this process does not occur;
- there is no need to repair the thermostat.It is better to buy a new device that will ensure reliable operation of the entire heating system in the future.
Causes of malfunction of the electrical system and its repair
There are several reasons for floor breakage. Most often it is a failure of heating elements, thermostats and temperature sensors.
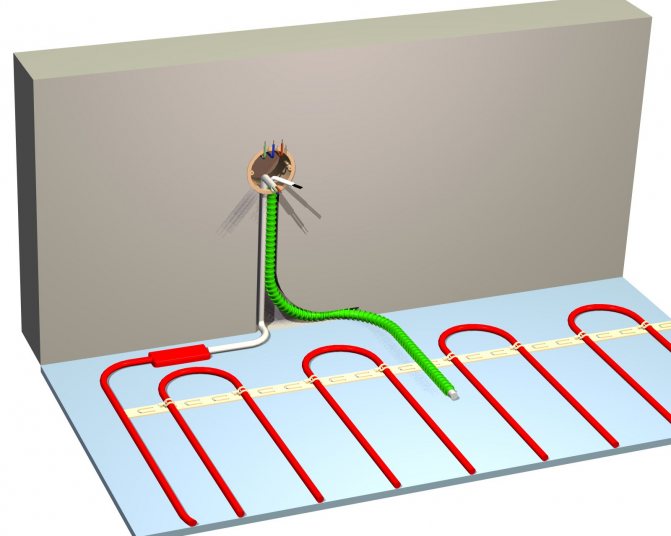
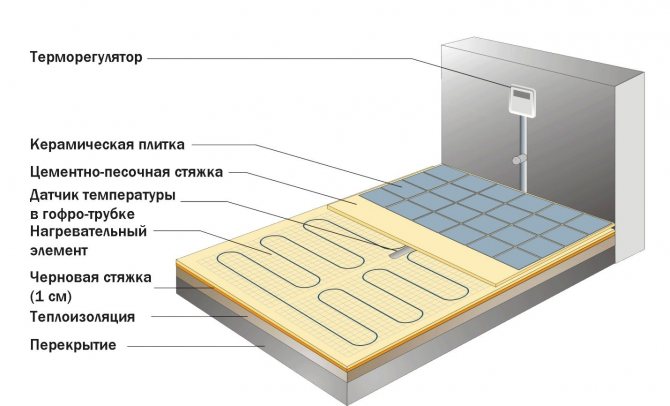
The principle of the location of the temperature sensor of the warm floor
Lack of power
If the electric underfloor heating does not work, the first thing to check is the power supply. Information about this comes from the thermostat to which the heating elements are connected - the presence of voltage is indicated by the corresponding indicator or glowing icons reflecting the parameters of the system. If the board “does not show signs of life”, you will have to find out the cause of the breakdown by visual inspection and with the help of a special tool - a multimeter, which determines the presence of voltage at the input contacts.

Multimeter
Important! The reason that the underfloor heating does not heat up to the set temperature may be a low mains voltage. You can solve the problem by installing a voltage stabilizer.
When detecting input voltage with a multimeter, make sure that it reaches the heating cable or infrared film. First, you should refer to the system settings and make sure that the heating temperature is not set to minimum by mistake. After setting the temperature, they check how well the wires are connected to the terminals - little or no heating is possible precisely because of the lack of contact.
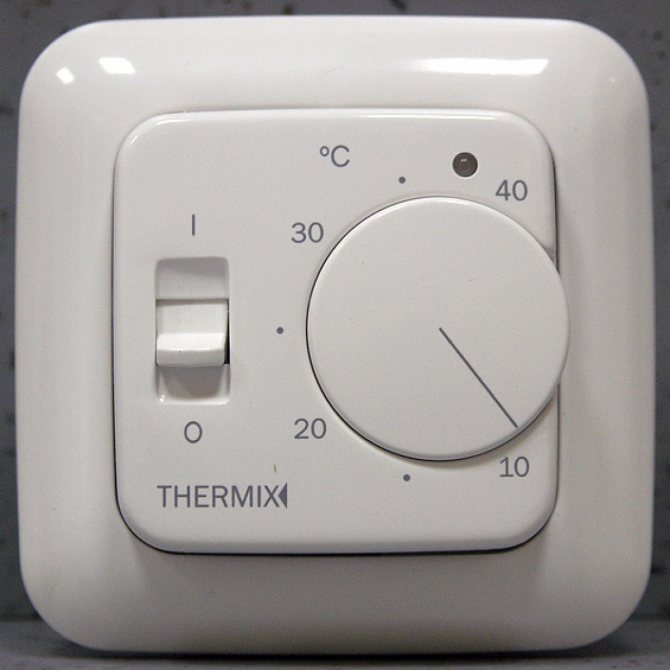
Mechanically controlled thermostat panel
When the connection and settings are checked, and the floor still does not heat, check the voltage at the output - at the section where the heating system is connected to the thermostat. If, when turned on, the voltage in this place does not correspond to the parameters of the network, then the thermostat is replaced.

Sensory floor heating thermostat
Advice. To identify a malfunction of the thermostat allows direct connection of the warm floor to the network. If it starts to warm up, then the reason is in the regulator.
Damaged cable
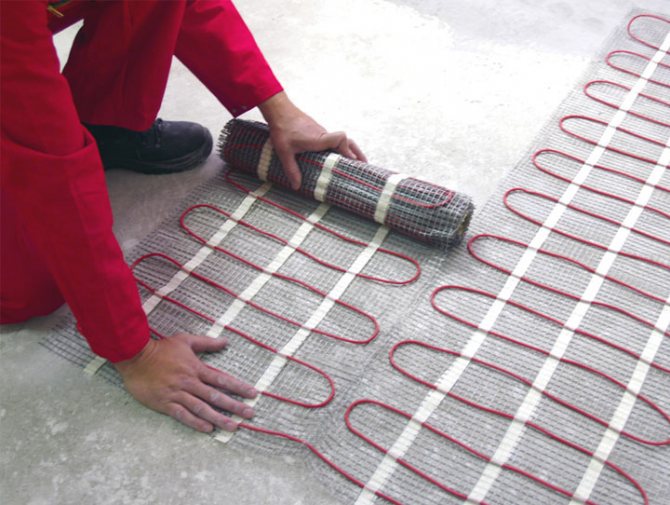
In an electric floor system, failure of the heating element is possible as a result of damage to the cable during installation. This becomes the reason that after a while it burns out. You can damage the cable when repairing the flooring with a cutting tool or drill.
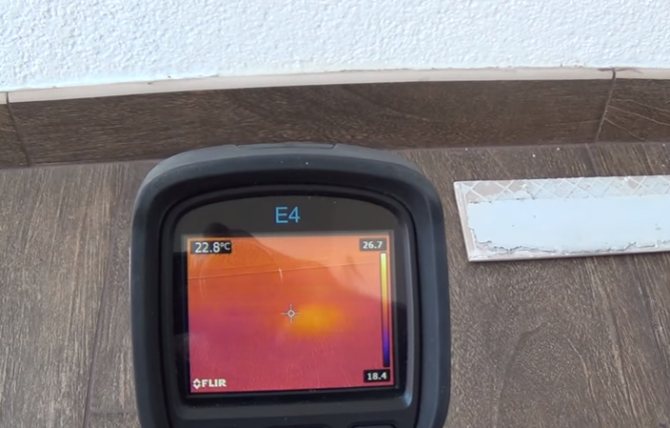
Damage to the heat mat is determined using a thermal imager
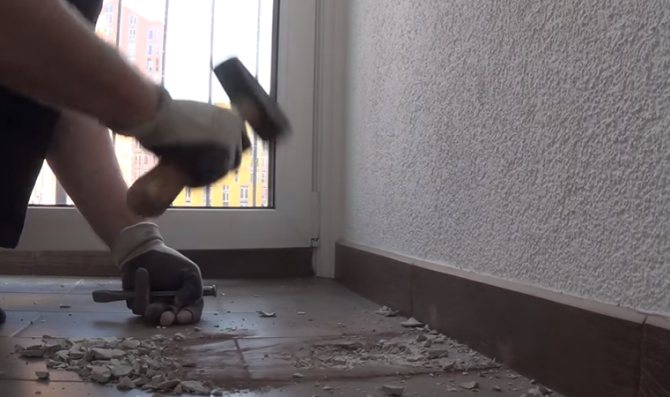
To remove the heating mat for repair, the floor covering is dismantled. If it is a tile, then you can use a hammer to break the element directly above the breakage point.
How to remove tiles from the floor? This work is dusty and rather laborious, but nevertheless, breaking is not building, and it can be done much faster than installing a ceramic coating. How to do it? Read in a dedicated article.
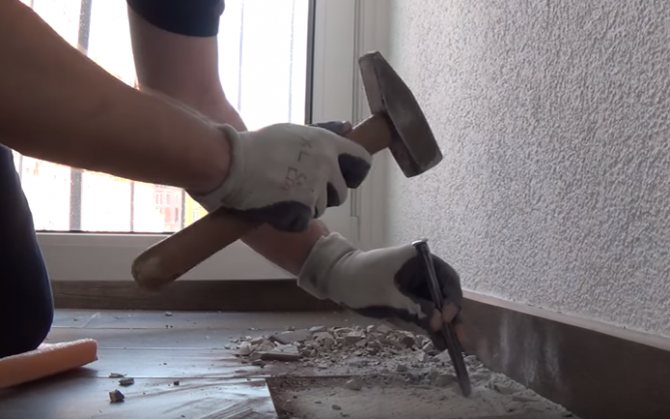
It is important not to damage the thin mat, which may be located directly under the tiles in the adhesive solution. To break the tiles correctly, blows are made starting from the center, moving towards the edges of the tile. To avoid damaging adjacent tiles, hammer blows should be directed towards the center of the tile to be dismantled, not away from it.
Dismantling tiles
After removing the tiles, carefully knock down the screed or dried glue to get to the heating elements and find out the reason for their failure.
Removal of the adhesive layer and release of the cable section in need of repair
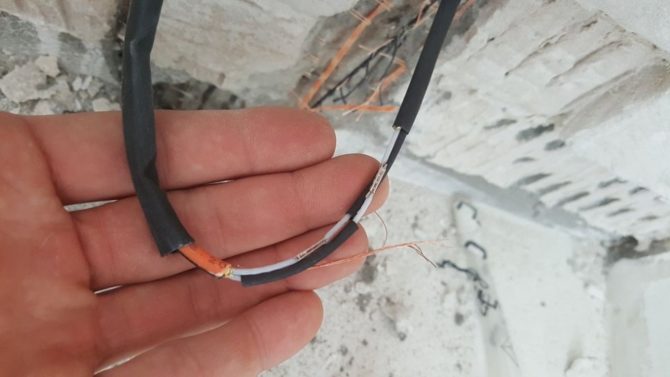
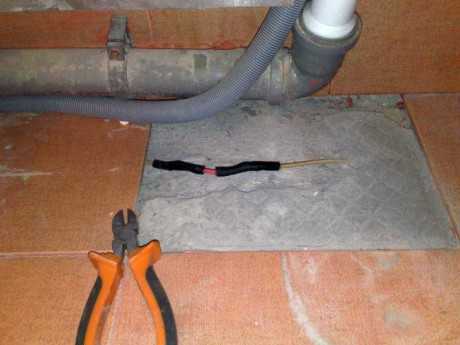
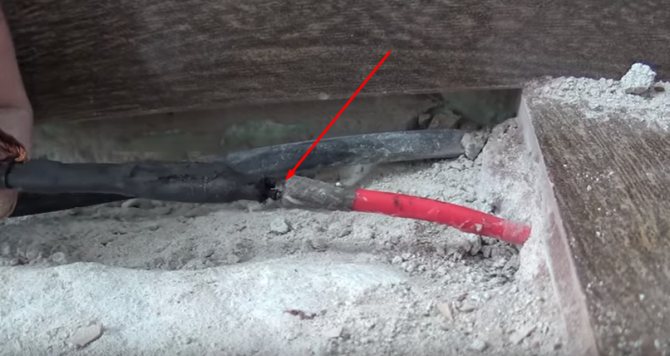
Loss of contact in the coupling may be the cause. This happens if a sharp turn of the heating cable is made in front of or after the sleeve. As a result, very large mechanical tensions are formed at this turn, and during operation of the cable, it turns out that it pulls itself out of the sleeve connections.
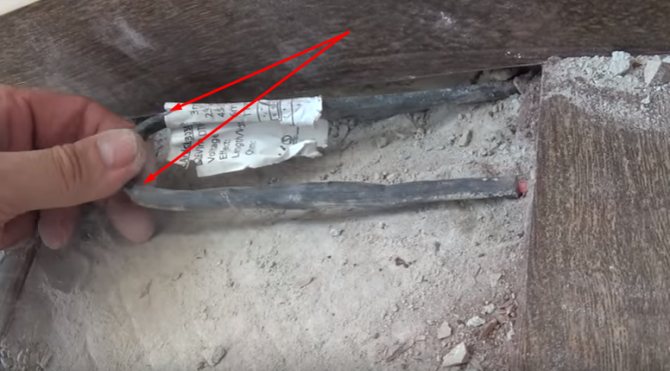
Too steep bend radius of the cable causes cable breakage.
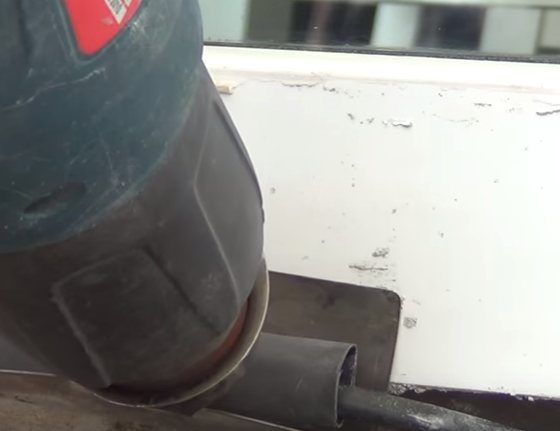
To cut the coupling, it is heated with a construction hair dryer.
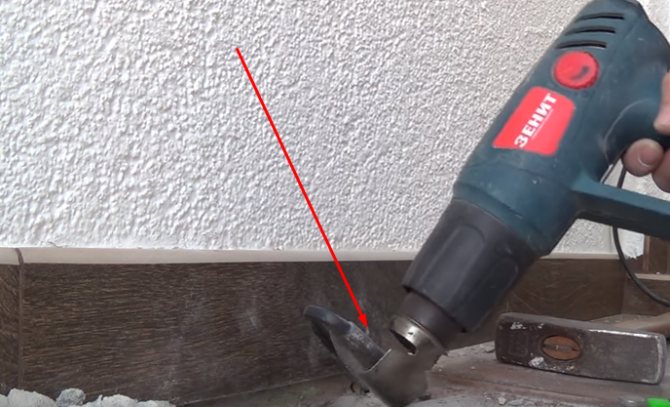
The clutch is heated with a construction hair dryer
They cut it off with a construction or clerical knife, freeing up the problem area, which was identified with a thermal imager.

Removing the coupling
The problem with heating mat couplings is that there is poor insulation between adjacent coupling sleeves, causing the cable to pull itself out under mechanical stress. Therefore, it is extremely important not to allow the cable to turn sharply after the coupling.
Damaged area
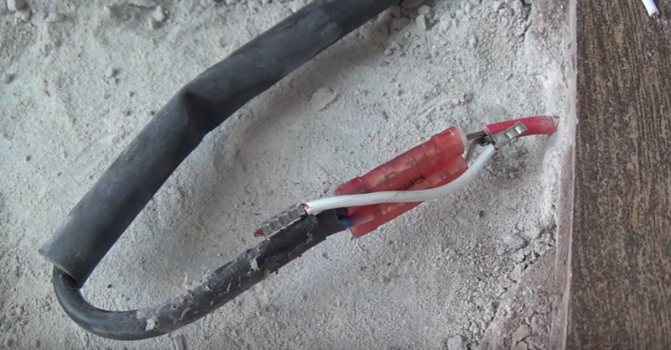
The result of the repair before being placed in the sleeve
Table 1. Repair of cable (cold ends)
| Illustration | Description |
| The area where the broken or damaged cable is located is freed from the decorative coating and screed. |
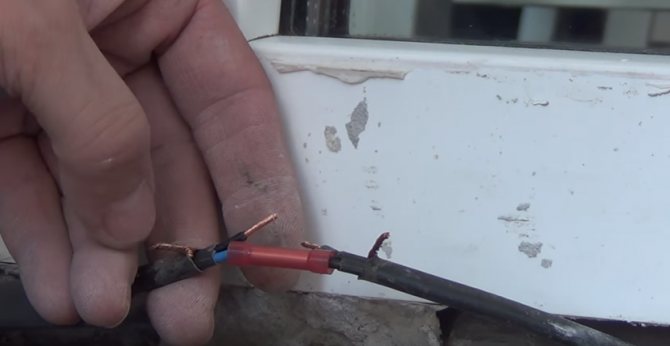
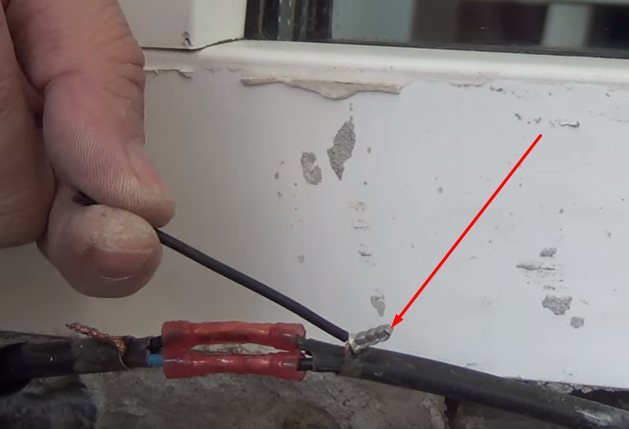
| The conductors at the ends must be stripped and connected using sleeves with a suitable diameter. |
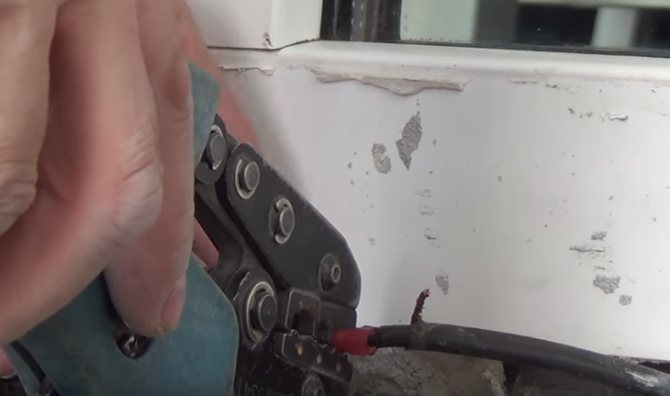
| The sleeves are crimped with special pliers. Sleeves in the insulator allow reducing the length of the sleeve, which does not need to be stitched to the side. |
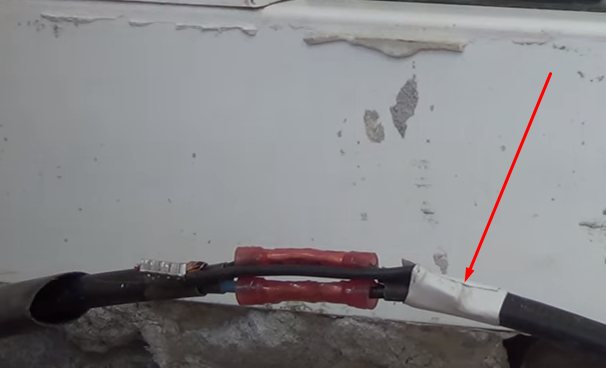
| The shielding braid is connected with an insulation wire. When connecting the cold end to the heating cable, connecting the braid with a wire without insulation, you can get a decrease in the insulation resistance between the screen and the heating core with subsequent breakdown. |
| So that the sleeve does not affect the heat shrinkage, does not pierce it, the insulation wire is wrapped with electrical tape. |
| Put on an adhesive heat shrink. |
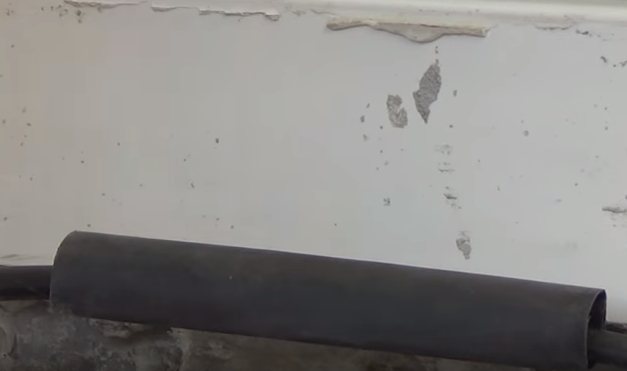
| They heat it with a construction hair dryer. |
| Glue is released during the heating process. As a result, the coupling becomes airtight and is not even afraid of being immersed in water. The end of the process is indicated by the glue protruding along the edges of the coupling. After that, it is necessary to allow the coupling to cool completely so that when it is moved, the adhesive does not peel off. |


Video - How to install and connect an electric underfloor heating
Sensor failure
Damage to the temperature sensor results in insufficient heating of the system. With proper operation, the floor heats up to maximum power and turns off automatically, otherwise there will be no shutdown, and electricity costs will increase. When using a damaged temperature sensor, there is no way to lower the floor heating temperature. There is no need to repair the sensor - it is easier to replace it with a new one.
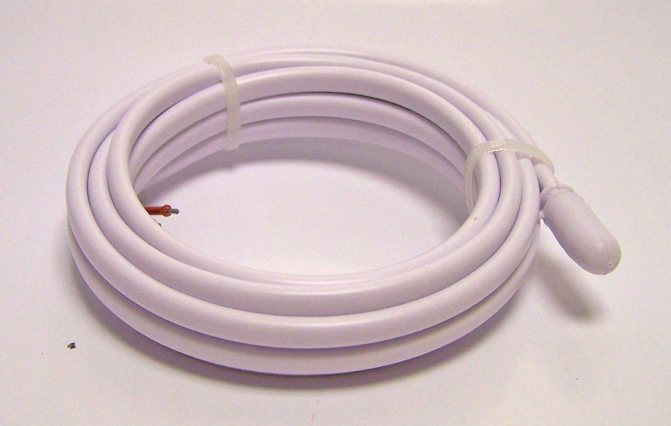
Underfloor heating temperature sensor
During the installation of the warm floor, the temperature sensor is laid inside the corrugated tube, so there is no need to dismantle the floor covering and the screed. It is enough to remove the broken sensor from the tube and install the working element in its place.
Video - How to make a future replacement of the thermal sensor
Incorrect installation
The conclusion about incorrect installation comes after checking all the elements of the system and confirming their serviceability. If at the same time the floor heating temperature does not exceed 30 degrees, the reason is sought in the following:
- In an error when calculating the heating power, the result of which is a weak heating of the system.
- In poor-quality insulation of the room, which results in significant heat loss.
- In improper laying of heating elements, non-observance of the cable pitch, in a too thick layer of the screed, or in the wrong position of the temperature sensor (too close to the floor surface).
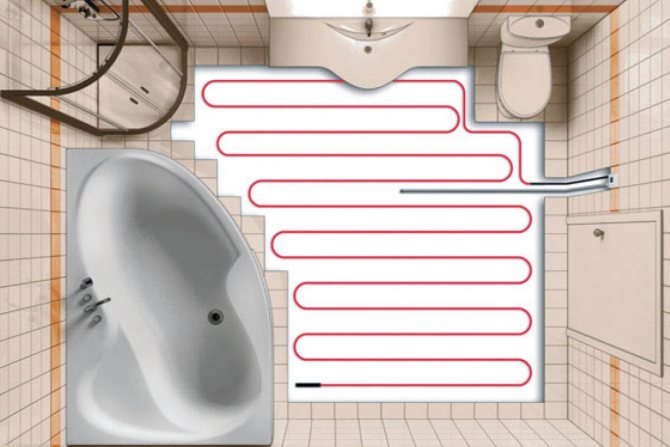
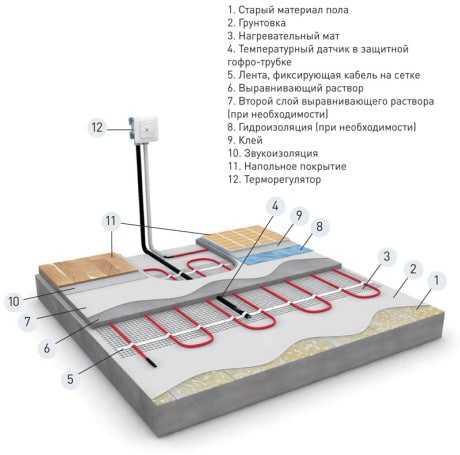
Laying scheme for a warm electric floor in a bathroom
The system can only be corrected by dismantling and re-laying it, taking into account all the requirements, if the installation of the temperature sensor to the required height does not help.
Installing a thermal sensor
Among the common mistakes when installing an electric underfloor heating, the following are noted:
- Despite the manufacturer's warning, sometimes the heating cable is placed under heavy furniture and plumbing equipment.
- When laying the cable, materials are used, which are characterized by low thermal conductivity - gypsum beacons when pouring the screed, debris caught in the screed, in the form of pieces of drywall, aerated concrete and other materials.
- The cable can be damaged after laying it, before pouring the screed, while walking on it, moving equipment, materials, tools, therefore, immediately before pouring the screed, they also check the system's performance.
- A common cause of cable damage is the use of a spatula or grinder when joining joints in the process of laying floor tiles, when it is necessary to remove excess hardened glue in the gaps between the tiles. Often, the cable is laid directly in the tile adhesive, so it is quite easy to damage it.
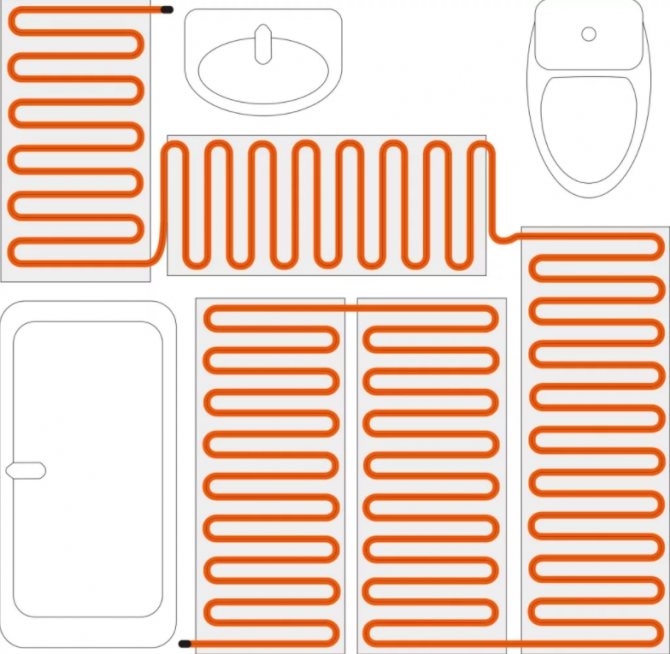
Layout of the coolant
When laying a warm floor, it is necessary to have a layout for the coolant. It will be useful for subsequent repair work and system operation.