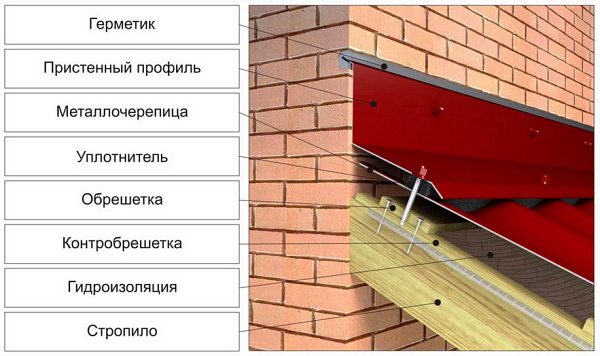
The importance of proper roof abutment work
One of the main functions of the roof is reliable weather protection. In order for precipitation not to penetrate inside, it is necessary to ensure its absolute tightness.
Such an irreplaceable metal roofing profile in the construction of houses.
All the subtleties of the process of building a hip roof with your own hands at the address.
On a flat surface, this is easy to achieve, but where the roof joins walls and other structural elements can create serious problems. Snow, rainwater, debris accumulate in these areas, as a result, the load on the rafter system increases significantly and the risk of leaks and a violation of the sealing of the roof covering increases.
Competent arrangement of abutments is a guarantee of the reliability of roof sealing. This should be taken care of at the design stage.
If the building is brick, then a special visor is equipped during the laying. It is made from half a brick. The purpose of the canopy is to protect the junction of the roof and wall from rain and snow.
Some people choose another method: they leave a small recess when laying. Subsequently, a roof covering is inserted into it.
Regardless of the method chosen, even before the start of installation work, it is necessary to take into account all future joints and determine the way in which they will be sealed.
Norms and requirements
High-quality installation of the chimney passage through the roof is so important for the safety of the building and residents that the state has officially enshrined the rules and regulations for its arrangement. The document that takes into account sanitary and hygienic, fire hazardous, corrosive and other loads on structures and materials is called SNiP 41-03-2003 "Thermal insulation of equipment and pipelines."
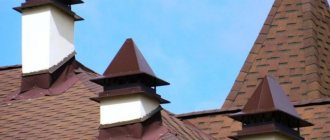
The routing of the pipe through the roof is planned during the construction phase. If the stove is reconstructed, changed or repaired during operation, then the chimney is usually left in the old place. A fundamental condition for a quality chimney is the location of the chimney in relation to the roof ridge.
To ensure optimal traction, the best place to lead the pipe to the roof is its highest point - the ridge. This allows the main part of the pipe to be guided through the attic space, which protects it from moisture and cold. The difficulty lies in the fact that it is necessary to violate the integrity of the horizontal beam by installing additional supports on both sides of the chimney. Most often, the pipe is taken out at a short distance, which makes it possible to limit the street part of the pipe to a minimum of fifty centimeters.
There is the following dependence of the height of the chimney on its distance from the ridge:
- the distance to the ridge does not exceed 1.5 m - the pipe rises 50 cm above it;
- distance from 1.5 to 3 m - it is enough to bring the chimney flush with the ridge;
- when the chimney outlet is more than 3 m away from the ridge, the chimney height may be lower than the top of the roof (the difference should be 10 degrees).
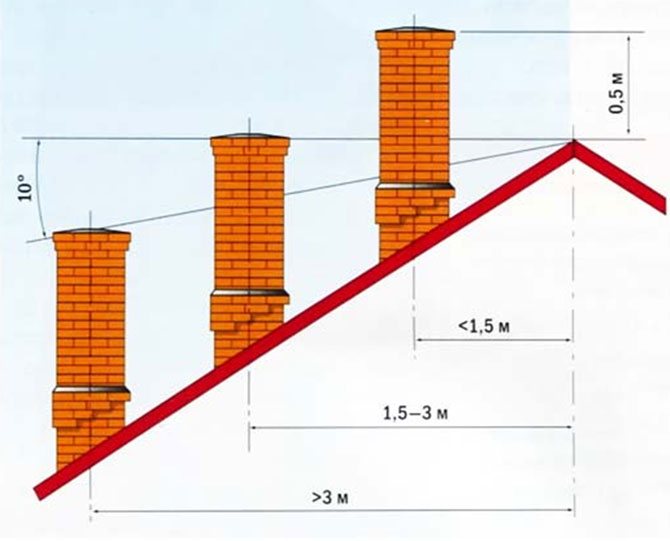
The optimal pipe height is from 0.5 m to 1.5 m. The outlet is located between the rafters so as not to violate their integrity and leave a distance of 15-25 cm to them.
Note! The worst location of the pipe outlet on the roof is in the recess between two slopes in a complex construction (in the valley).
If the straight vertical exit of the pipe falls on a similar merger of two roofs, then the roof penetration should be shifted by half a meter to the side, adding a horizontal section to the chimney (up to 1 m).Snow and ice accumulate in the deepening in winter, which creates an additional threat to the occurrence of leaks.
We recommend that you familiarize yourself with: How to independently remove a strong blockage in the toilet?
An unfortunate location for the roof penetration for the chimney is the lower part of the roof. Here, the pipe can be damaged by the descent of masses of snow and ice. In addition, a large section of the pipe has to be taken out into the street to ensure normal draft, which contributes to its freezing and the formation of condensation on the inner walls.
Types of wall connections
Roof and wall docking is of two types: upper and lateral... When roofing work, one has to face the task of decorating other construction details: ventilation pipes, chimneys, canopies, awnings. It is in these places that rain and melt water accumulates, and in winter - snow.
Arrangement of abutments to the wall
During the installation of the roof, all joints should be carefully sealed. The sealing process is carried out using different technologies and depends on the specific type of roofing.
In the presence of a roof based on roll materials, several methods can be used.
- Flashing
This method consists in applying plastic mastic to the junction points in combination with a special reinforcing geotextile. When using this technique, you can get an absolutely tight, durable and elastic joint, which, moreover, does not lose its quality characteristics for a long time.
This method is so simple that the work can be carried out independently, without the help of professionals. Before applying the mastic, the surface must be carefully prepared.
When using roll materials, they are cleaned of dusting. Polyvinyl chloride should be degreased, the concrete should be coated with a primer, and the brickwork should be plastered and thoroughly dried.
All places of future joints must be cleaned of dust and any contamination. If there are large cracks and chips, they must be covered. Only after thorough preparation of the surface can a layer of mastic be applied to it.
Geotextile is laid on top, which is again covered with a layer of mastic. After applying one layer, you must wait at least 3 hours and no more than 24 - before applying the next layer. After waiting for the treated area to dry completely, you can apply mastic of the corresponding color on top.
- Fastening with a rail with self-tapping screws
When using this method, the place where the roof adjoins to the wall is arranged as follows: a silicone sealant is applied to the section of the junction of the rail with the wall. The roll roofing must be raised on the wall by about 15-20 cm.
It is necessary to ensure that a depression does not appear at the junction, which in the future may threaten a tear. To avoid this, a triangular bar should be installed between the wall and the roof surface and a layer of additional thermal insulation should be laid. The resulting roller is the prevention of a possible breakthrough of the material and additionally insulates the abutment areas.
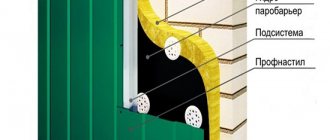
Roof from corrugated board
In the presence of a roof covering based on profiled sheets, the arrangement of abutments to the wall is carried out using special steel strips or aprons.
To install such a structure on a plastered or concrete base, it is necessary to make a recess in it with a depth of 20 to 30 mm. The recess must be parallel to the wall.
The apron is pre-treated with silicone sealant, after which it is inserted into the strobe and fixed from the bottom side with self-tapping screws.
You can also use a double apron. The top element must overlap with the bottom one. In this case, there is no need to groove the surface.
The upper part is attached to the base using dowels. The bottom element must be installed under it.It is snapped onto the top part using lock joints. The lower apron is equipped with clamps: they must be fixed to the roof with self-tapping screws. At the last stage of work, it is necessary to completely seal all sections of the connection.
When performing work, one must remember that a small gap must certainly remain at the points of abutment of the corrugated board to the wall.
Soft roofing from shingles
The junction of the soft-type roof to the wall begins with a line on the wall. It is carried out at a height of 200 to 500 mm from the coating. Along the perimeter of the junction, a bar with a triangular cross-section, pre-impregnated with an antiseptic substance, should be fixed. It is necessary in order to smoothly fold the roofing cake and create a barrier for water leakage.
The joints must be cleaned of debris, accumulated dust, then primed. A soft roof covering must be applied to the timber, after which a special strip for the installation of the valley should be glued to the sealant or bitumen mastic. It is a 1 meter wide roll material reinforced by a special technology - a valley carpet.
The strip starts from the wall on the wall, its other end is located on the horizontal part of the roof, at a minimum width of 200 mm. The roll materials to be glued are smoothed and pressed using a special rubber roller. It easily presses the material to the surface without damaging it. If there are large chips, it should be removed from the place of gluing.
At the end, you need to fix the abutment unit using a clamping metal strip (100-120 mm) with a flanged edge, which, during installation, enters the bar. It should be fixed on the wall plugs using rubber washers.
Arrangement of connections to chimneys and pipes
Arrangement of junctions to chimneys and chimneys is in many ways similar to the arrangement of junctions to walls. However, this work has some peculiarities associated with the high temperature of the pipes, their shape, and locations on the roof.
If the roofing material is metal or other cellular and profiled material, the abutment is made with an upper and lower metal apron around the chimney. To install it, it is recommended to release half a brick when laying the pipe. This technique protects the top of the outdoor apron from direct rainwater.
The chimney must be insulated from the roofing structure with a layer of asbestos, the lathing around is made continuous, but at the same time the 130-mm fire-prevention indent from the masonry must be preserved. The lower apron is installed on it.
It consists of 5 parts: top and bottom planks, two side pieces and a tie. It is necessary to cut the strips of the required length and join them to a seam, the upper flange is inserted into the groove to a depth of 20 mm, after which it is sealed.
On the sheathing, the apron is glued to the roofing sealant, and the tie that serves as drainage is directed to the nearest valley or brought to the cornice.
Why is the rafter system of a broken gable roof good in construction?
Instructions on how to properly make a ladder for the roof with your own hands.
If you have any difficulties with the correct fastening of the corrugated board on the roof, you will find answers to your questions in the article https://rooffs.ru/metallicheskaya/profnastil/ustrojstvo-krovli.html.
A roof covering is mounted on top, and the upper bypass of a pipe or chimney is installed on it. Planks can be prepared by yourself or you can buy ready-made ones. They must be connected to recumbent folds into a single structure. It is necessary to remember about the need to insert the upper flanging into the cut. The stem is treated with a heat-resistant sealant - for example, silicone.
As a result of the work carried out, water that flows down the roofing above the pipe location will enter the inner lower apron and be diverted through the tie into the valley or directly to the cornice. Other streams of water will fall on the upper bypass of the chimney and from there drain towards the cornice.
As for the roofing based on soft materials, it is impossible to arrange two aprons on them. For this reason, the roof abutment is carried out along the outer contour into the bar.
To prevent possible leakage from the top of the pipe under the apron, the upper bar should be 300-400 mm longer than the pipe. It is wound under a soft coating, after which it is sealed from two planes. On each side of the chimney, the strip should have a projection of 150 to 200 mm. Other planks are placed on the cover. Such aprons can also be installed on metal folded roofs.
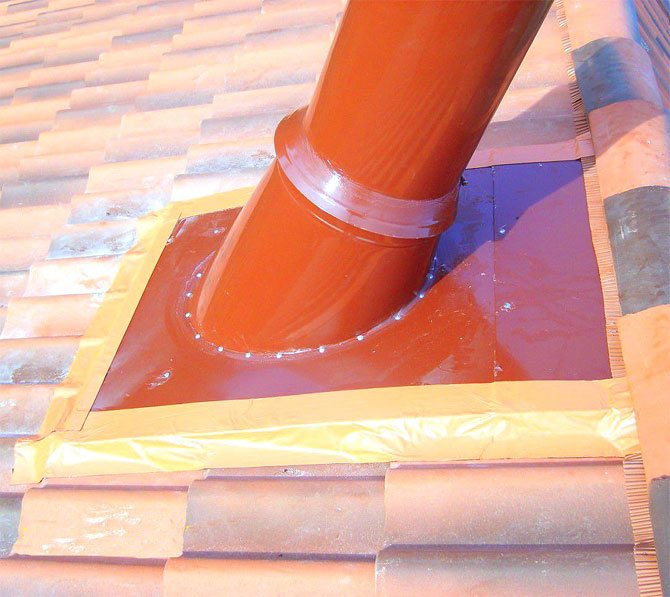
The areas where the roof adjoins the chimney can also be arranged using flash.
The surface is thoroughly cleaned of any dirt, dust and debris and is prepared for further work. Then a layer of waterproofing mastic should be applied to it and geotextile should be pulled on top. Another layer of mastic is applied to it.
The layers should dry for 3 to 24 hours. If necessary, several layers of mastic can be applied. An indispensable condition for laying the next layer is the complete drying of the previous one. The result is a very strong, flexible and durable connection.
If there is a round pipe, sealing can also be done using an apron. The main elements of the joints of the roof to the pipes are a metal inclined plate with a hole and a large diameter pipe put on the chimney.
The most reliable option is when the sheet and pipe forming the apron are pre-adjusted and fixed to each other. At the same time, they do not make a striker: the pipe connection is sealed at the bottom with asbestos. From above, it is sealed with cement mortar.
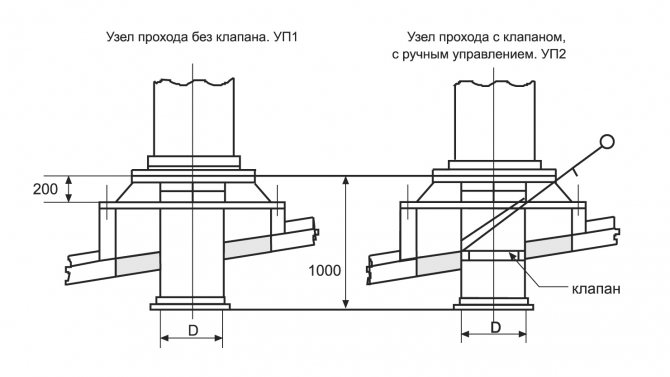

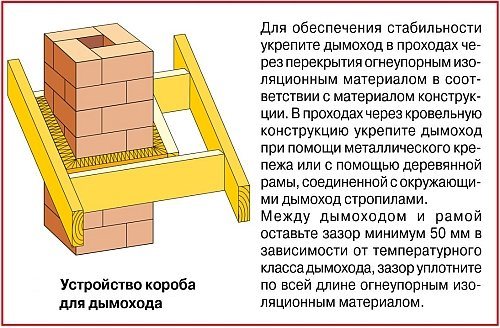
Chimney box
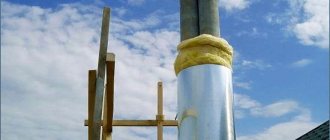
In order to properly lead the chimney through the roofing pie, you should equip your own rafter system around the pipe. It must be spaced from the chimney at the distance specified in SNiP. The structure consists of side rafter legs and horizontal cross-beams from the bottom and top, which are made of a bar of the same section as the rafters.
78f4859b81ff291d5061a723d5a08edf.jpe
To insulate the structure, it is necessary to use non-combustible heat-insulating materials, such as glass wool or stone wool - it is stuffed between the pipe and wooden structural elements.
When passing the chimney through the roofing pie of the operated roof, the steam and waterproofing is cut crosswise, like an envelope, the edges should be tucked up and fastened with nails or staples to the rafter system.
Roof chimney waterproofing requires special attention. When installing a chimney box for a pitched roof, the vapor barrier and waterproofing membrane are fastened as follows: the edges of the films are tucked in and tightly fixed with brackets to the box, in addition, the attachment points should be additionally sealed with a sealing tape or some other adhesive material. On the outside, on top of the roofing, protective elements are mounted that do not allow moisture to pass into the joints of the box with the roofing pie.
It is important to take into account that the installation of the box can negatively affect the air exchange in the under-roof space. To avoid deterioration of moisture removal, additional ventilation systems can be installed, for example, ventilation tiles, roof aeration grilles, etc.
The slope is a small roof of its own, which diverts water and snow from the pipe.Its installation is quite complicated, since all layers of insulation are part of the slope, in addition, it should be qualitatively combined with the main roof using curly elements. To avoid the installation of a slope, it is worth making the pipe smaller.
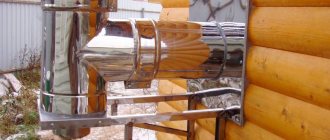
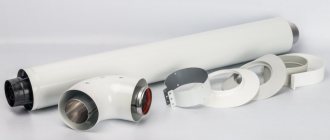
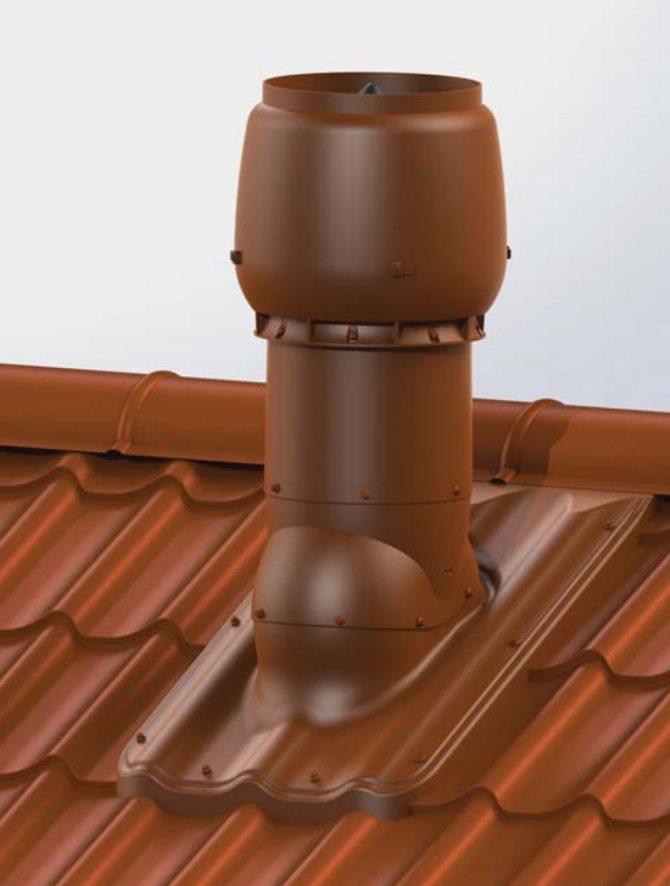
Using ready-made kits
Standard modular chimneys ("sandwich") greatly simplify the process of passing the pipe through the roof. A wide range of materials are used for the manufacture of structures, including
:
The choice of a modular chimney depends on the fuel used, since they differ significantly in their technical characteristics. The advantage of such systems is the ability to install the pipe at a non-right angle. This is especially true when installing a chimney in an operating building and allows you to choose almost any place for installing a fireplace, stove or automatic boiler.
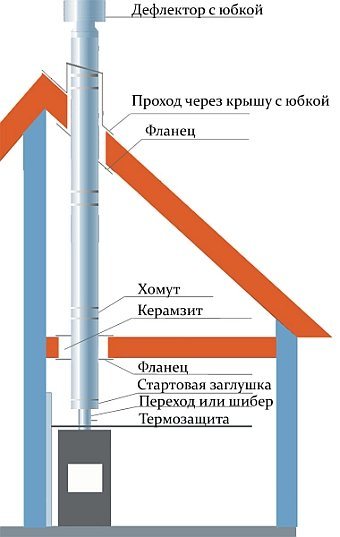
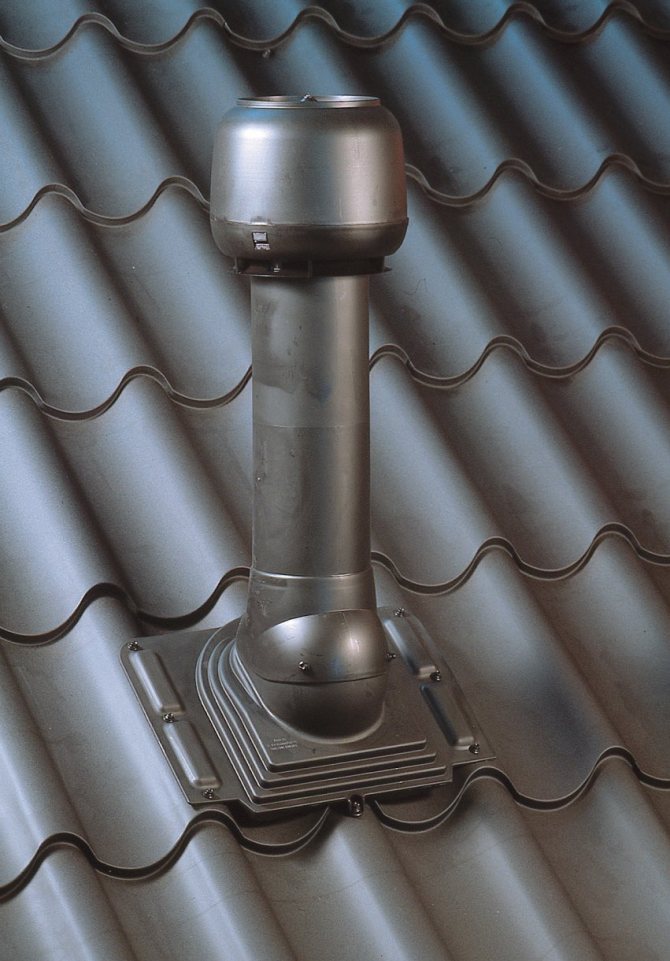
A modular chimney passes directly through the roof, consisting of parts such as
:
- deflector (a device that enhances the draft in the chimney by using a stream of hot air);
- a clamp for stretching (allows you to additionally fix a high pipe on the roof);
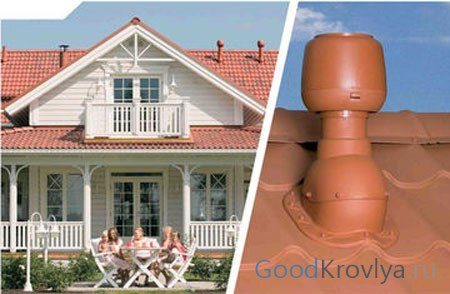
- skirt (an element that protects the place where the pipe exits through the roof);
- roof passage (element with a fixed apron, which is directly mounted in the roofing cake).
Modular chimneys have an attractive appearance.
Steel chimneys can be installed if the flue gas temperature is not more than 500 ° C. Forbidden for installation on coal-fired stoves. For asbestos-cement pipes, this parameter is 300 degrees; for coal stoves, such chimneys are also unsuitable.
If the chimney is made of concrete or brick, or a ready-made factory passage is installed, the structure should not be rigidly attached to the roofing system. Under the influence of external factors, the roof can deform, and these forces will be transferred to the chimney, which can lead to its destruction. When the chimney exits through the roof, all connections between the chimney and the roof are made using flexible elements.
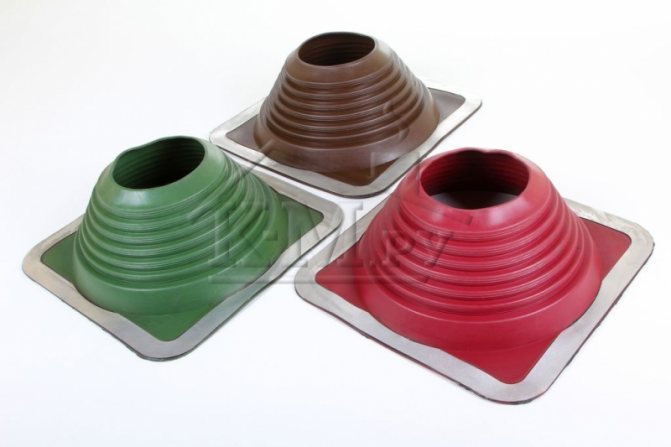
Modern materials and technologies
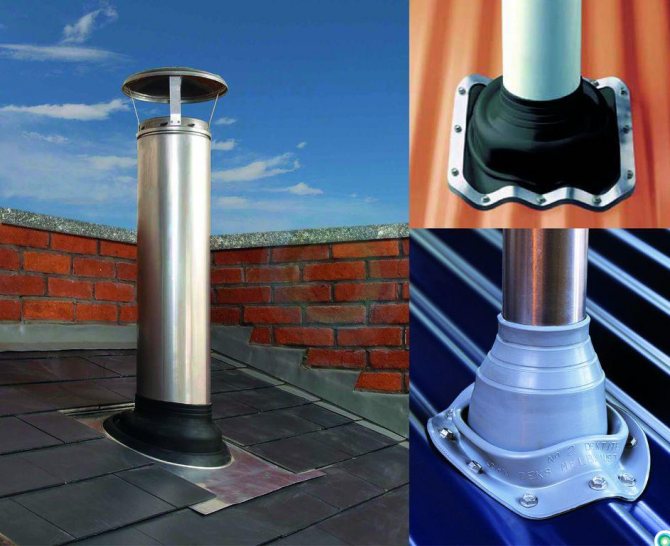
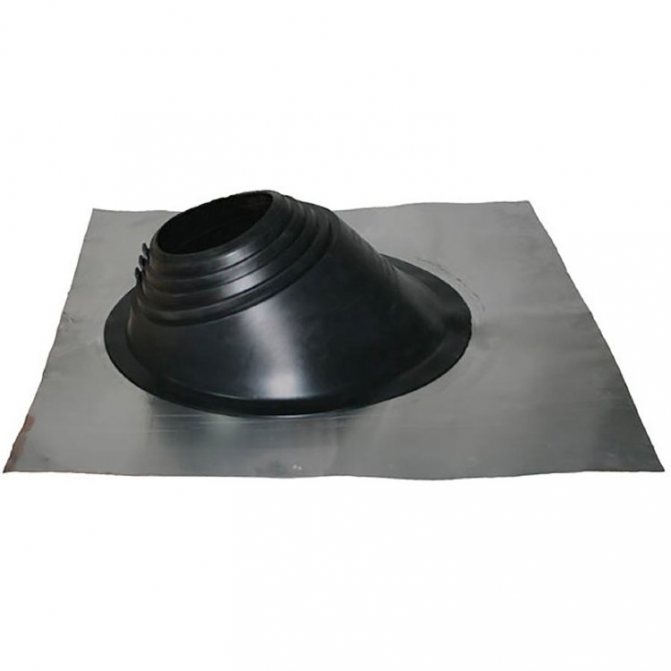
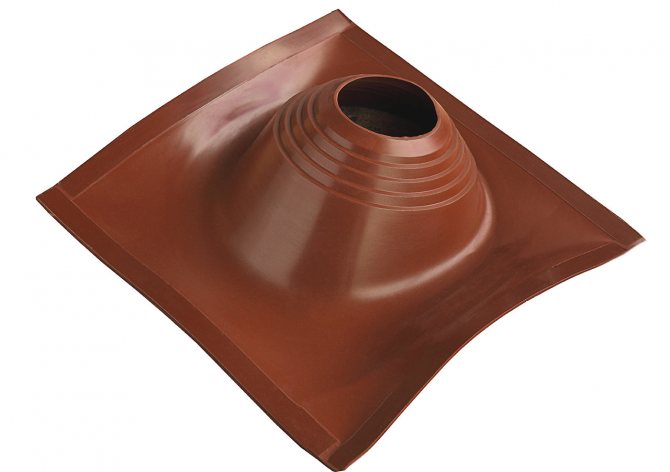
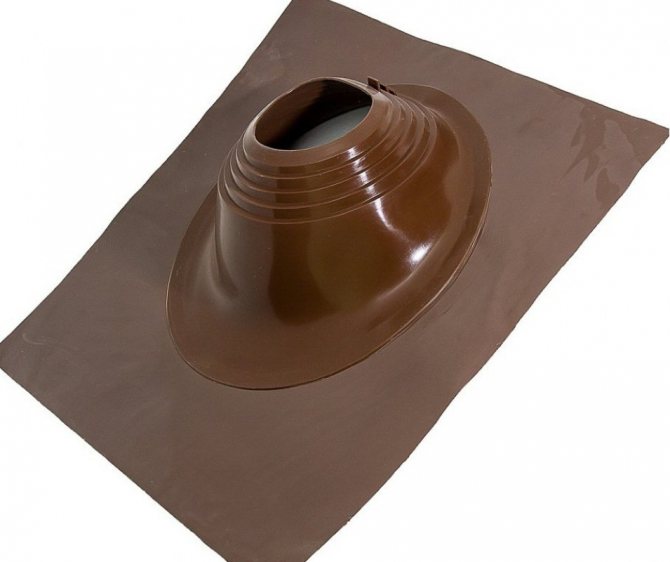
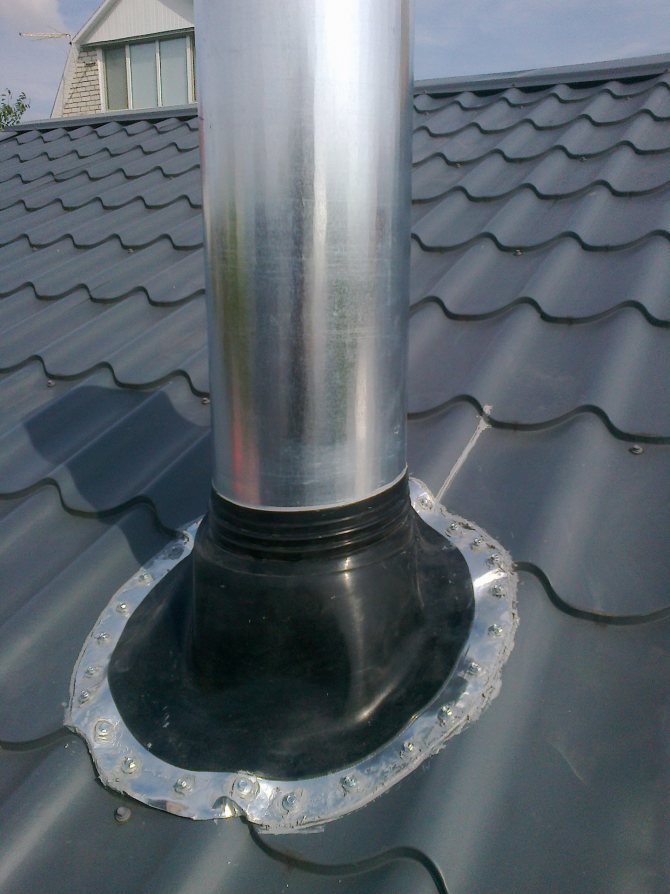
New generation materials greatly simplify the arrangement of points of abutment of pipes with an inclined roof. They reduce the labor intensity of the process and increase the reliability of roof junctions. The finished corrugated elastic cuff, made on the basis of heat-resistant silicone material, retains its technical properties at temperatures ranging from minus 50 to plus 350 degrees. It can withstand heavy snow loads typical for most Russian regions.
The cuff has an adhesive base, its installation is not difficult. The result is a reliably sealed abutment. The service life of the cuff is approximately 15 years.
You can do without a cuff: arrange an abutment using self-adhesive strips of corrugated metal. Their width is 280–300 mm, and their length is 5 m. They are made of lead foil or aluminum with an applied layer of glue. In the upper part, the strips are fixed to the pipe with a metal clamp.
With their help, it is possible to seal very complex joints on the roof. Their service life is approximately 20 years.
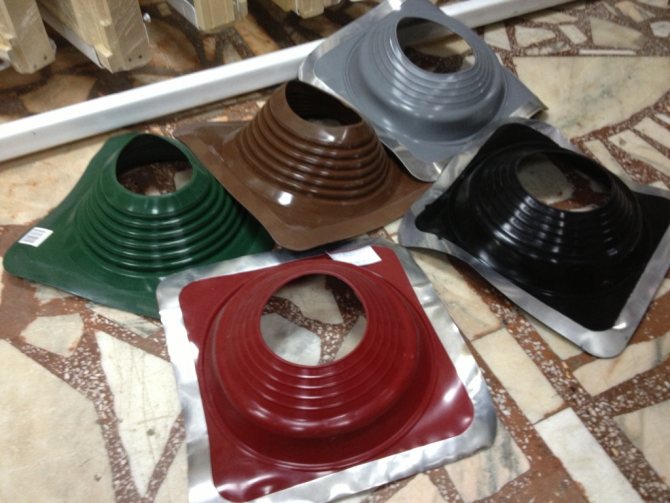
Corrugations are produced in a wide range of colors. Expanding, they increase the surface by 60%.
The material can withstand temperatures from minus 50 to plus 100 degrees. The top edge must be additionally attached to the wall using a special strip called the Tank strip. In this case, it is not necessary to carry out the punishment.
With the help of materials of a new generation, it is possible to arrange abutments of roofs of different types and to other details: dormer and dormer windows, ventilation pipes of different sections, pediments.
Repair of abutments
If there is a need to repair the abutments of the roof to the elements of the roof structure, then the simplest way is to carry out it using the flash method.
In this case, a special one-component mastic is used, which consists of bitumen-polyurethane compounds. It can create reliable and durable waterproofing and is used on surfaces of a wide variety of shapes.
The application of mastic does not require special training and special knowledge or tools. In addition, the method is very economical compared to the traditional repair method using roll material and hot bitumen.
The junction points can be repaired in another way. It is suitable for applications where the roofing material has recently peeled off the wall and is in good condition. It should be pressed with a rail and fixed with self-tapping screws. The sections of the joints of the rail with the wall must be sealed with a polyurethane sealant.
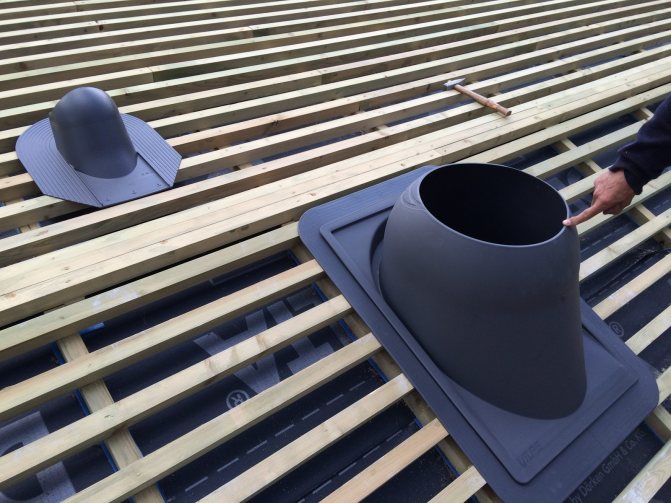
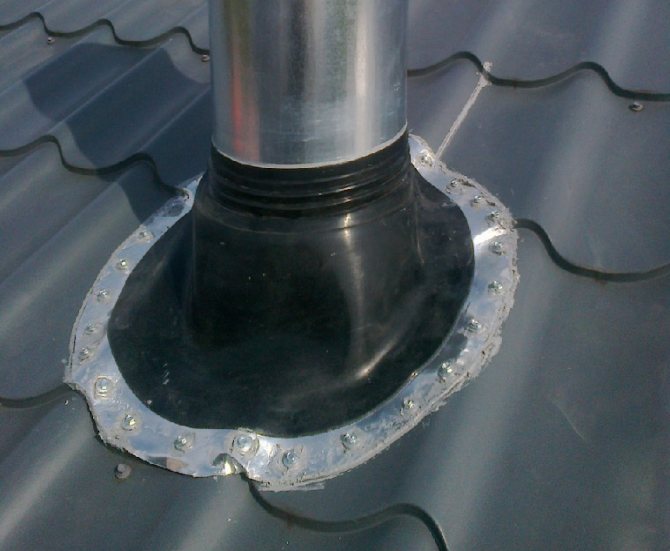
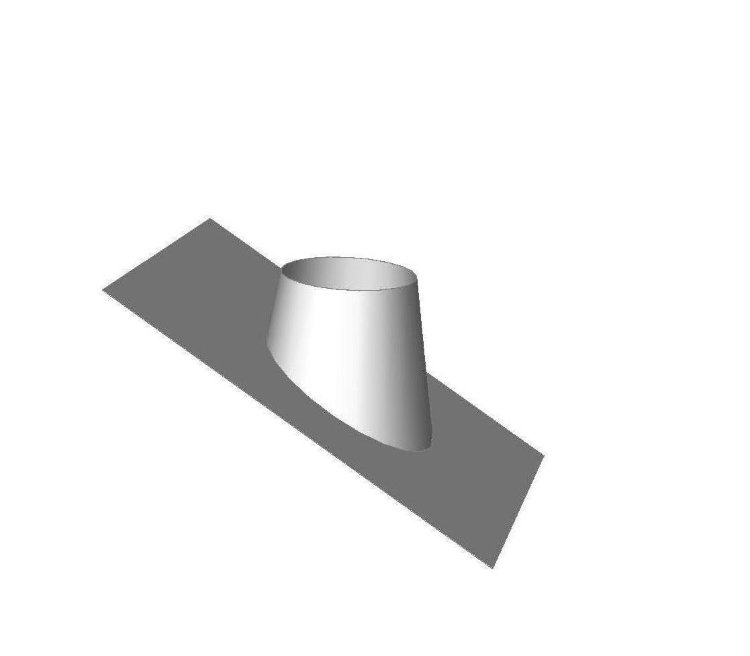
Installation of a circular roof penetration ↑
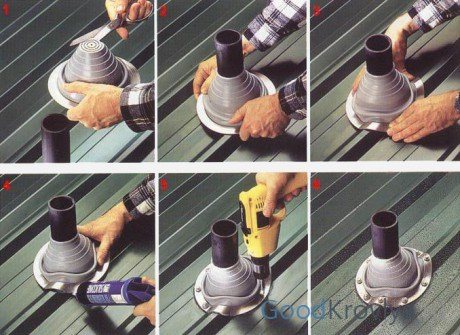
Step-by-step instructions for installing a circular roof penetration
- We select a seal of the required size. Its opening should be about 20% smaller than the cross-section of the pipe through the roof. If necessary, it can be cut off.
- We pull the sealant over the pipe. The procedure can be greatly facilitated by using a solution of laundry soap.
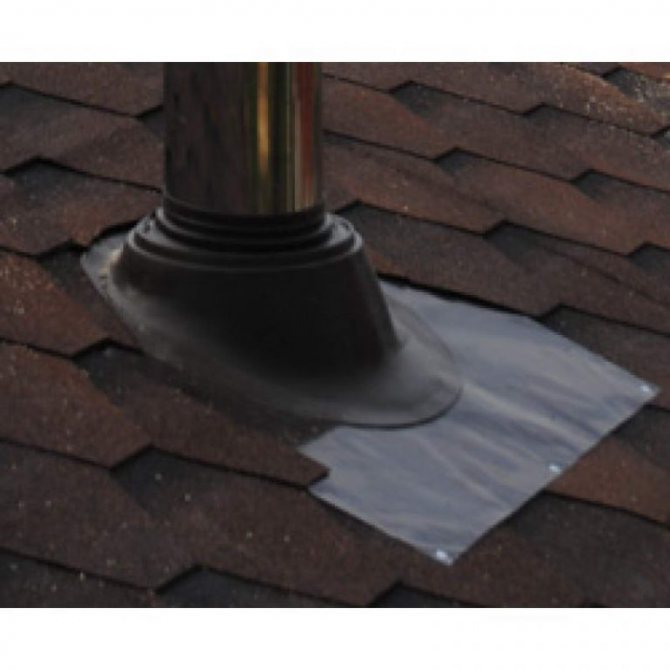
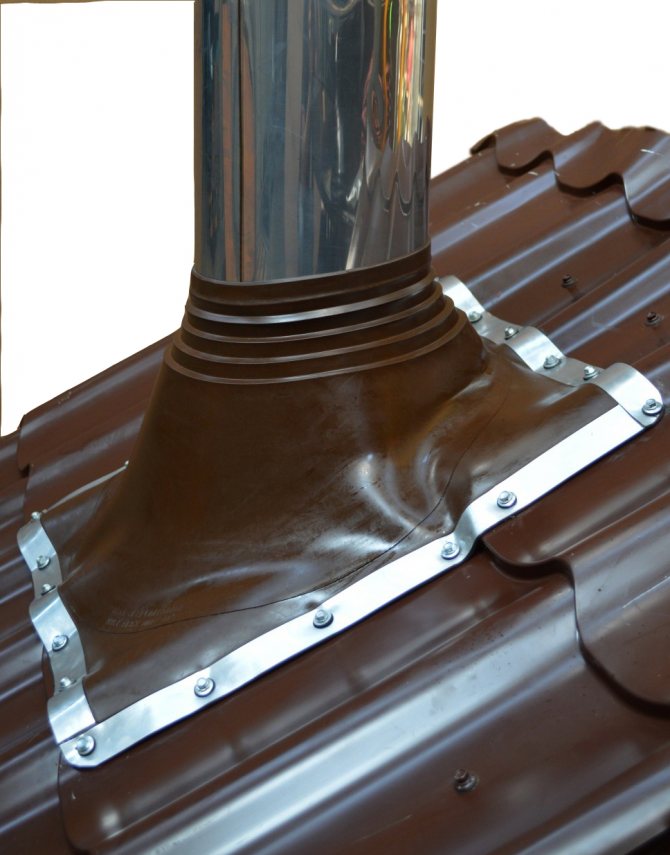
- To shape it to match the base, the seal is pressed very tightly against the roof. Special tools can be used to ensure a better fit of the flange edges to the roof surface.
- We apply a special sealant under the flange.
- We fasten the seal to the base using self-tapping screws. The distance between them should not exceed 35 mm.
- The roof penetration has been installed.
Roof penetration is a guarantee of the tightness of your roof!
A well-chosen and correctly installed penetration ensures the tightness of the roofing cake. Even a layman knows that the service life, strength and reliability of the roof largely depend on this factor. You can do all the work yourself, but only specialists who are professionally engaged in roofing work know all the subtleties and nuances of installing penetrations, of which there are not so few. It is best to entrust these works to professionals, they will cope with them with high quality and in a short time. And then the roof of your house will delight you with excellent performance properties and aesthetic appearance for many years.
FINDINGS
- Abutments are areas of contact between the roof and the rest of the building.
- Competent arrangement of abutments ensures reliable protection of the building from precipitation.
- The arrangement of the connections must be taken care of already at the design stage.
- Wall joints are divided into top and side joints.
- Sealing of abutments to the wall is carried out in different ways, depending on the type of roofing.
- When installing connections to the chimney, one must take into account the high temperature of the pipes, their shape and location.
- Modern materials and technologies greatly simplify the work of sealing the joints.
We invite you to familiarize yourself with the video on the design of the abutment of the roof to the wall of the building