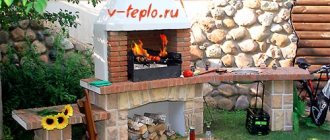
To ensure an acceptable temperature in your unheated garage in the winter, you can build a working oven with your own hands. It is not expensive, and fuel can be obtained for it at a bargain price if you try. There are several options for the construction of such a structure of varying degrees of complexity. Let's consider some of them.
To save on heating a small utility room, you can build a furnace for working out with your own hands
The operating principle of waste oil furnaces
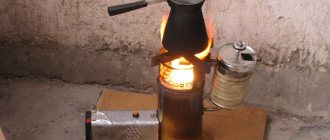
Fuel oil has been used by man as fuel for a long time. Being one of the heaviest components of oil, this substance is used not only for fuel, but also for the production of various oils and other liquids for petrochemical production. Like all components of oil, fuel oil and its derivatives have good flammability with the release of a large amount of heat. Used automotive oil must be disposed of using complex technological processes. However, you can benefit from it by carrying out combustion in a homemade furnace at working off. A drawing of the simplest version of such a design may look like the one shown below.
Waste oil is a very complex substance made up of a mixture of various hydrocarbons. If you set it on fire, only volatile substances will burn out, and everything else will go to waste. Moreover, they are very toxic and it is forbidden to dispose of them in an ordinary landfill. When heated without combustion, the mining begins to disintegrate into many components, most of which are gaseous. Here they, with sufficient access of oxygen, burn out completely, leaving no harmful substances. For such a process to occur, it is necessary to build a working furnace. You can do this with your own hands, for example, from an old gas cylinder.
Waste oil furnace operation principle
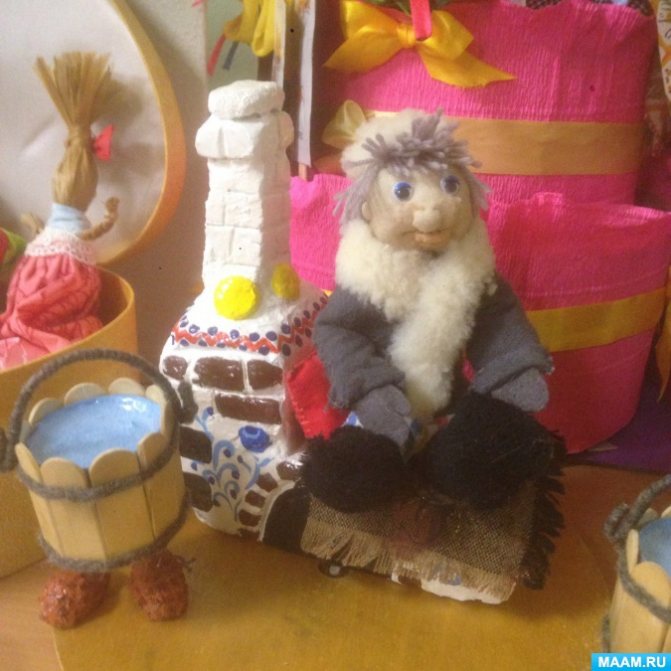
Assembling a bench for a stove for a mini museum of folk dolls and folk life Russian hut.
We cut out the details from three types of cardboard. The first four parts are made of thin white cardboard, which is included in the cardboard set for children's creativity or sold separately. In the diagram, fold lines are marked in red. Along these lines from the seamy side, you need to draw something solid. For example, draw lines with a ballpoint pen with pressure (of course, with a ruler).
Sheet 1 Parts made of white cardboard. Schematic drawings of the stove for the mini museum of folk dolls and folk life Russian hut.
We suggest that you familiarize yourself with How to wash superglue off your hands - how can you wipe superglue off your skin?
When you redraw the details, please note that our stove can be with a left or right chimney. If you want to get the stove, as in the picture in the post, then the drawing will be the front side for you, and if you want the pipe to be on the other side, then consider that this is the wrong side.
Sheet 2 Parts made of white cardboard. Schematic drawings of the stove for the mini museum of folk dolls and folk life Russian hut.
Parts 5 to 8 must be cut from very thick corrugated cardboard. After all, all these details will be a kind of "shelves" on which we will lay and stick the details. If there is no very thick cardboard (about 0.5 cm thick) at hand, then you can glue two layers of thinner cardboard.
Sheet 3 Details of thick corrugated cardboard about 0.5 cm thick. Schematic drawings of a stove for a mini museum of folk dolls and folk life Russian hut.
And the last parts 9 through 15 can be made from thinner corrugated cardboard or from hard pressed cardboard (shoebox, back hard cover from watercolor block of paper, etc.). Most of these details are reinforcing. The thickness of the corrugated cardboard is about 0.2 cm, and the pressed cardboard can be thinner. The main thing is that it is tough.

Sheet 4 Details made of cardboard with a thickness of about 0.2 cm. Schematic drawings of the stove for the mini museum of folk dolls and folk life Russian hut.
Having cut out all the details, we can start assembling.
In order to make a bench for the stove, we glue part 8 along the entire stove, and part 9 on top of it.
Then we glue the part on top 16. You can make an arbitrary bevel of the bench, round off the corners, etc.
It remains to paint the soldering bench - and our oven for the mini museum of folk dolls and folk life is ready.
We suggest that you familiarize yourself with How to build a cattle shed with your own hands with minimal costs
How to make a working oven with your own hands is the easiest way
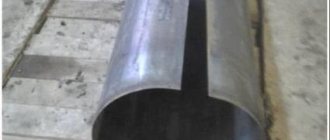
In order to independently make a stove for a garage, which will consume used car oil as fuel, you need to find an old gas cylinder. Before you start cutting it, you need to release all the residual gas and drain the condensate. After that, the balloon is rinsed with water to exclude even the very possibility of ignition. To disassemble the cylinder, you need to release the gas from it by pressing the valve.

An example of a homemade stove made from a gas cylinder
After the gas is completely drained, the valve must be unscrewed. If this is not possible, then you will have to drill a small hole with a diameter of 10 mm in the bottom of the cylinder. To do this, we take a drill and drill in the center of the bottom, without pressing hard, so as not to get sparks. To be sure, we constantly water the drilling site with water. As soon as the hole is ready, ordinary water is poured into the cylinder and rinsed. Then the water is drained and the places of the cuts on the cylinder are marked.
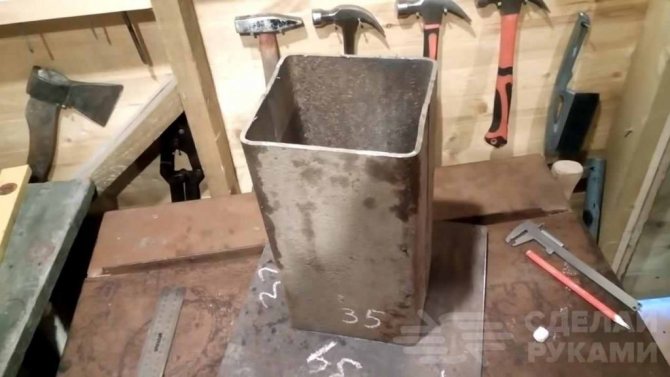
When making a do-it-yourself furnace from a gas cylinder, the drawing of which was presented earlier, it is necessary to cut off the lower part. Its height is 20 cm. Legs are welded to it, which can be adjusted for ease of installation on any surface.
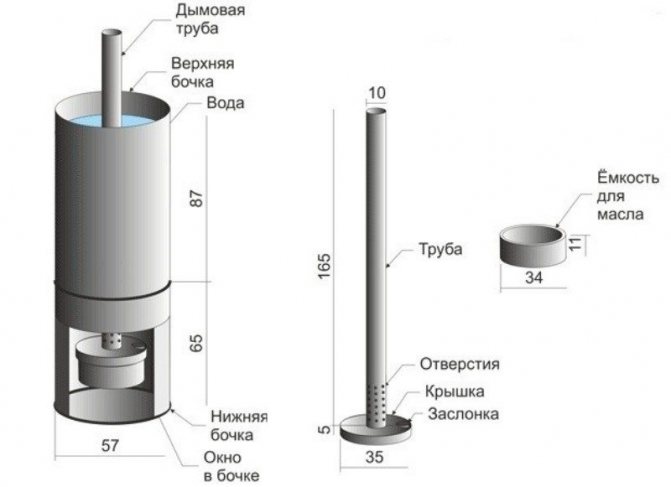
Mounting dimensions of the furnace from a barrel for DIY creation
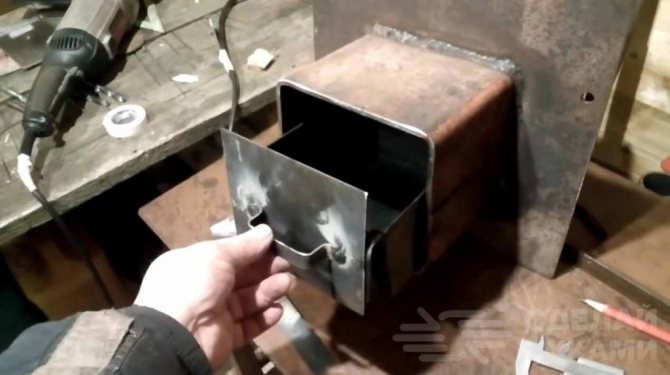
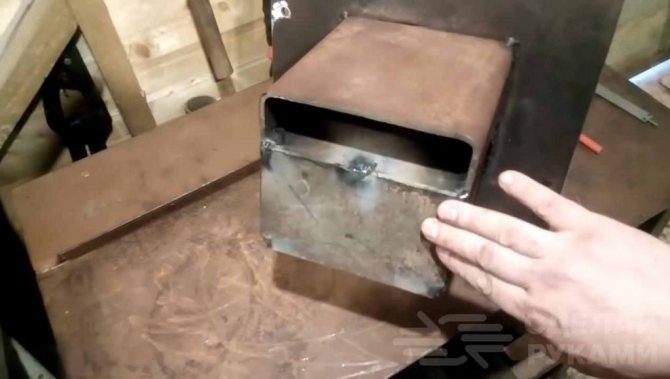
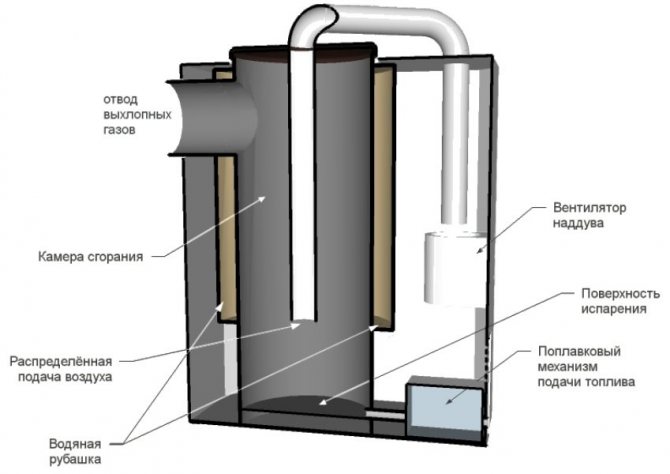
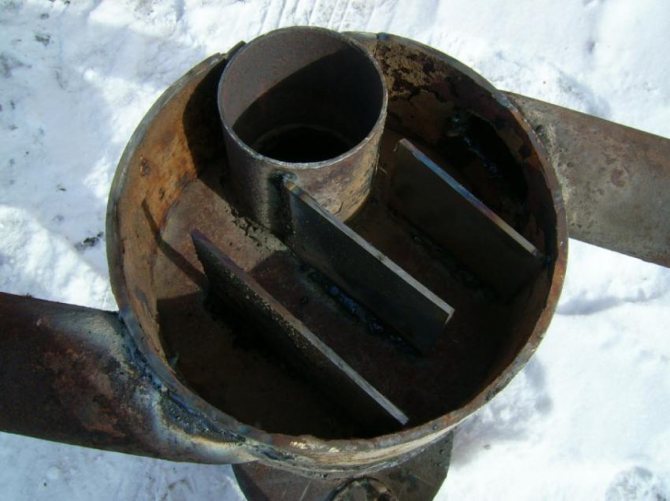
A primary combustion chamber is made from the bottom. Waste oil will be poured into it, which in the process of controlled combustion will be heated and decomposed into volatile fractions. The top of this chamber is closed with a 4 mm thick round steel lid. It must be easily removed if necessary, since the inner surface of the chamber needs to be thoroughly cleaned from slags every week.
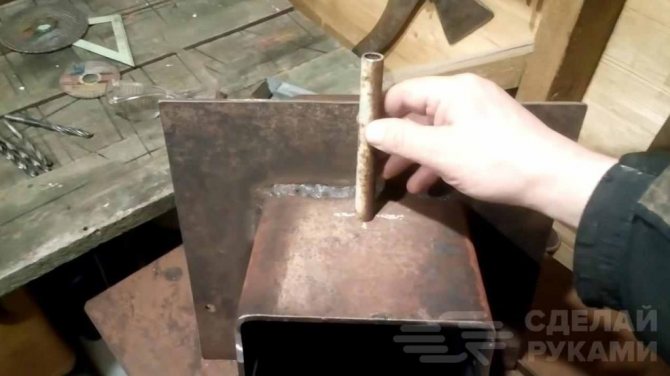
A hole with a diameter of 10-15 cm is cut in the middle of the lid. A 50 cm long pipe is welded onto it, in which a set of 10 mm is drilled. holes. The pipe must be thick-walled, at least 4 mm. In the same lid, a hole is made on the side of a smaller one, up to 5 cm in diameter. A small tube with a shutter is inserted into it. It plays the role of a filler neck for oil filling and a throttle to control the flow of the air mixture into the furnace.
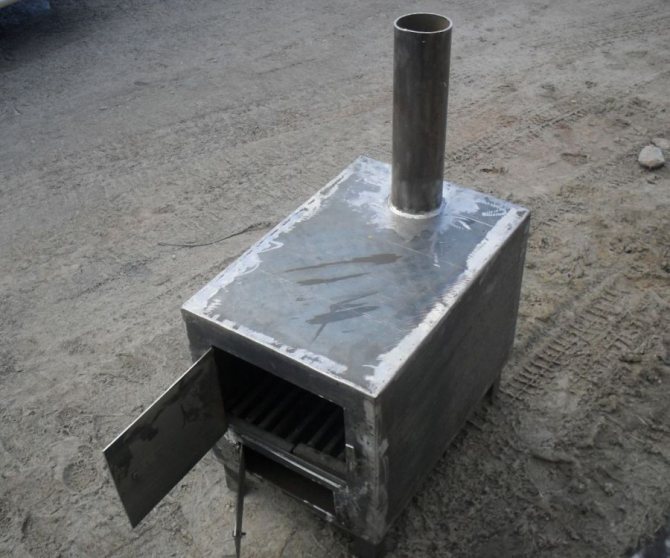
Working furnace welded from sheet metal
Since a self-created furnace for working off needs to remove smoke without exhausting fire, another chamber is made from the top of the cylinder, in which the exhaust gases cool before flying into the pipe. There is a baffle inside this chamber to prevent direct fire from entering the exhaust pipe. The incandescent gases have time to completely burn out in this chamber while they bend around this partition.
Making a furnace for working out with your own hands
This oven works as follows. Through the hole in the combustion chamber, waste oil is poured into two-thirds of its volume. There it is set on fire. When the combustion intensifies, the damper is closed. This ensures more economical oil consumption and complete burnout. When heated, the fractions that are not immediately burnt rise into a perforated pipe, where they come into contact with air, after which they ignite and burn, releasing heat in large quantities. The exhaust gases enter the upper chamber, where they are finally burned out and exhausted into the pipe.
So from a conventional gas cylinder, you can make a working furnace.A drawing with all the details and their dimensions can be seen in the photo.
The main stages of work
Then the pipe is inserted into the cut-out hole, and the base itself must be raised to a height of 20 cm from the lower edge of the pipe (only 15 cm of the combustion chamber should protrude above the base).
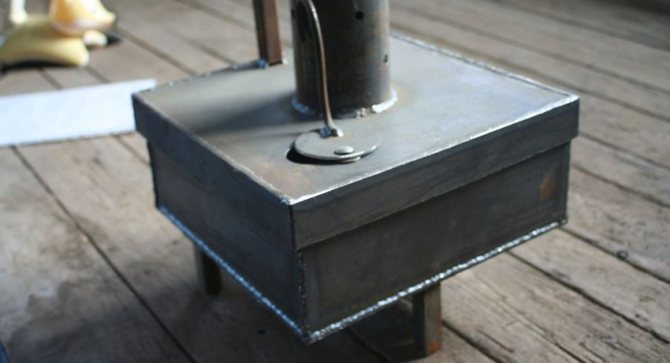
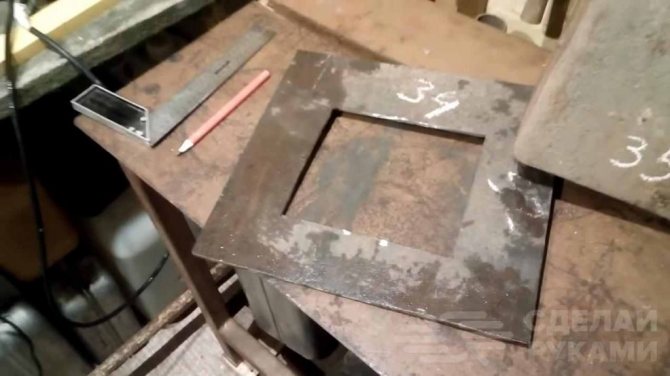
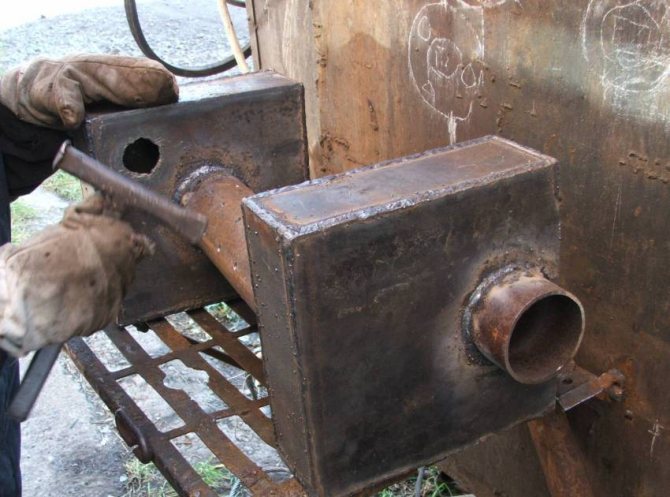
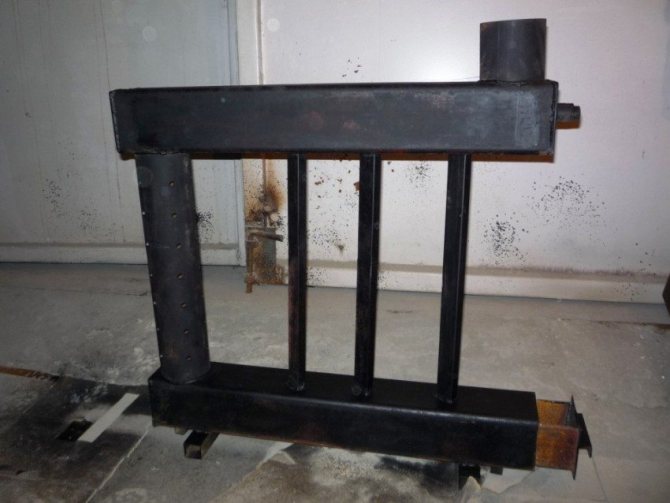
For the internal partition of the firebox, you need to cut out a workpiece from metal with a thickness of 5 mm (dimensions 16.5 * 20 mm). The partition will need to be welded to the walls of the square pipe from the inside.

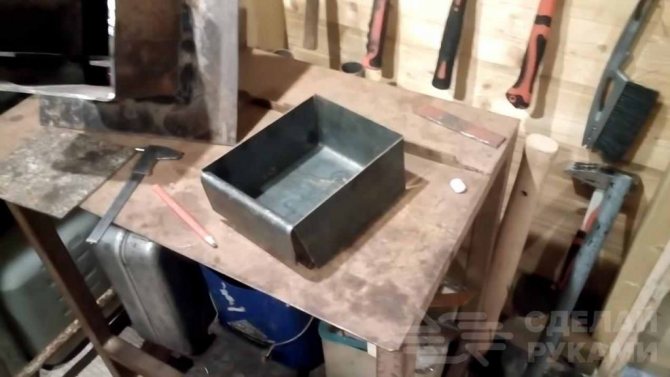
For the burner itself, it is best to use sheet steel 2 mm thick (workpiece dimensions - 163 * 440 mm). Then the central plate of the firebox and the sides are cut out. Next, we weld all these blanks to make a box. This will be the burner.
The use of capillary technology in the manufacture of the furnace
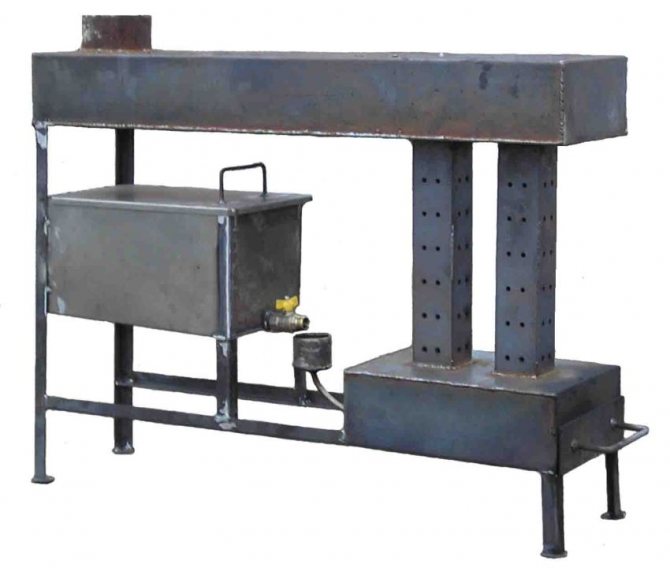
In addition to the simplest method of manufacturing an oil oven described above, more advanced versions are also used. One of them is a working capillary furnace. It is also within the power of anyone who knows how to handle metal and tools to make it with their own hands.
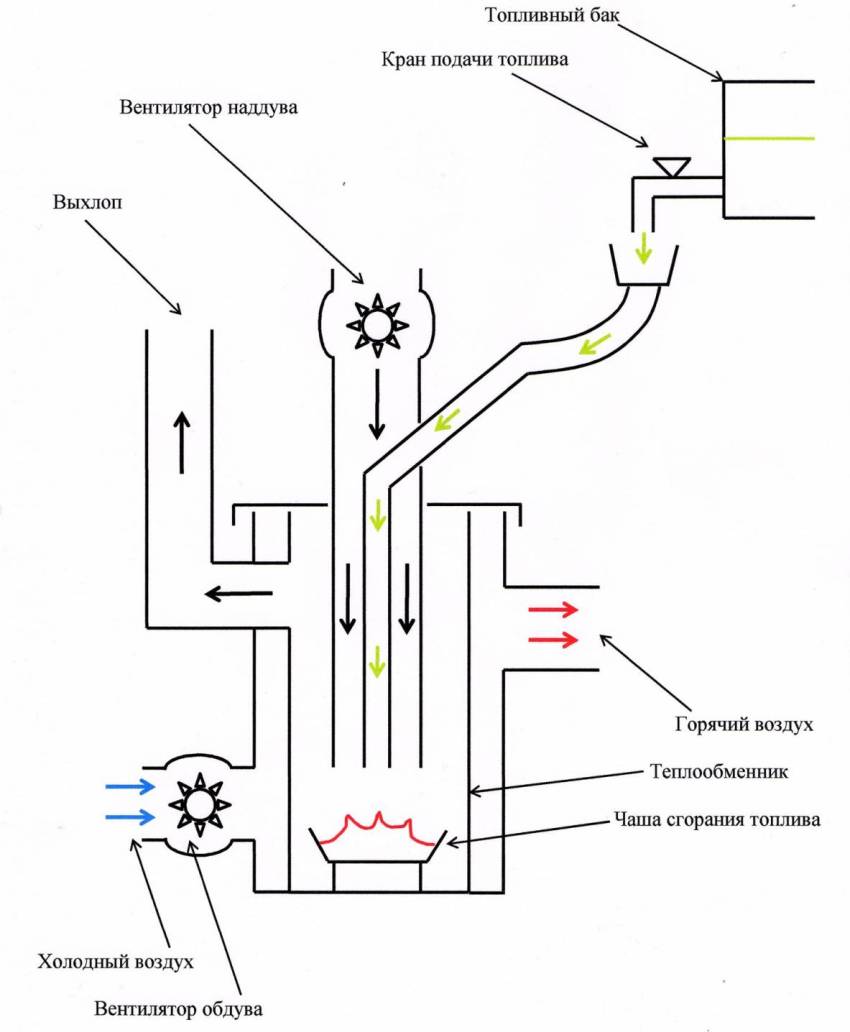
Oil in this design is not just poured into the combustion chamber, where it is in large quantities, but it is done gradually by means of a drip system. This method allows the oil to burn out with greater efficiency, and its consumption is reduced to a minimum. Separately from the furnace, an oil tank is installed in the upper part, which is connected to the furnace combustion chamber by a branch pipe. An adjusting valve is installed in the branch pipe, with the help of which the flow of oil into the furnace is dosed. Otherwise, the design is no different from the simplest furnace for working out. With your own hands, the drawings presented below will help you make such a unit without difficulty.
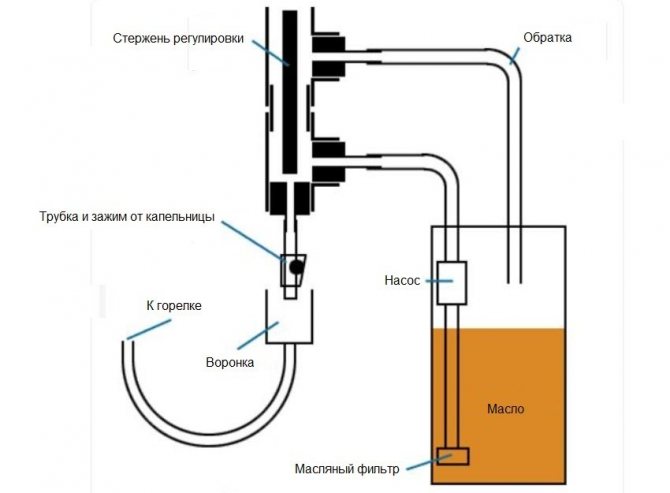
Drip fuel flow diagram for a homemade stove
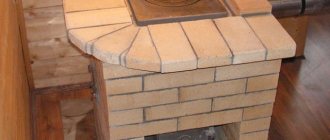
How to make a stove yourself?
All designs of stoves that are installed today by summer residents differ in several ways: material, type of fuel and installation technology.
According to the purpose, there are heating devices in the form of fireplaces, heating and cooking, special and those that are used only for heating. As for the resources used, there are gas convection ovens for summer cottages, wood-burning ones. There are also models that run on coal, peat, and pellets.
Manufacturing technology assumes the presence of masonry structures and those that are installed already in a finished, assembled form. There are metal and brick ovens depending on the material. If it comes to how to make a stove for a summer residence with your own hands, they usually mean brick options. Although some people create appliances from steel and other materials.
Making a brick stove
Consider how to make a small brick oven for a summer residence, which will take up little space and work efficiently. Minimum requirements are imposed on such devices. It is hardly possible to build a multifunctional and highly efficient furnace without building experience. But it will be easy to make a simple, small structure.
This will require the following materials:
- Refractory, solid ceramic bricks. It must be strong and have smooth edges. If the stove will not be used intensively and for a long time, ordinary material will do. Before laying, the brick is soaked in water for about 8 hours. This is necessary in order for the solution to be taken well.
- Furnace door.
- The grate of the grate.
- Gate valve.
- Blower door.
- Doors of channels for cleaning the system from soot.
- Clay, clean sea or river sand for mortar.
A long-burning stove is being made for heating a summer cottage according to the following algorithm:
- A reliable foundation is selected.
- A waterproofing layer is laid out.
- Above - a metal sheet.
- Then the brick is laid on the clay mortar. In this case, the thickness of the layer should not be more than 5 millimeters. Masonry is made according to special drawings, which are freely available on the Internet.
- The doors of the combustion chamber and the blower are fastened with steel wire, which is subsequently walled up in the masonry.
If the brick subsided during laying, it is removed and a new one is laid. Otherwise, the stove will let through soot and smoke heavily. It is forbidden to move the material along the clay solution. It is important to make the inner walls as smooth as possible. There is nothing complicated in the construction of a brick structure. But here you need to be extremely careful and attentive. The result is a heating and cooking stove for giving in one form.
Despite the simplicity and small size, brick units are very popular among summer residents. After all, such a stove heats up quickly. And her warmth is enough for a day. Moreover, the cost of its construction is low.
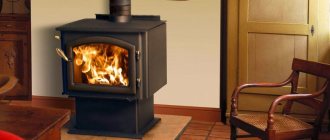
Making a stove from metal
Craftsmen often build iron stoves for summer cottages, which have some advantages over brick options.
For example, higher efficiency, low cost, light weight, high strength. However, there are also some downsides. These include a limited service life, an increased level of danger, rapid cooling after stopping the furnace.
A metal product for heating a house is known to many under the name of a potbelly stove. With your own hands, a compact stove for a summer residence is created quite simply. The design can be simple and complex. To understand which type is more suitable, from which you can create a device, you should consider several options for stoves.
Usually a long-burning iron stove is made for giving from thick-walled metal containers. For example, an old gas cylinder, a two-hundred-liter tin can is suitable. Or you can just take metal sheets 3-5 millimeters thick.
The simplest potbelly stove can be easily made from a metal barrel by welding the legs to it. A rectangular hole is cut on one side. The cut-out element is installed on the hinges - it turns out the firebox door. They also make a round hole to which the chimney pipe is welded. A grate is placed at the bottom of the structure, which will protect the metal from burning out and allow the stove to retain heat for as long as possible.
A thick steel wire should be welded on top of the barrel. This is necessary in order to be able to put a kettle or a saucepan. It turns out to be a good hob. Such an oven for a pizza dacha will do quite well.
A more complex design is a vertical structure made of a pipe or barrel. However, the efficiency of such a unit will be an order of magnitude higher. The algorithm is as follows. In the container, cuts are made and areas are taken out that will become doors for the firebox and blower. The hinges are welded and the shutters are hung on them. Stands are installed inside the barrel. Legs are welded from below. A chimney is also made. It turns out a pretty good option for a summer residence.
Making a gas stove
If you want to use a high-quality, economical furnace with a high level of efficiency, you should pay attention to gas installations. They are made of stone or metal. Iron ones are easier to lift, they quickly heat the room. A gas stove is being created for giving from scrap materials. For example, a regular high-strength gas cylinder will do. A brake disc is placed in the base and welded. You will also need 3 pipes. One is used to make a chimney. The second serves for gas supply, and the third will act as an air duct.
The gas cylinder is cut off from above. The diameter of the hole should be equal to the diameter of the brake disc. About 10 small holes are drilled in the gas pipe, air duct. In the lower part, holes are made into which the pipes will enter. All parts are connected by hot welding. After that, the oven is painted.
Organization of additional features of the waste oil furnace
When making a homemade stove that runs on waste oil, you can use electric fans. With the help of them, you can not only inject air mass into the combustion chamber, but also remove hot air from the furnace, creating artificial circulation in the room, which will significantly speed up the process of heating it to the desired temperature. For this, a casing is mounted around the main chamber, in which an air flow is created using a fan. You can see the work of such a do-it-yourself furnace for testing live. The video of the entire combustion process is very interesting and visual.
Another improvement is the manufacture of a water circuit for a homemade oil stove. The pipe coil is placed inside the secondary combustion chamber, where the highest temperature is observed. Or it is screwed on from the outside onto a perforated pipe. The coil is connected to the flow and return pipes of the heating system. When the liquid is heated, its natural circulation occurs in all batteries. You can make such a furnace for working out with your own hands, the video of which well reflects its effectiveness, in one day.
More complex design of a working furnace with a water circuit and a blower fan
What types of ovens can you make yourself from improvised means?
There are heat storage ovens for summer cottages and convection ovens. The first ones are thick. Thanks to this, the device perfectly accumulates heat. If you thoroughly heat such a stove, it will heat the room for 12 hours. Of the shortcomings, it is worth mentioning that it takes a long time to warm up such units. And the thicker the walls, the slower the device will warm up. However, the heat-saving indicators will be higher.
Convection, unlike heat storage options, are capable of heating several rooms at once. Moreover, the warmth in the house becomes almost immediately after the start of the system. Among the shortcomings of such an installation is inertia. After all, convection appliances cool down very quickly. Both varieties can be easily made by hand. You can read the article: How to make do-it-yourself drip irrigation from pipes and plastic bottles?
Advantages and Disadvantages of Oil Furnaces
Like all homemade designs, oil ovens have the main advantage - they are cheap. They can be made from old parts that have been lying around for a long time in the corner of the garage, waiting for their use. The second advantage of these devices is the fact that they actually run on cheap, unnecessary fuel, which is not difficult to obtain. These ovens are able to heat up a small room very quickly, as they use an open fire.
Waste Oil Furnace Chamber - Inside View
Moving on to the disadvantages, it should be said that such self-made structures do not pretend to be permanent and main sources of energy. They only help to warm the utility rooms. So, we list all the disadvantages of oil ovens:
- inability to use inside residential premises;
- an increase in the size of the combustion chamber does not lead to an increase in the power of the device, since the efficiency decreases;
- you cannot extinguish the stove with a fire extinguisher with powder, since the mixture simply explodes from the red-hot parts of the stove;
- it is impossible to accurately regulate the intensity of heat transfer;
- there is a risk of explosion when mining boils.
An example of a working furnace that you can do yourself
Creating a furnace for testing with our own hands, we ask ourselves where to get fuel for it. This question can be solved in the simplest way. You just need to negotiate with the owner of one of the car services located near your home. Perhaps he will be happy to sell you this fuel that is valuable to you, but has no practical benefit for him at a low price.
This can lead to consequences, the losses from which will probably outweigh all the benefits of such a furnace.
How to properly equip a brick screen
The brick screen is laid at a distance of 10-15 cm from the oven walls, ventilation holes are arranged in the upper and lower parts of the screen. When the unit heats up, warm air between the masonry and the walls of the furnace rushes upward, quickly warming up the room. At the same time, the cold air that replaced it cools the metal walls of the device, preventing their rapid burnout.
A properly equipped brick screen completely solves the problem of rapid cooling of the stove-stove. The brick perfectly accumulates the heat radiation of the stove, subsequently evenly transferring it into the air space of the heated room.
Note
After completion of the firebox, the brick screen will heat the room for a long time.
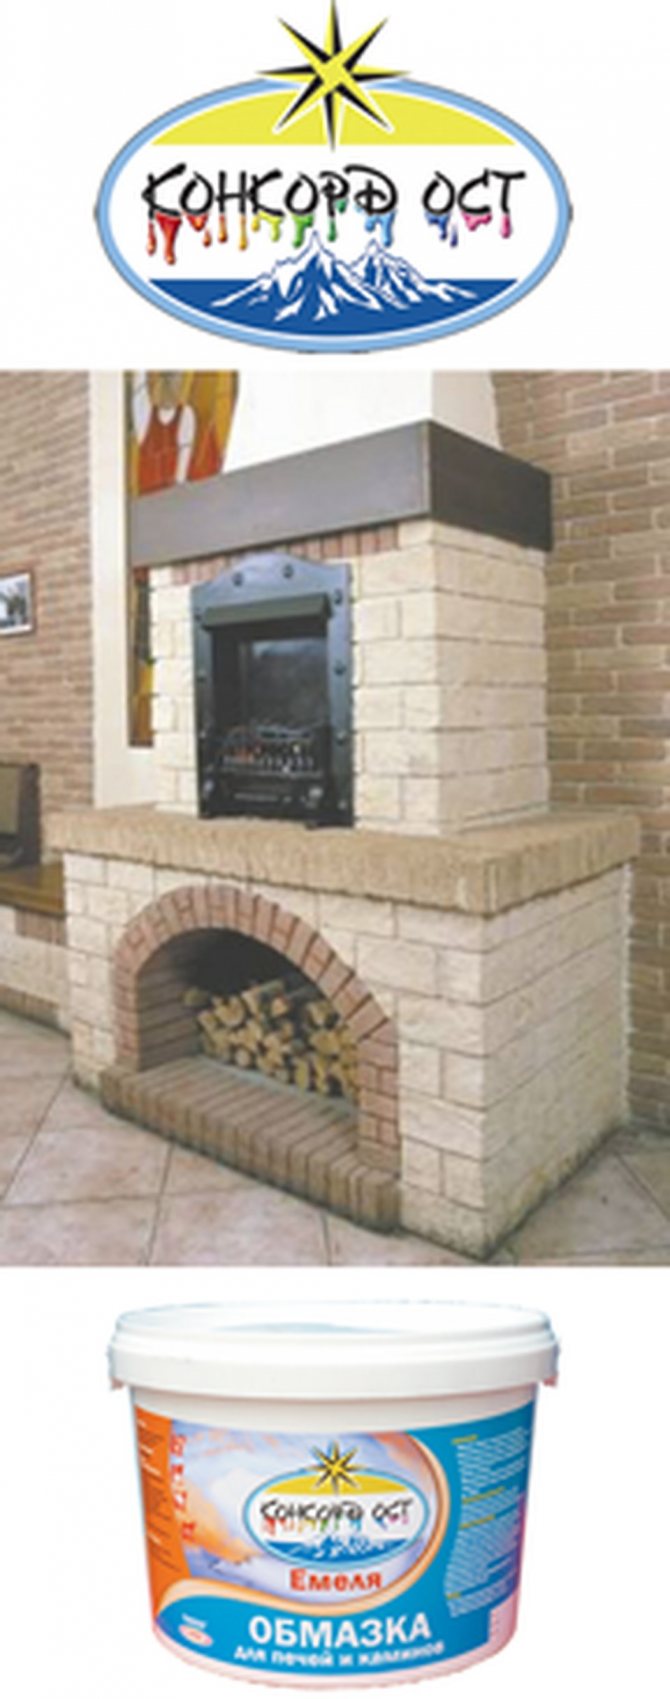
"Emelya" - for the repair and decoration of stoves and fireplaces
A friend bought a house. A real country house with two stoves. One of them - the so-called Russian - large, with a stove bench, was laid out in the kitchen. “Here I will cook real Russian cabbage soup!” - said a friend optimistically, picking off a piece of old plaster that has turned yellow with time with her fingernail.
Another stove, exclusively for heating, was in the bedroom. It was much smaller than the Russian one and just looked like a narrow post with a "mink" for fire. And it looked just awful - it was never whitewashed at all, and the unevenly protruding chipped bricks evoked thoughts of devastation.
But as soon as we tried to start a fire, both stoves began to smoke godlessly. I had to urgently evacuate. And then we seriously thought about urgent repairs. And to begin with, we turned on the laptop and found several suitable forums where people discussed similar problems.
At first everything seemed very complicated. I quickly realized that repairing, decorating and finishing ovens is a very demanding and time-consuming business. After all, expansion and heating always stand in the way of the master in the production of furnace finishing works. What kind of material can withstand such torture? It is not surprising that the village grandmothers in old films constantly tinted, greased and plastered their stoves with a solution of lime.
However, now is a completely different time, and the quality characteristics of materials have certainly changed a lot for the better. And the main thing here is not to make a mistake, to choose the right material correctly. Following the advice of experienced members of the forum, a friend bought a coating for the Emelya ovens.
Produced by Emelya, a domestic manufacturer of paints and varnishes and building materials, which has been successfully operating since 2000. According to the Internet, "Concord Ost" is engaged in the production of paints and varnishes and finishing materials on a water basis - paints, ready-made fillers (based on PVA, oil-glue, latex, acrylic), primers, PVA and Bustilat adhesives, heat-resistant coating for stoves and fireplaces and other materials required for construction, repair and garden work. As follows from the reviews on specialized forums, Concord OST putties meet the highest quality standards, are simple and convenient to work with, and are able to compete with leading Russian manufacturers of dry and ready-made building mixtures. And in the future - the production of fire retardant impregnations and paints for metal and wood. As for the Emelya coating itself, this is also an exclusive author's development of the company's specialists, created specifically for the repair of stoves and fireplaces. The company itself is located in the Moscow region, but we also have its sales representative in Yaroslavl - the materials are sold by Concord OST. And in the future there will be more such sales representatives - "Concord OST" is dynamically developing and looking for new partners.
And here we are again in the village. In a plastic bucket with a volume of one and a half liters, there was a beige homogeneous viscous mass with a faint odor.As promised by the Internet and the sales consultant, it is intended just for the coating (putty) of stoves, fireplaces, stove pipes, as well as facing with tiles, bricks and - most importantly for us - for sealing cracks. The coating has a very high temperature resistance, up to plus 900 degrees. And at the same time it has no domestic analogues. That is, abroad, of course, such coatings are produced, but you yourself understand that they are already much more expensive.
But, as they say, trying is not torture. We started to repair the stoves. We started with the bedroom. Thoroughly cleaned the bricks from dirt and dust and mixed the paste in a bucket. Then I straight with a finger - a blonde, why take from me! - I covered up wide cracks and crevices, and my friend applied a layer of coating 6-7 millimeters thick with a spatula on the brick and my art on the entire surface of the furnace.
After finishing the work, we left the oven to dry for two hours and did all the same operations in the kitchen. After two hours, the ovens were properly heated so that the coating would bake. Done! Now the stove does not smoke and looks decent, and mold with fungus is not afraid of it.
"And now we will make beauty!" - said the friend. We decorated the Russian stove with the same plaster and patterned roller for liquid wallpaper, and then heated it again so that the coating would set. It turned out just great! And they did not touch the stove in the bedroom. We want to lay it out with ceramic tiles, and we will fix them using the same heat-resistant coating for ovens.
They say it's not that easy. But now we know that Emelya can handle everything!
Retail - Yaroslavl, Vspolinskoe field, 12 Shop "Octopus", 32-85-83, 73-18-33.
Opt. - Moscow region, Lytkarino, Turaevo industrial zone, building 5.b, 552-34-27,970-09-15,970-04-78
Advertising