31.08.2014
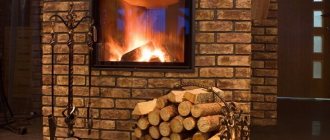
Owning your own home and a spacious plot around it, you can think about a place to relax and equip a barbecue on it with your own hands. This multifunctional and comfortable design will not only be useful, but will also be a great addition to the landscape.
There are a lot of options for the structures being built, the choice between which depends on the following two factors:
- Financial opportunities - the more functional and massive the barbecue oven is, the more high-quality building materials it needs
- Who exactly will do the work - it will be more difficult for a simple amateur owner to build a complex and multifunctional structure in a short time than for a professional craftsman
Options for making and laying a barbecue oven:
Click on the image to enlarge
- 1 Preparation for work 1.1 Choosing a design
- 1.2 Choosing a convenient location
- 6.1 Finishing work
Preparation for work
A barbecue is a stove that is placed outdoors and used for cooking. Despite the wide variety of models, they have the same principle of operation. Combining with other ovens, you can build a structure used not only for frying kebabs on a skewer, but also in a frying pan, for cooking, etc.
The preparatory stage of the work can be divided into three parts:
- Choice of design
- Choosing a convenient location
- Purchase of materials and preparation of working tools


Purchase of materials and preparation of working tools
You can lay out a barbecue oven with your own hands from fireclay and ceramic bricks. If they are combined with each other, you should pay attention to the difference in thermal expansion, erecting sections that are isolated from each other or equipping expansion joints.
The classic solution for ovens is sandy-clay. A cement-based mass will not withstand sudden temperature changes and will begin to crack. The ratio of sand and clay is different and depends on the quality and properties of the latter component. The most common mixture:
- 1-2 parts of sand
- 1 part clay
- 0.25-0.3 parts of water
In addition to the basic building materials, work will require: cement and roofing material for the construction of the foundation, large stones, a board for formwork, metal, working tools.
Getting Started
It is not difficult to build a barbecue oven with your own hands from bricks. The entire workflow is divided into three stages:
- Preparation of a drawing, sketch and calculation of the required building material, shopping for everything you need
- Erecting a foundation that can support the weight of the future barbecue
- Brickwork
Having completed the work, you can think about reliably protecting the structure from the vagaries of nature by building a small canopy.
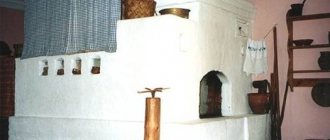
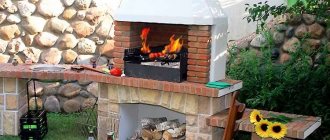
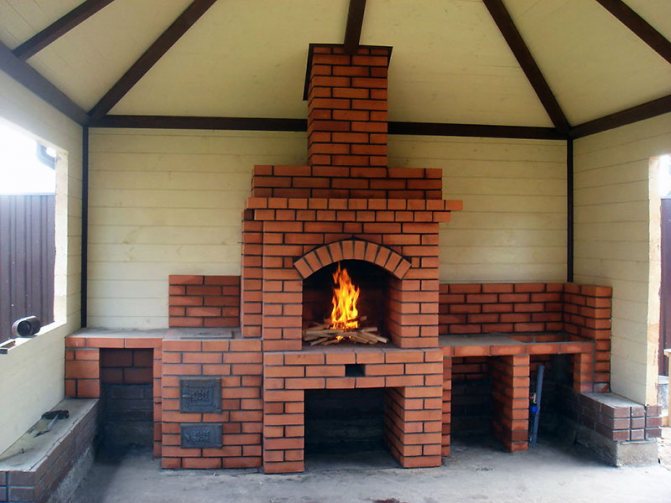
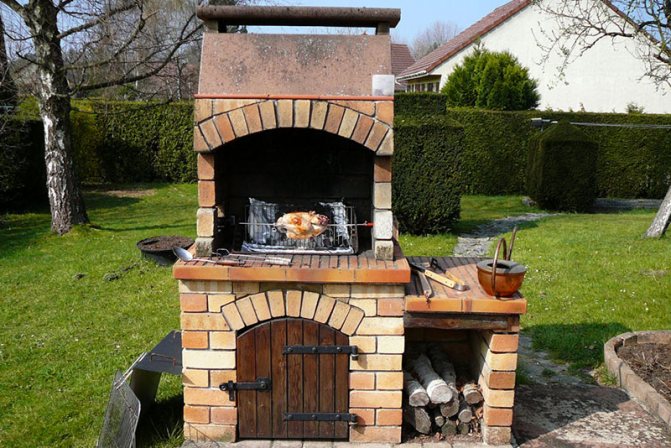
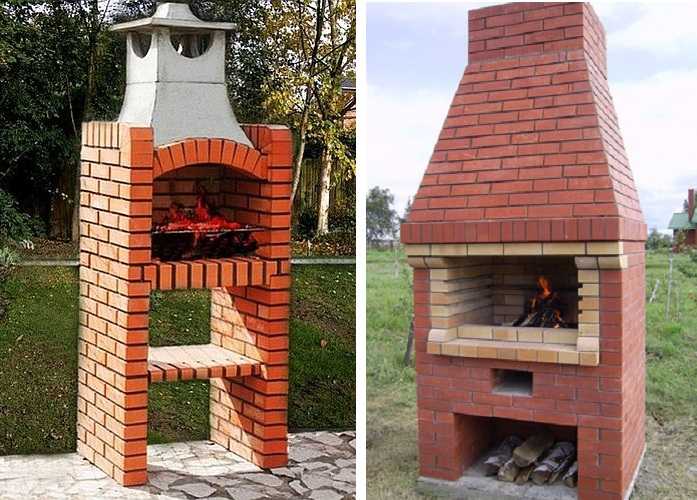
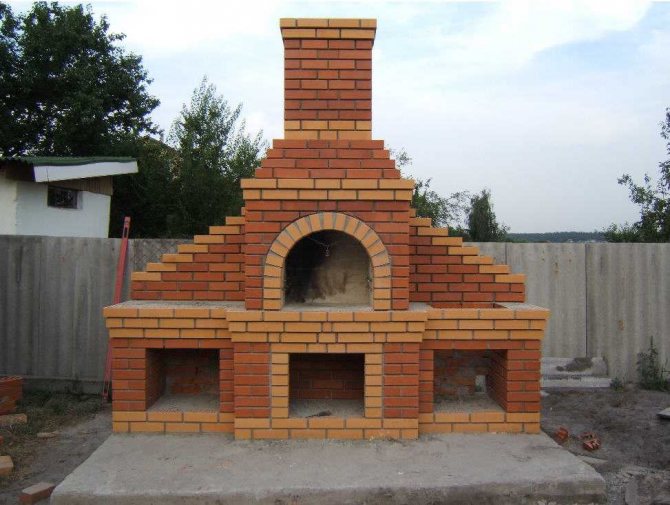
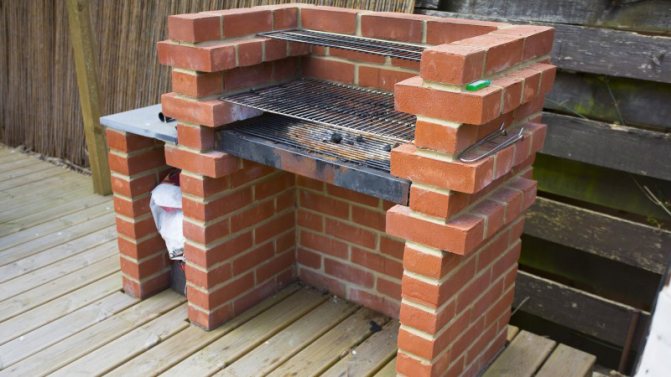
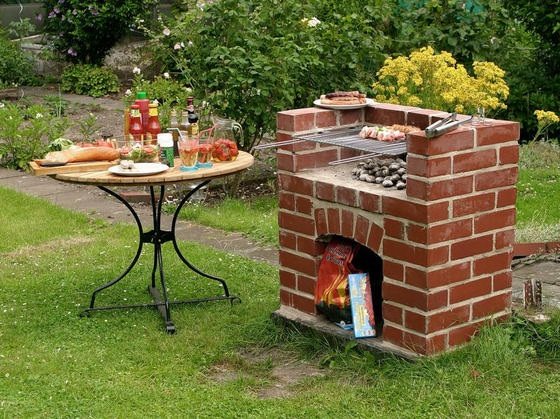
Photo of a brick barbecue
At first, a few simpler options. You can make these brick barbecues yourself.
You can build this brazier oven with your own hands.
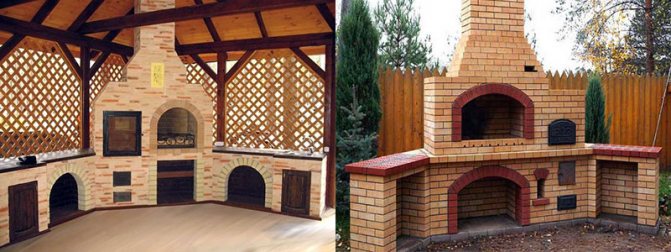
Simple options for a brick barbecue
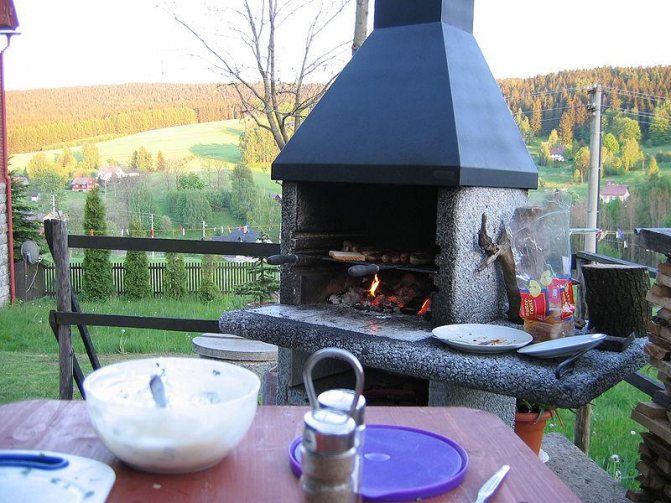
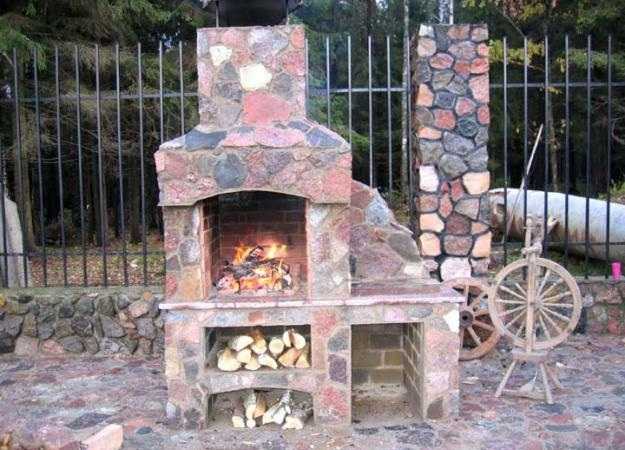
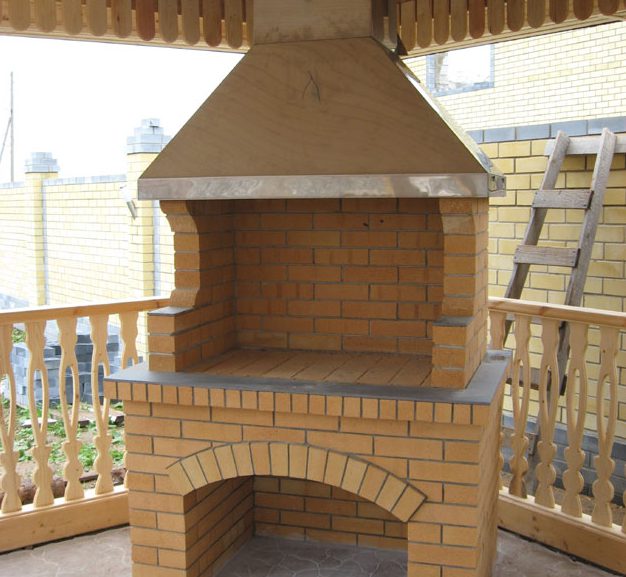
Slightly more difficult, but it's also possible to do it yourself

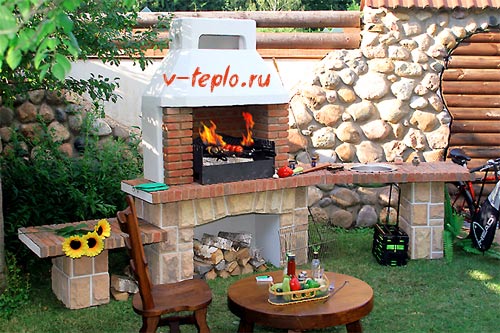
Variations on the same theme - original finish
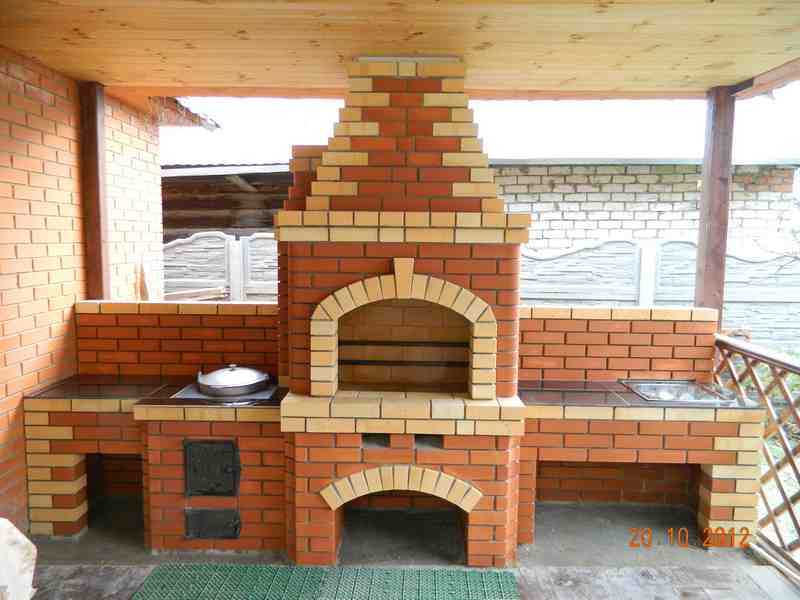
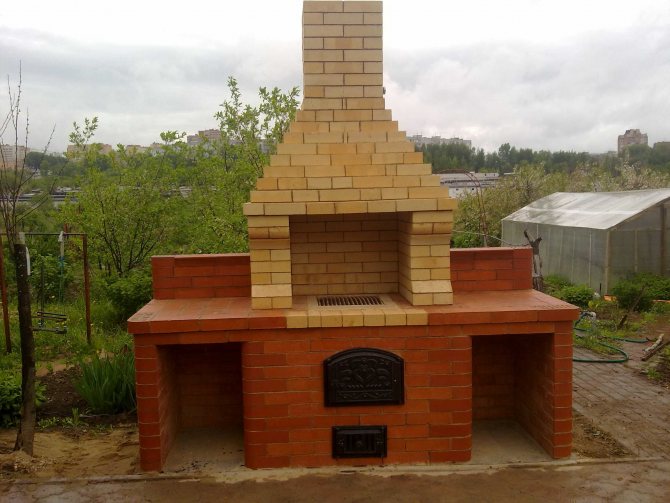
Several barbecues that can be built with some experience, but it is better to entrust it to a specialist (if you find it, of course).
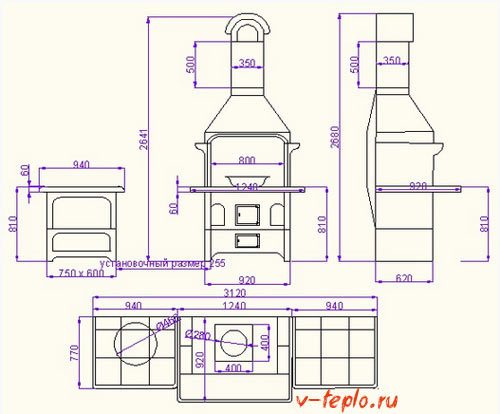
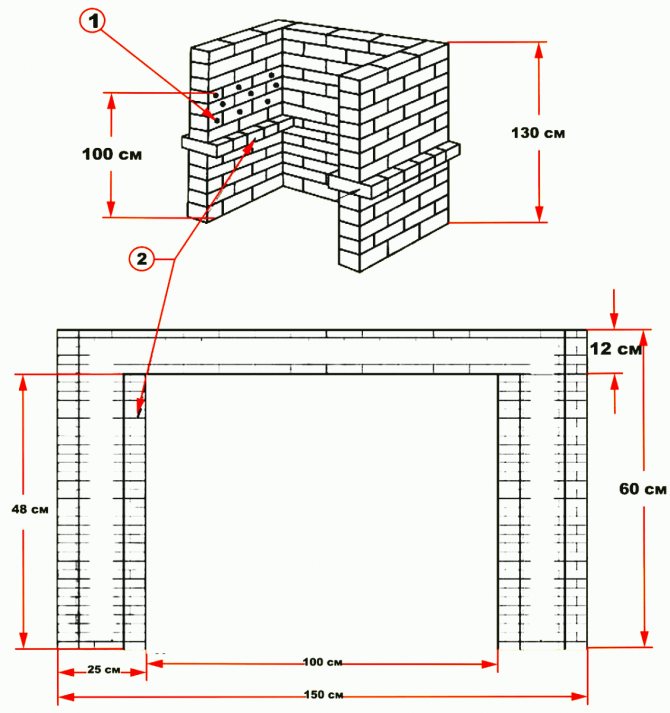
Drawing preparation
The barbecue should be placed on a concrete base. Most designs have at least 2 compartments - a cutting table and a spacious brazier.In the first, it will be possible to embed a sink. The brazier is equipped with a pipe and a vault to keep out smoke.
The drawing must contain each of the dimensions. If something will be corrected, you need to proceed from the dimensions of the purchased bricks (as a rule, 25x12x6 cm).
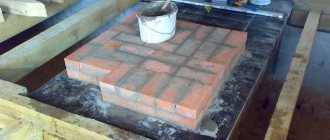
Barbecue oven base
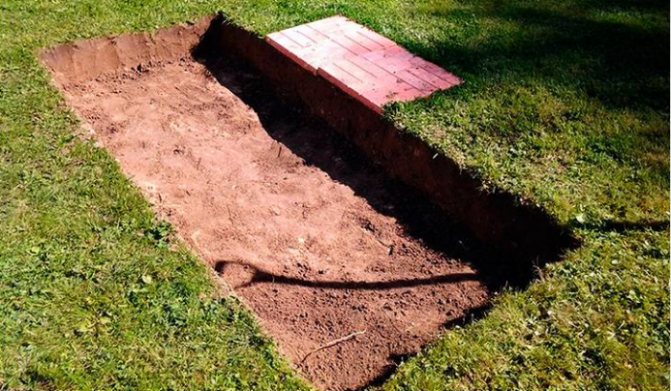
Before equipping the formwork for a barbecue oven with your own hands, you need to prepare the site. The dimensions of the structure are marked with ropes (plus 10-15 cm) and a layer of fertile soils is removed. If there is a wooden gazebo next to it, a concrete base 60-70 cm wide is equipped in front.
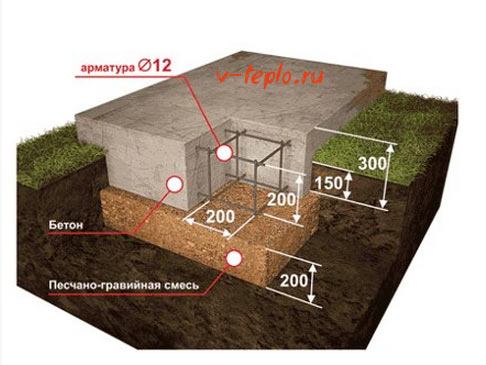
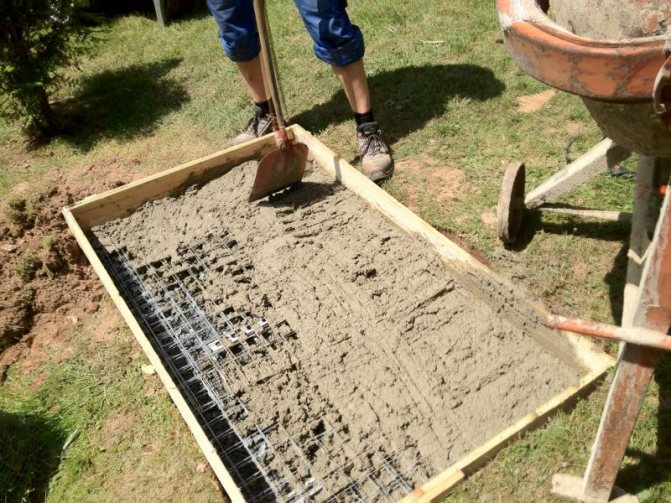
The most optimal base is a reinforced monolithic slab with a thickness of more than 0.3 m. A gravel-crushed stone cushion (10-15 cm) is placed under it and waterproofing is installed (an ordinary roofing material is laid) to prevent deforming effects in winter.
Then the formwork is set up from the boards, which is raised above the ground by about 10-15 cm. If the soil crumbles, it is set to the full depth. After that, a reinforcing cage is made, preferably from metal 10-14 mm. The rods are laid with a lattice with a cell size of 20x20 cm and tied with wire. Two such nets are needed: the first is placed on the bottom, the second - 5 cm below the top of the base.
The solution is prepared from frost-resistant cement grade M200 or higher. Having filled in and tamped with a vibrator, it is necessary to wait until the foundation is completely dry (up to 2-3 weeks). It is covered with foil and sprinkled with water on hot days. You can dismantle the boards after 5-7 days.
You may also be interested in a guide on how to make a brick fireplace on your own.
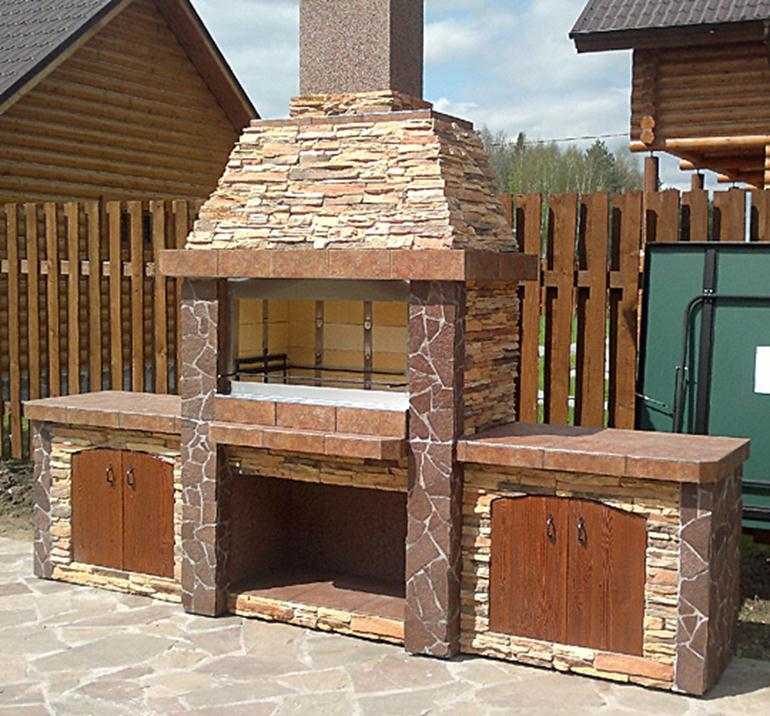
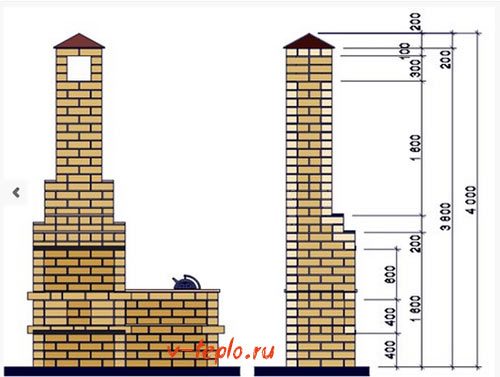
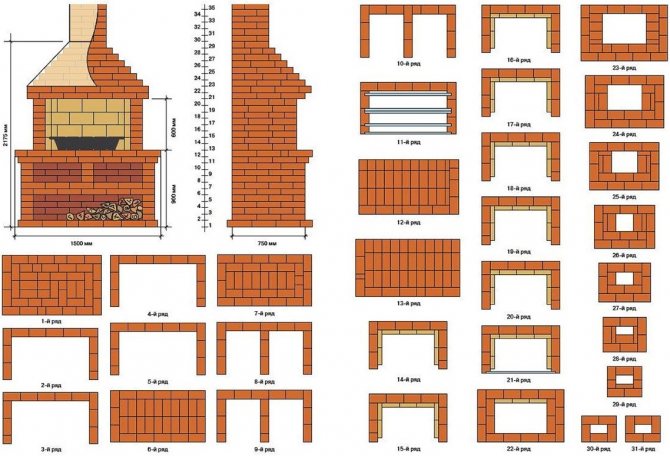
Brick BBQ with chimney: ordering
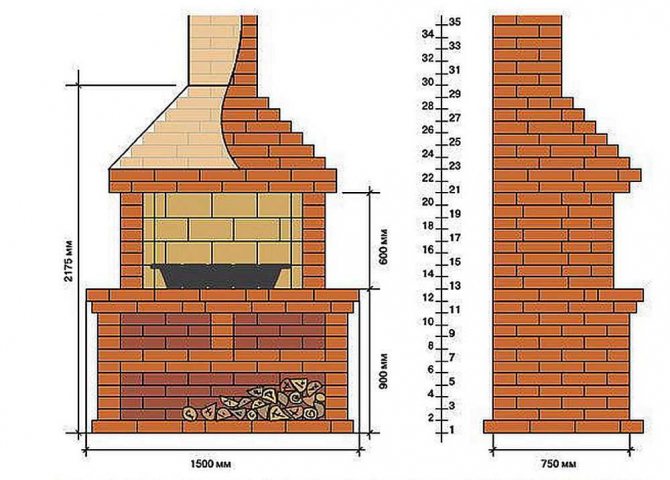
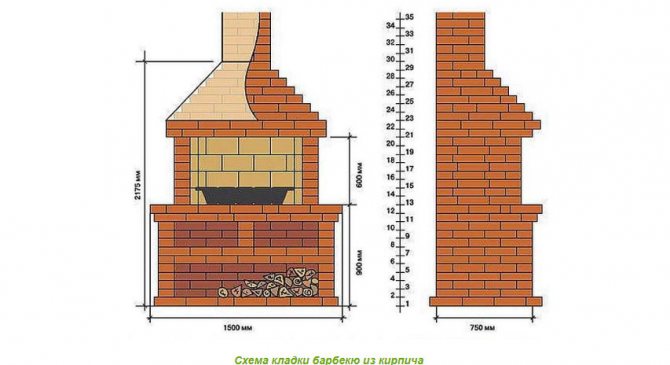
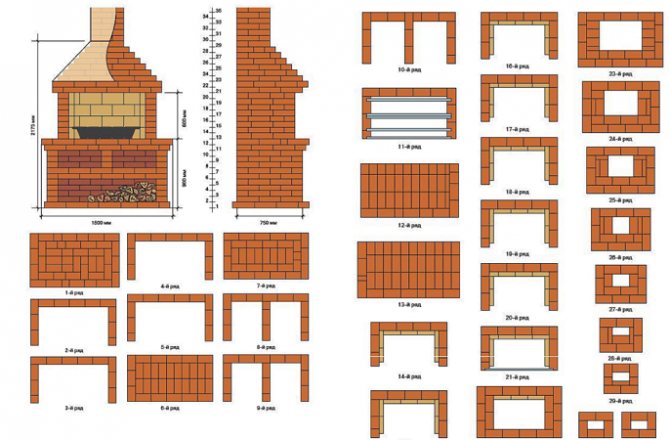
This barbecue option is a little more difficult, but also not the most difficult. The most important thing is that the combustion chamber here has a straight vault, and it is much easier to make it vaulted. The brick frying chamber is raised to a height of 90 cm, the total height - to the beginning of the pipe - 217.5 cm.
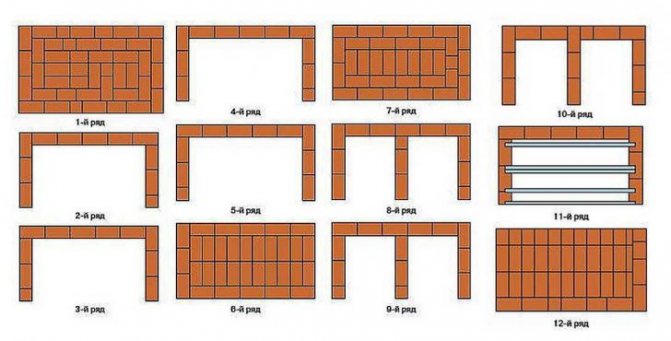
Brick BBQ masonry scheme
It all starts with the preparation of the foundation. For this barbecue oven, only a monolithic reinforced base (reinforcement pitch 15 cm) on a base compacted with rubble is suitable. On the dried foundation, waterproofing is spread in two layers, then laying begins. If barbecuing is done in a gazebo, the first row of masonry should start at floor level. If the foundation turned out lower, lay out an additional row (or two) bricks, and then begin laying according to the given scheme.
Brick BBQ Drawings
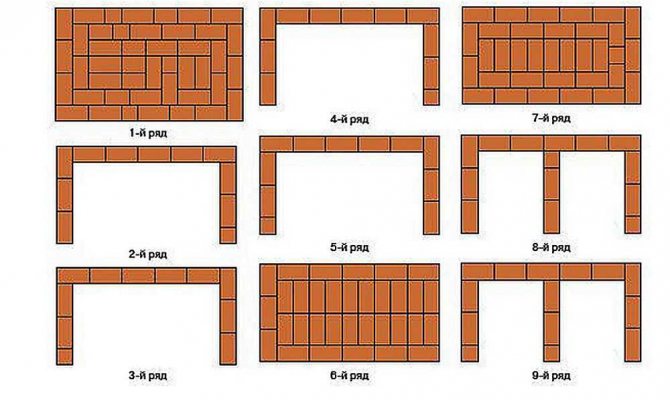
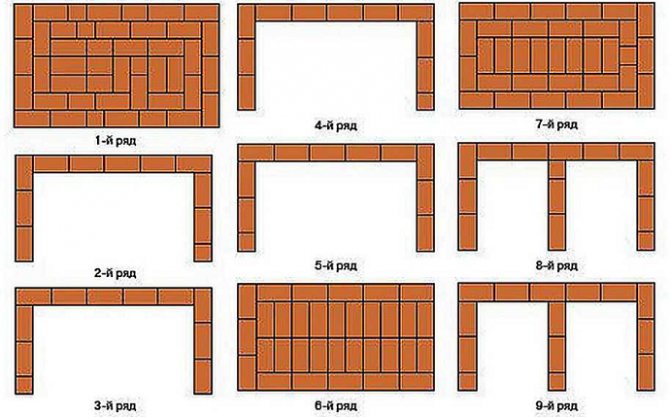
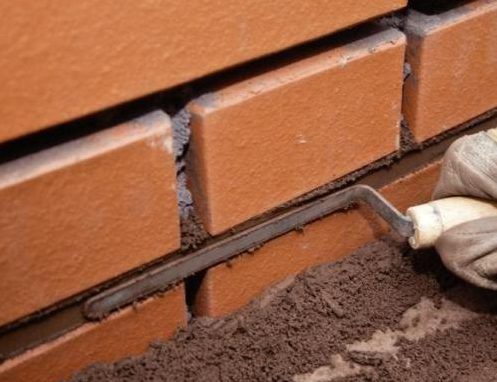
The first 9 rows do not require any special explanation. They are laid exactly according to the scheme, observing the order, using halves and cut bricks, if indicated on the plan. It is imperative to check the verticality of the resulting walls, as well as control the thickness of the mortar - 8-10 mm and the horizontal laying of each brick.
To control the thickness of the seam, you can use a reinforcement bar of the appropriate diameter. It is placed on the edge, the surface of the row is filled with a solution, the excess is cut off with a trowel just above the bar. After laying and tapping the bricks, an even seam is obtained - the bar does not allow the brick to go lower than necessary. The bar is then removed and shifted higher.
To be able to lay the 6th row (solid), after laying the 5th, put a strip of metal 4-5 mm thick, 40 mm wide. Length - slightly less than the furnace span - 1450 mm. Stripes are needed 3 - one on the edge, two approximately in the middle of each row of bricks, or as indicated below (11th row).
Formation of two utility chambers
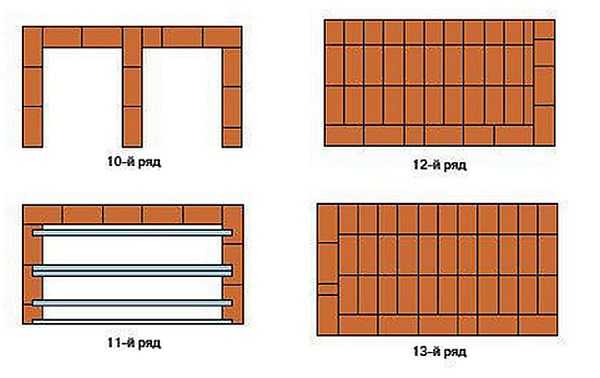
The layout of the next rows of barbecue is clear. Only in the 12th row, pay attention - you need bricks sawn along. It should also be said that the 12th and 13th rows are larger than the lower ones - forming a decorative "belt".
The formation of the combustion chamber begins

Fireclay bricks (ША-8) are marked in light color in these rows. They put it on the same composition of clay and sand (it is possible to add a small proportion of cement).It is better not to use mixtures based on chamotte: they need very high temperatures for sintering, which are unattainable in street barbecues. As a result, this solution may subsequently simply crumble.
Formation of the roof of the combustion chamber

On this part of the order, everything is also clear: we begin to shape the arch of the firebox. It overlaps on the 22nd row in which it gradually tapers.
The transition of the arch into the pipe
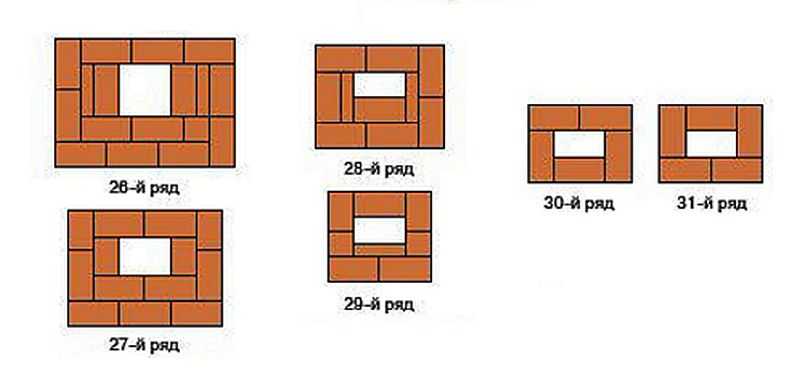
The formation of the vault continues, which in the 30th row passes into the chimney. Next, the 30th and 31st rows alternate until the required height is reached.


Order and layout of masonry
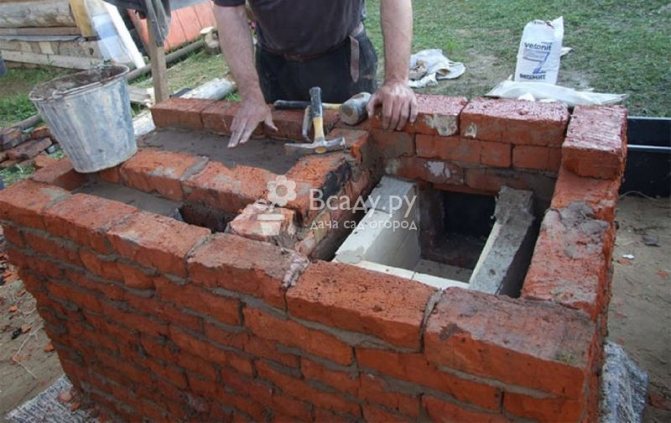
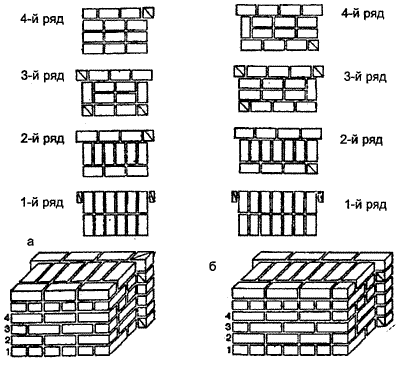
After removing the formwork and waiting for the concrete to get stronger, the most important of the stages comes - laying bricks. Marking is applied on the plate, indicating the dimensions of the future structure. You need to reapply a level and make sure the surface is horizontal. If significant errors are found, they are eliminated.
Rows from the first to the fourth must be laid with a spoon bandage. In front of the fifth row, a 40x40 mm corner is placed on the front side - it will act as a kind of support. To get the bases for the pallet and the shelf, the sides of the fifth row are placed with a butt bandage.
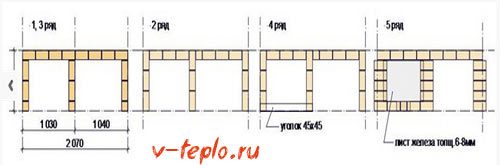
Spoon dressing should be adhered to, laying rows six through eighth. Row number nine is made in the same way as the fifth, so that supports are formed under the tabletop and grate.
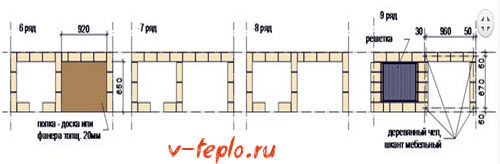
On this, the erection of the table can be considered completed. Further, a do-it-yourself barbecue oven will be built only from the side of the brazier. Again bricks from the tenth to the fourteenth rows are laid with a spoon-like dressing. In front of the fifteenth row, a metal corner is again placed on the front side, which serves as a support for the furnace vault. The fifteenth row is laid.
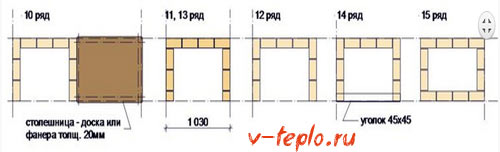
Then you need to equip a gradually tapering vault. It can be made by alternating the butt and spoon ligaments, gradually shifting to the center. At the sixteenth row, the knitting is done from the front side, the spoon knitting is done on the sides. At the seventeenth, on the contrary, in the eighteenth row we change again. The resulting protrusions can be arranged according to their purpose.
From the nineteenth to the twenty-first row they are laid with spoon masonry.
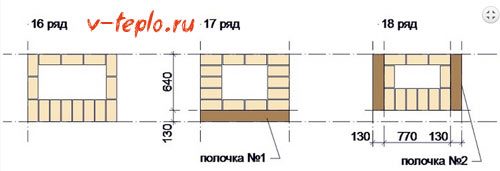
The pipe begins with the twenty-second poison. In the twenty-third row, the necessary narrowing is made and the work continues in the same sequence to the desired height. The higher, the better the traction will be.
In the penultimate row, windows are made to remove smoke. The last row will be laid completely.
The work can be considered completed. As long as the solution dries up, it remains to think about the external finish and reliable protection from the vagaries of nature.
We recommend that you read the instructions for making a false fireplace with your own hands
Finishing work
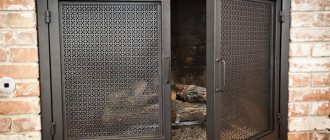
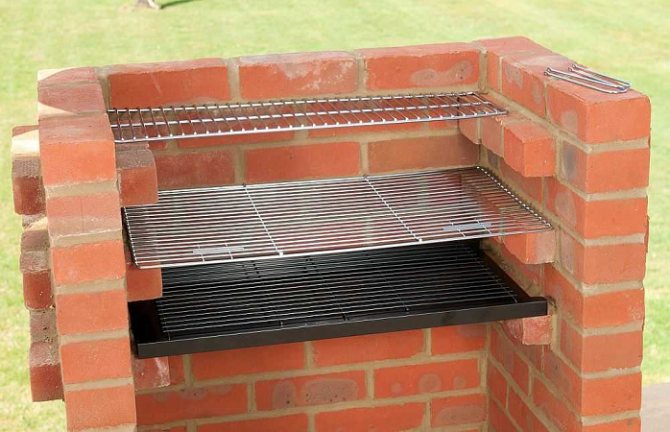
It is necessary to mount the shelves, finishing worktop, grill net and charcoal tray. The latter is made of a sheet of steel with bent edges. The minimum side height is about 5 cm.
The grate can be taken from the old oven or you can buy a new chrome model. The main thing is that it fits in size. Countertops and shelves are made of moisture resistant material.
The top of the pipe should be covered with a stainless steel roof. This will protect the smoke windows from rain. A monolithic slab is covered with tiles or porcelain stoneware to prevent moisture from entering.
Around the barbecue oven, you can equip a full-fledged gazebo, the canopy of which will cover the structure. It is very important that flammable objects and materials are located away from brick walls, which are very hot.
By welding the smoking chamber, the functionality of the oven will expand.
Subtleties of brickwork
"If the firebox near the brick barbecue is planned to be arched, then it will be quite difficult to lay out such an architectural delight with your own hands."
Before you start working with a brick, experts advise pouring water over it.This can be done a day before using the material or directly during the laying process. In the latter case, the brick is simply immersed in water for thirty seconds, and then a portion of the solution is applied to it and placed in the appropriate place. The brick wetting procedure will guarantee better adhesion of the masonry, since the elements will not take moisture from the clay.

Wetting brick for better adhesion
As for the order of laying out bricks, you can look at it on the Internet or come up with it yourself, outlining the idea on a piece of paper in a cage.
Ordering for a barbecue made of bricks
The simplest option for barbecue masonry is considered to be offset. In this case, each subsequent row is pushed half a brick to the side. The shift can be performed alternately to the right and to the left.
Offset type of masonry for barbecue
It is worth starting to lay out the base from the corners, gradually moving along the outlined lines to the center. After every third row, control the quality of work with a level or plumb line. The height of the plinth is arbitrary. It can accommodate compartments for storing coal, firewood or any specific utensils.
Brick grill with a plinth
A firebox is installed above the plinth. A ready-made concrete base with reinforcement can become a brazier, or it will have to be laid out with the same heat-resistant brick. If the firebox near the brick barbecue is planned to be arched, then it will be quite difficult to lay out such an architectural delight with your own hands. Use a circle. With it, you can distribute the bricks evenly and at the correct angle without any problems.

Spun for the arch
A reinforced concrete beam is laid on top of the firebox. Another brick row is placed on the lintel. After that, the wind walls are driven out, and the smoke box is formed.
Brazier made of bricks with a smoke collector
When working on a barbecue, you need to remember:
1. The design will be aesthetically pleasing if all the joints in the masonry are of the same thickness.
2. The firebox should not be made too high. This will reduce cravings.
3. Installing curbs inside the firebox will create problems when cleaning it.
For beautiful masonry, make the same seams.