When the question arises about heating a small country house, the best solution would be to build a stove. It is economical and practical, as the heat transfer from correctly stacked brick ovens is at least 90 percent.
Brick kilns have lived up to their purpose for centuries. And no matter how its design changes and improves, the basic requirements for it remain the same. These are safety in use, ease of use and the ability to keep warm for a long time.
With a strong desire, it is not difficult to lay out a mini brick oven with your own hands.
What are the benefits of small-sized wood-burning stoves
The advantage of a small stove is that it takes up a very small area with high heat transfer. For a country house, bathhouse, outbuildings, a mini wood-burning and coal-fired oven is ideal. There is a minimum of building materials, but if you put the hob on top, you can cook food and heat the water. Even in our time, a brick heating stove remains quite popular. The most important thing is that it will not be difficult for a novice master to make it. Having an ordering scheme in front of your eyes, you can fold the mini oven with your own hands in just one daylight. You just need to first prepare all the necessary tools and building materials.
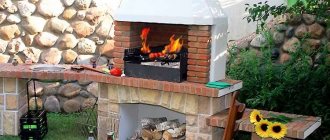
Compared to the "potbelly stove", a brick mini-oven for a dacha with wood looks aesthetically pleasing. Subsequently, it can be refined with tiles, and it will not only warm, but also decorate a country house.
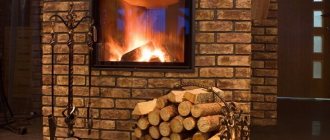
Sometimes its design is combined with a fireplace, and this will already be a mini fireplace stove. You can immediately build in a tank for heating water or provide a niche for drying vegetables and fruits.
There are a lot of options for brick ovens. But these are more complex designs, and you need to start building a mini-oven for a summer residence with your own hands from the simplest model.
Heating and cooking country stove: where to start and how to build
Small-sized furnaces, despite their small dimensions, are installed on a solid foundation. Only in some cases can you get by with reinforcing the floor. Experienced craftsmen work without diagrams and drawings, and beginners are advised to take the order of reputable stove-makers as a basis.
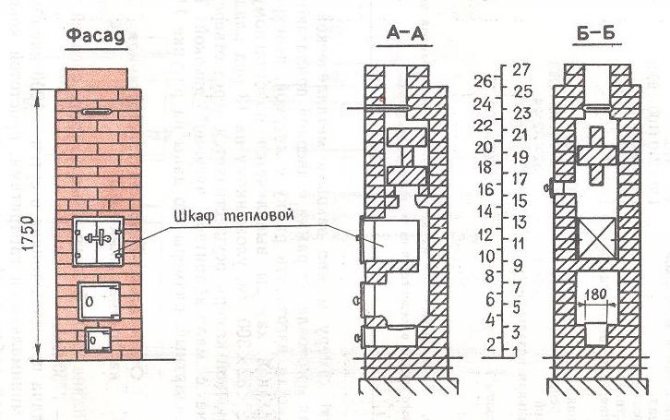
Construction diagram and materials
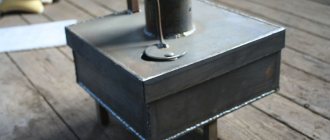
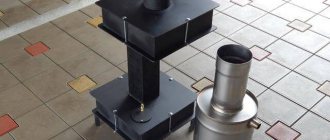
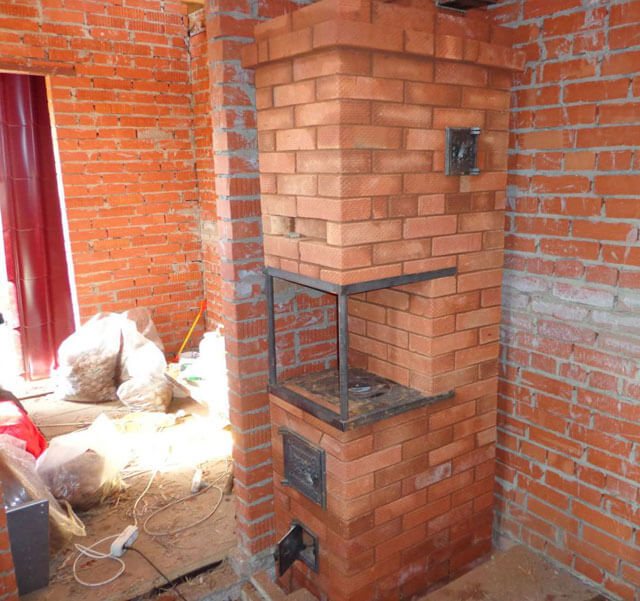
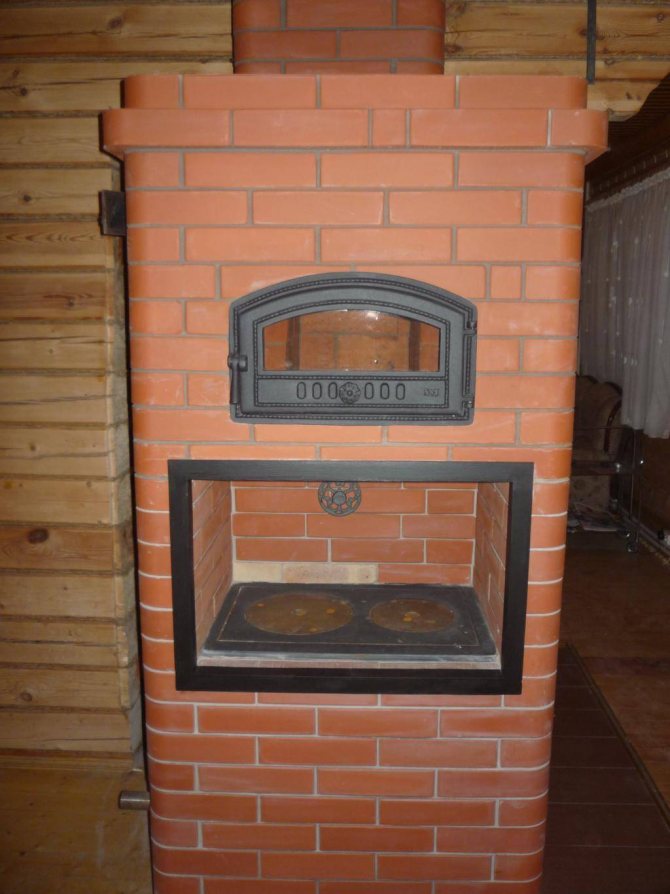
Ideal for a small house, this square mini brick oven is simple, compact and efficient. The design includes a low chimney with a channel section of 13 * 13 cm. The stove has an oven that allows you to cook and warm up dishes. The cabinet is made of sheet steel, but if desired, it can be replaced with a ready-made oven of suitable dimensions.
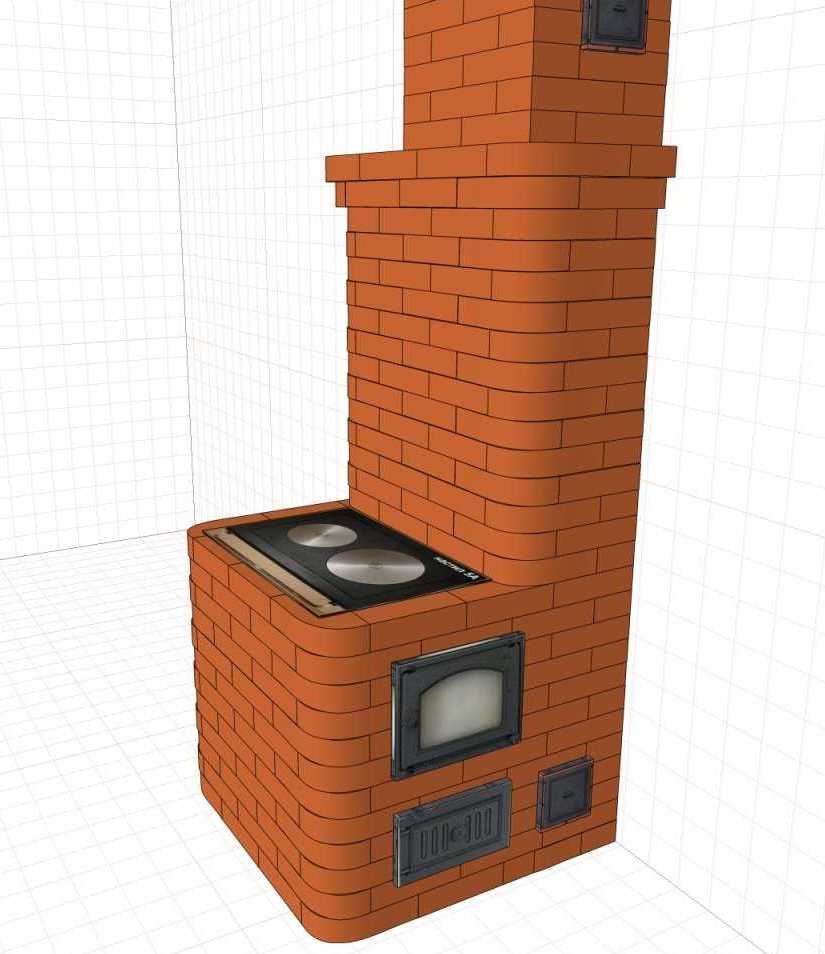
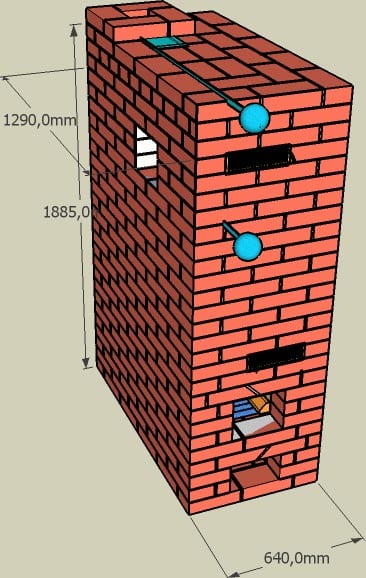
The appearance and structure of the furnace
A fireproof mortar is required for laying a mini-oven on wood. You can make it yourself from clay, but it will take more time, and the result will depend on the quality of the clay and the correct determination of its fat content. It is much easier to trust the manufacturers and purchase a ready-made heat-resistant mixture in the store - in this case, the product will remain to be diluted with clean water in the proportions indicated on the package.
The dimensions of the compact structure are 51 * 51 cm, the height of the hearth is 175 cm. To strengthen the firebox, fireclay bricks must be taken - it is not afraid of direct contact with the flame and does not crack. The walls of a mini-oven for a country house are laid out with red brick.
Consumption of materials:
- ceramic bricks - 170 pieces;
- refractory masonry mortar - 35–40 liters;
- door for the firebox measuring 23 * 25 cm;
- blower door (13 * 14 cm);
- cleaning door (13 * 9 cm);
- grate (25 * 18 cm);
- latch (12 * 34 cm);
- steel sheet;
- steel wire - about 2.5 m;
- roofing material for waterproofing.
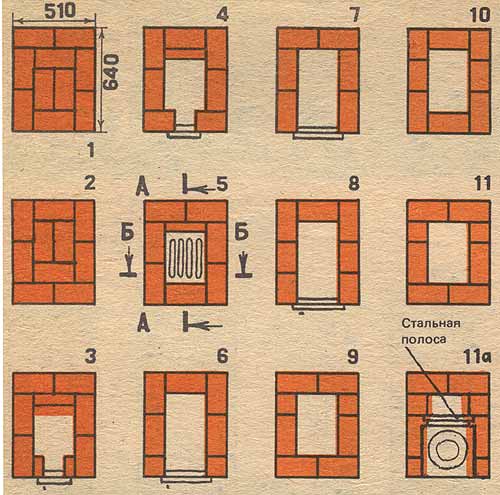
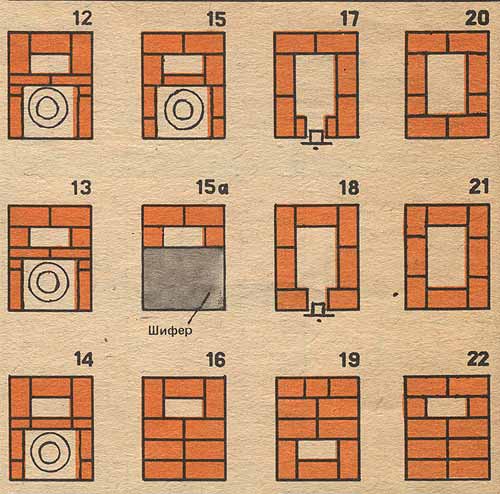
Masonry diagram and oven drawing
The first row, as always, is laid out without mortar. On the second row, a blower door is mounted, using steel wire for fastening, and an ash pan is laid. On the fourth row, a grate is laid, providing a gap of about 4 mm between the grate and the masonry.
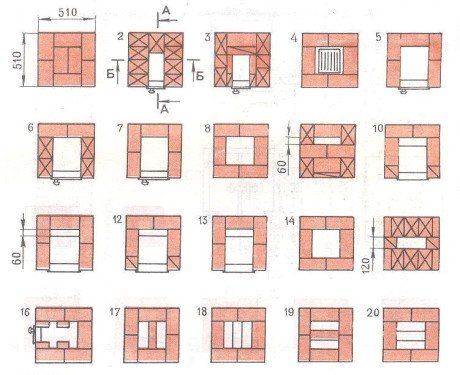
Ordinary masonry scheme
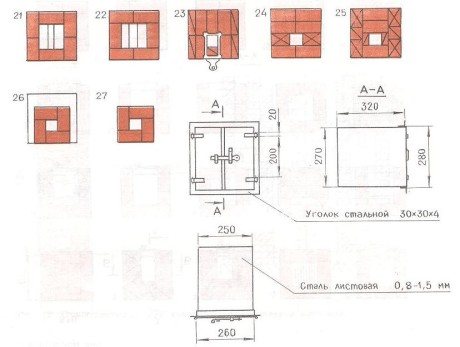
Top rows and oven drawing
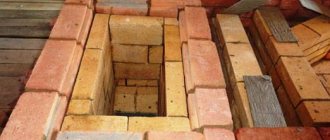
Laying the fifth row begins with the installation of a combustion door. The door frame is wrapped with an asbestos cord, and the door is walled up in the masonry using steel wire. This is followed according to the scheme: an oven, a chimney, a pipe are formed.
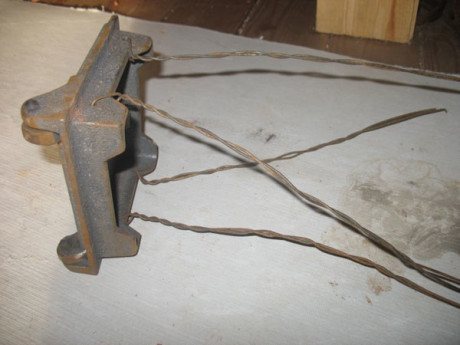
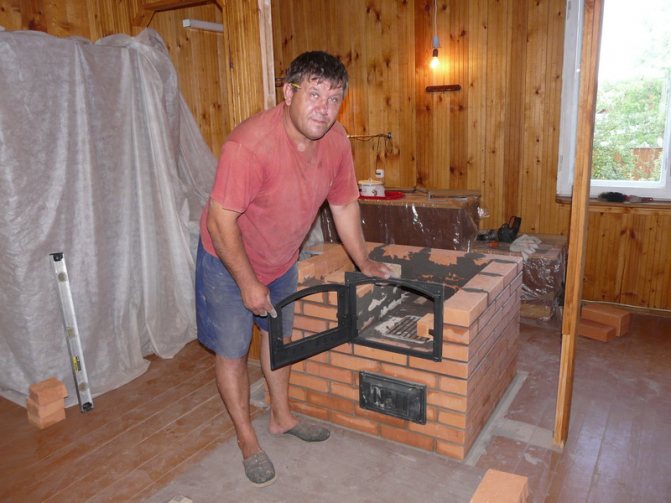
Preparing the door
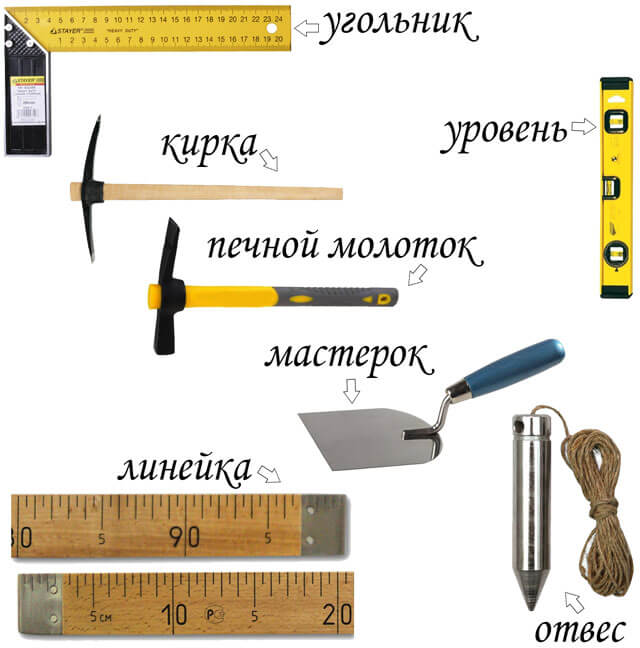
Required tools
You need few tools, they can be easily purchased at any hardware store:
- trowel, or as it is also called, trowel;
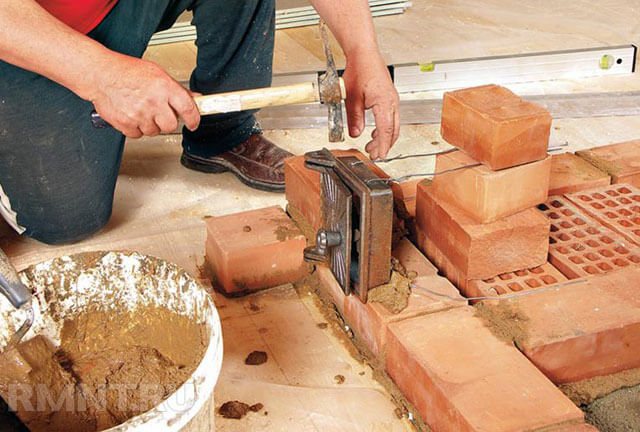
- handy pickaxe hammer;
- building level;
- roulette;
- plumb line.
In addition, in the process of work you will need:
2 buckets (for water and mortar), a construction sieve, a trough where to sift the sand.
Building materials for mini oven
You must first prepare the clay. To do this, it is poured with water and left so for about a day. You can speed up the process, for this, thoroughly knead it every five to seven minutes, preferably with a drill mixer, for an hour. Strain through a sieve. The sand must also be sieved beforehand.
To fold a mini heating stove, which will occupy an area of 0.4 sq. meter, you will need:
- 20 liters of solution;
- 60 pieces of red oven bricks;
- 38-40 pieces of fireclay bricks;
- firebox door;
- blower door;
- grate;
- hob;
- chimney valve.
Doors, grate and hob must be cast iron.
If you do without fireclay bricks, then it will be a model of a mini wood-fired stove, not coal. Even the highest quality red bricks will deteriorate over time from the high temperatures created by coal fuel. In general, to make a mini Russian stove with your own hands, you just need to follow the recommendations.
Negative qualities
Cast iron stoves are not without drawbacks. Among them, the following are noted:
- Fragility. This applies to almost all similar products. The material has a high brittleness coefficient, therefore it requires careful handling. He is afraid of hard knocks and falls.
- Large mass. For example, a 9 kW oven weighs approximately 70 kg. In a private house, for the installation of such a device, it is necessary to make a reliable foundation.
- Instability to sudden changes in temperature. No damage occurs when the stove is fired up, as the device heats up and cools down gradually. But if cold water accidentally falls on a hot surface, the cast iron may crack.
- Price. Of course, the cost is much higher than other analogues. However, this is justified: the product is highly reliable and designed for long-term operation.
- Fire safety. Do not store flammable materials near such a furnace. They can catch fire from the high temperature of the walls of the unit.
- The nuances of operation. The room in which the cast iron stove is installed should not have high humidity. This can cause rust. Any damage requires immediate repair. Models of foreign manufacturers are heated only with pellets or peat, so long logs do not need to be placed in them.
Location and preparation of the foundation
The best location for such a stove if the summer cottage consists of one room - in the center. In other cases, you need to focus on piers or intersections of interior partitions. Be sure to take into account the rules of fire safety.
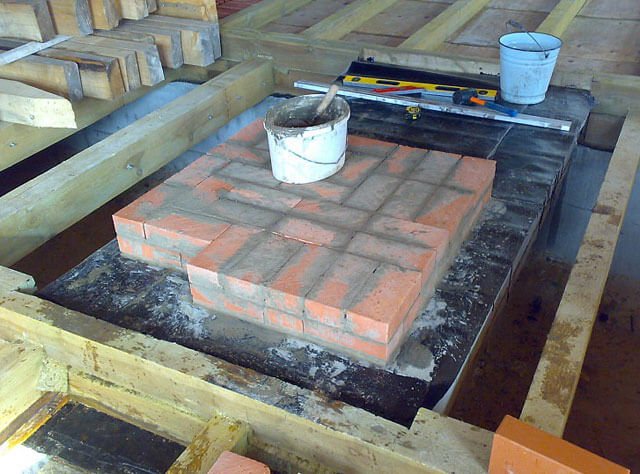
No foundation is needed for a structure of this size.However, in the base it is necessary to put a thick, solid board, fixed with lags, on top - a fire layer. It can be a regular asbestos-cement sheet.
Then arrange a waterproofing layer of polyethylene and roofing felt about 80 by 55 cm in size. Pour a thin layer of sand.
The procedure for laying a brick oven with your own hands
The next stage is the construction of the stove itself:
- In the first row, the solution is not applied. 12 pieces are laid out strictly horizontally on the sand. A blower is placed on the clay-sand mortar. The door is wrapped with asbestos cardboard, wrapped with a cord. Fastening is done with wire.
- Then the laying of the second row is made.
- In the third row, lined with refractory bricks, strictly above the blower, a grate is placed.
- The bricks in the fourth row go to the edge.
- In the chimney, a support for the partition is provided. The back wall is laid out without the use of mortar. These bricks will then need to be removed. Then they put the fire door, wrapping it with an asbestos cord. A couple of bricks are temporarily used for fastening. Secure with wire.
- The fifth row is laid out flat, like the fourth.
- The bricks of the sixth row go to the edge.
- The bricks in the seventh row are laid flat again. For inter-row bundling, you need to start with a brick chipped off three-quarters in size. Having placed two bricks with an edge, they begin to build the back wall.
- The eighth row will close the firebox door. To direct the fire towards the center of the hob, the brick is placed at an angle. Tightness is ensured with a wetted asbestos cord.
- The ninth row is also laid using an asbestos cord. The peculiarity of this row is that it is slightly shifted back so that the door remains open.
Final activities
Three more rows of brickwork are made to connect to the pipe. Having taken out the "knock-out" bricks, the channels of the furnace are immediately cleaned of construction debris. The perimeter of the structure is carefully covered with a plinth.
The whitewashing or facing of the furnace is done after a test ignition.
Only after the whitewashed or tiled mini-oven is completely dry, it can be used. In order for the mini stove for the summer residence to please for a long time, you should not rush to kindle it. Let it stand for a week or two with the doors open.
It is not recommended to use coal immediately; it is necessary to give the stove time to initially warm up with chips.
Many private houses are being built at a sufficiently large distance from the city, as a result of which it is impossible to install central communication systems in them. This includes heating, which must be autonomous. The traditional way of heating rooms is considered to be a stove that you can make yourself, and brick is most often used for this.
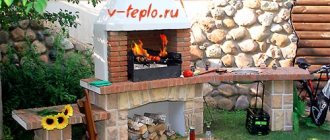
This design works on wood, which is an affordable type of fuel. Thus, for small buildings, a mini-oven made of bricks is considered an ideal solution, which is small in size and is also easy to create.
In addition to the undoubted benefits of using this equipment it should be noted that a brick mini-oven creates a cozy and pleasant atmosphere in any building. Such a design is suitable not only for a private house, but also for a summer residence, and its appearance and functions can be completely different, so you can choose a product that fits perfectly into the room and will have the necessary parameters.
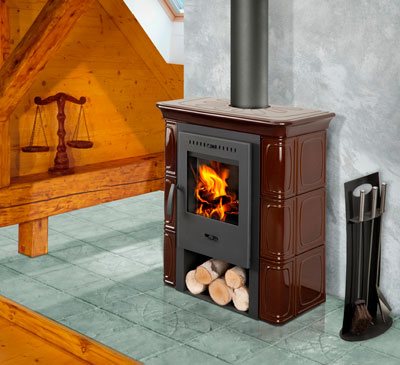
Industrial aggregates made of metal
Modern cast iron heating and cooking unit.
The most effective industrial heating and cooking appliances are cast iron analogues of long burning. They are spared the main disadvantage of solid fuel structures - frequent fuel loading. The instruction states that such units are capable of operating for half a day on one portion of fuel.
Choosing a cast iron stove
When choosing a unit, consider such points.
- Furnace performance... Long-burning cast iron units can create a comfortable temperature regime in rooms with an area of 80/150 m². The declared power (maximum) of some of the models is enough to heat up to 250 m².
- The type of fuel used is also an important factor. The best option is to choose a universal stove that can be fired with all types of solid fuel: coal, wood, wood and peat briquettes, pellets. Its price is not much different from its usual counterparts.
- The optional capabilities of the unit are important for the reliability and ease of use of the device.... For example, fuel can be loaded manually or automatically. It is also possible to regulate the heat transfer of the furnace using the built-in thermostat.
- Stoves with a hob do not have a water circuit, therefore they are not tied to a specific area of the building.
- Modern designs for smoke extraction make it possible to mount the stove at any point in the selected room.
Note! A cast iron heating stove with a built-in hob does not need to be connected to the heating system of the house. It heats rooms with air convection. This method is good in that it achieves high productivity and efficiency of the stove.
Positive and negative characteristics of the mini oven
This design has both pros and cons. That is why, before the very work associated with its construction, you should evaluate all the features of this equipment.
DIY brick oven, wood-fired, possesses the following positive parameters:
- The resulting design has a long service life, as a result of which you can get a high-quality and attractive stove for many years.
- Warming up occurs quickly, and also, even after the end of fuel combustion, the stove will give off heat to the premises for a long time.
- You can make the equipment with your own hands, however, for this, there must be a preliminary drawn up diagram of the entire structure, following which you can achieve an ideal work result.
- The walls of the stove, made of bricks, do not get very hot during the heating, so there is a very small chance of getting burned.
- If a structure is being built for a summer cottage or a small country house, then it can be a mini-stove, so it will not take up much space.
- If desired, you can get such an oven that will be equipped with additional elements for cooking and other processes, however, in this case, a suitable and appropriate scheme should be used, in which all the necessary nuances of construction should be worked out.
- If you watch the training video in advance, then the construction process itself will be implemented without problems and delays.
- You can make a furnace that will have the desired shape, size and other characteristics, since the process is carried out on its own.
- The scheme of the future chimney must be especially carefully worked out so that the stove has high efficiency, as well as is reliable and safe to use.
However, brick mini-ovens have not only advantages, but also some disadvantages:
- Even a mini wood-fired oven made of bricks needs a foundation, since it has a fairly large weight, so it will be important to initially devote a lot of time to forming the base.
- A clear, high-quality and correct scheme of the future masonry must first be formed, without which many mistakes can be made during work, they can be eliminated only after the complete destruction of the already created structure.
- During operation, it is imperative and always necessary to use and take into account the rules and safety requirements so that the future stove can be used for its intended purpose without fear of harming the health or life of people.
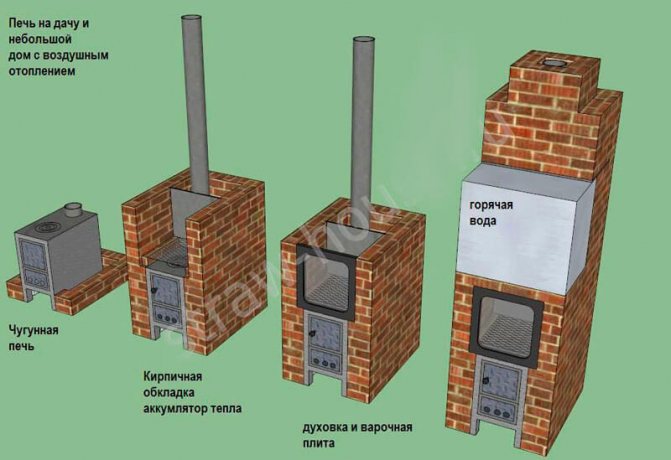
Furnaces for heating cottages
The range of heating stoves is wide, it is easy to get confused in it, therefore, even before going to the store, you need to clearly understand what functions the stove should have. To do this, it is worth understanding the capabilities of heating units.
96be7b255fe7a372957510ef0493aadd.jpe 70160cf0235ae453a8e2744ed1d3e6b1.jpe
Power
The most important characteristic, the wrong choice of which will make the oven ineffective. All heating devices have a certain thermal power, it is expressed in kW. For a normally insulated residential building, the calculation is usually made by area: the total number of square meters of the house is divided by 10 and the required power is obtained in kW.
For a country house, such a calculation is not entirely suitable. When selecting power, the following subtleties must be taken into account:
- material of walls, floors and ceilings and its thermal insulation properties;
- seasonality - will the house be used in winter, or heating is needed only on cool days in spring, summer and autumn.
The greatest power of the stove will be required if the house is made using lightweight technology, and it is planned to come to the country house in winter, in frosts. In this case, it is necessary to choose a stove with a power greater than the calculated one or install additional heating devices.
Long burning mode
Some wood-burning stoves can operate in a continuous burning mode. It is caused by a special mode of fuel combustion - pyrolysis. Pyrolysis stoves can operate on wood or pellets. When ignited, the wood heats up, and the process of decomposition begins into a solid fraction - coal and ash, and gaseous - smoke.
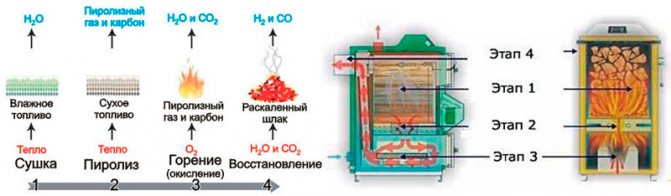
Flue gases contain many combustible elements, in ordinary stoves they are not completely used and go out through the chimney, heating it strongly and giving off heat to the atmosphere. Thus, the heat resource is used at 60% at best.
In stoves equipped with a long burning mode, flue gases are burned out in a special zone, it is called smoke circulation. The smoke passes through these channels, and its combustible components burn out, giving off heat to the walls of the stove.
For the successful course of this process, it is necessary to limit the flow of air into the firebox in order to cause smoldering firewood and increased formation of smoke. It is regulated by means of a latch on the combustion door, while the optimal mode is selected empirically.
Body and firebox material
- The debate about which stove is better, cast iron or steel, has been going on for a long time. What is the difference?
- The weight. Cast iron models have thicker walls and a massive structure, therefore they are heavier, their weight can exceed 250 kg. If the floor in the country house is wooden, it may need to be strengthened, which will lead to additional costs. Steel models are about two times lighter.
- Corrosion resistance. Cast iron does not corrode in a weakly acidic environment - for furnaces that are used periodically, this is a big plus. The temperature difference during firing leads to the formation of condensation in the furnace. Mixing with the soot deposited on them, water forms a weak carbonic acid. Steel structures corrode under these conditions.
- Resistant to burnout. Due to the thick walls, cast iron models are more resistant to burning out even at very high temperatures.
- Price. Steel models are 1.5-2 times cheaper than cast iron ones.
Inexpensive models popular with summer residents are usually combined. Highly heated and corroded surfaces in them are made of cast iron, the rest of the structural elements are made of steel, which allows you to combine durability and low weight. The price for such devices is in the middle range.
Additional functions
The main task of heating stoves is to quickly warm up the house.
- ... Depending on the model, they can be equipped with additional useful functions:
- hob, solid or with burners;
- the ability to connect a heating circuit, water or air;
- decorative elements that allow you to create a cozy atmosphere at the dacha - panoramic glass in the furnace door, decorative inserts, forged gratings.
Whether these functions are needed or not is a matter of personal preference, but it should be borne in mind that their presence affects the price of the stove.
Mini oven parameters
Since these wood-fired structures are small in size, then their device is considered simplified. It is enough to choose a product that will occupy only 0.5 sq. m. Brick laying can be done both on the edge and flat. This design, which is easy to make, gives off a large amount of heat and provides uniform and high-quality heating.
Since the mini oven is small in size, its weight is not considered significant, so the base should not be too complicated and expensive. You can make a structure literally in one day on your own if you watch the training video in advance, as well as prepare drawings that will fully describe the entire process of the upcoming work.
Manufacturing process
All work can be divided into separate stages, which are executed only in the correct sequence. Each work needs to be given a lot of attention, since mistakes at any stage can cause the need to disassemble the stove and correct violations. Stages of work:
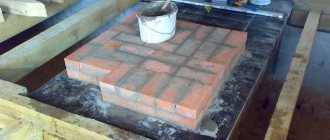
Base
- Determination of the location of the future structure. A mini-oven that runs on wood should be located in a place in the room where it will be safe to use it, so there should not be any flammable elements near it.
- Drawing up drawings of the future design, which should contain careful and accurate calculations and diagrams. It is on them that you need to focus on during the work process.
- In the chosen place, you need to disassemble the floor covering in order to get to the base, since this is where the foundation for the future stove will need to be made. This work can be viewed carefully on a special video presented on the Internet. Usually a standard concrete base is created, all subsequent steps should be performed only after the cement mortar has completely solidified.
- A layer of roofing material is laid out on the frozen foundation, which performs the function of waterproofing. In this case, it is important to ensure that there are no holes or other opportunities for moisture to penetrate to the base.
- Sand is laid out on the waterproofing layer, which must be clean and of high quality.
Ordering and structural elements
- Next, the direct laying of a mini-oven, operating on wood, begins. For this, the first row is created, for which a small number of bricks are used, and 12 elements are most often used. They are fastened to each other with a reliable fastener, and also leveled and adjusted using a level and suitable equipment. The evenness of the location of each element must be monitored especially carefully, since the evenness and safety of using the final structure depends on it.
- A clay mortar is applied to the first row, after which the second row is laid, and here you can immediately install a blower door. This door should be wrapped in asbestos to avoid unnecessary gaps and holes.
- The next step is to lay the third row of the wood-fired oven. For this, fireclay brick is considered the most optimal choice.
- Next, a grate is mounted, which is located under the blower.
- When creating the fourth row of masonry, it is important to lay all the bricks on the edge, and the back wall is usually created by laying bricks with a special protrusion outward, and it must also be taken into account that clay mortar is not used in this process.
- Next, a furnace door is mounted, which, like the other door, is wrapped in asbestos.It is best if this door opens upwards.
- The fifth row of masonry is laid flat. It is important to repeat the contour and features of the fourth row.
- The sixth row is laid with an edge, the seventh is done flat again. We must not forget about the dressing.
- The eighth row of masonry should completely cover the furnace door, above which the sloped brick is mounted. It is important to create a perfect seal between the slab and the bricks.
- Laying the ninth row should be done with a certain offset, which will allow the fire door to be well kept open when necessary.
- During the laying of the tenth row, the formation of the chimney begins, so it is important to decide what parameters the chimney will have. It can be vertical or horizontal, straight or bell-type, direct-flow or counter-flow, as well as combined. Each can be formed independently if you watch the video of its creation by specialists.
After creating the stove and chimney whitewash the structure, and also make sure that there are no large gaps and other problems, but if they are present, they must be eliminated. To prevent sand from spilling out during the operation of the structure, you can nail a special plinth along its edging. It is not only a protective element, but will also improve the appearance of the oven.
Thus, the process of creating a mini wood-fired oven is considered quite simple and straightforward. With the right approach to the formation of this element, one can expect a durable, reliable and completely safe structure for use, which will not only be a means of heating rooms, but also a bright unusual decoration that increases the comfort of using the structure as a whole. Due to the small size of the stove, it will not take up much space in a small house, but it will have a high efficiency, which ensures thorough and uniform heating of a summer house or a private building.
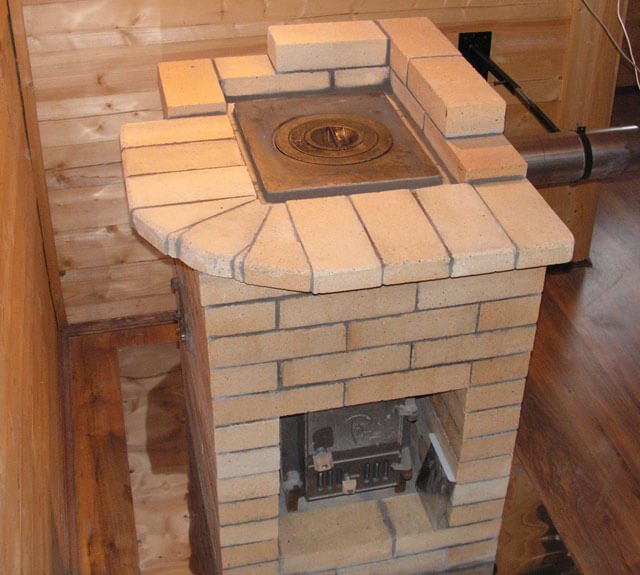
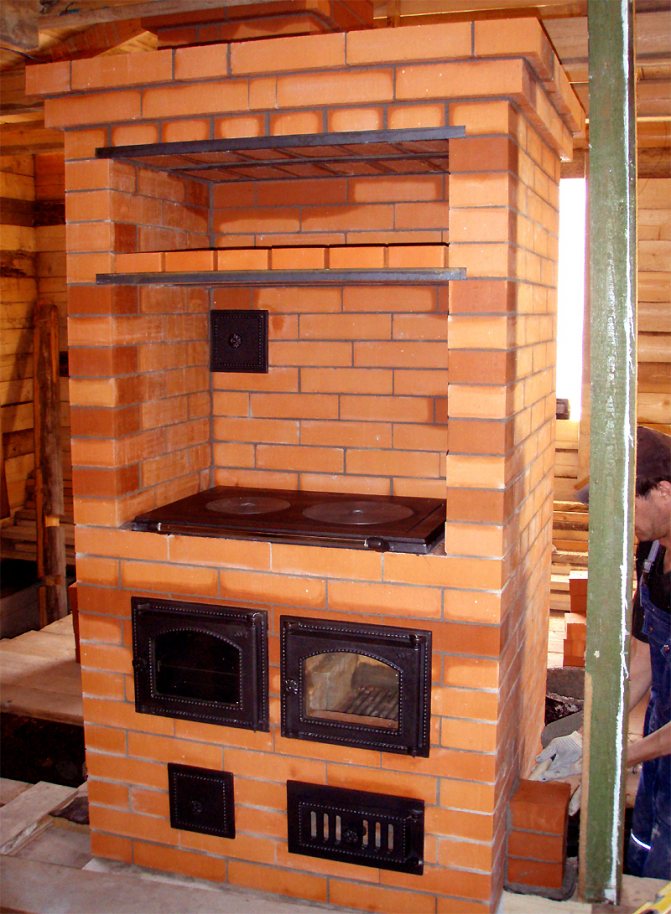
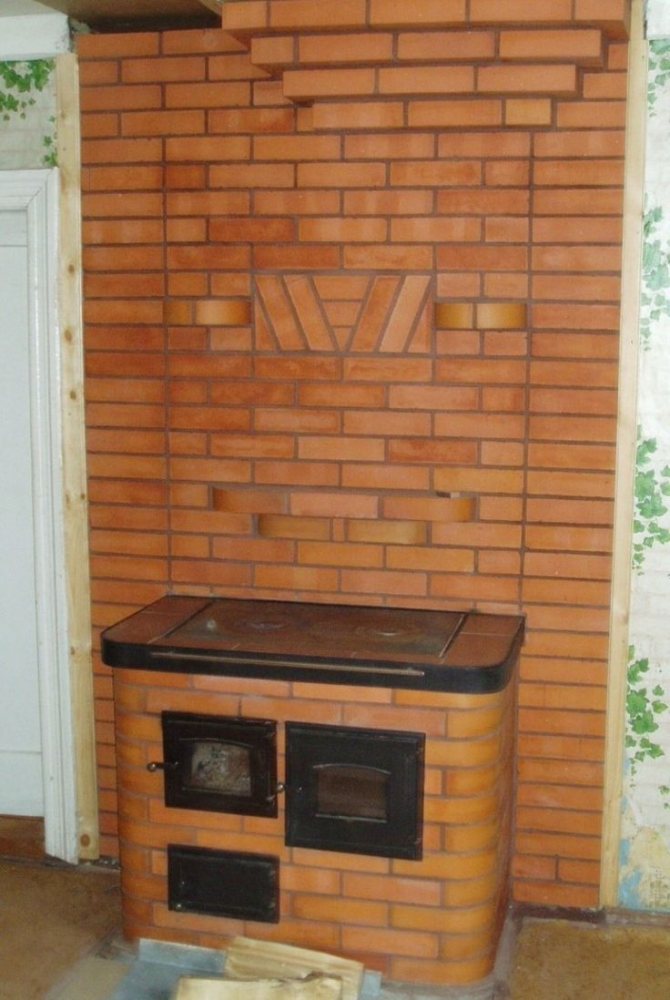
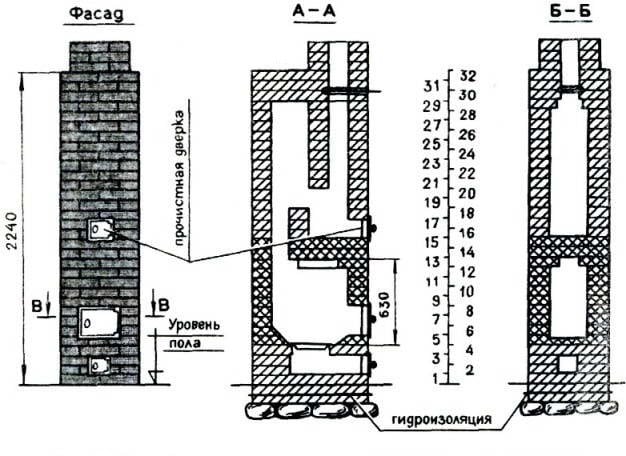
Baby stove with stove and oven
Another mini-oven for a summer residence has dimensions at the base of only 51 * 64 cm, while the depth of the firebox is 50 cm. The model is perfect for a country house or a summer kitchen. Firewood, coal, peat, briquettes can be used as fuel.
Design features and materials
Despite its small dimensions, the compact stove is quite functional and is equipped with a hob and oven, which allows it to be used not only for heating the room, but also for household needs. According to the reviews of those who have already built this assistant in their country house, the kettle on the stove boils in literally minutes.
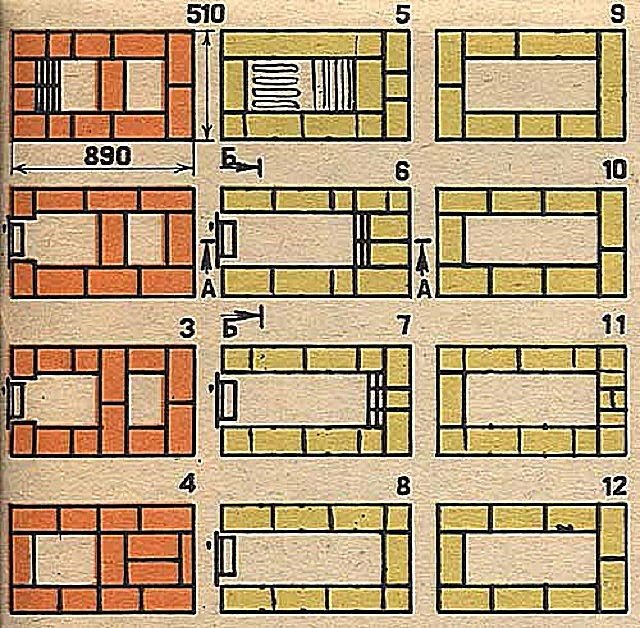
The compactness was preserved thanks to the vertical arrangement of all elements. The chimney has a cross section of one brick. The exhaust gases pass through the channels located behind the cooking chamber, then enter the horizontal chimney, bypass the oven on both sides and go into the chimney.
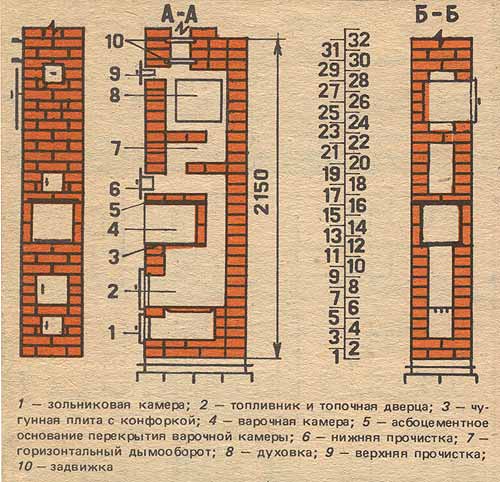
Diagram of a mini-oven for a country house or summer kitchen
For construction you will need materials:
- red brick - 220 pieces;
- clay masonry mortar or ready-made - about 50 liters;
- grate;
- steel sheet (pre-furnace) with a size of 50 * 70 cm;
- steel strip 4 mm thick with parameters 350 * 25 cm;
- slate sheet 51 * 30 cm;
- gate valve - 2 pieces;
- firebox door;
- 3 cleaning doors;
- blower door;
- oven (32 * 38 * 42 cm);
- stove (38 * 35 cm) with one burner.
Masonry order
The first row of a brick mini-oven is laid without mortar. After the second row, a blower door is installed, the next row is placed and the firebox begins to form. The grate is laid without mortar. The sequential diagram clearly shows where and how the doors, stove, oven and latches should be installed.
Masonry scheme for a miniature stove with a stove
Continuation of ordering
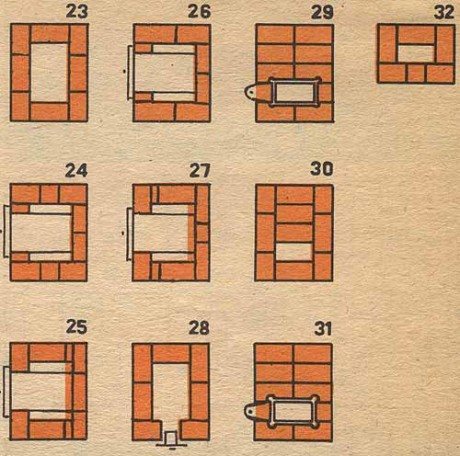
Ordering the upper part of the oven
To protect the ceramic bricks from fire, a lining is carried out - fireclay refractory bricks are laid in a separate row.It is important to remember that different types of bricks cannot be tied together - they have different expansion temperatures. Failure to follow this rule leads to cracks.
Lining principle
Work sequence
After you have decided and chosen the right location, pay attention to the surface. It is important that it is made of well-fixed, thick and durable boards. Place a 78 x 53 cm plastic wrap on the stove site. Make a 1 cm thick sand pillow.
First row. On the sand you need to lay out 12 bricks, do not make fasteners between them. Align at the same height so that they are exactly in the horizontal position.
Second row. Apply the clay solution in a non-greasy layer and install the blower door, wrapping it in asbestos cardboard in advance. We fix the door with wire.
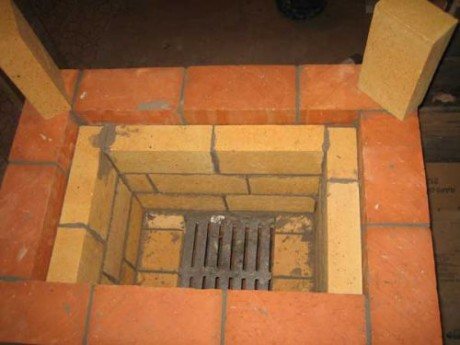
We build the third row with refractory bricks. Now you can install a cast-iron grate for the firebox above the blower, but only if the row has been completely completed.
Fourth row. We put the brick on the edge in the middle of the chimney. We lay out the rack for the wall from the inside of the oven. We make the reverse side with a protrusion on the outside without clay mortar. These bricks can then be knocked out to clean the well. Wrap the firebox door with an asbestos cord so that it can open from the bottom up. Install. We fix it with wire and put a couple of bricks for a while. We install one behind the door, and the second on top.
Lay the fifth row in a layer. We repeat the outline of the last row.
We put the sixth row with an edge. We rub the walls of the stove with a damp cloth.
Lay the seventh row in a layer. We make a bunch from three quarters of a brick with subsequent rows. Put a couple of bricks on the edge again. We build a back wall near the stove.
We lay the eighth row so that it blocks the furnace door. Be sure to install a sloped brick above the firebox. Thanks to him, the flame in the stove will tend to the center of the burner on the cast iron stove.
We spread a slightly wetted asbestos cord. We install the cast iron stove. This will create an airtight seal between the bricks and the slab.
We shift the ninth row slightly to keep the door open.
Tenth row. We form a chimney with an extension at the back. The chimney must be straight.
Eleventh row. We fill the valve with an asbestos cord, pre-lubricated with clay solution and install. Now the chimney is tightly connected to the metal one. If the pipe tilts to the side, it needs to be covered with three rows of bricks.
Remove dirt from the chimney. To do this, you need to pull out the bricks from the fourth row. White oven. We cover the walls and the metal part. In lime for whitewashing, you need to pour a small amount of milk and blue. It is important to thoroughly coat all seams of bricks and cast iron surfaces.
Step-by-step instructions for making a mini oven
Considering the layout of the mini-oven for the summer cottage, let's get to work.
Stages 1 to 12
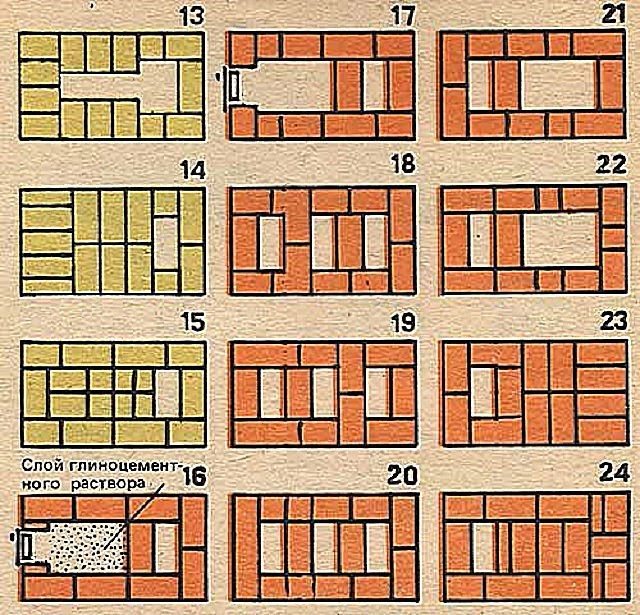
Steps 13 to 24
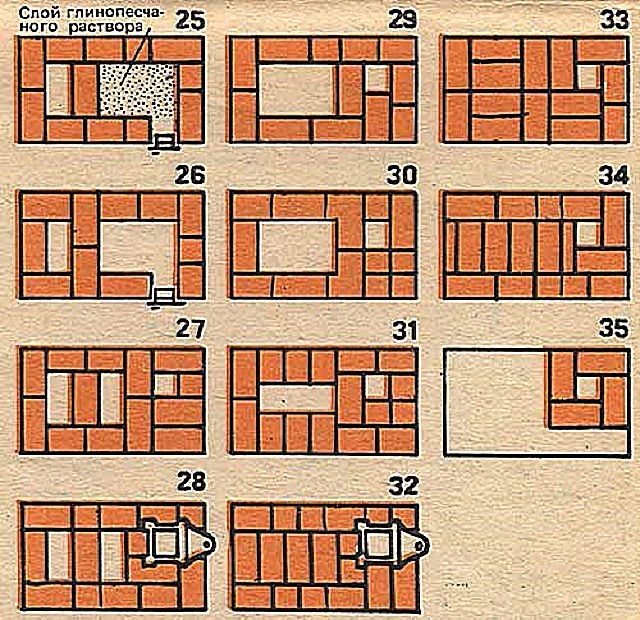
Stages 25 to 35
Laying from 1 to 12 rows
The first row is laid out, and in the second it is necessary to provide a place for the blower door. The rows must be coated with a solution. Before installing the blower door, it must be wrapped in asbestos, and the door will be fastened with wire.
Next, the 3rd row is laid out, in which refractory bricks and a mixture of refractory clay are used.
During the laying of the 5th row, a grate is installed. Starting from this row, up to the 15th, masonry should be made with refractory bricks.
In the 6th row, a firebox door should be installed, with which the same work should be done as with the blower door (wrap with asbestos, secure with wire).
Lay out the 7th row according to the layout. Each layer must be coated with a solution. Lay out the 8, 9, 10, 11 and 12th rows in accordance with the layout.
Laying from 13 to 24 rows
From the 13th row, we begin to form the combustion chamber and vertical channels. The main thing here is to carefully follow the orders, otherwise you can violate the correctness of the design.
On the 15th row, it is necessary to lay out a layer of clay-cement mortar. It will strengthen the bottom of the cleaning chamber, after which you can install the door itself.
Drying the oven
Close all gaps between the original row of bricks and the floor. We nail a plinth along the edge of the stove, this will prevent sand spilling out and give a marvelous look. At the end of all work, the oven will need to be heated for the first time with chips and paper or cardboard. Then leave the doors and cooking zones open until the oven is dry. After that, it will be possible to drown it in full force.
This design is suitable for a summer residence or a small residential building. It will be convenient for cooking food, it will save electricity or gas. The oven will be able to withstand all temperature fluctuations. By following these simple instructions, the oven will serve you for years to come. Looking at it, you will experience aesthetic pleasure and pride in having laid out each brick with your own hands.