Features of the furnace for working out
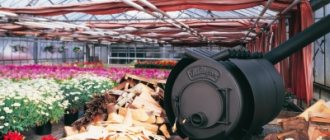
Furnaces, boilers for mining are most often installed in places where there is an abundance of used engine oil: in garages, car services, on farms with their own fleet of vehicles. The process of disposal of used oil is not easy, since it cannot be discharged into the ground or sewer. Using it in the form of fuel, you can solve the problem.
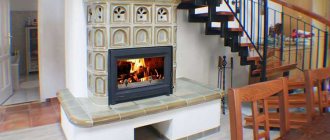
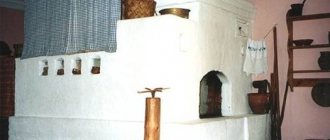
If you put an ordinary potbelly stove for this purpose, it will warm up the air rather quickly, but as soon as the burning of the fuel stops, it will immediately become cold. Therefore, it is not possible to steadily heat a garage or workshop in this way. If we make a working furnace with a water jacket, then the energy efficiency of the heating unit will increase significantly.
Supercharged furnace design
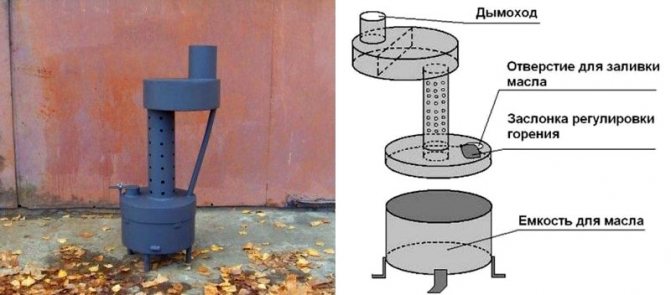
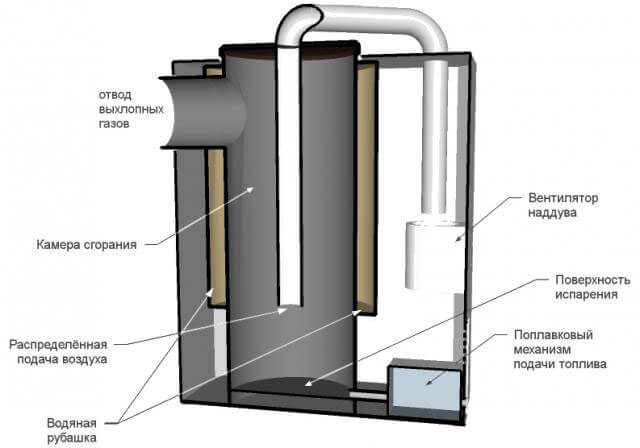
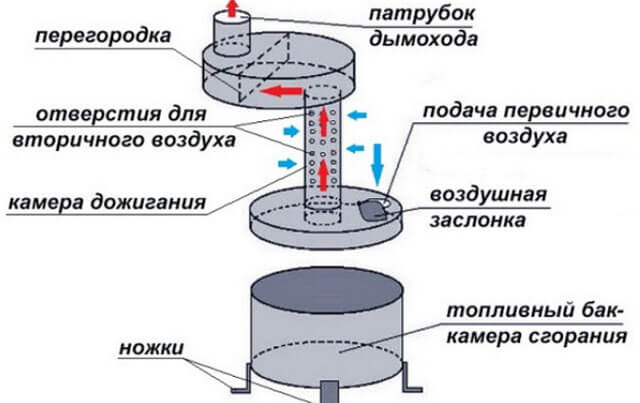
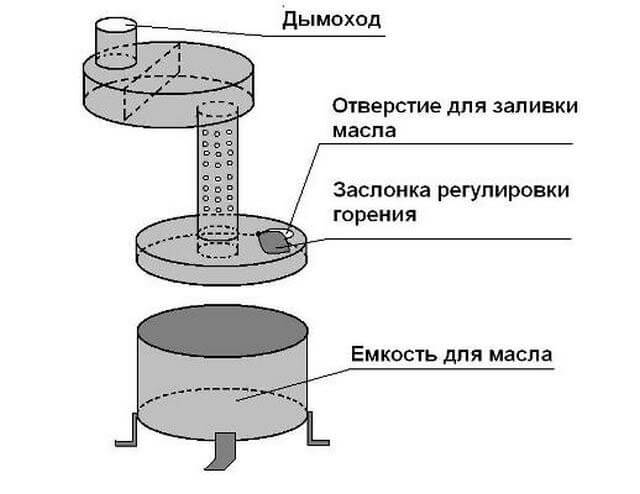
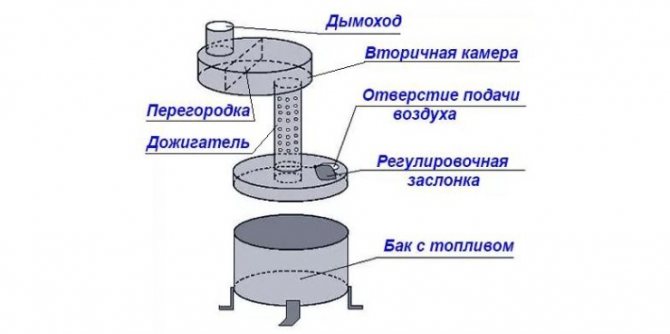
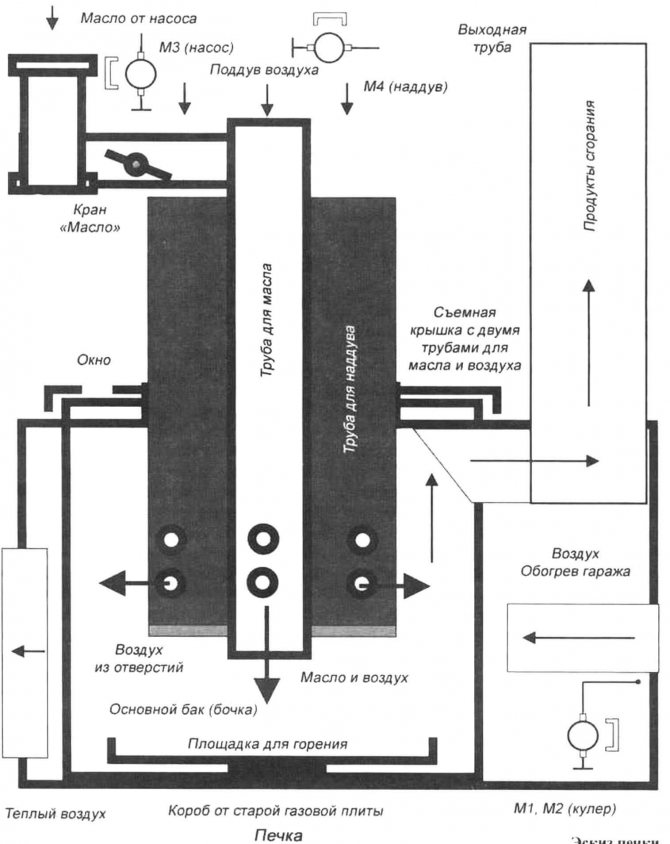
The blown home-made stove for mining is a closed-type cylindrical vessel, inside of which there is a well-known afterburner in the form of a pipe with holes. In the lower part of the vessel there is a door for access to the firebox and ignition. The chimney pipe is welded to the upper part of the cylinder, and forced air supply to the pipe with holes through the top cover or a simple cut through the side wall.

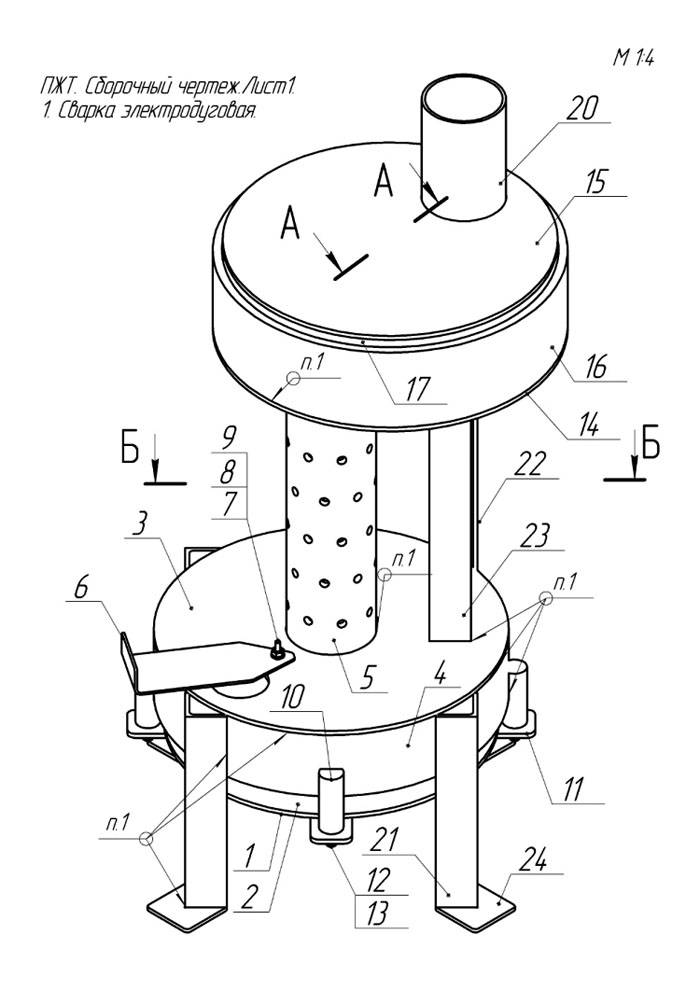
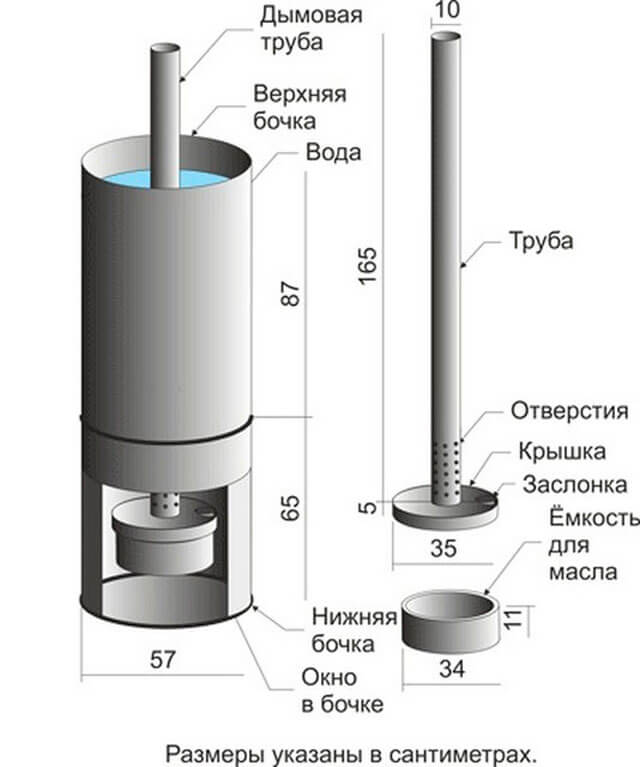
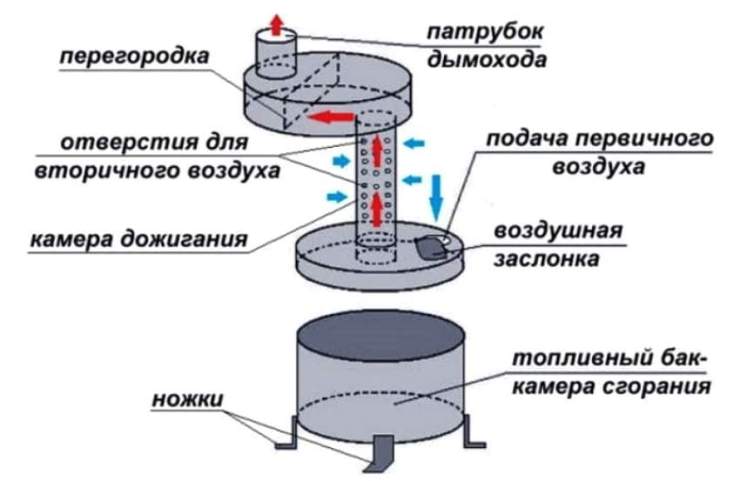
Waste oil is located at the very bottom of the vessel and is automatically supplied as needed. The methods of supply can be different: from a tank with a submersible pump or by means of a float mechanism, whoever likes what. The above figure shows a diagram of a stove with air injection, water jacket and fuel supply using a float valve.
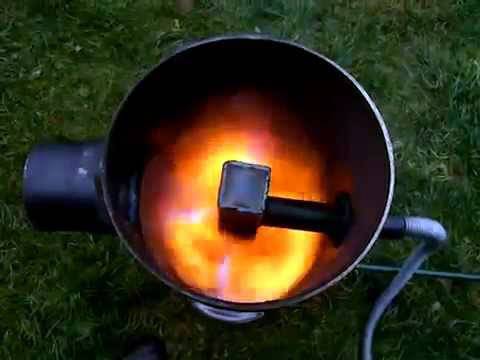
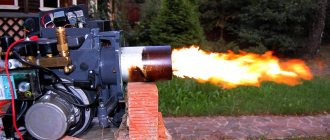
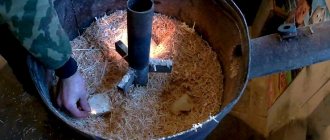
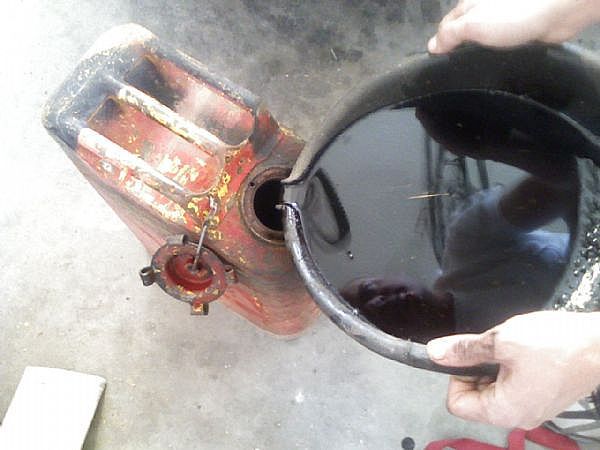
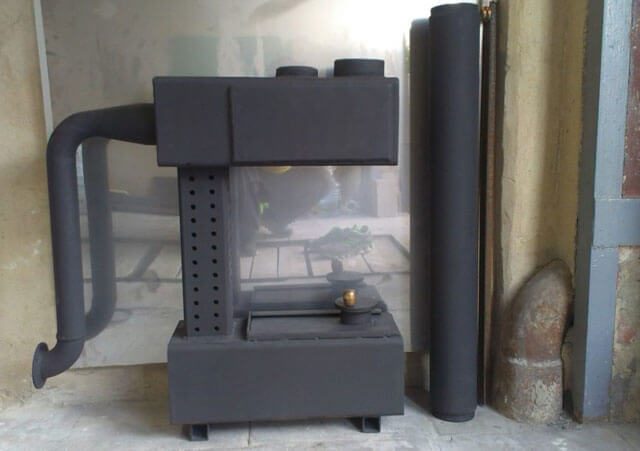
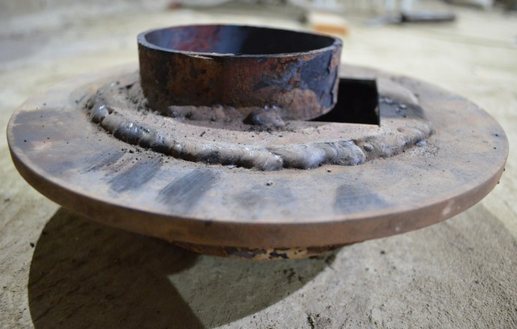
The used oil at the bottom of the container is ignited by adding a small amount of gasoline or thinner, then the blower fan is turned on. After warming up, the fuel begins to actively emit vapors, which are burned with an excess of oxygen. The result is a powerful torch of flame that spreads in all directions, as seen in the photo.
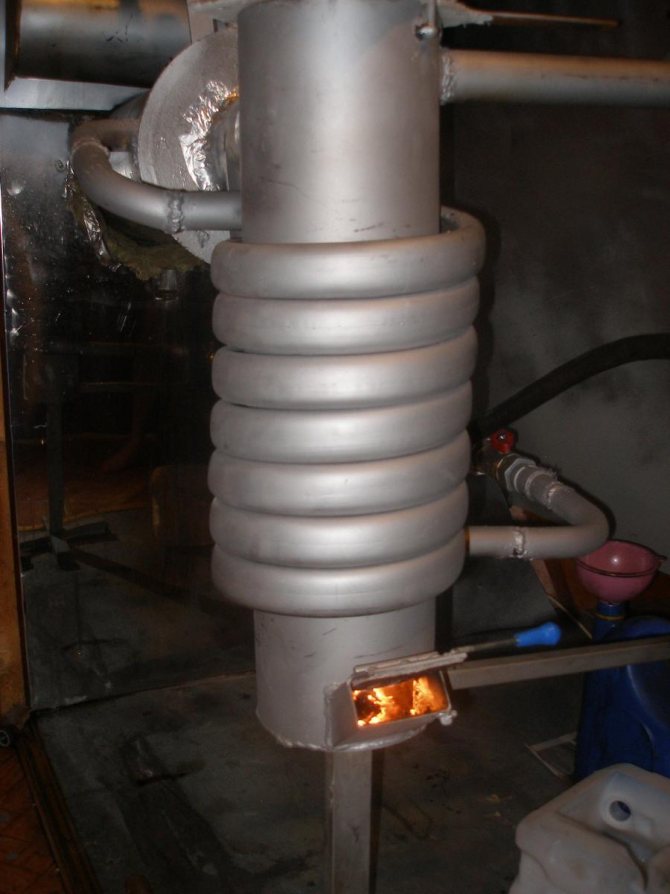
The combustion products leaving the furnace body have a very high temperature (sometimes up to 400 ºС), as in the previous case. In order to prevent heat emission and increase the efficiency of the unit, the chimney must be equipped with a water heat exchanger connected to the heating system through a storage tank. Then it is possible to achieve a furnace efficiency index of the order of 80-85%.
How the oven works and works
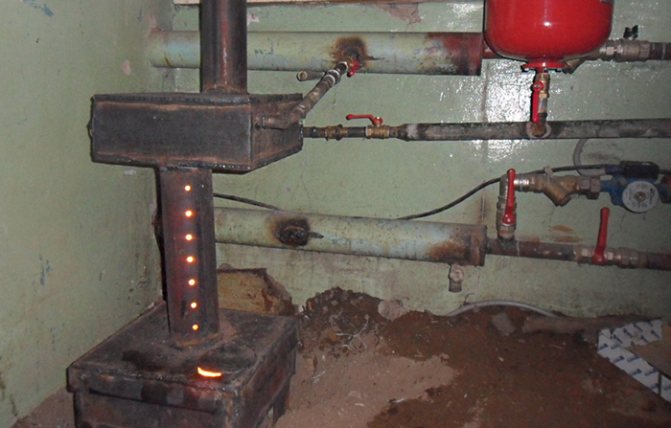
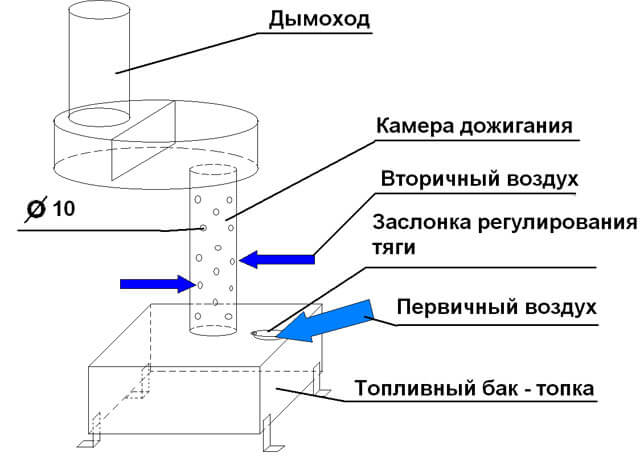
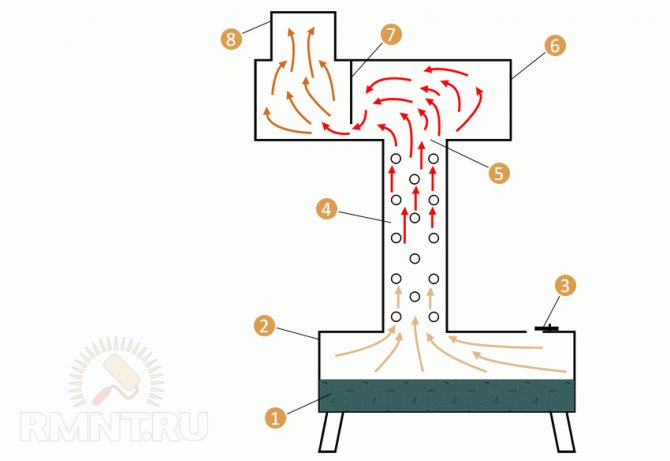
The design of a working furnace with a water circuit is not complicated: two chambers, which are connected by a perforated metal pipe. The lower chamber is equipped with a special container where the fuel is located (mining). It can enter the waste oil boiler with a water circuit in an automated way or manually. The oven is ignited with a small amount of gasoline, which is poured over the oil from above. Gasoline starts to burn, the oil underneath heats up, starts to boil. Oil vapors enriched with oxygen in the perforated pipe begin to actively burn in the pipe and the upper chamber. At the same time, the temperature in the lower chamber is 350 degrees, and at the top it reaches 900.
If the furnace has a manual supply of fuel, in the lower chamber the filling and ignition occurs through a special hole at the bottom of the chamber. With an automated fuel system, a branch pipe leads to the chamber, which is connected to a container filled with used oil.
The lower chamber must be additionally equipped with a special opening with a damper so that the draft and combustion temperature can be controlled.To organize the water circuit above the upper chamber or around the chimney channel, a tank is installed with welded fittings for supplying and exiting the coolant.
Important. To control the temperature and pressure of the coolant, a pressure gauge and a thermometer must be installed on the heating unit.


How to light up and stop the stove?
After a lot of experimentation, I found the easiest and most effective way to light up such a stove. First, I pour oil into the pan. There shouldn't be too much of it. It is enough for the oil to cover the bottom of the sump.
Then I take a piece of foam rubber and thoroughly wet it with gasoline or thinner. I put the impregnated foam rubber in the pallet so that the lower part of the piece is immersed in the oil.
Then I light the foam rubber. It burns steadily even if the thrust gets too strong. As a result, the surface of the pallet is heated to the required temperature.
Then I carefully open the fuel tank valve so that it starts to flow in a very thin trickle. Adjust the flow rate as carefully and slowly as possible.
The stove will gradually enter the operating mode. Periodically monitor the level of waste in the pallet.
To stop such a stove, it is enough to simply close the valve on the oil tank, and then, when the oil stops flowing, close the emergency valve. The oven will go out completely within 3-5 minutes and the body will begin to cool down.
The advantages of such a furnace, and what disadvantages need to be considered
Waste oil furnaces with a water circuit help out in many cases and have their advantages:
- it is a universal heating unit, which is ideal for utility rooms, greenhouses, home workshops, garages;
- the construction of the furnace is inexpensive (it can be collected from scrap metal);
- very quickly heats up the room in any frost;
- compact design;
- can be adapted for heating and cooking;
- allows you to dispose of mining.
But there are also disadvantages that need to be borne in mind when operating the oven:
- demanding for regular cleaning of the chimney and combustion chambers, since during operation it is intensively covered with soot;
- works "loudly", when the fuel is actively burning, it emits a hum;
- you need a container and a place for storing used oil (it will freeze on the street at subzero temperatures);
- the furnace is fire hazardous, since the body is heated to very high temperatures and the requirements for installation and operation must be strictly observed.
But all these disadvantages are not significant compared to the fuel economy, especially if the used engine oil is obtained free of charge. If all requirements are met, the oven will serve for a long time and safely.
Oil ovens with a water circuit can have any configuration and size, it depends on what materials the home craftsman has, and on what power of the unit is planned to be obtained.
Universal circuit
We have unfairly ignored another scheme for building a waste oil boiler - based on a burner. Here we can use a simple Babington burner with high efficiency and simple design.
It uses a metal ball through which mining flows down. The ball itself has a hole through which air is supplied. It picks up the smallest particles of waste oil, spraying it. The ready-made airborne mixture is ignited and forms a steadily burning high-temperature flame.
The finished burner is connected to a universal factory boiler that can work with any type of burner. It is also mounted in conventional solid fuel metal and brick ovens. The advantages of the resulting assembly:
- The temperature can be adjusted by limiting the fuel supply to the waste oil burner.
- The ability to automate the regulation of the intensity of combustion.
- Possibility of converting to another type of fuel - for example, to pellets, to natural or liquefied gas.
Choosing a Babington burner to build a home-made boiler, consumers get at their disposal a device that can work even with contaminated waste oil. The main task is to provide air supply under high pressure. Usually compressors from refrigerators are used for this.
As a basis for homemade products, we choose a drawing of any heating boiler with a traditional firewood burning scheme. A small illustration will help to understand the essence:
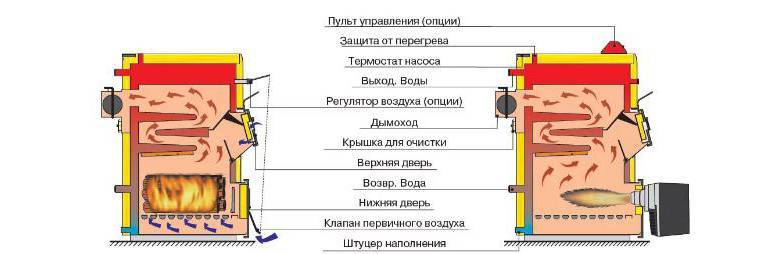
Here we see a boiler that can work with equal success both on wood and waste oil - with the help of an appropriate burner.
The work takes place in several stages. The first is to assemble a Babington burner according to this scheme (or any other):
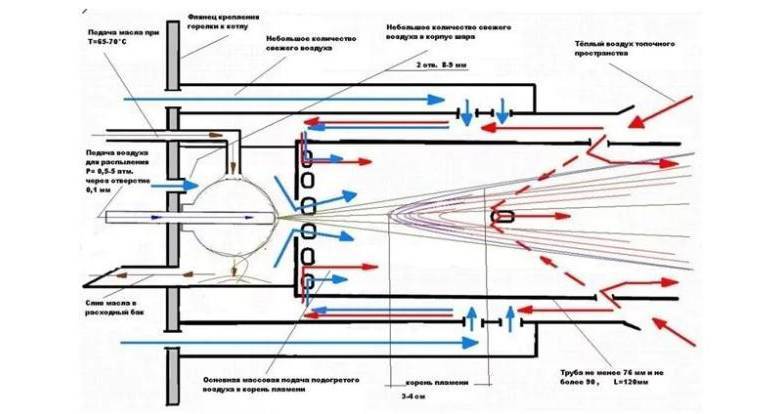
There are a great many schemes for assembling a Babington burner. We decided to use the most common one here.
The second stage is the assembly of a suitable solid fuel furnace, which will subsequently run on waste oil. When choosing a drawing and following it, in no case reduce the size of the combustion chamber where the burner flame bursts out - if tomorrow you do not have enough working out, you will have to freeze. And you can always put a portion of firewood into the large combustion chamber and continue enjoying the warmth.
The third stage is the connection of individual elements. The burner is connected to the fuel tank, after which it is inserted into a self-assembled boiler. We start heating the oil in the tank, open the valve, turn on the compressor, ignite the fuel-air mixture, and control the operation of the water circuit.
If necessary, you can switch from used oil to LPG. For this, a gas burner is purchased (no homemade products with gas!) And installed instead of a liquid burner. A gas cylinder is connected to it. As a result, you will get a full-fledged water heating, albeit somewhat gluttonous.
What are the requirements for fuel
Any oil that has worked out its resource is suitable as a fuel: industrial, transmission and motor oil.
There are certain precautionary requirements that you need to be aware of before starting to operate the unit:
- mining should not contain impurities, even insignificant ones, as this can provoke an explosion of the heating unit;
- a fire can be caused by ordinary water entering the oil, which boils much faster than oil, splashes can ignite.
Important. Before pouring the mining into the fuel tank, it must be filtered. Other flammable liquids must not be used as fuel. Gasoline for ignition is taken in very small quantities.
What ovens can you build yourself according to the drawings
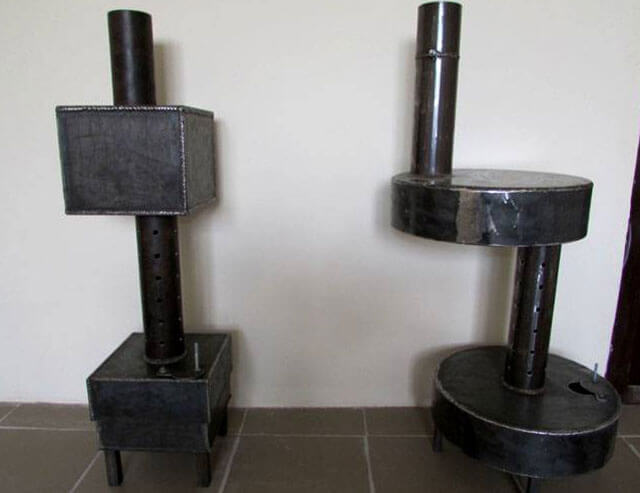
A waste oil stove with a water circuit can have a different design:
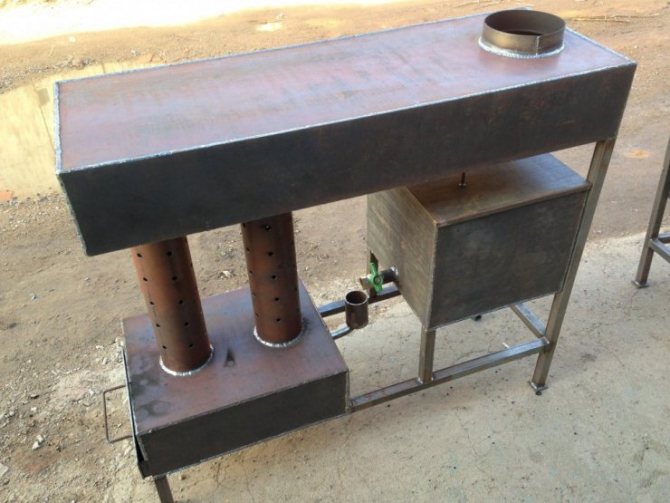
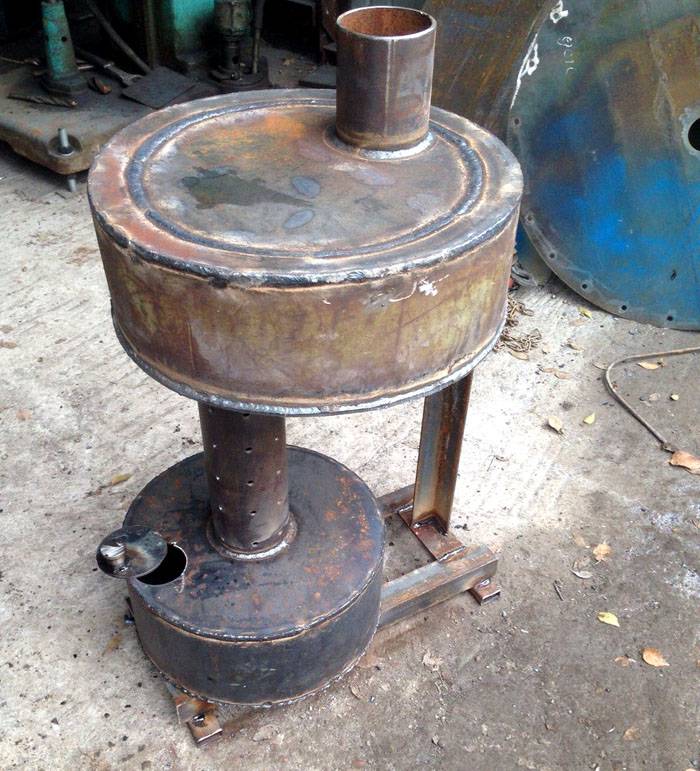
- The oven is round, welded from sheet steel. The fuel tank is combined with the combustion chamber. The afterburner chamber is a perforated pipe and an upper chamber equipped with a dividing wall that splits the flame. A hole is cut out in the cover of the lower chamber, where the mining is poured, and air will also enter there. The principle is as follows: the wider the damper is open, the better the oil will burn.
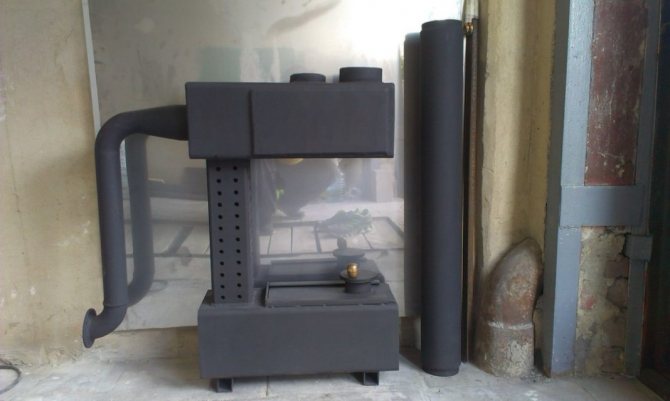
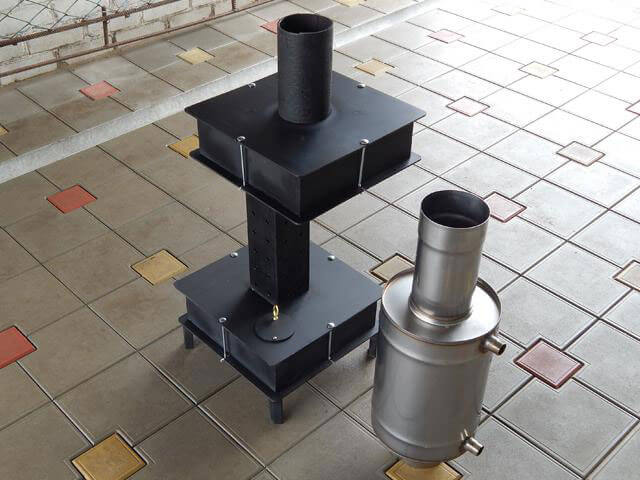
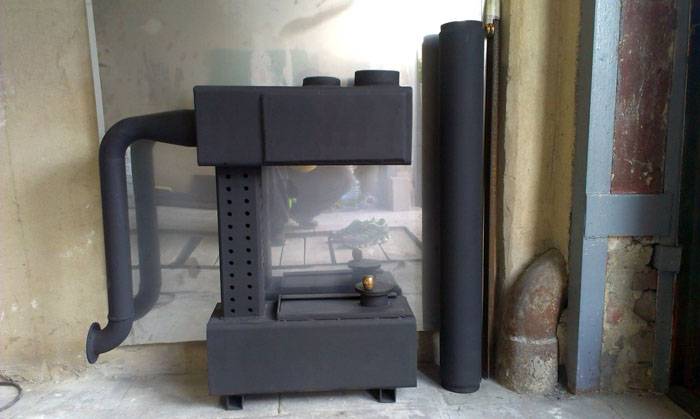
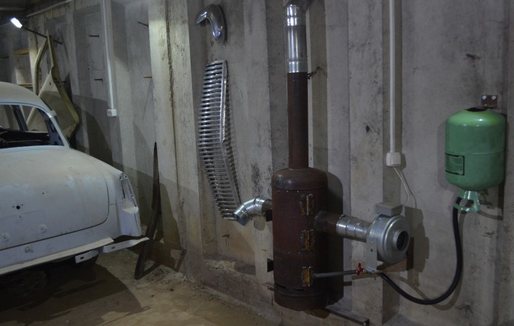
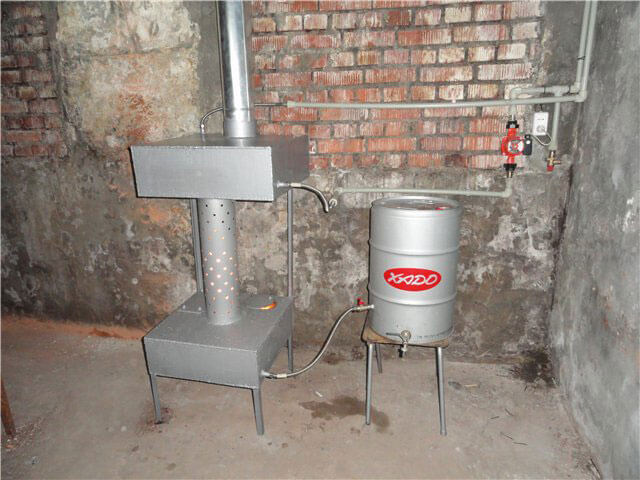
- Two-barrel oven. In one (bottom) there is a fuel tank, there is an opening for its loading. The upper combustion chamber consists of a pipe that passes through an upper barrel filled with water. It has fittings for supplying heating water. Externally, the model is very similar to a samovar. Its body gets hot enough, so you need to handle the stove carefully. Install such a "samovar" only in those rooms where accidental contact with the body of people or animals is excluded. This design has a big plus: a large tank serves as a heat accumulator.
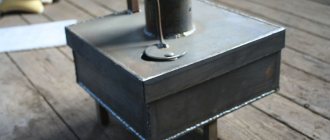
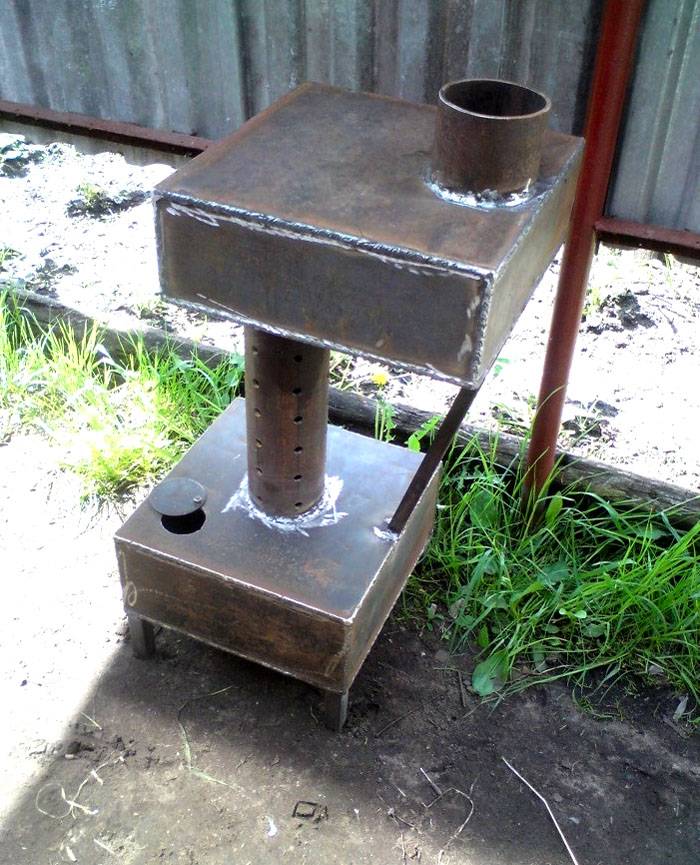
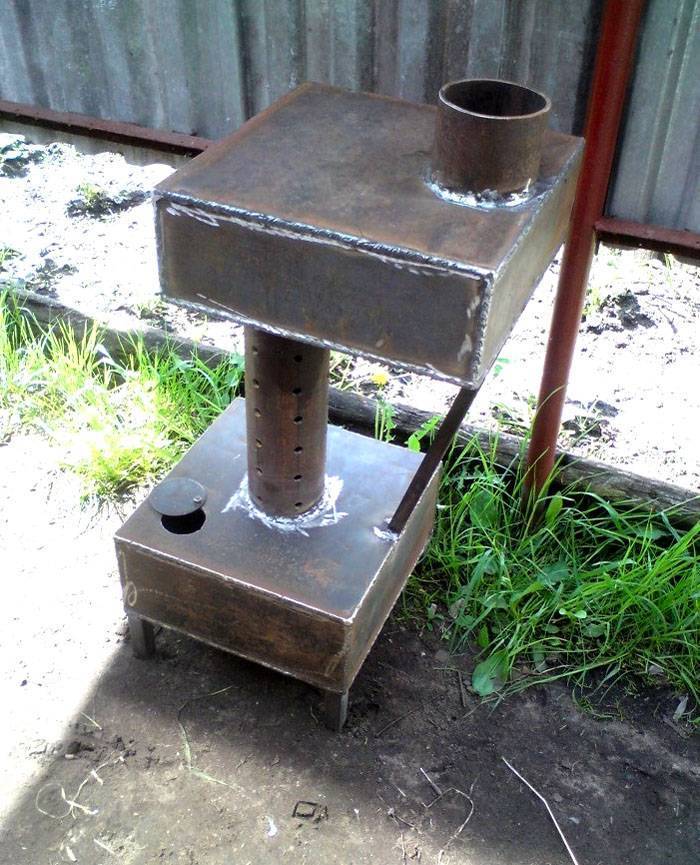
- A compact mini-oven made of a square shaped tube 18x18 cm and 10x10 cm. Simple in design, it is very easy and quick to assemble. You can cook food on it.
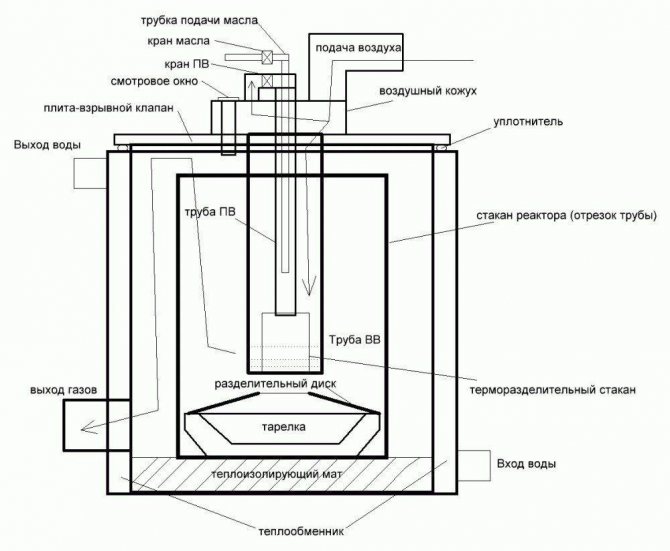
- Practical model of a mining boiler with a water circuit from a gas cylinder with a cut off top. Here you can envisage an automated feed of working off. The oil line is located in the combustion chamber. The water circuit looks like a boiler, through which the chimney is passed. Or it can be a copper heat exchanger coil, which is wrapped around the furnace body.
Sizes may vary. But the location of the main nodes is unchanged.
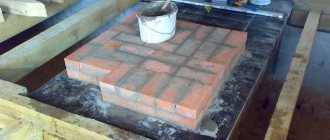
Manufacturing of the case
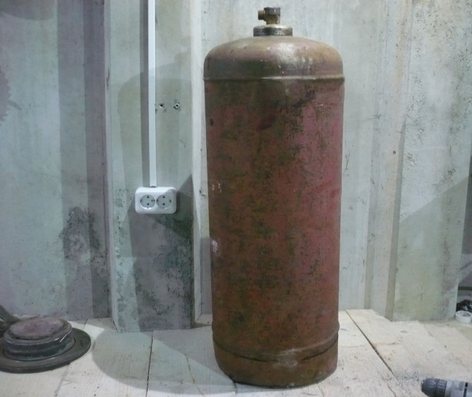
I will make a stove from this balloon
I used a used cylinder. There was no gas in it, but just in case, I opened the valve and left the cylinder on the street overnight.
Then I carefully and slowly drilled a hole in the bottom of the cylinder. To prevent sparks from appearing, I pre-moistened the drill with oil.
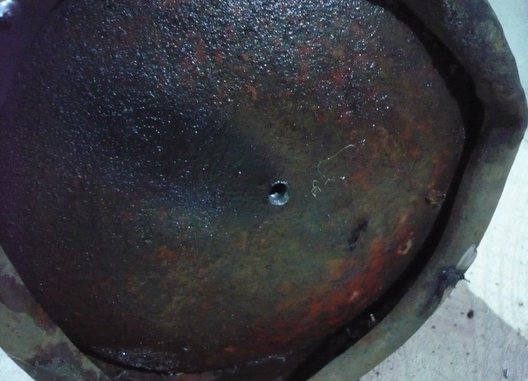
Hole
Then I filled the bottle with water and drained it - this removed the remaining gas. Work carefully, try not to spill gas condensate, because it stinks very strongly and for a very long time.
Then I cut out a couple of openings. In the upper opening I will make a combustion chamber and put a heat exchanger, in the lower one there will be a burner with a pan. The chamber at the top was specially made so large that, if necessary, it could be heated with wood, pressed briquettes, etc.
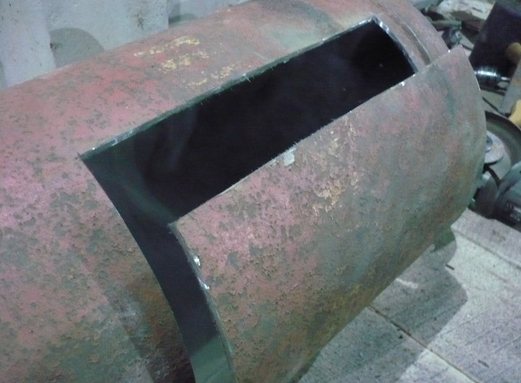
Shown how I cut a balloon
Then I once again rinsed the opened gas cylinder from gas condensate.
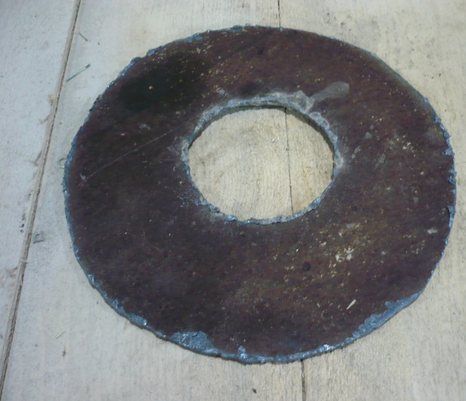
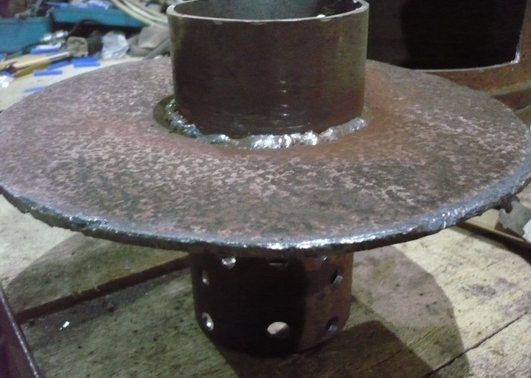
The pallet was made from a cast iron car brake disc. Cast iron has good heat resistance, so I decided to take it.
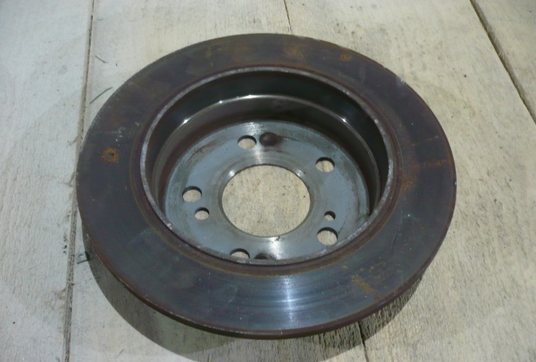
From this disk I will make a pallet
At the bottom I welded the bottom.
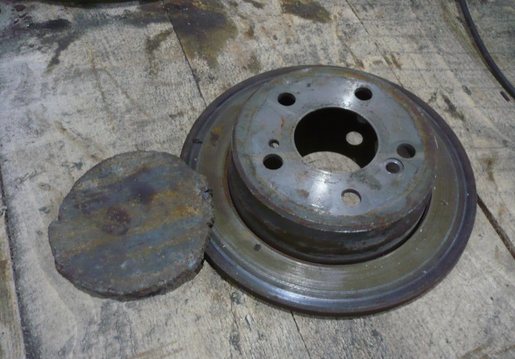
The steel circle is the bottom
I welded the lid on top. In it you can see the counterpart of the burner and the opening. Air enters the stove through the opening. I made it wide - it's better this way. With a narrow opening, the air draft may not be strong enough to prevent oil from entering the sump.
Then I made a clutch. She connects the pallet and the burner in my stove. With the clutch, it will be much easier to service the stove. If necessary, I can take out the drip tray and clean the bottom of the burner.
Then I made a clutch
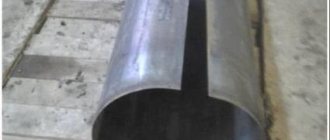
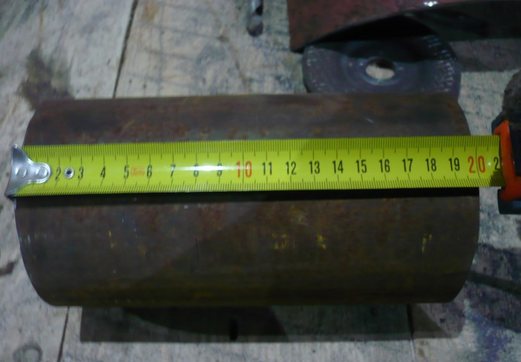
The sleeve was made from a 10-centimeter pipe, simply by cutting it along the longitudinal edge. I did not weld the opening in the coupling - there is no need for this.
Welders
How to make a waste oil oven: step by step instructions
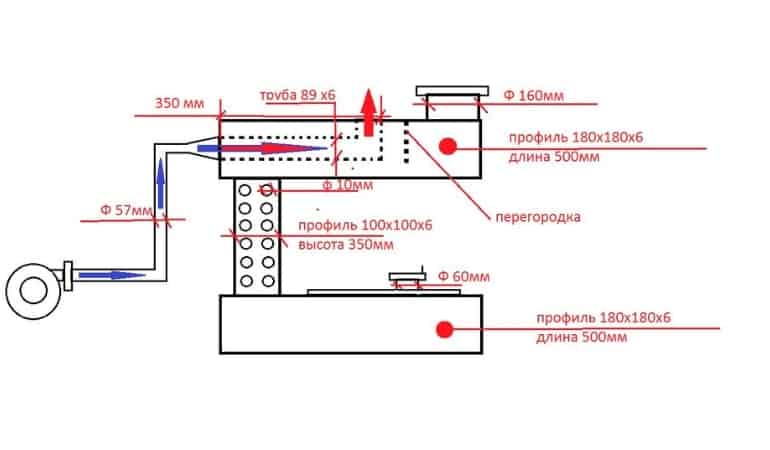
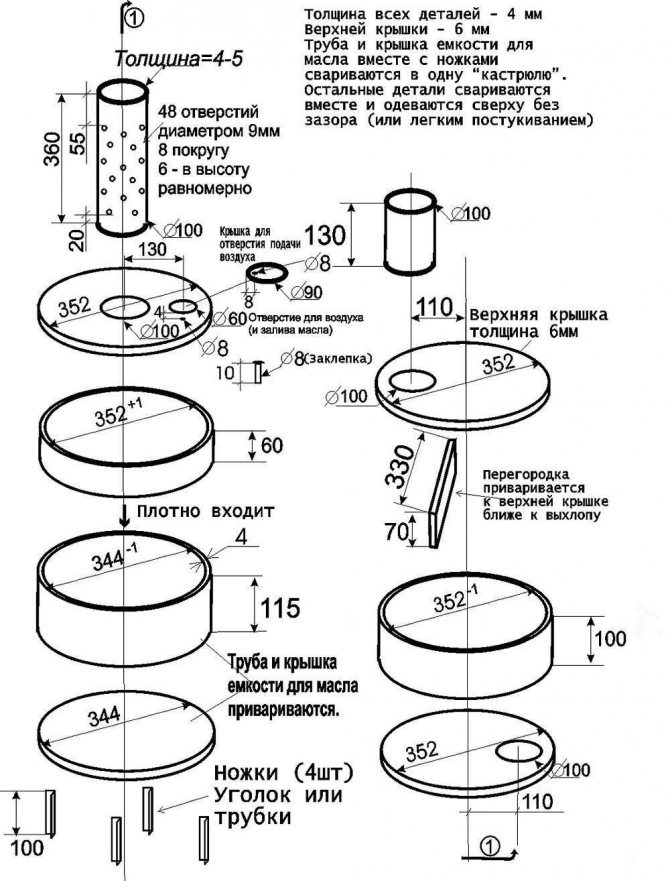
The most common model of a furnace for development is made from pipe sections with a diameter of 352 mm, steel sheets with a thickness of 4 mm and 6 mm. You need to prepare a small piece of thick-walled pipe with a diameter of 100 mm and a metal steel angle for the supports. Such a model will cope with heating an area of 80 square meters. meters.
Tools that you need for work:
- welding equipment;
- grinder with a wheel for cutting metals and a grinding disc;
- drill;
- roulette.
You also need to purchase heat-resistant paint and solvent.
Stages of manufacturing a working furnace with a water circuit according to the drawings:
- The necessary parts are cut out, burrs are removed at the cut points;
- The bottom tank is welded from a pipe 115 mm high and 344 mm in diameter. The bottom is made of steel sheet. The legs can be welded from a metal corner or from pipe scraps.
- A piece of pipe with a diameter of 100 mm and a height of 360 mm is perforated.
- Put together, by welding, the bottom tank lid: a pipe with a diameter of 352 mm, a height of 60 mm, a lid with two holes and a pipe with perforations. The damper on the air supply hole is fastened with rivets.
- Parts of the upper compartment are welded from a pipe with a diameter of 352 mm and a height of 100 mm. The bottom is welded from a steel sheet, in which a hole for a perforated pipe is provided.
- A chimney with a diameter of 100 mm and a height of 130 mm is welded. On the inside of the lid, closer to the chimney, a steel sheet partition is attached.
- The upper chamber is welded to the lid on which the chimney is installed. The upper chamber is connected to a perforated pipe. You can strengthen the structure by pulling it down with an iron bar.
- The upper boiler compartment is tightly put on the lower one.
- In order to increase the service life of the unit, it is painted with heat-resistant silicone paint. Before applying paint, the metal is cleaned of rust, the seams after welding - from scale.
- Install the oven, connect it to the chimney.
Important. The chimney of a welded stove for mining with a water circuit must be straight, at least four meters long and without bends.
By the same principle, you can make a rectangular oven.

The bottom of the firebox chamber and the burner
Then I made a bottom for the top compartment of the stove. For this I used a sheet of steel 4 mm thick.
I cut the bottom out of steel
I decided to make the burner 20 centimeters long - that's enough.
It will be a burner
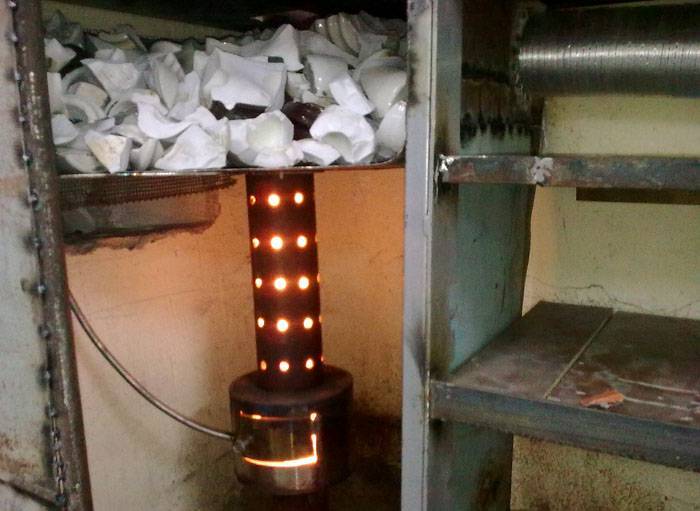
I made a lot of holes around the circumference so that air can easily get to the fuel. When all the holes were ready, I sanded the inside of the burner. Be sure to do this too, because soot will begin to actively collect on junkets and other defects.
First, I welded the burner into the bottom of the upper chamber and then put them back in place. On such a shelf of the stove, you can safely lay wood. Relevant for cases when there is no way to replenish mining stocks.
First, I welded a burner into the bottom of the upper chamber
Connecting the water circuit to the furnace
The water circuit is connected to the upper chamber. You can weld the water container directly to the surface of the stove, but it is better to make a separate structure so that when the bottom burns out, water does not enter the combustion chamber. This will cause the oil to splash and ignite.
The tank can be made in any size. For maximum heating, it should fit snugly against the upper chamber and flue gas vent. The fittings for the coolant supply and return are welded to the tank.
Be sure to attach a thermometer and a pressure gauge. The pump and expansion tank are installed on the return line, closer to the boiler.
Fire safety requirements
The working furnace heats up and becomes fire hazardous, so you need to comply with the requirements for its installation and operation:
- The floor surface must be non-combustible. Concrete, ceramic tile, metal surfaces are allowed. The wooden floor near the stove is covered with metal.
- If the wall near which the stove is located is made of wood or other non-fire-resistant material, then it must be covered with an asbestos sheet.
- Drafts must not be allowed in the room where the stove is installed. Flames from the perforated pipe can spread to surrounding objects.
- It is forbidden to store any flammable materials near the oven.
- The mining stocks are stored in another room.
- Fuel must not be added to the oven during operation.
- In the room, you need to keep in a convenient place a powder or salt fire extinguisher.
Important. It is forbidden to extinguish burning waste oil with water. The fire will only intensify.
A working furnace is an economical and convenient heating unit, which, with proper operation and installation of the water circuit, will significantly improve the indoor climate and will be an irreplaceable source of heat in a garage or workshop.