There is a cartridge in almost every single lever mixer. It is he who allows you to set the appropriate water temperature, and most often is the reason for the premature failure of the device.
Such a breakdown is easy to fix on your own, because you can change the cartridge in the faucet in the kitchen without having the skills of a professional plumber. It is enough to have a desire and a minimum set of tools.
Cartridge: device, how it looks and where it is
Modern mixers are equipped with either a ball cartridge or its disk counterpart.
Ball cartridge
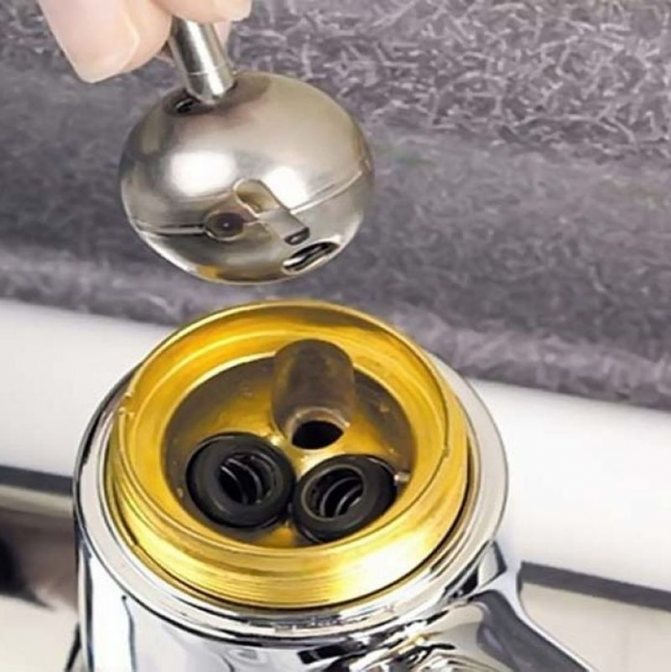
The ball valve design includes the following elements:
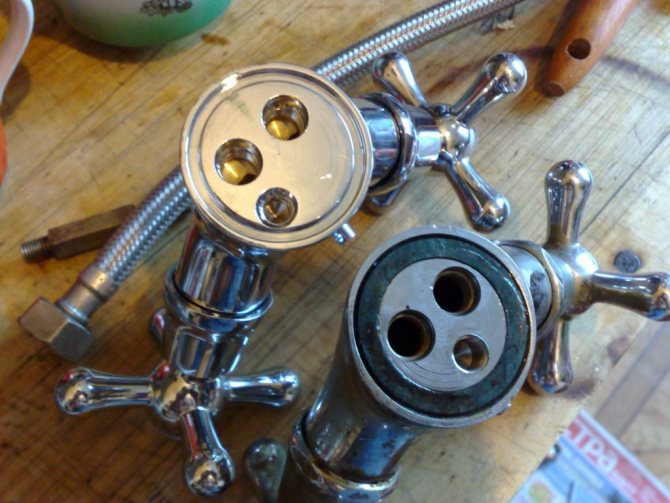
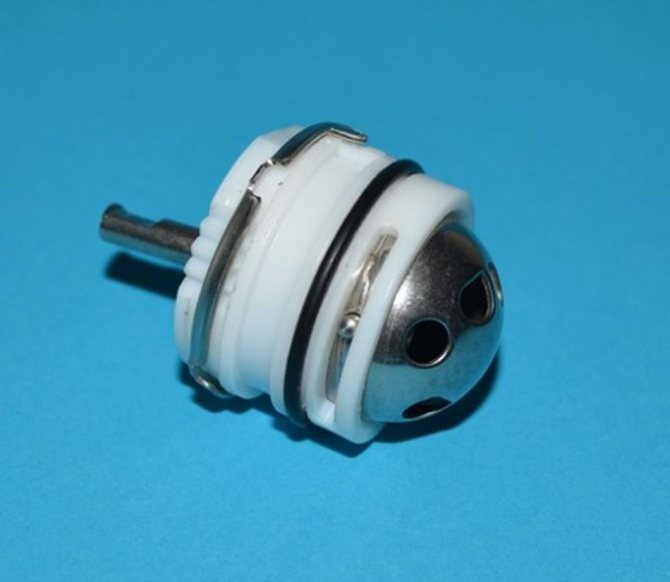
- a hollow ball with a diameter of about 40 mm with three identical holes, one of which is in the middle, and the other two are on the sides slightly lower;
- the seat also has three channels with rubber seals;
- on top of the ball there is a rod for adjusting its position.
The inner cavity of the ball (mixing chamber) is filled with cold and hot water through the side holes, where mixing takes place. The middle hole serves to discharge the already mixed liquid into the outlet channel, through which it enters the mixer head in a state ready for use.
The design of the seat allows the inlet channels to be closed when the ball is turned (using the rod). The water supply of the required temperature depends on the throughput of each of the holes, which can be partially or completely closed.
Disk cartridge
Most of the faucets available on the plumbing market are equipped with disc-shaped cartridges, which are cheaper, easier to manufacture and do not need to periodically (every 2-3 years) change rubber seals, like ball models.
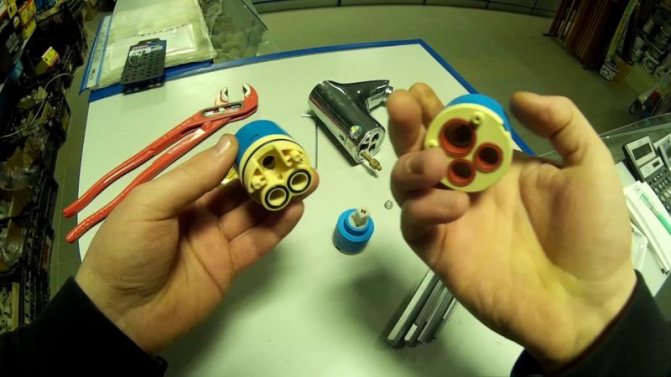
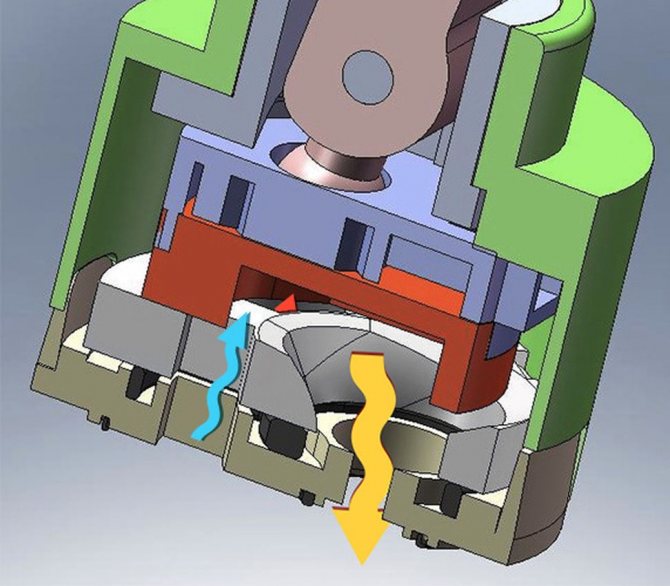
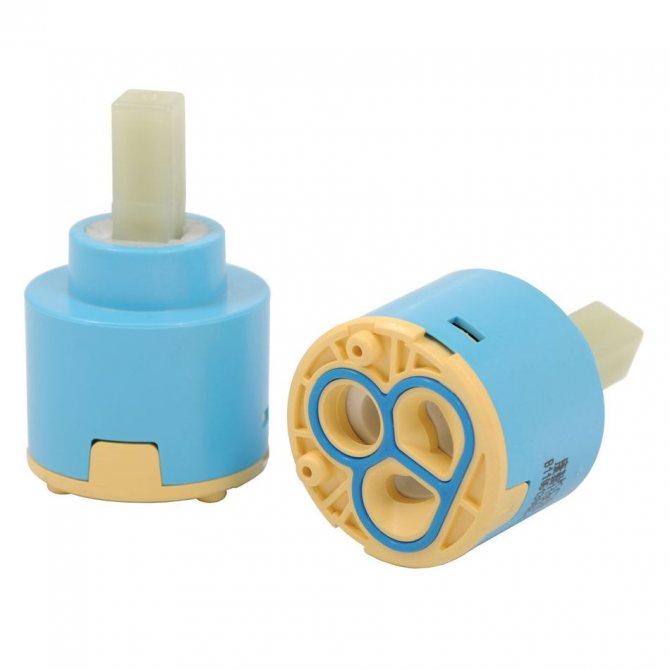
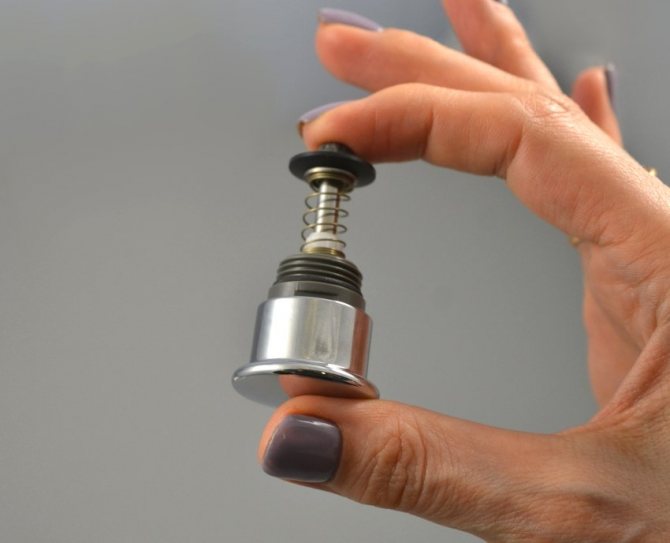
The disc-shaped cartridge has a cylindrical shape with three holes on the bottom (2 inlets and one outlet). Inside the cylinder there are two ceramic discs in close contact with each other. One of them is motionless, and is located below. The upper disc is driven by a rod connected to the mixer adjusting handle.
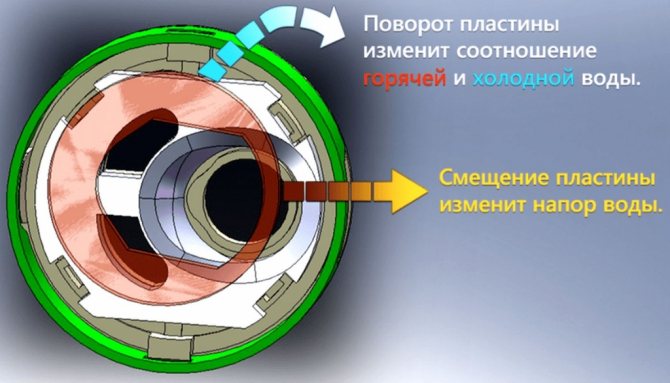
The lower disc has holes that match those in the case. The upper disc, displaced by means of a lever, reduces the clearance of each of the inlet channels (up to a complete overlap), thus regulating the amount of incoming water. For smooth movement of the plates, the space between them is filled with silicone grease.
Types of cartridges for single lever mixer
The cartridge for the single-lever mixer is produced in 2 types:
- ceramic;
- ball.
Speaking for a ball cartridge, it regulates hot / cold water. So you can easily adjust its comfortable temperature. Due to its design and shape, it is less sensitive to dirty and hard water.
Its principle of operation is as follows: water enters the ball through a spring-loaded Teflon seat and two supply channels. Inside the ball, a stream of hot and cold water is mixed, and then comes out.
Replacing the cartridge
The ball is very sensitive to corrosion. This is one of the main disadvantages of the ball cartridge design. In addition, Teflon seals wear out quickly in them due to chlorinated water.
Another cartridge option is ceramic. It consists of two washers (plates) that are made of aluminum oxide. No water should seep between these plates. Such cartridges are able to serve without interruption for about 10 years.
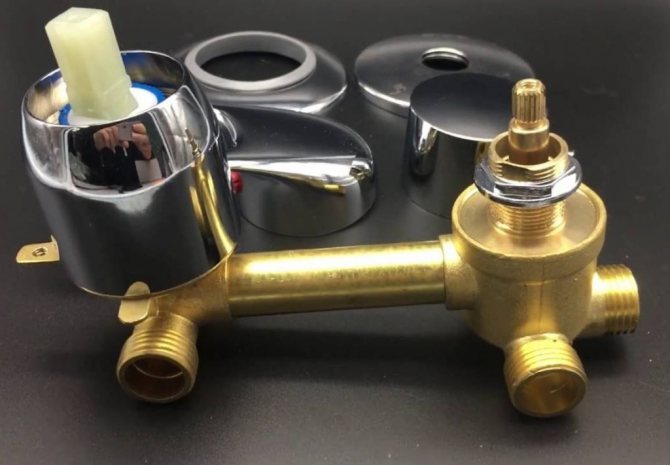
This device is used in shower cabins. It distributes water to the shower head. The cartridge is located in the divertor. If a breakdown occurs, then it will be necessary to replace the divertor. If it is installed in a kitchen or bathroom, then the principle of replacement is described in this article.
When to change
If the phenomena described below are observed in the operation of the device, it is highly likely that the cartridge needs to be replaced:
- the flow head at the outlet does not correspond to the position of the lever;
- lateral movements cause significant difficulties, there is no smooth running;
- there are leaks along the body of the mixer, water accumulates around it;
- arbitrary temperature change, inadequate response of the device to the turn of the adjusting knob;
- water flows even when the tap is completely closed.
There are a number of factors that are most common in premature kitchen faucet cartridge failure. The main ones are listed below:
- Fragments of lime scale, rust particles and other water-insoluble impurities, getting between the discs, often cause chips. Even small defects on the surface of the plates break the tightness, negatively affecting the operation of the cartridge and the device as a whole.
- Regular water hammer. This phenomenon can be observed during the water supply, after it is turned off.
- Poor quality materials used in the construction of the device.
- The mixer operating conditions do not meet the manufacturer's requirements.
- The high content of calcium salts in tap water provokes the formation of scale on the discs, which causes their premature wear and failure.
Important! A conventional coarse filter installed in front of the mixer will help protect the device from the harmful effects of small fragments of lime scale, metal oxides or sand. Its absence for some manufacturers is the reason for the disclaimer of warranty obligations.
The main causes of cartridge breakdowns
The main reason for the rapid failure of the cartridge is the low quality of the parts used in its manufacture. At the same time, breakdowns of this crane element can be provoked:
- poor quality of water passing through the system;
- the presence of metallic impurities in the water;
- salt deposits inside the plumbing fixture;
- frequent and too strong hydraulic shocks inside the water supply system;
- improper operation of the mixer;
- errors during installation or replacement of the device;
- by installing the wrong type of design.
It should be remembered that installing a filtration system on the water supply to the taps has a positive effect on the functioning of the mixers. The filter allows you to block the passage of various impurities, which prolongs the life of the internal parts of the plumbing fixture, reducing the risk of cartridge failure.
How to change it yourself: instructions
It is quite easy to figure out how to change the cartridge on a kitchen faucet - no more difficult than replacing the rubber gaskets in a conventional valve. To do this, you need the following tools:
- flat screwdriver with a narrow slot;
- hex wrench;
- a gas or adjustable wrench, an ordinary open-end wrench of the appropriate size is also suitable;
- a knife with a thin blade.
Perhaps a piece of cloth and a tool for stuck-on threaded items, such as WD-40, will come in handy. If one is not available, vinegar solution will replace it.
Do-it-yourself mixer tap repair of frequent faults
Problems that arise during the use of devices are mainly due to wear of the moving parts of the mechanism. In this case, it becomes necessary to repair the mixer cartridge with your own hands. There are several faults:
- when opening the tap (in the same position), the water temperature may differ;
- possible difficulties with the rotation of the lever itself;
- it is impossible to close the tap completely. Water continues to drip or flow;
- difficult to adjust the water temperature.
If water continues to drip in the closed position, then it's time to change the mixer cartridge.
Helpful advice! Before purchasing a faucet for a bathroom or kitchen, you should familiarize yourself with the list of leading manufacturers and customer reviews to help you make the right choice of a quality product.
Cartridge wear can occur due to several factors:
- poor quality of running water. It can contain various impurities;
- violation of operating rules;
- manufacturing of a cartridge from low-quality materials;
- water hammer, which occurs due to pressure surges during water supply;
- end of service life.
If at least one of the factors occurs, then it's time to think about how to change the cartridge in a bathroom or kitchen faucet. It will be much easier and cheaper to change it than buying a new crane.
To replace the mixer cartridge, you will need a screwdriver and an adjustable wrench
It is very easy to repair a shower mixer, a faucet in a bathroom or kitchen. But it is possible to repair the cartridge itself only if a blockage has formed on the working surface or the thrust rings are worn out. If the plates are worn out, cracks have formed, etc., then it is worth replacing the cartridge in the mixer of the shower, bath or kitchen. It will not be possible to fix it even with the help of professionals.
Renovation work
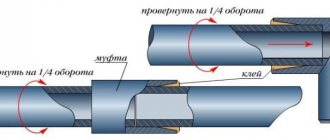
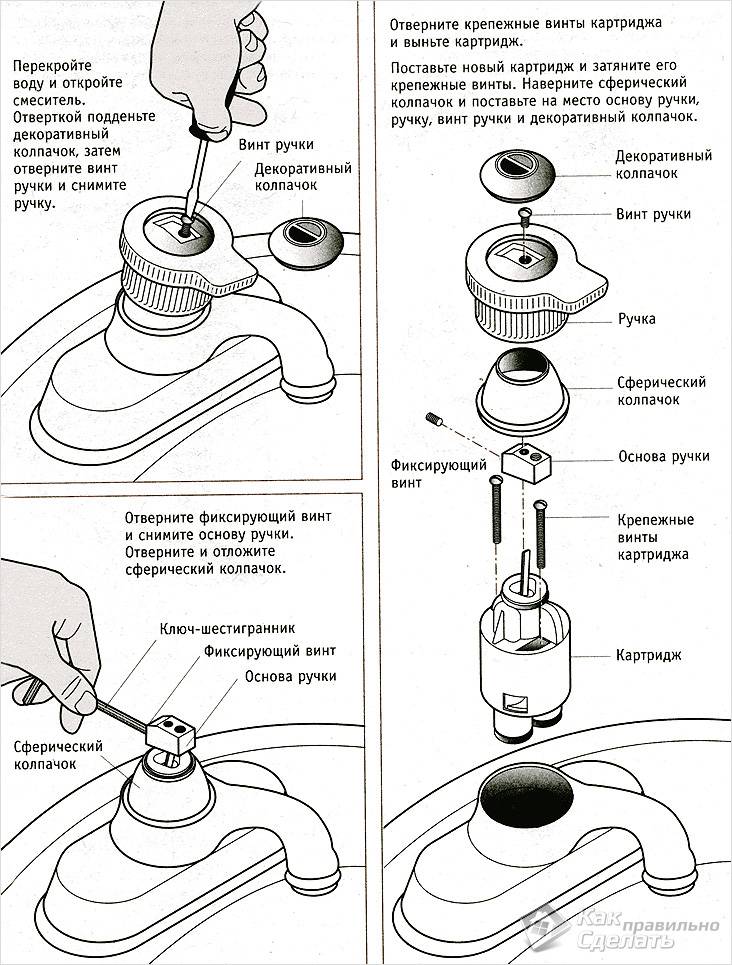
Next, we will take a step-by-step look at how to replace the cartridge in a kitchen faucet. The process includes the following points:
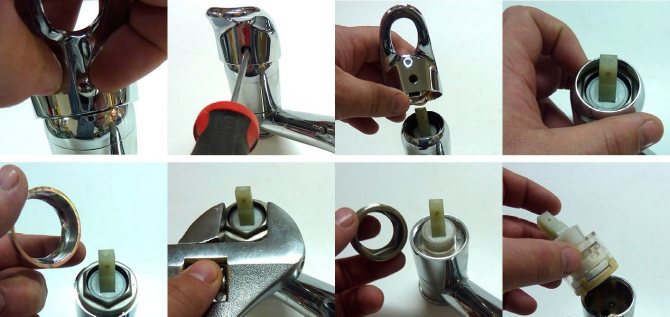
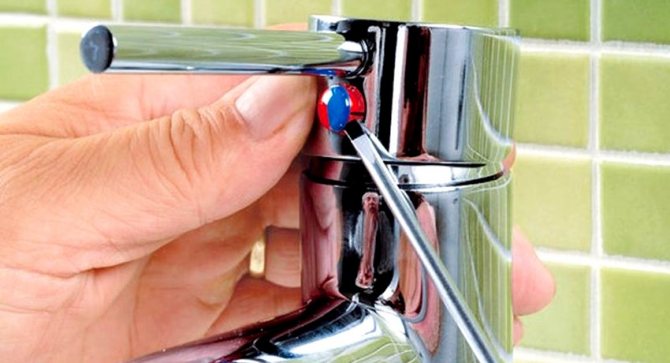
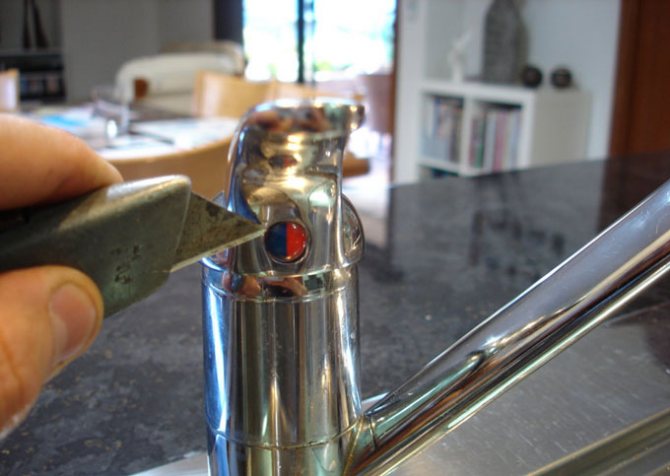
- Use a thin knife or a thin screwdriver to remove the plug on the mixer lever. Finding it is easy: this plug usually has a blue and red sticker on it. The function of the sticker is to tell the user the correct position of the lever for dispensing cold or hot water. This procedure should be carried out carefully so as not to damage the coating.
- A screw will be visible through the opened hole, which must be unscrewed in order to freely remove the lever. Depending on the profile of the slots on the head of the screw, you will need a screwdriver or a hex key of a suitable size.
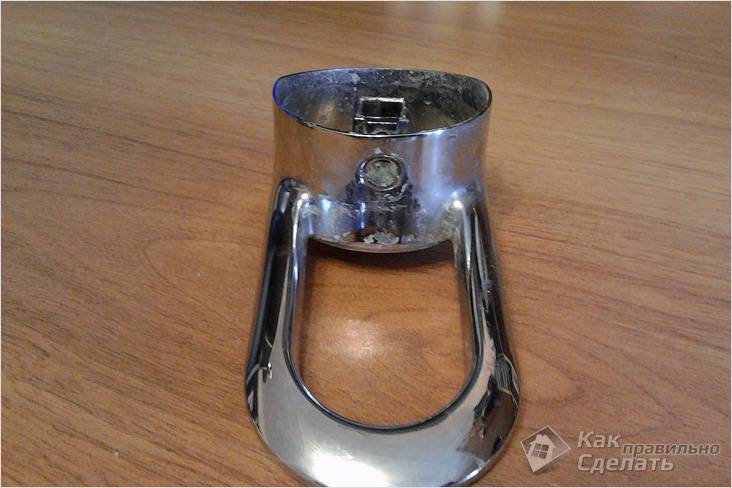
- After the mixer handle is removed, you need to unscrew the protective ring. This procedure is performed without the use of any tools.
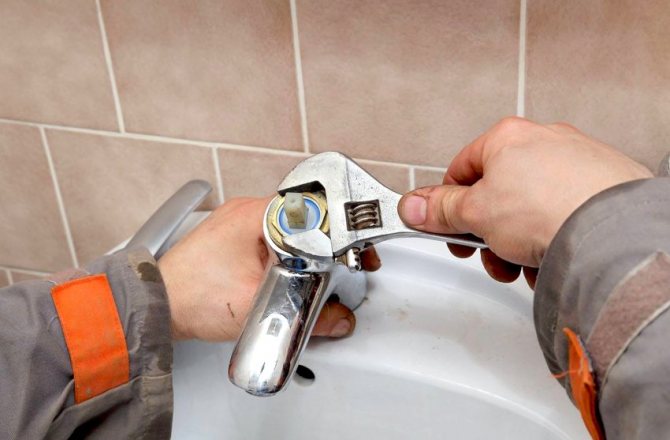
- It remains to unscrew the clamping nut, for which an adjustable wrench is best suited. You can also use a gas wrench or open-end wrench.
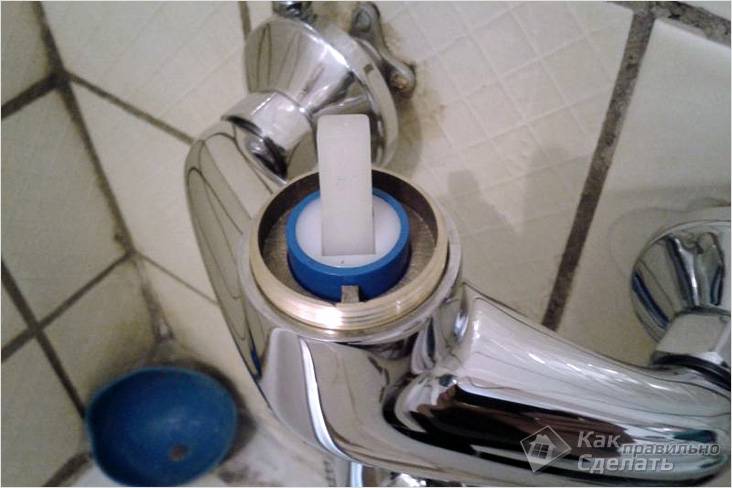
Now you need to remove the faulty cartridge from the mixer, carefully clean the seat from foreign objects (if any), install a new one and assemble everything in reverse order.
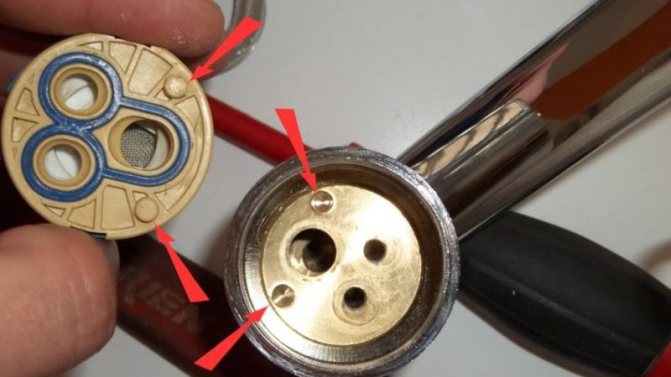
The installation of a new cartridge should be carried out in such a way that the protrusions on its body coincide with the recesses of the mixer seat. If the cartridge is correctly selected, there should be no problems.
The repair of the ball valve occurs in much the same way, with the only difference that the ball has to be changed extremely rarely. The gap between the ball and the seat is large enough so that any particles interfere with smooth rotation.
All moving parts and the mixer seat are made of metal, which, unlike ceramics, is not prone to cracking. Most often, the ball mixer has to be disassembled in order to replace the rubber gaskets.


Replacing the cartridge in the mixer: easy and simple repair of a single lever valve
Replacing the cartridge in the mixer: types of cartridgesHow does the mixer cartridge work: can it be disassembled How to replace the mixer cartridge: sequence
Agree, repairing a mixer, in which the water flow is controlled using the axle box valve, is a rather difficult and tedious task. In addition, the axle boxes themselves are not reliable and now and then leak.There are a lot of places and reasons for a leak.
Another thing is the so-called joystick mixer, in which a ceramic cartridge is used as shut-off and control valves - although it breaks down periodically, its design does not allow water to flow out in emergency situations. This article, along with the vannaja.
net we will analyze the question, how is the cartridge replaced in the mixer?
Photo Joystick Mixer Cartridges
Before getting close to the question of how to change the cartridge in the mixer, let's first clarify the situation with the varieties of this device a little. The fact is that they may differ in some parameters, and there is no absolute certainty that a particular cartridge will definitely suit your crane.
The cartridges of joystick mixers can differ in two design features.
- Ball cartridge. In such devices, the control of water flows is assigned to a hollow metal ball, in which several holes are drilled - when it is turned, the holes are more or less aligned with the holes in the valve body, through which cold and hot water enters it, mixing in the cavity of the ball in a certain proportion. A significant disadvantage of this design of the cartridge is that when it is not used for a long time, it starts to stick - between the ball and the sealing insert, limescale settles, and gradually the cartridge fails. In addition, due to the same drawback, a joystick mixer with a ball cartridge is practically not produced today.
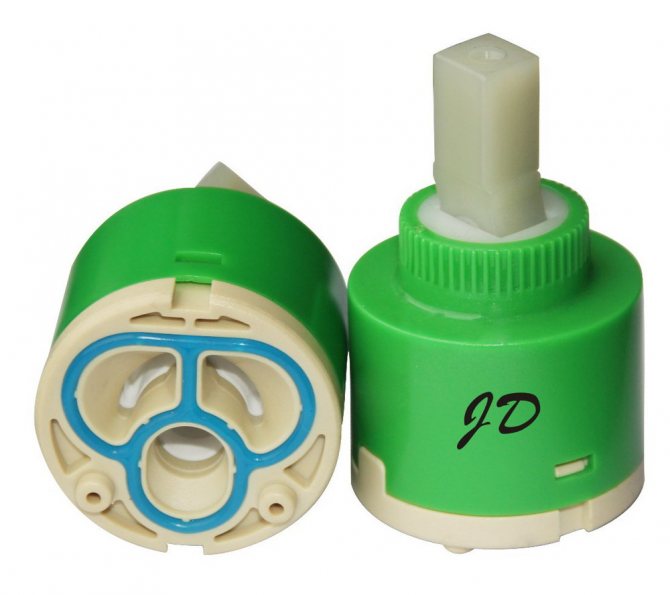
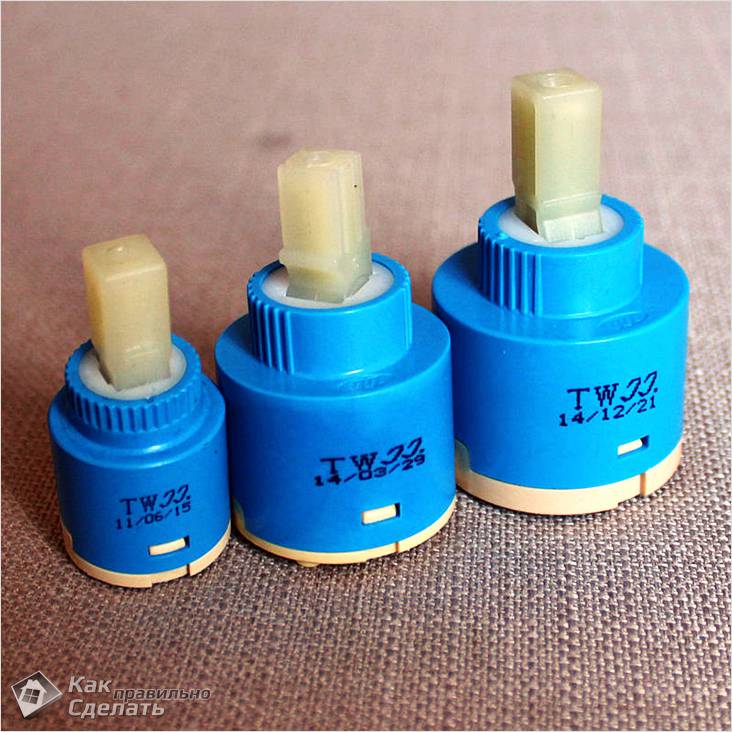
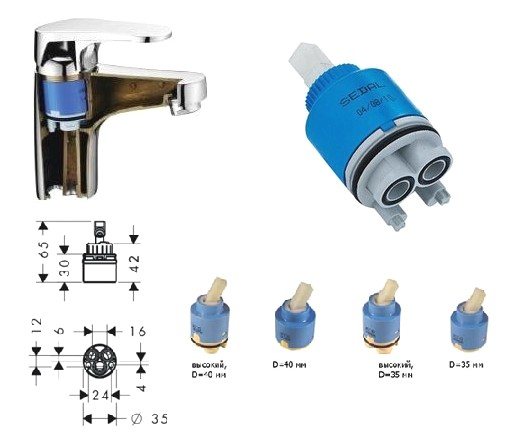
- Another thing is the plate cartridge, it can be called absolutely reliable. Such a device, with high-quality manufacturing, can serve stably without breakdowns for up to 10 years. But if it's time to change it, then it's time to know that such devices can also differ in four ways: diameter, height, seat and, in some cases, the length of the stem. It is for this reason that you need to purchase a new cartridge with an old one in your hands.
What is the design of the cartridge? Surely many craftsmen will have a desire to disassemble it and see what's inside, and maybe instead of buying a new one, you can repair the old one? I will not dissuade you from this activity (curiosity always prevails), I will only say that this idea is useless, and almost always the cartridge cannot be repaired.
By the way, cartridges are both collapsible and non-collapsible. The last view consists of two parts - upper and lower.
In the body of the upper part there is a stem, which is inserted into the upper ceramic disc with its lower part.
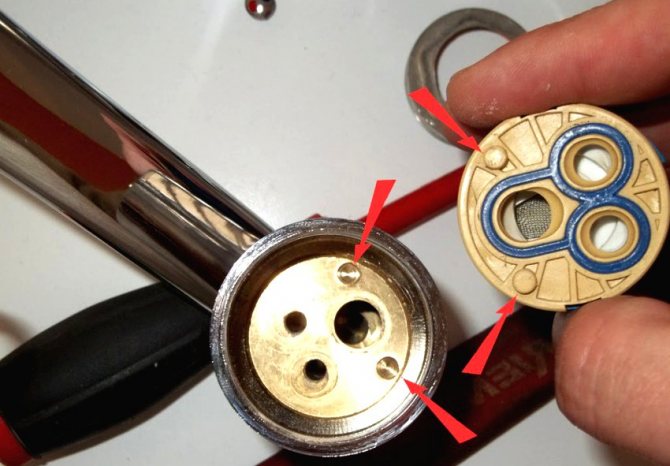
The lower ceramic disc is installed motionlessly - moving relative to it, the upper disc closes and opens the holes, through which the water flow is regulated.
Photo mixer cartridge repair
For a reliable connection between the cartridge and the mixer, rubber seals are installed at the bottom of the cartridge, and to extend the life of the ceramic parts of this device, the holes in the lower part of the case are equipped with coarse filters (metal mesh) that do not let small debris into the cartridge.
In the video clip, you can clearly see how the repair and replacement of the cartridge in the mixer takes place.
Of all the plumbing jobs, nothing is easier than replacing the cartridge in a joystick faucet. If everything is done correctly and some subtleties are observed, then even a schoolboy will cope with this work. In general, the solution to the question of how to replace the cartridge in the mixer is as follows.
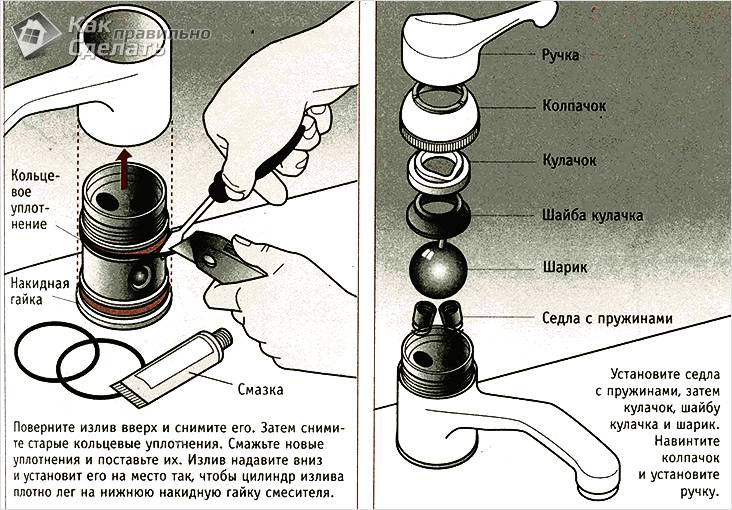
- We shut off the water supply from the riser and raise the mixer lever to the highest position. In its lower part, in front, we find a plastic cap with a red and blue mark - carefully pick it out with a knife or a thin screwdriver.Under it you will find a small screw, by unscrewing which you can easily remove the mixer lever. It is not worth unscrewing the screw completely, it is enough to loosen it a little.
Replacing the cartridge in the photo mixer - After removing the lever from the mixer, you will have access to the chrome decorative cap. In theory, it should be easily unscrewed by hand, but if the mixer has been in operation for a very long time, this may not be possible. In this situation, we take the first number adjustable wrench, set it up so that it does not break the plastic cap and carefully, without sudden movements, unscrew it.
- Unscrewing the decorative cap, you get access to the nut that holds the cartridge itself - we unscrew it with the same key and take out the broken cartridge, with which we go to the store for exactly the same new one.
- Before installing a new cartridge, you need to do a little cleaning - you need to clean the cartridge seat. Over a long period of operation of the mixer, dirt may accumulate there, which will not allow the cartridge to be sealed. In addition, hard ceramic particles may remain there as a result of the fracture of the ceramic discs.
How to change the cartridge in the photo mixer - We install a new cartridge - here you need to make sure that the projections on the cartridge coincide with the holes in the mixer seat.
- After the cartridge takes its place, we tighten the nut back, install the decorative cap, then the joystick itself and the screw cap.
We invite you to familiarize yourself with Doors for the bathroom we choose the best of all available options
That's the whole repair of the mixer cartridge, if, of course, you can call it that. Now we open the water supply and check the mixer for operability and the absence of leaks.
As you can see, everything is not as scary as it might seem at first glance. You know, there is one saying - the eyes are afraid, but the hands do. Replacing a cartridge in a mixer looks exactly the same for an inexperienced person.
Do not be afraid - remember that at any time you can always turn off the water again and eliminate all your flaws. By the way, the occurrence of the latter is very unlikely if you do everything as described above.
Recommended
Recently, more and more people prefer single-lever models when buying faucets. In such a device, water is opened and closed with one movement of the lever.
The main working element here is a cartridge that mixes water coming from different pipes. Over time, such a cartridge wears out or breaks. In this case, it is simply changed.
It is unprofitable to repair it, since it is inexpensive, and it will not be difficult to replace this part. We will tell you how to do this below.
All cartridges used in modern mixers are divided into two main types:
- Ball. The main part of the device is a hollow metal ball with holes. When turned, its holes align with the channels in the mixer body. In this way, hot and cold water is mixed. Today, such models are considered obsolete. The disadvantage of this design is the formation of limescale on the surface of the ball, especially if the mixer has been inactive for a long time.
- Ceramic. Here the main acting role is played by two ceramic plates with holes. Due to their movement relative to each other, the strength of the flow and the temperature of the water change. Nowadays, almost all faucet cartridges are made of ceramics. They may have different body materials and slight differences in design, but the principle of operation is always the same.
Failure
If your faucet stops blocking the water or the lever moves too tightly, it means that it is time to replace the cartridge. Also, this problem is indicated by a leak from under the mixer lever.
Most often, cartridge breakdowns occur due to:
- Bad water. Dirt and sand can destroy the finest pottery;
- Negligent handling. The mixer has been hit, jerked, etc .;
- Permanent switching on - switching off the water in the system, leading to water hammer.
As a rule, despite the assurances of manufacturers that their cartridge can last up to 10 years, in practice this device does not live up to 5. Therefore, almost everyone has to deal with replacing the cartridge.
As life shows, there is nothing terrible and complicated in this, and such work is within the power of anyone, even a person who is not experienced in plumbing.
Replacement
Replacing the cartridge is a snap. The main thing is to follow simple rules, namely, not to rush and not be afraid:
- First, shut off the water. If there are valves that shut off the water separately to the mixer, great! Otherwise, you will have to turn off the water for the entire apartment. If it is not possible to shut off the water in the apartment, then the only option that remains is to contact the UK or HOA in order to block common risers.
- Next, carefully remove the decorative plug on the mixer lever (red and blue plastic thing). This can be done with a flat screwdriver or a knife.
- Under it we will find the locking lever screw. It will most likely be difficult to see with the naked eye, so use a flashlight. The screw can be either a Phillips screwdriver or a hexagon. We loosen it and remove the lever.
- The next obstacle that comes our way is the chrome cap. The difficulty here is that it sticks with time and it can be quite problematic to turn it off. You can, of course, do this with a key, but this part is so delicate that it can be easily damaged. Although this will not affect the performance of the device in any way. Except that the appearance will suffer. Therefore, to avoid unnecessary sacrifices, use WD-40 before unscrewing the cap, it will greatly simplify the task.
- After we have removed the inconvenient cap, under it we find a convenient nut, which can be turned off with any key (it is more convenient with an adjustable wrench). It actually holds the part we need in the mixer body. If the nut does not want to give in, we use the same magic WD-40.
- The nut is removed and now it is the goal of our operation - the cartridge! We remove it from the nest and clean the place where we will put the new one, from dirt, sand, rust and all that which should not be there.
- Now we take the faulty part and go with it to the store (unless, of course, you purchased it in advance).
- The seller will easily select the exact same cartridge for you, and you can safely start assembling your mixer.
- We carefully insert our part into the seat. It is necessary that the projections on the cartridge body line up with the holes in the mixer. We tighten the nut. When screwing, it is better to lightly hold the cartridge so that it does not jump out of the grooves. Attention! The mixer is a rather delicate device. All parts are tightened tightly, but without much effort. Some people think that the tighter you tighten, the more likely you are to avoid leakage, but this is not entirely true. If you overdo it, you can achieve the opposite effect.
- We recommend that you turn on the water immediately after tightening the nut, that is, before you put on the cap and lever. This is in case a leak is found, so as not to disassemble it all over again. If water has leaked somewhere - well, you will have to disassemble everything again, now you know how to do it. There can be two reasons for the leak: either the part has jumped out of the grooves and is not tight, or it is a factory defect of a new cartridge.In the second case, of course, the part must be replaced.
- If everything is in order, tighten the fixing screw on the lever, put the decorative plug and that's it, you can use it!
We suggest that you familiarize yourself with Replacing a cartridge in a mixer: how to change an element in a tap, how to replace it with your own hands, repair of Blanco Daras products
Blitz Tips
Features of replacement on different mixers
In the plumbing market, many companies are engaged in the manufacture of all kinds of taps and mixers. There is no single standard for the cartridges used in all of these devices.
For each brand of mixer, only a cartridge of this manufacturer is suitable. If there is no proper experience, the only correct option is not to be mistaken - to buy a new cartridge only after removing the faulty one, taking it as a sample.
On various versions of single-lever mixers, both solid cartridges and collapsible cartridges can be installed. In the case of the latter, there is the likelihood of a successful repair.
However, finding the right part is quite difficult, especially for older models. Therefore, in most cases, you should buy a new cartridge assembly for replacement. And even better - when purchasing a mixer, immediately take a spare cartridge for it.
Cartridge selection
It is recommended to start choosing a new cartridge for the mixer only after disassembling the faulty plumbing device and removing the faulty element. This approach to solving the problem eliminates the choice error and guarantees the purchase of a cartridge that is ideally suited to the design features for the mixer being repaired.
In some cases, due to a thick layer of rust inside the faucet, it becomes difficult to remove the old cartridge.
The cartridges used in the mixers differ in width and height, and among other things, the following parameters should be taken into account when choosing:
- availability of a quality certificate for the item of the plumbing fixture being sold;
- availability of a guarantee certificate with a mark of passing the test with a pressure of 3.5 atm;
- the material used in the manufacture;
- shape and number of bottom holes;
- number of grooves and protrusions;
- manufacturer reviews.
Produced cartridges can be collapsible and non-collapsible. The latter option is more affordable, but cannot be lubricated or cleaned, it is not suitable for removing the gasket, therefore it fails more often than collapsible models. To date, the brands Grohe, Kaiser, Blanco, Potato and Frap have proven themselves best.
How to understand if a cartridge is broken
There are more likely causes of breakage leading to the replacement of the cartridge in the mixer:
- The water supply is interrupted (either cold or hot water is supplied)
- One type of water does not turn on (when you turn on the tap, you cannot turn on certain water)
- The water temperature changes every time, although the position of the lever remains unchanged.
- It is not possible to achieve complete water shut-off or maximum head.
- Effort is required to change the position of the lever.
Recently, of all mixers, consumers have preferred single-lever mixers with a ceramic cartridge. The great demand for such mixers is due to the fact that they have a long service life and are easy to use, unlike traditional ones. This mixer has a long service life due to the fact that it replaces metal parts subject to constant friction with more durable ceramic ones. The convenience of a single-lever mixer is that there is no need to set the desired temperature, since the water is turned on and off with a lever.
The ceramic cartridge consists of two ground plates adjacent to each other. They are durable and resistant to corrosion, but still their surfaces can be damaged by impurities in tap water.It is the quality of the water that affects the durability of the mixer, since the water is in constant motion, it destroys the surface of the water pipes and delivers particles of rust and metal to the mixer system, which leads to breakdown. To purify water from impurities, it is recommended to install a filter in front of mixers of this kind.
If this is not done, the ceramic plates will fail much faster. Well, if, nevertheless, water starts dripping with the tap closed, most likely you will have to replace the ceramic cartridge.
How to replace a cartridge in a kitchen faucet with your own hands
So, you decided not to contact the professionals, but to replace the cartridge for the kitchen faucet on your own. A full plumbing kit is not required for such a mini-repair.
You only need a few tools that are available in almost every home:
- regular pliers;
- flat screwdriver;
- adjustable wrench;
- something to descale from the mixer - for example, WD-40.
Important! Do not forget to shut off the water supply pipe before starting work.
For your convenience, here is a step-by-step action plan:
- First you need to remove the decorative plug. It's a small button just below the lever. Most often it serves to show which side is hot and cold water. To remove the plug, take the prepared flat screwdriver and unscrew it.
- You will see a screw in place of the plug. It is thanks to him that the lever is fixed to the mixer. Unscrew it with a screwdriver.
- Now you can remove the valve handle and the casing ring by hand.
- Only the clamping nut remains. It is for her that you need an adjustable wrench. By unscrewing the nut, you can pull out the faulty cartridge.
- Now is the time to descale the mixer parts. The clamping nut and the thread of the fastening screw are particularly affected.
- Next, replace the broken cartridge with a new one. At the bottom, it has holes that are inserted into the suitable protrusions of the crane.
- Reassemble the mixer: tighten the nut, put on the cover and the tap handle, fix it with the screw and screwdriver, replace the plug.
- Open the water riser and enjoy your kitchen faucet working properly again!
Features of replacement on different mixers
The replacement process is the same for different faucets, however you may have difficulty purchasing a new cartridge. Some devices (especially design models) use original cartridges. Therefore, it is advisable to take the faulty one with you before buying a new one.
It would be a great idea to purchase a spare cartridge at the time of purchase of the crane - they are cheap (about 30 rubles), and in the event of a breakdown, you will not have to go to the store again for a new part.