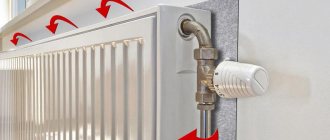
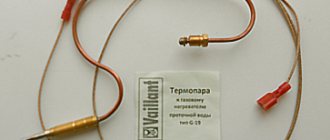
Replacement of the membrane of the water unit of the gas column Neva 4510, Neva 4511, Neva 4513, Neva 4011
AND So! Let's start with the simplest. (The topic is relevant for all gas water heaters).
The weakest point in any gas column is the membrane. Why? Because in 99% of cases the following happens.
You turned on the tap, but the column does not start. The first and most likely reason is that the membrane has burst. You turned on the tap, and the column does not give the flame at full power. The flame is "small" and the water heats up poorly. This is because insufficient gas is being supplied to the burner. The diaphragm does not push the stem with the force required to open it completely. The first and most likely reason is t thickness in membrane ... You turned on the tap, and the column is unstable. It often turns off or only turns on from the third or fifth time. The first and most likely reason is Rmembrane stretched from time to time .
Therefore, before raising a panic, you should always start by replacing the membrane. In general, we recommend simply changing the membrane every two years, without waiting for the above troubles. What's the matter?
The membrane is the most basic element for a normal column start-up. Why? When the tap is opened, the water flow creates a vacuum behind the membrane, the membrane bends. That, in turn, shifts the stem, which opens the gas supply to the burner, and all this works purely mechanically, which means it is subject to wear.
The price of the issue. The cost of a membrane for any gas water heater is from 200 rubles. up to RUB 500 We buy a membrane. When we have a brand new membrane in our hands, to replace it we need: a pair of screwdrivers, 8 mm and 24 mm open-end adjustable wrenches, a glass (only for professional plumbers) and 30 minutes of time.
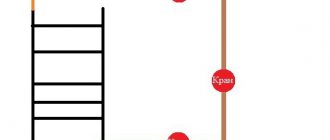
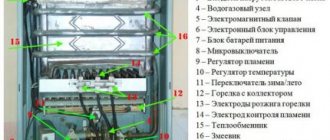
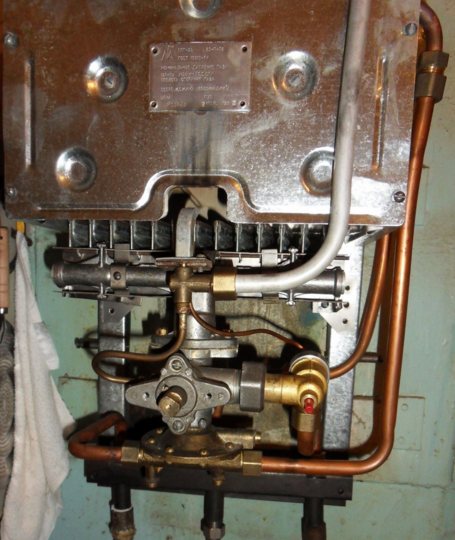
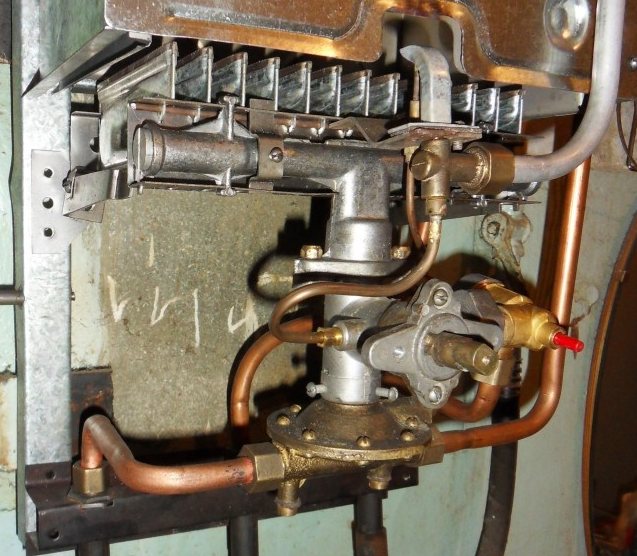
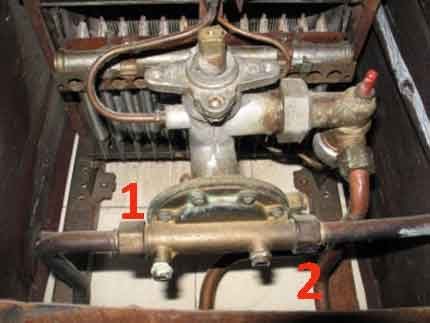
In order for your eyes not to run, first look directly at the photo of the NEVA 4511 column with a water-gas unit installed inside. Screws and nuts are marked with red dots, which must be unscrewed to separate the water part and then work with it. When the eyes are more or less accustomed, we move on to the first point.
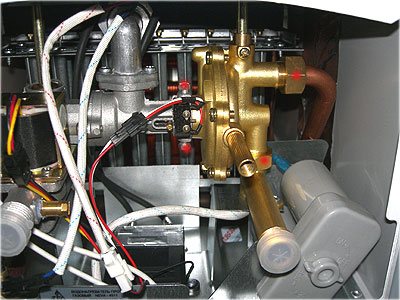
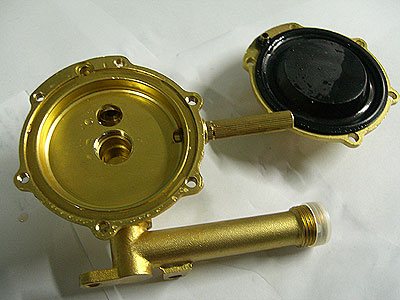
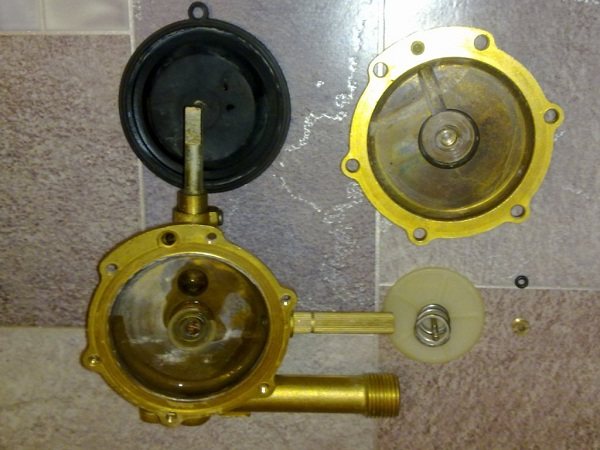
1. Before us is a water-gas unit used in gas water heaters NEVA 4510, NEVA 4511, NEVA 4513. Between themselves, these units have a tiny difference, but it will not interfere with the matter. First, a couple of points to understand what it is. It consists of two halves: a gas unit (this part is gray) and a water unit (this part is yellow). We take a "plus" (cross) screwdriver and separate the gray part from the yellow one.
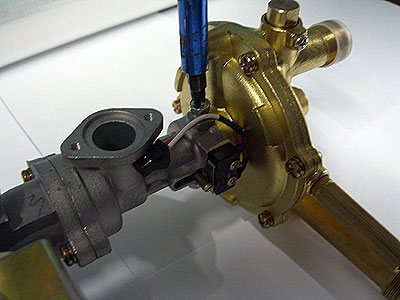
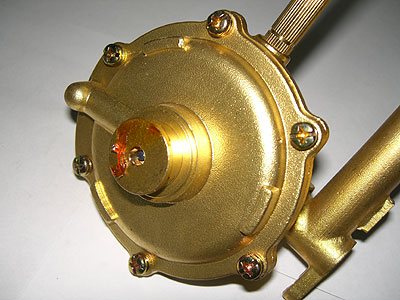
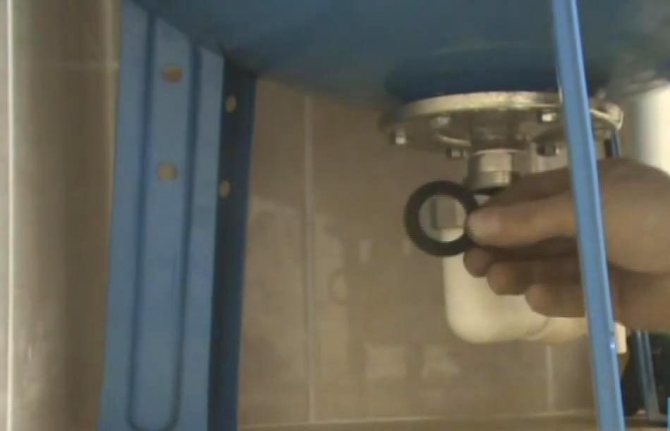
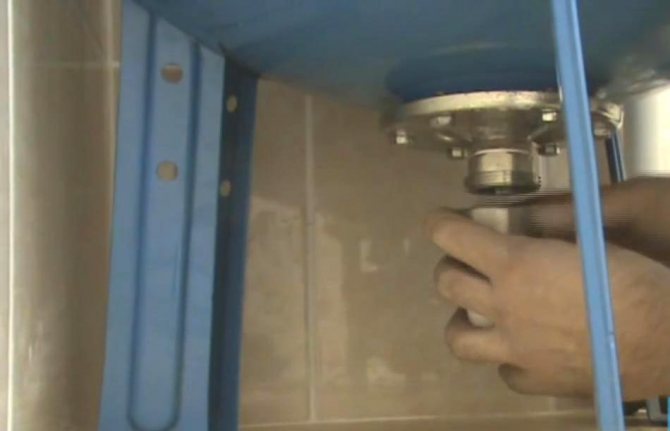
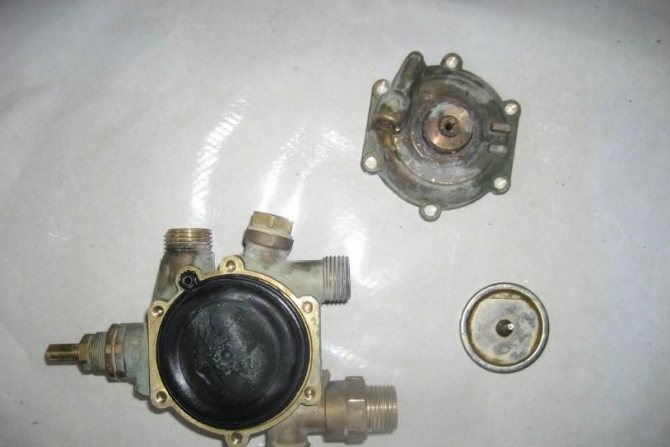
2. The third photo shows how they are fastened to each other: with the help of two screws, simply squeezing from the ends this "greased cylinder" of the water unit. Let's consider the water part. Photo 4. Here, where the grease is, do you see a hole on the end of the cylinder? It is from this hole that the stem comes out, which opens up gas access to the column. It is it (the stem) that our membrane pushes when opening the tap.
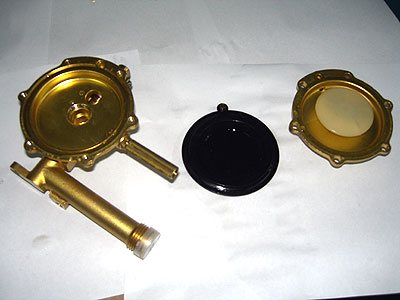
3. To reach the membrane, carefully unscrew all six screws and the water assembly will open in half, like an oyster.
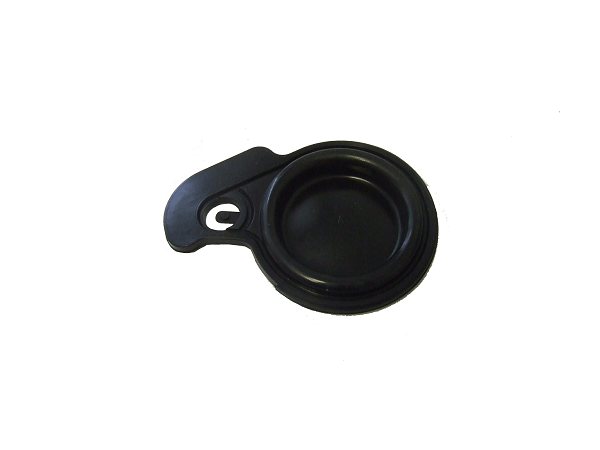
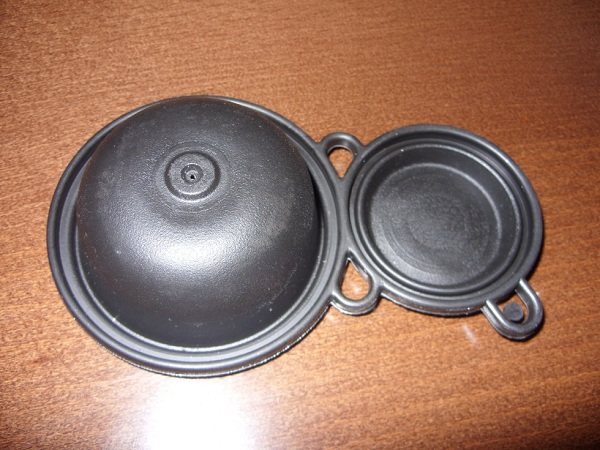
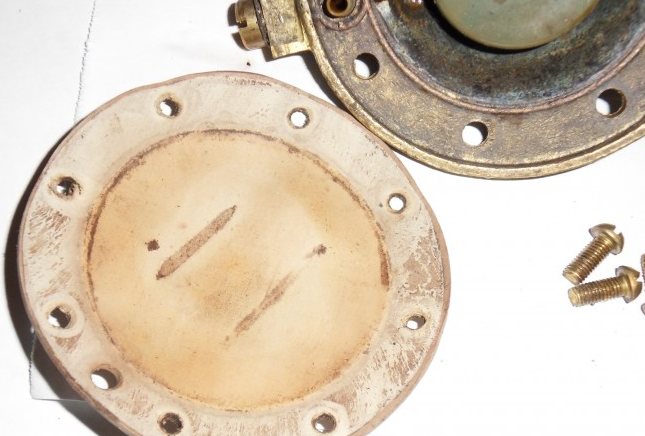
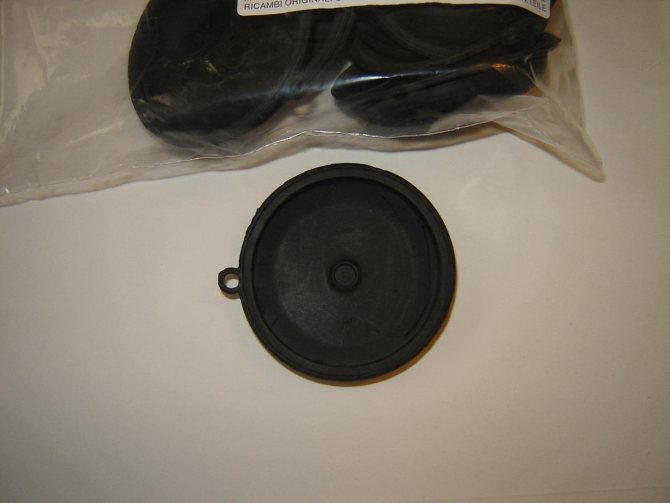
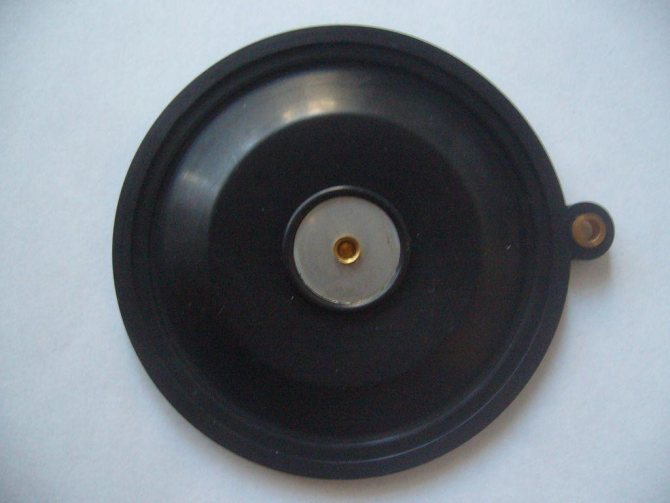
4. If you carefully examine both the resulting halves, it is easy to guess that the membrane is this black elastic band lying in the right half. The membrane, as you can see, has an eyelet that fixes its position. Carefully remove the membrane from its containing halves.
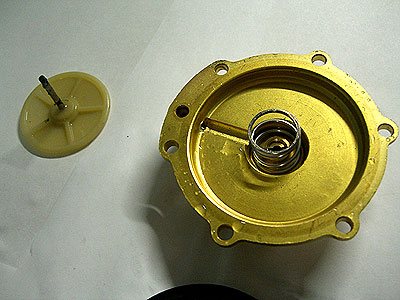
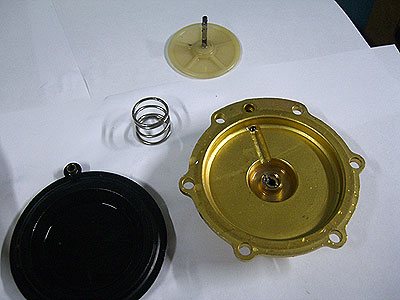
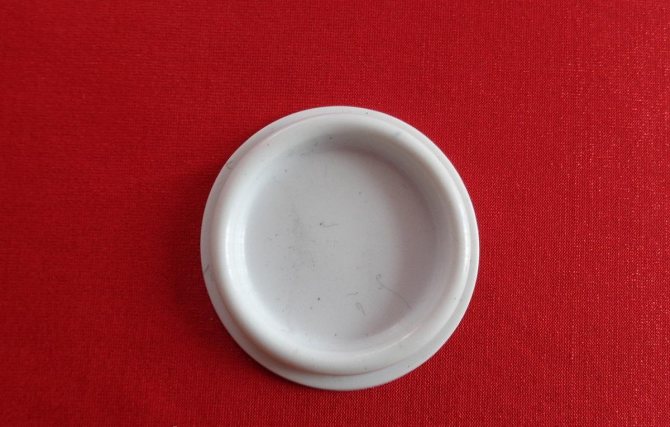
5. And what are these parts inside? One of them is a plate with a stem, the second is a spring. Our membrane presses on this plate with the stem. The spring, on the other hand, returns the stem to its previous position when the valve is closed, gas access is stopped and the column is turned off. If everything inside our oyster is dirty, take out the plate, take out the spring.
6. Everything inside this yellow saucer is thoroughly cleaned and washed. We replace the membrane with a new one. Do not forget about the membrane eyelet, which fixes the position correctly. Don't forget about the sides of the membrane. It should, as it were, hug the plate with the stock with its recess. Then everything will work correctly.
Now we scroll everything in the opposite direction (both pictures and screws). We open the tap. Finally, we wash ourselves. Section Membranes.
Here you will find out:
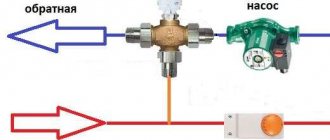
The water regulator is actually the heart of the gas water heater. The unit in which the rubber gasket (diaphragm) is installed regulates the flow: it opens and closes the gas supplied to the burner device.
The principle of operation of the membrane in the gas column is as follows:
- The water regulator is a metal assembly with an empty cavity divided into two parts by a diaphragm.
- The first compartment is required for filling with water. After opening the hot water supply tap, the liquid enters the connected part of the regulator. Pressure builds up inside the assembly that bends the gasket.
- The diaphragm in the gas column presses on the stem located in the adjacent section of the regulator. The metal rod opens the gas valve and at the same time gives a signal for electric ignition of the burner (in automatic dispensers).
- After closing the hot water tap, the pressure drops. There is a spring on the metal rod that returns it to its original position. The gas supply is interrupted. The burner is extinguished.
The device of the membrane on the gas column may vary depending on the model of the water heater, but the basic principle of operation remains the same. Over time, the diaphragm wears out, becomes insufficiently elastic or breaks, which leads to the failure of the heat generator.
The membrane in the flow-through gas water heater is responsible for supplying gas and turning on the automatic ignition of the burner. A malfunction of the water regulator (frog) immediately affects the performance of the equipment.
Signs of membrane breakage
How do you know when it's time to change the rubber diaphragm? You need to pay attention to:
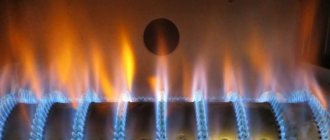
- The force of pressure of gas and water in the system. Open the tap, count how many liters are consumed per minute. Normally, it should be at least two to three liters. The gas flow can be calculated visually by looking at the strength of the fire.
- Flame location. In appliances with wick ignition, the fire must burn from the edge of the burner, be at least 3-5 centimeters high. Does not match? Then check the jets for blockages. After cleaning, look at the flame again. If the situation does not change, the problem is the diaphragm.

- Technique with piezo ignition should click when the button is pressed. This means that the diaphragm has worked. If no sounds are heard, the part may be damaged or torn.
- In some models, the rod, which controls the operation of the control unit, will help determine the breakdown. Remove the protective cover and open the water. If the stem is not moving, the diaphragm must be replaced.
After you have found a breakdown, you need to choose the right replacement part.
Why do you need
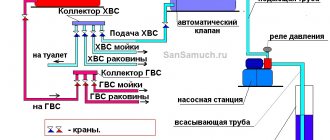
Many ordinary people who are going to mount a water supply system, having familiarized themselves with the device of a hydraulic tank, do not fully understand why this unit is needed in an autonomous water supply system.
For greater awareness, it is worth noting the fact that the accumulator is designed to perform a number of the following tasks:
- accumulates a reserve stock of water in case of emergencies in water supply;
- stabilizes excess pressure that appears in the water supply;
- protects the pipeline from water hammer that occurs when the pump is turned on for water intake;
- maintains a stable water pressure in the pipes when the pump is off;
- contributes to the long-term operation of the pump, since the pump unit turns on much less often;
- promotes uniform water supply at moments of maximum consumption.
Perhaps you will be interested in an article on the repair of pumping stations for your home with your own hands. Read the article on how to make a hydraulic accumulator yourself here.
How to choose a new part
For each column (Termet, Ariston, Beretta), the membrane is selected individually. For foreign models, it is most difficult to find a replacement, since the product can only be purchased from an official supplier. In this case, you have a choice: spend on a new element or buy a new column.
With domestic equipment, everything is easier. Replacements can be found in stores or ordered online.
Experts recommend choosing a silicone diaphragm. It is more elastic and durable.
If you think that the principle of the structure of all membranes is the same, this is not so. For example, in water heaters "Ariston" special elements - "eight" are installed. They are made of dense rubber and have a special shape. Their cost ranges from 300 to 500 rubles.
The membrane in Electrolux devices works according to the "figure eight" principle. But its price is much lower - from 200 rubles.
The simplest membrane for operation and replacement is "Neva" and "Astra".
There are also universal options, but they are only suitable for temporary installation. It is impossible to fine-tune equipment without factory parts.
How to change a membrane in a gas column: choose and install yourself
The efficient operation of the water heater depends on the serviceability of all units and mechanisms. The membrane in the gas column is one of the important parts, but it wears out over time. How to make a DIY replacement? For this we have a detailed work plan.
Diaphragm functions, causes of malfunction
The elastic membrane is located at the base of the water unit and reacts to pressure drops in the system. As soon as you open the mixer, the rubber element bends under pressure and pushes the stem. The stem in turn actuates the gas valve. This is how the fuel enters the burner.
With intensive use of the column "Vector", "Neva", "Oasis", the membrane wears out. Rubber stretches, clogs and gets damaged. As a result, the fuel does not enter the burner: the column does not ignite or ignites, but immediately goes out.
Breakage signs
How do you know when it's time to change the rubber diaphragm? You need to pay attention to:
- The force of pressure of gas and water in the system. Open the tap, count how many liters are consumed per minute. Normally, it should be at least two to three liters. The gas flow can be calculated visually by looking at the strength of the fire.
- Flame location. In appliances with wick ignition, the fire must burn from the edge of the burner, be at least 3-5 centimeters high. Does not match? Then check the jets for blockages. After cleaning, look at the flame again. If the situation does not change, the problem is the diaphragm.
- Technique with piezo ignition should click when the button is pressed. This means that the diaphragm has worked. If no sounds are heard, the part may be damaged or torn.
- In some models, the rod, which controls the operation of the control unit, will help determine the breakdown. Remove the protective cover and open the water. If the stem is not moving, the diaphragm must be replaced.
After you have found a breakdown, you need to choose the right replacement part.
How to choose a new part
For each column (Termet, Ariston, Beretta), the membrane is selected individually. For foreign models, it is most difficult to find a replacement, since the product can only be purchased from an official supplier. In this case, you have a choice: spend on a new element or buy a new column.
With domestic equipment, everything is easier. Replacements can be found in stores or ordered online.
Experts recommend choosing a silicone diaphragm. It is more elastic and durable.
If you think that the principle of the structure of all membranes is the same, this is not so. For example, in water heaters "Ariston" special elements - "eight" are installed. They are made of dense rubber and have a special shape.Their cost ranges from 300 to 500 rubles.
The membrane in Electrolux devices works according to the "figure eight" principle. But its price is much lower - from 200 rubles.
The simplest membrane for operation and replacement is "Neva" and "Astra".
There are also universal options, but they are only suitable for temporary installation. It is impossible to fine-tune equipment without factory parts.
Self repair
For repairs, you will need to disassemble the entire water-gas unit. You will need:
- slotted and Phillips screwdriver;
- wrenches 19 and 24;
- repair kit;
- new part.
Shut off the water and gas supply first. After that, open the faucet in the bathroom, drain the remaining water.
- Remove the adjusters from the body by pulling them towards you.
- If there is a display, disconnect the wiring leading to it.
- Now you need to remove the cover. In some models it is bolted at the top and bottom, in others it “sits” on latches. Pull the trim towards you and up.
A water node will open in front of you. In earlier models, it is located separately, vertically. A gas block is installed on top, a water supply is organized on the left, a heat exchanger is on the right.
To dismantle an item like this:
- Unscrew the two nuts on the water pipes. Use the key at 24.
- Unscrew the two mounting screws, pull down and remove.
In the latest models, the water node is placed horizontally. There is a special tap at the bottom through which the rest of the water is drained.
- Unscrew the fastening nuts with a 19 wrench.
- Disconnect the incoming sensors.
- Remove the bolts that secure the unit to the base.
- Remove the burner.
- Unscrew the fasteners of the water-gas unit with the manifold.
You can start disassembling. In the old versions of "Astra" and "Neva", you need to unscrew eight bolts to separate the assembly. In modern models "Neva" 4513, 4511, 4510, "Oasis", "Vector" only four screws hold it.

If the fasteners are rusted and stuck, spray them with VD-40.
It remains to get the worn out membrane and install a new one.
Reassemble in reverse order. Check after completion of work. Gradually opening the water supply, inspect all connections for leaks. Then open the tap to full. Everything is fine? Put on the shroud, supply fuel - use hot water for your pleasure.
In the video, the aperture is changed for some models:
Is it possible to make the membrane yourself and from what
Before starting repair work, it is worth making sure that poor operation of the burner is due to a failed diaphragm. The cause of a malfunction of the water heater can be dead batteries and malfunctions in the igniter. Only after all other breakdowns have been excluded do they proceed to repair the water regulator.
Diaphragm problems often occur unexpectedly. It takes a few days for a suitable pad to arrive. To use hot water all this time, you can restore the membrane yourself or make it yourself.
For temporary laying, rubber with a thickness of 1.5-2 mm is suitable. Some people use an old car camera or thick household gloves as a blank. The bolt holes and the bypass are made with a punch, which is easy to make yourself from a metal tube.
The new diaphragm is cut out using the old one as a template. As a temporary measure, the membrane can be sealed with a patch. After completing the repair work, the column will be able to work for some time, sufficient to purchase the factory diaphragm.

How to replace a membrane in a gas column with your own hands

- Content:
- How does a membrane in a column work - what it is responsible for? Types of membranes for columns
- Symptoms of a defective membrane in the column - how to check
Self-replacement of the membrane in the gas column will be easier if you understand how the water regulator works and what purpose it serves. There are general indications that the rubber diaphragm has failed and the assembly needs to be rebuilt.
How does a membrane in a column work - what is it responsible for
The principle of operation of the membrane in the gas column is as follows:

The water regulator is a metal assembly with an empty cavity divided into two parts by a diaphragm.- The first compartment is required for filling with water. After opening the hot water supply tap, the liquid enters the connected part of the regulator. Pressure builds up inside the assembly that bends the gasket.
- The diaphragm in the gas column presses on the stem located in the adjacent section of the regulator. The metal rod opens the gas valve and at the same time gives a signal for electric ignition of the burner (in automatic dispensers).
- After closing the hot water tap, the pressure drops. There is a spring on the metal rod that returns it to its original position. The gas supply is interrupted. The burner is extinguished.
The device of the membrane on the gas column may vary depending on the model of the water heater, but the basic principle of operation remains the same. Over time, the diaphragm wears out, becomes insufficiently elastic or breaks, which leads to the failure of the heat generator.
Types of column membranes
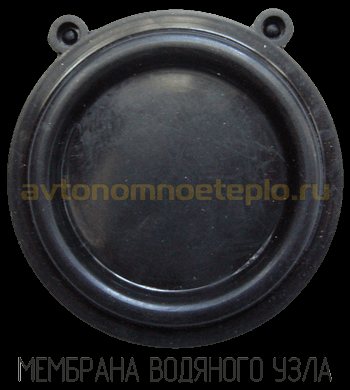
The diaphragm of a gas water heater is a round gasket made of black rubber or silicone. Depending on the manufacturer of the column, hard plastic or metal elements may be present on the membrane. Some diaphragms are reshaped.
Gas water heaters made by European manufacturers use diaphragms that are difficult to counterfeit. For example, in the Ariston Fast GIWH the so-called "figure eight" is installed, in the Electrolux GWH or Vaillant MAG there is a diaphragm with a special tab. It will be possible to purchase such a gasket only in an official service center. There is a membrane for a frog on a European water heater from 200-500 rubles. For comparison, a repair kit for the domestic NEVA Lux 5013 (5016), together with plastic parts, costs only 150-200 rubles.
If we talk about the material from which the diaphragms are made, there are several types of them:
- Black rubber membrane - classic look. Most manufacturers prefer to make gaskets from black rubber. Such a diaphragm will last 7-8 years, provided that no marriage occurs.
- Silicone membrane - guaranteed to work for 10-12 years. On the market you can find spacers for domestic and Chinese equipment. Owners of European water heaters will have to make do with black rubber diaphragms.
- Red membranes - poor quality material is used. Rubber breaks after several turns on the column. Suitable as a temporary measure. It happens that the necessary gasket has to be ordered directly from the manufacturer. By installing the red membrane, you can continue to use hot water while waiting for the delivery of the original part.
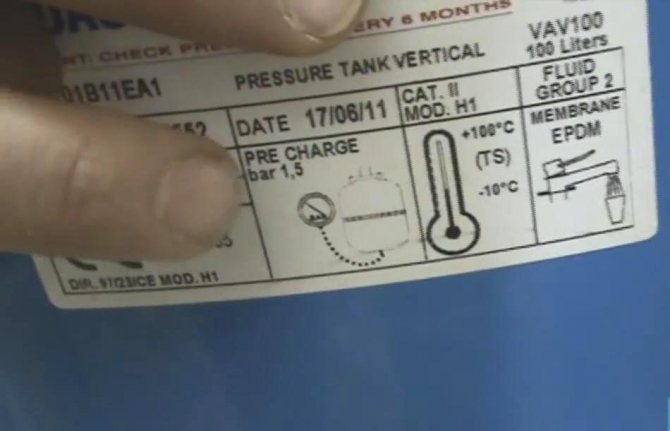
You can fully find out which diaphragm is used in the technical documentation attached to the instantaneous water heater or after disassembling the water regulator.
Symptoms of a defective membrane in the column - how to check
- The water regulator is leaking - in the normal state, the gasket completely covers the part of the assembly in which water circulates. It starts to drip only if the membrane is torn.
- It takes a long time from opening the hot water supply tap to turning it on - if the unit is working properly, the burner lights up after 1-2 seconds. There are several reasons for the long response time:
- The membrane is leaking - provided that the leaky small column will work for some time. Over time, water will begin to drip from the regulator.
The diaphragm is stretched - in this case, the pressure on the stem will not be enough to open the gas supply. The same problem occurs when the gasket becomes rough due to hard water.
- The microswitch rod of the electronic unit does not turn on - another characteristic sign that the diaphragm has become unusable. At the same time, the column does not show signs of life.
The membrane on the column breaks down due to poor water quality. The surface becomes rough and loses elasticity. Over time, microcracks form, allowing water to pass through.
Is it possible to make the membrane yourself and from what
Before starting repair work, it is worth making sure that poor operation of the burner is due to a failed diaphragm. The cause of a malfunction of the water heater can be dead batteries and malfunctions in the igniter. Only after all other breakdowns have been excluded do they proceed to repair the water regulator.
Diaphragm problems often occur unexpectedly. It takes a few days for a suitable pad to arrive. To use hot water all this time, you can restore the membrane yourself or make it yourself.
For temporary laying, rubber with a thickness of 1.5-2 mm is suitable. Some people use an old car camera or thick household gloves as a blank. The bolt holes and the bypass are made with a punch, which is easy to make yourself from a metal tube.
The new diaphragm is cut out using the old one as a template. As a temporary measure, the membrane can be sealed with a patch. After completing the repair work, the column will be able to work for some time, sufficient to purchase the factory diaphragm.
How to put the membrane on the gas column correctly
The gasket is located inside the water regulator (frog). Replacing the diaphragm is not difficult. Before starting work, shut off the gas and water supply. The liquid is drained. To do this, open the hot water tap located below the lower level of the column. Repair work is carried out in the following sequence:
- Remove the speaker casing - in most modern devices, the casing simply weighs on hooks. To flip off the cover, just lift it up.
- Dismantle the water regulator - for this, disconnect the cold water supply and unscrew the gas reducer.
To change the diaphragm on the gas column, the "frog" is disassembled. Typically a few brass bolts will need to be removed. Unscrew them carefully so as not to damage the folds. Access to the gasket will open. After replacing the diaphragm, the water regulator is reassembled in the reverse order. They open the gas and let the water in. Make a test run of the water heater.
If any of the above is difficult, it is better to call the gas service technicians. Replacing the membrane will cost 900 rubles, plus the cost of the material.
Warning before work
In other words, the owners of gas water heaters are prohibited from performing work on gas equipment on their own.
And even considering that the water reducer is theoretically not related to the gas system, it is also forbidden to disassemble this structural part and change the membrane with your own hands.
According to the rules of service, any service or repair work is carried out only by representatives of specialized companies.
Sometimes the desire to do everything on your own, without having practical experience in performing this kind of work, can turn into disastrous consequences. As evidenced by the numerous accidents associated with household gas equipment.
A bitter example from life, when, due to self-repair of the column, a gas explosion occurred. As a result, the destruction of a significant part of a multi-storey residential building.
And there are a lot of such cases every year.Often there are craftsmen who are ready to independently change the reducer membrane on the gas water heater. Moreover, it is, in fact, not difficult to perform such an operation if you have locksmith skills.
Do this light job as follows:
- With the help of documentation or by opening the column case and examining the internal contents, the brand (model) of the installed gearbox is determined.
- Based on the obtained technical information, a new membrane is purchased on the market.
- If the equipment is imported, it may be necessary to purchase a membrane only to order.
- In the presence of a membrane, shut off the gas supply to the equipment, close the tap for cold water supply from the central heating system.
- The contents of the heat exchanger of the gas heater are drained using the service drain valve, the location of which is determined according to the documentation.
After these operations, you can proceed to dismantle the gear unit. However, one should not rush here. It is required to work carefully, carefully so as not to damage other nearby parts of the gas column.
How to replace the gas column membrane: reasons + instructions on how to carry out repairs
Domestic water heaters - gas water heaters are used in old high-rise buildings and private houses for the preparation of sanitary water. Their parts and assemblies tend to wear out in the same way as any other equipment. Most often, the membrane of the water reducer fails, which can be changed with your own hands.
We will tell you how to replace the gas column membrane. In our proposed article, the steps to prepare for the replacement of the membrane are described in detail, recommendations for its selection are given. Taking into account our advice, you will be able to control the work of the gas worker or restore the operation of the water heater yourself.
About reducer and diaphragm location
The device, called a water reducer, is included in almost any design of gas heat exchangers.
This part can have a different configuration depending on the model of the water heating device, but the principle of operation of such devices remains unchanged.
The water reducer installed on the gas column serves to maintain stable water pressure directly in the water heater heat exchanger system. Due to the uniformity of pressure, a uniform flow is ensured, which means the same uniform heating of the liquid.
The part of the reducer, contributing to smooth pressure regulation, is a rubber membrane. This component of the gearbox, made in the form of a gasket, usually based on technical rubber, is in the shape of a circle. It is installed inside the gearbox housing.
Due to the long-term operation of water heating equipment, being constantly in motion, the membrane gradually wears out. The wear of technical rubber in some places leads to tears of the material. Accordingly, the water pressure regulation function stops acting according to the set algorithm.
In such cases, it becomes inevitable to replace the rubber membrane of the reducer in the gas column, because the water heater does not work properly.
The quality of heating sanitary water is sharply reduced, and in other cases, the column simply cannot be turned on. User comfort is lost.
Steps for replacing the reducer diaphragm
If we proceed from the rules for servicing gas equipment and strictly follow these rules, the performance of any installation, plumbing work, as well as work related to the power supply is the prerogative of the gas services, in particular, the local service gas company.
What do you need to know before starting work?
In other words, the owners of gas water heaters are prohibited from performing work on gas equipment on their own.And even considering that the water reducer is theoretically not related to the gas system, it is also forbidden to disassemble this structural part and change the membrane with your own hands.
Sometimes the desire to do everything on your own, without having practical experience in performing this kind of work, can turn into disastrous consequences. As evidenced by the numerous accidents associated with household gas equipment.
However, premature wear of the membrane and other components of the water heater under pressure can be prevented by timely cleaning the equipment with your own hands or by a gas service representative.
Often there are craftsmen who are ready to independently change the reducer membrane on the gas water heater. Moreover, it is, in fact, not difficult to perform such an operation if you have locksmith skills.
Do this light job as follows:
- With the help of documentation or by opening the column case and examining the internal contents, the brand (model) of the installed gearbox is determined.
- Based on the obtained technical information, a new membrane is purchased on the market.
- If the equipment is imported, it may be necessary to purchase a membrane only to order.
- In the presence of a membrane, shut off the gas supply to the equipment, close the tap for cold water supply from the central heating system.
- The contents of the heat exchanger of the gas heater are drained using the service drain valve, the location of which is determined according to the documentation.
After these operations, you can proceed to dismantle the gear unit. However, one should not rush here. It is required to work carefully, carefully, so as not to damage other closely located parts of the gas column.
Dismantling the gearbox and disassembling
The water pressure reducer has inlet and outlet pipes. Actually, thanks to the threaded fittings, the device is mounted inside the gas system, directly on the water flow line.
Therefore, in order to dismantle the device, it is necessary to unscrew the two union brass nuts on the pipeline. But before doing this work, it is recommended to unscrew one or both plugs on the drain taps of the gearbox, which are located under the poppet housing.
The nuts should be unscrewed smoothly, at the same time keeping the device from possible turning. The mechanism of the device has a regulator rod in contact with another part of the gas column. On some models, the stem head is secured with a screw. This point should be taken into account and, if necessary, loosen this screw.
Dismantling can be accompanied by residual water leakage. It is recommended to stock up on a convenient capacious collection container.
Brief instruction on membrane replacement
The removed pressure regulator will need to be disassembled to reach the rubber (silicone) diaphragm. The disassembled part looks like a plate.
- unscrew the fastening screws on the top of the plate;
- carefully use a flat screwdriver to bifurcate the plate;
- remove the defective membrane;
- install a new one;
- articulate halves of the plate;
- fix the joint with screws in a circle.
The correct position of the diaphragm on the gear plate is determined by a special "key" recess or pin, which, in turn, is located on the radial edge in the same row with the holes for the fastening bolts.
It is necessary to align the diaphragm “key” with this recess before joining the plate halves and screwing in the screws.
The moment of screwing in the fastening screws is a traditional action. However, it should be borne in mind that the parts of the gearbox are tightened evenly. Technically correct tightening is performed using the "criss-cross" method. That is, first, four screws are sequentially tightened, located one opposite the other, and only then all the rest are tightened.
The assembled gearbox, complete with a new diaphragm, is installed in place in the reverse order. Carefully insert the stem inside the tube of the regulating device, align the device to the level of the water pipes. Then the nuts are manually screwed onto the adjacent sections of the pipe.
As a rule, pipe connections provide for the presence of gaskets and their correct installation. This moment must be taken into account when installing the gearbox at the installation site. Then it remains only to tighten the fastening nuts, applying a little effort and do not forget to tighten the drain plugs under the plate.
Membrane shapes and materials
The design of gas water heaters is diverse. Accordingly, a change in the design of the pressure reducing valve is not excluded. Therefore, the existence of reducer membranes of various shapes is also seen as an obvious phenomenon.
If a round product is considered standard, which can often be found when disassembling the valves of domestic gas water heaters, imported devices are often equipped with "exotic" ones.
One of such examples is gas water heaters of a well-known foreign company that produces household appliances under the Electrolux brand. Many models of this brand's equipment are equipped with figured membranes in the shape of the "eight".
The devices of the foreign company Vaillant are somewhat less popular in comparison with Electrolux, but they also stand out from the whole range of household gas water heaters by non-standard production of reducer membranes. When disassembling their valve, there is a chance of colliding with the flag membrane.
For the sake of objectivity, it should be noted: non-standard products show a finer regulation of the flow pressure, however, in terms of long-term performance, they are often inferior to standard ones. The quality of the material often determines the degree of durability.
In practice, it has been noted that silicone membranes last longer than rubber ones. However, for silicone, an important criterion is a thorough filtration of network water. Even a small amount of sand or rust trapped in the area of the silicone product dramatically reduces the life of the material.
Technical rubber is less sensitive to suspended particles, but for the most part "suffers" from insufficient chemical resistance. That is, if the composition of the water to some extent has an aggressive component, in these conditions, products made of technical rubber usually do not serve for a long time.
Repair of gas column membranes
The desire to save on everything makes some users resort to such a virtual replacement technique as repairing a defective membrane with their own hands.
It should be noted right away: this occupation may be interesting for a handyman of all trades, but, from the point of view of service, it is absolutely irrational and meaningless.
They try to repair the membranes of gas columns in different ways:
- by filling with silicone sealant;
- using adhesives of various types;
- the imposition of pentelast;
- installation of miniature patches;
- and even masking tape.
The activity of such a "repaired" part lasts, as a rule, no more than 1-2 days. After that, problems begin again, and often even more aggravated.
Repair of membrane plates of gas columns, especially with your own hands, in any case fails. It has been tested in practice more than once. So, it is not recommended to change the “awl for soap”, unless there is a purely research interest in this matter.
If it is not possible to restore the functionality of the wall-mounted water heater, you will have to buy a new gas water heater. The following article will acquaint you with the guidelines for the choice of equipment, which examines this topical topic in detail.
Conclusions and useful video on the topic
The video demonstrates the personal experience of one of the owners of the heater - that is, do-it-yourself repair of the water pressure regulator.In particular, all repairs are reduced to replacing the membrane. Let us remind viewers once again: self-repair of gas systems is unacceptable!
It is easier to find and buy a new membrane for the gas water heater, replace this accessory according to the instructions described above and sleep well. Moreover, replacement, in most cases, does not require significant financial costs. On average, 200-300 rubles are enough for the purchase of a complete accessory.
Please leave comments, post photos on the topic of the article and ask questions in the block below. Tell us about how you chose and changed a membrane in a gas water heater. Share useful information and technological nuances that will be useful to site visitors.
Steps for replacing the reducer diaphragm
If we proceed from the rules for servicing gas equipment and strictly follow these rules, the performance of any installation, plumbing work, as well as work related to the power supply is the prerogative of the gas services, in particular, the local service gas company.
Dismantling the gearbox and disassembling
The water pressure reducer has inlet and outlet pipes. Actually, thanks to the threaded fittings, the device is mounted inside the gas system, directly on the water flow line.
Two positions for dismantling: 1 - pipe nut on the inlet of the pressure control device; 2 - pipe nut on the outgoing branch pipe. Drain plugs should also be used
What are gas column membranes
A person's life should be comfortable. To achieve convenience, many equip their home with various modern appliances. Some of them must be kept in every home, since without them the standard of living is significantly reduced.
Gas water heaters are a reliable and convenient way to heat up cold water and provide your home with hot water.
With the right choice of column and its use, you can be sure of a long service life. But it also happens that the column breaks. In such situations, the owners often do not know where to start the renovation. If the outlet water is not hot enough, it is definitely a membrane that may have deteriorated.
The process of replacing the membrane in the gas column
The membrane is designed to separate the cavities in the water regulator. Despite the quality of the column and its manufacturer, the membrane wears out over time, leading to rupture. This type of malfunction is very common, but anyone who first read the instructions will be able to cope with the choice of a new membrane and replacing the old one.
According to the instructions, any repair of the gas water heater must be carried out by qualified personnel.
Self-repair without special skills and knowledge can lead to equipment damage. Also, self-repair is very dangerous in that a gas leak may occur. If any difficulties arise during self-repair, you should immediately contact the gas service.
Membrane replacement process:
- Turn off the column.
- Shut off cold water and gas.
- Open a hot water tap to change the pressure in the pipes.
- You need to open the tap that is located closer to the column. Usually it is a bathroom faucet.
- When disassembly takes place, water from the heat exchanger and pipes will flow out through the open tap, and the siphon effect will help this.
- There is no need to turn on the kitchen tap, which is located higher than the water regulator. This can cause 3 to 5 liters to simply spill onto the floor.
- Remove the column cover. Finding the attachment points will not be difficult. The absence of a casing will make the interior of the column accessible.
- Remove the water regulator. For this, the union nuts and fixing screws must be removed.
- Disassemble the regulator and replace the diaphragm.
It is not difficult to change the membrane.But it is important to make sure that all actions are performed correctly. The membrane should not be upside down, and the bypass, which facilitates the integration of the water unit, should not be blocked.
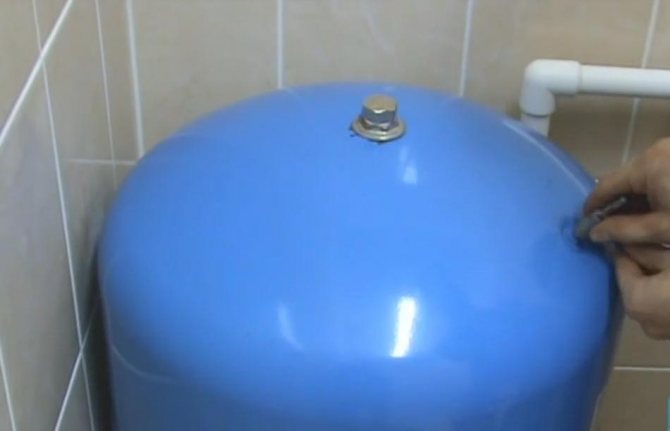
How does a membrane for a hydraulic accumulator work?
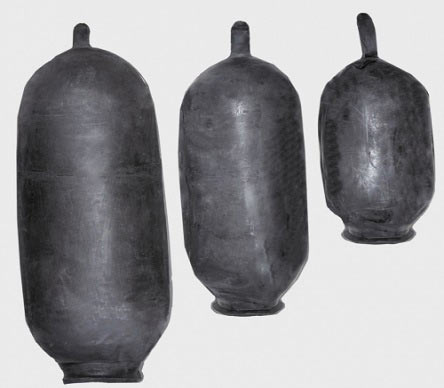
Outwardly, it very much resembles a simple medical heating pad when it comes to a small hydraulic tank (no more than 100 liters). If the tank is larger (with a volume of over 100 liters), then the described product will more resemble a bottle or a pear in shape.
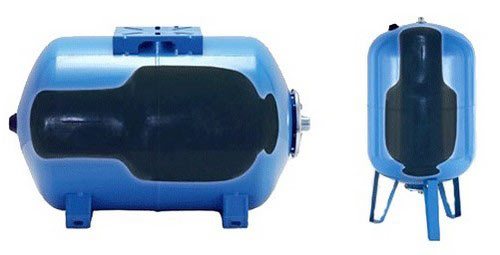
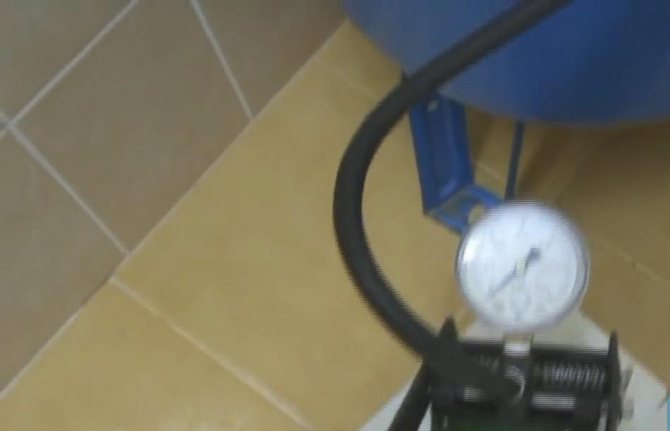
But this does not affect the essence in any way: no matter what the volume of the accumulator is, the membrane is always made of elastic material. It is placed inside an iron body so that it seems to divide it into two parts. The first (that is, inside the membrane itself) contains water, and the second contains air, which is pumped into the device. What is all this for? And in order for the pump, after switching on, to pump liquid into the membrane, it will fill up to a certain point, that is, until the pressure in the system reaches the maximum permissible value (if the network is for domestic use, then this is usually 1.8- 3 atmospheres). This indicator is pre-set on the pressure switch.
After that, the pumping equipment is turned off. The liquid will still be under pressure, and therefore will be able to flow from the taps of the plumbing equipment with a normal pressure. And it is not surprising, because it will already be under the influence of compressed air inside the hydraulic tank.
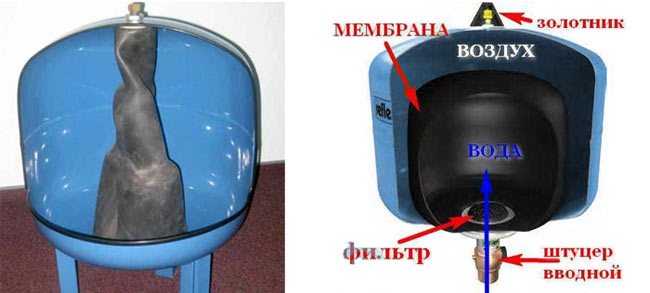
Note! All this will save on electricity and significantly extend the operating life of the equipment (the pump itself will be turned on much less time). Moreover, the use of a hydraulic tank in the water supply system is also good in that it minimizes sudden pressure drops that inevitably accompany the activation of pumping equipment.
Advantages of the membrane for the gas column "Neva"
To replace a broken membrane on your own, you will need certain knowledge and skills. Repair of the Neva-4513 column can be done with the help of the service center specialists, but it will cost several times more. Before buying a part, it is important to study the device of a particular gas column.
When buying a membrane in a specialized store, you do not need to hesitate to ask questions to specialists - they should answer the client's question in as much detail as possible.
The rubber diaphragm, designed to regulate the flow, is designed to last for five years. The actual time of its serviceability largely depends on the quality and hardness of the water, the intensity of the column. When buying a membrane, it is important to pay attention to the rating and reviews about the manufacturer of the product.
Membrane advantages:
- Consists of high quality rubber.
- In the presence of an arcuate branch in the shape of an ear.
- If the membrane is damaged, then the gas column does not produce hot water.
No matter how high the membrane is, it will eventually become unusable. Modern technologies allow you to purchase a membrane of the highest quality without leaving your home. On specialized sites, the membrane can be ordered online. You can also purchase a membrane in specialized stores, where you can consult with a specialist in real time.
Silicone membrane repair: tips
Gas water heaters in our country are represented by a large number of manufacturers. At the same time, the columns themselves hardly differ from each other in terms of their internal functional content. In many columns, the disadvantage is the frequent breakdown of the membrane.
A silicone membrane is considered to be of better quality than a rubber membrane. The latter breaks so often that it has to be replaced once a year or even more often.
Many users claim that after replacing the rubber membrane with a silicone one, the problems with water heating and its leakage stop.But the long service life of such a membrane cannot be guaranteed either. Therefore, many users ask questions about whether it is possible to repair a membrane made of silicone.
Silicone membrane repair:
- Try to seal with a sealant.
- Use Pentoelast.
- Choose a silicone sealant that has a high stretch ratio.
- Try to glue the patch.
- Apply scotch tape.
Many agree that the silicone membrane simply needs to be replaced. This approach can be justified, since constant repairs will lead to the cost of time, effort and nerves. Replacing a part is not so difficult if you know how to handle the column in general. The most common speaker models for which users are looking for new membranes: Vector, Beretta, Oasis.
Replacing the membrane for the gas column (video)
Gas water heaters are so common today that few people do not know how to handle them. However, when devices break down, many fall into despair. There are such types of breakdowns that can be quickly eliminated.To do this, you can contact a special service or fix it yourself. But you should be extremely careful. Often the breakdown of the membrane affects the cessation of heating by the water column. It is she who passes water to the heating device. Diaphragms can be made of rubber or silicone, but they all tend to wear out.