A heated towel rail installed in the bathroom not only dries clothes, but also creates a favorable microclimate that prevents the formation of unpleasant odors, fungi and dampness. Today the market for this sanitary ware is full of models with various designs and functions. From this article you will learn how to properly connect a heated towel rail to a hot water riser. A diagram and a detailed description of this plumbing equipment are also found in this publication.
Design features
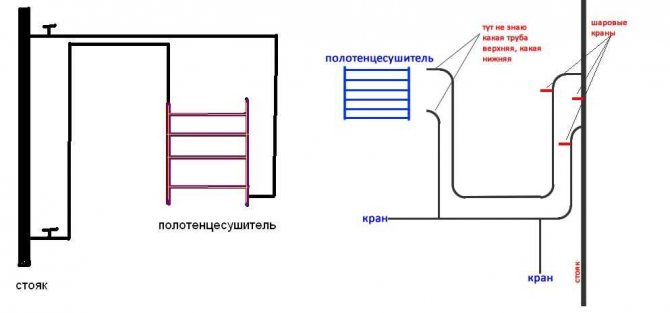
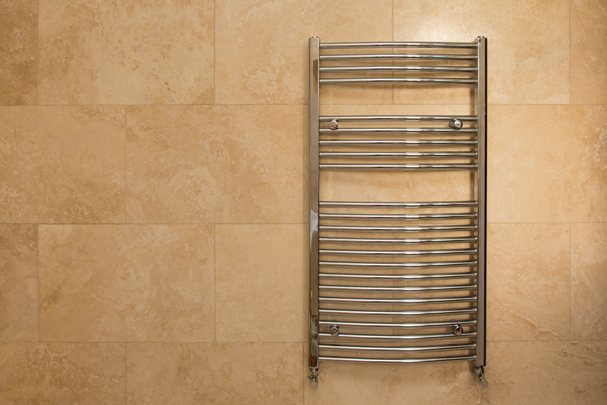
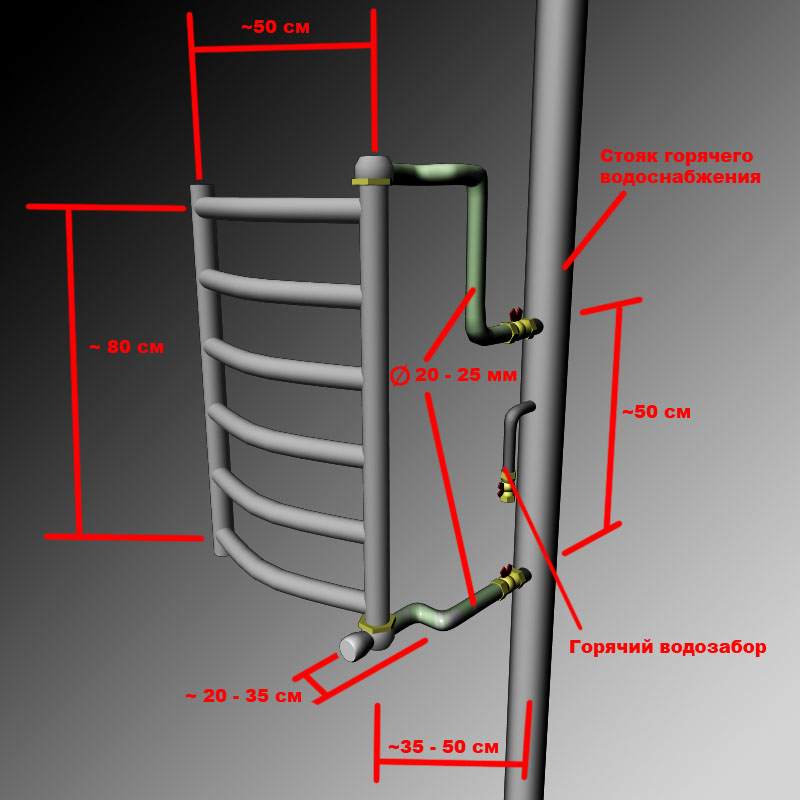
The water heated towel rail can be in various configurations. The simplest among them is a coil that is connected to a general hot water supply system. Usually, this option was provided for in Soviet-built houses. In relatively new buildings, it is possible to connect a heated towel rail to a hot water riser (diagram below) via a separate outlet. This allows you to install this equipment of various modifications - from the classic U-shaped heated towel rail to the popular "ladder".
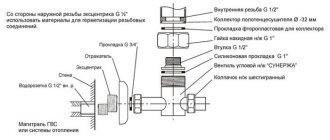
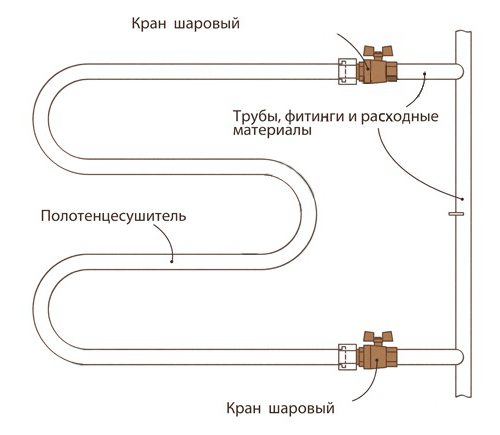
Most often, they prefer the latter option: housewives have already appreciated its convenience in everyday use and functionality. Connecting a ladder heated towel rail is carried out using the following elements:
- Water shut off valves.
- Water circulation system - supply and return pipelines.
- Blanking plug.
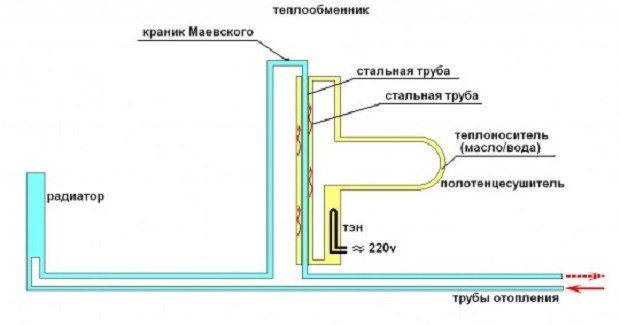
- Air vent valve (during installation, the Mayevsky valve is located on top).
- Bracket designed for wall mounting.

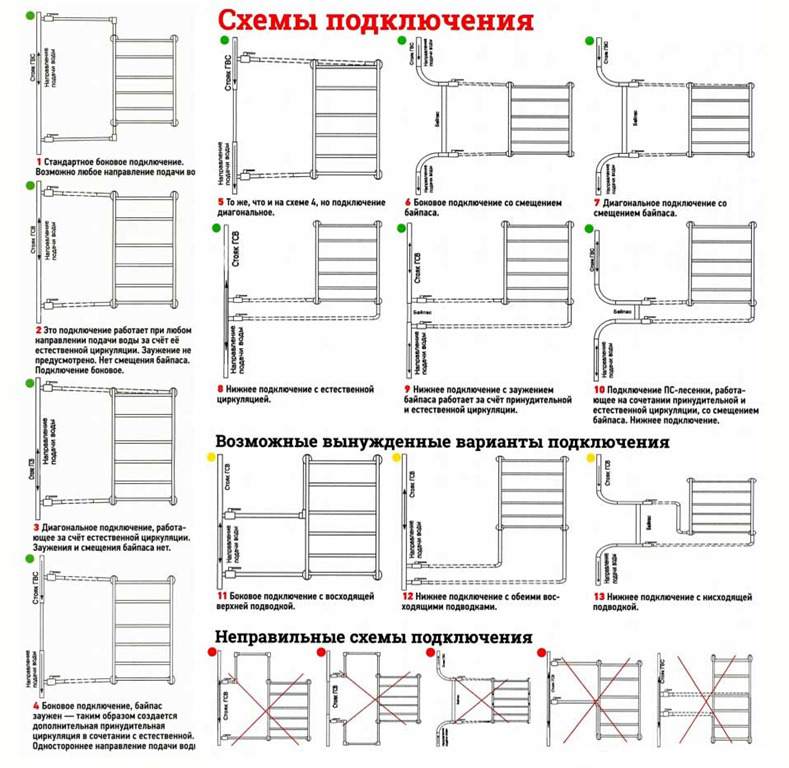
Connection diagrams
We have three scenarios to analyze:
- Apartment building with dead-end hot water supply;
- Apartment building with circulating hot water supply;
- Private house or autonomous water heater in the apartment. In this case, we have complete freedom of action: hot water supply systems with heated towel rails can be designed from scratch.
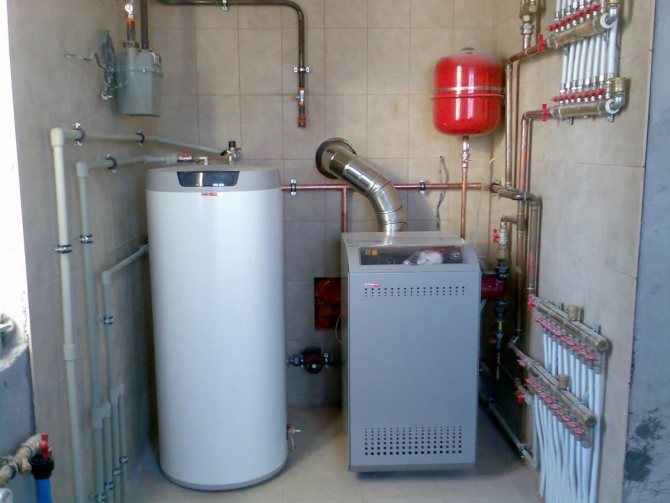
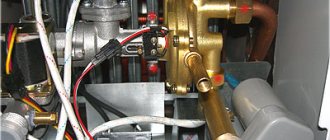
Boiler room with a boiler in a private house
The video in this article will help you learn more about how heated towel rails are mounted: a connection diagram, auxiliary fittings and a DHW circuit diagram will be presented to your attention.
Dead-end DHW
The heated towel rail is connected between the riser and the hot water supply. A shut-off valve is installed at the water supply inlet to the dryer. For obvious reasons, heating the coil is possible only when water is flowing through your taps.
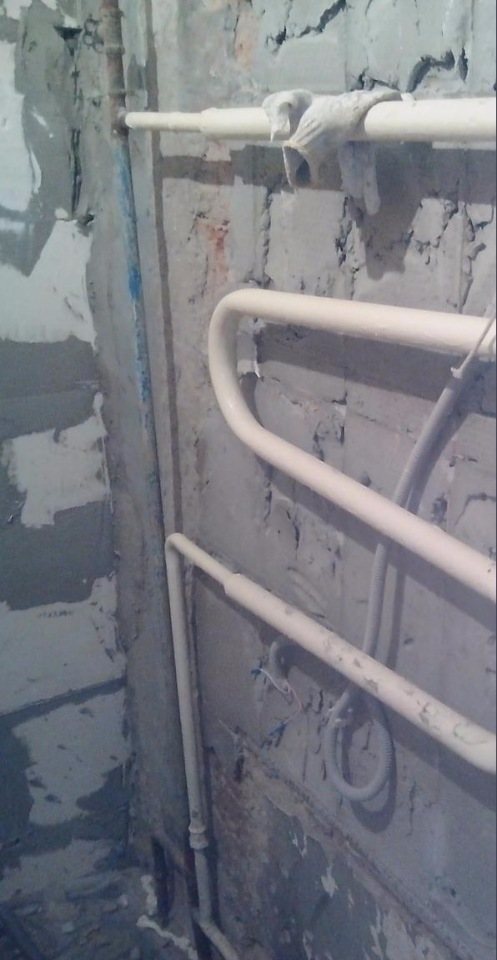
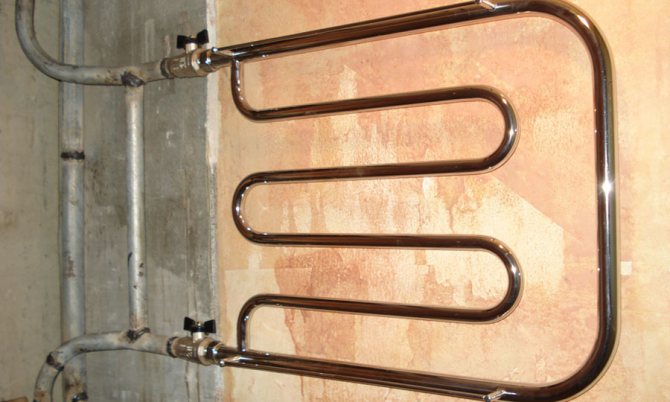
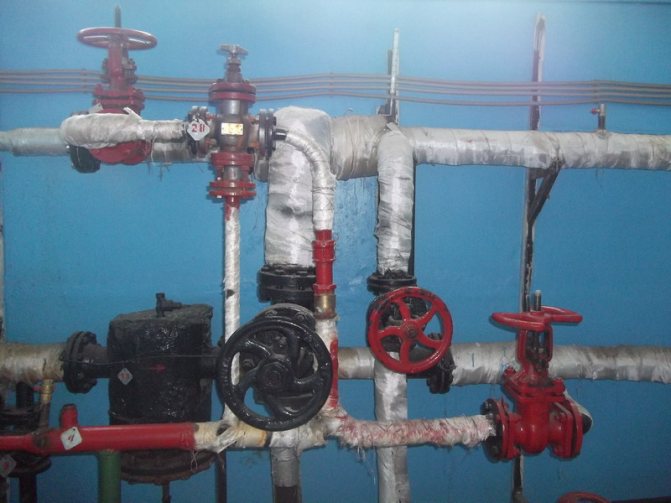
Bathroom in Khrushchev: the hot water supply is connected to the riser through a coil
Is it really impossible to realize continuous circulation through the coil - at least by creating a closed loop and supplying it with a circulation pump?
This is possible, but it doesn't make any sense.
There are two reasons:
- The circulation system must have a heat source for heating the water to compensate for heat loss through the pipes. An obvious candidate for such a source is a hot water riser. Only - that's the problem! - he, like the coil itself, cools down in the absence of a draw-off;
- An inexpensive circulation pump costs about 2,000 rubles and consumes 50-70 watts. An inexpensive electric heated towel rail costs the same and has an energy consumption of 30-80 watts. The principle of Occam's razor, which does not recommend unnecessarily complicating the task, cuts off the circulating hot water supply as an unreasonably complex solution.
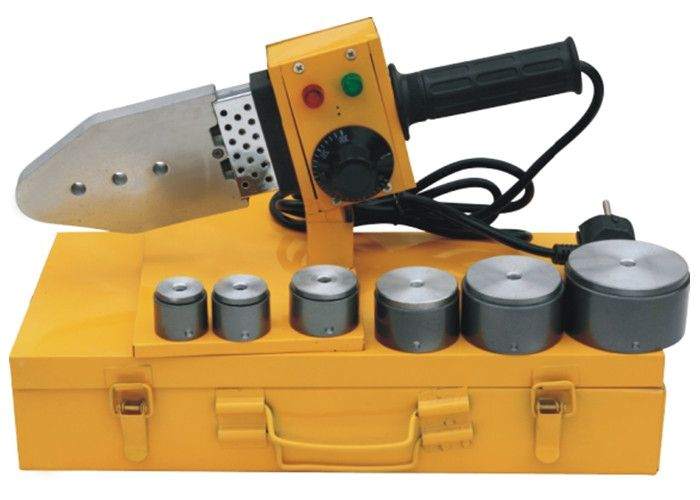
The electrical appliance in the photo consumes no more than 80 watts.
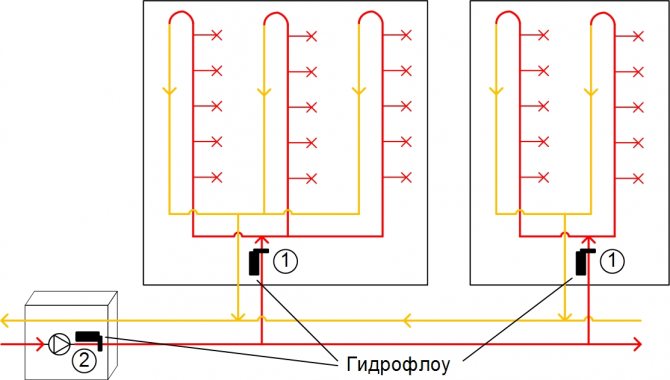
DHW circulation
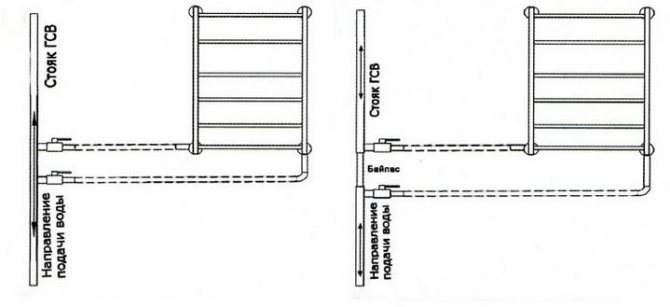
Comprehensive instructions for connecting the dryer to the circulation water supply are contained in the already mentioned SP 30.13330.2012.According to the text of the document, heated towel rails must be connected to the supply pipelines of hot water supply (read - it is placed in the gap of the risers of hot water connected to the supply filling). Connection to circulation risers (return) is allowed provided that shut-off valves and a bypass are installed.

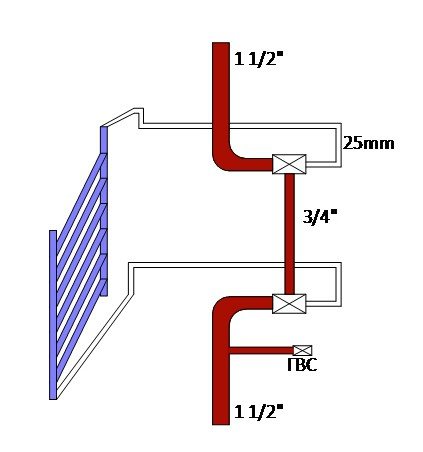
Coil connection with bypass and valves
Please note: the author strongly advises to adhere to this connection diagram, even when installing the coil for supply. Shut-off valves will provide the ability to turn off the dryer in the summer heat, and the bypass will exclude the stoppage of circulation in the group of risers when it is turned off.
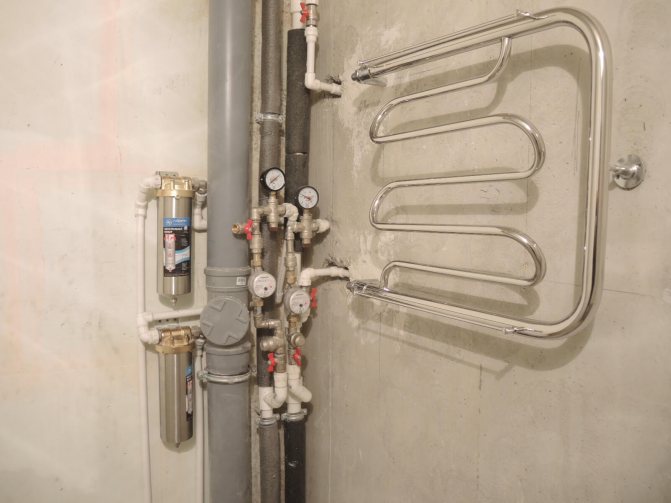
Practical implementation of the connection
Autonomous hot water system
How to implement hot water supply with a heated towel rail in a system with autonomous preparation of hot water when installing it yourself?
The device is installed in the gap between the looped filling or hot water supply. The circulation in them is provided by the pump.

DHW circulation pump
The connection of the circuit to the heat source is determined not so much by its type as by the presence or absence of an additional outlet for connecting the circulation pipeline.
Here are two examples of wiring diagrams.
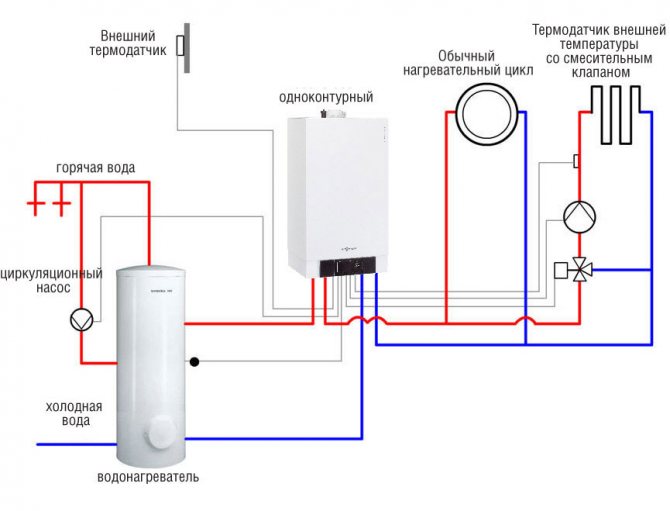
DHW circulation in a system with a single-circuit boiler and an indirect heating boiler
The pump forces the water to circulate in a closed loop between the boiler inlets. The boiler (in this case, indirect heating) must have three tie-ins: two for connecting the DHW circuit and one for making up.
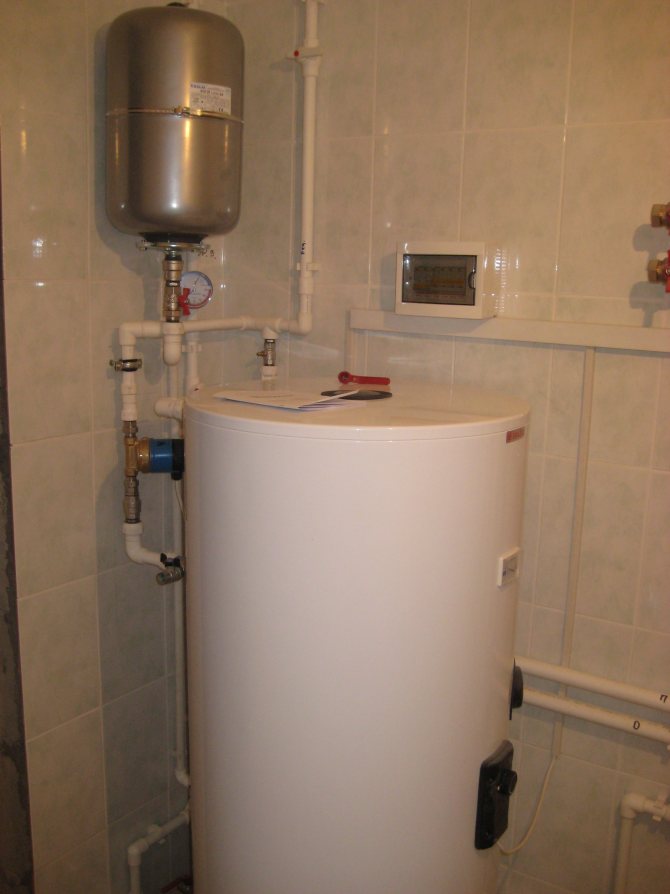
Boiler in a system with DHW recirculation
Captain Evidence suggests: the connection of an electric boiler with a circulation pipe is completely identical to that shown in the diagram.

DHW with thermostatic mixer
If the boiler or any other device (gas water heater, double-circuit boiler, flow-through electric pressure-type heater) does not have a circulation tie-in, a scheme with a three-way thermostatic mixer is implemented: hot water circulates in a closed loop and is heated to compensate for heat loss. As the water is consumed, the circuit is fed from the cold water system.
Aquatic
This option has been known to us since the days of the USSR, when such equipment was installed in all bathrooms. Such models remain the most popular to this day. In this case, the heated towel rail is connected to a hot water riser (the diagram will help to do this correctly) or to the heating system.
Valves are installed on the device itself, with the help of which the water is shut off when replaced. These models are generally available in stainless steel, brass and copper. And most importantly, they have a low cost.
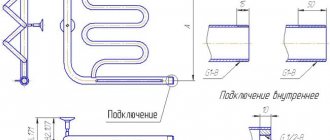
Bottom diagram
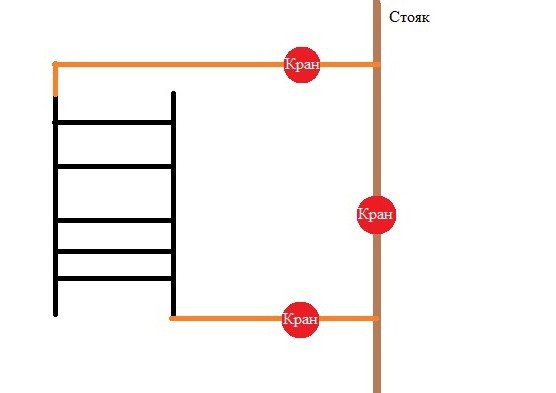
The heated towel rail, connected using the liner located at the bottom, looks interesting and aesthetically pleasing. True, its efficiency is slightly lower than with other connection options. However, this option is quite popular. There are several working schemes for connecting such a model:
- with direct bypass. An indispensable condition is the installation on one of the verticals of the Mayevsky crane. As a rule, it is included in the equipment package. Drainage taps are necessary in order to be able to get rid of the presence of air in the system after the water supply is cut off. So that these details do not violate the appearance of the room, they are usually masked with a special decorative cap;
- with extended vertical bottom eyeliner. This scheme practically does not differ from the previous one. It is necessary for those cases when it is necessary to position the horizontal pipes of the supply line as low as possible to the floor;
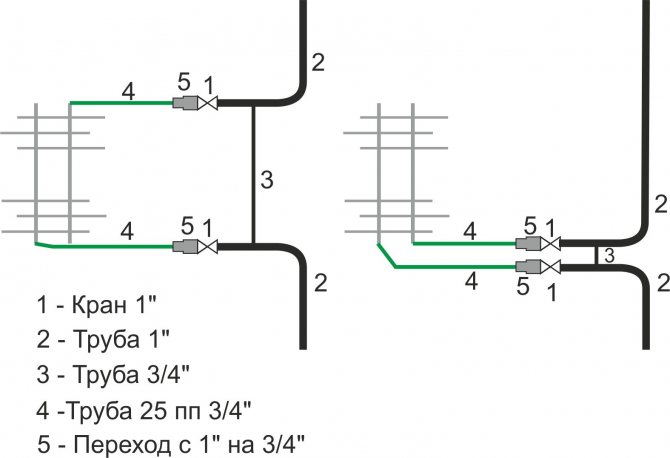
- with a narrowed bypass. In this case, the upper branch should have a slight rise towards the heated towel rail, this figure should be from 5 to 20 millimeters per meter of pipe;
- with offset bypass. Moreover, its diameter should be equal to the diameter of the riser.
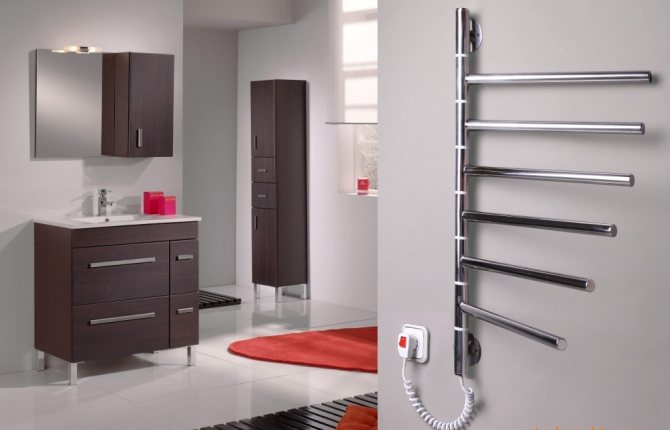
Electrical
This model is used if there is no possibility of connecting a water heated towel rail. There are two main options - wall-mounted and floor-mounted. The first of them has the most varied design and is used in small rooms. Having given preference to this option, special attention must be paid to the power consumption in order to calculate in advance the approximate cost of electricity. In this case, the connection diagrams for the heated towel rail may be as follows:
- Open - plug and socket are in use.
- Closed - the wiring fits into the wall structure.
The main features of electric towel warmers:
- Often these devices are equipped with temperature control.
- They can be installed not only in the bathroom, but also in other rooms.
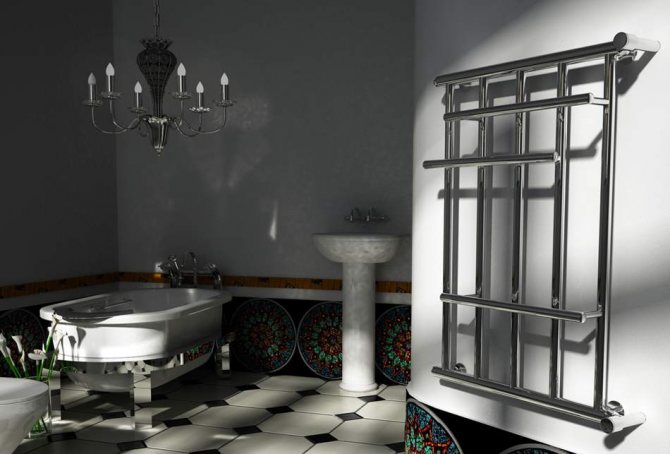
- Thanks to a variety of design solutions, you can choose a model that fits perfectly into the design of the room.
Dismantling of modern construction
If modern equipment has been correctly installed, with detachable connections, then it will be easy to replace it. It is important that the new plumbing device is the same as the old one and has the same dimensions in the centers of the connecting pipes.
The new equipment must be aligned with the center of the connections. It is necessary to remove the heated towel rail, which has already served its purpose, and then install a new one on the mating connectors, connect it to the system and fix it on the wall.
Varieties of towel warmer designs
The market offers several forms of heated towel rails, which differ in the way of heating:
- electric - autonomous heaters in the form of a heated towel rail, which operate from the electrical network;
- combined - autonomous, operating on a water heating element;
- water - connected to the heating system or hot water supply.
The first two types of heated towel rails are sold ready-to-use. To install them, you will need the brackets that come with the kit. The third type, the water type, requires the use of additional parts not only for fixing on the wall, but also for connecting to the water supply system.
Note! A water heated towel rail is the most common type and the most economical. After installation, it does not require additional costs, since it is integrated into the central communications.
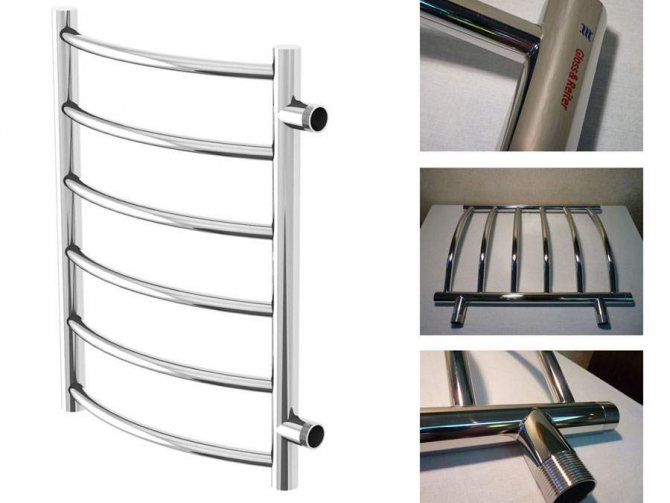
Water heated towel rails can have different geometric shapes:
- classic coil;
- U-shaped;
- in the form of a ladder of different sizes;
- angular.
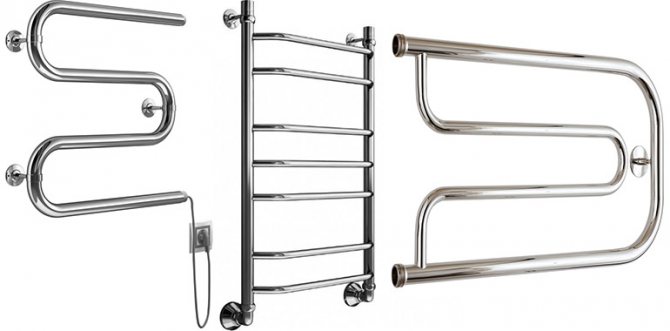
The shape of the heated towel rail does not affect the connection to central communications and is a matter of taste for the owner.
Metal for a heated towel rail is different. Since it has constant contact with moisture and heat, it must be a corrosion-resistant metal.
Manufacturers offer the following options:
- stainless steel;
- copper;
- chrome steel;
- brass.
All of the listed metals and alloys are corrosion resistant and have an attractive appearance.
Note! In addition to beauty and price, the main criterion when choosing a heated towel rail should be its diameter and the compatibility of imported models with domestic threads on fittings.
The diameter of the heated towel rail must match the diameter of the heating pipe (or hot water supply) to which it will be connected. The most common options are: 32 mm or inch; 25 mm or ¾ in. If the coil is smaller than the central pipe, it can burst due to a pressure surge in the system.
We recommend that you familiarize yourself with: Push Fittings - the latest development for a reliable pipe connection
Removing the old coil
It is much more difficult to replace the old Soviet coil. In this case, a side-connected heated towel rail is installed together with the replacement of the riser. Moreover, it can be partial (in your apartment) or complete. However, it is impractical to change part of the old pipeline; it is advisable to completely replace the riser. To do this, you will need to negotiate with the neighbors from below and from above, so that they connect a new riser. This is a common practice as it is very dangerous to leave old pipes in the ceiling.
Installing a water heated towel rail with your own hands
To install a new device, first of all, a heated towel rail connection diagram is required, indicating the size of each section and the location of the fittings, then the assembly will turn out to be more accurate.
Do-it-yourself installation of a heated towel rail in the bathroom now requires a soldering iron for welding plastic pipes. The set should include nozzles of standard sizes. If you follow all the instructions correctly, the welding process is easy to master on your own. It is helpful to watch a video tutorial on this topic so you don't miss out on important technology points.
USEFUL INFORMATION: Selecting screens for the bathroom: description and installation features
You can extend the pipes to any place where the device will be installed. Don't just hang a heated towel rail over the bathroom. There are several reasons for this:
- Dryers are never placed where there is excess moisture.
- The ingress of water on hot pipes will provoke increased humidity and the settling of calcium salts on them.
- It is inconvenient to take a shower and reach for things on pipes through the bath.
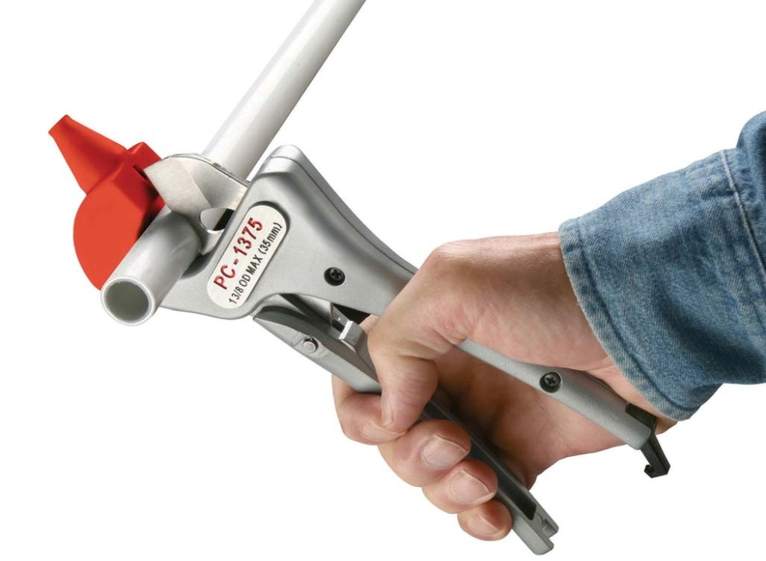
Pipe preparation
The work progress will be as follows:
- A pipe cutter is used to cut sections of plastic pipes of the required size. At the ends, a chamfer is removed with a slope of 150 and a length of 2-3 mm. Burrs and crumbs are removed from cut edges for quality joints.
- It is necessary to turn off the valve for supplying hot water to the riser and cut off the old heated towel rail from the pipes.
Important! The issue of installing the device should be previously agreed with the housing office.
- The riser can be worn out, then it is advisable to replace it in part or put a new one entirely. It is advisable not to leave old pipes in the ceilings, and the connection points for new ones should be available for repair. The work of replacing the riser and installing branches from it should be entrusted to specialists.
- The next step is to install ball valves and a bypass - a section of the pipeline with fittings.
Attaching the heated towel rail to the wall
How to hang a heated towel rail in the bathroom? For this, brackets are used. First they are screwed to the appliance, then they are leveled with a level and marks are made on the wall.
In the bathroom, you have to drill holes in the tiles, for which a special drill is used. The device should be fixed to the wall with plastic dowels.
It is important to decide at what height to hang the heated towel rail, and choose the right gap. The distance from the wall to the axis of the heated towel rail pipe according to the norm is:
- from 5 to 5.5 cm with a diameter of up to 2 ″;
- 3.5 cm in diameter up to 1 ″.
The mount can be fixed or with an adjustable clearance due to a stud screwed into the bracket. In this way, the necessary air circulation can be created to ensure quick drying of the laundry. Too frequent adjustments are not recommended as the pipes are constantly under pressure. They work reliably when they are permanently fixed.
The device should not be rigidly fixed so that the load-bearing sections of the wall are not loaded during thermal deformations of the pipes.
How to install a heated towel rail for ease of use? The standard stipulates that the installation height of a heated towel rail is 120 cm according to the rules.If the size cannot be maintained, the lower limit is 95 cm and the upper limit is 170 cm.
USEFUL INFORMATION: Modern bathrooms: design, photo
Before connecting the heated towel rail correctly, you should select the appropriate fittings. The thread is sealed by winding from flax, and the tightening is done carefully so as not to damage the threaded connections.
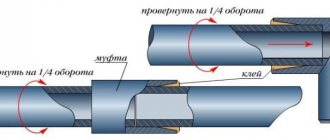
Pipe connection
Polypropylene pipes are welded to the couplings with a soldering iron. Nozzles of the required length are cut. The ends are chamfered and the edges are cleaned. The pipe is inserted into the sleeve, and the sleeve is pushed onto the pin, after which they are heated. The warm-up time is determined from the table.
Additional control: an element is considered hot if it can be easily rotated and removed from the nozzle.
After removing from the soldering iron, the heated parts are immediately connected. They are positioned exactly relative to each other with slight pressure. After 3-5 seconds, the pipe joint sets.
Install the device so that water flows through it from top to bottom. For this, a water heated towel rail is first connected to the riser with the upper inlet socket. Having connected and secured the device, the system is checked for leaks, for which they open the taps and turn on the supply of hot water. The installed devices must be free of leaks.
Jumper installation
The jumper is a kind of lifesaver in unforeseen situations. Its installation is optional, but highly desirable. So, for example, a leak has formed at the junction of a heated towel rail, which is becoming more and more intense every minute. And there is absolutely no time to call the emergency service and wait more than an hour for their arrival.
So, in order not to depend on such situations, a bypass is installed. Outwardly, it is an ordinary section of the pipeline. To install it, ordinary ball valves are mounted on the ends of the heated towel rail, with which you can shut off the water flow if necessary.
Water heated towel rail: side connection
This design option allows you to install plumbing equipment in a standard towel rail riser or in an existing hot water network. In other words, it does not require the preparation of an additional drainage system. However, water heated towel rails with side connection have one small drawback - the presence of welded elements. But with the proper quality of plumbing equipment, this model will last a long time.
When connecting this device, consider the following parameters:
- Correspondence of pipeline diameters.
- Center distance - the distance between the outlet and inlet holes.
It is allowed to carry out the side connection of the "ladder" heated towel rail with the use of water couplings. At the same time, it is forbidden to make the transition from pipelines with a large diameter to pipes with a smaller section, as this can lead to an increase in pressure in the device, which will provoke leaks or even rupture of welded joints.
In addition, water heated towel rails with side connection are installed in situations when it is planned to close the water pipes by means of tiles. During the installation process, it is necessary to ensure reliable waterproofing of the pipeline and the connected device. For this, gaskets and couplings are used, which are pulled together using an adjustable wrench of the appropriate diameter.
When installing a side-connected heated towel rail, it is important to remember that the water supply is carried out under pressure, respectively, the connection points must withstand sudden changes and a strong pressure of the water supply.
How do I connect correctly?
The equipment must be installed in the bathroom in accordance with accepted standards.Thus, the connection diagram of the heated towel rail to the hot water supply riser must meet the requirements of SNiP 2-04-01-85. A similar design is connected to the heating system in private houses that are equipped with an individual heating system.
In multi-apartment buildings, it is more expedient to carry out installation in full accordance with the project, if necessary - to a separate riser. This approach is quite justified, because the central heating system functions only in the cold season, and the water supply is carried out constantly.
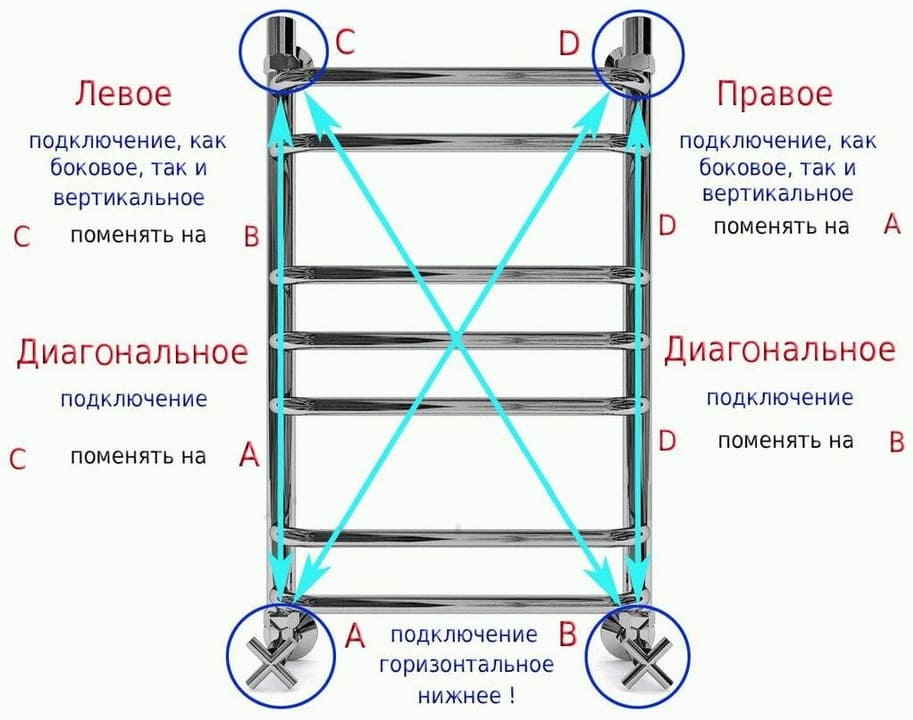
The principle of connection is not affected by the type of heated towel rail: it is important to correctly ensure the supply and outflow. As a result, a regular supply of water will be produced. Depending on the design features, the following connection methods are possible:
- Top-connected device.
- Heated towel rail with bottom connection.
- At the bottom of the plumbing fixture.
- Diagonal connection (used for ladders).
Thus, the connection diagram of the heated towel rail to the riser directly depends on the installation conditions and the type of structures.

Heated towel rail connection technology
The installation process for the towel dryer depends on the type of device. Water heated towel rails require a special approach to connection. Electrical accessories are easy to connect.
Materials and tools
Before connecting the heated towel rail, you must familiarize yourself with the connection diagram proposed by the manufacturer in the instructions. Also check the package contents of the purchased device.
To install the drying, you will need the following tools and materials:
- construction level;
- pencil;
- roulette;
- a hammer;
- Adjustable wrench;
- screwdriver;
- soldering iron and knife for PVC pipes;
- Mayevsky crane;
- two tees;
- clutch;
- fasteners, brackets;
- PVC pipes with a diameter of 32 mm;
- tow or sealing tape;
- fitting.
If a jumper is to be installed, two more ball valves must be purchased.
Stages of installing a water heated towel rail
The towel dryer is most often connected to the hot water supply system. You can install the device yourself by following the selected connection diagram and step-by-step guide:
- shut off the water supply;
- designate with the help of the building level the areas of fastening of the drying on the surface of the wall, observing the required distance from the riser and the slope of the liner 5 - 10 millimeters;
- install and fix the heated towel rail;
- mount a jumper by installing tees and ball valves at the ends of the pipe;
- using angle and straight fittings, connect and adjust the direction of the supply and return outlets of the coolant;
- install a Mayevsky tap on the heated towel rail.
All joints are sealed with tow or special tape. Before supplying water to the system, as well as after starting the coolant, the tightness of the joints is checked.
Connecting an electric heated towel rail
This type of towel dryer can be installed in any room, regardless of the location of the hot or heating piping. The installation process of the device consists of fixing the structure in the selected place and connecting it to the network.
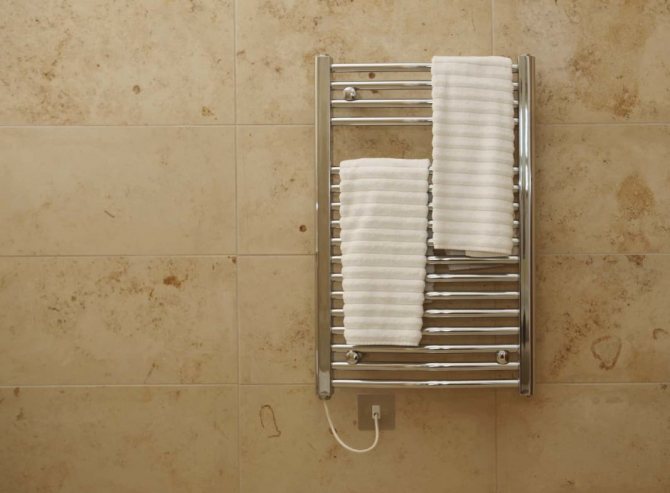
Correctly connected electric heated towel rail
Installation of an electric heated towel rail in a bathroom or in another room with high humidity is carried out taking into account compliance with safety standards:
- connection must be made via a three-core cable;
- grounding must be present;
- installation of only hidden insulated wiring is permissible;
- it is necessary to use an RCD.
Requirements for the installation of heated towel rails:
- distance from the floor - at least 20 centimeters;
- pieces of furniture should be placed at a distance of 75 centimeters;
- there should be a space of 30 centimeters between the wall and the drying;
- distance from the bathroom and washbasin - at least 60 centimeters.
The outlet should be at a safe distance from the hot towel drying surface. Connecting a heated towel rail in a country house
To ensure the drying of bath towels in a country house, various connection methods are used. If heating is carried out in the country, then an excellent option would be an insert into the heating system circuit. But with such an installation, it should be borne in mind that the device will function only in the cold season.
If you intend to regularly use a heated towel rail, then an electrical design will be the best option. This drying can be turned on and off as needed.
The connection of water devices in a country house is carried out according to standard schemes. Most often, when connecting to a heating circuit, a side or diagonal insert is used.
Basic moments
To connect any equipment in the bathroom, you need to have professional skills. Since errors in measurements of a few millimeters can lead to big troubles and problems with operation. If there is a need to install a heated towel rail, you should contact an experienced specialist.
It is important to take into account the features and subtleties of the work:
- Making accurate measurements.
- Determination of the location of the structure.
- The presence of couplings, fittings, brackets and other additional parts.
- Choosing a connection method.
Installing a heated towel rail in the bathroom belongs to the category of difficult plumbing work. Therefore, if you are not sure, you do not need to tempt fate and try to complete the installation yourself. The consequences can be very different: from banal leaks of pipelines covered with ceramic tiles to damage to tiles in the process of hanging brackets.
Before starting work, it is important to decide whether such work is within your power or not. Even if you decide not to do it yourself, at least you will know the installation sequence, which will allow you to control the quality of the installation of hired specialists.
Hiring professionals is the most correct and balanced decision, thus, you will be able not only to save time and nerves, but also to get an excellent result. Quick drying will become a pleasant reality, towels will be fresh and dry, and the bathroom will be comfortable.