Here you will find out:
- Features of using the device
- Error codes for the gas water heater "Oasis"
- The main causes of the malfunction and their elimination
- How to prevent breakdown of the Oasis gas water heater
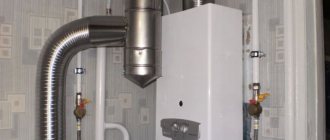
Before proceeding with the search for malfunctions of the Oasis gas column and choosing a way to eliminate them, you must clearly understand what type of device the device belongs to, know the device, the principle of its operation.
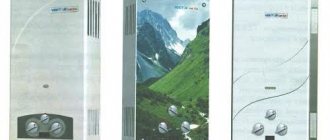
The layout of the Oasis gas column assemblies is typical for most models of Chinese-made flow columns
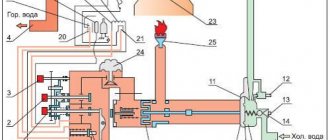
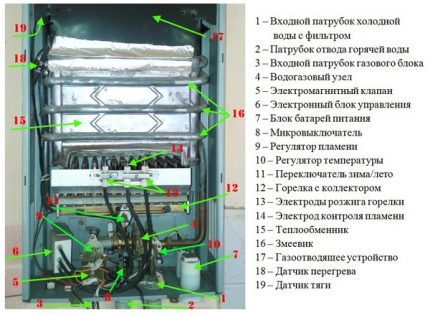
Above in the diagram, the device of a typical gas water heater is considered, which is also typical for Oasis columns. Let us further consider how the most common type of chimney flow-through model of the brand with automatic ignition works.
When the tap is opened, water is supplied through the inlet pipe to the water-gas unit, which turns on the ignition and gas supply. As soon as it ignites, a signal is sent from the flame sensor to the electronic unit to stop sparking.
Further, the water passes through a coil rigidly fixed to the heat exchanger, which is heated by the burning gas. The coil transfers heat to the outgoing running water.
When the tap closes, the water-gas unit cuts off the gas supply. Burning stops and the column goes into standby mode for opening the water tap.
An important condition for the normal and safe operation of the column is the removal of combustion products through the ventilation chimney. If the hood is absent or insufficient, the draft sensor is triggered and the column turns off.
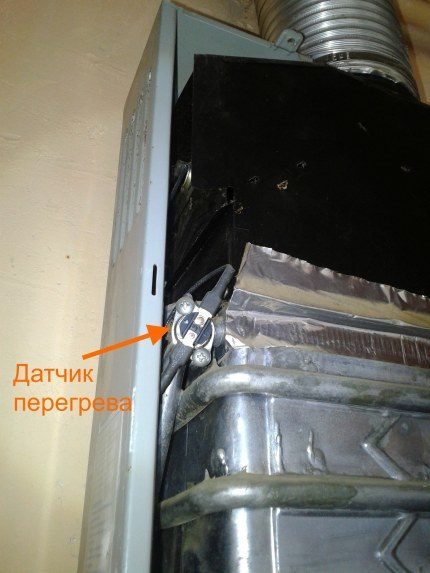
The overheating sensor is responsible for the timely shutdown of the column when the maximum temperature is reached. It is an essential element of the column to provide overheating protection
Maintaining the required temperature regime is an equally important condition for fire safety and a long service life of the column. Overheating negatively affects the condition of all elements, especially the heat exchanger, which leads to their premature failure.
Features of using the device
So, in order for the Oasis gas water heater, the instruction manual of which is attached to the product, to work effectively, you need to follow certain rules for using the device:
- Use only the type of gas specified in the technical recommendations;
- It is necessary to monitor the charge of the batteries on which the device works;
- If you want to turn off the device, you must first turn off the water;
- If you are going to use the equipment for the first time, you need to take into account that air may be present in the gas supply pipes, so the device may not immediately ignite;
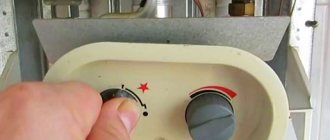
- The setting of the degree of water heating must be carried out by turning the handle of the tap or the gas regulator on the body of the device;
- If you are going to turn off the device for a long time, you must first turn off the hot water tap, the gas shut-off valve.
Now let's consider what should not be done while using equipment such as the "Oasis" gas water heater:
- You cannot turn on the device if there is no draft in the chimney.
- Do not leave the device unattended for a long time.
- No need to buy and install damaged or defective models.
- You should not unauthorizedly disassemble the device and repair it, as well as touch it during operation.
Power problems
For normal operation of most of the components inside the unit, a stable power supply is required.Therefore, if malfunctions of the gas column appear in the form of failures, which are characterized by the fact that the flame does not ignite or goes out during the operation of the device, then a possible cause of such a malfunction may be a lack of current power supplied from the batteries.
This does not apply to units without electronic components in the design. For example, you will not find it in the Neva 3208 unit, which you want to repair, or when repairing an old model Astra gas water heater.
Often, when repairing the Oasis gas water heater, as well as the Junkers gas water heater, users are often misled by the fact that the LCD display glows and there seems to be no power supply problem. But it should be borne in mind that for ignition, a sufficient charge is required in order for a spark to form in the glow plug. In addition, the electronic unit also needs power to transmit it to the solenoid valve in order to keep it in the "open" state. Therefore, if the batteries are already dead, then there may be insufficient power to ensure the operation of these modules.
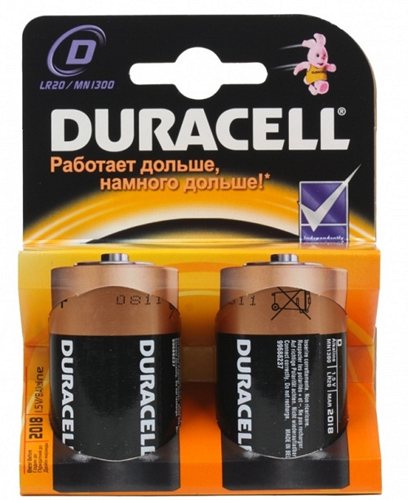
In the instructions for the water heater, the manufacturer indicates the operating time of one set of batteries. As you might guess, this value is approximate, and it depends on the quality of the batteries used. When buying batteries, you should pay attention to the markings applied to them. For long-term operation of the gas water heater, it is recommended to choose batteries marked LR20. This means that they are alkaline, that is, alkaline.
Cheaper ones, labeled R20, fail very quickly and cannot cope with constant load. Lithium CR20 batteries are ideal. Their main difference from alkaline ones is their high capacity, stable generated current, long-term operation, which is several times longer than the service life of LR20 batteries. The only drawback of CR20 batteries is their high cost. So buying LR20 alkaline batteries will be the right choice in terms of economy and cost effectiveness.
It should be remembered: never buy batteries from street kiosks, and even more so from trays in the market. This recommendation especially applies to the winter period, since the batteries lose their charge from the cold.
Error codes for the gas water heater "Oasis"
- Error E1: Ignition defective. Reasons: no gas supply, or gas pressure is too strong. Defective ignition control electrode.
- Error E2: The air pressure switch does not close. Causes: chimney clogging.
- Error E6: There is no flame. Causes: Air has accumulated in the system.
- Error E7: Low pressure. Reasons: there is little liquid in the hot water supply system.
- Error E9: It signals that the pump has broken down and that the system has an impermissibly low pressure.
The main causes of the malfunction and their elimination
The designs of all gas water heaters are similar to each other. Why not summarize all the problems and describe the options for solving them? Because each brand has its own weak points. Then there are malfunctions characteristic of specific brands. We analyzed user reviews to collect reliable information for you.
In Oasis water heaters, a factory defect is extremely rare.
External and internal factors can cause a breakdown:
- Incorrect installation and connection.
- Incorrect operation.
- Chimney and ventilation blockages.
- Problems with internal components: scale, corrosion.
We have described the ways to fix these problems below.
The column does not light up
There can be many reasons, we will help you figure it out. The main thing is to correctly determine the location of the breakdown.
If the device does not ignite at all, no spark is generated, then:
- The batteries are dead. Automatic ignition devices are battery operated. For replacement, take quality elements with a good charge.If you find a leak where they were installed, clean all contacts and install new batteries.
- Traction problems. For the normal operation of equipment, it is necessary to have a draft in the chimney. If not, inspect the ventilation hole for blockage. This could be a foreign object, soot, or debris from the street. Clean the hole if possible. Make sure that the outside of the chimney outlet is not blocked.
How do you know if there is cravings? Light the spike, bring it to the viewing window of the column. The flame deflects - there is a thrust, it burns evenly - no. You can also lean a piece of paper against the ventilation. In the presence of traction, the sheet will press against the terminal, otherwise it will fall.
- The water pressure regulator is set at the minimum level. A small pressure is created in the system to activate the diaphragm and open the gas valve. Set the knob to the maximum value.
- Low line pressure. Does a trickle flow when you turn on the tap? Contact the water utility and wait for the supply to be restored. If this happens frequently, it is recommended to install a circulation pump.
- The strainer is clogged. The part is located at the entrance to the water unit, retains small debris that enters with the flow of water. It is necessary to disassemble the unit, rinse the filter under running water.
- The membrane is stretched. The element is used to start the gas valve. With line pressure, the diaphragm expands, pushes the stem and opens the valve. It wears out over time, so it needs a replacement. You can read about it here: "Water column of the gas column".
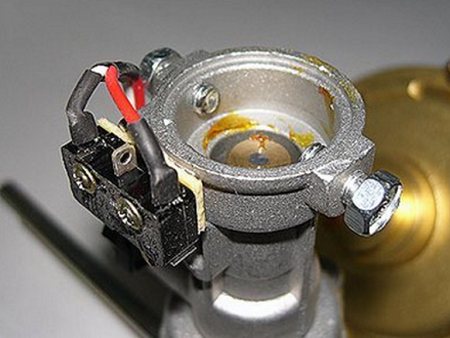
- Broken microswitch. It cannot be repaired, so a replacement is needed.
- Wiring problems. Remove the cover, inspect all wires leading to the control box. If the insulation is broken, replace the loop.
- Defective solenoid valve in the gas unit. You need to inspect, check and install a new part.
The flame is lit and extinguished
This happens when the electronic unit does not receive an ignition signal, stops the ignition and shuts off the gas. The reason may be a malfunction of the flame sensor or the formation of carbon deposits on the sensor.
Remedy: Lightly clean the sensor with a fine emery cloth (zero grade). In this case, one should not be too zealous so as not to damage the metal coating. If this procedure fails, the flame sensor needs to be replaced.
The column is leaking
Leaking is a serious malfunction, but you can cope with it yourself.
The stuffing box leaks through the stem. To verify this, remove the shroud and check where the water is coming from.
How to do a DIY repair:
- Remove the adjustment knobs by pulling them towards you.
- Unscrew the four screws securing the casing.
- Disconnect the display wiring.
- Remove the batteries from the unit and disassemble it by unscrewing the bolt from the bottom.
- Disconnect the water hoses.
- Unscrew the bolts of the water valve, remove it.
- You got to the stuffing box and its stem. When dismantling the old stem, the gasket may remain inside - this is not a big deal. Simply remove the gasket from the new part and install.
- The assembly is carried out upside-down.
A more serious problem is radiator leakage. The new heat exchanger costs almost as much as the new Oasis Turbo model. How to save money? Close the fistulas by soldering. Read more in the article "How to solder a gas water heater".
The easiest way to repair a leak is if a hole has formed on the outside of the tube. Then you can use cold welding. Internal corrosion requires the use of a soldering iron or torch with a temperature of 170 degrees. A rosin or aspirin tablet is suitable as a gumboil.
Before starting work, prepare the radiator:
- Drain the pipes.
- Dry.
- Sand the soldered area with fine sandpaper.
- Wipe with a degreaser.
You can start repairing. To prevent the fistula from appearing, the thickness of the solder should be 2-3 mm. Examine the node for green spots - these are future fistulas. Better to take care of them right away.
The column goes out after a few minutes
Such a malfunction is often associated with poor traction or overheating.
Remedy: clean the chimney, reduce the water temperature by adjusting the flame and pressure, do not dilute hot water with a mixer.
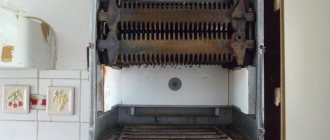
Clogged heat exchanger
How to understand that the radiator is clogged:
- Long-term heating of water.
- The stream is not hot, but warm.
- Pieces of scale come out together with water.
These are indirect signs, so it is better to inspect the device. Scale on the heat exchanger plates and the coil appears from poor-quality water and high heating temperatures. It is recommended to set 55 ° С and do not mix flows on the mixer.
There are two ways to get rid of the blockage.
- Without removing the node from the column. You will need a dedicated pump with tubing. A reagent is poured into it, which can be bought in a store or made on the basis of hydrochloric acid. Connect the hoses to the coil and start bleeding until all scale comes out of the holes.
- With dismantling. This is a more budget option. A deep container is filled with water, a heat exchanger is lowered into it. A solution of citric acid (150 g / 750 ml) is poured into the coil through a watering can. The container is placed on the stove and boiled for 15 minutes. Then the radiator is rinsed under running water, dried and installed in place.
Reduced pressure and weak water heating
Signs of scale formation in the heat exchanger are a decrease in the flow of water at the outlet of the column and its weak heating. In this case, the column may not ignite well, and the radiator overheats due to poor heat exchange with water. This triggers the thermal protection sensor and turns off the column.
Clogged radiator fins also lead to overheating. When they become clogged with debris, scale, it becomes difficult for the combustion products to exit into the chimney, which can lead to burnout of the heat exchanger skirt.
Water hardness is the main reason for the deterioration of the pipeline capacity. The presence of calcium, magnesium and other impurities contributes to the formation of scale and reduces heat transfer. Heating greatly enhances this process.
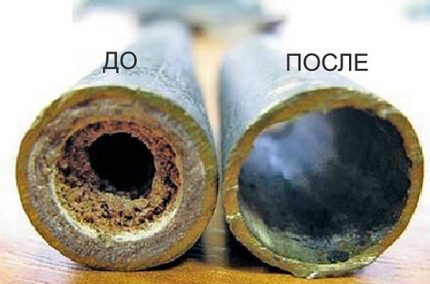
Scale reduces efficiency, increases gas consumption to achieve the desired temperature. If you do not take measures to remove it, deposits will grow even faster, up to the complete blocking of the water flow.
It is impossible to use a column with heat exchanger tubes clogged with scale. This will lead to local overheating, cracks in the coil and the need to replace it.
Remedy: flush the heat exchanger with a special solution. There is a wide variety of reagents available for professional use. They do the best in descaling without damaging the piping.
Most chemicals contain solutions of various acids. Their concentration and composition are selected in such a way as to effectively dissolve salt deposits, but to act as gently as possible on the inner surface of the pipeline. The choice of a suitable reagent should be based on the material of the heat exchanger.
For example, reagents intended for copper radiators cannot be used for pipelines made of galvanized and stainless steel and vice versa.
The highest quality flushing is carried out using special equipment (boosters). The effect is achieved due to repeated circulation of the reagent, its heating, reverse, and the use of special formulations. The cost of such equipment, as well as services, is quite high. Buying boosters is more justified for professional use.
Good results can be achieved in less costly ways using available tools and reagents.
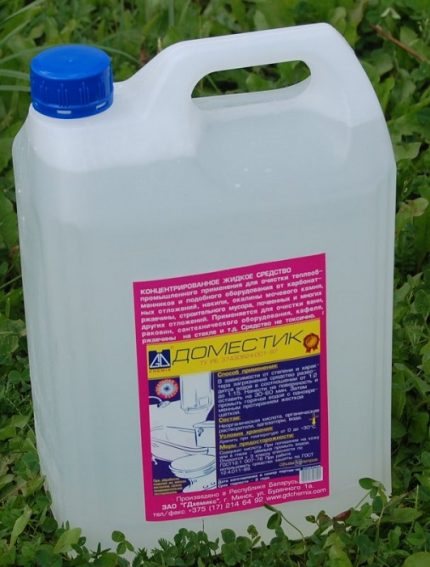
The most popular and proven heat exchanger flushes are citric acid, vinegar, decalcifier and other acid cleaners.It is important to observe the dosage - exceeding the concentration of the active substance can damage the pipeline
For descaling, usually 10 - 20% solutions are used. For 1 liter of water, 100 g - 200 g of antiscale or citric acid or 9% vinegar are taken. The greatest effect is achieved when the solution is heated to 80 - 100 degrees.
Flushing can be done in two ways:
- without dismantling the radiator;
- with the removal of the heat exchanger.
To flush the radiator without removing it, a number of steps have to be performed. First, turn off the water by substituting a container for draining. Disconnect the outlet pipe, open the tap. Then unscrew the nut connecting the coil to the water block. Connect the funnel from the cut plastic bottle to the coil inlet with a flexible hose.
Then fix the funnel above the heat exchanger. Pour the working solution into the funnel in small portions until foam appears at the other end of the coil. The procedure will have to be carried out for 4-6 hours - until the end of the chemical reaction, guided by the released foam, or using acidity indicators.
With the dismantling of the heat exchanger, flushing is performed as follows: first, the column is disassembled, the radiator and burner are removed. Then the plate is cleaned from soot and soot. After that, the radiator is placed in a large metal container with water, the reagent is poured into the pipeline and the container is heated. At the end, the heat exchanger must be rinsed with cold water and a 10% soda solution.
Gas smell when turned on
This is a serious and dangerous problem. Shut off the gas supply immediately! Contact the gas service.
The oil seal is probably worn out. Replacement in the event of a gas leak must be carried out by a specialist. How to disassemble the gas-water unit and get to the oil seal, we have described above.
When starting to operate the equipment, read the instructions. It is recommended to carry out a routine inspection of all units of the water heater once a year. Now you know what to do. And if you are confused, cut off the fuel supply and contact the service center.
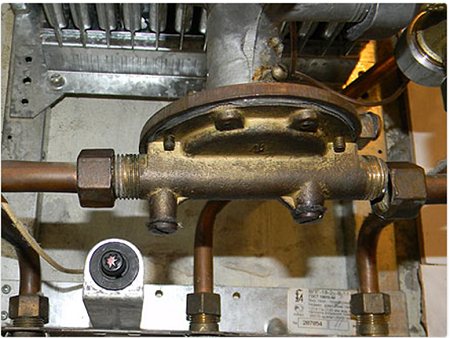
Malfunction of the water unit
Most often, gas water heaters are repaired due to a malfunction of the water block. Its work consists in the fact that under the influence of liquid pressure, the membrane inside it, bending, transfers movement to the rod, and it already moves the pusher of the gas unit. As a result, the spring valve opens and the power supply to the control unit is turned on. Therefore, if the water unit is faulty, the device will not start.
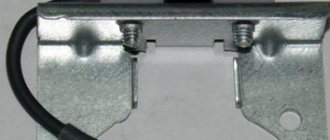
The breakdown of the water block can be determined by external signs.
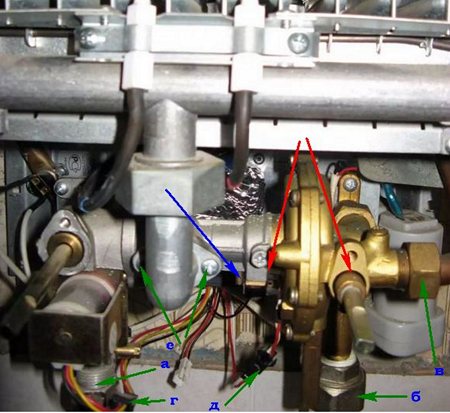
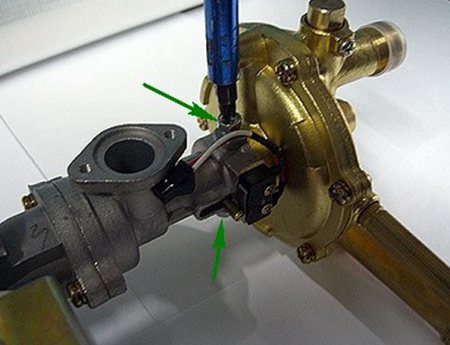
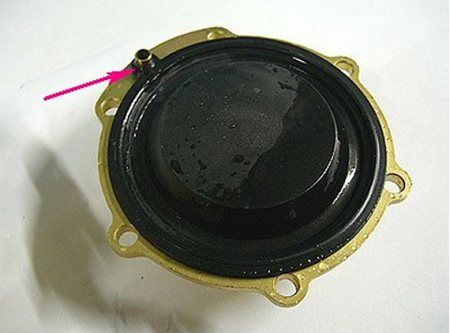
- If you opened the water supply, and the rod pressing the switch plate remained stationary (shown in the figure with a blue arrow), this means that the membrane located inside the main component of the water unit - the “frog” - is damaged.

- Jamming of the stem may be due to sticking.
- Possible leakage in the place where the gas and water unit are connected, or fluid seepage from under the control valve (shown by red arrows).
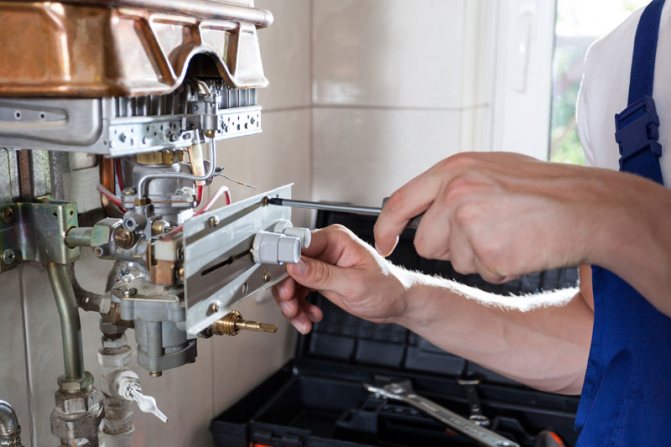
If you notice at least one sign, then the node will need to be removed and repaired. The water unit can only be removed together with the gas module, since they are a single structure. This can be done in the following way:
- after you have made sure that the gas valve on the pipe is turned into a closed state, you can disconnect the supply hose (a);
- similarly, with the water supply turned off, the nut on the pipe of the water block (b) is unscrewed;
- then, using a wrench, it is necessary to unscrew the nut that connects the water block to the heat exchanger (c);
- disconnect the connector block (d) on the conductors connecting the solenoid valve to the control module;
- in the same way, the wires (d) going to the switch are disconnected;
- using a screwdriver, unscrew the 2 screws (e) securing the branch pipe to the water-gas unit, through which the fuel is supplied to the burner manifold;
- after unscrewing the fasteners, the entire unit can be easily removed from the device.
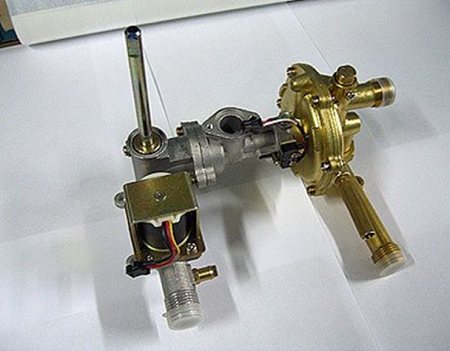
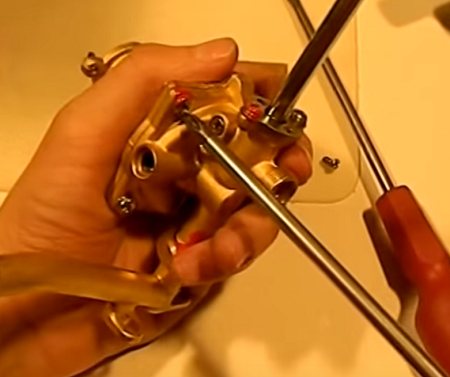
Next, you need to disassemble the gas-water module itself.
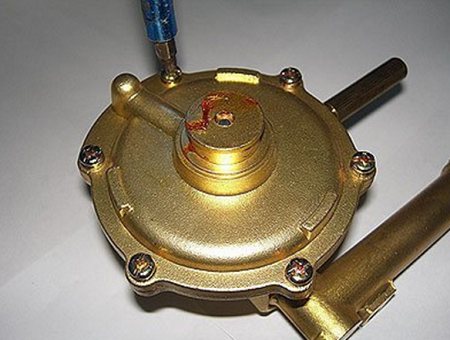
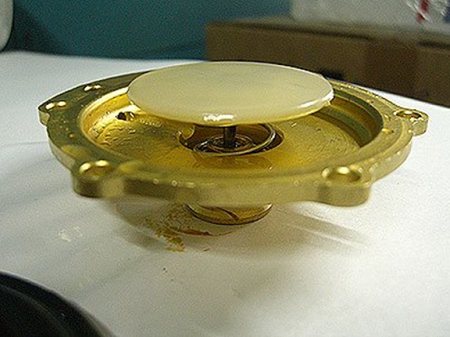
- After removing the device, it is required to separate the water unit. To do this, unscrew the 2 screws (indicated by arrows). It is not necessary to unscrew them completely. With the help of a clamp, they fix the “frog” in the gas unit. The attachment of the “frog” to the latter may differ in different models, for example, in the Neva 3208 gas water heater.
- This is what the gas module looks like with the water module disconnected.
- Next, you will need to disassemble the "frog" itself by unscrewing 6 screws. They can stick and twist tight or even “lick off” with a screwdriver, if you make a lot of effort. To prevent this from happening, you can first drop a special WD-40 liquid on them, after which they can be easily unscrewed, and none of them will break.
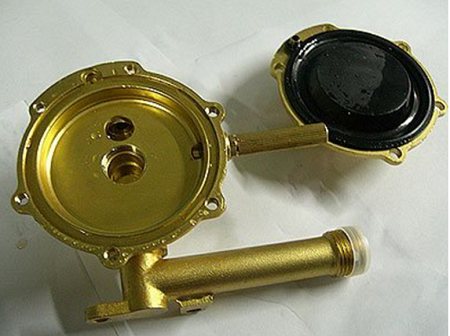
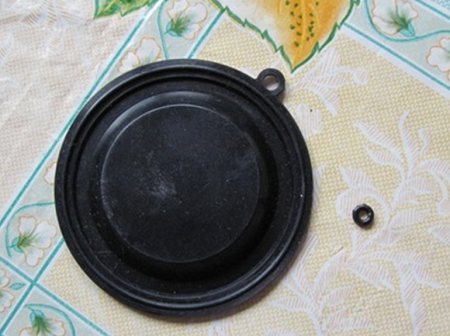
- After successfully unscrewing the screws, the module opens in two halves, and you will see a rubber membrane.
- The membrane must be carefully inspected, and if it is found that it is very stretched, or it has gusts, it must be replaced with a new one.
- To get to the spring plate, the diaphragm must be removed. If it is intact, it must be done carefully so as not to damage the ring with which it is put on the branch pipe (indicated by the red arrow in the figure above).
- After removing the membrane, you will see a spring plate.
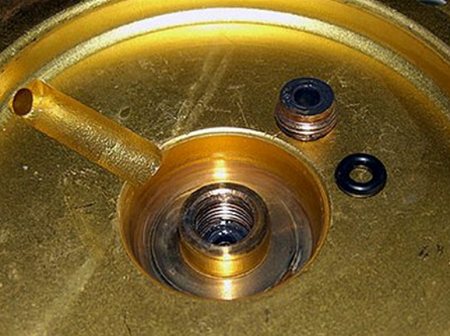
- So that you do not disassemble the unit once again, inspect the oil seal. To do this, carefully remove the plate with the stem.
- Take out the spring and you will see the screwdriver cut plug. There is an O-ring underneath. The plug must be unscrewed from time to time to lubricate and replace the rubber gland.
- Having previously purchased a repair kit for the "frog", change the failed oil seal and membrane. When you install the oil seal back, do not forget to lubricate it with silicone grease, and also lubricate its location.
- The assembly of the water block of the gas column takes place in the reverse order. The plug must be tightened so that the stem passes through it without much effort. When you have completely assembled the “frog”, the repair of the water block can be considered complete.

Repair of the gas water heater Neva 3208 regarding the “frog” malfunction is similar and intuitive, although the internal view of the unit is slightly different. The Neva 4511 gas water heater can also be disassembled, repairing it with your own hands is quite feasible.
When a Chinese gas water heater is being repaired, the size of the water unit is always surprising. It is rather small in size, and to disassemble the “frog”, you will need to unscrew only 4 screws.
How to prevent breakdown of the Oasis gas water heater
In order to prevent a situation when it is necessary to repair the Oasis gas column, it is necessary to properly care for the gas equipment and operate it correctly. It is these recommendations that can be read in the instructions for gas water heaters. Here are some tips for use:
- It is necessary to monitor the charge of the batteries.
- When turning off the unit, you must first turn off the water.
- If the unit is shut down for a long time, then it is necessary to shut off the supply of bitter water.
- Descale the column periodically.
- Use only the gas recommended by the manufacturer.
- Do not turn on the column if there is no traction.
- Do not repair yourself.
Features of using batteries
Of all the parts, batteries require the most frequent replacement. For gas water heaters, you should choose only alkaline batteries made according to the Alkalin power technology of standard size "D" and the first letter "L" in the designation - LR20. Their capacity and service life are five times longer than that of saline ones: from 1 to 1.5 years.
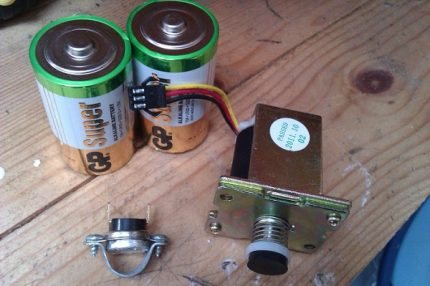
It is better not to buy items that are too cheap, they may be counterfeit.It is possible to install NiMH or Li-Ion batteries, but their price with a charger is higher
Quality batteries start at $ 1.2. There is a radical way to reduce the cost of replacing batteries - converting the speaker to power from the mains.
To do this, you can buy a special power supply unit for 3 V, or use a charger for a mobile phone, for 5 V, with an additional stabilizer. The main requirement is that its power is sufficient for ignition, which occurs at a supply voltage of 3 V and a current of 350 mA.
In cases of power outages, you can always keep batteries in stock, fortunately, alkaline batteries have a shelf life of 5 years and more.
Column heat exchanger quality
When choosing a column, you should pay special attention to the quality of the heat exchanger. The type of metal and its quality have a large impact on the life of the radiator. They are made of galvanized steel, stainless steel, copper.
The most durable stainless steel, but inferior in thermal conductivity to copper. Accordingly, they are less economical and have lower efficiency. Copper ones are the most efficient in terms of heat transfer, but also the most expensive.
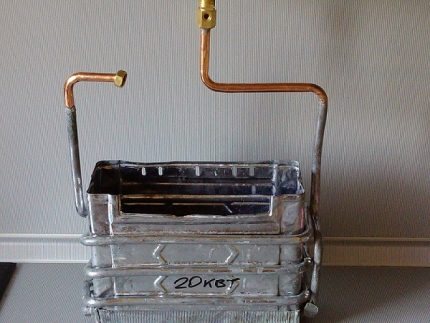
When replacing the heat exchanger with a new one, pay attention to the thickness of the metal and the weight of the radiator. Quality shouldn't be too light
The factor of the high cost of copper leads to the fact that manufacturers save as much as possible on the thickness of the heat exchanger wall, bringing it down to 0.5 mm, which significantly reduces the service life. For the same reason, other metals are added to copper. The alloy obtained in this way can have unpredictable properties. As a result, such a heat exchanger cannot even be soldered.
System water quality
If the water in the system is subjected to frequent chlorination, this will adversely affect the condition of the copper heat exchanger. Combined with thinner pipe walls, this can quickly lead to corrosion and fistula formation.
Increased water hardness in combination with heating is no less problematic. Scale deposits require periodic flushing.
You can improve water quality with aquafilters and magnetic softeners.