On the eve of the whole evening I was listening to music in my Mitsubishi Outlander XL, pumping the 700-watt subwoofer with only one battery, for which I had to pay in the morning - the car did not want to start. When trying to start, he sneezed and clicked, hinting at a lack of battery power. And I had to urgently go with my son on business.

This situation sometimes arises if you drive a little - the battery does not have time to be recharged by the generator and sits below the minimum level allowed for the starter plant (about 11.7 V).
There are three options:
- Connect to start the battery from another machine (not everyone wants to take risks or spend their time on this).
- Remove the battery and take it to the mains charging (it is difficult and long, the setting in the BC and the radio tape recorder may go astray).
- Use a small booster feed.
A booster is a small device that is connected to a failed battery and helps it start the car, adding the necessary watts of power. Usually the booster contains several typical lithium cans with good current (flat or 18650 - it doesn't matter) plus any indicator electronics.
The price of such a useful thing starts from 2,000 rubles, which you don't really want to throw out on such a simple device. Maybe later somehow it will be bought (assembled), but you need to go now! In general, the idea came to mind like this: let the radio controlled toy jeep help launch the big jeep!
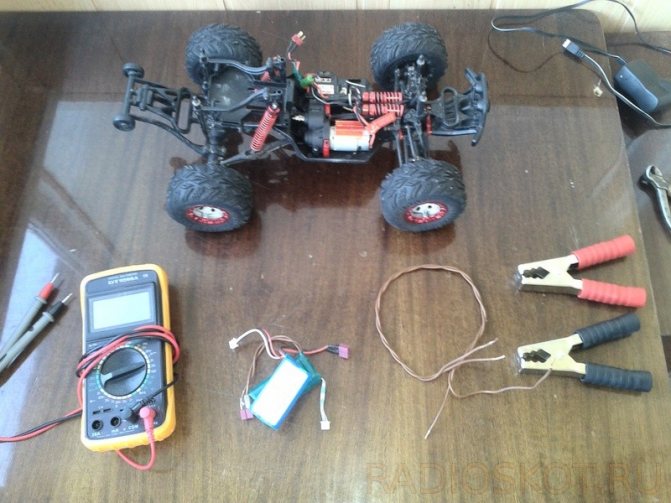
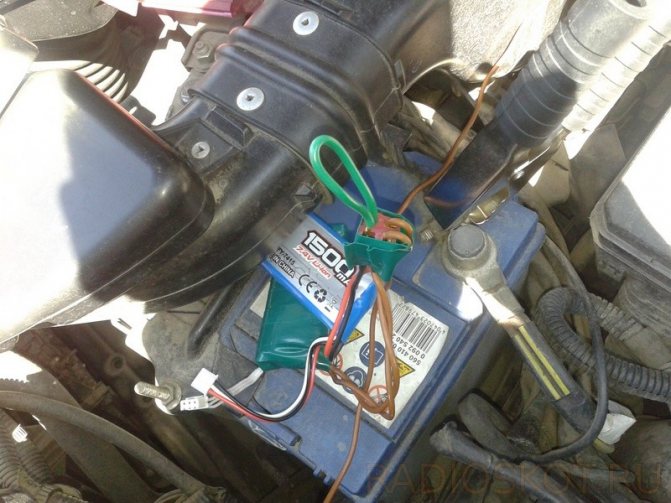
It will help with its two 7.4 V batteries (8 V when fully charged), connected in series with each other and parallel to the automotive lead.
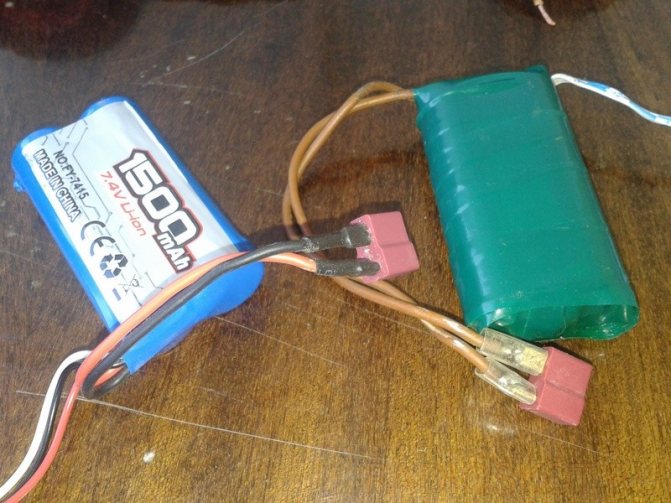
Of course, their power will not be enough for a reliable start, it is advisable to connect another such chain of 4 Li-Ions in parallel with the first one, but since the voltage measurements showed that there is not enough of a few tenths of a volt, there is a chance to crank up this little business.
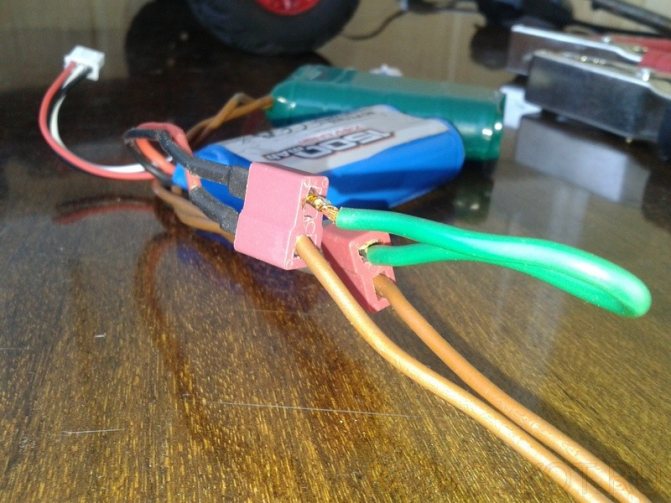
Hastily connected the connectors with a wire and connected them to cables with powerful crocodiles.
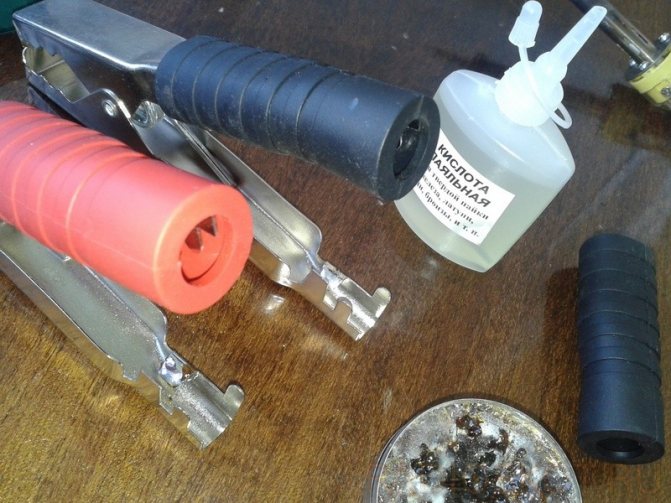
The metal of these crocodiles is soldered very poorly - I had to use soldering acid.
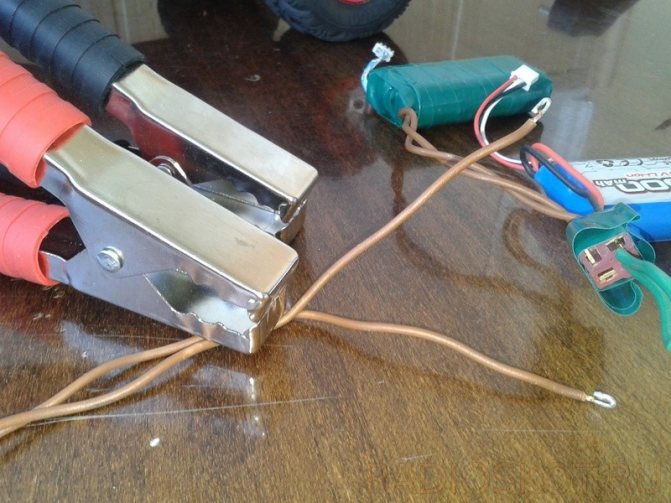
In general, in 20 minutes, the simplest homemade booster was ready - let's proceed to the tests.
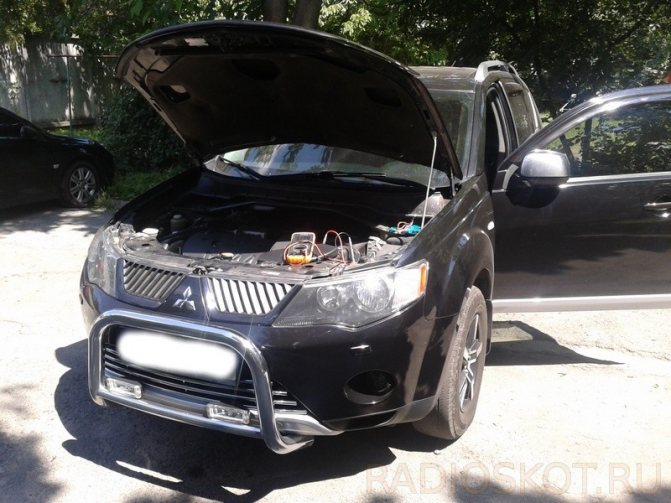
With the electronics turned off, the car battery showed 11.4 volts, and when the devices were turned on, the voltage dropped to 11.1.
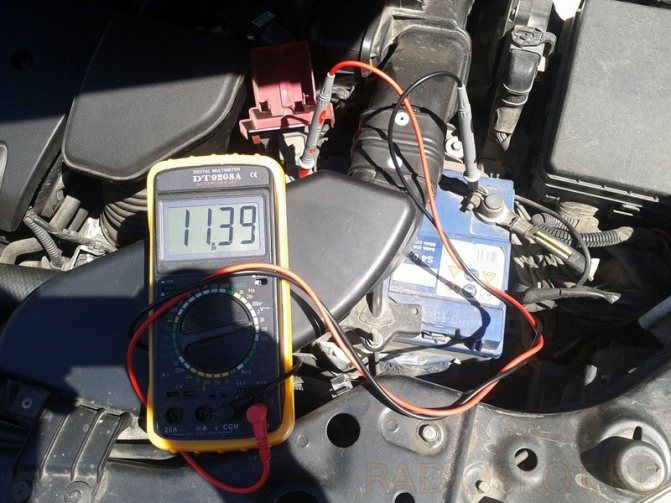
Add lithium lead and try to press the engine start button.
Surprisingly it worked! For 5 seconds the engine was indignant, after which it started up. At the same time, the booster wires got very hot - after all, a 200 A current pulse. Naturally, when the battery is deeply planted, such a trick will not work, at least not with 4 lithium cans, but if the battery is not too critical, it will be possible to assemble such a homemade booster very quickly, since almost everyone has Li-Ion 18650 batteries.
Why is cleaning necessary
Sometimes there are certain problems in the operation of the heating system and in order to get rid of them, it is enough just to clean the equipment.
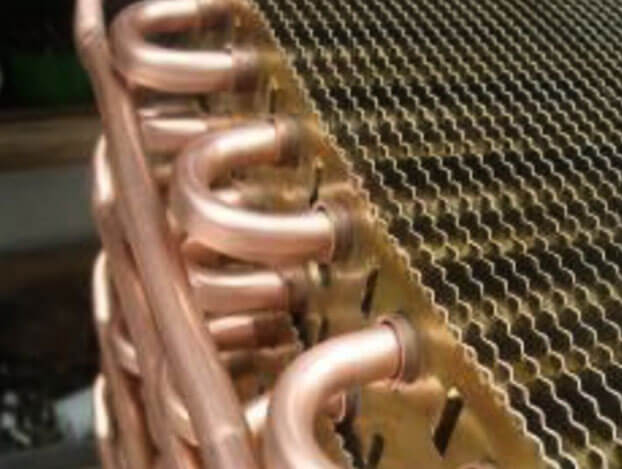
This is due to the fact that during the long-term operation of the boiler, various substances and deposits are collected in the heat exchanger, which can lead to the complete destruction of this part of the equipment.
In addition, under the influence of high temperatures, the impurities deposited on the heat exchanger react with each other, which in turn will lead to a decrease in the operational properties of the entire heating system as a whole.
So, they can interfere with high-quality heat exchange:
- hardness salts;
- dissolved iron.
Hardness salts and excess iron are characteristic of water in many regions of our country, so the problem is urgent for many!
In order for your boiler to operate at the maximum level of efficiency, and the heat exchanger to maintain its operability as long as possible, it is recommended to periodically clean the equipment using special fluids and solutions for this, which we will discuss in more detail below.
The frequency of cleaning directly depends on what kind of liquid you use in the heating system:
- if this is ordinary, clean water, then this procedure must be performed every four years;
- if it is antifreeze, then the cleaning procedure is performed every two years.
When using antifreeze, it is extremely important to replace it on time. If this is not done, then the entire heating system of the house can be seriously damaged.
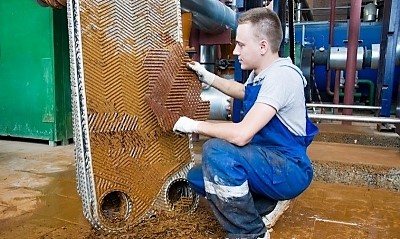
Of course, ideally, this should be done by specialists, but the cost of their servants is unreasonably high. Therefore, if desired, with a little skill, you can achieve an acceptable result with your own hands.
Booster preparation and pumping features
It should be noted right away that the biggest problem in this situation is the booster, that is, a special device that provides fluid pumping through the heat exchanger and at the same time removes the fumes.
It is unlikely that he will be able to take it from someone from his acquaintances. And it makes no sense to buy it yourself - its cost exceeds $ 300 (and these are not the highest quality and reliable devices). It is clear that the acquisition is unjustified. Therefore, the only correct option is to make a booster from scrap materials with your own hands.
An example of how to clean the heat exchanger of a gas boiler in the video:
For these purposes, an old, but working pump of a washing machine may be suitable. If you don't have one, then you can easily purchase it at a flea market or on the Internet for a small amount.
Connection features
It would seem that there is nothing complicated in further actions, but in fact, not everything is so simple, since it is important to correctly connect the flushing pipes coming from the pump.
For this, a special mounting plate must be made. Carefully study the features of your equipment and based on this:
- take two metal solid plates, the thickness of which is 2.5 millimeters;
- depending on the features of the device, drill holes to match the holes in the heat exchanger;
- at a regular plumbing store, buy four so-called "American" women with a diameter of half an inch and some spacers under them;
- use only the inner part of the "American", installing them in the lower hole of each plate;
- using bolts, fasten the plates so that the fittings are pressed as tightly as possible to the heat exchanger.
Even conventional ¾ ”brass fittings will do to allow the hoses to be connected. They can be used for both primary and secondary heat exchangers. By the way, how to properly connect a booster for flushing heat exchangers with your own hands, see the video presented in this article.
The preparation does not end there. You will now need additional container. It can be a regular plastic canister or even a five or six liter water bottle. Be sure to rinse the container well to remove even the slightest contamination.
At the bottom, install a fitting that will allow you to connect the hose. The fitting must be secured tightly and firmly. Perhaps you need to melt the hole for it a little, install a fitting, and when the plastic starts to solidify, it will wrap it tightly and ensure tightness.
If there is a desire and opportunity, install a tap at the outlet, but this is not necessary.
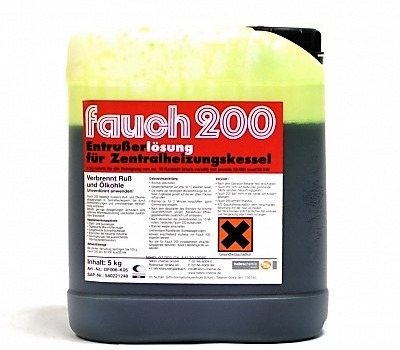
Flushing agent
The next step is to select a flushing agent.There are a great many such solutions, and on specialized forums, each specialist advises the tool that he himself used. Honestly, you should not believe unconditionally such statements, there is a very high probability that the liquid is actually not ideal.
For example, some persistently advise using a 10% hydrochloric acid solution. Or phosphoric acid. However, we strongly recommend not to use acidic solutions - they can burn the heat exchanger and you will have to buy a new one! Or go in search of a craftsman capable of efficiently and reliably soldering a hole burnt with acid.


Heating flushing apparatus
Heat exchanger flushing unit: operating principle. Heat exchanger flushing pump
During operation, a thick layer of scale and limescale forms on the walls of the heat exchangers. As a result, the efficiency of using boilers and other heating equipment is significantly reduced. To return the heating system to its capabilities, you can use modern methods of cleaning pipes and radiators using flushing plants. The main task of installations for washing heat exchangers is to ensure the forced movement of a chemical washing reagent supplied to the system, which will remove most of the build-ups, scale and various contaminants. The pump is the main part of the flushing system.
When to clean heating equipment
Heating and technological systems equipped with heat exchangers are cleaned as planned after the end of the heating season, or once every 2 years.
Cleaning is also carried out as needed - this can be determined by significant deviations from the required indicator by the pressure of the coolant in the system or by temperature data. If you clean the system in time, you can avoid replacing the heat exchanger on the gas boiler. This is a big money saver.
Scheduled flushing
Private homeowners do the cleaning of stand-alone systems much less frequently. But if signs of contamination are detected, the owner should think about the need for preventive maintenance. In the event of a drop in the efficiency of the heating system, not only the pipe-in-pipe heat exchanger itself (or any other) is washed, but also the radiators, as well as other components of the system.
Signs of contamination
When does the heat exchanger need to be flushed? This can be determined by the following features. So, the fuel consumption for the boiler increases significantly. The boiler often stops, heat transfer drops, the batteries do not warm up enough. Also, rapid clogging of the filters indicates the need for flushing.
If you regularly perform flushing using installations for flushing heat exchangers, then pipelines and other elements of the system get rid of blockages, as well as disturbances in the circulation of the coolant.
Low-power treatment equipment is used for autonomous heating systems in private housing construction. More efficient pumps for flushing heat exchangers are used in multi-storey residential buildings, administrative buildings, as well as in industrial facilities.
The use of such equipment makes it possible to prevent accidents, failure of radiators, the need for overhaul or complete replacement, and an increase in energy costs.
In boiler equipment, the heat exchanger is a critical and critical unit. It is on him that the efficiency of heating the premises depends, as well as the correct course of technological processes. You should not refuse flushing, especially if experienced specialists announced its need after diagnostics. Cleaning with a heat exchanger flushing unit using hydrochemical technology is much cheaper than a major overhaul or complete replacement of heating equipment.
Flushing technology
There are several methods of cleaning work, which are conventionally divided into:
Collapsible technology is necessary in case of severe contamination or when it is necessary to replace any components of the system. When performing work, the heat exchanger must be disassembled, and then each component is subjected to mechanical, hydrodynamic or chemical washing.
Since collapsible cleaning requires certain resources, a method is most often used that does not require the mandatory dismantling of the system. This is a chemical wash technology. If carried out regularly, it will help preserve the properties and characteristics of the device for the entire period of operation.
The technology is simple and economical. For its implementation, a pump is needed to flush the heat exchangers. It is connected to the inlet and outlet of the heat exchanger. The result is a contour. Further, a chemical reagent is poured into a special container of the pump, after which it enters the inside of the heat exchanger. The direction of flow on different devices can be changed both manually and automatically. Once the flush is complete, the reagent will be neutralized. It is drained, and the heat exchanger itself is washed with plain water.
Types of flushing equipment
Cleaning the heating system in a timely manner will help get rid of corrosion, scale and sludge. There is special equipment for the maintenance of heat exchangers. There are several types of such attitudes. We will talk about them further.
Hydraulic flushing
This technology is the supply of compressed air to the heating system together with water. By means of high pressure and frequent impulses, small air bubbles actively fill individual areas. This allows you to quickly and efficiently stratify deposits on the walls of the water heat exchanger.
Compressors are used for cleaning in this case. This equipment allows you to flush the entire heating system. But the process is done in stages. To achieve maximum effect, small areas should be rinsed. Before proceeding to the process, determine the required amount of water and the level of pressure that will be supplied to the DHW heat exchanger or any other.

It is possible to perform water flushing in two ways - flow and filling. The first technology involves the complete filling of the system with water. In this case, you need to open the air intake valve. After maximum filling, the valve is closed. Then compressed air is supplied to the system by the compressor.
Cleaning chemicals
They are used to maximize the effect of flushing heat exchangers and heating systems with copper pipes. The chemicals are also suitable for steel products. With installations for washing heat exchangers, red liquids are used, which, reacting with contaminants, change their color. The amount of the product is adjusted depending on the amount of dirt. Along with special fluids, hydrochloric or orthophosphoric acid is also used. These substances will help to flush the pipe-in-pipe heat exchanger or any other as efficiently and quickly as possible.
For high-quality cleaning, 10 to 30 percent of the chemicals are pumped into the system. The use of aggressive substances allows not only cleaning various elements of the system, but also protects against corrosion, foaming water, increases
www.teplo-ltd.ru
When does a gas boiler need to be flushed?
To understand if the gas boiler needs cleaning, it is important pay attention to the following points:
- increase in time to heat the room (at the same air temperature outside the window);
- difficult work circulation pump;
- drop in pressure water in the tap - if a double-circuit boiler is used;
- uneven heating batteries, pipes and other heating elements;
- overheat heat exchanger - occurs when the return water is difficult to return;
- crackle, micro-explosions and other sounds that shouldn't be.
Attention! In a country house or cottage, a gas boiler works around the clock during the entire winter period. This means that flushing should be done annually at the end of each heating season.
Heating system flushing pumps
Pumps for flushing heat supply are a type of flushing units that are designed to remove scale, lime and other deposits that form in pipelines. The units have a flow reversal function, which is why they provide effective cleaning of the system without the possibility of the formation of stagnant zones. Elements of pumping equipment are made of materials that are resistant to acidic environments.
Heating: hydropneumatic central heating system flushing
With this equipment, like a heating system flush pump, very stubborn deposits can be removed. Carrying out preventive procedures makes it possible to achieve the following effects:
- The resource of work of the components of the highway becomes more;
- The efficiency of the system is increased (heat transfer);
- Costs are reduced due to the reduced consumption of the heat carrier.
The area of use of pumps is quite extensive - from cleaning household heating networks of private country houses to servicing high-rise buildings and large-scale industrial complexes. The sizes, power and other characteristics of the operation of the units differ, depending on their purpose.
One of the main criteria for a heat supply flushing station is power. The larger the heating system, the higher the power of the installation should be. Another significant parameter is the capacity of the tank. The pumps can be equipped with tanks with a capacity of 10, 20 or 30 liters.
Another advantage is the presence of a reverse toggle switch. This function will make it possible to adjust the water flow, direct it in the required direction. In the kit with the pump, in most cases, hoses are supplied for connecting the unit to the system. All equipment parts are made of materials that can come into contact with the flushing solution.
Do you want to purchase reliable equipment for flushing heating mains? can offer you efficient pumps suitable for servicing systems of various sizes.
Heating 'target = "_blank"> ’)
Boiler cleaning methods
Exist two ways flushing the boiler from scale and dirt:
- Collapsible Is a method that requires disassembly of the unit. When using it, the contaminated parts of the boiler are dismantled. Then these components are either placed in a container with a reagent for a few hours and cleaned mechanically, or a different cleaning method is used. It all depends on the degree of pollution. Then the elements are put back in place.
- Indiscriminate - cleaning is carried out without dismantling the parts, directly on site. This procedure is best done with a booster.
CIP flushing is carried out as follows:
- the boiler is disconnected from the fuel supply;
- cools down;
- water is drained;
- the device is disconnected from the heating system;
- a booster is connected;
- the pumping of the liquid reagent begins (2-6 hours);
- at the end of this process, the cleaning liquid is drained;
- the boiler is flushed with water;
- dried;
- reconnects to the heating system.
For the best result, the procedure repeat several times.
Dismantling and cleaning parts
When choosing a collapsible method in order to to prepare gas boiler for cleaning, it should be disassembled:
- shut off the gas supply;
- disconnect the wires from the gas valve;
- unscrew and remove the boiler door;
- disconnect the wire leading to the piezoelectric element;
- detach the thermocouple and nozzles (be sure to mark the immersion depth of the nozzles into the burner);
- disconnect the fuel supply pipe;
- take out the burner, unscrew the nuts and remove the top cover.
Key points cleaning parts:
- Igniter. In order to clean it, you need to turn off the gas, remove the igniter, clean it with a metal brush, make a purge, and reinstall the igniter.
- Burner and nozzles. To clean them, it is necessary to shut off the gas supply, remove the burner from its place, mark the location of the nozzles, then carefully unscrew and clean the nozzles with a brush, and the burner with a brush. After that it is desirable blow out the burner hole using pumping equipment, which is at hand, then the nozzle should be inserted back, focusing on the mark, after which the burner is installed in its place.
- Heat exchanger requires cleaning both inside and out. Water circulates inside, and the main blockages are located there. Outside heat exchanger contaminated with soot, which negatively affects his work. You can clean the device from soot mechanically; a scraper, a metal brush, and brushes are suitable for this.
Mechanical cleaning of the heat exchanger
As an element of a gas boiler, the heat exchanger takes up a large amount of space inside the unit. It is located above the combustion chamber, and it is not easy to get close to it.
Before the gas boiler heat exchanger is flushed, this element is removed:
- first remove the outer part of the case. Before this, disconnect the gas supply and the electrical power, if present in the device;
- the heat exchanger is disconnected from the pipes of the heating structure;
- remove the fasteners of this element.
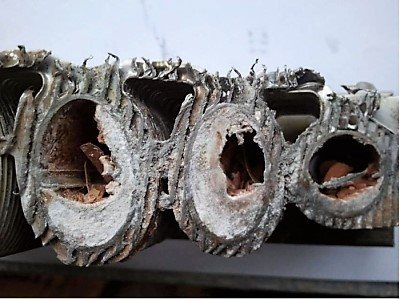
Inside the pipes, when the heat exchanger has not yet been rinsed from scale, you can see that its cavities are clogged with deposits. Most of them consist of salts of various metals, usually sodium and calcium. Cleaning is carried out using metal tools such as pins, scrapers, etc.
This must be done carefully so as not to damage the wall of the heat exchanger.
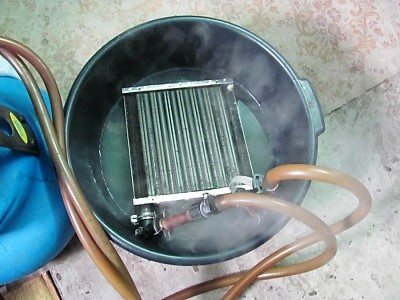
The device is soaked in a container, perhaps in a bath, and a weak acid solution, such as hydrochloric acid, is poured into it. After the deposits have softened, they are removed. At the end of the procedure, it is necessary to rinse the internal cavities with water under low pressure. To do this, you can use a hose connected to the water supply by attaching it to the pipe.
Then you should wait until clean water flows. For greater effect, they use a mallet, tapping it on the heat exchanger during the flushing process.
How to flush a heat exchanger with your own hands
The heat exchanger can also be flushed in several ways.
Mechanical method and rinsing with secondary cleaning
Manual cleaning means cleansing at home... This is the easiest way to process. It includes:
- Mechanical cleaning - involves removing blockages from the heat exchanger using tools: brushes, metal brushes of different sizes, a hammer (rubber or wooden).
- Flushing the heat exchanger in active solutions followed by mechanical cleaning. Some experts consider this method more expedient due to its effectiveness, especially for double-circuit boilers.
Stages manual cleaning:
- Examine the documentation for the device.
- Disassemble the boiler in such a way as to gain access to the heat exchanger. Before that, disconnect the unit from the power supply (if any), disconnect it from the pipes of the heating systems and the gas supply system.
- Dismantle the heat exchanger.
- Soak it in a solution of active elements, for example hydrochloric acid... In this case, the solution must be weak so as not to damage the device. Salt deposits are easily removed after soaking.
- Clean with metal brushes, paint brushes or vacuum cleaner.
- Rinse with water and dry.
- Return the heat exchanger to its original place.
Descaling with improvised means
You can rinse the heat exchanger at home with the help of available tools.
Principle such:
- Take capacity volume of 15-20 liters... In the lid are cut 2 holesto which the hoses are connected.
- The container is filled with a cleaning solution. As it is used chemicals (acids)diluted with water. You can take citric acid or vinegar 9%... Dissolve for preparation 20 g citric acid in a liter of water. Based on this proportion, the required amount of liquid is prepared.
- The same hoses are connected to circulation pump.
- The pump itself is connected to the pipes of the heat exchanger on both sides (supplying return flow). The result is closed system... The solution circulates inside the system, cleaning the inside of the heat exchanger.
Such flushing is done by a collapsible method at home using improvised means.
Using chemicals
For such processing, use booster and chemical compositionsintended for cleaning boiler parts. A booster is also used here, only not homemade, but bought in a store, certified, designed specifically for these purposes.
The booster hoses will be connected to two nozzles of the heat exchanger, then chemical elements move inside the closed system.
Factory-made boosters are equipped with heating components, What allow reagents heat. This, in turn, speeds up the cleaning process.
This procedure can be carried out both collapsible and CIP. The event lasts from 2 to 6 hours.
At the end of the procedure, the reagent is removed and poured into the heat exchanger neutralizing agent his. After that, the heat exchanger is rinsed with water and dried.
The main disadvantage method - the use of active chemical elements, the impact of which negatively affects durability heat exchanger. With frequent dry cleaning, it can fail earlier.
Reagents for dry cleaning:
- Adipic acid - a reagent that is diluted in water, maintaining a certain concentration. It is an active substance capable of softening salt deposits inside the unit. The reagent is injected after dismantling and cooling down the heat exchanger. After cleaning, the device is rinsed with water and dried.
- Sulfamic acid acts on the same principle: it requires dilution with water and is fed into the heat exchanger under pressure. After exposure to this substance, salt deposits, scale and other contaminants are softened and easily removed.
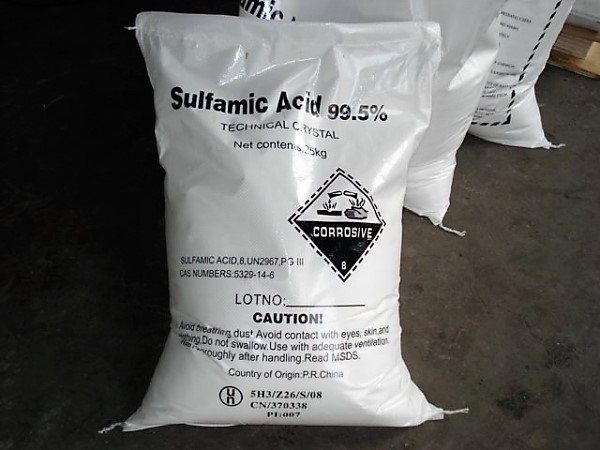
Photo 1. Packing 25 kg with sulfamic acid 99.5% in the form of a powder for dilution in water.
- Gel for cleaning boilers (it is not an acid) perfectly cleans metal elements from scale, dirt, salt deposits. After treatment with this substance, rinse the heat exchanger with clean running water. The gel has a huge advantage over other reagents. It has a gentle, gentle effect on metal elements. At the same time, the quality of cleaning is not worse.
Advice. Since this method uses active chemical elements, you should be careful to wear rubber gloves and mask, follow safety regulations.
Hydrodynamic method
This is the way to clean the boiler does not require disassembly. Its principle is that water is pumped into the system. Sometimes an abrasive filler is added to it. Then pressure builds up... In the process of exposure, the speed of movement of the liquid increases, due to which cleaning occurs. This helps to break down salt deposits, dirt and scale inside the system.
Important! With hydrodynamic cleaning the critical pressure level must not be exceeded, as this can lead to rupture of pipes!
This procedure it is not recommended to do it yourself... It is better to entrust hydrodynamic cleaning to professionals who have a certificate and admission to work with gas equipment.
Description of the starting device
What is such an engine starting system, how does the module work and what is its purpose? Let's take a quick look at these issues.
Purpose and functions
The purpose of the car charger is to provide a better engine start. Such a need may arise in different cases, but as practice shows, usually our compatriots face such a problem precisely in frosts. In addition, most modern charging modules also allow charging mobile gadgets - tablets, smartphones and other devices. For this, they even have additional ports.
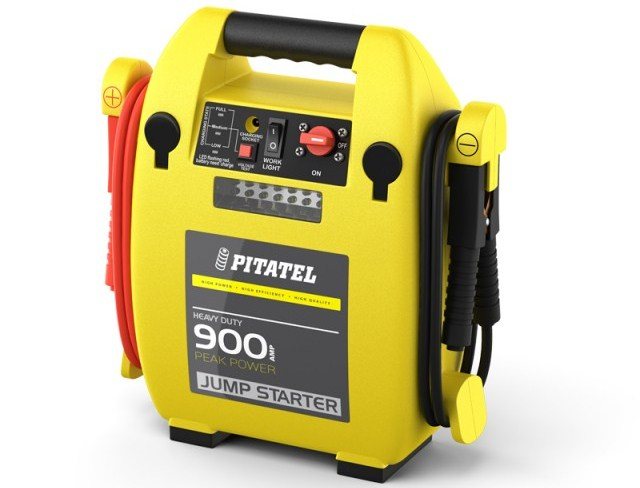
Starter Feeder 900
Device and principle of operation
There are several types of charging modules:
- Pulse blocks, the basis of the principle of operation of which is pulse voltage conversion. In such a module, the voltage first increases under the influence of the current frequency, after which it decreases and is converted. Such devices are usually characterized by low power and, as a rule, are used to recharge a discharged battery. But if the battery charge is very low, while it's freezing outside, then in this case, recharging the battery can take quite a long time. The main advantages of such blocks are low price, low weight, and compact size. As for the disadvantages, this is the low power of the module, as well as the complexity of its repair, especially, as practice shows, they can often fail due to unstable voltage.
- Transformer blocks - in this case, the main element of the device is a transformer used to convert current into voltage. Such charging modules allow you to increase the charge of any battery, regardless of its discharge, even if it is almost full. In addition, devices of this type are immune to voltage surges and can function in any state. The main advantages are the power of the modules and their reliability, as well as their simplicity in terms of operation. As for the disadvantages, it is high cost, large size and weight.
- Boosters are another type of block. A booster is a portable battery that functions on the principle of a portable unit - first the booster charges the battery, and then the power unit is started from the battery. Boosters can be household or professional, they differ in volume and size. In household boosters, the capacity is quite low, but it is usually enough to start one engine. Professional devices are full-fledged chargers that can start several cars, and the on-board network in such cars can be either 12-volt or 24 V. The advantage of boosters lies in their compactness and autonomy, however, due to their size, they can only be installed on flat surface.
- Capacitor modules. In this case, the procedure for starting the motor is carried out according to a rather complicated principle, the circuit of such devices is based on powerful capacitor devices. First of all, they are charged, after which the capacitors transfer the charge to start the motor. Capacitors charge quite quickly and they also quickly release their charge to start the internal combustion engine. As a result of the high cost of such modules, they are not so popular. Moreover, in practice, their frequent use can lead to accelerated wear and tear of the battery (the author of the video is the carpow carpow channel).
Read next: Comparison of UAZ Patriot and Toyota Land Cruiser
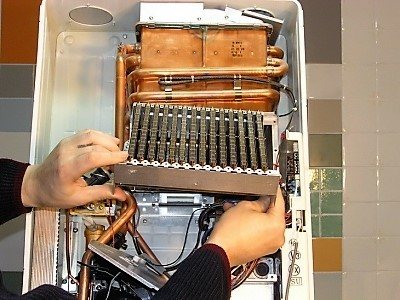
Assembling the equipment after cleaning
During assembly, all parts return to their places in reverse order.
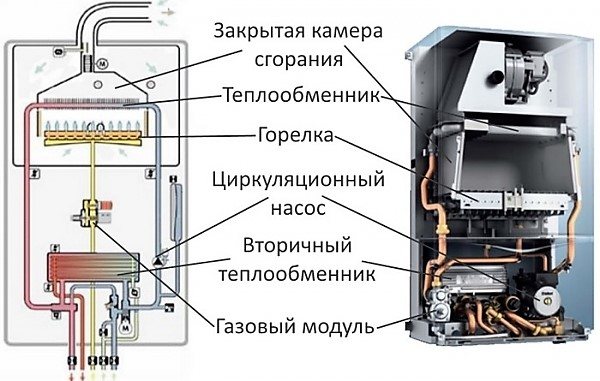
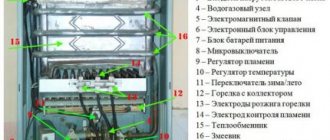
Photo 2. Scheme (left) and a picture of the internal structure of a gas boiler (right). The main details are indicated.
The highlight here is - gas leakage prevention after assembly.In order to control this, you need to make soaping compounds... Check the tightness of fixing the elements only after switching on the gas boiler.
Important! When reverse mounting pilot burner should install a new gasket... Connecting the ignition electrode is done only manually, it is not recommended to use the key.
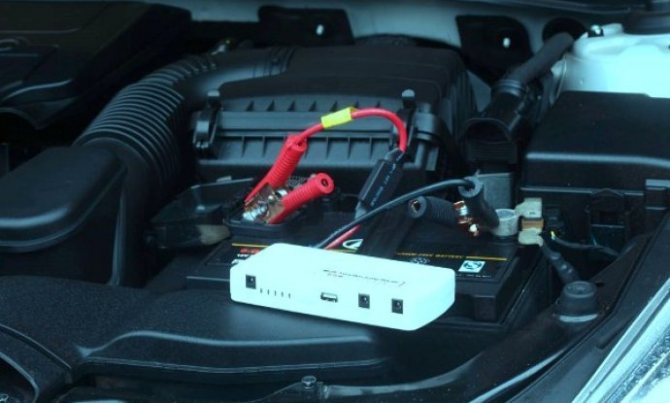
What to do if the standard battery does not work
If there is a shortage of battery charge while starting the combustion engine, it is recommended to use a booster.
The main reasons why it is impossible to start the engine:
- failure of the storage battery (malfunctions have appeared or the battery has exhausted its resource);
- low ambient temperature;
- long-term connection of gadgets to the cigarette lighter;
- the lights in the cabin, headlights and side lights were left on.
In practice, in order to start a vehicle engine, an additional external source of energy is required: mechanical (push the car) or electrical.
Selecting a cleaning option for the heater
When choosing a boiler cleaning method the financial issue is critical, that is, the high cost of the procedure. If funds are limited, you will have to use materials at hand and clean the boiler at home. If opportunities allow, then cleaning is not worth saving. Better to use services of professionals.
Autonomous heating is now found not only in private houses, but also in apartments. During the operation of heating equipment, and in the entire system as a whole, it becomes necessary to flush, since salts and scale are debugged on the walls. One of the methods is chemical, by means of an acid. In this case, a booster is needed to flush the heat exchangers.
Advice for the future
In order to always know and control the level of charge of the car battery in the future, to avoid the situations described above, buy yourself (about 300 rubles) such a voltmeter in the cigarette lighter:

It can display battery voltage, interior temperature and USB current. The indication is displayed on the LED display alternately with an interval of 10 seconds.

Yes - yes, they still have a couple of standard USB connectors, which in the car will not be superfluous at all. So this device is a must have for motorists!
Discuss the article DIY BOOSTER FOR CAR BATTERIES
Experiments with some models of low-voltage converter-drivers for powering LEDs.
Diagram and design of a very simple homemade car battery charger.
A simple, proven FM bug for a newbie spy.
It will also come in handy for repairs:
- Cost estimate for construction work
- Rose sweet haze rose encyclopedia
- Stencils for liquid wallpaper print
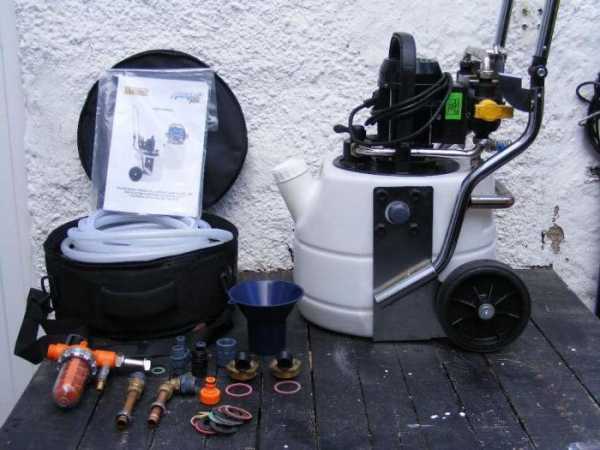
What is a booster for flushing heat exchangers
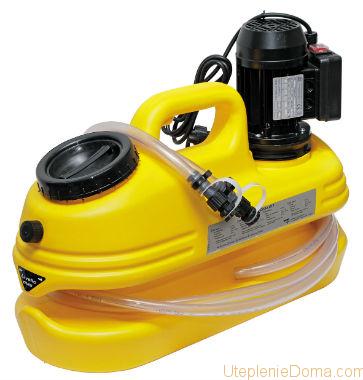
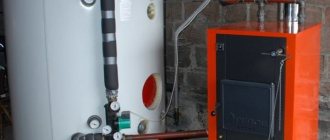
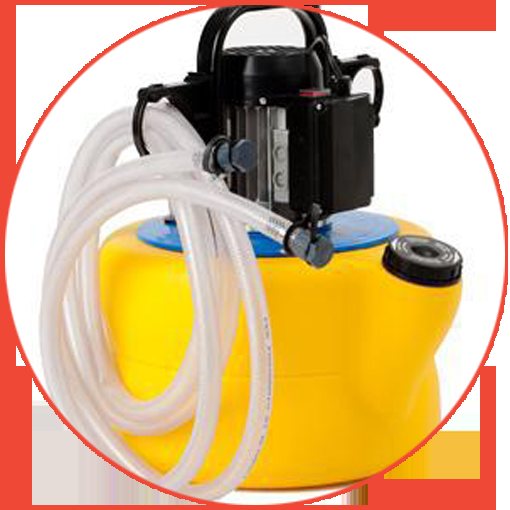
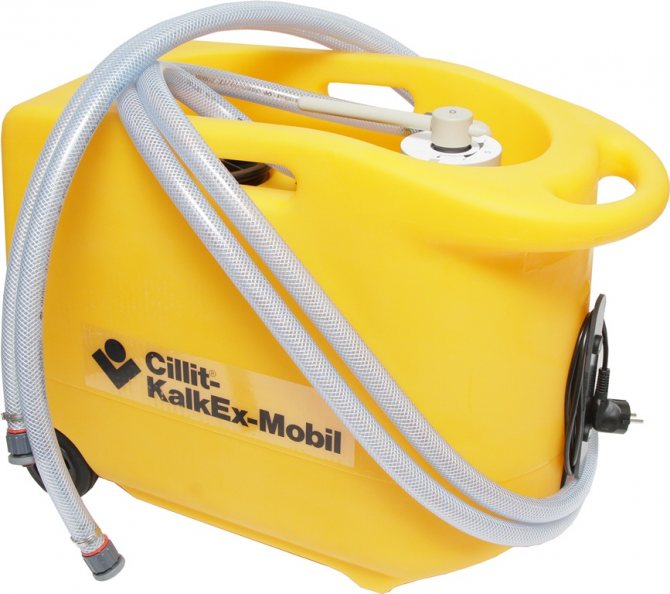
Factory-made booster.
The booster is an apparatus for chemical circulation flushing of plate heat exchangers of boilers and columns, all types of radiators and heating systems in general. Typically, cleaning is carried out without disassembly. The heat exchanger flushing booster consists of three main parts:
There are units without heating elements, but they are less efficient. For flushing, an active substance is used, most often hydrochloric or orthophosphoric acid, the activity of which greatly increases with increasing temperature. When choosing a booster, you need to pay attention to the volume of the tank, maximum temperature, circulation rate and pressure, which is measured in meters. The higher the head, the longer the circuit can be flushed from one point. If the power is insufficient, then the system will have to be split into small sections, which takes a lot of time.
The principle of operation is that the acid in the tank is heated and pumped through a pump through a heat exchanger or a whole circuit.
The active substance eats away the limescale and circulates it back into the tank. The process continues until the system is completely cleared.In time it is about 2 hours. The cost of washing machines starts at 600 rubles. For domestic needs such a unit is enough, the price of professional equipment can be 160 thousand rubles. In principle, you can make a do-it-yourself booster for flushing heat exchangers from scrap materials. The most expensive part in this case is the pump.
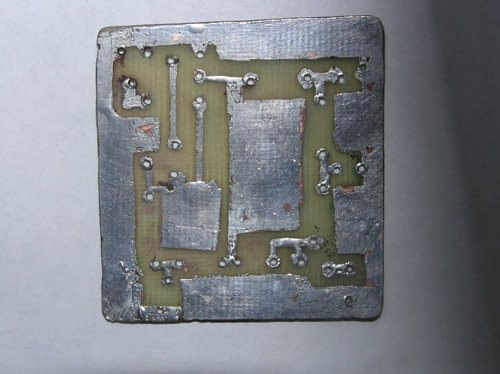
Manufacturing of a printed circuit board, soldering of radioelements
If everything is purchased and prepared, we can roll up our sleeves and start from a bunch of different things to create a booster. First, I had to decide how I would make the board itself. I settled on the "laser-ironing method" (LUT), which is widely and in detail described in many different sources on the net. So, the first step was to get a pattern of tracks on the PCB. To begin with, I drew how the radio components will be located, when viewed from above.
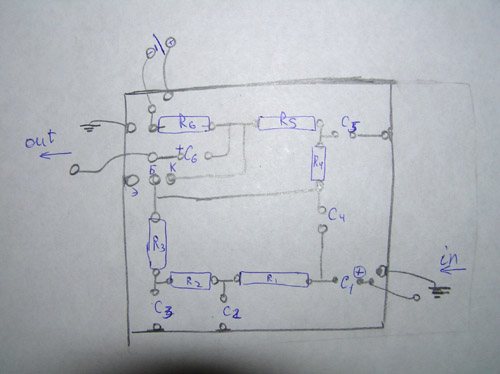
Next, this is how the printed circuit board will look like from the side of the tracks.
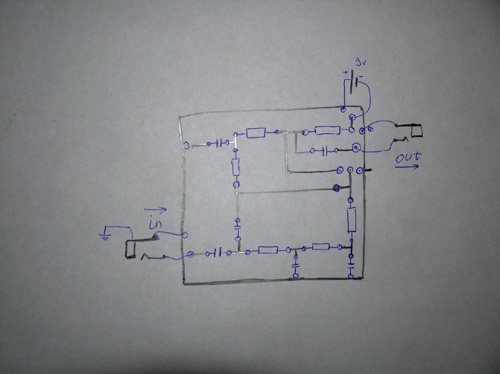
For LUT in some simple program, create a mirror image of the tracks. I use sprint-layout 4.0 - this program is quite simple - in half an hour the most noob can draw tracks. The only difficulty is the dimensions, for the sake of simplicity, I personally added a new mesh with a side of 1 mm in the program. So, we draw a mirror image of the tracks, making gaps in them, in dimensions equal to the size of the radio component, which must be installed in a specific place. It is imperative to print all the arts on a laser printer. Next, we cut out a blank from the PCB, slightly larger in dimensions than our board is supposed to. I got a 42X45mm board. We process the blank with zero, then wash it with soap and a cloth, then wipe it with a degreaser. As a result, we get something like this:

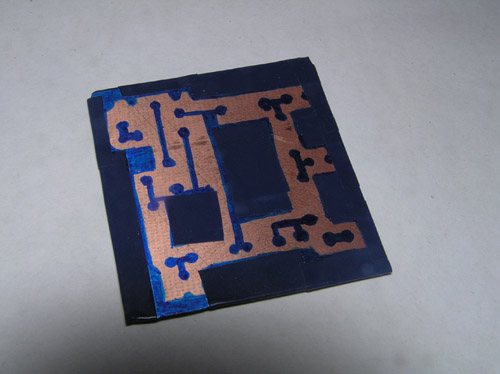
Next, we follow the points of LUT, apply the printed drawing to the textolite, smooth it with an iron from the heart, then lower it into plain warm water and tear off the soaked paper. At the moment when I was creating my scheme at hand, unfortunately, there was no laser printer and nowhere to print, so I somehow, using electrical tape and a waterproof marker, applied the pattern to the textolite.
Then I diluted the ferric chloride solution. We don't need much - by eye, for the water to turn brown. Personally, I diluted it in water with a temperature of about 50 degrees. We mix and drop the board there. After a few hours, the board is ready, we clean it from the marker and everything else with ordinary solvent or alcohol.
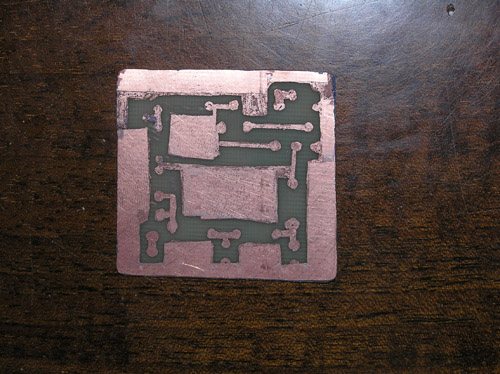
As you can see, there are errors in the board, places where protection was insufficient and ferric chloride leaked through it a little. We will fix this by tinning. Tinning consists in the fact that taking quite a bit of solder on the tip of the soldering iron, we just drive it along the board
ATTENTION!!! You need to take very little solder so that it does not freeze with drops on the board - this will look unpresentable and may complicate the subsequent installation of radio components. The solder will only fall on the tracks, the places between them, where ferric chloride etched copper, will remain intact, you need to be careful in places where the distance between the tracks is small
A better result can be obtained by pre-covering the board with flux (I used phosphoric acid as a flux). There are a lot of fluxes, but each serves a specific purpose. Phosphoric acid is good because it is used for soldering on oxidized copper (in fact, this is the material of our tracks) and for stainless steel (we will encounter soldering on stainless steel later, when connecting a mono-input and output to the board). Also at this stage I made holes for the subsequent installation of the elements.
The next stage is the installation of radioelements. I started with resistors, followed by capacitors, transistor and contacts. Pay close attention to the exact locations of the parts on the board. I signed for myself the destination of the elements, the polarity for C1 and C6, as well as the places of the emitter, collector and base of the transistor. Total we get:
Now let's get down to our exits.To begin with, I cleaned with a file with a file contacts 1-which connects to the circuit and 2-which will go to the ground of the circuit (in a guitar, this contact goes to the body.
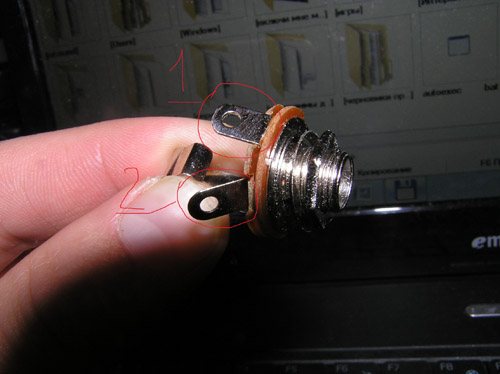
After covering the contacts with flux-acid, we tinker them.
Then I tinned the ends of the wires and soldered them to the pins.
We solder the input and output to our board through wires and get the finished device.
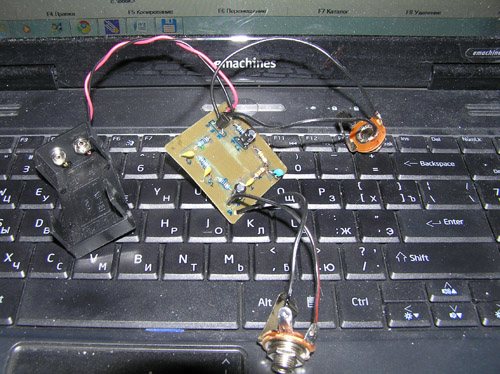
Done.
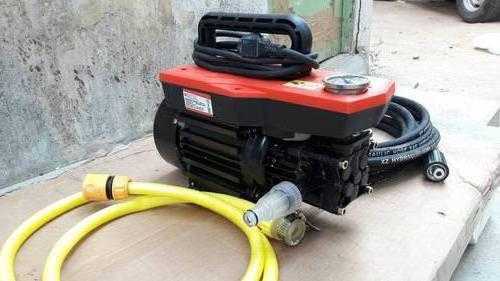
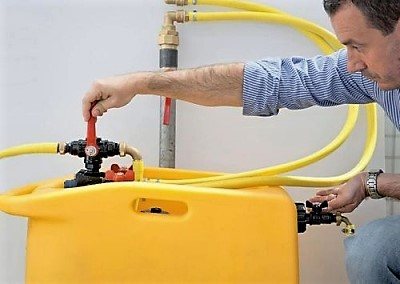
How to make a booster with your own hands
In order to make a booster for flushing heat exchangers with your own hands, you will need:
- reagent reservoir - a plastic canister for at least 10 liters, more is possible;
- ½ or ¾ inch flexible hoses;
- water pump.
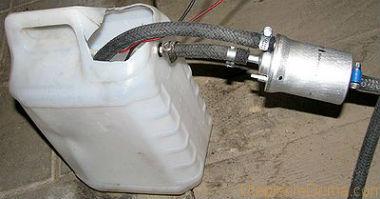
You need to make a booster based on the type of pump. It can be a submersible pump or a free-standing pump. If the pump is submersible, then no additional holes in the tank are needed. A hose is connected to the pump and screwed onto the heat exchanger. The second hose (return) will lead the acid directly back to the tank. In this case, even an ordinary bucket can be used as a reservoir for the reagent. It is important that the pump is suitable for handling acids.
It is more convenient to use external pumps, by the way, even an ordinary electric circulation pump for heating is suitable. To connect it at the bottom of the tank, you need to insert a metal squeegee and tighten it with nuts to the walls of the tank. Everything must be sealed. Next, a coarse filter is screwed onto the squeegee - you must not allow debris to get into the pump, and it will be better for flushing. A pump is wound behind the filter, from which a hose goes to the heat exchanger. The circulation hose goes straight into the plastic canister.
The average service life of heating pipes in an apartment is at least 25 years, but even half a century is not the limit.
Here we talked about what pipes to make heating in a private house with autonomous heating.
The disadvantage of a self-made booster for flushing heat exchangers is the absence of a heating heating element. Descaling with a cold reagent will take longer, but you can save on energy costs.
Types of restraints

Types of restraints
The child restraint is purchased for the child according to his age, height and weight. On this basis, car seats are divided into several groups:
- Group 0 - a car seat in the form of a cradle for children from birth to six months. Installed sideways in the direction of travel. The child's weight is up to 9 kilograms.
- Group 0+ is usually a portable car seat. They can often be seen in the hands of young mothers - equipped with a special carrying handle, they are very convenient for transporting a child in a store or clinic. Suitable for children up to a year, weighing up to 13 kilograms. The child rides backwards in it.
- Group 0 + / 1. Sufficiently economical car seat. From birth to two or three years old. The maximum weight of a child is 18 kilograms. A prerequisite is that the chair must be able to be installed against the direction of travel. In children under one year old, the neck muscles are still very weak, it is difficult for them to maintain the weight of a rather large head. Therefore, the chair for their transportation must be installed with the back forward, otherwise fatal injuries (up to latent decapitation) are possible in case of an accident.
- Group 1 - for children 1-4 years old, 9-18 kg. The car seat is installed in the direction of travel.
- Group 1/2/3 - a car seat that holds the child with regular seat belts. The adjustable headrest and armrests allow you to change the configuration to adapt the device to the child's height. For children 1-12 years old.
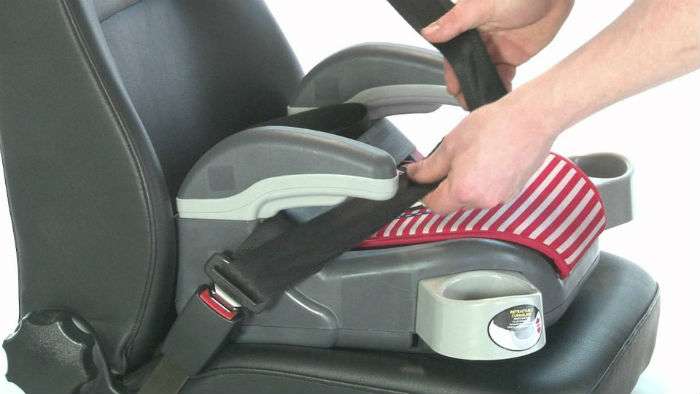
- Group 2/3. For children 3 - 12 years old, weighing 15 - 36 kg. The chair is placed in the direction of travel. Boosters can also be referred to this group.
Booster - child restraint, seat with seat belt grooves. Some parents, instead of a booster, use various self-made pads:
- seats from chairs,
- ottomans,
- pillows.
This is wrong, because only a special child restraint guides the seat belt correctly and protects against chest injuries during hard braking.
Popular chair models
The buyer is now offered many different car seats, from very expensive to the most budgetary.

Popular chair models
It would seem that here is a chair - one for 10 thousand, the second for one and a half. Why overpay? It is not that simple. The primary way to evaluate a restraint is through crash tests. The higher the score, the better the car seat. Our Mishutkas and Pandas are cheap, but these chairs have not passed any tests. They only help to fix the child and prevent him from falling off the seat in the event of a collision. Foreign counterparts in this regard are much more reliable.
Firms currently have the best crash test indicators:
- Romer,
- Recaro,
- Britax,
- Cybex,
- Maxi-Cosi,
- Konkord,
- Kiddy.
Britax-Romer First Klass plus. Group chair 0 + / 1. A special soft pad for babies allows the youngest passengers to travel in comfort. The chair is installed for babies against the direction of travel, upon reaching the age of one year and weighing more than 9 kg - in the direction of travel. Has two tilt positions - upright and reclining. The seat is equipped with reliable seat belts, side impact protection. Safety standard ECE R44 / 04. This car seat is a great option for those who do not need a carrycot.
Maxi Cosi Cabrio Fix. Car seat 0+, for children up to 12-15 months. Safety standard ECE R 44/04. A very comfortable and lightweight portable car seat weighing only 3.5 kilograms has three-point seat belts, a removable headrest, increased sides. The sun visor can be extended if necessary and the baby will be protected from rain or sunlight. The comfortable handle will allow the mother to carry the sleeping child without any problems without taking it out of the chair. This chair is a great solution for mobile mothers.
Practical application of the booster
The first signs that the boiler heat exchanger needs to be flushed are clicking, energy waste, low water temperature. Heating systems can have pressure drops. All these signs indicate that a lot of salts and scale were deposited on the walls, which led to a decrease in the nominal bore and heat transfer.
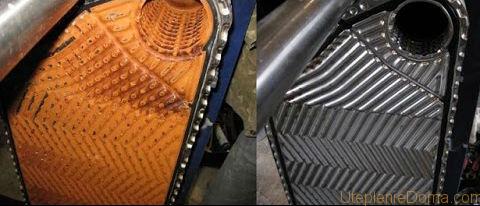
Heat exchanger before and after cleaning.
If you are using a factory booster with heating elements, then you need:
- cut off the boiler from the circuit and drain the water from it;
- screw the hoses from the booster onto the heater;
- pour acid and turn on the unit.
If you made a booster with your own hands, then most likely there is no heating element in it. In this case, you can speed up the flushing process by turning on the boiler by a third of its capacity. With the expectation that the acid will heat up 45-50 degrees. Only first you need to fill the heat exchanger with an active substance so that it does not burn out, and only then start the heater.
For the system to be reliable, you need to correctly calculate the thickness of the pipes for heating. The conditional passage and walls matter.
Features of the selection of pipes for air heating are described here.
If you plan to flush the entire circuit, then the supply and output of the reagent can be organized through the heating radiators. At the end of modern batteries there are plugs that can be unscrewed and installed in their place with squeegees. During cleaning, the acid foams a lot, so a special substance is added to it, which smooths this process.
How does the engine start with a booster
An internal combustion engine is started in one of two modes available for the booster:
- "Start engine" (270a);
- Override (400a).
There are situations when the native battery installed in the car has not yet completely died, and even tries to give out something in the form of sobs. In this case, it needs to be pushed, and the driver presses the booster button, called "Start engine".The inside of the booster has reliable protection (special relay) against currents exceeding 270 amperes. Thanks to this, the portable booster for starting the engine does not overheat and does not deteriorate under the influence of uncontrollable high currents.
When operating the booster in this mode, it can be turned on many times, acting many times until it is discharged. There is one condition, the device must be given breaks so that the batteries cool themselves on a timer in accordance with the readings of their own temperature sensor.
What happens when the standard battery, when activated, does not produce anything at all? When the booster is connected, the message “Connecting” will appear on the screen. This will serve as a signal to turn on the "Override" button. In this mode, very high electric currents operate, close to short-circuit currents. In order to avoid damage to the booster, you need to be careful not to accidentally close the terminals of the device (here the protection provided for 270 amperes does not work). When connecting the terminals of the booster, care must be taken and careful not to allow the crocodiles to fall out of the hands and, moreover, touch each other.
Important: Unlike the previous mode, it is not recommended to torment the starter for a long time here. If the engine fails to start after 2, 3 attempts, it can be concluded that the engine does not start through no fault of a discharged battery.