Often the owners of private houses have an idea to implement backup power systems... The simplest and most affordable way is, of course, a gasoline or diesel generator, but many people turn their eyes to more complex ways of converting the so-called free energy (solar radiation, energy of flowing water or wind) into electricity.
Each of these methods has its own advantages and disadvantages. If everything is clear with the use of water flow (mini-hydroelectric power station) - it is available only in the immediate vicinity of a fairly fast-flowing river, then sunlight or wind can be used almost everywhere. Both of these methods will have a common disadvantage - if a water turbine can work around the clock, then a solar battery or wind generator is effective only for a while, which makes it necessary to include batteries in the structure of a home power grid.
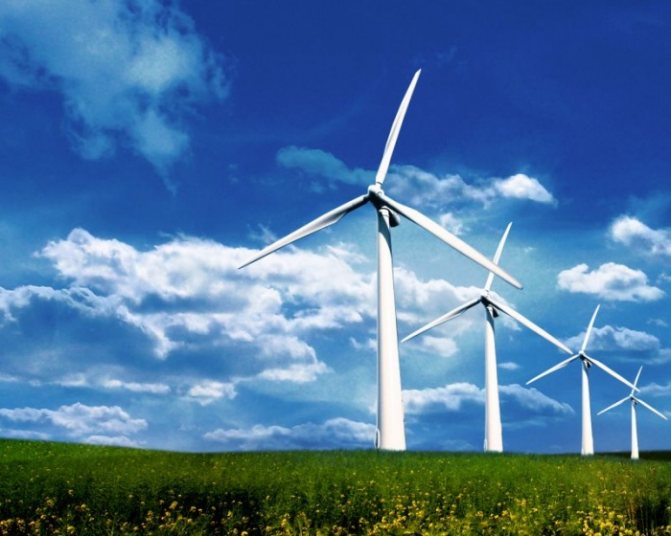
Since the conditions in Russia (short daylight hours most of the year, frequent precipitation) make the use of solar panels ineffective at their current cost and efficiency, the most profitable is the design of a wind generator... Consider its principle of operation and possible design options.
Since no homemade device is like another, this
article is not a step-by-step instruction, and a description of the basic principles of designing a wind turbine.
General working principle
The main working body of the wind generator is the blades, which are rotated by the wind. Depending on the location of the axis of rotation, wind turbines are divided into horizontal and vertical:
- Horizontal wind turbines most widespread. Their blades have a design similar to an airplane propeller: in the first approximation, these are plates inclined relative to the plane of rotation, which convert part of the load from wind pressure into rotation. An important feature of a horizontal wind generator is the need to ensure the rotation of the blade assembly in accordance with the direction of the wind, since the maximum efficiency is ensured when the direction of the wind is perpendicular to the plane of rotation.
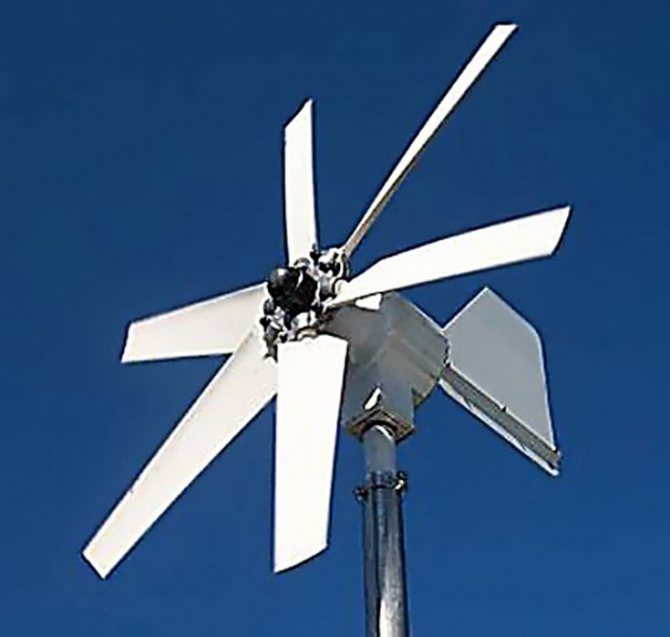
- Blades vertical wind turbine have a convex-concave shape. Since the streamlining of the convex side is greater than the concave side, such a wind turbine always rotates in one direction, regardless of the direction of the wind, which makes the turning mechanism unnecessary, unlike horizontal wind turbines. At the same time, due to the fact that at any given time, only a part of the blades performs useful work, and the rest only oppose rotation, The efficiency of a vertical windmill is much lower than that of a horizontal one: if for a three-blade horizontal wind generator this figure reaches 45%, then for a vertical one it will not exceed 25%.
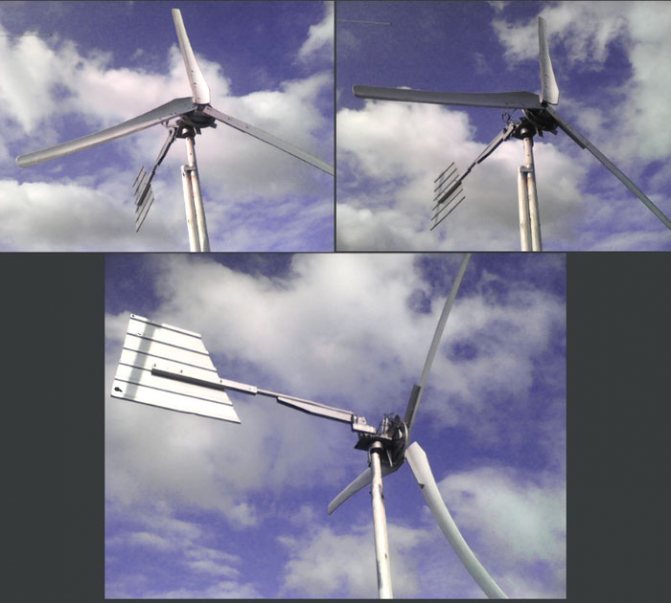
Since the average wind speed in Russia is not high, even a large wind turbine will rotate rather slowly most of the time. To provide sufficient power, the power supply must be connected to the generator through a step-up reducer, belt or gear. In a horizontal windmill, the blade-reducer-generator unit is mounted on a swivel head, which enables them to follow the direction of the wind. It is important to take into account that the swivel head must have a limiter that prevents it from making a full turn, since otherwise the wiring from the generator will be cut off (the option using contact washers that allow the head to rotate freely is more complicated).To ensure rotation, the wind generator is supplemented with a working weather vane directed along the axis of rotation.
The most common blade material is large diameter PVC pipes cut lengthwise. Along the edge, metal plates are riveted to them, welded to the hub of the blade assembly. Drawings of this kind of blades are the most widespread on the Internet.
The video tells about a self-made wind generator


DIY windmills for home: an overview of designs
As you already understood, the very first part that perceives wind energy is the wind wheel. Not a single windmill scheme for the house can do without it.
It can be executed:
- with a vertical axis of rotation;
- or horizontal.
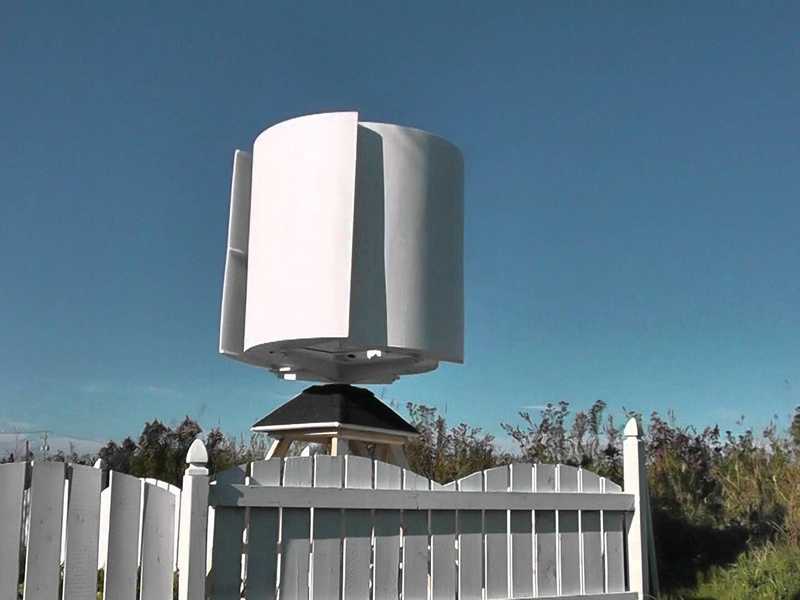
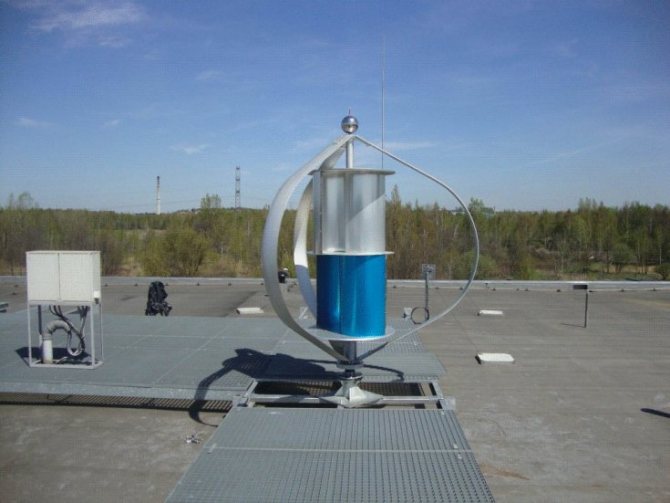
Vertical wind turbine
I will show with a photo one of the structures that are easy to manufacture, made from an ordinary steel barrel.

Such a vertical wind generator, made by hand, and even located above the ground itself, surrounded by buildings and plants, will not be able to develop normal speed to generate enough electricity to power a private house.
He will be able to perform only some single tasks for low-power equipment. Moreover, the low speed of rotation of its rotor will require the mandatory use of a step-up gear, and this is additional energy losses.
Such designs were popular at the beginning of the last century on steamships. A water wheel, located with its blades along the direction of movement of the vessel, ensured its movement.

Now it is a rarity that has lost its relevance. In aviation, such a design not only did not take root, but was not even considered.
Rotor Onipko
Of the low-speed designs of wind wheels, the Onipko rotor is now massively distributed via the Internet. Advertisers show it spinning even in very light winds.
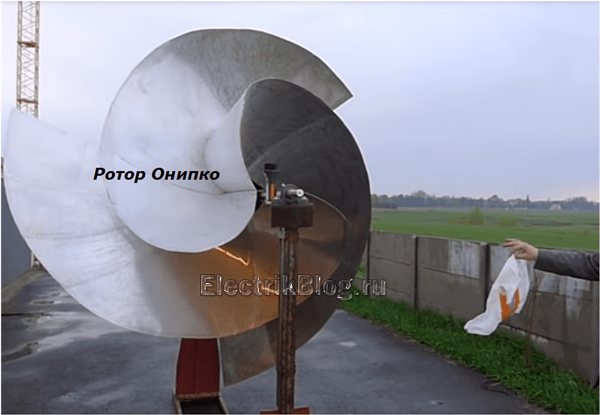
However, for some reason I also have a critical attitude to this development, although it is not so difficult to repeat it with my own hands. I did not find enthusiastic reviews among buyers, as well as scientific calculations of the economic feasibility of its use.
If any of the readers can dissuade me in this opinion, I would be grateful.
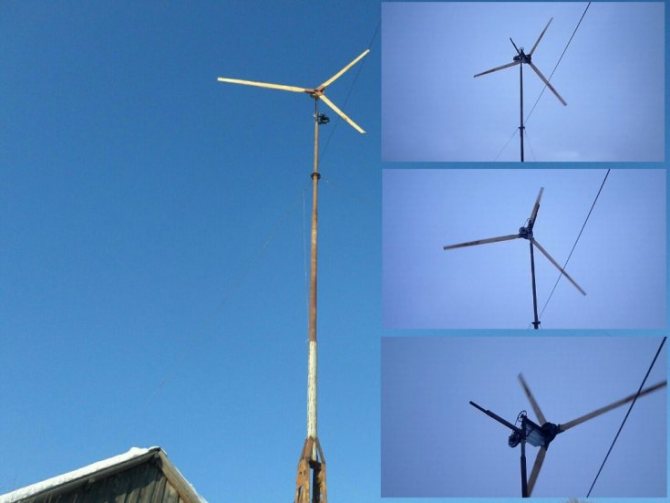
Horizontal wind turbine
From the very beginning, aircraft engines began to use a propeller that propels air along the aircraft body. Its shape and design are chosen so as to use the reactive component in addition to the active pressure force.
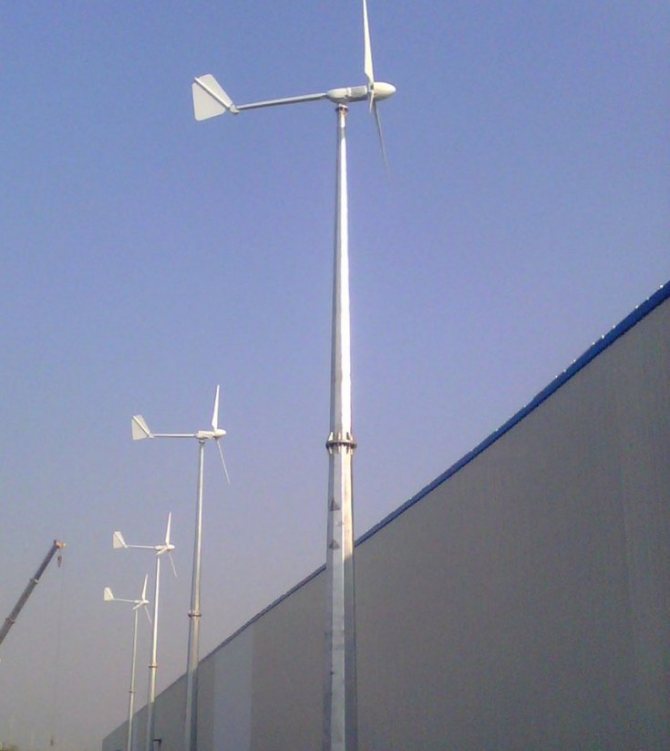
Any horizontal wind generator, which is made industrially or by hand, works according to this principle. I show an example of a homemade construction with a photograph.
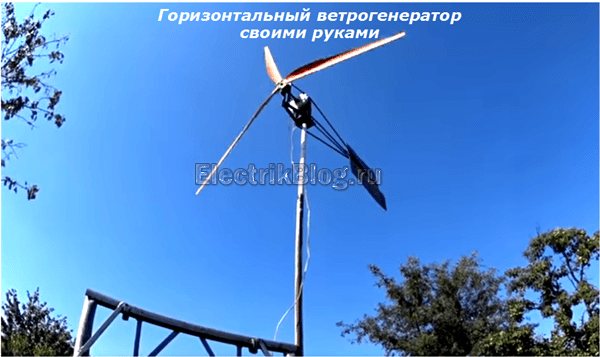
According to the principle of using wind energy, it is a more efficient design, and in terms of design to ensure household issues of electricity supply, it is low-power.
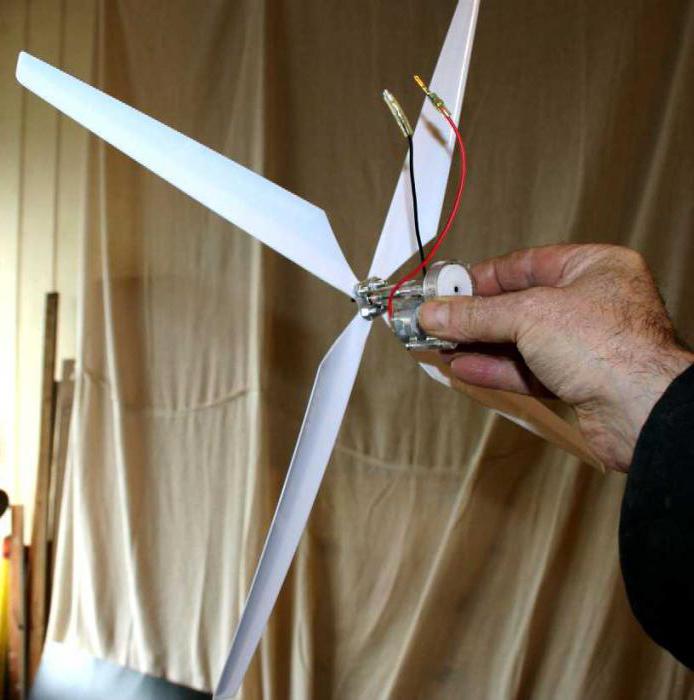
A small electric motor, the rotor of which spins a wind turbine, can, even at optimal pressure and wind strength, generate only low power as a generator. You can connect a weak LED light bulb to it.
Think for yourself whether you need to assemble such a backlit weather vane or not. Such a design will not cope with other tasks. Although it can still be used to scare away moles in the area. They really dislike noises accompanied by the rotation of metal parts.
In order to make full use of the electricity received from the wind, the impeller of the wind generator must have the dimensions corresponding to the power consumption. Count on a diameter of about 5 meters.
When creating it, you will face a technical difficulty: you have to accurately balance the large parts. The center of mass must always be at the midpoint of the axis of rotation.
This will minimize bearing runout and swinging of a high-altitude structure. However, balancing like this is not easy.
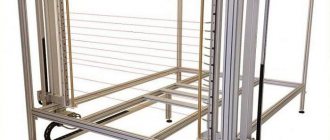
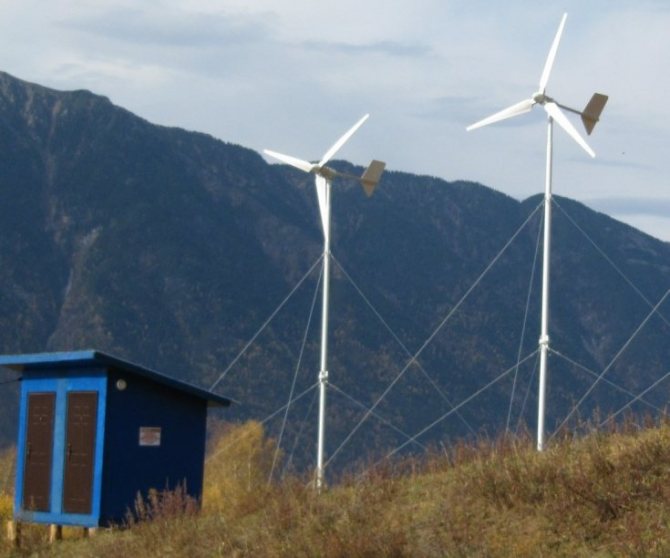
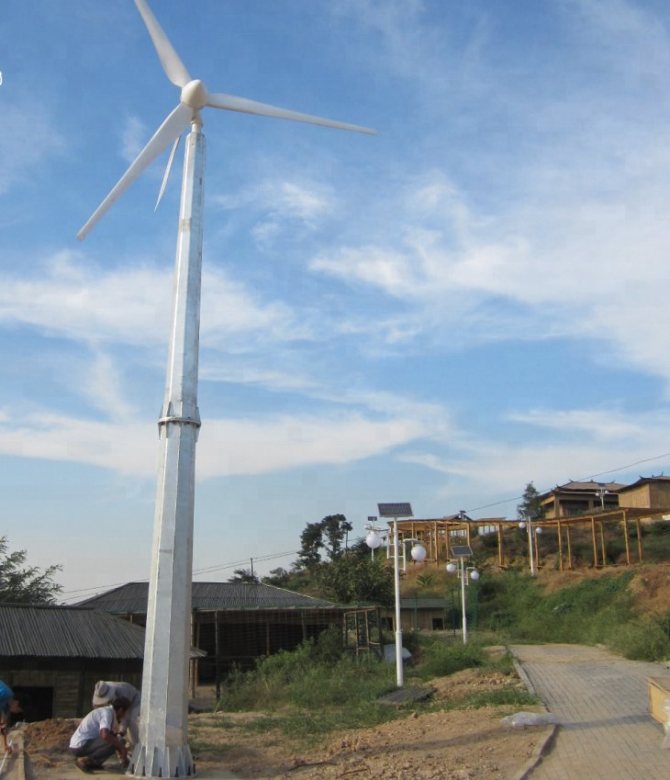
How to install a wind turbine: a reliable mast layout for mounting at a height
The weight of the impeller for normal production of electrical energy is quite decent. It cannot be installed on a simple stand.
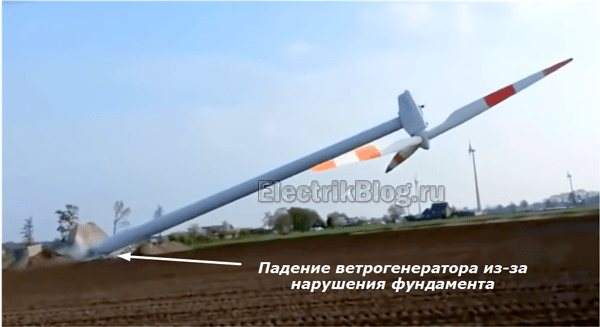
You will need to create a solid concrete foundation for the metal mast and guy anchor bolts. Otherwise, the entire structure, assembled with great difficulty, may collapse at any inopportune moment.
A stand for a wind turbine raised to a height can be made:
- in the form of a prefabricated mast assembled from sections with braces;
- or a tapered tubular support.
Both schemes will require reinforcement from overturning by creating several tiers of guy wires from the cables, which are necessary to hold the mast in case of heavy gusts of wind. They will have to be securely attached to stoppers and anchors.
From personal bad experience: while using analogue television, I had a Spider-line antenna with a hoop diameter of 2m. It was located at a height of 8 meters, it was fixed on a wooden pole with two levels of guys. Heavy gusts of wind swayed her so that the rack collapsed.
Fortunately, modern digital television requires much smaller antennas. They are not only easy to do with your own hands, but also not so difficult to fasten.
How to make a mast for a windmill
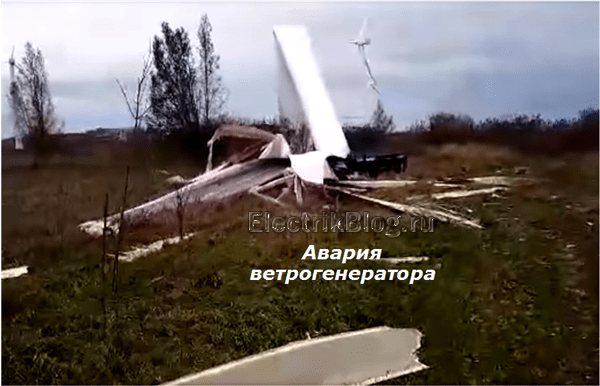
Pay attention immediately to creating a solid, trouble-free design. Otherwise, just repeat the sad experience of YantarEnergo employees, who had an accident during a storm: a multi-ton mast collapsed, and fragments from the blades scattered throughout the district.
The device of the mast will require calculating the amount of materials required to create a structure from a steel angle of various sections. Shape and dimensions are selected according to local conditions.
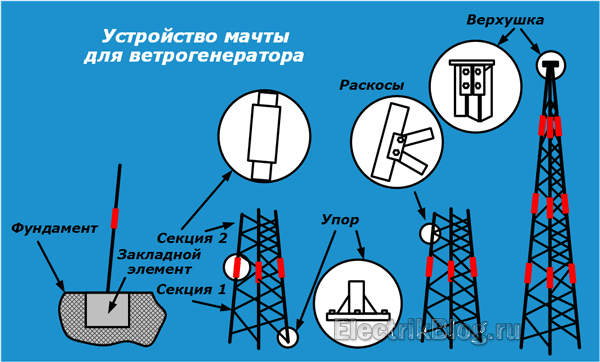
It is made of three or four uprights. Each of them is mounted on a stop from below. At the top of the mast, a platform is created for installing the wind turbine.
Since the length of the corners is limited, the mast is assembled from several sections. The rigidity of the general fastening is given by lateral ribs fastened through the braces.
Embedded metal elements are an obligatory element of the foundation. They will be used to fasten parts. We'll have to take care of the welding and connecting bolts.
Do not neglect additional guy lines.
How to make a support from pipes
A telescopic structure made of steel pipes of the corresponding profile is easier to assemble, but it should be more carefully calculated for strength. The bending moment created by a heavy tip in a stormy wind should not exceed a critical value.
At the same time, difficulties will arise with preventive maintenance, inspection and repair of the assembled air power plant. If you can climb to a height along the mast like a ladder, then it is problematic to do this through a pipe. And working upstairs is very dangerous.
Therefore, it is immediately necessary to think over the option of safely lowering the equipment to the ground and an affordable way to raise it. This allows you to perform one of two schemes with:
- Swivel axle on the main support.
- A thrust lever on the bottom of the support leg.
In the first case, a solid foundation is created for the installation of the main support. A welded pipe structure with a wind turbine and a chain hoist system on steel cables is attached to its axis of rotation.
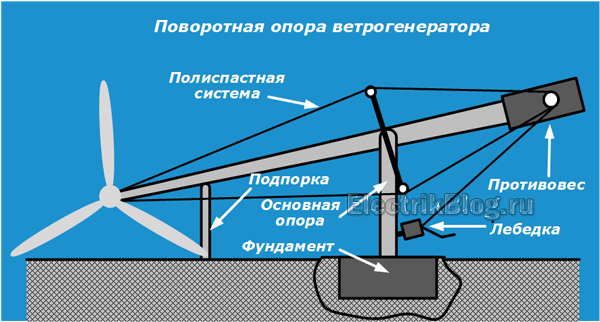
A counterweight is located at the bottom of the pipe to facilitate lifting and lowering with a hand winch.
Guy belt safety cables are not shown in the picture.They simply hang from their mountings down to the ground when raising and lowering the mast, and are attached to stationary concrete stakes for continuous operation.
The scheme for installing and lowering the windmill according to the second option is shown below.
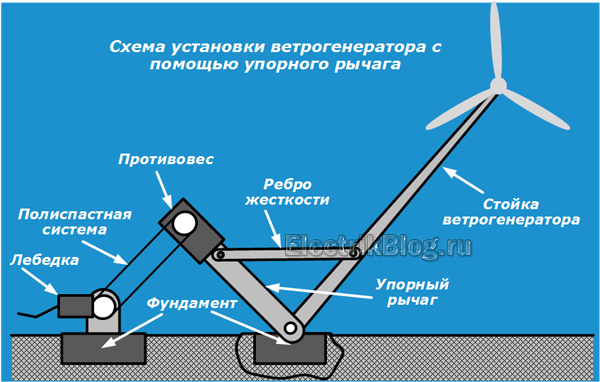
The mast and a counterweight thrust arm, reinforced with a stiffener, located at a right angle to it, are turned in the vertical direction by a winch with a chain hoist system.
The axis of rotation of the created structure is at the top of the right angle and is fixed in the guides embedded in the foundation. When lifting or lowering the mast, the guy ropes are removed from the stationary anchorages on the ground. They can be used as a safety rope.
Wind generator: device and principle of operation of the electrical circuit in simple words
Industrial wind farms are designed in such a way that they are able to immediately supply electricity to the grid to consumers. You can't do this with your own hands.
When choosing a generator that will spin the wind wheel, the principle of reversibility of electrical machines is used. A torque is applied to the electric motor and the stator windings are excited.
However, the idea of spinning the rotor of a three-phase asynchronous electric motor as a generator to obtain an electric current with a voltage of 220/380 volts is realized from internal combustion engines, water pressure, but not wind.
The general design of the generator with the rotor will become heavy, otherwise it will not be possible to ensure high shaft speeds.
For small capacities, you can:
- use a car generator that produces 12/24 volts;
- apply a motor wheel from an electric bike;
- to assemble a structure of neodymium magnets with coils of copper wire.
You can also take a wind turbine sold in China as a basis. But he needs to immediately conduct an audit: pay attention to the quality of the installation of the windings, the condition of the bearings, the strength of the blades, the overall balancing of the rotor.
We'll have to tune in to the fact that the value of the generator output voltage will vary greatly depending on the wind speed. Therefore, batteries are used as an intermediate link.
Their charging must be assigned to the controller.
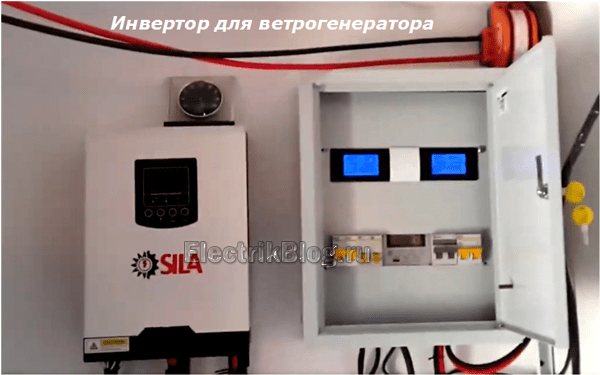
Household appliances of a 220 volt network must be powered by alternating current from a special converter - an inverter. The simplest diagram of a home wind farm is as follows.
It can be greatly simplified because consumer digital electronics: computers, televisions, telephones operate on direct current from 12 volt power supplies.
If they are excluded from work and the digital equipment is powered directly from batteries, then the loss of electrical energy will be reduced by canceling the double conversion in the inverter and units.
Therefore, I recommend making separate 12 volt sockets, powering them directly from the batteries.
Within the electrical circuit, the same power balance will have to be maintained as in the mechanical structure. Each connected load must comply with the energy characteristics of the upstream source.
Household appliances of 220 volts should not overload the inverter. Otherwise, it will disconnect from the built-in protection, and if it fails, it will simply burn out. The batteries, power contacts of the controller, and the generator itself work according to the same principle.
Protection by a circuit breaker for a home wind turbine must be performed without fail.
To do this, it must be correctly selected strictly according to scientific recommendations, checked and adjusted.
It is impossible to foresee an accidental overload, and even more so the appearance of a short-circuit current. Therefore, this module is necessarily installed as the main protection.
The wiring diagram for batteries, an inverter and a controller for a wind generator is practically no different from that used in solar power plants with light panels.
Therefore, a reasonable conclusion immediately suggests itself: to assemble a combined home power plant, powered by wind and solar energy at the same time. These two sources complement each other well, and the costs of assembling single stations are significantly reduced.
There are a lot of channels on YouTube dedicated to wind turbines for the home. I liked the work of the owner "Solar Panels". I think that he is quite objective in presenting this topic. Therefore, I recommend taking a closer look.
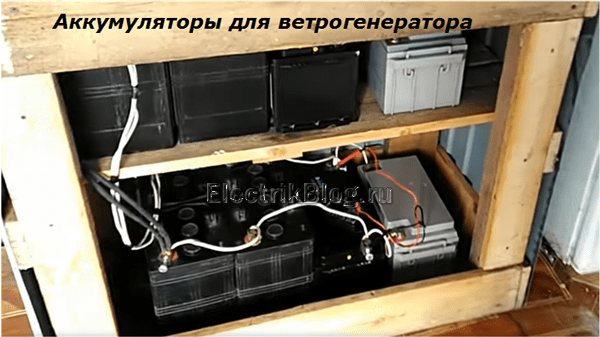
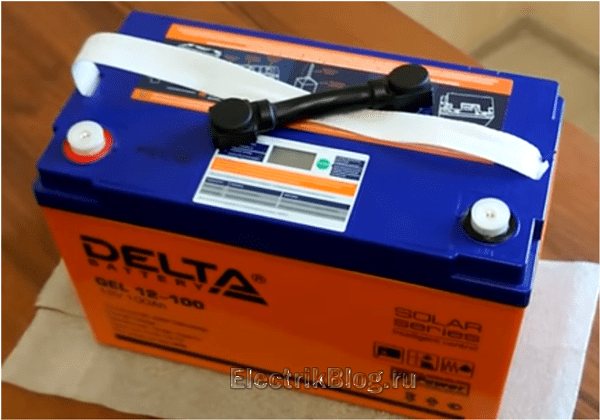
Wind turbine batteries: another problem for the home owner
One of the costly tasks of a wind or solar power plant is the issue of storing electrical energy, which is solved only by batteries. They will have to be bought and updated, and the cost is quite high.
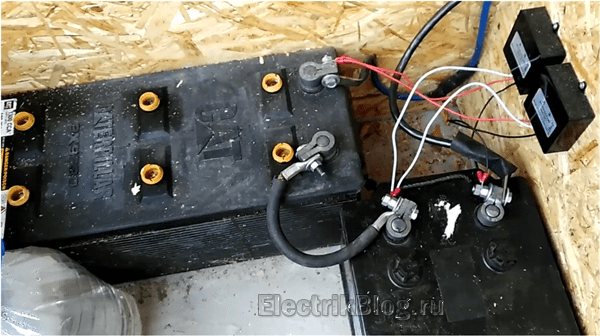
To select them, you need to know the performance characteristics: voltage and capacity. Usually, composite batteries from a 12 V battery are used, and the number of ampere-hours in each specific case should be determined empirically, based on the power of consumers, their operating time.
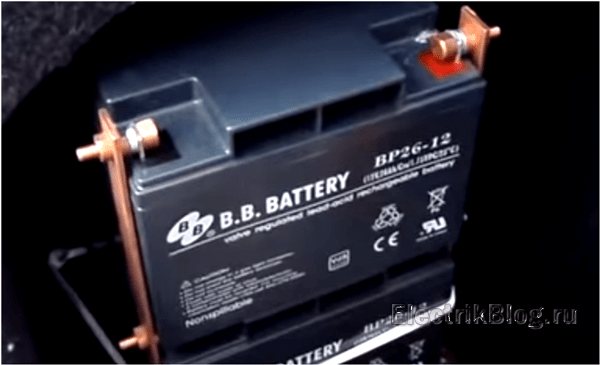
You will have to choose batteries for a wind generator from a fairly wide range. I will confine myself not to a complete review, but only to four popular types of acid batteries:
- conventional starter motor vehicles;
- AGM type;
- gel;
- armored.
Sellers do not recommend purchasing starter batteries for wind farms because they are designed to work in critical vehicle operating conditions:
- when stored in the cold, they must withstand the huge starter currents that are created when a cold engine is spinning up;
- while driving, they are exposed to vibrations and shaking;
- recharging takes place in a buffer mode from the generator when the car is moving with different engine speeds.
Wherein:
- serviced batteries, requiring periodic electrolyte level and distilled water topping up, are designed to withstand 100 discharge / charge cycles;
- not serviced - they have a more complex design and the number of cycles is 200.
However, the wind turbine battery when operating inside the house:
- usually placed in a basement, where the temperature, which is maintained at + 5 ÷ + 10 degrees year-round, is optimal;
- not exposed to shaking and vibrations, permanently installed in a stationary state;
- do not receive extreme loads during start-up, and when household appliances are turned on through the inverter, they work in a gentle mode;
- are charged from the generator with small currents, which have a beneficial effect on the desulfation mode of the plates.
All this is the most favorable conditions for their operation. Therefore, I suggest taking note of this option for those who are not too lazy to periodically monitor the voltage on the banks and monitor the electrolyte level in them.
AGM batteries more complex in design. They have the same plates, but glass mats are impregnated with acid, which work simultaneously as a dielectric layer. Their discharge / charge cycle is 250 ÷ 400. Overcharging is dangerous.
Golem batteries are also created by a maintenance-free design with a sealed body and an electrolyte thickened to a gel state. They do not like recharge very much, but they are more resistant to deep discharge. The number of calculation cycles is 350.
Armor batteries are among the most modern developments. Their electrode pads are protected by polymers from acid attack. Operating cycle range: 900 ÷ 1500.
All these four types of batteries differ significantly in terms of price and operating conditions. If you take into account the recommendations of the sellers, you will have to shell out a pretty decent amount of money.
However, I recommend that you first listen to the useful tips that the same owner of Solar Batteries gives in his video "How to choose batteries for a wind farm and a solar station".
He has his own opposite opinion on this matter. How you treat him is your own business. However, to know information from opposite sources and choose the most suitable option from it: the optimal solution for a thinking person.
Calculation of a bladed wind turbine
Since we have already found out that a horizontal wind turbine is much more efficient, we will consider the calculation of its design.
Wind energy can be determined by the formula P = 0.6 * S * V³, where S is the area of the circle described by the tips of the rotor blades (throwing area), expressed in square meters, and V is the calculated wind speed in meters per second. You also need to take into account the efficiency of the windmill itself, which for a three-blade horizontal circuit will average 40%, as well as the efficiency of the generator set, which at the peak of the current-speed characteristic is 80% for a generator with permanent magnet excitation and 60% for a generator with an excitation winding. On average, another 20% of the power will be consumed by the step-up gear (multiplier). Thus, the final calculation of the radius of the wind turbine (that is, the length of its blade) for a given power of the permanent magnet generator looks like this: R = √ (P / (0.483 * V³))
Example: Let's assume the required power of the wind farm is 500 W, and the average wind speed is 2 m / s. Then, according to our formula, we will have to use blades with a length of at least 11 meters. As you can see, even such a small power will require the creation of a wind generator of colossal dimensions. For more or less rational structures with a blade length of no more than one and a half meters in the conditions of do-it-yourself manufacturing, the wind generator will be able to produce only 80-90 watts of power even in strong winds.
Not enough power? In fact, everything is somewhat different, since in fact the load of the wind generator is fed by the batteries, the wind turbine only charges them to the best of its capabilities. Consequently, the power of a wind turbine determines the frequency with which it can supply energy.
Generator selection
The most logical option for a generator set for a homemade wind turbine seems to be a car generator. This solution makes it easy to assemble the unit, since the generator already has both mounting points and a pulley for the belt multiplier. It is not difficult to buy both the generator itself and spare parts for it. In addition, the built-in relay-regulator allows you to directly connect it to a 12-volt battery, and to it, in turn, an inverter for converting direct current to alternating voltage 220V.
But, as mentioned above, the efficiency of generators with an excitation winding is quite low, which is very sensitive for an already low-power wind generator. The second disadvantage is that when the battery is discharged, the car generator cannot be excited.
In a number of home-made designs, you can find the G-700 and G-1000 tractor generators. Their efficiency is no more, the only useful difference is the magnetization of the rotor, which makes it possible to excite the generator even without a battery, and the low price.

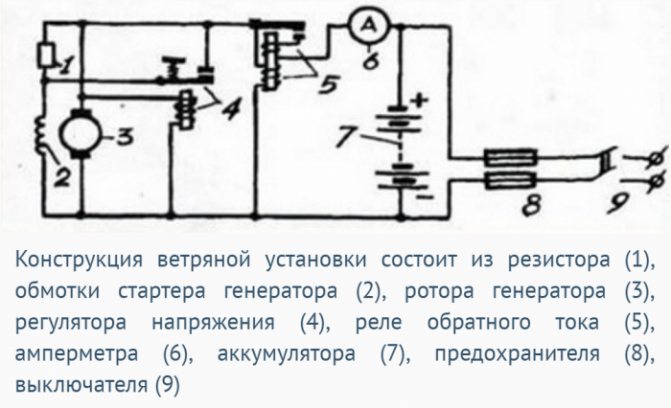
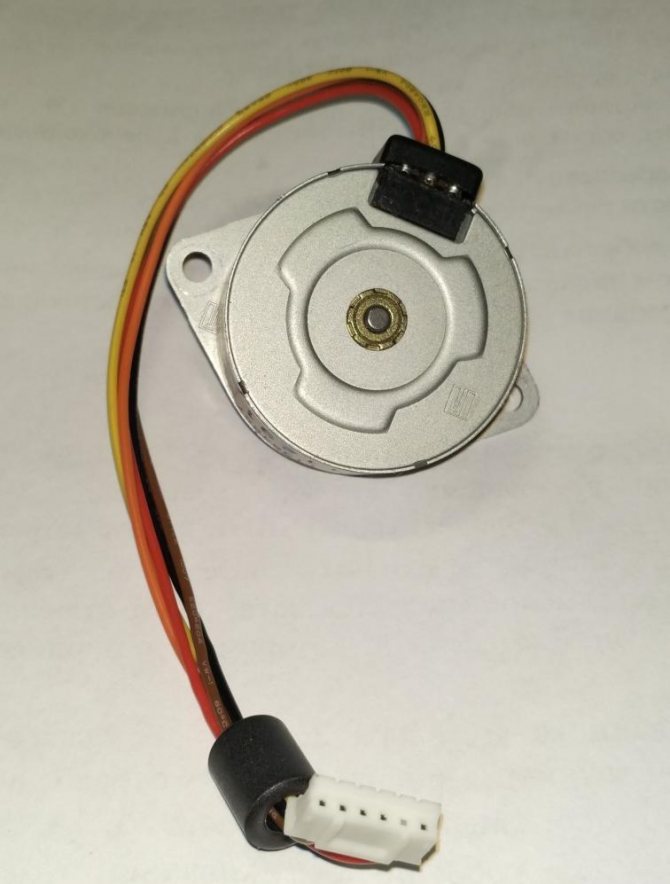
Some authors, when building wind generators, use the property of reversibility of collector electric motors - by forcibly rotating their rotor, direct current can be removed from it. The stator of this type of motors either consists of permanent magnets, which is more preferable for our purposes, or has a winding. To use the engine in generator mode, it is connected to the vehicle's relay regulator to provide the desired voltage.Consider the connection of a relay-regulator using the example of a node from the VAZ classics (it is convenient because it is not combined into one block with a brush assembly):
- Connect one of the motor brushes to the body - this will be the negative pole of the generator. Here, securely connect the metal case of the relay-regulator and the “-” terminal of the battery.
- Connect terminal 67 of the relay to one of the terminals of the stator winding, the second temporarily to the case.
- Connect terminal 15 through the switch to the positive pole of the battery (this will supply the field current to the winding). Give the rotor rotation in the same direction that the wind turbine screw will provide, and connect a voltmeter between the free brush and the housing. If a negative potential is found on the brush, swap the connections of the stator with the relay-regulator and ground.
The main feature of connecting a DC generator to a battery is the need to separate them with a semiconductor diode, which prevents the battery from discharging onto the rotor winding when the generator stops. In modern car generators, this function is performed by a three-phase diode bridge, and we can also use it by connecting its phases in parallel to reduce the voltage drop across it.
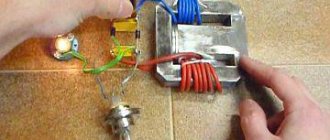
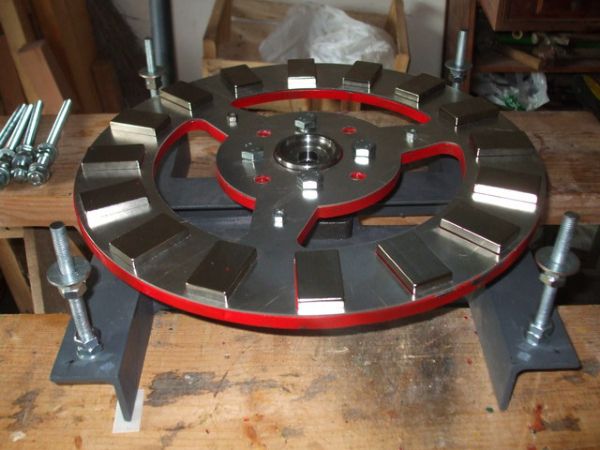
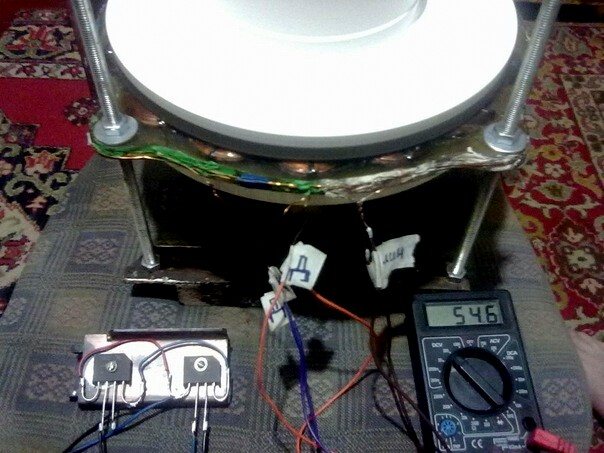
The greatest power can be removed from the generator, the rotor of which consists of neodymium magnets. Constructions based on an automobile hub with a brake disc are widespread, along the edge of which powerful magnets are fixed. A stator with a single-phase or three-phase winding is located at a minimum distance from them.
Wind turbine of axial design with magnets
At the heart of such a 220v windmill is a passenger car hub with brake discs. If the part is not new, disassemble it, check and lubricate the bearings, and clean off any rust.
Distributing and securing magnets
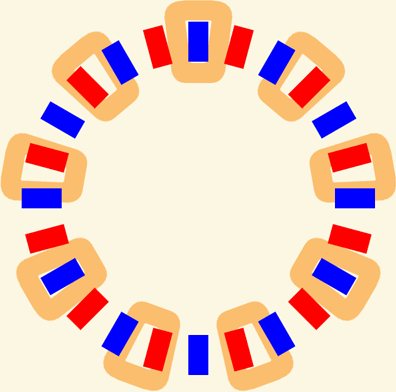
First you need to glue the magnets onto the rotor disc. In this case, the magnets used are not ordinary, but special neodymium magnets. They are much more powerful. You will need 20 magnets, the size of which is 25 by 8 mm. The magnets are placed in alternating poles. For correct placement, make a template as shown in the photo below.
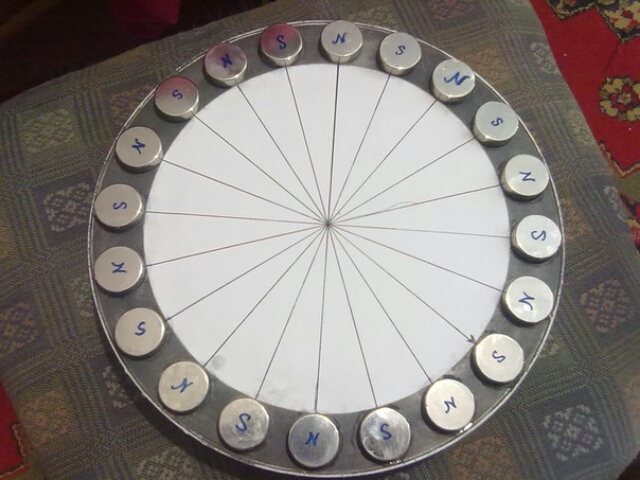
Advice! If possible, use rectangular rather than round magnets for the wind turbine. Their magnetic field is concentrated not in the center, but along the length.
Use silicate glue to secure the magnets to the disc. And for strength at the end, you can fill the magnets with epoxy. To avoid resin leakage, make plasticine curbs or tape the disc.
Note! In order not to confuse where the pole of the magnet is, you can mark them with "+" or "-". To determine this - bring one magnet to another. Magnet surfaces that are attracted have a “+”. If the magnet is repelled, it has a “-” pole.
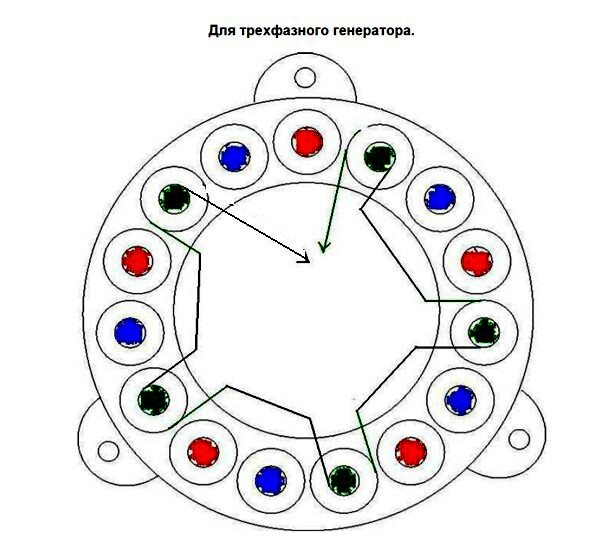
Three phase and single phase generator for wind turbine
If we compare them, then a device with one phase is worse, because under load it vibrates due to the difference in the amplitude of the current. And it appears due to the inconstancy of the current. This effect is absent in three-phase products. Their power is always the same. The thing is that one phase compensates for the other and vice versa, if the current disappears in one phase, then it will increase in the other.
What is the end result? And the fact that three-phase generators have 50% more output than single-phase ones. In addition, the absence of vibration, which can annoy and affect comfort, is encouraging. Under heavy load, the stator will not hum. If the noise does not bother you, and you decide to use a single-phase generator, be prepared for the fact that vibration will negatively affect the operation of the wind generator. Its service life will be shorter.
We wind the coils
The wind generator cannot be called very fast. It is required to do everything so that the 12 V battery becomes infected from 100–140 rpm.With such initial data, the total number of turns in the coils should be equal to 1000-1200. But how do you know how many turns are there per coil? It's simple: this figure is divided by the number of coils.
If you want the wind turbine to deliver more power at low rpm, you need to make more poles. In this case, the frequency of the current oscillation in the coil will increase. To reduce resistance and increase current resistance, we recommend winding thick wire around the coils. Take into account the fact that with a strong voltage, the resistance of the winding can "eat" the current.
Note that the number and thickness of the magnets that are attached to the discs determine the operating parameters of the generator. To find out how much power a wind generator can deliver, wind one coil and turn the generator. Measure voltage at some rpm without load. For example, for 200 rpm you got a current of 30 V with a resistance of 3 ohms. Subtract 12 V (battery voltage) from these 30 V. Now divide the number you get by 3 ohms. It looks like this:
30 – 12 = 18;
18 : 3 = 6.
As a result, it turned out 6 A. They will go to the battery. It is clear that in practice it will be slightly less due to the losses in the wires.
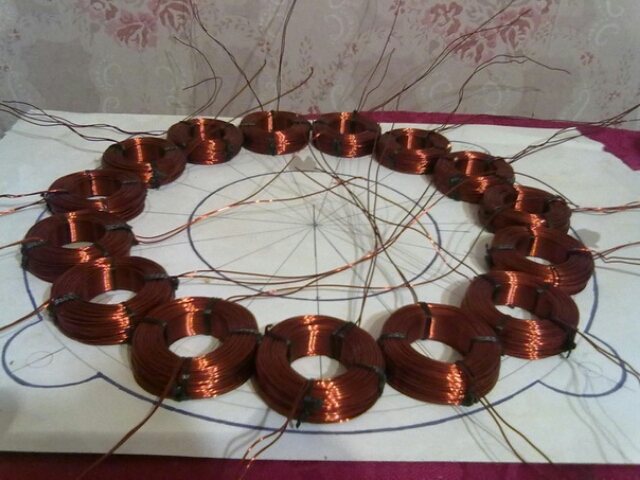
It is better to make the coils elongated. Then the copper in the sector will come out more, and the turns will be straight. The diameter of the hole inside the coil should be equal to or slightly larger than the size of the magnets.
Note! The stator thickness must be the same as the thickness of the magnets.
The mold for the stator can be plywood. But the sectors for the coils can also be placed on paper by making a plasticine border. The coils must be fixed so that they do not move, and the ends of the phases must be brought out. Connect all wires with a star or delta. It remains to test the wind generator by rotating it by hand.

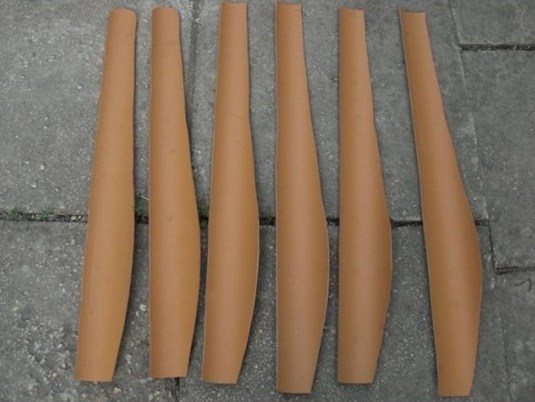
We make a screw and a mast for a wind turbine
The mast for the generator must be high, from 8 to 12 m. The base must be concreted. It is better to mount the pipe so that the pipe can be easily lifted and lowered by the winch. The wind turbine screw will be attached to the top of the pipe.
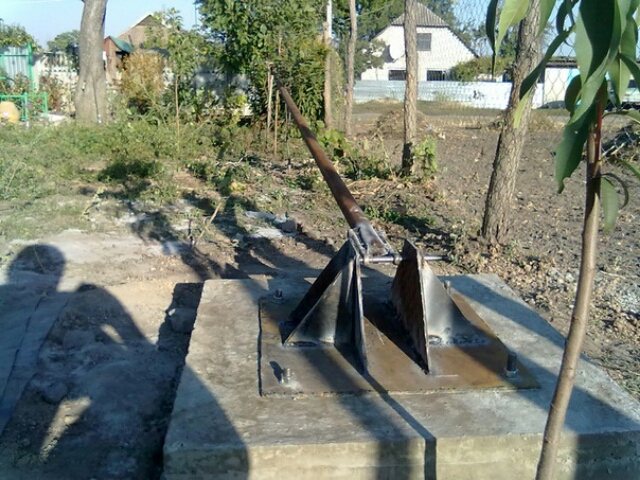
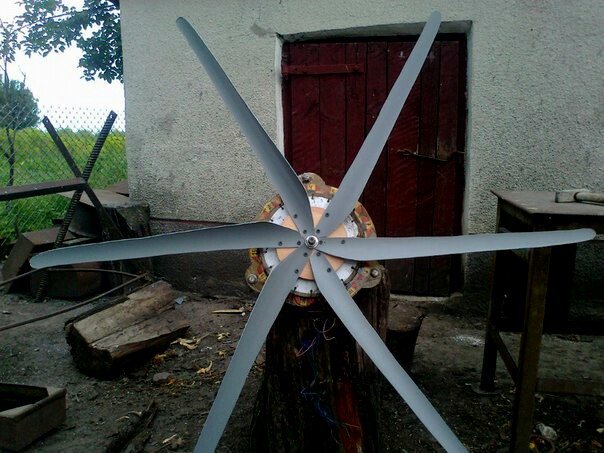
You can make it from Ø160 mm plastic pipe. Cut out a screw with six blades, 2 m long.
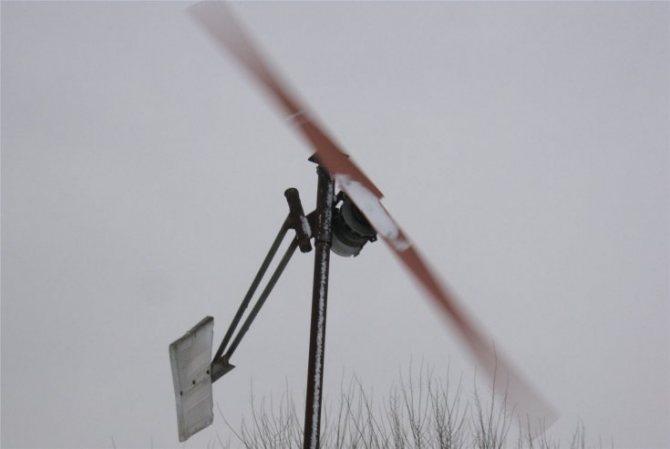
To keep the propeller away from a strong gust of wind, make a folding tail. As a result, all the energy that the wind generator generates can be accumulated in the battery.
That's it, you know how to make a wind generator with magnets. Now you can use the electricity generated by such a wind generator, saving your money. All your efforts will be rewarded.
Multiplier calculation
The generating set has an inclined current-speed characteristic: with an increase in the rotor speed, the maximum power delivered to it increases. Therefore, in order to ensure the highest efficiency of a low-speed wind turbine, we need a multiplier with a large increase factor.
For a homemade design, the most optimal solution is a belt multiplier: it is easy to manufacture and requires a minimum of machine work. The ratio of the increase in revolutions will be equal to the ratio of the diameter of the drive pulley connected to the axis of the propeller to the diameter of the driven pulley of the generator. If necessary, the gear ratio can be easily adjusted by replacing one of the pulleys.
When designing the multiplier, it is necessary to take into account both the average speed of the blade assembly and the current-speed characteristic of the generator. If we use a serial car generator, then it can be easily found on the Internet, with homemade designs, most likely, we will have to go through trial and error.
For example, let's take a common tractor generator, which was already mentioned above.
Taking the calculated power of our wind turbine at 90 watts, we find a point on the graph corresponding to the generator's output to this power.At a nominal voltage of 14 V, we need a current output of at least 6.5 A - according to the graph, this will happen at a speed slightly above 1000 rpm. Let the propeller of our design rotate with the wind at a speed of 60 rpm (medium wind). This means that we need at least a twenty-fold ratio of the diameters of the pulleys - for a 70-mm generator pulley, the windmill pulley will have to have a diameter of almost one and a half meters, which is unacceptable. This unequivocally hints at how low the efficiency of wind generators of this type is - without a complex multistage gearbox, which in itself will lead to large power losses, it is almost impossible to bring a car generator to operating mode.
Choice of design and details
DIY wind generator from a car generator
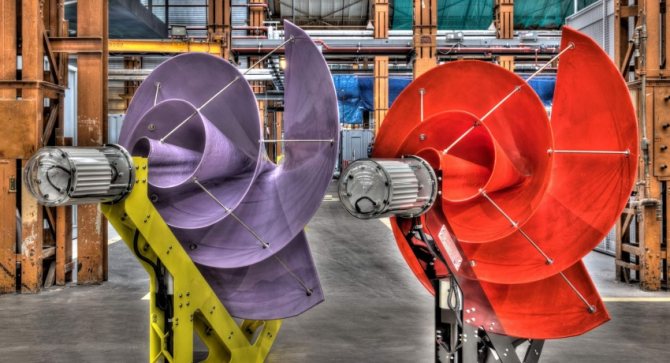
When choosing the design of a wind generator set, one should proceed from the climatic conditions characteristic of the area. So, for areas with low wind activity, wind power generators equipped with sail-type blades are optimal (its appearance is shown in the figure below).
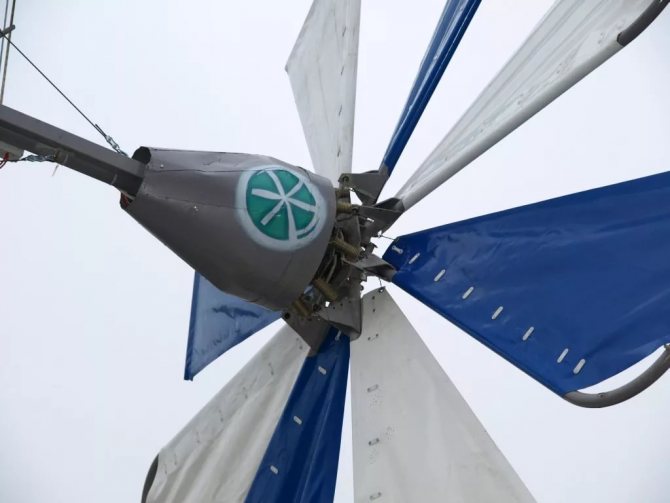
Sail-type wind turbine
In regions with strong wind loads, a homemade wind generator for a home is most often made in the form of a vertically placed device of limited power.
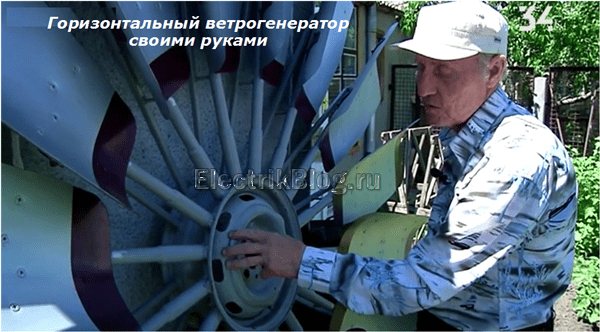
Despite the fact that wind turbines with a vertical axis of rotation are somewhat more expensive to manufacture than their horizontal counterparts, they are better able to withstand strong wind loads. For their manufacture, homemade blades collected from improvised means can be used (some craftsmen have adapted to make them from a barrel cut into separate metal fragments).
It is more expedient to buy more wind ready-made and adapt them to a generator, which can be used as a converted motor from a printer. In any case, before starting work, a sketch of the future generator should be worked out, which should show a detailed diagram of the prefabricated unit.
Additional Information. When choosing purchased blades, one should proceed from the fact that the so-called "sailboats" are considered the cheapest.
On their basis, the easiest way to make a vertical wind generator.
To complete the description of possible designs, we add that the future device can be made from an automobile starter or any autogenerator that has served its life. Let's consider each of the proposed options for making do-it-yourself electric generators in more detail.
Mast
The mast on which the wind turbine is mounted - this is one of its most important nodes.
It not only ensures the safe operation of the windmill (the lower point of the circle described by the blades should be no closer than 2 meters to the ground), but also allows it to use the wind energy as efficiently as possible, the flow of which becomes more turbulent near the ground.
A high height leads to a low rigidity of the wind turbine mast and makes its strength calculation quite difficult not only for an amateur, but also for an engineer. You can list only the main points:
- Place the mast as far as possible from the house and trees shading the air flow. In addition, in case of strong wind, the wind generator may fall on the building or be damaged by trees;
- An optimal mast design is openwork welded truss similar to power transmission towers, but it is difficult and expensive to manufacture. The simplest, but quite effective option is several parallel pipes with a diameter of 80-100 mm, welded with short seams to each other and concreted to a depth of at least one meter in the ground. It is highly desirable to strengthen the structure of one pipe with cable ties, which are also attached to the supports poured into concrete.
- To simplify the maintenance of the windmill, its mast can be made a turning point: in this case, when the stretch line going in the direction of the fracture is weakened, the mast can be tilted to the ground.
A story about a very simple wind generator from a home fan
Additional electrical equipment
As mentioned above, an integral part of a wind farm is a battery that takes over the power of consumers. when choosing it, you need to remember that the larger its capacity, the longer it will be able to maintain the voltage in the network, but at the same time it will take longer to charge. The approximate operating time can be defined as the time during which half of the battery capacity is exhausted (after that, the voltage drop will already become noticeable, in addition, deep discharge reduces the life of lead-acid batteries).
Example: So, a battery with a capacity of 65 A * h will conditionally be able to give 30-35 Amp-hours of energy to the load. Is it a lot or a little? A conventional 60-watt lighting lamp will require, taking into account the presence of an inverter that converts 12 V DC to 220 V AC and having its own efficiency within 70%, a current of 7 amperes is a little more than four hours of operation. Our windmill with a nominal power of 90 watts, even in the best case, with a constant strong wind, will take at least five hours to recover the wasted energy. As you can see, when using a wind turbine solely as an autonomous source of energy, electricity in your home will be available only for a few hours a day.
The second node of the power supply system is the inverter. In our case, you can use both a ready-made automobile and one extracted from an uninterruptible power supply. In any case, it is important not to overload it with current consumption, given that its real operating power is 1.2-1.5 times less than the indicated maximum power.
As you can see, the attractiveness of using free energy rests on numerous restrictions, and even the only efficient option in central Russia - a wind generator - is unable to provide long-term autonomy.
But at the same time, this idea is not bad both as a source of emergency power supply and, especially, as a design task - the pleasure of creating a wind turbine with your own hands can significantly exceed its power.