
Installation of walkways for two-storey buildings
If the building is two-story, then in this case, after the installation on the first floor, it is necessary to tackle the second. How to run a sandwich pipe through the second floor? Consider the main points of wiring a chimney sandwich through the second floor:
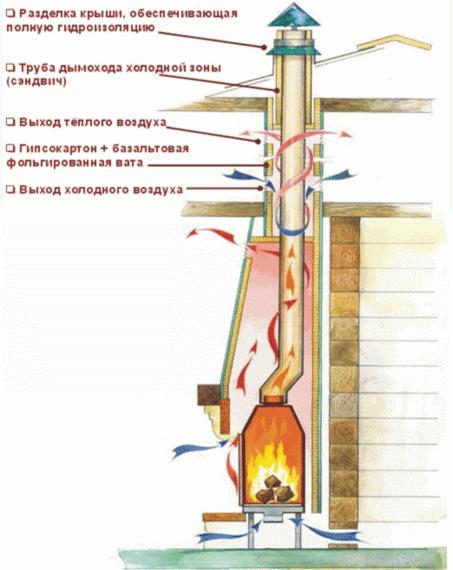
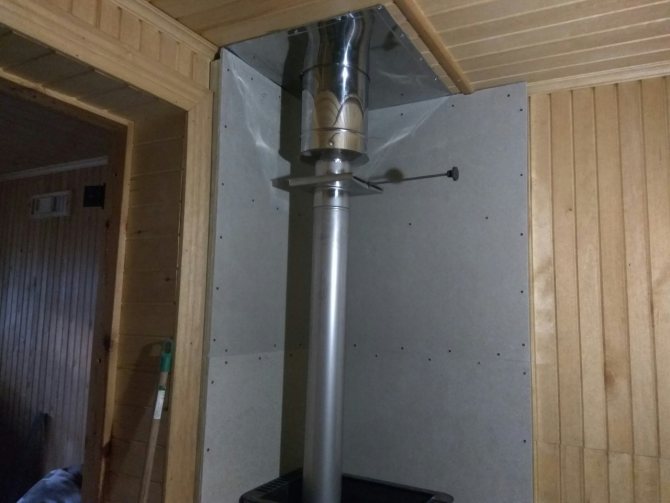
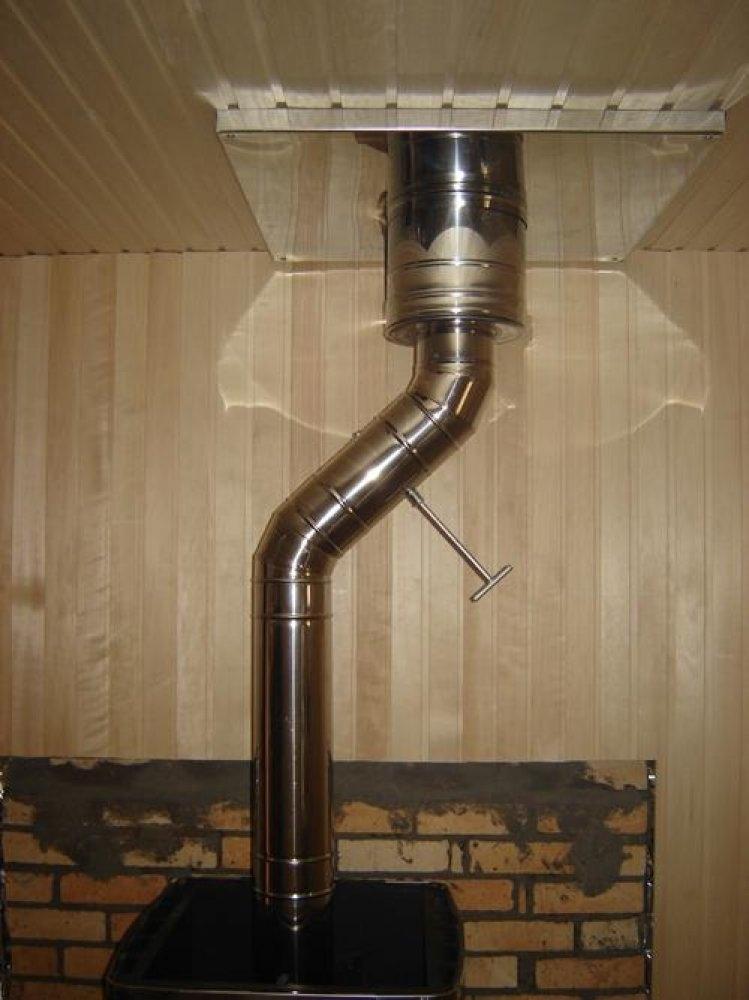
- As a rule, the second floor of the baths is set up as a relaxation room. Also, laying a sandwich chimney can take place in a private house. In such cases, a transition is made from a sandwich pipe to a single-wall pipe. This is done so that the heat from the chimney spreads and warms the premises. The transition to a single-wall pipe should be carried out at a height of 1 m from the floor of the second floor.
- In front of the attic passage unit, a transition is made back to the sandwich pipe.
- The attic walk-through is installed in the same way as the previous one.
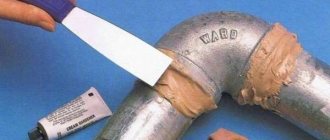
- It is necessary to run the chimney through the waterproofing coating and the roof. It is imperative to perform thermal insulation and equip a protective apron, which will serve as a waterproofing sandwich of the chimney. For these purposes, homemade aprons and heat-resistant sealant may be suitable.
Waterproofing after laying the pipe through the roof is necessary so that moisture does not penetrate into the attic and does not flow down through the structure. When sandwich pipes pass through the roof, it is also necessary to comply with the standards described in SNiP.
Lining of the middle part of the chimney
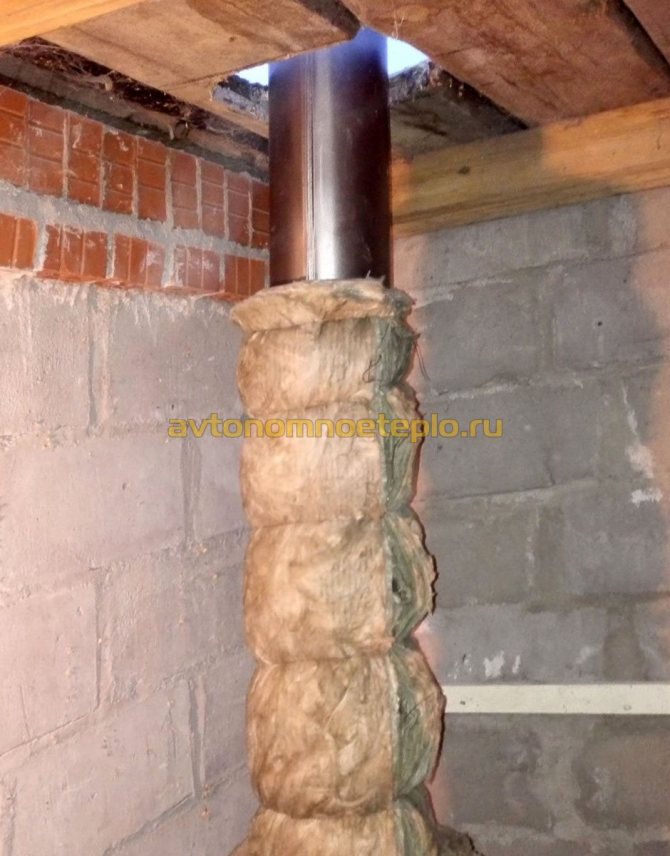
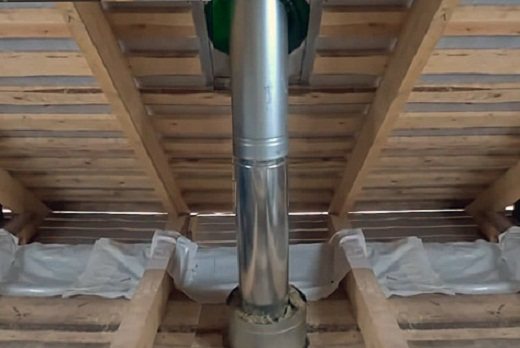
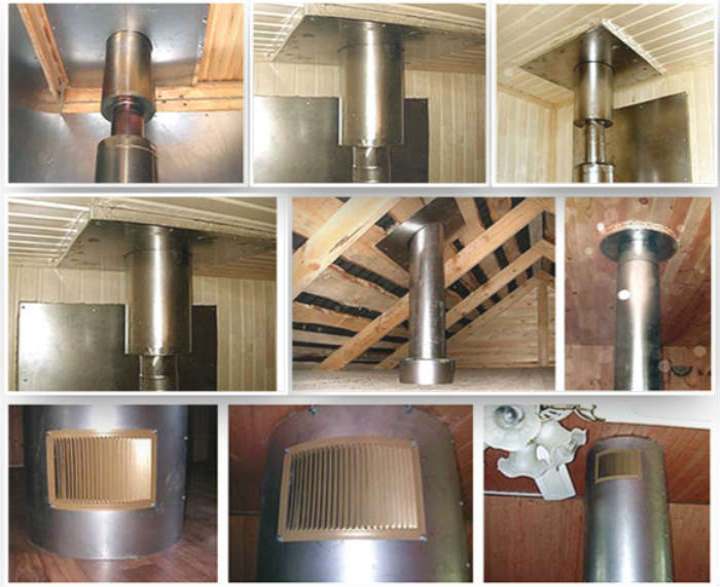
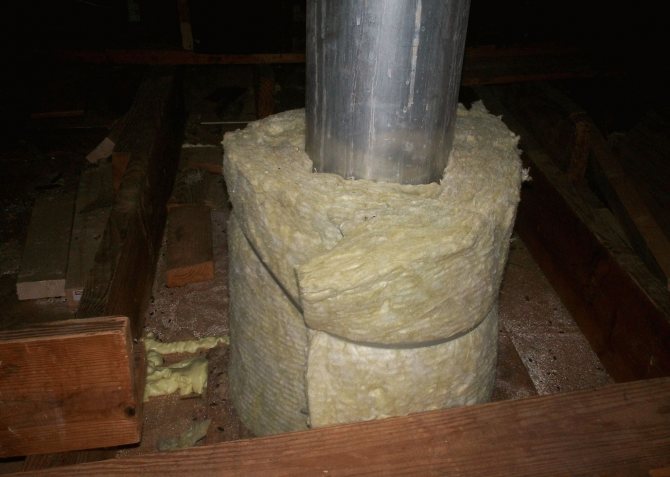
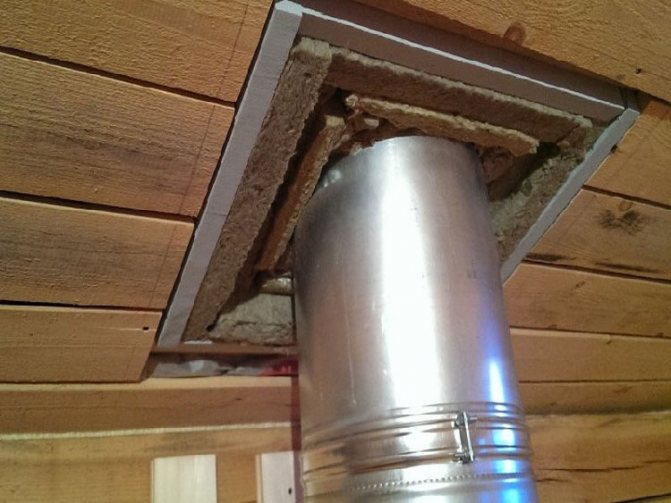
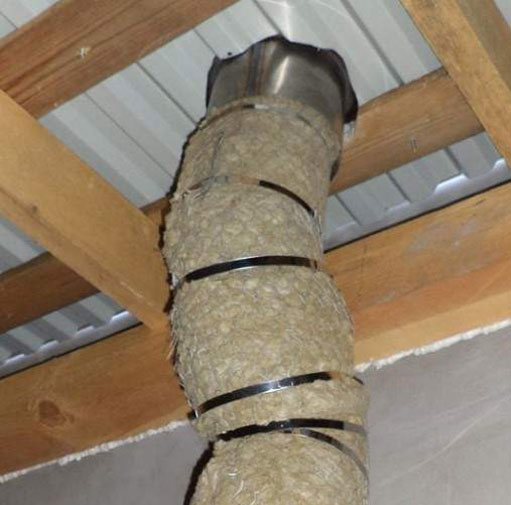
The middle part of the chimney, passing through the attic, is lined only for thermal insulation. If the attic is being set up, the pipe passes through it and heats the room. In this case, the lining of the chimney should be harmoniously combined with the interior of the attic. For work, you can use heat-resistant plaster, but first the pipe must be insulated. For this, basalt wool is used, which is attached to a pre-installed metal frame.
Plates of cotton wool are laid so that they are held by the frame itself. Additionally, self-tapping umbrellas are used. For plastering work, a reinforcing mesh is pulled over the insulation plates. Such thermal insulation excludes the formation of condensate inside the chimney, and its subsequent destruction.
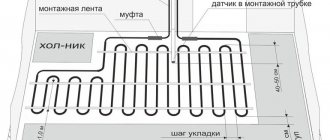
DIY PPU installation
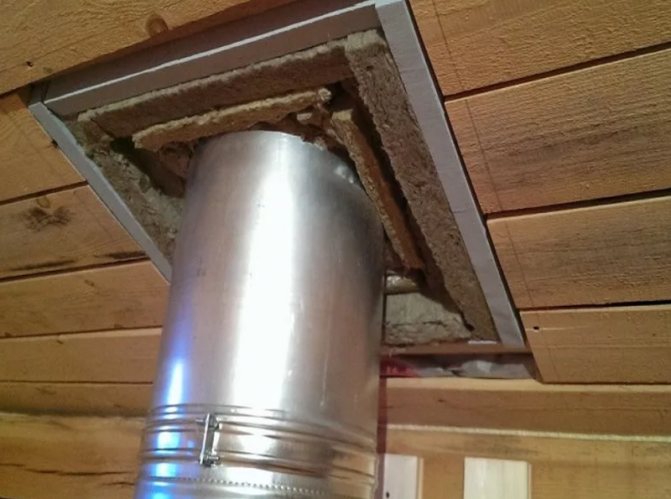
The hole should be about 0.5 mm thicker than the channel diameter. This will ensure easy insertion. Thermal insulation is packed along the outer and inner walls. The distance between them is 1-2 cm.
If you do not have a ready-made kit, you can perform high-quality stove heating in the house without it. For this, the free space in the ceiling is sealed with refractory thermal insulation, on top of which steel strips are installed. A plate of heat-resistant metals is installed on it, in which a suitable hole is cut. Such a plate is fastened with a bolt connection. It is most convenient to make it from metal.
When installing it, we comply with all requirements, and maintain the established distances to fire hazardous objects. The resulting voids, from the side of the second floor or attic, should be covered with expanded clay or other non-combustible insulation.
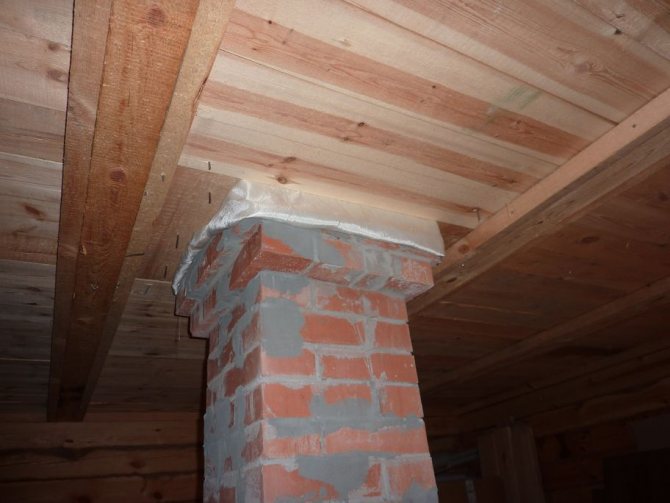
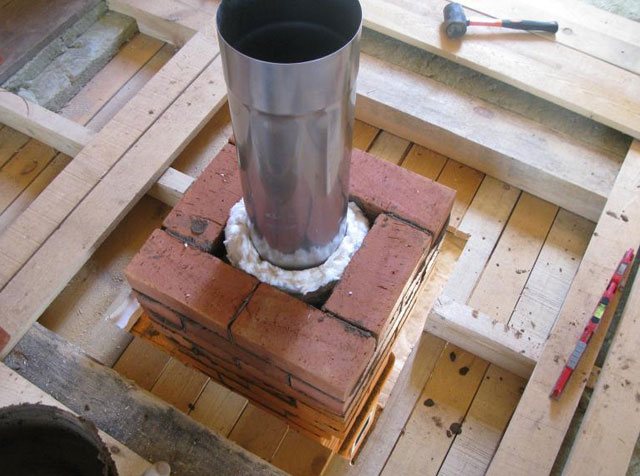
Passage of a brick chimney through a wooden floor
Laying out a stove chimney is a complex process where many nuances must be observed. Therefore, it is better to entrust this business to specialists. In addition, construction errors can lead to poor traction and fire.
An important point: a simple building brick for laying individual parts and the entire chimney is not suitable.A prerequisite for durable and trouble-free operation of a brick pipe is the use of ceramic heat-resistant bricks.
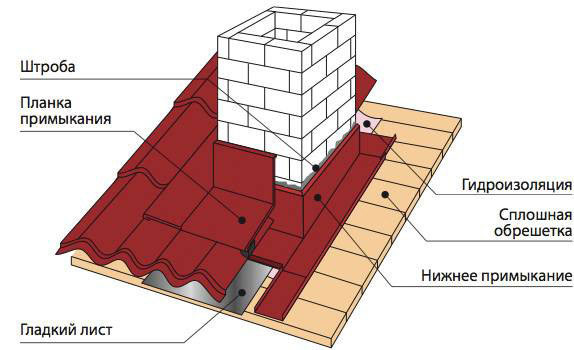
When constructing structures, it is necessary to lay them out in a special way in the places where the floors pass. The ideal option would be to cut the chimney on the ceiling. The height of this section of masonry must be at least three rows of bricks. The thickness of the walls of the chimney when passing through the roof or wall (partition) must be greater than the main height. The distance to combustible materials must be at least 25 cm.
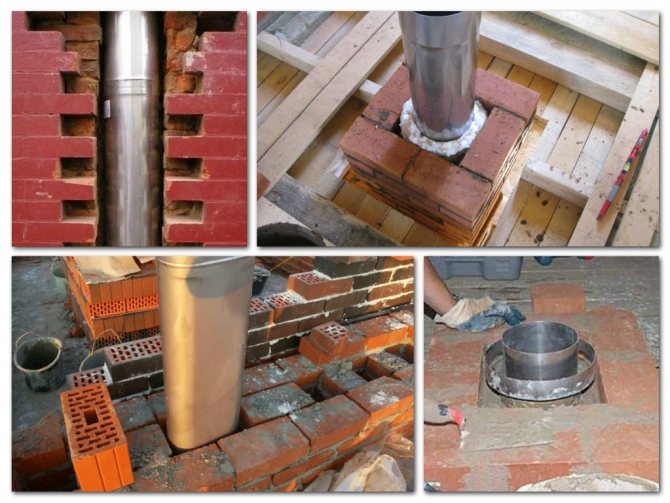
Two passes of a brick chimney are possible. In the first version, the pass-through unit is mounted by increasing the thickness of the masonry, the so-called "fluff". The second variant of the passage of a brick pipe through the attic floor without laying out the "fluff" is carried out in almost the same way as a metal pipe. In this case, the chimney along its entire height has the same cross-sectional size, without increasing the thickness of the walls.
The hole in the ceiling is fixed with a stainless steel sheet or minerite slab. A window is cut out in the center of the sheet through which the chimney will pass. The length and width of this opening should exceed the same parameters of the pipe by literally 3 ÷ 5 mm. When laying the chimney, about three to four rows to the ceiling, a sheet with a prepared opening is put on it, and then the laying is made further to the height of the clean floor of the attic. Wooden floors are laid with mineral wool to reduce heat transfer from the pipe. But a more reliable way would be a stainless steel box, into which a brick chimney will pass, the distance from the pipe to the walls is also laid with mineral or kaolin wool by 5-7 cm.
Sealing joints
This stage is considered the most difficult when removing through the roof. For this, a lower apron made of sheet metal is installed.
A "tie" made of metal is laid under it, the purpose of which is to divert liquid into the drain. Outside, you can install a decorative apron, the purpose of which is to create an aesthetic appearance.
When using a flexible coating, the task of waterproofing is greatly simplified. It is fairly easy to fold such material onto a pre-impregnated pipe to create a better fit. It is also recommended to seal the joints of the wall and the roof with a sealant.
Video tip - chimney passage through a wooden floor
From the following video, you can learn how to properly lay the structure, without spending extra effort.
Finishing the upper part of the chimney
Finishing the outer part of the pipe also begins with its thermal insulation. If it is brick and in good condition, it is enough to use basalt wool and any facing material for external work. Suitable: profiled sheet, sheet metal, clinker, tiles or panels made of natural stone. If the brick is old, the chimney must first be repaired. To do this, make a sleeve of a brick channel with a steel pipe.
The metal chimney is insulated in the following way: a second pipe (of a larger diameter) is put on it, and the space between them is filled with basalt wool. For beauty, the metal chimney outside can be trimmed with any material that is used for brick. The fastening of the finish is carried out on a frame made of a metal profile, if it is a sheet material.
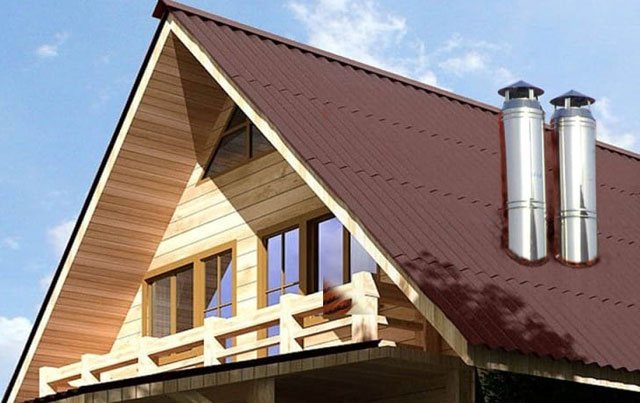
All private houses have an individual heating system. Even if this is a boiler, and not a wood-burning stove, it still requires the removal of gas and smoke from the system from the combustion of fuel. When the heating boiler is located in the basement of the house, the instructions for its operation allow the chimney to be led out along the outer wall.And then it can be considered as an element of the facade, and its decor can be produced in accordance with the exterior of the house. If the building has a stove or fireplace, the chimney passes through the space of the room in which they are located and the attic. In this case, the interior decoration of the attic roof is carried out taking into account the existing chimney.
A few tips for thermal insulation
Among the most reliable structures for the passage of a pipe through the roof, a specially made box is considered - according to the type of rafter system. Instead of wood, which is a flammable material, it can be made of galvanized roofing, but according to the same scheme.
The design of modular chimneys has ready-made thermal insulation, but they differ in configuration. For example, there is a double pipe with a layer of basalt wool or a special ceramic core and an outer shell made of concrete. The assembly of modular blocks is quite simple - the diagram is attached with the purchase.
It is possible to install an asbestos gasket, followed by sealing with an asbestos mortar. Each new block of the module is attached over the previous one with the same composition of the mixture. After completion of the installation, the pipe is isolated from a leak in the roof window in any way described.
Modern roofing with corrugated board has its own characteristics - here it is better to make the window for the chimney a little wider. All abutting surfaces are also filled with materials with thermal insulating properties. The chimney, before being wrapped with basalt wool, is placed in a steel box. Carefully cut the film layers of vapor and waterproofing, fix by the edges of the box. It is imperative to make a heat-resistant filling between it and the pipe.
Next, external waterproofing is carried out - a sealing cap material corresponding to the dimensions of the chimney pipe is put on from above, the edge is fastened with a clamp to glue. The lower edge fits tightly to the roofing material and is rigidly fixed with a sealant. A steel cap is often included with such a chimney. They are put on rounded pipes. Installation is recommended when the outlet smoke from the solid fuel boiler has a temperature of more than 100 ° C.
If you properly insulate the chimney pipe, then you will not be in danger of dampness and rotten ceiling.
Chimney sealing examples
The use of improvised means to seal the chimney has long been irrelevant. The building materials market is overflowing with various ready-made solutions to this issue.
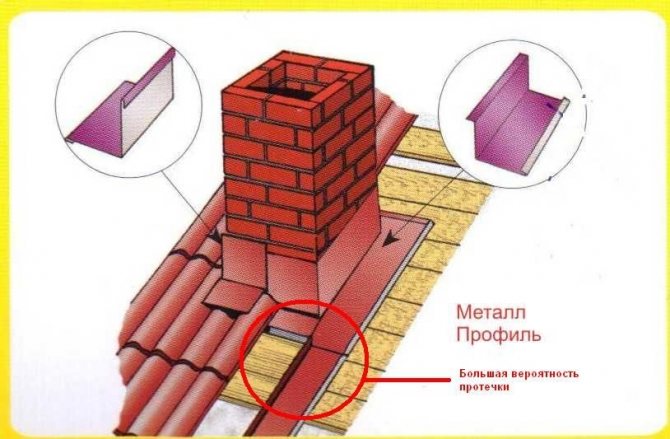
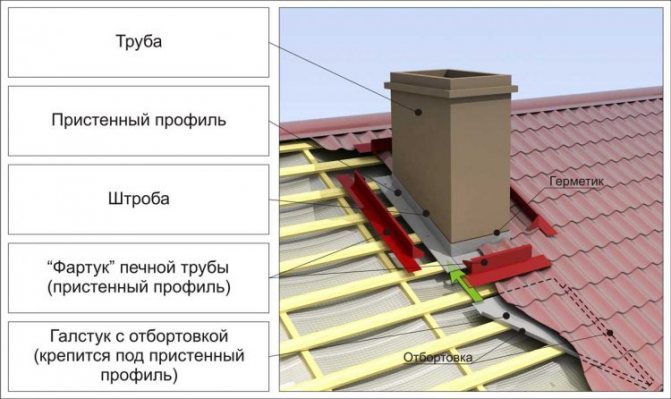
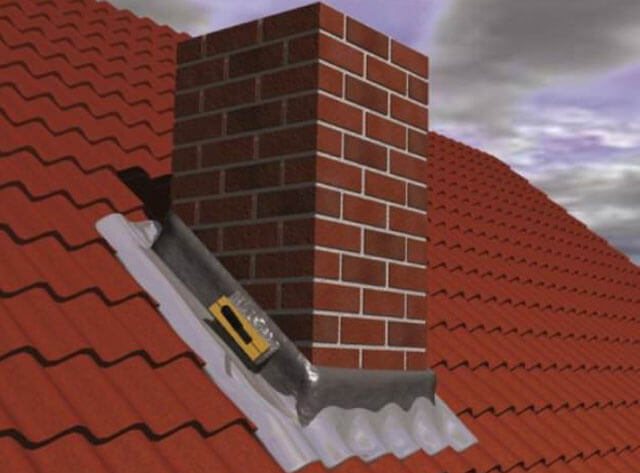
- For square or rectangular pipes, you can purchase or make your own metal apron, which is a corners made of galvanized metal, lead or aluminum tape. The figure clearly shows its forms. It is attached to the chimney and under the roofing material - corrugated board, slate or metal tile.
- The round chimney on the roof can be easily sealed with a rubber seal. It fits snugly to the circumference of a pipe of any diameter, and its base is attached with self-tapping screws to any roofing material.
- There are other materials for sealing the chimney, but less elegant and aesthetic, like the first two options. These include membrane tapes. They are glued to the pipe and the roof, preventing moisture from entering the roofing cake through the cracks.
- For better insulation from leaks, several insulating materials should be used at the same time.
Installing and finishing a chimney on a roof is not an easy and time consuming task. Only a foreman with experience and qualifications of a stove-maker can install a chimney in accordance with all the rules of the normative documentation of SNiP, fire safety and health care.
Fireproof insulation of the chimney
For this purpose, a wooden box is constructed between the pipe and the roof from the elements of the rafter system. The chimney must be located inside the duct at a distance of at least 15 cm from its walls.The space between the chimney and the duct walls is filled with a non-combustible material with low thermal conductivity (usually mineral wool).
Instead of a wooden one, you can make a welded box made of galvanized roofing steel, guided by the same principles.
The inner layers of the roof (vapor barrier, thermal insulation, waterproofing) at the pipe passage are cut and fixed with brackets or nails to the cross beams and rafters. The waterproofing layer is fixed around the roof passage with a frame. In this way, reliable insulation of the chimney from the combustible elements of the roof is ensured.
There are ready-made modular chimneys, the design of which provides for thermal insulation. The modules consist of a ceramic core, a layer of basalt wool and an outer casing made of lightweight concrete. The installation of a chimney from modular blocks is not complicated. First, an asbestos gasket is installed between the stove and the chimney, then a layer of mortar is applied to it, a module is placed and leveled. Each next modular block is fixed with a layer of mortar. After the construction of the modular chimney, it is necessary to isolate the chimney from leaks at the passage through the roof.
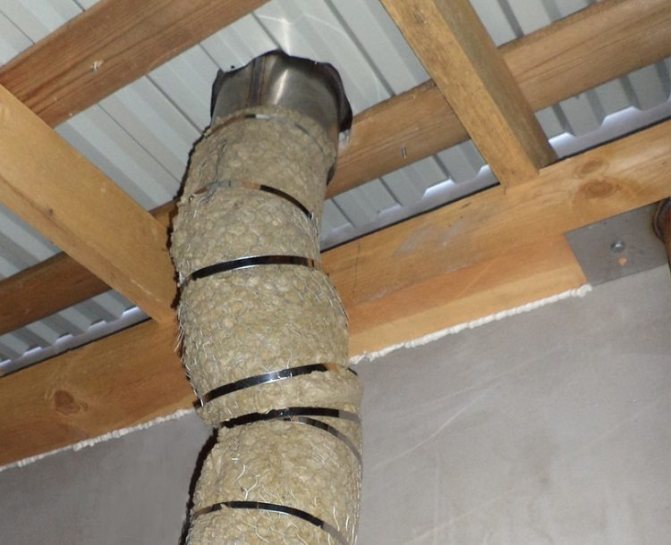
The next method of insulating chimneys is used mainly in the construction of baths. The metal chimney in the place of passage through the roof is wrapped in several layers of mineral wool and fixed with wire. Then the plaster is performed with a clay-sand mixture. The pipe prepared in this way is wrapped with a layer of galvanized roofing steel, fixed with self-tapping screws and the chimney is mounted on the roof.
Chimney finishing materials
The chimney lining will protect from all the negative influences to which the chimney is exposed, whether atmospheric or thermal. In addition, finishing with different materials will make it more attractive.
- Refractory bricks or tiles. Pipes lined in this way will be in harmony with any roofing material and, which is attractive, dirt is almost imperceptible on brick or tile. The material withstands temperature extremes well. All seams are covered with a special compound.
- Plastering of pipes. Acrylic, mineral or silicone is used, but the usual one can be used. The technique of applying plaster does not differ from the technique of filling the walls. The advantages of the material include availability, the ability to paint in any color, ease of application and versatility.
- Fiber-cement boards can easily cope with large temperature fluctuations, are resistant to sunlight and are environmentally friendly non-combustible material.
- The chimney on the roof can be finished with the same material as the roof itself, for example, corrugated board. In this case, for a fairly low cost, you can get an attractive-looking pipe.
Manufacturing of boxes
About how to insulate the iron chimney pipe, it was said earlier. Now you can move on to the next step. It seems to many that making a chimney box is too difficult a task. In reality, this is not the case. It is enough to approach work responsibly, competently.
Required tools:
- Drill;
- Metal scissors;
- Compass;
- Metal sheets;
- Self-tapping screws.
Stages of work:
- Hole preparation. Along the edges, it is necessary to fix the bars, which will act as a support for the body.
- Two blanks are cut from a metal sheet. They are given a U-shape. Then the finished parts are screwed to the ceiling with self-tapping screws.
- Again, two blanks are made, but they are already fixed on the standing sheets with a small overhang. It turns out a one-piece frame in the ceiling.
- Now the bottom for the box is made of metal sheet. In the center of the workpiece there should be a hole for the chimney, here you need a compass.
- The box contains four fasteners of two centimeters. They are cut and folded perpendicular to the bottom.
- Walls are attached to the bottom. Now a chimney is inserted into the box, it is additionally secured with clamps. The voids are filled with an insulating layer.
Installation of the box
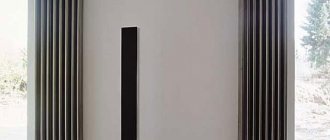
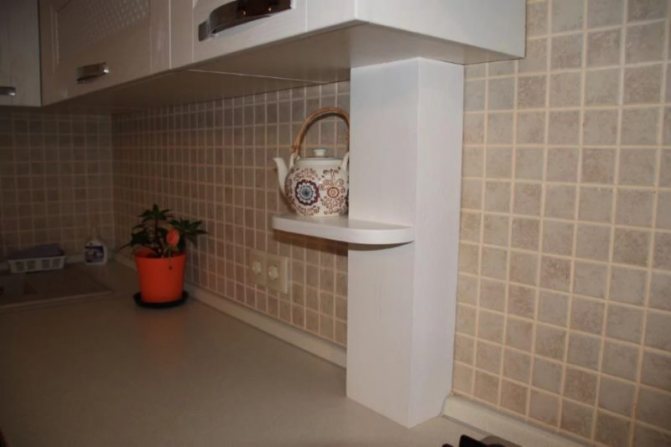
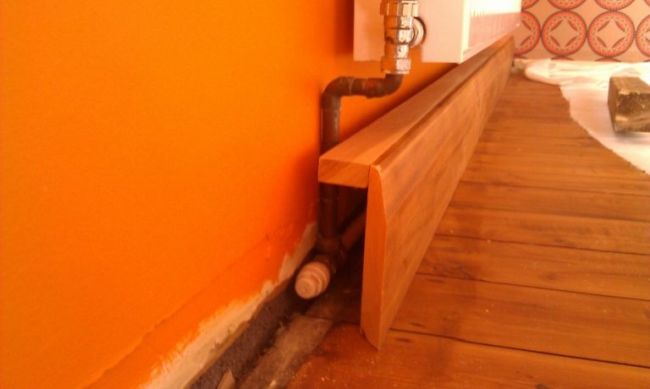
The pipes can be closed from prying eyes by installing a box (which, by the way, can also be decorated or painted later).
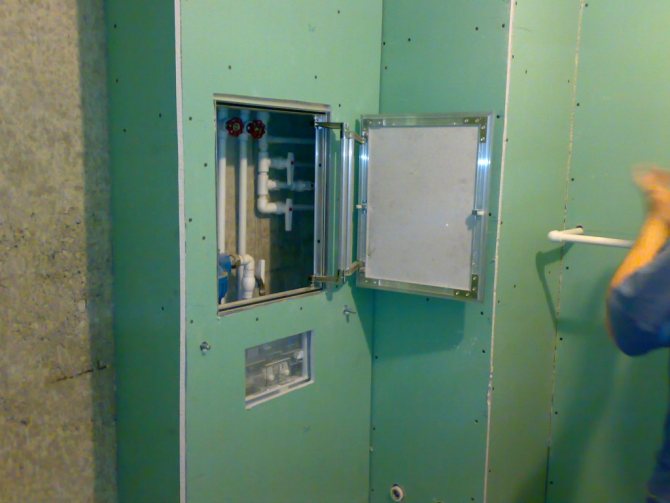
The most optimal material for making a box is wood. The wooden box can be attached directly to the wall. First, a frame is made and strengthened from slats, and then they are sheathed with panels. It is advisable to make one of the sides in the form of a door and hang it on hinges. This will make it easier to get to the pipe if service is needed.
Also, the box can be made of plastic or drywall. Installation of the box is advisable in children's rooms, especially if there is a temperature regulator on the pipe.
A box can close this space from prying eyes of children.
These are just a few options for how you can decorate pipes.
Various interior design ideas can be found on the website https://decor-p.ru/, and you can learn something new for yourself.
Chimney fixing
The workpiece must be taken to the roof through the attic. All gaps, especially the voids between the roof and the branch pipe, are filled with waterproofing. When withdrawing the workpiece, you must remember about safety precautions.
28a68763ca5396a3ddd85de429ee95d8.jpe

A knee is used to secure the chimney pipe. It is designed to adjust the vertical position of the structure. To give everything reliability, the pipe is additionally attached to the wall, using suitable brackets. Usually they are included in a ready-made set. They can also be made by hand, it is best to use metal corners as a basis for them.
Chimney lining and materials for it
The finishing work of the flue gas system is carried out before the roof is laid to avoid damage or contamination. There are enough cladding options to make the right choice. Usually the finish on the roof of the chimney depends on the material from which the structure itself is made.
This could be:
- Clinker tiles or bricks
- Plaster
- Fiber-cement boards
Consider the features of each material. Clinker brick is durable, resistant to temperature extremes and atmospheric precipitation. As a facing material, only solid bricks are used, the masonry of which is carried out on a special mortar. Grouting compounds are used to fill the joints.
We watch the video with what material to cover the chimney:
Clinker tiles are light, thin, and have excellent aesthetic properties. It is used for cladding high chimneys.
Plaster is a simple and cheap way of finishing, but with a limited service life. The screed is made of cement mortar, sometimes with the addition of lime. But such a cladding on top must have a decorative layer, for example, of silicone paint.
Small-format slabs are one of the most durable and resistant materials to aggressive environments. They have an attractive appearance and are non-flammable.
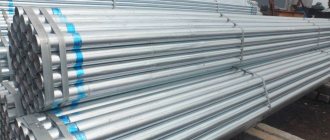
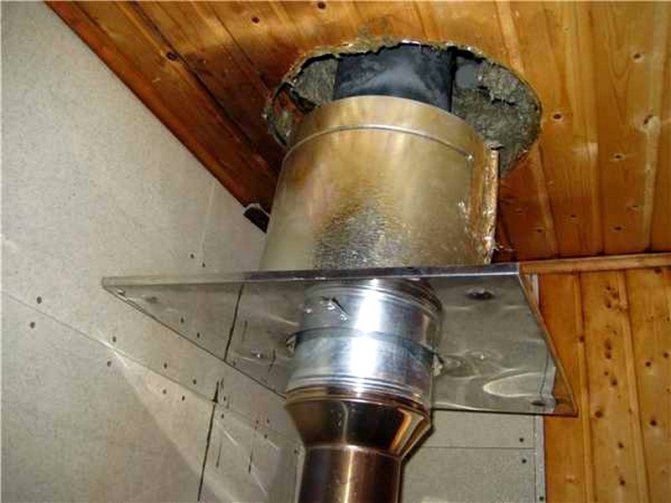
Replacing a brick pipe with a metal one
If the brick chimney is not enough, it can be further extended with a metal pipe. Time-consuming task, but quite realizable
It is important to approach her responsibly.
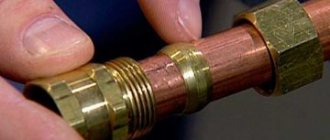
To begin with, a flat steel platform with a branch pipe is made. Moreover, its diameter should be the same as the diameter of the metal pipe that you plan to use. The platform must be securely fixed. It is fixed with dowels and screws. Sealing will add additional reliability.
Work order:
- On the brickwork, you need to mark the points at which the mount will be installed. They must not be placed on a masonry seam. It is advisable to place them closer to the center of the brick, and not on its edge.
- Holes are drilled in the marked places to accommodate the dowels. At the same points, holes are made on a flat platform, self-tapping screws will go there.
- A refractory sealant is applied to the brick base, then a steel platform is placed there. Self-tapping screws are screwed into the dowels
- It is important to monitor the tightness and uniformity.
- Now it remains to wait for the sealant to dry completely and go directly to lengthening the chimney using a metal pipe.
Important nuances of installation:
The decision on how to insulate a metal chimney pipe should be made based on the budget, as well as the needs of the structure.
It is important to approach the task as responsibly as possible, performing work in full compliance with all norms and nuances. Then the insulation of the chimney will last a long time without any complaints.
Brick chimney box
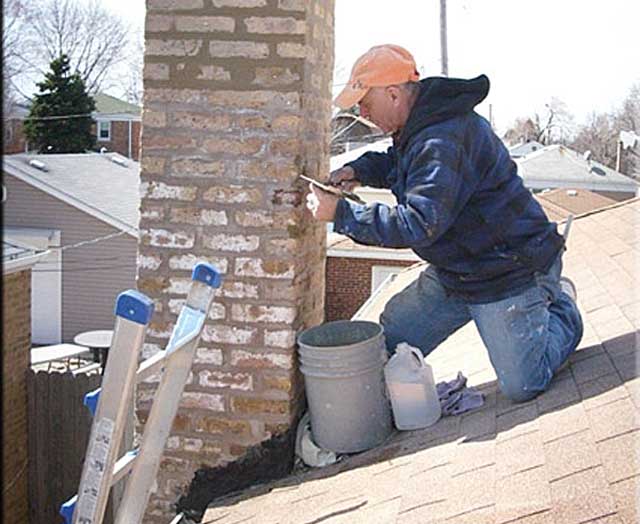
For a brick pipe, you can choose a standard galvanized steel cover or another option. For example, plaster a brick chimney over a heat insulator. Let's consider this process step by step:
- First, it is necessary to clean the brickwork of the pipe from dirt and dust.
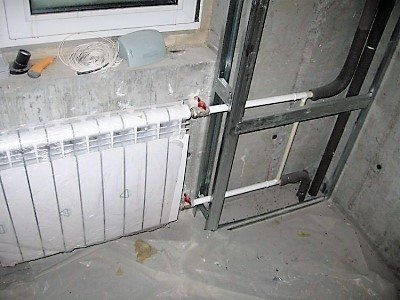
- Next, you need to install metal profiles on the chimney. For this, ordinary dowels are used. First of all, it is necessary to fix the upper and lower profiles, and then insert the racks into them. Racks are fixed with self-tapping screws.
- At the third stage, the installation of heat-insulating material is carried out. It must be placed between the grilles and fixed by means of special dowels with "skirts". The heat insulator must completely cover the surface of the brick chimney.
- Then the thermal insulation material must be covered with a vapor barrier material, which is represented by a special film.
- At this stage, it is necessary to fix the plaster mesh over the vapor barrier film. The mesh must adhere tightly to the surface, therefore it is recommended to use dowels with "skirts".
- The chimney is plastered with a pre-prepared cement mortar. It is necessary to apply the plaster in an even layer over the entire surface of the structure.
After the layer of plaster has dried, you can revet the chimney with decorative tiles or galvanized sheets.
For the box, you can use wooden, plywood panels, fiberboard or chipboard, but they must be protected from moisture by an outer coating
Fire insulation options for smoke exhaust systems
The insulation of the chimney is carried out in order to resist the heating of the adjacent materials. The passing part of the chimney through the ceiling or roof is placed in a box, the distance to it should be more than 10 cm. This free space is filled with refractory material with low thermal conductivity (basalt wool or fabric, asbestos fiber).
If the chimney has a prefabricated structure (steel, ceramic). then the set must necessarily include special elements that already have increased fire performance. Such modules are attached to the pipe, can have an additional reinforcing frame and a waterproofing apron for the roof. Sometimes round pipes are insulated with brickwork, for this they cut a window in the ceiling, brick it in one or several layers, the distance to the pipe is clogged with mineral wool.
The release of new building materials and the development of advanced technologies are a guarantee of effective thermal insulation. The choice of materials for this purpose is largely determined by the shape of the chimney, the way of wrapping the pipe that removes hot gaseous substances during fuel combustion.
The main difficulty is not to allow the materials adjacent to the chimney to heat up unnecessarily, so that they do not ignite in any type of building.
Most of the buildings in private households have a chimney coming from:
- solid fuel boiler;
- fireplace;
- ovens;
- cooking plates.
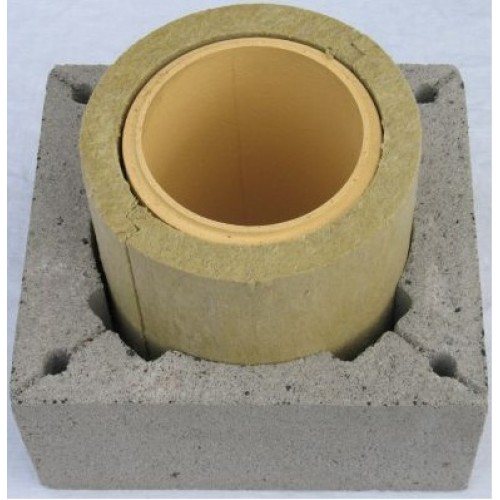
Ceramic chimney kit
Before insulating a pipe in a bathhouse or a residential building, you should choose the option most suitable for your design. The ceramic chimney is no less effective and durable; it is used for a fireplace or a bath. The assembly of the finished structure includes components made of fire-fighting materials. Some of them adjoin directly to the pipe or cover it, others are designed to seal the passage through the roof.
1af9b90d0956b0edcbe386ff1bdb0cc0.jpe

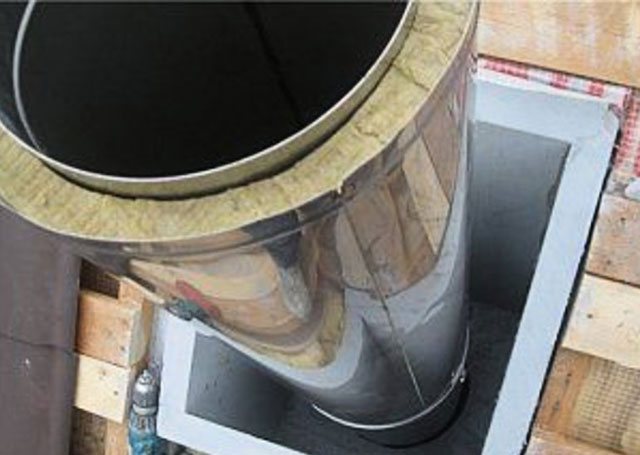
The separation of the chimney and the multilayer roofing cake (with insulation, hydro and vapor insulation) is carried out according to all modern standards:
for double metal pipes, internal insulation with mineral wool is provided; a single pipe is covered with a finished insulating shell of the required diameter and protected from the outside; in brickwork, it is important to increase the thickness of the walls of the order (38-40 cm) and protect the contact surfaces with special plaster.
The box for the outlet of the chimney is constructed from a cross beam and rafters, keeping the distance from the wooden structure to the metal chimney at least 15 cm. The gap between them is filled with basalt wool.
The membranes of the roofing cake cut at the exit of the pipe must be carefully cut and rolled up. Then they are pressed with a crate and fixed along the edges of the box with nails. For complete tightness of the roof, the pipe in this place must be wrapped with a special sealing tape.
When the chimney runs through an unheated attic, and not in a residential attic, the risk of overheating of the roofing elements is reduced. Complete tightness of insulation is necessary in any case, but it is better to additionally wrap the pipe with a special tape. Competent installation of the inner waterproofing and the outer cap will ensure reliable sealing after the thermal insulation of the chimney is installed in the opening of the roof covering.
Exiting the pipe through the roof
Chimney pipe finishing: options and work progress
The final finishing of the flue duct is closely related to the work on the insulation of the roof and the laying of the pipe through it.
Pipe passage through the roof
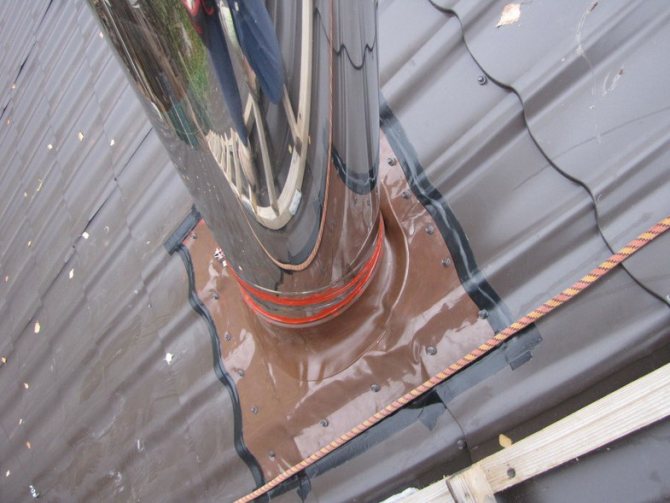
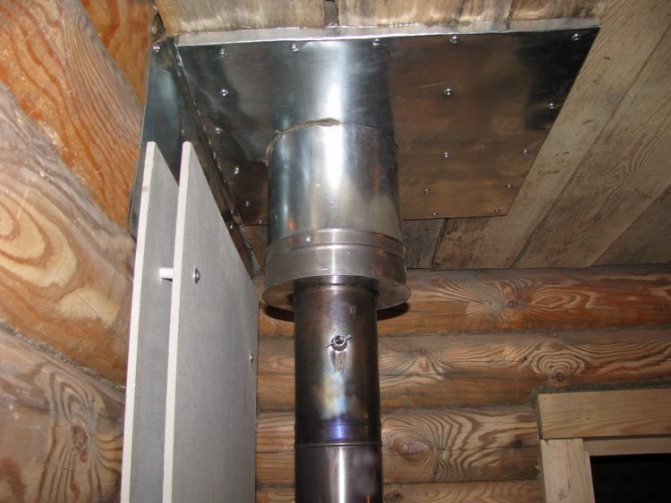
The outlet of the pipe to the roof depends on the modification of the pipe itself. The easiest way is to pull out a round metal sandwich pipe. No additional material is required for its insulation, since it has one layer of thermal protection inside the sandwich. Protective flanges can be purchased ready-made. They are flexible, making self-installation easy.
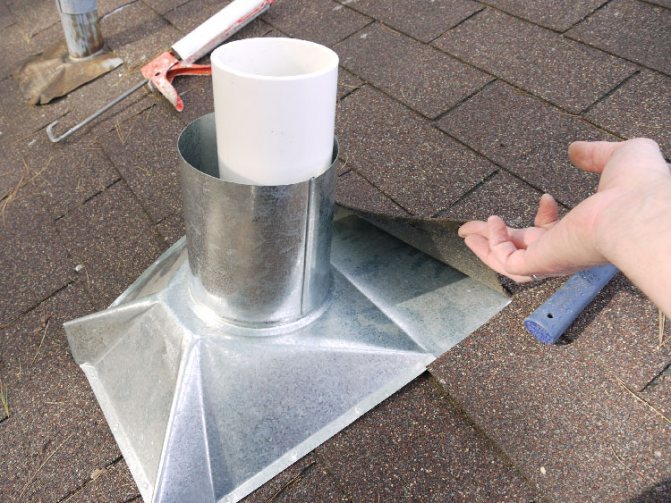
To remove the sandwich chimney through the roof, you should:
- Cut a hole for the pipe diameter. Why do we apply the markings from below and drill the contour marks. It is more convenient to cut from the side of the roof.
- Slide the inner protective flange onto the pipe. Install the structure. Lubricate the flange with a fireproof sealant, fix it with self-tapping screws to the roof from the attic side.
- Put a protective, flexible, tapered flange on the outside of the pipe. First, cut a hole in it, which is slightly smaller in diameter than the chimney. To make the tightening process go better, coat the flange and pipe with soapy foam.
- Coat the flange with sealant and fasten it with fastening screws over the roof.
It is somewhat more difficult to bring a classic chimney through the roof. For its wiring, you will need to purchase or build a protective box with a heat-insulating layer.
Algorithm for withdrawing a square pipe through the roof:
- In the roof and roofing pie, cut a hole 25 cm larger on all sides than the square of the pipe.
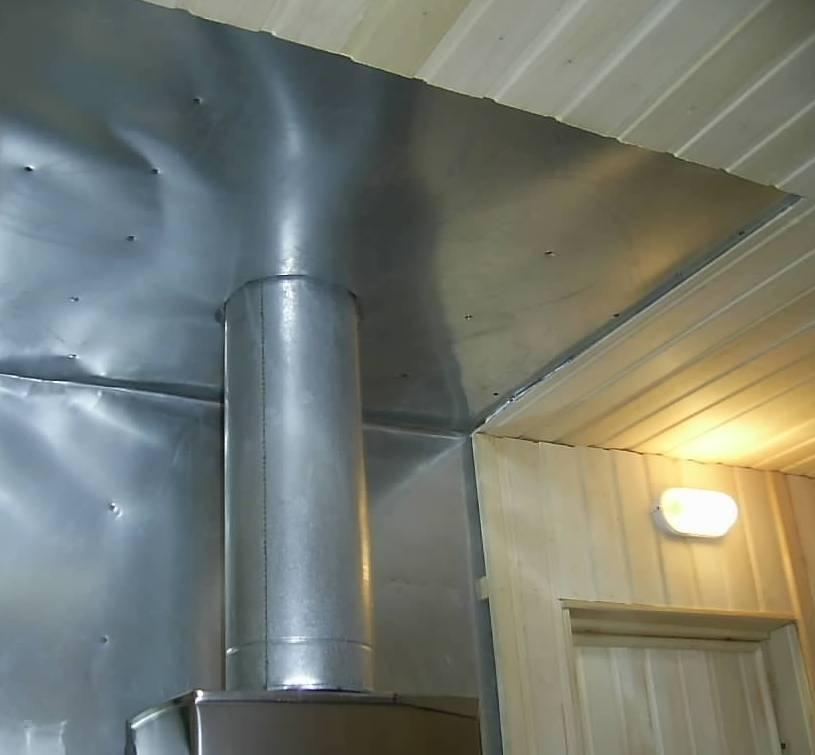
- Construct a protective box according to the size of the hole obtained. As a rule, galvanized sheet is used for the box. It is easy to work with it on your own, galvanized iron meets the requirements of building codes, you can buy it inexpensively.The resulting box should look like a box, in the center of which a pipe is inserted, and the remaining volume is filled with basalt wool.
- Install the box in the opening. Remove the pipe.
Related article: Types of roof sills
Then comes the most difficult and important stage in the construction of the chimney - finishing the pipe and sealing the roof.
Cladding options
Sealing a brick or plastered pipe:
- Disassemble the roof by 70 cm around the perimeter, remove a little more at the bottom. This is necessary for the construction of a protective inner apron and tie. A tie is an additional protective structure made of metal, which is made in the form of a long sheet with curved edges.

- At a low height from the roof, grind the pipe along the perimeter to a depth of 2-3 cm. It is convenient to do this with a grinder.
- Drive a metal wall profile into the recess, the end of which is lowered onto the roof.
- Fix the profile to the roof on all sides with self-tapping screws with protective washers.
- In the lower part, the wall profile is attached to a tie. The lower part of the tie is brought out over the roofing material.
- Lay and secure the roofing material.
- Mount the upper protective and decorative apron on top.
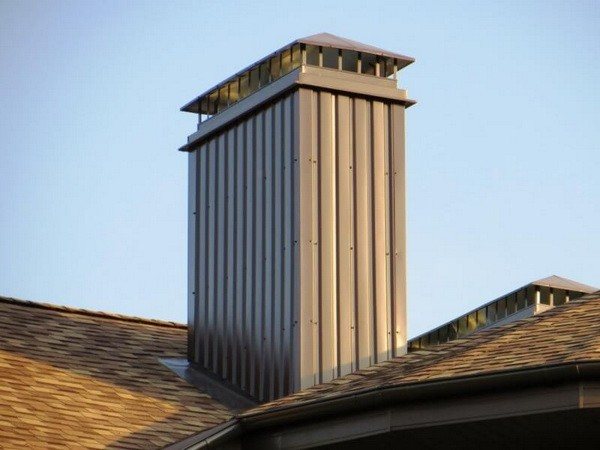
Facing with corrugated board is used to protect both brick, plastered pipes, and to decorate a sandwich chimney, if required by the architectural solution of the house.
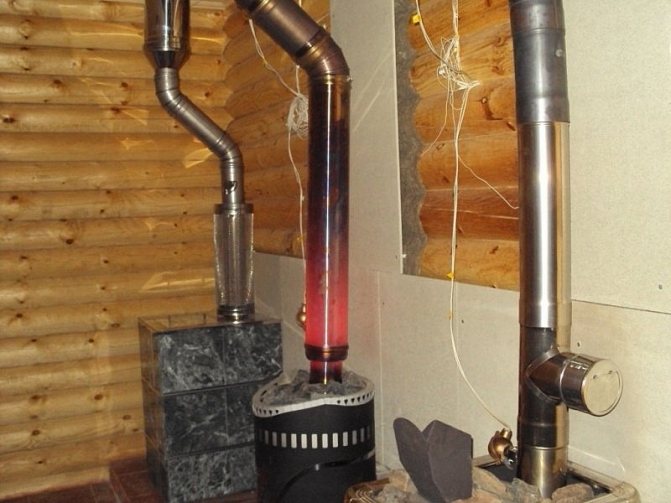
A common cladding option is a frame when pulling out a double sandwich pipe from two independent ovens (for example, a stove and a fireplace). In this case, one rectangular pipe, sewn up with siding, looks more presentable than two iron ones.
Algorithm for the installation of the frame finishing of the chimney pipe
- Mount a metal profile frame around the pipe. The size of the frame is the same as the hole made to lead the pipe through the roof.
- Place rectangles of mineral refractory wool between the pipe and the frame.
- Sew up the frame with corrugated board from all sides using special self-tapping screws with protective press washers.
Note! When installing a protective box for a double sandwich pipe, an internal insulating partition must be used.
What is the insulation of chimneys for?
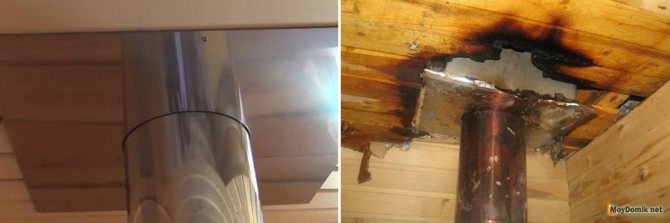
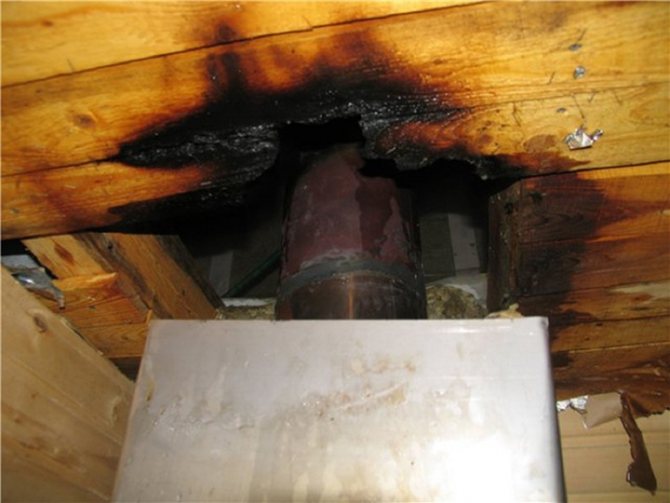
The flue gas system is constantly exposed to high temperatures. It is also influenced by chemically active substances and various external factors. As a result, the integrity of the chimney is under threat, the efficiency of its operation decreases, and the prerequisites for the shrinkage of the walls of the house appear.
Cracks or gaps on the surface can cause poor traction and possibly carbon monoxide poisoning. Soot fires are not uncommon.
In order to safely and efficiently operate the chimney, as well as extend its service life, several operations are necessary. One of them is chimney insulation.
It is recommended to insulate the chimney during the construction of the chimney, since it is more difficult to work with the finished chimney. This may require changes to the design of the roof slabs.
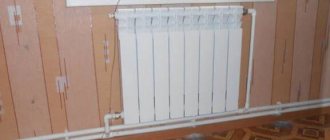
Methods for decorating heating pipes
Suppose that in your apartment there are old heating systems that are out of place heating pipes: the design of such objects can be limited only by your imagination and material capabilities. Let's list some of the simplest and most accessible ways for everyone to show their creative individuality:
- The simplest solution is to simply paint the protruding pipe in the color of the wall.
- Investing a little more - both labor and time - will require decoration.
- The most time consuming is, undoubtedly, the attempt to hide the pipes behind furniture or to build a simple structure specifically for this purpose.
You can make decorative boxes for heating pipes from any suitable material that will correspond to the design idea of decorating the room:
- drywall;
- wall panels made of polyvinyl chloride or MDF;
- laminate;
- parquet board on a slatted frame.
The most popular is drywall. This material allows you to create structures of various configurations. Read about the features of its installation in the article "How to hide heating pipes".
It is quite easy to decorate a plasterboard structure that hides the pipes by painting it, for example, in the color of the walls or by pasting wallpaper.
Bath chimney
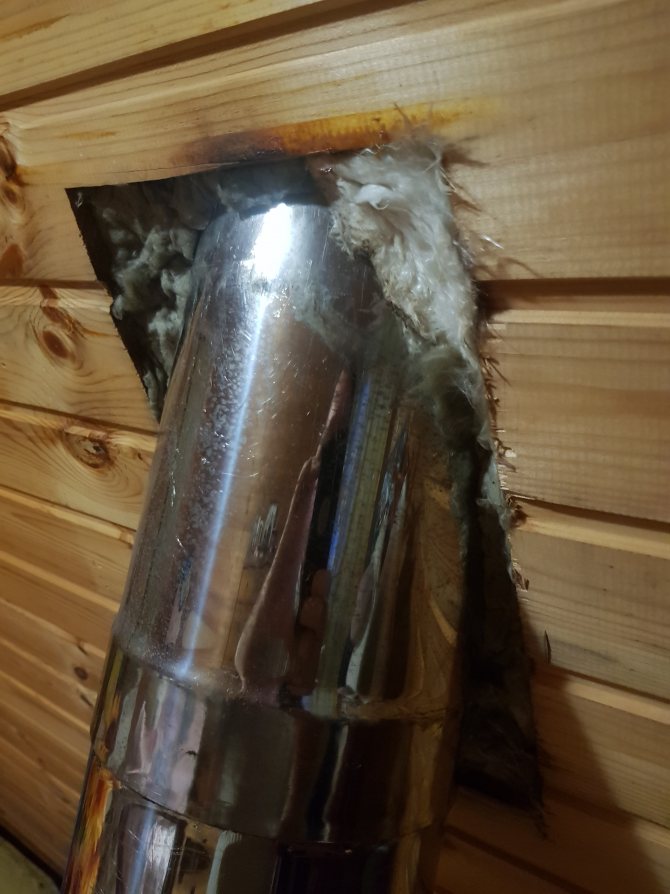
When performing the insulation of the chimney in the bath, the safety of people should be paramount. The main threat in the room comes from open flames. Therefore, it must be protected, having previously made the overlap resistant to high temperatures.
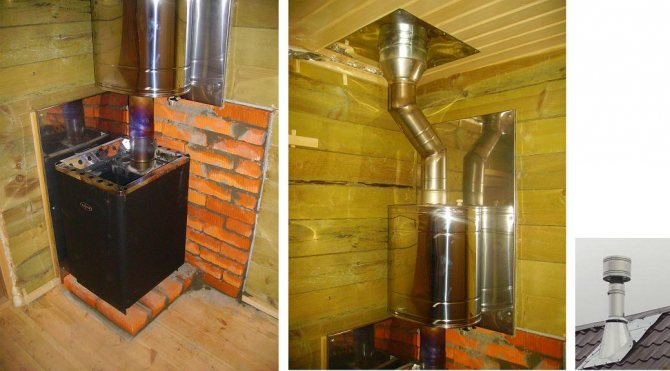
Basically, baths are built from wood, a flammable material. A very common misconception is the opinion that sheathing the ceiling with metal sheets will be a sufficient measure. But in reality, such protection is not enough. After all, the upholstery will still heat up, which can lead to ignition. A popular solution to the problem is to insulate the chimney with red bricks. But this is not suitable for every bath design.
There are now two good options for chimney insulation:
- Folgoizol. A bath with such insulation will not lose heat, everything works like a thermos. At the same time, it warms up quite quickly, maintaining the temperature for a long time.
- Thermal insulation. The material is used for winding the chimney.
A popular solution is the use of sandwich pipes, which show a high degree of safety. The insulation structure consists of several sections that can be easily combined with each other. This option is also suitable for saunas with a metal stove.
Chimney decoration - how to sheathe correctly
When performing finishing work, it is necessary to adhere to fire regulations. The gases escaping from chimney structures are at very high temperatures. It is imperative for all types of chimneys to provide sufficient draft force.
Related article: How to mount a drip on the roof
One of the main requirements for finishing chimneys is the use of exclusively non-combustible materials. Therefore, such a solution, how to sheathe a pipe on the roof with a metal profile, is considered the best. When the chimney is installed next to the ventilation ducts, it must be brought out above the common hood.
Today, stainless steel chimneys with internal thermal insulation have become widespread. They are allowed to be taken out on the roof without brickwork, using a metal apron.
The finishing methods for canals opening onto the roof are varied and largely depend on the preferences of the homeowners. The pipe can be sheathed with corrugated sheets, clinker bricks, fiber-cement slabs, lime-cement plaster, artificial or natural stone, a finished double-circuit structure. The last option is convenient and attractive.
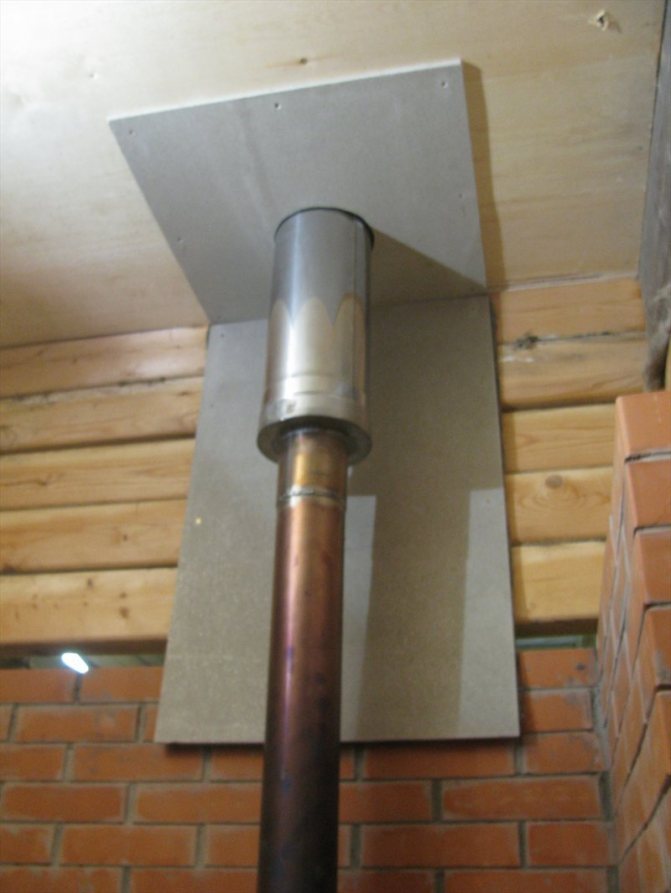
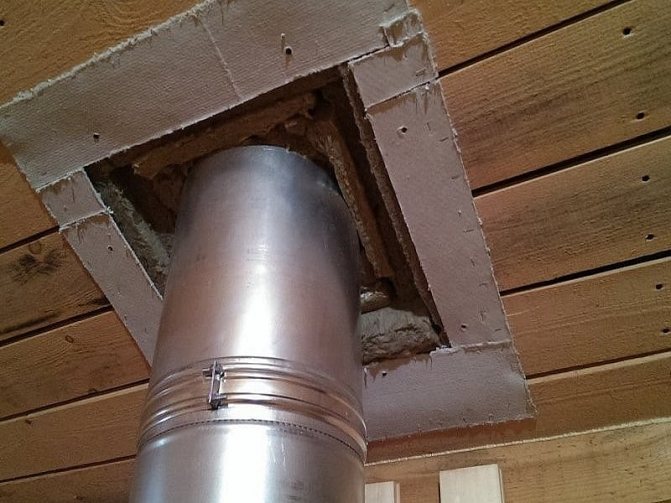
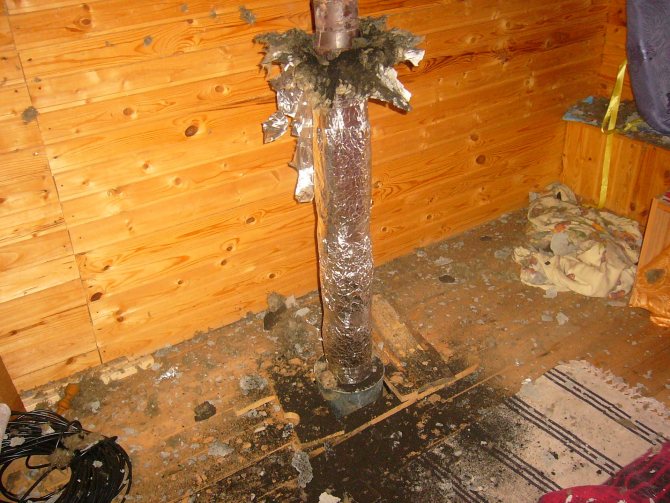
Preparing the site for the ceiling cut
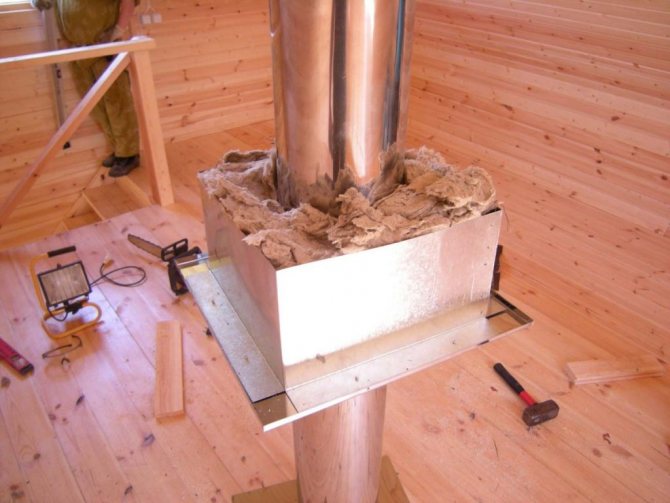
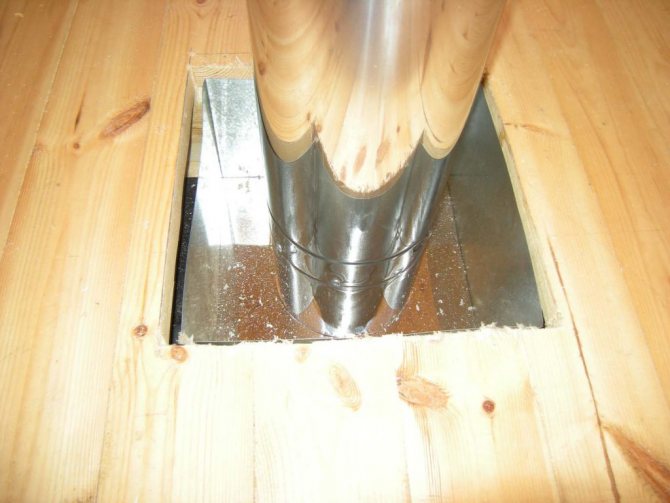
The center point at which the sandwich pipe will be held is found using a plumb line. The place that was chosen for the passage of the pipe is marked out, and then the hole is made. If it is done by hand, it is recommended to decorate it from the side of the steam room to preserve the aesthetics. To do this, you can use a sheet of stainless steel or galvanized. A sheet should be made in size that exceeds the size of the hole for the chimney.
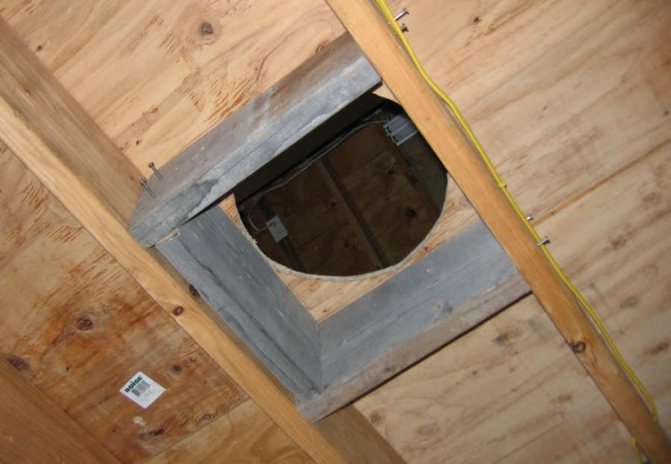
The chimney opening should be slightly wider than the pipe that will go through it
When preparing a site, it is worth paying attention to several important points:
- when installing a sandwich structure vertically, it is worth remembering that the holes are marked first at the top point, and then at the bottom points.That is, first of all, the markings must be carried out on the roof. When marking, it is imperative to use a plumb line to determine the center;
- when using production models of assemblies, it is recommended to carefully study the instructions, which usually indicate tips and preferences for installing a specific model of ceiling cut;
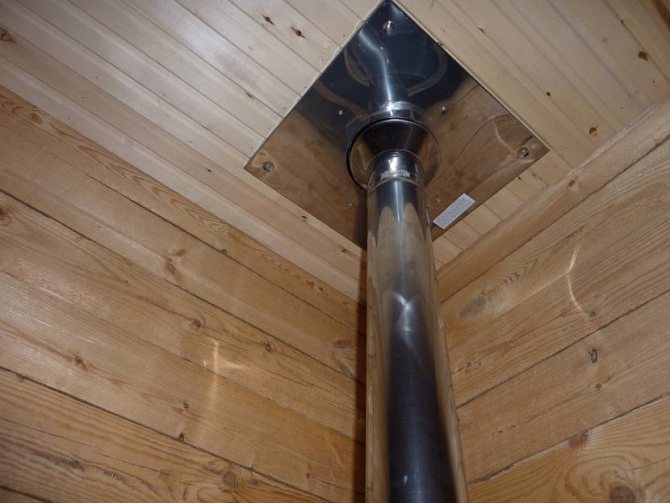
- do-it-yourself ceiling pass-through units for the chimney are made using stainless steel sheets. The hole in the sheet is made 1–2 mm larger than the sandwich pipe.
If the installation of the chimney will be carried out in an already finished building, then the necessary moment is to make changes to the design of the ceiling above the stove. Part of the beam (closest to the chimney) is cut out and reinforced with special bridges.
ebc073ba284c8310266528b9c80702f6.jpe

Possible materials for lining chimneys
What materials can be used for cladding? The easiest way is of course facing brick
- or an Italian, or our domestic. This is rather commonplace, and therefore I will suggest more interesting materials for lining chimneys than just brick. It has one drawback - you cannot insulate it, and if you do insulate it, then it makes no sense to spend money on expensive brick if it will not be visible.
The next possible material is colored tin
, using which you can save. Chimney finishing will be cheaper. We lay out a chimney from a simple domestic brick. If you do not insulate it, then they just bend out of tin
2 U-shaped parts
and are attached to the pipe with a dowel key. This is the roofer's job as it is done on the roof. But if you think you can do it yourself, then this article is for you.
Material and tools:
- Bar 40x30.
- Hammer drill + drill for 6 and 8 mm.
- Amoshki 6x80 mm.
- Press washers in the color of the gesture or roofing screws, also in the color.
- Mineral wool for insulation.
- Screwdriver with three bits of roofing and a hexagon for amoshku.
- Mushrooms for attaching mineral wool.
Cladding and insulation
The first thing to take care of when doing roof work is safety. Having provided insurance for the person working on the roof, you can proceed with the installation:
- We fasten the bars on the sides with the help of amoshek, checking the vertical with a level on each side - at least two beams.
If the sides are wide, we make three beams and calculate in advance the joints of the tin. We also fix the timber there. - We put mineral wool
, drill holes, insert the fungus and wedge. - We fix the mineral wool on the side along the entire chimney with mushrooms.
- Next stage. We put already pre-bent sheet metal on one side, fasten approximately 2-3 press washers per bar
and also the second part of the tin. We fasten their joints with press washers. - Close the top end angle
the same color, or you can choose a different color - it will look good too.
Advice: for such work as lining chimneys, pay attention to the valley - this is hidden gutters for water drainage
, are mainly used on chimneys and inside roof corners. Do not damage them, the chimney lining should always lie on the valley, and not under it.
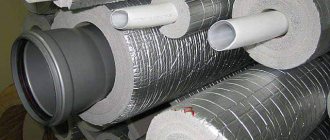
Insulation materials for bath pipes
Moisture and smoke generated during fuel combustion are aggressive factors affecting a brick chimney. The temperature difference in the cold season and the accumulated moisture deposited on the walls fills the microcracks with water, and the stone structure collapses from the inside. Small ice crystals crush from the inside and destroy it.
This is eliminated by the insulated chimney. In the process of combustion, condensate forms on the surface of the flue, which contains a chemical series of oxides. Interacting, the elements form weak acids (carbonic, sulfuric, etc.) that can destroy the metal surface. It is for this reason that the chimney must be insulated.
The main question of the owners of country houses with an autonomous heating system is how to insulate the chimney. In order to reliably insulate the outlets for the furnace or boiler, materials with a high degree of thermal insulation are used to ensure the heat balance of the chimney on the roof.
Relevant for insulating a chimney with mineral wool or basalt. Insulation is obtained from a molten volcanic rock - gabbo-basalt. It is converted into fibers, so that the insulating material has the following advantages:
- retains up to 95% of heat;
- characterized by good vapor permeability;
- differs in chemical and corrosion resistance;
- prevents the growth of fungus and mold on the surface of the chimney on the roof;
- vibration and heat resistant;
- made of ecological materials;
- does not undergo destruction under the influence of ultraviolet radiation.
Metal "armor" in the form of a pipe made of stainless steel is used as an option for insulation. It is able to provide full protection against mechanical damage, moisture and other aggressive factors. The chimney cover is mounted on a pipe on the roof. The space between the pipes is filled with basalt wool, the outside is covered with insulation, 5 cm thick. An asbestos chimney can be wrapped with this insulation.
Wood shields
Wooden shields are considered one of the simplest options for insulating a chimney. Thermal insulation is made in the form of a timber frame made of plates of the appropriate size. On top of it, slate or other flooring is fixed, from which the roof of the dwelling is made. After the pipe is completely covered with wood, the empty cavity is filled with felt, slag, sand, mineral wool. Frame seams must be covered with a waterproofing compound.
Insulation of a chimney in a private house using iron and slag concrete slabs provides the smallest distance between the joints on the structure. The space inside and the corners are reinforced with mesh or wire, gypsum, clay and sand are poured in the form of a solution. Plaster is applied over the tile insulation.
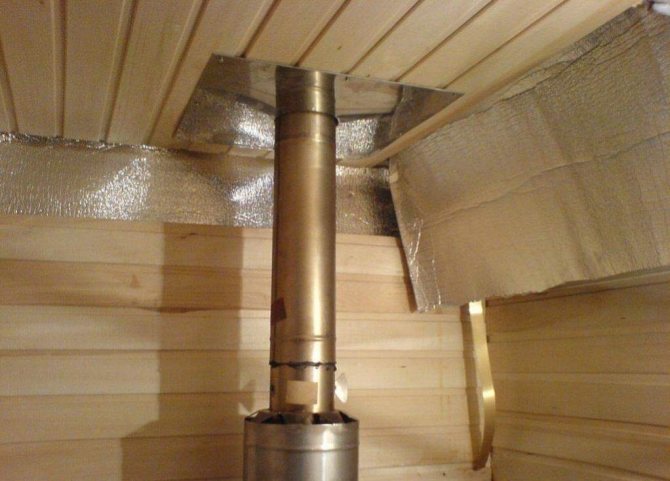
Since bath buildings are often built of wood, these objects need to be insulated for chimneys, stoves, ceilings, walls, since this material is highly flammable. You need to think about how to secure the pipe in the bath, making the thermal insulation of the smoke exhaust structure so that it cools down more slowly and condensation does not collect on it.
When solving the problem of how to wrap a metal chimney pipe in a bath, experts distinguish foil insulation and thermal insulation.
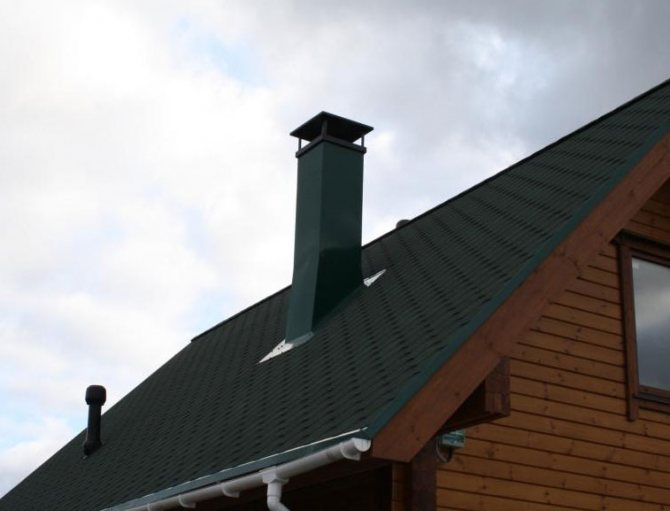
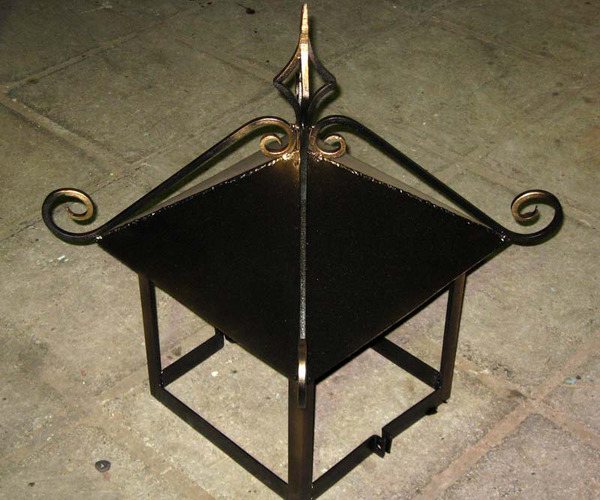
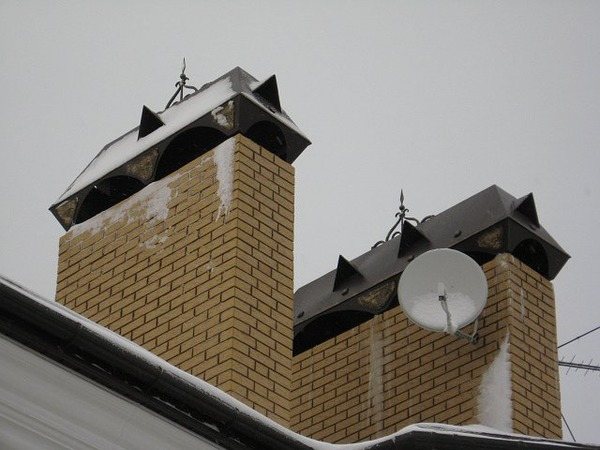
Types of hoods (weather vans) for brick and metal chimneys, photo
As a rule, forged smokestacks are piece products, made according to the personal wishes and sketches of the customers. Thanks to this, they are exclusive and original business cards of private houses.
The main purpose of the chimney, which is also often called a weather vane, is to close the pipe from precipitation, foreign objects: leaves, debris, and also birds. Such a hood can be installed not only on the chimney, but also on the gas duct, ventilation outlet. In addition, this decorative element is capable of decorate the architecture of the building, make it exclusive and original.
For your information. Some of the chimney designs enhance traction.
Of everything exists several types of chimneys... Some products look like a house with a roof, others look like an umbrella. Also manufacturers offer caps with round or flat top.
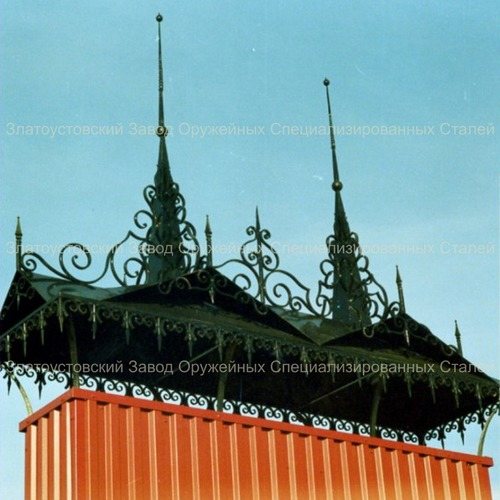
Forged rectangular chimney with a complex roof. Photo Art workshop Zlatoust
Chimney caps are one- or two-tier... Each individual option has its own advantages. It is recommended to install single-tier products on roofs with good traction. It is customary for two-tier ones to be mounted on chimneys with low draft resistance.
Important... Wind vane and chimney hoods are suitable for roofs with any metal coating.
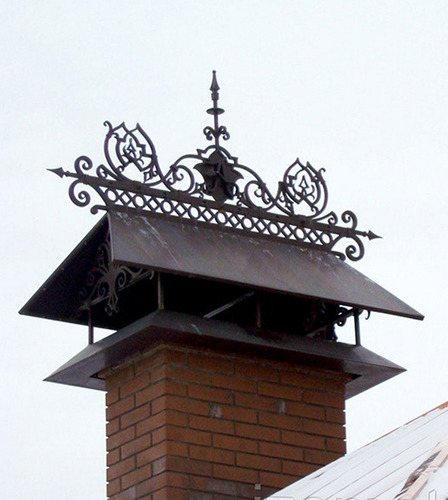
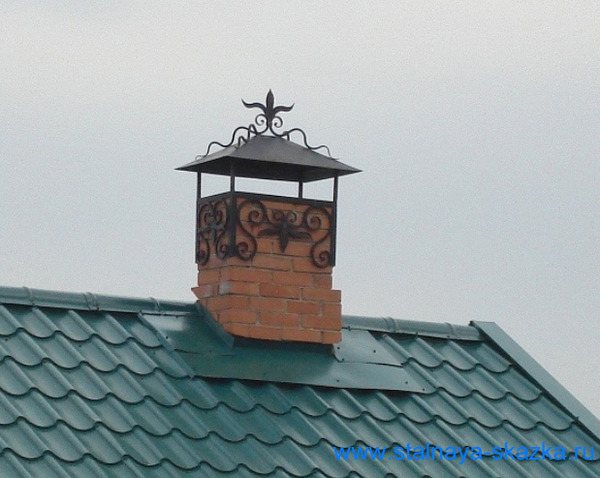
With a weather vane
Often with the help of artistic forging, masters of their craft make chimneys with weather vane... With this approach, the chimney becomes not only an important element performing protective functions, but also the main decoration of the architectural solution.
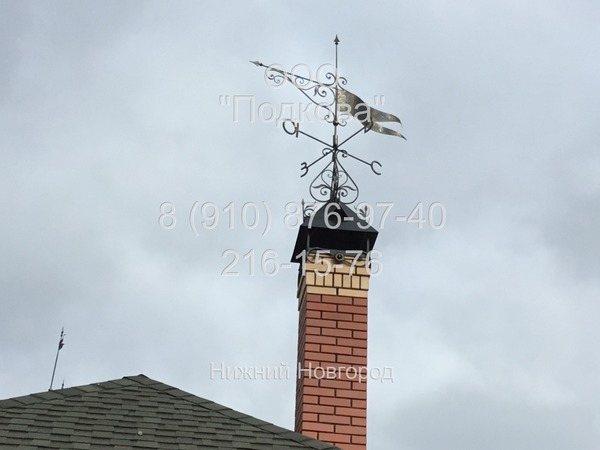
Forged chimney with a weather vane. Photos Horseshoe-NN
What is a weather vane? This is a decorative element made in the form of funny figurines. Previously, the products were installed on almost all roofs, they helped to determine which side the wind was blowing from.
Nowadays, this type of decoration is an exception; it can be found in luxurious country houses with interesting landscape design. Installing a chimney with a weather vane gives the house a special uniqueness... This design can be both rotary (indicate the direction of the wind) and stationary.
Roof shapes
In total, there are several types of forged chimney roofs:
- flat;
- gable;
- vaulted;
- tent;
- steeple-shaped;
- hip.
The shape of the chimney roof does not affect its functionality, but serves only for aesthetic purposes. The most interesting design is possessed by products with a steeple roof... This non-standard configuration draws attention to the architecture of the building.
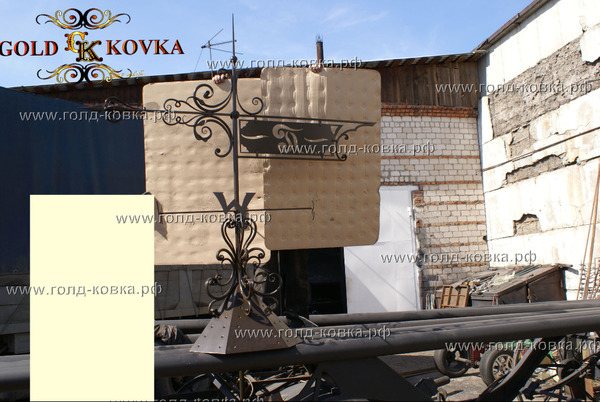
Forged chimney with a steeple-shaped roof. Photo Gold-Kovka
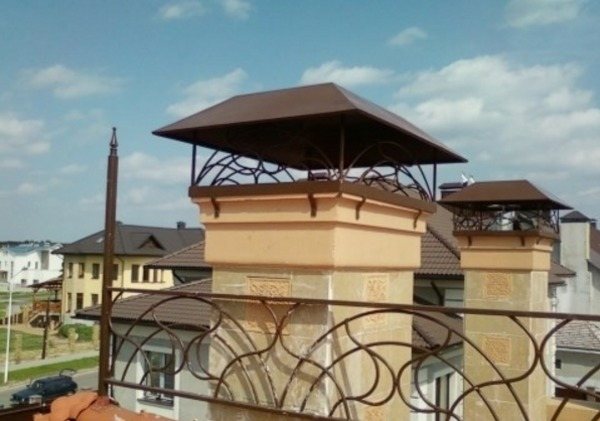
Semicircular (vaulted) products are in great demand in our country. They have high aerodynamic properties and prevent precipitation from entering the pipe. These wind vans are ideal for rectangular pipes.
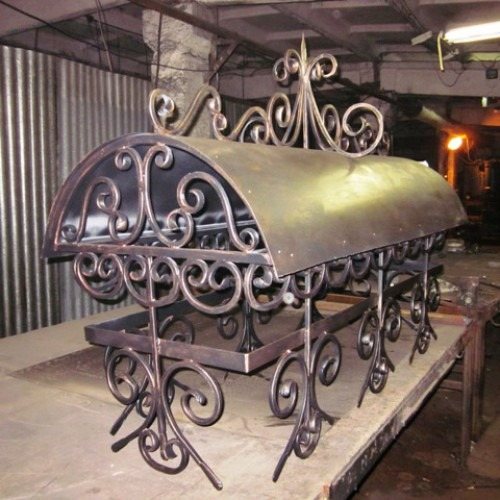
Forged chimney with a semicircular roof. Photo by Profizba
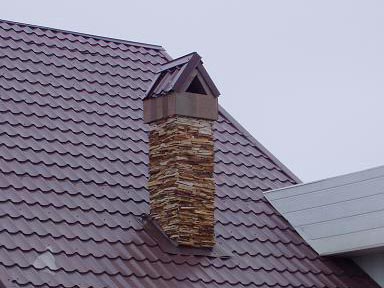
The hipped roof is a more complex structure, reminiscent of a hipped roof. This form provides excellent protection from snow. Such caps are most often used for rectangular brick pipes. You can supplement the chimney with a weather vane in the form of an animal.
Forged chimney with a hipped roof. Bulat Photos
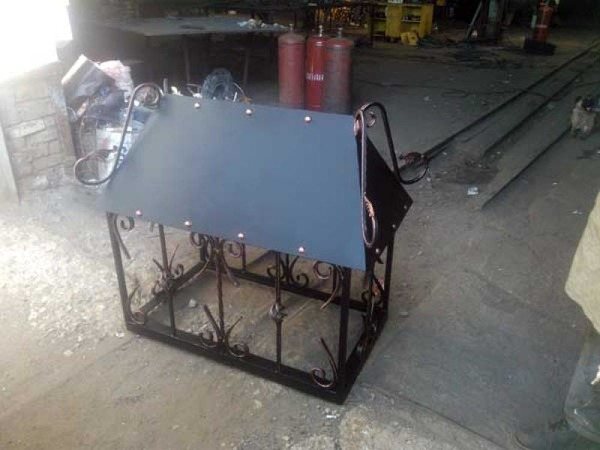
Dual slope design prevents the accumulation of large amounts of snow.
Forged chimney with a gable roof. Photo Gold Label
Chimney flat shapes are mounted on the roof of the building and are suitable for the direction of minimalism. But since in such a design there is completely no slope, snow accumulates on the chimney.
Forged trapezoidal chimney with a flat roof. Kovanka Photos
Hip roof is a kind of four-slope design: two slopes are triangular in shape, extending from the ridge to the cornice, the other two are trapezoidal.
Forged chimney with a hip roof. Photo Factory of art forging
Product shape
As for the shapes of chimneys, the most common are rectangular (elongated) and square products... Their shape depends on the section of the chimney.
Forged chimneys of rectangular (elongated) shape. Photos Makarovskaya Smithy
A weather vane with forged elements of a rectangular or square shape will be distinguished by its strength, reliability and resistance to negative factors.
Forged smokestack of square shape. Photo Steel tale
Insulation of asbestos-cement pipes
To complete the entire cycle of work, you will need to perform several operations:
- we clean off the remnants of the solution, dirt, paint from the surfaces; we assemble the finished steel protective device (casing), which consists of several parts and is put on the pipeline as a simple clamp of 2 parts; put on the first part and fill the inner space with a layer of thermal insulation; Example of thermal insulation, install the following sections of the chimney , the work is carried out according to a similar scheme; at a certain distance, the pipes are fixed to the wall with self-tapping screws with dowels; after going to the roof and before installing the protective visor, it is necessary to close the inner space between the steel lining and the asbestos-cement pipe.
Slate pipe finishing: stages of work
The lining of the chimney on the roof is necessary not only for better preservation of the chimney structure, but also as a decorative finish, therefore it is customary to make it from the materials most suitable for the roof covering. One of the most durable, durable, and also very aesthetic is the stanz.
Its color depends on the deposit and may be:
- Purple
- Green
- Graphite
It can be in the form of tiles or panels. Fastening of the slate is possible using copper nails with a wide head with a diameter of 2.5 mm and a length of 40 mm.
When performing work, it should be borne in mind that with temperature drops, deformation of materials is possible. Therefore, the nails are not nailed to the end; a small gap must be left between the head and the tile.
The installation of the tiles is carried out on the crate, the beams are fixed at the corners of the chimney, and if it is more than 60 cm wide, one more additional beam will be required.
Finishing the chimney on the roof is carried out in several stages:
- The extreme guides are set according to their level, the rope is pulled (top, bottom and middle - at a height of more than 2 m), and then intermediate bars are set
- If necessary, the smoke channel is insulated
- Plywood sheets are laid on the guides
- Tiles are laid (installation is carried out in such a way that one overlaps the other within 1.2, and the angle is not less than 22 °
There are several ways to lay slate, from standard rectangular to fish scale. They are selected taking into account the pattern of the roofing.
The simplest and cheapest way of cladding is to cover the surface of the smoke channel with a cement compound. But such a cladding has an unpresentable look and, moreover, is short-lived. Therefore, it is recommended to apply marble or Venetian plaster on top of it.
The first is performed on a previously primed surface. To do this, the dry mixture is diluted in a bucket with water in the proportions indicated on the package. Please note that it is usually sold in white, and a color scheme is added to obtain a colored finish.
The diluted composition is applied in a thin layer and left to dry, and then cleaned with a steel brush. Next, a second layer is applied - if necessary, but experts recommend still limiting yourself to one. The final touch is the surface treatment with a sander and grout with an iron trowel.
Unlike marble plaster, Venetian plaster is considered an expensive pleasure, but it looks amazing. Moreover, if you do everything yourself, then you can save a certain amount of money.
It is also sold in bags, has a white color and is diluted with water for application with the addition of color. It is applied with a spatula or trowel. But to obtain a high-quality coating from Venetian plaster, the use of forced drying technology with a construction hairdryer is required. The cracks that appear are treated with paint or varnish and, after drying, are polished with a grinder.
Wild stone as a facing material
Another option for finishing the chimney can be the use of natural materials. In this role, the wild stone has proven itself well. It is laid on cement using a plaster mesh fixed to the surface for adhesion rigidity. Seams are sealed with cement with the addition of color.
And the last stage of work related to the arrangement of the exhaust gas removal system is the finishing of the chimney inside the house. It can be made of various materials, the choice of which depends on the interior of the room.
The importance of chimney finishing
In this article, we have covered the assembly, insulation and lining of a combustion product removal system. Each of these steps is mandatory for the efficient operation of heating equipment, but can be performed using different materials. Which one is the best is up to you.After all, it depends both on the design features of the chimney and on the architectural style of the entire building.
Temperature fluctuations and weather are the main enemies of your chimneys. During combustion, condensation forms in the chimney, because the temperature of the chimney during operation is higher than the air temperature. Such condensate contains rather harmful impurities. In addition to water particles, acids and combustion products at subzero temperatures eventually lead to the failure of chimneys. And usually this happens during the most active time of their use - in autumn or winter, and repairs will be very difficult and expensive.
In winter and in rainy weather, all work on the roof of the house with a slope more than 15% prohibited
on safety (safety). The exception is
Emergency
(emergency): the work is carried out with many safety net, and the cost of such work is very high. Therefore, so that such situations do not arise, I will tell you several ways how to avoid this and not only protect your chimney from all troubles, but also refine it to the envy of others and to your delight! To solve this problem, the chimney is lined on the roof and inside the house. The choice of the option is made taking into account the overall finish of the house.
Heating pipes decor: sockets, screens and other solutions
The climate of our country is such that we simply cannot survive without heating in the long winter. But risers and pipes, and even radiators - do not always serve as an interior decoration, but often simply disfigure the situation. Most often this can be said about houses that were built several decades ago: no one really thought about attractiveness, everything was subject to rationality. But today there are many ways to solve the problem: from purely decorative to "decorative and construction".
Several original ideas
There are a number of design tricks that can be used to decorate heating risers. For many, they can probably be useful when solving the problem of hiding pipes or giving them a more aesthetic look.
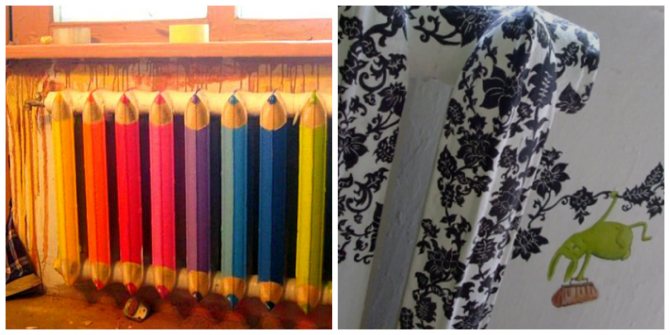
Dyeing
Painting with paint is most expensive and most affordable for many owners, the option of decorating heating pipes. Below we will give a few examples of ready-made solutions.
You can try to transform the element in question into parts of the interior, for example, a children's room.
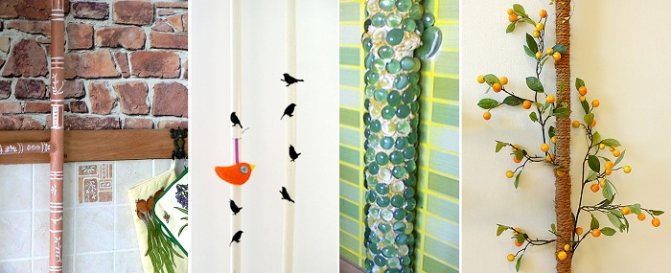
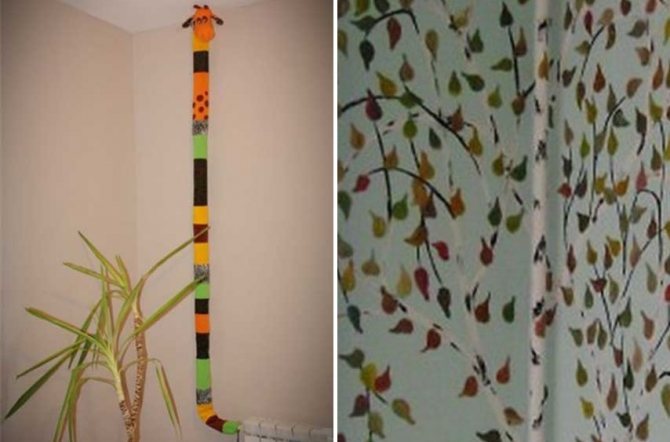
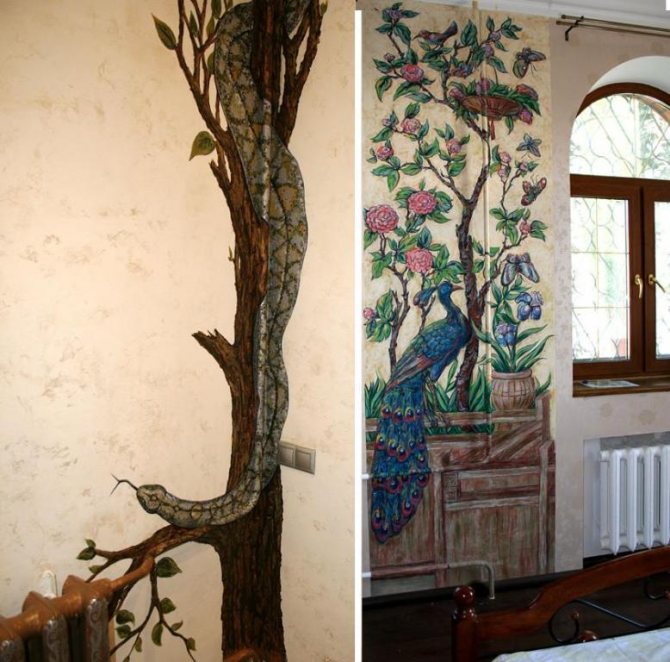
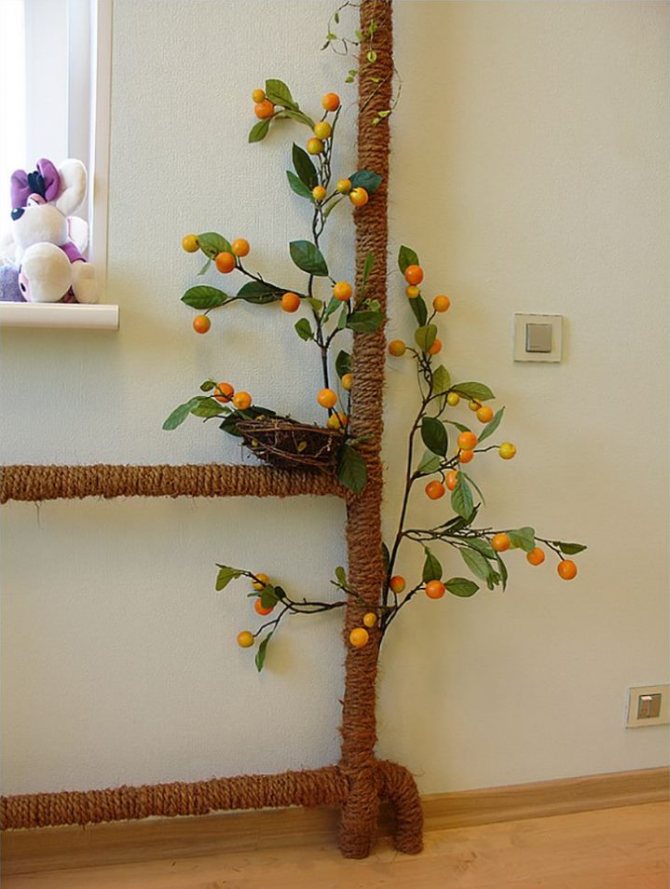
If you refuse to use the traditional white color, which is habitually used by many owners to paint pipes, then the vertical structure can turn into a tree. Wall painting can begin from it. To do this, it is enough to draw branches on them. Even a person who does not have drawing skills can cope with the performance of such work. And, having created branches on a tree, you cannot do without leaves, which are also worth drawing. It is unlikely that anyone will have a problem with this.
To the business of creating leaves on such a tree you can attract your childwho will gladly help you in this exciting business. It is quite simple to interest him in this activity, especially if, depending on the season, the leaves on this tree are changed. By decorating pipes for the season, you will get the opportunity to create an interesting game for your child in which he will learn accuracy and develop his observation skills, as well as love for nature.
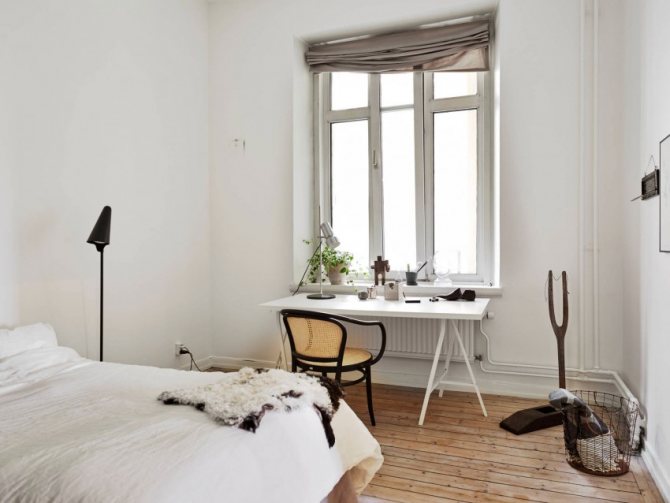
In the bedroom and living room, you can use a different approach in the design of heating pipes.
Here, when dyeing, it is best to opt for a noble golden color, or you can use a more silver one. Bronze is also quite appropriate here. The main point is that the chosen shade should be combined with the style of the room. When choosing the color of the paint with which the heating risers in the room will be painted over, it is necessary focus mainly on colorsdominating in furniture and window fittings.
Decorating
When designing heating pipes, you can not limit your imagination and use one of the ideas proposed by designers:
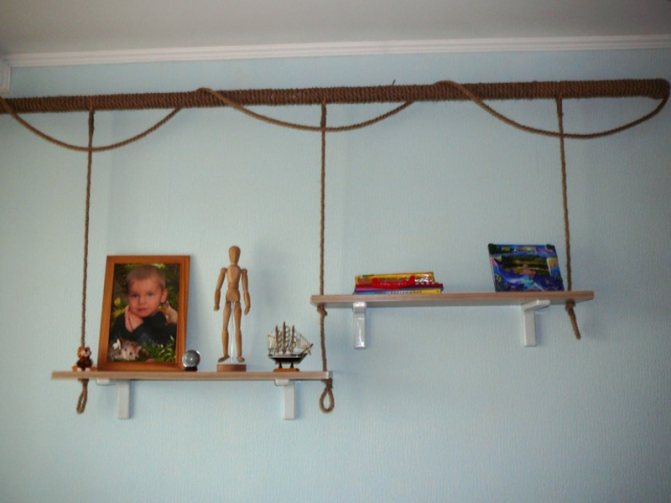
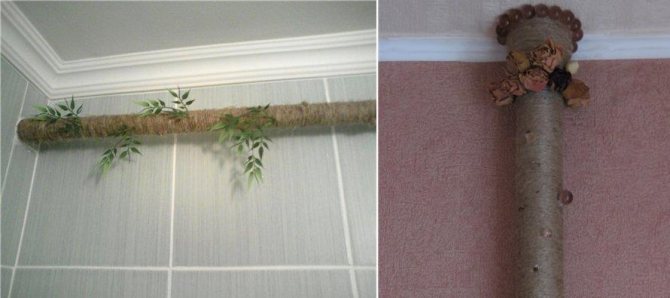
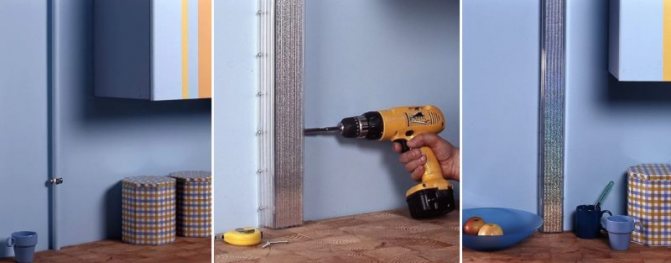
- wrapping a pipe with a rope is a rather original technique for decorating it. But you need to close it not with an ordinary rope, but with a hemp or jute cord. If you are not worried about the fact that the heat transfer of pipes from such a design will decrease, then you can consider this option;
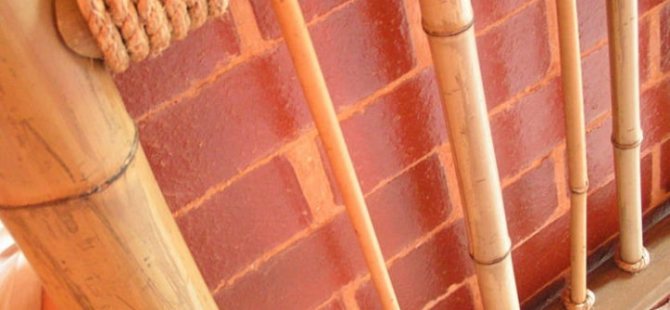
- Another equally interesting option is the use of bamboo trunks. The halves attached to the pipe are then glued together. As a result the original case is obtained from natural material, which perfectly decorates the vertical heating pipe. If you close the pipe not with bamboo, but with artificial flowers, then such an unusual decoration will be noticed not only by your family, but also by guests who come to you;
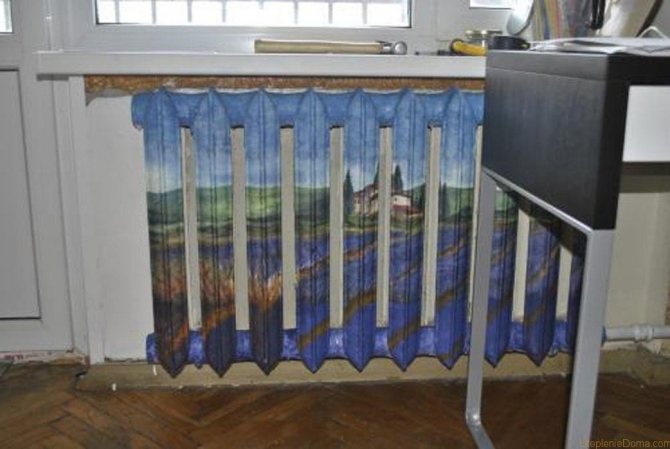
- if in some rooms of your apartment the pipes extend to the floor, then their decoration can be done with the help of decorative overlays. You just need to choose the right color and texture, and the image will be complete;
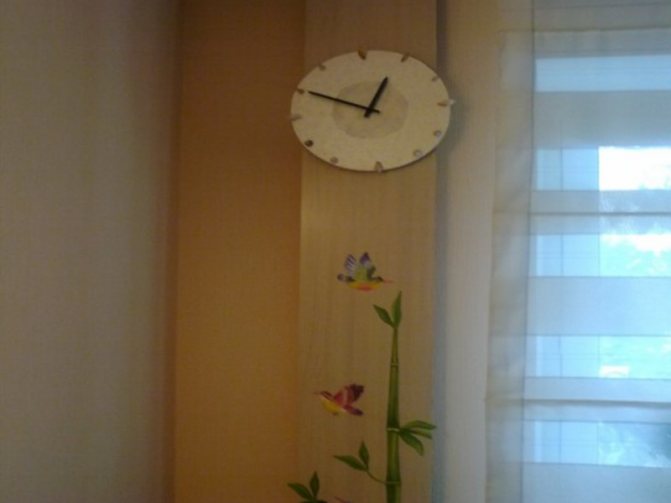
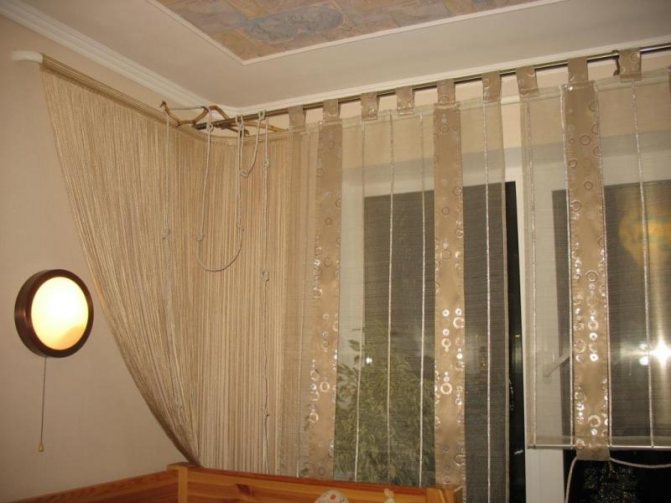
- To decorate pipes in an apartment you can use fabric draperysimilar to curtains. This solution will create a certain charm in your apartment.
Stained glass
Stained glass was previously a fairly fashionable way to decorate dwellings. Nowadays, it returns again and becomes the favorite method of designers. You can also think about how to use it to decorate pipes. By creating a partition with stained-glass elements in the corner of the room, in which the heating pipes are located, it will be transformed and will look quite elegant. Having made a choice in favor of stained-glass windows, you need to think about the lighting of the created composition. In this case, the stained-glass window will not only decorate the room, but also act as a night lightcreating an atmosphere of romance in the room.
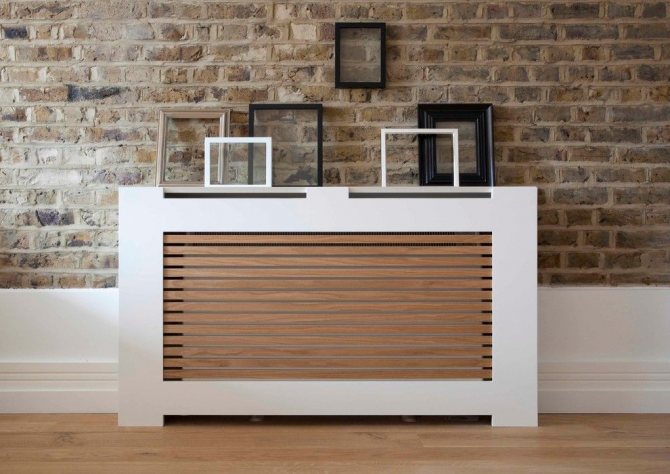
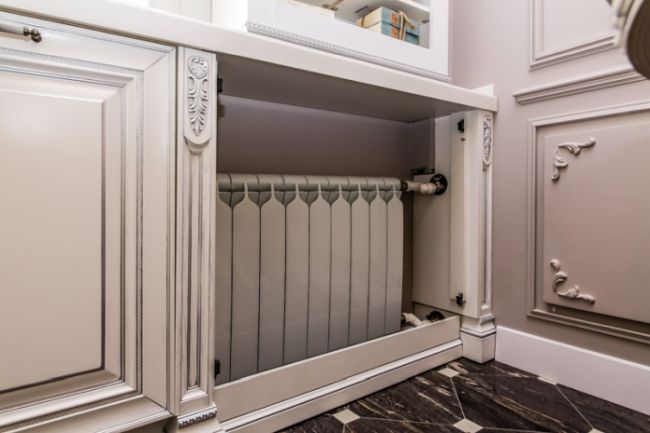
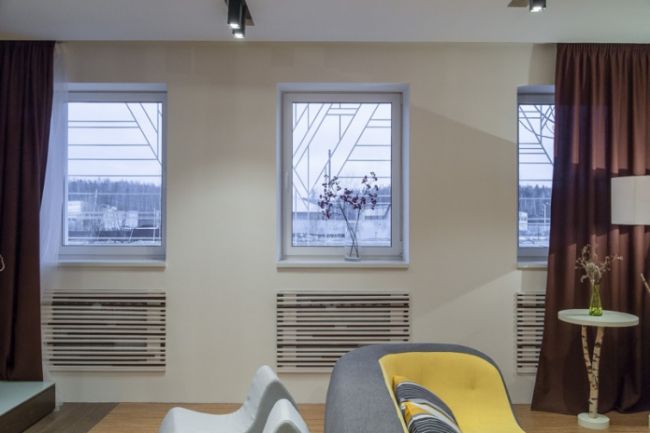
Decorative screens for heating pipes
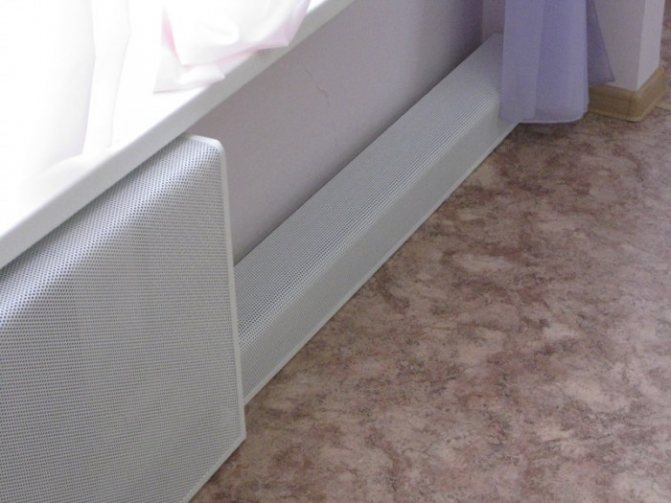
This device is perfect for decorating. It successfully hides bulky radiators behind it and perfectly complements the interior. However, it is inconvenient in practical terms. The screen prevents free access to the battery, impairs heat transfer, and slows down the circulation of warm air masses. Therefore, if you decide to purchase something similar, then it is best to give preference to perforated panels - you will not have a problem of thermal conductivity with them.
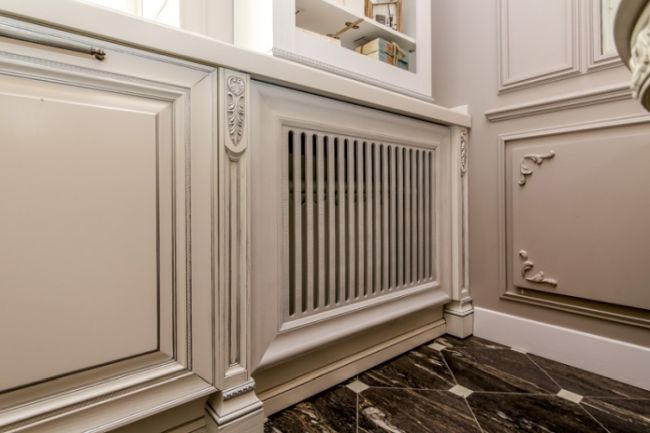
A wooden screen with curly elements is perfect for a classic interior.
The wood panel is secured with magnetic clips
Important! The canopy must be removable or partially removable.
The appearance of the screen should be in harmony with the overall interior of the room.
Here the pipes themselves are hidden behind a plasterboard structure, and for access to the joints, the rack screen is removable
Models of such panels usually have magnetic latches, hooks, a hidden lock, with which the product is fixed in place. But it is necessary that the screen be dismantled without problems.
It is recommended not to ignore this advice, because your batteries will still need inspection, maintenance by a professional (not to mention the possible occurrence of force majeure, such as a sudden rupture of the pipeline), an impractical decorative canopy can prevent this.

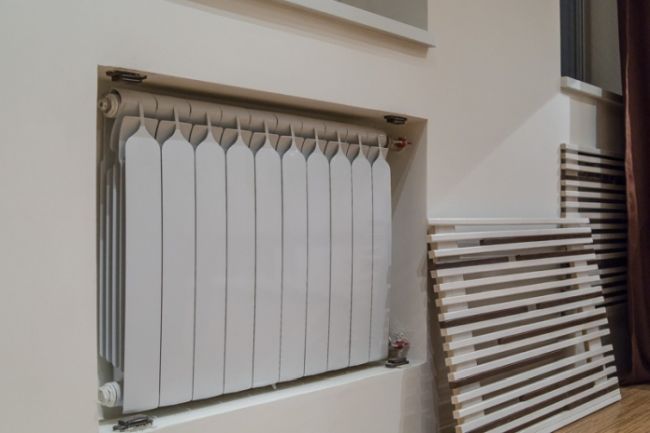
A lattice panel made of thin wooden slats that covered the heating pipes together with the radiator
What are the battery screens made of?
As a rule, these are: wood, metal, plastic. There are also perforated, non-perforated, designed to overlap one radiator, or bulky, located along the entire wall.

Metal mesh box slightly reduces heat transfer
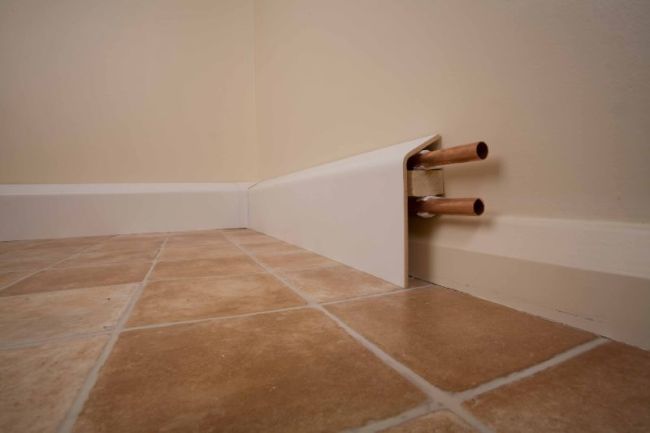
If heat dissipation is not important, pipes can be laid in a plastic skirting box
You can make a wooden box yourself
To mask a boring section of a wall, a decorative stained glass screen will do.Due to the many gaps, it will serve as an original design solution, will become a feature of your interior.
How to decorate a heating pipe in a room?

Decorating heating pipes is choice of two options:
- hide them so that they are invisible in the apartment;
- make them a piece of furniture, decorating in an affordable way.
The decoration does not require special efforts, special training or knowledge, except that a little imagination and aesthetic taste.
Plasterboard box
The technology for closing heating pipes with a plasterboard box is quite simple. Installed frame made of profiles that are attached to the wall with self-tapping screws... And then drywall sheets are fixed. You need to know that for the box it is worth choosing moisture resistant material.
Although the method is quite simple and does not require significant investment, main drawback his is that he restricts free access to the highway, and in the event of an unforeseen emergency, the box will have to be disassembled. But even here there is a secret. If you use self-tapping screws during installation, then dismantling will not be so difficult.
Important! Box it is impossible post directly near batteries heating.
Such designs can be not only from drywall. Instead, you can use any suitable material... The main condition is compliance with the interior design.
False wall
Usually erected when the heating element takes up a lot of space... First is set skeletonwhich then upholstered with appropriate material.
This method is similar to the previous one, but more difficult to implement... Here you can use various materials for upholstery, but if you need to close the radiators, then for this be sure to use perforated sheetsto prevent heat loss.
Before you build a false wall, you should make sure that everything is in order with the heating equipment (pipes, radiators). And you also need to pay attention that the use of this method of decoration leads to a decrease in free space rooms.
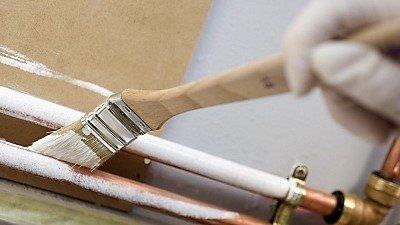
Painting
Refers to the most simple and popular ways to decorate heating pipes. Before using it, you need to take care of the base for painting, because the remaining or peeling old paint can spoil the idea. A hairdryer or putty knife will help clean the surface from the previous coating.
Important! But no need to try to heat up too much heating riser, as in the pipes, according to operational standards, water remains in the summer. And even with strong heating, the winding installed on the thread at the joints is destroyed. Therefore, you should simply get rid of most of the unnecessary paint, and clean the remains with an iron brush.
It is better to paint metal pipes alkyd enamel PF-115... There is no need to use a primer, the main thing is thorough cleaning. It is recommended to carry out the procedure twice.by applying a thin layer of enamel.
This work best done in summerwhen the heating system is not in use.
Winter option painting is not suitable for the reason that the enamel on hot pipes will dry very quickly, without giving the opportunity to grind it properly. In this case irregularities and smudges cannot be avoided.
The simplest masking of heating pipes in a room is painting them to match the walls or the color of the radiators... Any idea can be, the main thing is that it fits perfectly into the interior of the room.
Bamboo barrel and other linings
The pipes hidden in bamboo look extraordinary. His the trunk is sawn to length, cleanse from internal partitions and clean the cuts. Blanks apply and tighten with a rope of the appropriate color.
Moreover, bamboo is used not only when decorating a room, say, in japanese style... It looks good in other interior options... The main thing is that bamboo fits well into the overall design of the room. And so that the riser pipe framed by a bamboo trunk does not attract much attention, it is advisable to decorate other elements of the room with this material.