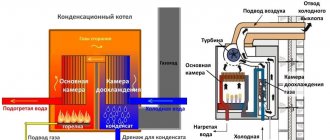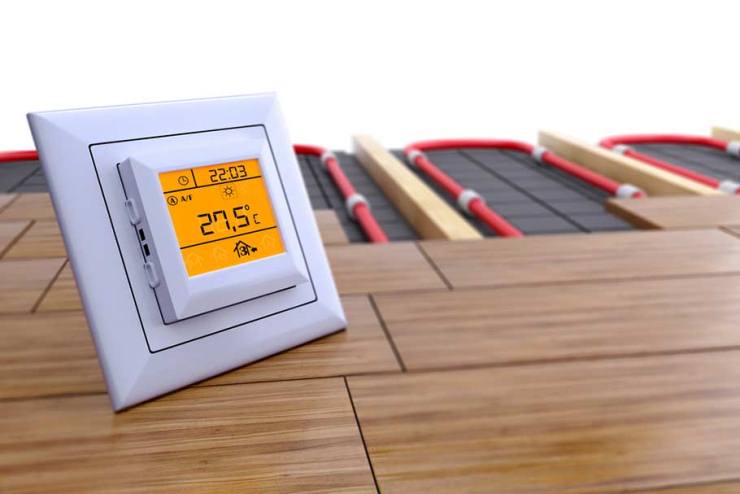
The popularity of new types of heating devices, in particular such as underfloor heating, is growing every year. This space heating medium is often used in bathrooms and hallways, installing the heating system under the floor covering. Today there are 3 types of underfloor heating structures: electric, water and infrared.
The connection diagram of a warm floor and the principles of operation of different types differ from each other. Before thinking about how to properly connect a warm floor, how the heating elements will be installed, whether the thermostat will be connected or not, you need to understand the device and types of heating devices.
The principle of operation of electric underfloor heating is to convert electrical energy into heat, using the physical properties of conductors, or rather their resistance. On top of the underfloor heating, the main floor covering (tile or floor screed) is mounted, which heats up and distributes heat throughout the entire heating area.
Floor heating connection diagram
The electric underfloor heating is connected through a thermostat. Connection diagrams for underfloor heating of all types, like heating elements, have a different design:
- one- or two-core heating cable (cable underfloor heating);
- thermal mats.
Infrared panels first heat the person, and then the space in the room
Infrared underfloor heating is considered a new technology for this type of heating. The heating element in the heating system of such floors is a two-layer infrared film with a total thickness of up to 1 mm, in the middle of which a plate (carbon or bimetallic) is mounted.
The connection diagram of film warm floors has some significant differences from other types. Electricity is supplied to the plates through ultra-thin copper-silver conductors, and heat energy from the heating element is emitted by infrared (infrared) rays from the surface using the applied carbon paste. The control of the required temperature level is "monitored" by the floor heating thermostat.
Scientists believe that the most comfortable heat for the human body comes from infrared heating devices.
The power of the thermal panels must correspond to the area of the room
These devices use the principle of secondary convection, according to which the human body and objects are heated, and then air.
When choosing a warm floor, you must always take into account the power indicator. To determine this indicator, you need to know: the area of the room, the purpose of the heating device itself (main or additional) and the type of heated room (kitchen, bathroom, balcony). There are tables with which you can determine the power of the required underfloor heating.
Installation and connection of the thermostat
Thermostat - the brain center of underfloor heating
After we got acquainted with the principles of operation and devices of the varieties of new types of heating, it is worth thinking about how to connect the thermostat according to the appropriate connection diagram for underfloor heating, and where it will be installed.
The thermostat or thermostat is the "brain center" of the heating device in question. He is responsible for turning on the heater, adjusting the temperature parameters and monitoring the entire system.The device is able to "read" all readings from a temperature sensor, which is connected with a thermal protection cable, is installed together with the warm floor and automatically turns off the power when the required temperature is reached.
As soon as the room gets colder, the thermostat will turn on the heating
In this case, the thermostat remains in operation and monitors the temperature indicators. If the temperature drops below the set rate, the device will supply power to the heating system and it will start functioning.
Today the range of thermostats is quite diverse. There are mechanical models, combined electromechanical options and electronic, which can also be divided into programmable and non-programmable.
Everyone chooses and connects a thermostat for a heated floor independently, depending on the requirements, but connecting the regulator to a new heating system is mandatory.
Thermostat installation requirements
Install the thermostat close to a power outlet
The need to use a floor heating thermostat (electric and infrared) should not be in doubt, such a device cannot be switched "directly". Before connecting the warm floor to the thermostat, it is necessary to decide on the location of the thermostat itself, taking into account the connection diagram of the warm floor.
During installation, there are certain requirements:
- The device can be installed from a warm floor at a height of no more than 1.5 m.
- The thermostat is mounted on the opposite wall from the battery (if any) to avoid overheating and false triggering of the sensor.
- According to the wiring diagram for the electric underfloor heating and its regulator, the installation location must be chosen near the outlet or pull the separately released cable to the switchboard (it is recommended that the underfloor heating be switched on to the switchboard through a circuit breaker).
- The connection of the thermostat to the warm floor must be carried out according to the diagram to the device.
It should be remembered that according to many schemes of electric underfloor heating, when connecting a thermostat, it is necessary to mount the heating cable in the wall in plastic pipes (each wire separately) to avoid a fire in the room.
Having considered the principles of operation of the types of warm floors and their "brain center", you should figure out how to connect a warm floor to a thermostat, and how to mount heating devices. There are requirements that must be met when installing all types of underfloor heating:
- thermal insulation of the underfloor heating installation surface;
- leveling the surface;
- the temperature sensor should be located so that the heated element does not touch it;
- the couplings (connecting the heating element and the power cable) must be located and connected under the floor covering.
The rest of the features of the scheme for connecting a warm floor to an infrared floor thermostat and types of electric floor should be considered separately.
Installation of cable electric underfloor heating
Installation and connection of a cable-type underfloor heating occurs after leveling and insulating the surface. The mounting tape is laid, on which the fasteners for the cable are located at different intervals. Considering all the features of the connection diagram, the heating element - the cable is laid with a snake and fixed on the tape with fasteners (the cable should not intersect and is located under constantly standing objects so that the warm floor does not fail). For information on how to install a warm cable floor under the tiles, see this video:
After installing the heating element, it is necessary to check the cable resistance with a tester. If the indicators are normal, you can pour the screed or tile.
After the floor covering has hardened, you can carry out the remaining switching work and connect the electric cable to the thermostat, and then it is worth connecting the warm floor to electricity.
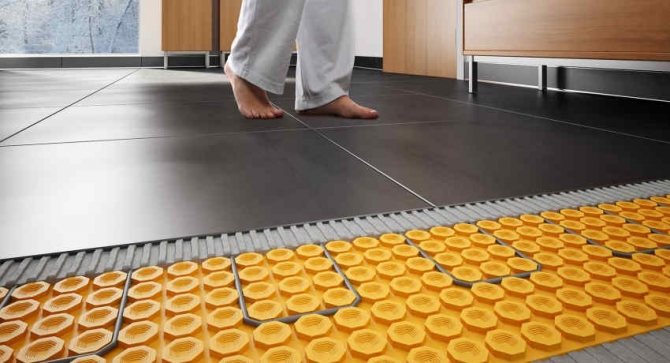
In thermomats, the cables are already laid and fixed, you just need to unwind the roll
Installing a warm floor in the form of electric mats is easier than installing a cable analogue. An electric mat is the same cable installed with a certain pitch on a thermal film. The heated mats are available in different lengths and capacities. Electricity from the switchboard is directly supplied to the underfloor heating thermostat.
Electric mats are convenient to install in rooms with limited floor height, they are relatively low cost and do not need an electrician for installation (you can do it yourself). There is also a connecting element for mats, which allows the warm floor to be connected to an additional mat or to be reduced.
Insulation must be placed under the IR panels
The infrared film is also laid on a flat surface, but underneath it is an insulating substrate with a reflective plane to reflect the radiation. The conductors that connect the heating elements of the film have contact terminals for connecting power circuits.
The connection diagram for an infrared underfloor heating (included in the delivery set) shows that the contour of the conductors is 3-5 sections of the plates, this is 20-30 cm, depending on the manufacturer. This makes it possible to cut the film into pieces along the marked lines, which makes it possible to conveniently position the connected heating element. See the subtleties of installing a warm infrared floor in this video:
The connection of the infrared underfloor heating to the thermostat is carried out in the same way as in other models of a new type of heating only without couplings, all conductors will be connected to the thermostat separately or through a common terminal block.
When installing underfloor heating, it is necessary that the power of the mat, cable or infrared film corresponds to the permissible load of the underfloor heating thermostat.
Infrared floor heating connection diagram
When changing the size of the underfloor heating segments (building up mats, adding a film), it is necessary to take into account the underfloor heating regulator (thermostat), or rather its parameters, and, if necessary (not combining devices in terms of current and power values), replace it.
Each type of warm floor has its own characteristics. Connecting a warm floor to a thermostat and choosing the thermostat itself is not difficult. The main thing is to analyze the situation, make your choice in favor of a certain type of heating element, choose a thermostat for a warm floor and proceed with installation.
In this case, you can rely on the above points and on the instructions from the manufacturer of the warm floor, where many companies indicate the installation procedure and features. In case of difficulties, if the thermostat connection diagram is not clear, in order to get out of the situation, you should use the services of an electrician.
Connecting underfloor heating is the most popular method of additional room heating. To save money, it is permissible to perform part of the work with your own hands. In the presented material, we will consider how to connect a warm floor with existing heating systems and what subtleties are important to take into account.
There are two basic types of heat-insulated floors - water heat-insulated floors and electric ones. In heating the water version, the heat carrier is heated water supplied from the boiler or from a common riser.
And in electric floors, the transfer of heat is implemented as follows: the flowing current heats up the copper heating elements, and they, in turn, transfer heat to the surrounding objects.Electric mats and a heating cable function according to this principle. And the principle of operation of infrared film lies in the emission of long infrared waves by specialized elements, which heats up all objects in the room.
Any of the types has subtleties when connecting, then we will consider the connection of underfloor heating in more detail.
Types of warm floors
Rack layout on a wooden base
By the type of material in which pipes are laid, the main types of installation can be distinguished:
- in a concrete screed;
- on a polystyrene base;
- on wooden slats.
The first type is the most reliable and widespread. A layer of heat and hydro insulation is laid on a flat surface. To strengthen the structure, a reinforcing mesh is laid. Next, pipes are laid and fixed with special brackets. The mounted system is poured with a mortar of a mixture of cement and sand, and you can also add plasticizers that strengthen the screed. The best decorative coating option would be tile or stone.
You can not use the warm floor until the screed is completely dry, it may crack.
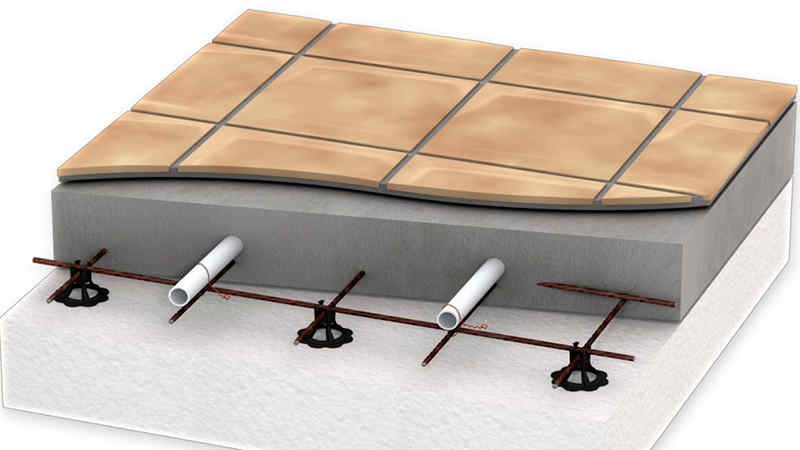
The next option is installation on a polystyrene base. This option is the easiest to install. The pipes are installed in special ready-made forms. To mount a single base on them, engagement locks are provided and additional fixation is not needed. After laying the pipes, the heat distribution plates are attached from above, and then the finishing floor covering.
The last option is installation on a wooden base. The material is different - edged board, plywood or other wooden products. Strips are made of them and laid on a wooden floor, with gaps for pipes. In these gaps, the pipeline is attached using special brackets. Next, the surface is covered with polyethylene and a layer of gypsum fiber, it will distribute the temperature evenly and the topcoat is attached to it.
To perform the correct calculation of a warm floor of a water type, you need to take into account a lot of parameters and conditions:
- main or secondary heating;
- installation is planned in the house or apartment;
- what is the topcoat;
- what is the volume of the room;
- what is the purpose of the premises;
- what kind of heat loss in the room.
Calculation of the heat loss of the room is very important, especially if the warm floor is the only heating system. To do this, you need to take into account the nuances:
- type of building materials for walls and floors;
- type of window frames and glazing;
- number of doors and size of windows;
- peculiarities of the climate in your region;
- availability of alternative heating systems.
For premises of various types, a certain heating temperature of the coating is provided, namely:
- living rooms - 30 degrees;
- in rooms where strong heating is needed - 36 degrees;
- with high humidity - 33 degrees;
- for natural wood - 27.
The choice of the material for the topcoat must be made at the costing stage, in advance. Otherwise, the heating power will not be enough or it will be excessive.
The peculiarities of heating with underfloor heating imply an accurate thermal calculation of the power of the system. This is especially true for rooms with wooden floors. Such a surface has low thermal conductivity and heating will be weaker at the standard system power. Having studied all the nuances and paying attention to important points, you need to make an accurate calculation of the performance of the warm floor, heating equipment and calculate the step between the pipeline, taking into account the selected layout scheme. All this information will help you make heating with underfloor heating in a private house with your own hands.
Water floor installation errors (2 videos)
Water floor schemes (25 photos)
Articles others read:
- Servo drive for underfloor heating collector: automation of underfloor heating
- The right choice of screed in a new building: features and specifics
- Engineering or parquet board: how to choose?
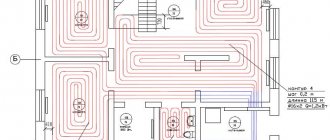
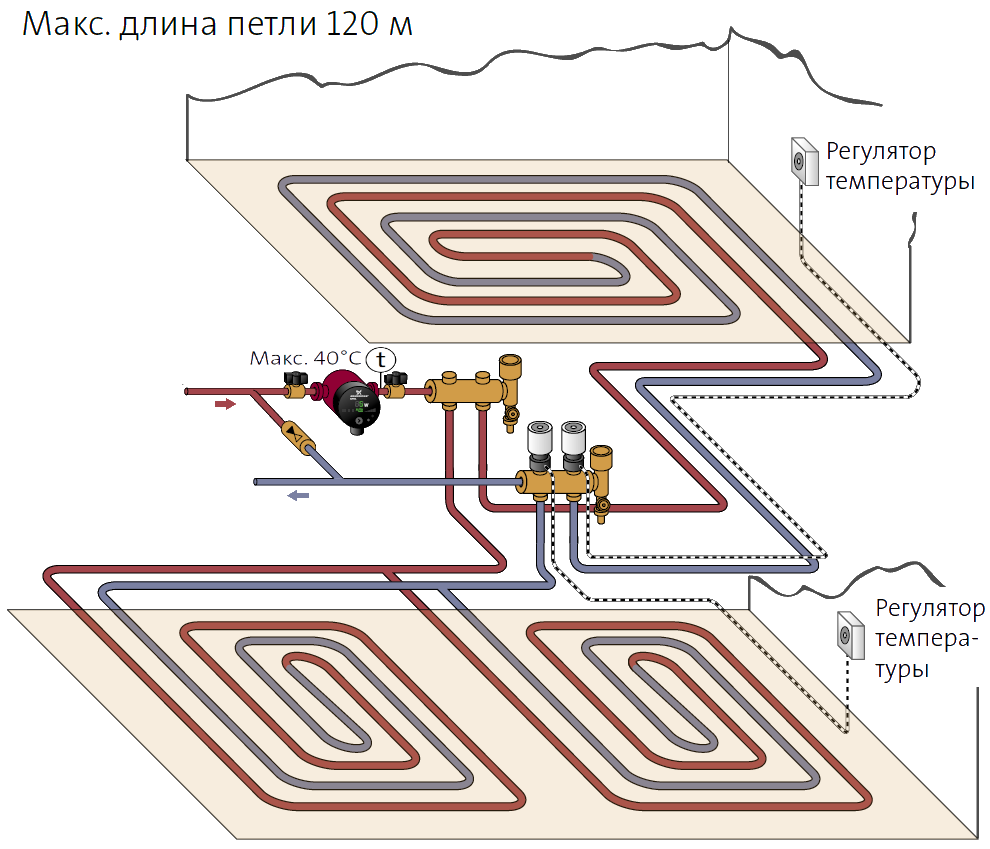
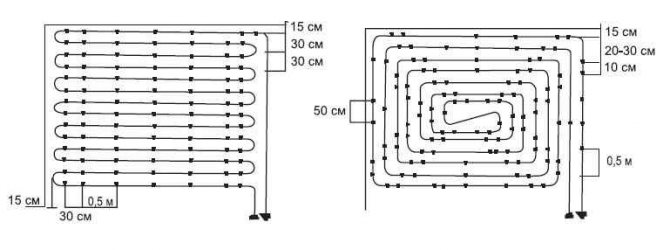
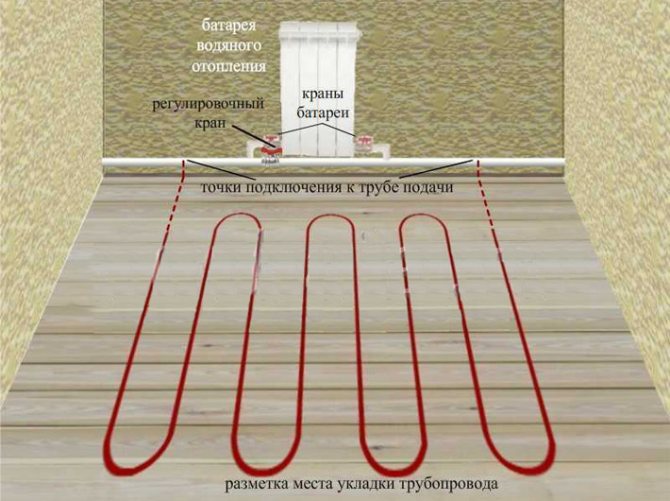
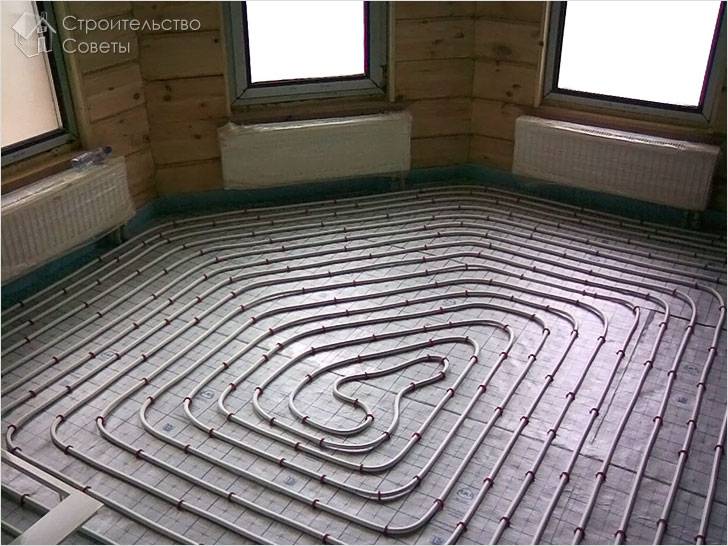
The room should be divided into sections depending on the configuration. Draw a preliminary sketch of the heating scheme on paper. In this case, two conditions must be met: the number of heating pipes in each section should be approximately the same, sharp turns should be avoided if possible. The maximum area of one section cannot exceed ≈20 m2, the length of pipes on it is not more than 100 m. The specific values depend on the pump power and the technical characteristics of the heating pipes.
Wiring diagram for connecting a water-heated floor to the boiler
Wiring diagrams can be made of plastic (the cheapest and rather durable option), corrugated stainless (in all respects they occupy middle positions) and copper (the most expensive and most reliable option) pipes.
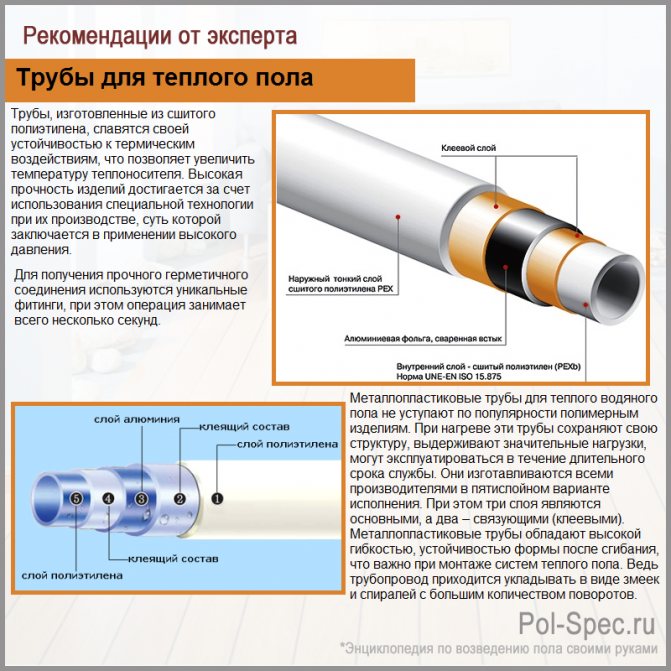
Underfloor heating pipes

Corrugated stainless steel pipes
Next, you need to draw a pipe layout on paper, taking into account the above conditions. The distance between the pipes is 15–30 cm, depending on the required indoor temperature. It should be borne in mind that floor coverings cannot heat up to more than 30 ° C.
When drawing up a diagram, one more condition must be fulfilled. In the room, each circuit should have the same pipe length and approximately the same number of bends. The schemes provide for laying the pipe with a spiral method, zigzag and snake, it is allowed to use several methods in one room, it all depends on the features of the floor configuration. It is recommended to increase the density of heating pipes near windows, otherwise the floor under them will be much colder.
Floor heating connection diagram
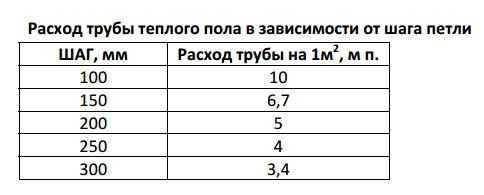
Pipe consumption depending on the step
The length of each circuit is increased by about two meters, they will be required for piping to the riser. If you can make a little mistake with plastic pipes, then copper ones are too expensive to cut them into pieces, unproductive waste increases the cost of the heating system. It is possible that you will have to draw several sketches, change the appearance and dimensions of the outline.
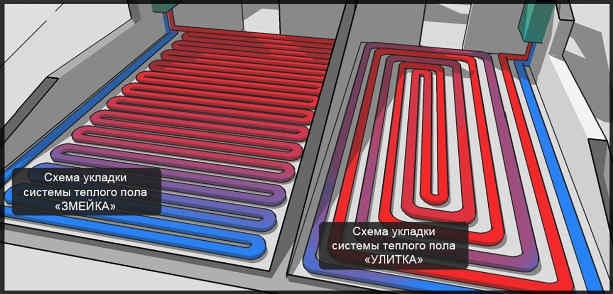
Pipe Laying Options
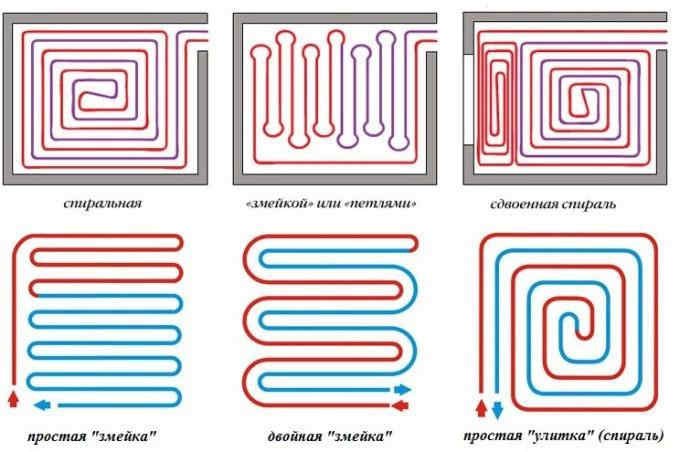
Methods for laying out pipes for a water-heated floor
Having found the optimal solution, the layout of the contour can be marked on the basis with a felt-tip pen. Further development of the installation depends on the type of base.
Scheme of a water-heated floor on a concrete base
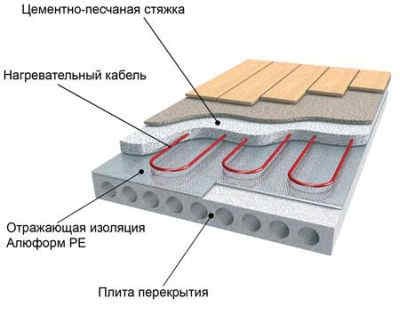
Installation of a water heated floor with a concrete screed
A hot water heating installation on a concrete base contains several layers of cake.
Insulation layer
It is laid on a cleaned base, if it has large irregularities, then a screed must first be made. It is advisable to use foam concrete, it reduces unproductive heat losses. The thickness of the insulation must be more than three centimeters, the density of the insulation must be at least 35 kg / m3.
Insulation layer
It is recommended to put foam or pressed mineral wool of increased physical strength into the circuit. In the implementation there are special mats for water floor heating systems, they have installed clamps, which greatly facilitate the process of pipe laying. If the room is large, the thickness of the insulation increases.
Read more: Hydraulic calculation of the heating system area calculation
Pipe laying
Fixing underfloor heating pipes
On average, approximately five running meters will be needed per square meter of the room with a step of 20 cm. These indicators can vary taking into account the calculated power of the heating system.
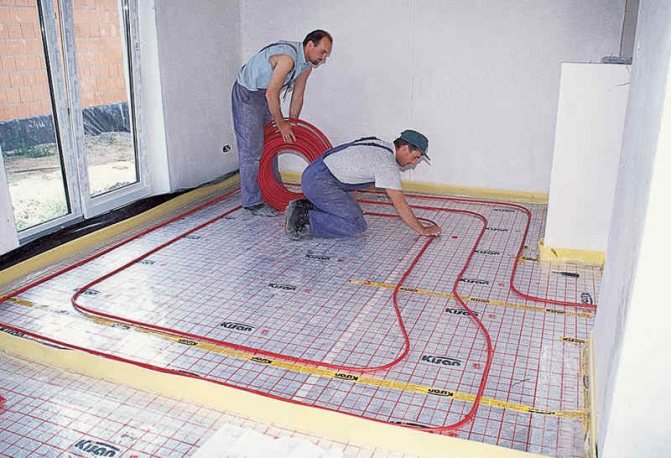
Pipe laying
After connecting all sections, it is imperative to conduct a hydrotest of the tightness of the connection. To do this, plug one end of the pipe, and connect a water pump to the other. The water pressure during the tests should be twice the operating pressure.Such tests will allow timely detection and elimination of leaks.
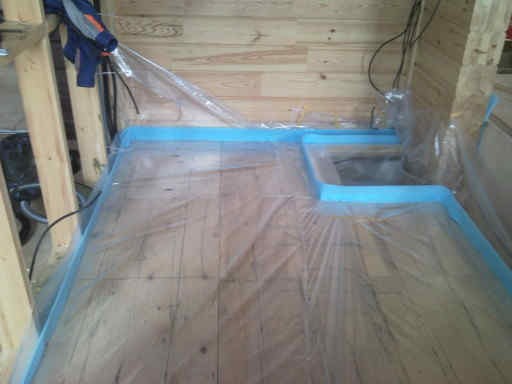
Damper tape for underfloor heating
Damper tape and insulating film
A damper tape is provided along the contour of the room, which compensates for the thermal expansion of the upper cement screed. A layer of waterproofing is provided between the pipe contour and the screed in the diagram. For these purposes, you can use a cheap plastic film with a thickness of at least 30 microns.
A metal or plastic mesh for reinforcement is laid on top of the waterproofing.
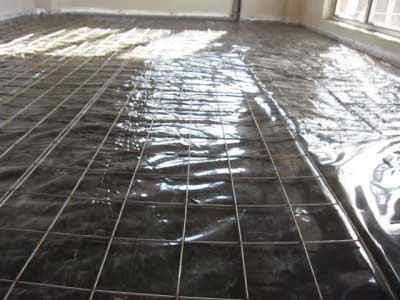
Insulation film and mesh
The screed thickness is 3–10 cm above the pipe surface. The screed is done in the usual way, you can use wet or semi-dry material. After cooling down, the final flooring is installed.

Screed over a water-heated floor
All layers of the warm floor are drawn on the diagram, indicating the materials of manufacture and linear parameters.
Provides for the use of ready-made OSB boards with sawed grooves for pipes and metal plates. The thickness of the slabs is not less than 22 mm; in the diagram, the installation of thermal insulation is provided in the floor. A variety of modules in terms of configuration allows you to put them in the desired sequence according to the developed scheme.
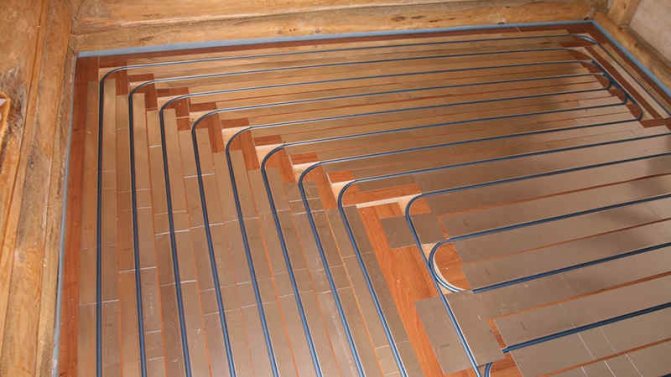
Warm floor on a wooden base
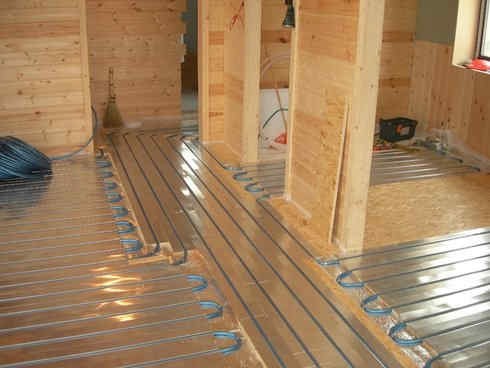
Photo of laying pipes for underfloor heating
The diagram is drawn taking into account the use of wooden or OSB slats with a thickness of at least 28 mm. The slats should be laid on the floor joists, the distance between them is slightly larger than the diameter of the pipes. Metal profile plates are used as clamps, there are latches on top. The system is covered with gypsum fiber boards.
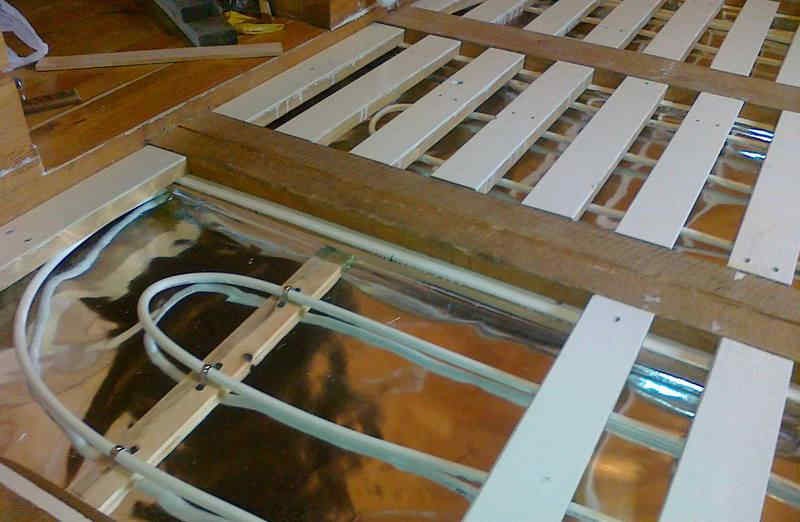
Warm floors on a wooden base
When considering the problem of how to connect a warm floor to the heating system, it is immediately worthwhile to clearly understand the difference between the device for heating it in a private and an apartment building. In the first case, the owner is free to carry out the improvement without any restrictions, based only on the characteristics of the boiler and the layout of the premises. In high-rise buildings, connecting a water-heated floor to the heating system causes much more problems.
The main ones are the following:
- the difference in hydraulic resistance in heating radiators and floor heating pipes;
- the quality of water in the central heating system is poor and can have a tangible effect on the operation of underfloor heating;
- water hammer and pressure drops can lead to premature failure of the underfloor heating system.
Preparation of the base and connection of underfloor heating
Before connecting the warm floor, it is necessary to prepare. Whatever scheme of a warm floor you choose for implementation, it is always important to prepare the base:
- The first step is to dismantle the old flooring.
- If a new screed is to be performed, then it is also necessary to remove the old screed.
- Then the base is inspected and, if cracks and deep chips are found, they are sealed. To do this, the crack is cleaned to a solid base, the surface is primed and filled with a prepared solution, or a specially purchased repair mixture.
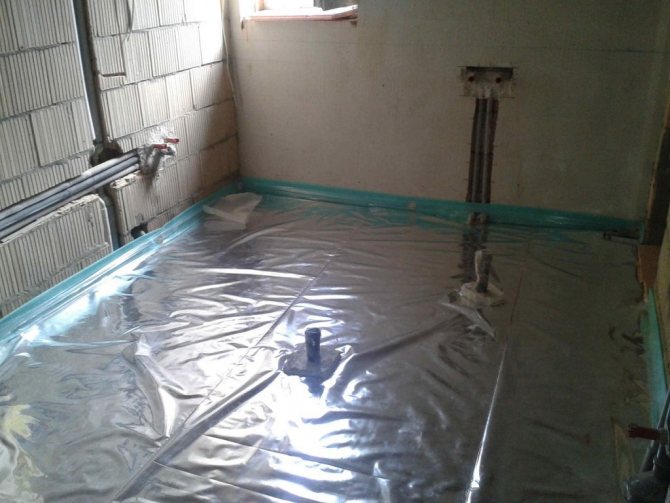
- The next step is to lay the waterproofing layer in the form of a polyethylene film with a minimum thickness of 200 micrometers.
- Then the insulation layer is laid, and a damper film is attached to the walls around the perimeter of the room, which will level the thermal expansion of the future screed.
The base preparation algorithm is the same for almost all types of underfloor heating, with the exception of infrared underfloor heating.
Connecting the water floor
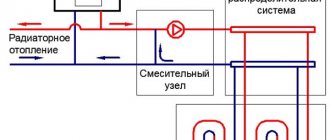
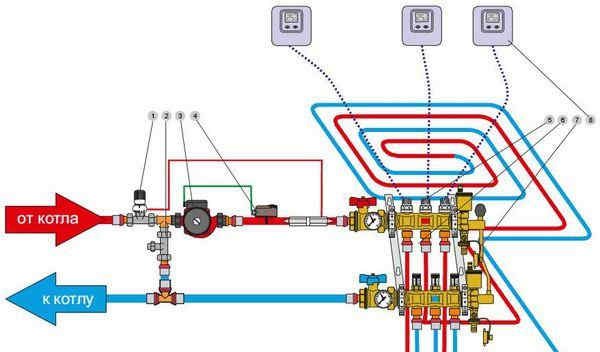
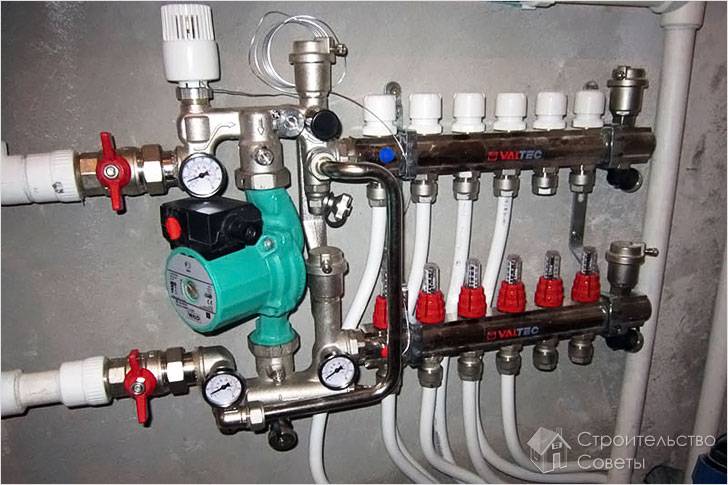
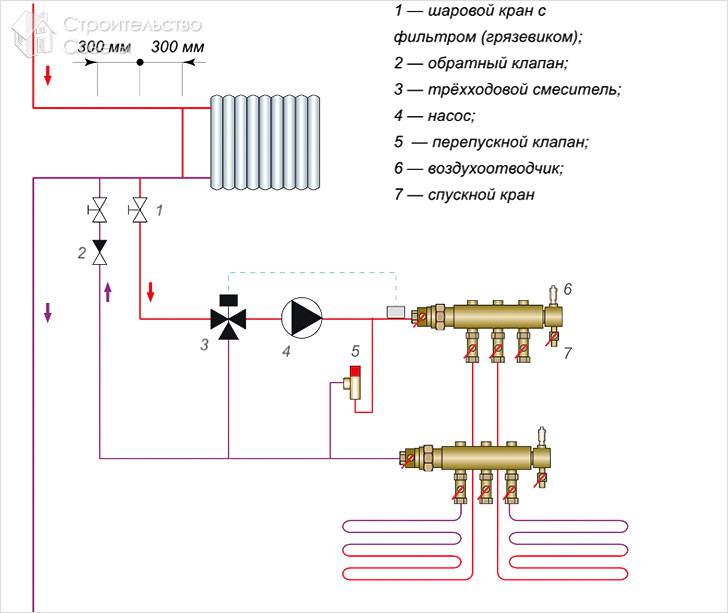
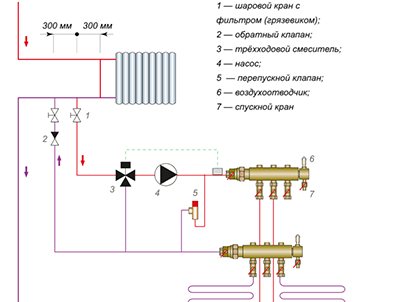
The most competent answer on how to connect a warm floor based on a water version is to connect them to a boiler using a water pump.Due to the fact that the temperature of the coolant cannot be more than 35 degrees, it is necessary to use the collectors and mixing units.
To ensure such a connection, a three-way and two-way valves are installed. Then the supply pipe is connected to the switchboard, which should have outlets according to the number of circuits, as well as flow regulators and valves. They can be used to regulate the water flow and set the temperature of the entire floor.
To disconnect a separate circuit for supply and return, valves are installed.
Approximate scheme for connecting a water floor
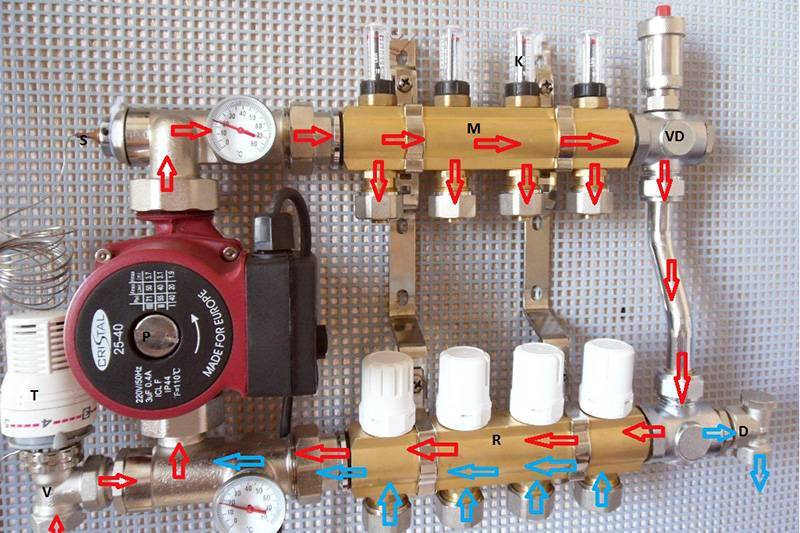
Connecting the system to the coolant supply and installing a collector
Manifold connection system
The collector connection scheme boils down to the fact that the boiler and the collector must be connected with a pipe line. If the boiler is installed near the gas pipe (in cases where the boiler is gas), then the collector can be mounted in any convenient place. It must be accessible for supplying pipes with supply and return, as well as for monitoring and controlling the system.
Before connecting the pipes, stopcocks must be installed on the manifold. To make it easier to control the temperature, a thermometer can be additionally included in the valve design.
So, a unit consisting of a manifold, a pipe and a valve is connected to each other by compression fittings. To connect pipes, special connections are used, which consist of a brass nut, a clamping ring and a support sleeve. If it is necessary to connect pipes of different diameters, then adapter fittings can be used.
Thus, we have the simplest scheme for connecting underfloor heating. This circuit has the following nodes:
- Simple manifold with shut-off valves.
- Supply / return pipeline, connected through taps with a comb.
Complete manifold set
https://www.youtube.com/watch?v=iSG92rSo27c
So, the coolant will be evenly distributed over the heating circuits.
Thermostatic control valve
To organize full control of the warm floor in
will include:
- Pump and mixing unit.
- Drain cock.
- Circulation pump.
- Air vent.
- Shut-off valves and pipes.
Thermostatic control valves can be installed at the outlet / inlet instead of conventional taps. Through them, you can set the throughput of the crane. This is achieved thanks to the paraffin wax, which expands or contracts under the influence of temperature.
The mixing pump is installed between the supply of pipes and the supply of the collector. There is also a third outlet that goes to the return flow before the return flow in the manifold. If necessary, the pump will pump the cooled heat carrier into the supply to reach the set temperature.
Read more: Water flows from the air conditioner into the room: reasons for what to do
To figure out how to connect a warm floor to the heating system, you need to understand which elements of the system are involved in this. As in classic heating schemes, these elements are:
- heated coolant supply pipe;
- return pipe or return of the cooled coolant.
When the system consists of only one circuit, it can be connected directly to the boiler. If there is more than one circuit, to ensure uniform distribution of the coolant, it is necessary to connect the underfloor heating collector to the coolant supply. To it, respectively, the contours of the rest of the system are attached.
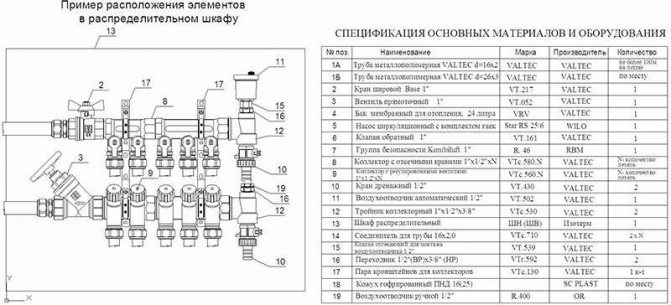
First, you need to choose the location of the collector. There are several accommodation options:
- arrangement of the collector cabinet;
- installation in a niche in the wall;
- wall mounting in a suspended position.
Popular collector models are equipped with automatic thermoregulation.The set will include temperature sensors and various measuring instruments. The process of distributing the coolant occurs automatically. The simplified scheme of the underfloor heating collector provides for a pair of thermometers and manual adjustment.
To begin with, two pipes are connected to the collector - return and supply. After that, "branches" of various pipelines are connected. To control and regulate heating, it is more accurately necessary to connect a circulation pump, a three-way mixer and control valves.
For ease of repair and maintenance, shut-off valves are mounted in the pipe connection zone, and a drain valve is provided at the end of the collector. Such a system operates on a boiler, and the temperature will depend on the temperature of the heating agent supply.
The collector, or more correctly, the collector cabinet, is the main element of the system, and is located in the wall. The best place is closer to the middle of the room. The classic size of the device is 60x40x12 cm. The wall niche in which it is placed should be placed near the floor surface.
The collector is responsible for the movement of the coolant. It is the "meeting point" of the supply and return pipes. Once in the boiler, the water heats up and flows back into the pipes under the floor. A circular pump is responsible for the automation of the process.
In the collector cabinet, both pipes have shut-off valves that are used to turn on / off the room from heating. A compression fitting is used to connect metal valves and plastic pipes.
The collector is actually a tube that collects the metal-plastic elements of the underfloor heating system. Their connection is ensured by using fittings. The number of outlets in the manifold must be equal to the number of contour elements. The collector is connected to the valve, and a splitter with a drain valve and an automatic air vent is placed at the outlet. The latter device eliminates the possibility of air bubbles in the system. I use the drain valve in case of need for repairs.
That is, if we consider a warm water floor, connecting to a collector will look the most delicate and reliable way to organize the system.
The process of connecting a warm water floor with a comb is very simple and boils down to connecting the pipes of the heating circuits to the collector, and the collector itself to the boiler. However, there are differences in the configuration of the collector. This is what we will consider in this subsection.
The collector must be installed in such a way that it is convenient to lead the heating circuit pipes to it. So, install shut-off valves on the manifold. Connect the side outlet to the pipe both for supply and return.
If you buy a ready-made manifold kit, then it will already have all the necessary valves, even at the outlets of the pipes going to the boiler. The presence of taps will allow you, if necessary, to carry out repairs or temporarily disable one of the circuits. If you assemble the manifold yourself, then the assembly of the connection of each element is performed with a compression fitting. As a result, underfloor heating will be connected to the boiler through the collector.
So, instead of shut-off valves, install thermostatic control valves on the manifold. In their design, there is a thermal balloon with paraffin, which, pushing off from the air temperature in the room, narrows or expands. These actions set the capacity of the thermostatic valve. As for the pumping and mixing unit, the principle of its operation was described above.
Connecting the thermostat to the warm floor
Before answering the question of how to connect a warm floor to a thermostat, you need to study what a regulator is and how it is connected to the circuit.
The main task of this device is to regulate the temperature in the room. The heating elements are also connected to the power supply through the thermostat.
The thermostat, which monitors the air temperature in the room, is mounted on the wall at a distance of at least one meter from the floor level.
There are two main ways to connect the thermostat. This is a connection to a separate power line from a distribution board or a connection to an existing outlet.
The scope of delivery always includes a connection diagram for underfloor heating, which means that this procedure can be performed without any prompting.
After installing the thermostat, we perform the slitting of two channels. In one of them, the supply wires will be laid, and in the second, the control wires of the sensor will be laid, which will be placed directly in the thickness of the screed. At the end of the main operations described above, you can lay and connect the warm floors in the room to the configured and installed sensor.
The market offers a wide range of regulators, ranging from the most primitive mechanical systems to intelligent regulators (set up once and use them continuously without intervention). How to connect a warm floor to a thermostat is not a difficult task.
Choosing a thermostat for a warm floor
With all the convenience in operation, with the complication of the thermostat circuit, its price also increases. It should be said that the installation of devices with many additional functions is justified only when controlling the heating of large areas. And also - when these features will really help you save energy. Therefore, when choosing a thermostat, carefully read its capabilities and try them on to your situation.
If underfloor heating is installed in several rooms, it makes sense to think about centralized control. It is possible to install a floor heating thermostat capable of simultaneously monitoring and controlling the temperature of several objects. In this case, another highlight, inherent in some not cheap modern regulators, will be useful: Wi-Fi communication with a mobile phone.
In small areas, such as a bathroom or toilet, a simple and inexpensive thermostat is still sufficient. These rooms are visited regularly and chaotically, which makes it impossible to predict when the heating should be turned off or turned off. Unless only at a time when the whole family is absent.
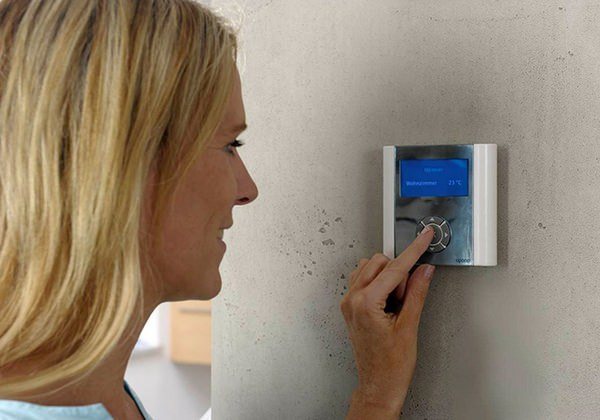
Underfloor heating controller in modern design
And don't forget the kids. The luminous display and buttons attract them like a magnet. To exclude the possibility of "unauthorized reprogramming", either purchase thermostat models with only mechanical temperature control, or with a button lock function.
It is assumed that the heated floor itself has already been selected, therefore, the power consumed by it is known. This value should not exceed the maximum nameplate value of the thermostat set for control.
Note: It is also vital to familiarize yourself with the recommendations for choosing a thermostat by the manufacturer of the heating elements that you purchased.
Connecting the cable floor
How to connect an underfloor heating cable. At the start of the cable installation, you need to draw up a main wire distribution diagram. At the same time, the following moments are calculated:
- It is impractical to place the heating cable under the furniture, therefore, the wire is not placed under it. The required buffer from the walls is thirty centimeters.
- The step between the turns of the wire is chosen arbitrarily according to the principle: the denser the location, the stronger the heating, but it is impractical to lay 10 cm denser. As the consumption of materials increases, the efficiency remains the same.
Do not allow the wire to cross during installation, as this can lead to a short circuit and failure of the entire underfloor heating system. It is also preferable to use a two-core cable, since it generates much less electromagnetic radiation during operation.
You can fix the cable to the floor in any way, for example, it is quite simple and convenient to lay it on the mounting tape.
After completing the installation of the cable, you need to lay the monitoring sensor. After that, you need to perform the correctness of the mounted system as a whole. To do this, take a multimeter and check the resistance at the ends of the cable. It must comply with the data specified in the documentation.
After checking, the floor is ready for screed filling.
After waiting for the right time until the screed is completely dry, you can proceed with the direct connection of all electrics to the thermostat and the mains. It is quite easy to perform this procedure, it is enough to strictly follow the scheme.
Tighten all connections carefully. The efficiency and durability of underfloor heating depends on the quality of the tightening. If, when performing work, how to connect a warm floor, make a poor-quality connection of wires, then heating will occur in this place, which can lead to a fire.
Cable floor layout
Connecting an electric underfloor heating
The electric floor comes in several varieties. Each has its own connection characteristics.
- Cable
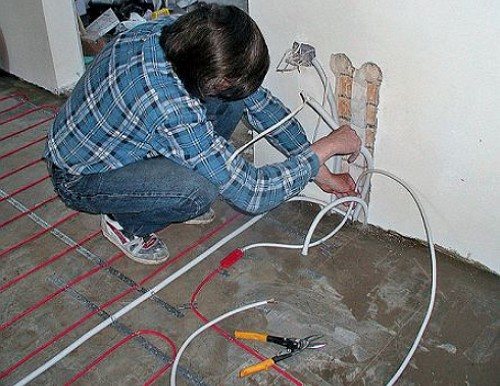
Before starting the connection of the cable floor, you must first level the surface. After that, a damper tape is laid along the wall, then thermal insulation is installed. If there was a heated room below, then the cable can be laid on the old surface, without using a lining. To connect to the thermostat, first of all, all the wires are pulled to it, and then the cable is laid.
So that the cable does not move and is fixed in the required position, a standard mounting tape is placed on the floor, and then heating elements are laid. The cable can be laid according to any scheme, but remember that its sections should not touch or intersect. The most popular and convenient way is the snake. A cable is produced, already laid with a "snake" and fixed to the mesh. It can be purchased in rolls.
Having spread the cable evenly on the floor, it must then be attached. Remember that the edges of the underfloor heating should not reach about 10 cm to furniture and walls. Then, at a distance of about 40-50 cm from the coil of the heating element, lay the temperature sensor, which is located in the tube. This is the whole process of installing the cable and sensor.
Be sure to check with a tester what is the resistance of the heating element itself. After you make sure that it matches the passport data, fill everything with a screed and wait until it completely hardens. After that, connect the wires to the thermostat and check if the system is working properly. But it is not recommended to connect an electric floor right away, as cracks may appear, due to which the strength indicator will greatly decrease.
Connecting electric mats
How to connect electric mats. Heating mats are inherently a more advanced type of cable heat-insulated floor, so that connecting underfloor heating of this type will be easier. The difference lies in the fact that a thinner wire is used in the construction of the mat, the required interval has already been set and the wire is fixed on a special material.
Thus, the installation of such a structure is greatly simplified and requires less effort. It is also not required to pour a thick screed to hide the wire, it is enough to make a thin screed, or you can use tile adhesive if the final coating is porcelain stoneware.
Since the finished structure has a small thickness, then to lay the temperature sensor, you must first grind a niche in the base.
Another important advantage of using mats is the saving of the ceiling height. The principle of connection to sensors and power supply completely coincides with the thermal cable floor.
Warm mats laid
Connecting heat mats
It is not difficult to understand how a warm floor made of heating mats is connected. The principle of operation in this case is the same as when installing a cable system. Therefore, it makes sense to talk only about the existing differences.
A heat mat is a thin heating cable attached to a heat-resistant foil. Since the laying step is predetermined, it remains only to determine the area on which the system will be located and its power density.
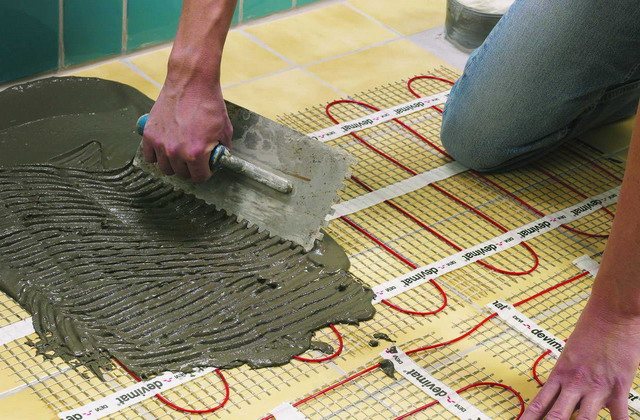
Applying a screed to thermal mats
Before connecting the warm floor, the film with the cable is placed directly on the rough concrete surface, poured with a thin layer of screed or tile adhesive and covered with the material chosen for the finishing. The use of thermal insulation in this case is unacceptable, as it leads to overheating of the system.
Underfloor heating pipe, calculation and installation
The finished structure is only one and a half centimeters thick, so you have to make a recess in the floor surface to place the sensor.
If to connect the warm floor to the thermostat there is not enough so-called. cold ends, then a part of the cable is cut out of the mat. The coupling is placed inside the tie.
Since a heat mat is a type of heating cable, the installation of both systems is very similar. The difference is that with heating mats, the job is easier and faster. The absence of thermal insulation and a thin layer of screed makes it advantageous to connect a warm floor, the price for it will be lower due to savings on materials and volume of work. Also a plus is the ability to install the system in rooms that have restrictions on raising the floor height.
Infrared floor connection
How to connect an infrared type warm floor. For infrared floor heating, the connection is different from the ones described above, since the floor itself functions according to a different algorithm. The entire structure is made of carbon or bimetallic heating elements soldered into a thin layer of material with heat-resistant characteristics.
Copper conductors are made along the edges of this film, which are directly connected to the network. It is important to install specialized heat-reflecting foil insulation before installing the infrared film.
The film can be cut at specially designed places, which are placed over the entire film at intervals of 30 centimeters.
Otherwise, the installation principle does not differ from heating mats and heating cables.
In the above article, the main types of underfloor heating were considered, as well as the methods for connecting them. After familiarizing yourself with the described material, you can perform this action with your own hands, so that connecting underfloor heating is up to everyone.
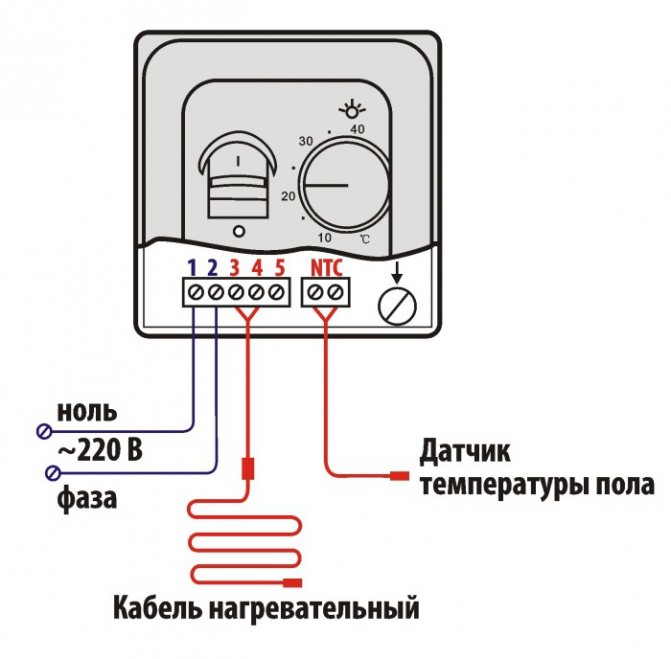
The device of the underfloor heating system consists in the installation of heating elements under the floor covering and their further connection to the power source. This does not happen directly, but through a thermostat - a device that serves to adjust the temperature regime. Connecting a warm floor to a thermostat (thermostat) and electricity is a simple operation, so it can be done without the involvement of professional electricians. Moreover, caring manufacturers usually depict an electrical installation diagram on the housings of their thermostats. However, if you are a person who is not at all versed in the wilds of electricity, some of the nuances may not be clear to you. We will try to take into account possible controversial nuances and describe the process of connecting the thermostat to the underfloor heating system in as much detail as possible - for "dummies".

General connection principles
When installing a floor heating system of any electrical type, you should first decide where to install the thermostat. He will control the entire system, maintain the desired temperature and connect the heating devices to the mains.Devices with built-in sensors that register the temperature in a room are mounted on a wall at a height of at least one and a half meters from the floor. The place for the device must be removed or protected from heat sources.
Until the thermostat is connected and the subsequent installation of an electric underfloor heating, it is necessary to decide how this will be done. There is a possibility of a stationary connection from an electrical panel, or a regular socket is used to turn on.
Many models of thermostatic devices on their cases have diagrams with the help of which the warm floor is connected to the thermostat. With their presence, the installation process is simplified, all work can be done on your own, without involving electricians for this.
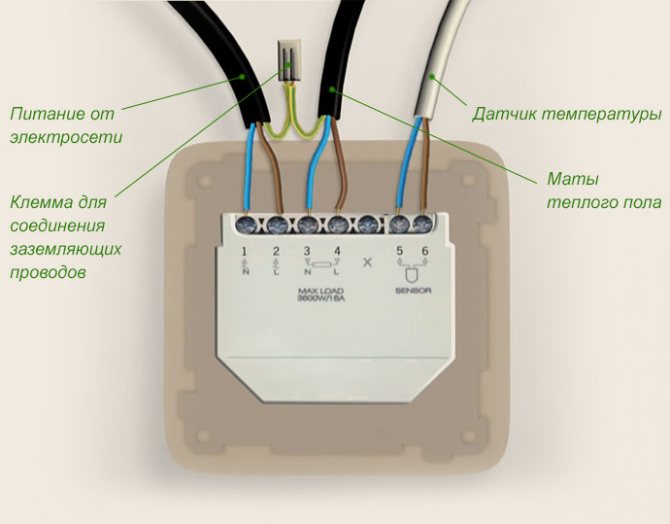
Wiring diagram for underfloor heating to the thermostat
After installing the thermostat, phase, zero and ground are displayed on the junction box. A groove is made in the wall, into which plastic tubes are placed. One houses the power lead of the heating cable, the other houses the sensor wiring located under the floor. As soon as all work is completed, it is allowed to proceed to the installation of heating, acting in accordance with the connection diagram of the warm floor to the thermostat.
By the way, the video with the thermostat connection sequence can be easily found on the Internet today.
How does the thermostat work?
The thermostat is used to maintain a stable temperature in a "warm" system, as well as to turn on and off heating mats (films). The device "reads" the readings of the temperature sensor and automatically cuts off the power supply as soon as the floor heats up to the required limit. At the same time, he himself remains in working mode and continues to control the situation. If the sensor notifies about deviations in the temperature mode, the thermostat will again put electricity into the system and the floor will begin to heat up.
The most popular and reliable thermostats are mechanical and conventional electronic. More complex ones are electronic programmable. Despite the significant difference in its "stuffing", the principle of connecting thermostats is very similar.
The kit for the thermostat includes a temperature sensor, a junction box, terminals, installation and operating instructions
Installing and connecting the thermostat
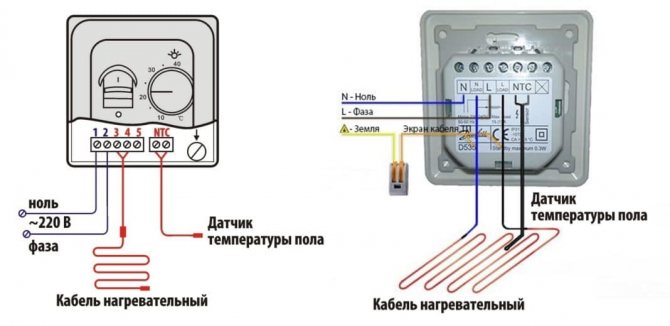
The thermostat is usually wall-mounted like a conventional switch. For it, a place is chosen near the existing electrical wiring, for example, near an outlet. First, a recess is made in the wall, the thermostat junction box is installed there, the wires (phase and zero) of the supply network and the temperature sensor are connected to it. The next step is to connect the thermostat.
On the side of the thermostat there are "nests". The wires of the network (220V), the sensor and the heating cable are connected here.
It is useful to know that the wires that are connected when installing the thermostat are color-coded:
- white (black, brown) wire - L phase;
- blue wire - N zero;
- yellow-green wire - ground.
Connecting the warm floor to electricity is performed in the following order:
- To "sockets" 1 and 2 connect the mains wires with a voltage of 220V. The polarity is strictly observed: the L (phase) wire is connected to contact 1, and the N (zero) wire to contact 2.
- A heating cable for underfloor heating is connected to contacts 3 and 4 according to the principle: contact 3 - wire N (zero), contact 4 - wire L (phase).
- The wires of the temperature sensor (usually built into the floor, that is, determining the temperature in the floor) are connected to "sockets" 6 and 7. The principles of polarity do not need to be observed here.
- Check the health of the thermostat. To do this, turn on the -220V power supply, set the minimum temperature on the device and turn on the heating element system (by turning the knob or pressing the button).After that, the heating mode is changed to the maximum, that is, the thermostat is “programmed” to the highest temperature that is possible for it. Correct operation of the device will report itself with a click, which will indicate a closure of the heating circuit.
Connection diagrams may differ slightly, depending on the types and models of thermostats. Therefore, so that the user does not make a mistake, as a rule, all contacts are written on the device case.
Installation and commissioning of hidden heating systems is a fairly simple process, if we are not talking about water structures. Electric heating circuits are suitable for rooms of any configuration and purpose, and unlike more complex water systems, there are practically no restrictions on their use.
Installation and arrangement of such a heating element consists in laying the heat carrier itself and connecting it to a power source. This is not a difficult job that does not require special knowledge and colossal experience, but if the installation of the source itself does not cause many problems, then not everyone knows how to connect a warm floor to a thermostat.
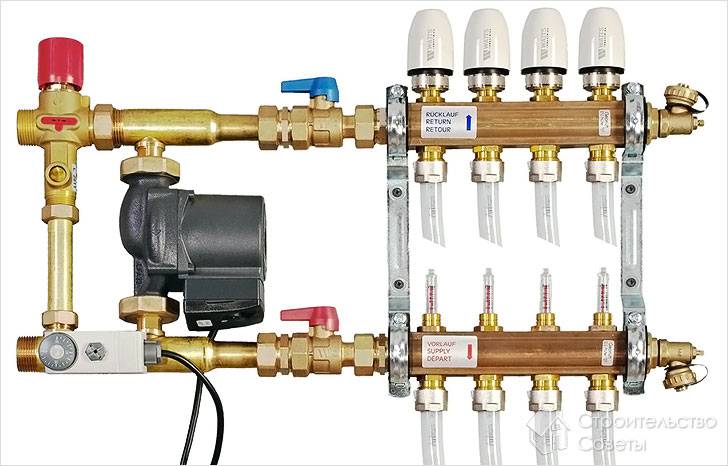
Collector for underfloor heating system
For underfloor heating, a common collector unit is most often mounted, or a separate collector is installed in front of each heating circuit. If the latter option is implemented, then all collectors are equipped with flow meters, thermostats, and the following elements:
- Return and supply mixing valve;
- Heater balancing shut-off valve;
- Overflow valve.
It is possible to assemble a collector for a warm floor yourself according to different schemes, and in some schemes of collector nodes bypasses are used, but not always - only in single-circuit systems. If the underfloor heating system is organized according to a two-circuit scheme, then the collector can be connected without a bypass to the secondary circuit.


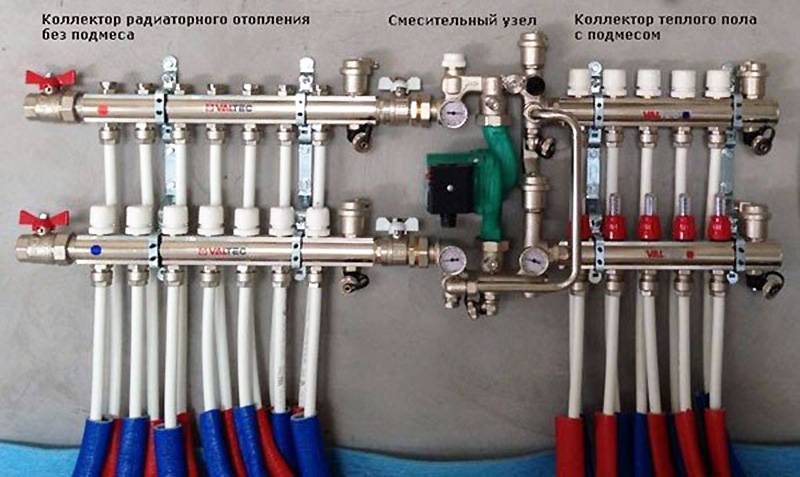
Double-circuit underfloor heating system with a collector
Before assembling a manifold assembly for a warm floor, weigh your possibilities - sometimes it is easier to buy a ready-made structure. If the collector is to be bought, it is better that all its parts and elements are from the same manufacturer. When assembling the unit yourself, you must choose the material from which the main components of the unit will be assembled: from copper, steel, polymers or brass.
Also, when choosing an industrial design, it is important to consider the following parameters:
- How many heating circuits will be in the system (usually from 2 to 12), the total length of the pipeline and the throughput of the circuits;
- Maximum allowable pressure in pipes;
- The possibility of expanding the heating system;
- Manual or automatic control of the collector;
- Electric power of all units and assemblies;
- The diameter of the internal openings of the collector (throughput).
DIY collector
The most efficient operation of the assembled manifold assemblies can be ensured by connecting to them heating circuits of the same length. In order to equalize the pipelines in length with sufficient accuracy, they are divided into equal segments, which are connected to the collector. The easiest way to calculate the collector unit is in a special computer program or on an online calculator so that a phenomenon called "heat zebra" does not appear, that is, uneven heating of the floor.
For the calculation, you need the following data:
- Type of decorative flooring;
- the area of the heated room and the plan for placing large items in it;
- Material and diameter of the circuit pipes;
- Boiler rated power;
- Floor insulation type.
Reservoir calculation
Collector installation - recommendations
When designing a floor heating system, you first need to find the optimal place for installing the collector. As a standard, the unit is installed in a manifold cabinet, and the cabinet itself is mounted at a height of 30-40 cm from the floor level next to the supply and return.
In order not to blame your own mistakes and ensure maximum heating of the underfloor heating pipes, study the instructions for connecting the collector. Then assemble the assembly in the following sequence (this applies to the industrial manifold assembly):
- Unpack the pipes for direct and return flow of the heating medium. The pipes must be with flow meters and supply valves. If the manifold is multi-section, assemble the sections into one structure;
- From the assembled sections, you need to assemble a unit on brackets (included in the kit);
- Next, we install shut-off valves, automation, sensors and the rest of the connecting fittings;
- We attach the unit to the wall or in the cabinet, mount the thermostat, servo drive and circulation pump;
- We connect pipes from the boiler and pipes from the heating circuits of the "warm floor" system.
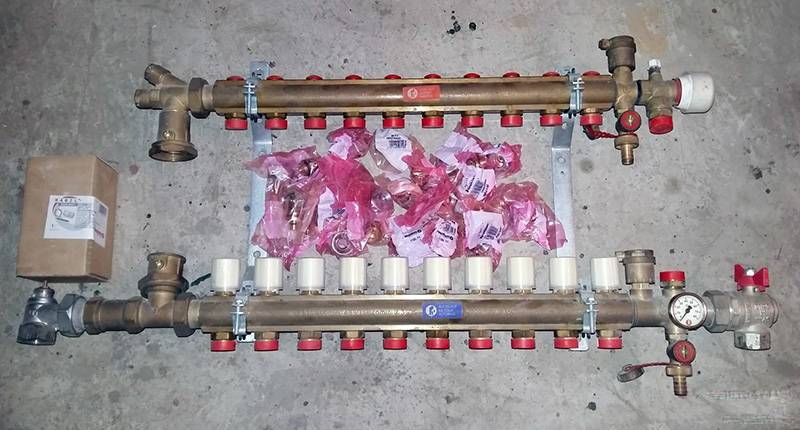
Collector set
Now the connection diagram of the underfloor heating collector is pressurized, after which the concrete screed can be poured. The thermal settings of the collector can be carried out after the installation of the topcoat.
Do-it-yourself manifold assembly
A factory collector is a rather expensive product, so many craftsmen want to make it with their own hands. Many items will still have to be purchased, but the cost will be cheaper. The easiest way is to solder a self-made collector from PVC pipes and fittings Ø 25-32 mm. You will also need tees and bends of the same diameters, and shut-off valves.
Homemade collector
The number of valves and fittings is calculated according to the number of heating circuits. Of the tools, you need a soldering iron for propylene elements and nozzles for it, special scissors for cutting pipes and a tape measure.
The marking of the collector consists in marking and cutting off the pipes of the required length, observing the minimum distance between the tees. Valves and transitions are soldered to PVC tees with a soldering iron. Fittings for connecting the pump are soldered to this structure. As you can see, everything is simple, but it is better to buy more complex manifold units ready-made.
Types of electrical systems
This hidden heating option is the most common among people who want to create comfortable temperature conditions in their home. Despite the fact that electric floors operate from the same power source, they differ in the heating element. To find out how to connect a warm floor to a thermostat, you need to clarify what type of heating system you are dealing with.
So, among all the variety of heat sources, the most common ones can be distinguished:
- cable with the property of self-regulation of temperature regime;
- resistive one- or two-core heating cable;
- thermomats are thin, rolled material, in which the heat source is sealed in several layers of a special cloth;
- a film based on carbon, bimetallic heat-transfer fibers, as well as carbon rods.
For each of these types of electric flooring, its own individual wiring and connection diagram has been developed. When installing thermal cable elements, it is necessary to correctly calculate the laying pitch, which will eliminate excessive heat generation or uneven heating of the floor covering.
So, what types of electric floors are, we have already found out, now let's figure out how the temperature regulator works.
VIDEO: How to connect a warm floor to a thermostat
What is the principle of thermostats
This device, as mentioned above, is used to maintain a stable temperature in a hidden heating system. Also, by means of a thermostat, a cycle of on / off operation of thermal elements is carried out. How does he do it?
So, during the pouring of the screed, the sensor is laid, which will read its thermal data from the floor surface.Further, when the cement base is completely dry and the decorative coating is laid, the warm floor should be correctly connected to the thermostat. As a rule, it is located in the wall covering, according to the principle of the device of sockets and switches. But if the latter are installed, according to the European standard, 80 cm from the floor covering, then the regulator should be easy to use. Most trained professionals recommend placing the thermostat at eye level for comfortable use and protection from unnecessary actions by young children.
So, back to how this device works. The thermal sensor, located in the screed, "transmits" the heating data to the auto-thermostat, which, when the set temperature is reached, turns off the heating system. In this case, the device itself remains in operation and continues to monitor the situation. When the device detects deviations in the temperature of the concrete base and the one set by the program, it re-energizes the system and the floor starts warming up again.
Today the market in this segment offers a huge number of regulators, among which mechanical and conventional electronic models are the most popular and reliable. More complex - electronic thermostats with the function of programming the cycle of switching off / on, as well as other additional features. Despite the significant difference in their "stuffing", and, accordingly, in cost, the principle of their connection to the network is almost identical.
Connecting thermostats
Before connecting the warm floor to the thermostat, you need to decide which method you will use to connect. Creatures have two options:
- Stationary supply of the power source from the main meter.
- Using an outlet.
Many models in their configuration already have a scheme, thanks to which the procedure for putting the device into operation will not cause difficulties. And if you are at least a little versed in electrics, then, most likely, you can independently carry out this procedure without resorting to the help of specialists.
After you have installed the underfloor heating thermostat in the place you need, phase, ground and zero must be connected to the junction box. Now let's start preparing the place for the output of the wires from the data meter. In the wall covering, we cut a small groove in which two plastic tubes for wires should fit - the power wire of the heat source and the connection of the internal sensor. Based on this, you should understand that the connection of the underfloor heating regulator is carried out before finishing work, otherwise you will simply ruin the finished, beautiful walls and you will have to deal with their improvement again.
As soon as a number of these measures are completed, you can proceed with the installation and connection of the electric underfloor heating.
How to connect the cable floor?
Before proceeding with the installation of the cable, it is necessary to stretch the power wires to the thermostat, while the heating element itself and the wires passing to the regulator are connected with a special coupling, which will later be located in the screed.
The next step is to lay the cable directly. There are many schemes that help create uniform heating of the floor plane, but whichever you choose, it is important to remember that the cable lines should not intersect in any case.
Next comes the installation of the sensor, which is placed in a plastic pipe of a suitable size. And, before pouring the screed, you need to make sure that the laid heat source is working, using a special tester for this. After this device has shown resistance identical to the passport data, you can start pouring the concrete base.
The connection of the bonded underfloor heating to the thermostat is carried out only after the base has completely solidified.
Connecting thermomat
Connecting this heating system to a thermostat is not so difficult, especially since the process is almost identical to the previous version. Therefore, it makes sense to point out only the differences.
Due to the fact that in this case there is no need for a concrete screed, an additional opening in the floor surface will be required to place the sensor. Once the mats and data meter are positioned, fix them with a thin adhesive backing. That's the whole difference.
VIDEO: Installation of underfloor heating based on heating mats
Connection to the network of the film structure
At the edges of the heating film there are copper rods, which are connected to the network. The thermostat is connected to the film variety according to the same scheme as the thermomat device. The difference lies in the use of a special substrate, which is laid out over the entire insulated surface, which is a foil sheet.
VIDEO: Warm film floor connection instructions 220 watts
The temperature controller is an important element of any electric underfloor heating. It improves the efficiency of the entire system and significantly reduces power consumption. The installation diagram of this device is quite simple. Even a non-specialist who has basic skills in working with electrical appliances will be able to install it.
Connection diagrams
Exist several ways the commissioning of a heating system for a room of this type.
In each of the schemes, it is necessary to provide for the absence of particles in the pipes, otherwise this will lead to clogging of the structural elements of the underfloor heating.
Through a separate input
With this method dry running of the circulation pump is not allowed. For this, a relay is installed that regulates pressure or flow.
And it is also permissible to use overhead thermostat, allowing to block the operation of the pump when it crosses the mark of the lower temperature threshold.
The most efficient option is regulator installation, correcting the temperature regime of heating the room in accordance with the external temperature of the room.
Through vertical wiring
The main purpose of such a scheme is the process of rebuilding an existing radiator system.
By fixing the underfloor heating pipes directly to the riser, you can double the amount of heat received. This is due to the fact that at the same temperature in the supply pipe and return at the time of the difference in the pipes of the heated floor, it will be higher than in the radiator.
If available in a residential area 4 risers coolant of the two is in transit, and of the rest, warm water from the central heating system is used.
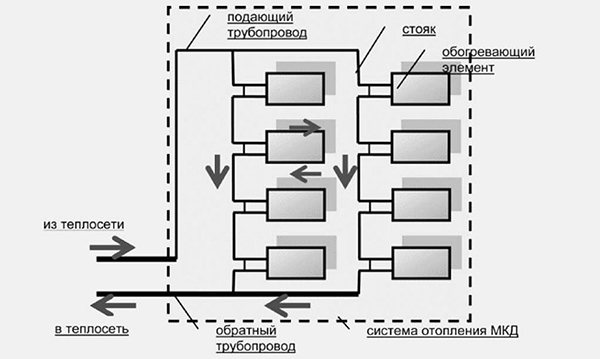
Photo 1. Diagram of connecting a water heated floor to the heating system by means of vertical wiring.
The sequence of actions according to this scheme:
- installation of new exchangers heat in place of previously used radiators;
- parallel fixation of the secondary circuit from the underfloor heating.
Important! When carrying out the process, it is imperative application of PVC pipes one length.
One pipe system
Such a scheme does not provide for flow control coolant and lowering its temperature.
The underfloor heating is connected to the central heating system by means of a riser. This can be done by replacing the radiator with an underfloor heating circuit.
The difference in heat load between the central heating system and the underfloor heating should not be more than 5-10 degrees.
In this case, the room temperature can be controlled using a circulation pump and a thermostat.
In the absence of coolant in the riser, pump operation stops automatically.
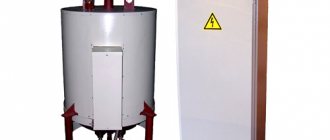
To maintain a comfortable temperature in winter, it can be used in the used scheme peak electric boiler... This element will be able to perform this function using a thermostat, provided it is connected to the central heating on one side, and to the heated floor on the other.
How does the thermostat work?
The main purpose of the thermostat is to maintain the stable operation of the electric underfloor heating. Depending on the set parameters, it turns on and off the heating elements at a certain time. This action allows you to reduce energy consumption without compromising the quality of heating. The temperature controller receives information about the system using a special sensor. It is installed inside the structure, where it records changes in the set temperature regime.
There are the following types of devices for regulating the operation of an underfloor heating system:
Despite the difference in the device of this type of devices, the connection diagram is no different.
Preparatory work
Before installing the thermostat, sensor and other elements of the system, it is necessary to calculate the number of devices of this type, which will ensure the effective operation of the warm floor. If underfloor heating is provided for the entire house, then it is recommended to carry out an independent connection to the mains for each room.
Also, for different circuits, you need to install a separate thermostat. This approach will allow you to get a more efficient system, where certain operating parameters can be set in each room.
Before installing the temperature controller, you must carefully inspect its body and familiarize yourself with the passport. Usually the manufacturer describes the installation scheme in detail. It should be understood that the power cable can be connected to the device both directly through the wiring and through the outlet. Also, manufacturers recommend using a separate circuit breaker when installing the thermostat. This will allow for more efficient operation of underfloor heating.
The thermostat is installed on the wall near the electrical wiring. It is best to choose a location near a power outlet, but not exposed to direct sunlight. The installation height of the thermostat is about 1.5 m. A small recess is made in the selected area, which will allow the device box to be installed. You also need to make a groove in the wall where the two plastic tubes will be placed.
They are designed for the power wires of the heating cable and the temperature sensor, which will be installed inside the underfloor heating structure. It is imperative to connect the phase, ground and zero to the thermostat box. After all the preparatory work, proceed to the installation of a single-core cable.
How to connect a cable underfloor heating to a thermostat
Connecting system elements to the network
After installing the temperature sensor, the underfloor heating is connected to the thermostat. The connection diagram of all elements of the system is as follows:
After installation, check how efficient the temperature controller is. To do this, turn on the power and set the minimum operating temperature for the heating elements. For this, the device has a special button or knob, depending on the specific model.
After these manipulations, it is necessary to set the maximum heating temperature, which the underfloor heating of the cable type must reach. The correctness of the actions should be confirmed with a characteristic click. It indicates a short circuit in the heating circuit.
The need for floor thermoregulation
Thermoregulation in the underfloor heating system plays a major role.With the help of the thermostat, a stable temperature regime is maintained in the system, the heating elements are turned on and off. The device recognizes the readings of the temperature sensor and automatically de-energizes the system when it warms up to the desired limit. At the same time, the device continues to maintain the operating mode, monitoring the situation.
As soon as a signal is received from the sensor about a decrease in temperature, the thermostat activates the system again by supplying electricity. The flooring will begin to warm up again. The most popular are reliable mechanical and simple electronic devices. Electronic programmable thermostats are considered more complex. But differences in design features do not have a particular effect on the connection diagram of the warm floor to the thermostat and the electrical network.
Features of connecting different types of underfloor heating
Depending on the type of underfloor heating, the connection of its elements to the thermostat, including the sensor, is carried out in the following way:
The principle of connecting all elements of the system to the thermostat and the mains is the same. Depending on the model used, some peculiarities may appear during installation. In order not to be mistaken and to do everything right, you should carefully study the instructions, where each step is indicated. Also, on the device itself, a schematic diagram of the connection of all elements is drawn.
Video: Installation of single-core and double-core heating cables
Secrets of joint pain treatment from our regular reader.
Hello!
My name is Gennady Alekseevich. I am a stove-maker with over 20 years of experience. I am engaged in both the repair and construction of Russian stoves and fireplaces. I always do the work very efficiently and carefully, which negatively affects the condition of the joints. With age, the pains started getting stronger, up to the point where I could no longer work. Having tried a lot of both medicinal and traditional methods of treatment, I realized how serious my disease is, since there was no positive effect. Until I came across one tool, which I want to tell you about.
It is a unique blend of the rarest and most powerful natural healing substances. This tool has proven its effectiveness not only for patients, but also for science, which has recognized it as an effective drug. Joint and back pain go away in 10-15 days, studies have shown. The main thing is to clearly follow the instructions in the methodology. You can order the product in its original packaging, with a quality guarantee, at