Hello readers of my blog! Today we will talk about How to properly lay a warm electric floor with your own hands. It would seem that this is not a tricky matter, but when faced with this problem, you have to think about how to do it right, what preparation to do, what materials to choose. Thus, I decided that this article would be useful to someone, and I devote my efforts to this subject. In it, I will answer a number of questions that will arise immediately before How to properly lay a warm electric floor with your own hands, and some even after that. This topic is wide enough, because before work, you need thorough preparation, but how to do it? And this is a separate topic. You can find out about all this in great detail in the article below.
What is underfloor heating
How to lay a warm floor, or rather, how to properly lay a warm floor with your own hands so that it will serve me as long as possible? I studied this question from A to Z.
In this article, I will tell you in detail what a cable floor heating is and how to lay a cable floor heating with your own hands.
It's no secret that the most common type of underfloor heating is electric.
Where is it used? Everywhere.
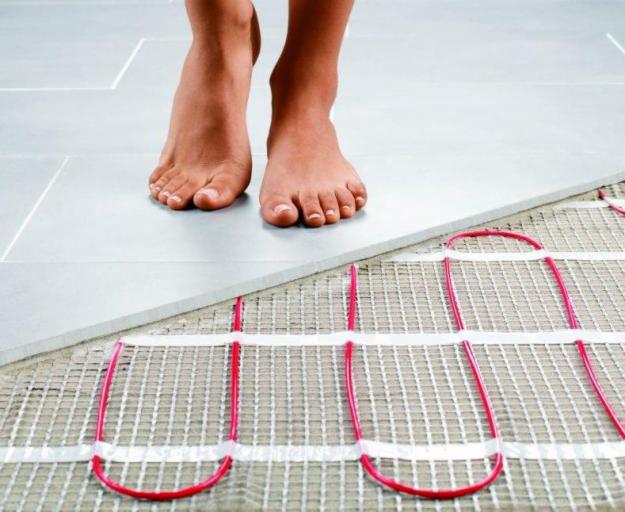
Electric underfloor heating is easy to install and therefore you can find it not only in apartments, in private houses, but also in garages! There is no need to run any pipes, break walls and unnecessarily irritate the neighbors. Laying a warm floor of a cable electric is not difficult and not at all noisy. And you will be convinced of this now.
What is underfloor heating cable electric
Since the warm floor is called electric, it is absolutely clear that it is heated with electricity.
Or rather, an electric cable, which, by heating itself, heats the floor. There are two types of such cables: a resistive cable and a self-regulating cable. What is the difference between them?
The first type of cable (resistive) heats up itself due to the electricity that flows through it, and heats the surrounding space, that is, the floor. The cable is single-core and two-core.
Single-core is when there is only one wire along the entire cable - a core. It is braided and insulated. Two-core, respectively, consists of two of the same insulated conductors.
IMPORTANT: When installing, a single core cable must start and end at the same location. That is, it should be closed. This rule does not apply to a two-core cable.
IMPORTANT: Single-core and two-core resistive cables have two drawbacks - they emit an electromagnetic field (however, two-core cables are weaker). Do not place heavy furniture on a heated floor made of a resistive cable, the cable may overheat. The same can happen if the technology of installing a resistive underfloor heating is violated.
The second type of cable (self-regulating) is much more complicated and free from the previous drawbacks. Accordingly, the cost of such a cable is much higher.
So, you figured out the types of cable floor heating. And now I will tell you how you can determine how much cable to buy?
How much to buy cables for electric underfloor heating
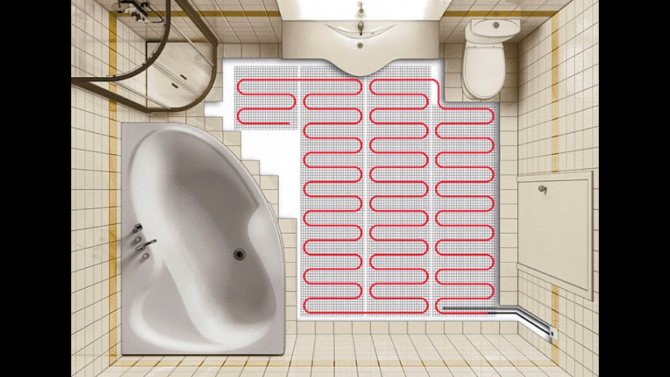
First of all, you need to measure the floor area on which you want to lay the cable underfloor heating. Install an underfloor heating cable electric (as opposed to, for example, water) only on those areas of the floor surface where there is no furniture (cabinets, sofas, beds), plumbing or large household appliances (stove, washing machine, refrigerator).
The cable underneath may overheat.And why heat the surface under the furniture and spend electricity, and hence money, on it? And the warranty period of the floor only decreases from this.
Measured the area? Remember this figure.
Better yet, write it down (for example, the floor area in my room is 9 m2). Now multiply it by the power of the heating system, which falls on 1 m2 of the room.
Now you have received the system power that you need to heat the entire area of the selected room (I multiply my 9 m2 by 150 W = 1350 W). With this figure, feel free to go to the store, where a smart seller will help you choose the cable of the right parameters. Underfloor heating in the form of a cable is most often sold in ready-made pieces of a certain size.
Necessarily! Ask your dealer for the length of the selected cable.
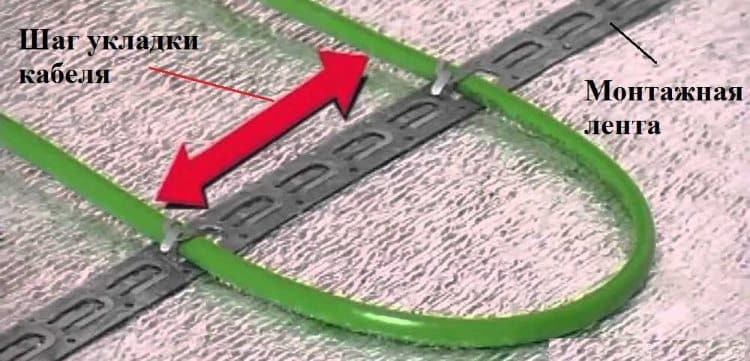
This is where the fun begins in laying a warm electric floor with your own hands. This is the calculation of the so-called "step". The pitch is the distance between the turns of the cable.
It is measured in centimeters. We calculate how many centimeters should be left between the cables when laying it. To do this, multiply the area on which you decided to lay the warm floor by 100 and divide the result by the length of the cable (in my room: 9 square meters x 100 / cable length = step).
Everything! Now you know how to start laying an underfloor heating cable electric with your own hands.

IMPORTANT! Correctly calculate the required power of the future underfloor heating in order to avoid overheating of the cable.
And now the most important and responsible event is the installation of a warm floor with your own hands or its installation (as you wish).
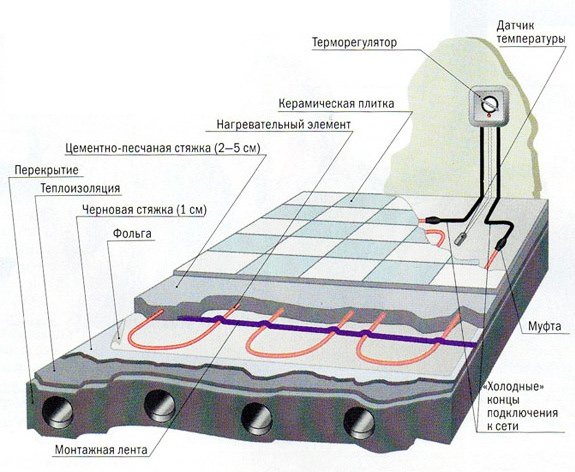
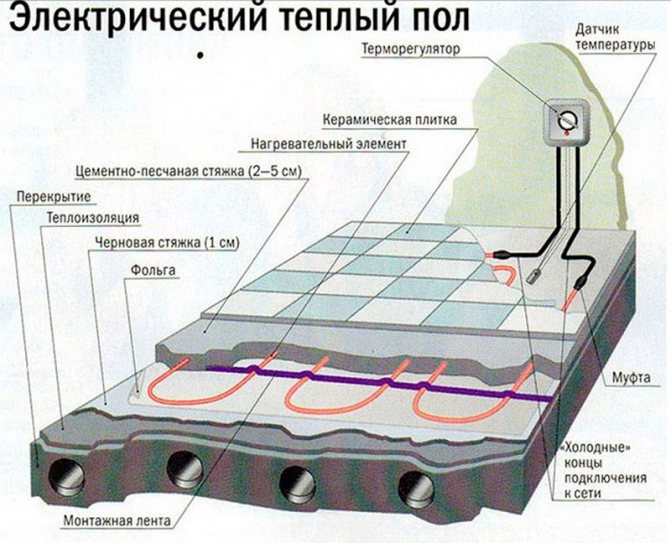
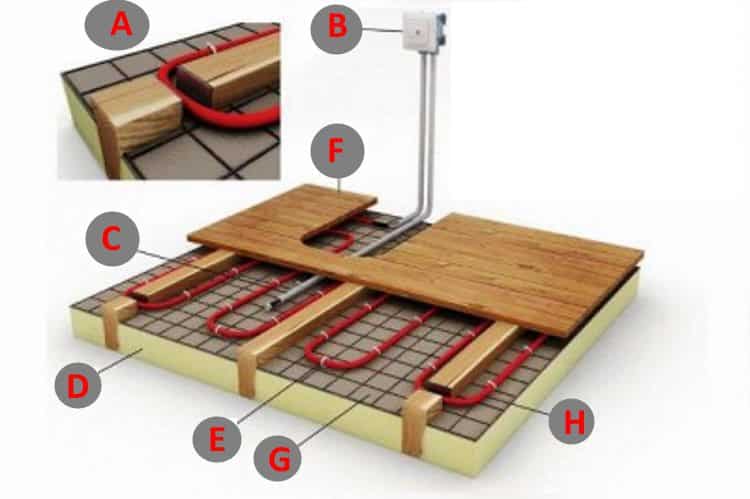
Cable underfloor heating construction
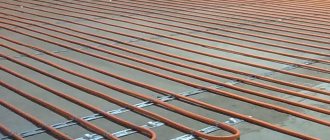
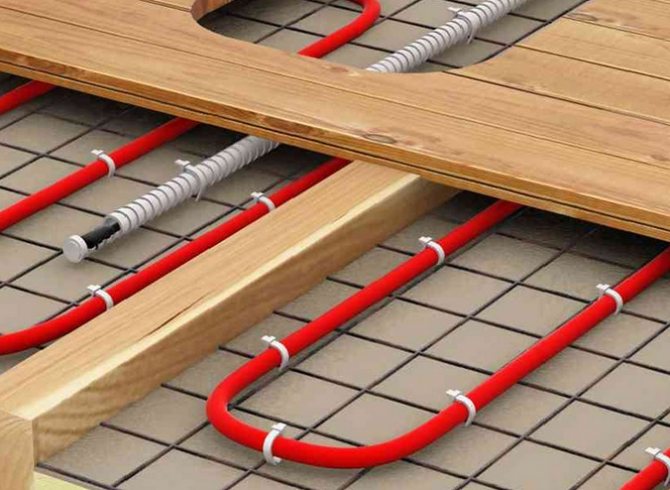
Heating technology with cable underfloor heating is based on converting the power of electricity into heat. The underfloor heating cable can be heated up to a temperature of 60-70 ° C. Such a heated floor must be installed in a screed or tile adhesive.
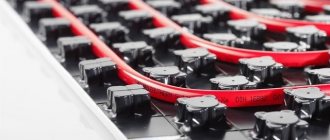
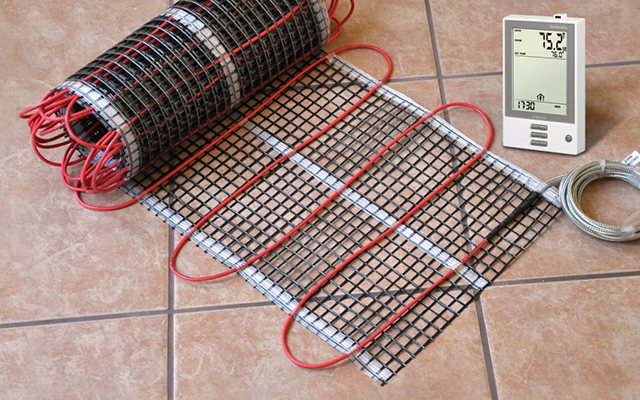
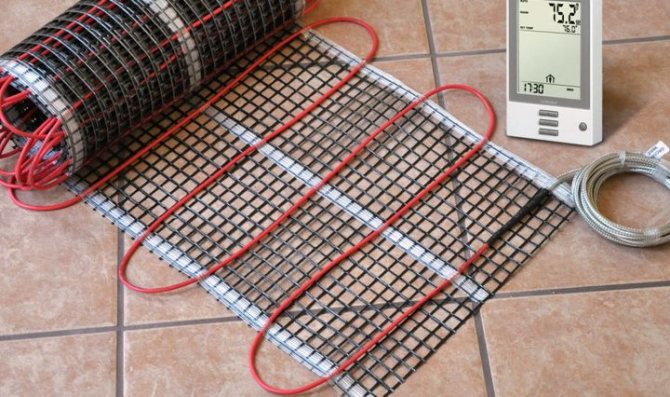
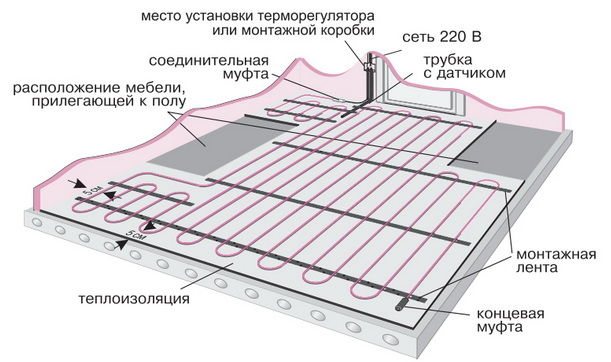
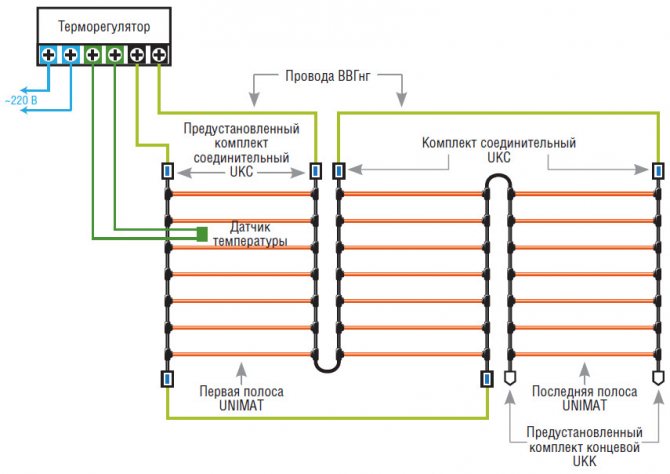
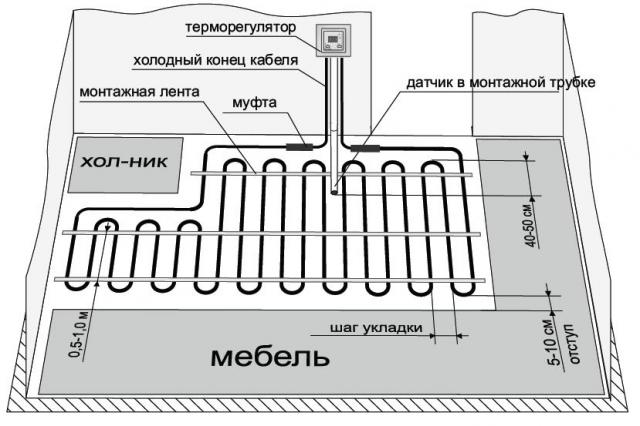
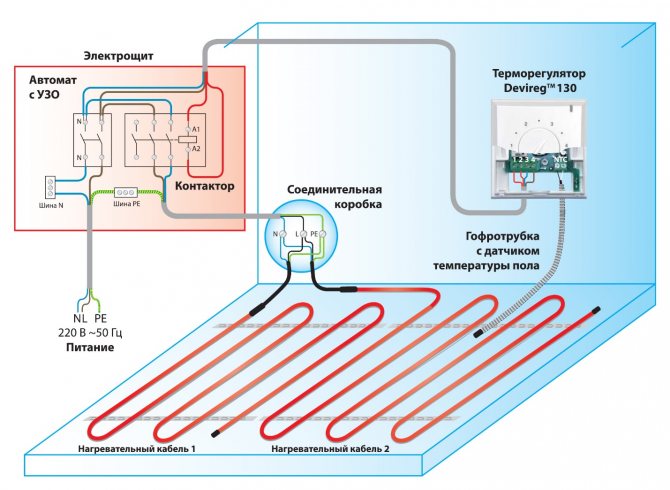
The heating circuit diagram is quite simple - a resistive single-core, two-core or self-regulating wire with a cross section of 2.6 mm is placed on a special mesh mat, where it is fixed. Before laying the cable electric floor, the power and step are calculated.
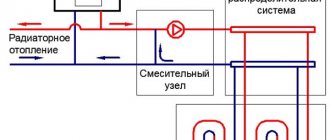
In some cases, it can be laid under plaster or ceramic tiles, or along the wall. The cable floor diagram consists of a temperature sensor to which the control unit is connected. The cable and sensor are connected to a wall-mounted thermostat. When a signal is sent from the sensor, the thermostat turns on or off the heating circuit from the mains.
Comparison with other underfloor heating systems:
- Cable heat-insulated floor, unlike pivot one, cannot be laid in those areas of the room where furniture or plumbing equipment will be placed;
- Cable underfloor heating can be installed in a room with high humidity. Infrared or bar floor such conditions can be harmful;
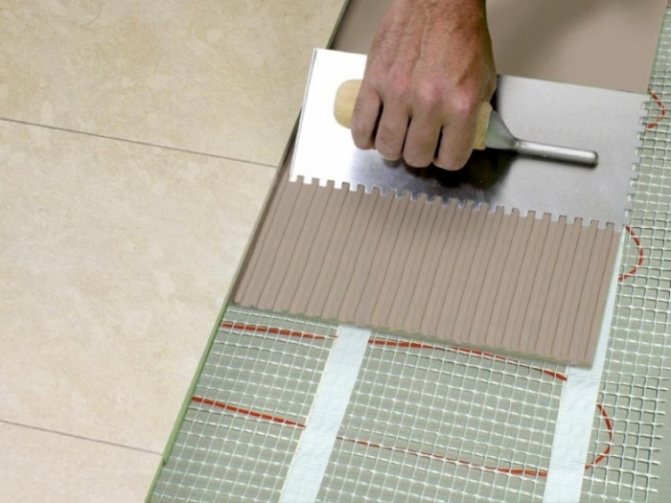
- Tiled products are easier to lay on top of an electric cable, film counterparts have a low degree of adhesion to tile adhesive;
- The cost of the device and installation of a cable underfloor heating is relatively low;
- The instruction requires mandatory grounding of the cable underfloor heating;
- Cable underfloor heating does not need a large number of additional devices, just installing a thermostat is enough;
- The cable floor is optimal in rooms with a small area; it will be problematic to install a water analogue in such rooms.
Do-it-yourself electric cable underfloor heating
What needs to be done first of all when laying any electric underfloor heating with your own hands? Choose a thermostat and a place for its installation.
A thermostat is a device with which the heated floor is controlled: it keeps the set temperature, regulates the on-off heating.Choose a thermostat based on the power of your underfloor heating.
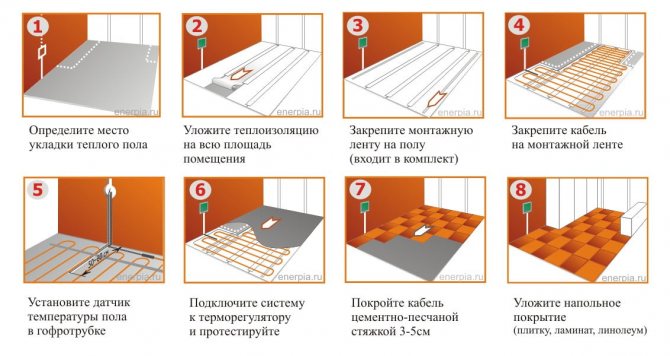
After you have chosen the thermostat and the place where you will install it, proceed directly to the installation of the thermostat and laying the underfloor heating, having previously leveled the floor surface with a cement screed.

Glue damper tape around the perimeter of the room. Install at least 2 cm thick thermal insulation. It is needed so that the cable heats only your floor, and not someone's bottom ceiling or basement.
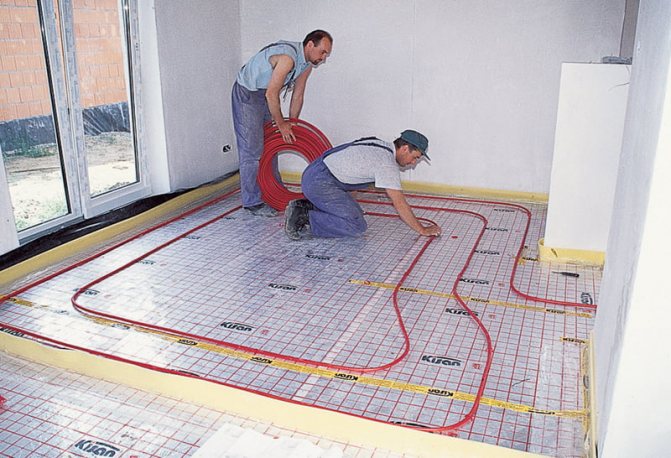
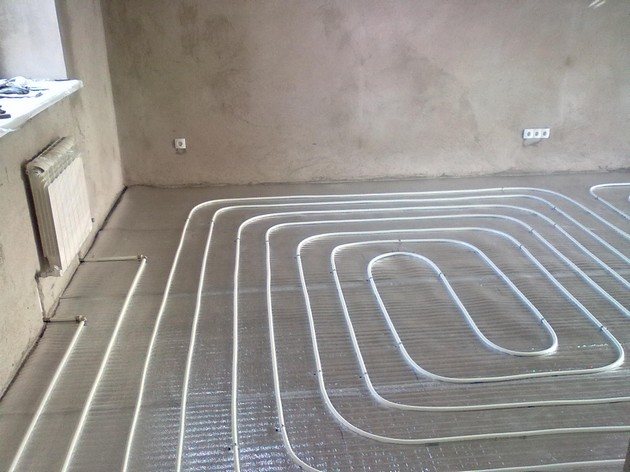
There are two main ways to install underfloor heating - parallel and spiral. The names speak for themselves.
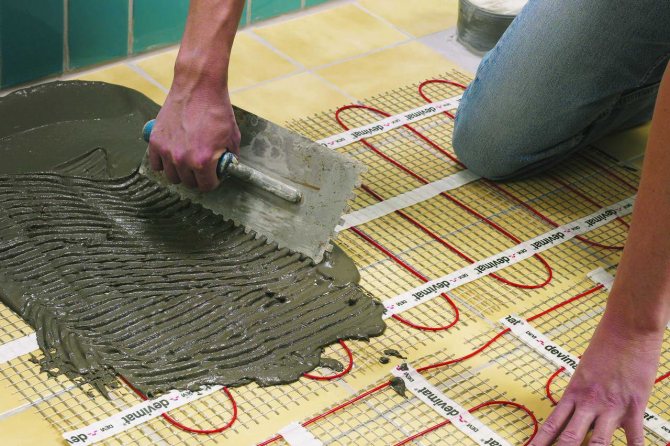
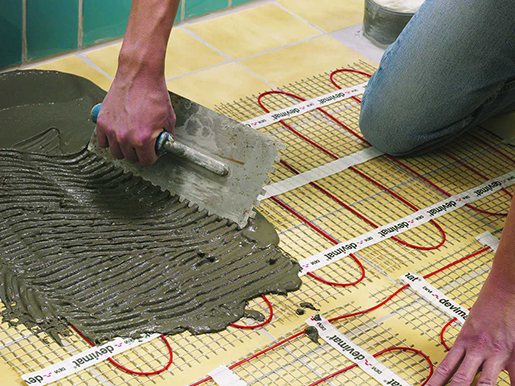
It is more convenient to lay the cable underfloor heating in the second way. You will need: mounting tape, cement screed, the cable itself.
The floor is prepared. It is flat and insulated.
Now lay and fasten the mounting tape to the prepared floor surface. And mark the cable laying step on it. Remember, you calculated it before?
IMPORTANT: The cable must not cross itself!
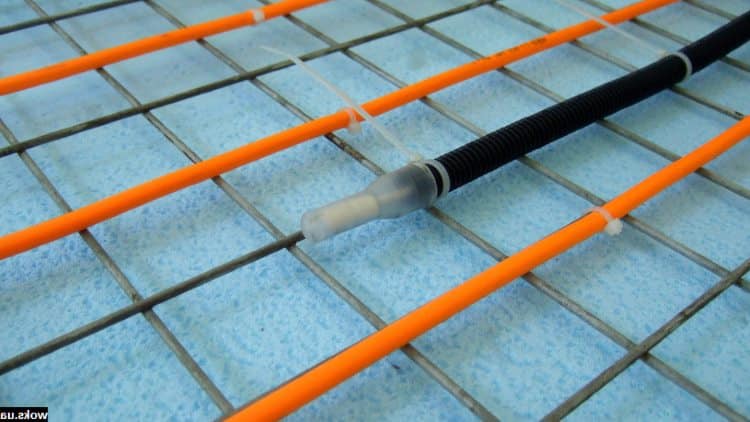
It remains to install the temperature sensor. In the prepared groove on the floor and on the wall (from the underfloor heating cable to the thermostat) we place a cable with a temperature sensor at the end.
Tip 1: To make the temperature sensor serve you faithfully for a longer time, protect it with a plastic corrugated pipe. A plastic corrugated pipe is a special hollow tube into which the temperature sensor wire is placed and the end is closed, for example, with insulating tape so that nothing unnecessary gets inside the tube. Pass the cable with the temperature sensor in the corrugated tube along the floor between the cable turns.
Advice 2: After laying the electric cable of the underfloor heating, check its functionality.
That is, you take a special tester and measure the resistance of the laid cable. The data obtained should not differ from those indicated in the data sheet by more than ten percent. If there is no tester, just connect the cable to electricity and at least check if it heats up or not.
Everything is fine? Now you have come to the finish line. It remains only to fill everything with cement screed.
The thickness of the cement screed should be 3 to 5 cm. Leave the screed to dry. After it has dried (recommended 28 days), you can start connecting the underfloor heating cable to electricity.
Connect the temperature sensor, floor cable wires, and electrical wires to the back of the thermostat.
Advice 3: If you are not sure that you can independently connect the warm floor to the thermostat, ask professionals to do this (for example, a neighbor - an electrician).
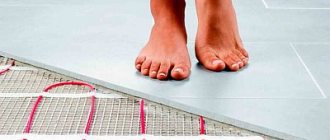
This completes the installation of the underfloor heating cable electric. Floor coverings such as tiles, laminate, carpet, cork flooring and so on can be laid on top of the cement screed with installed electric cable underfloor heating.
Installation of electric underfloor heating
Cable heating systems can be installed in any premises, both in residential and office or industrial buildings. Correct laying and installation of an electric underfloor heating will ensure its reliable and safe operation for many years. The installation of an electric underfloor heating begins with the work of the preparatory plan.
Preparatory work is carried out for one single purpose - to calculate the required amount of materials and elements. The main task before laying an electric underfloor heating is to calculate the power of the heating cable.
Electric underfloor heating: types, device, features
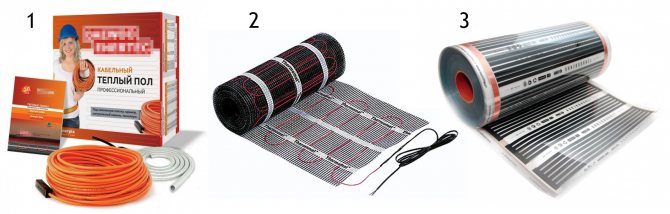
Installation of electric floor heating from scratch implies initially a competent choice of the type of equipment, since there are several types, the device of which implies connection features and do-it-yourself laying options. The main criterion for the accepted classification of existing systems is the type of heating element.
According to this, they are distinguished:
- cable underfloor heating with a conductive core;
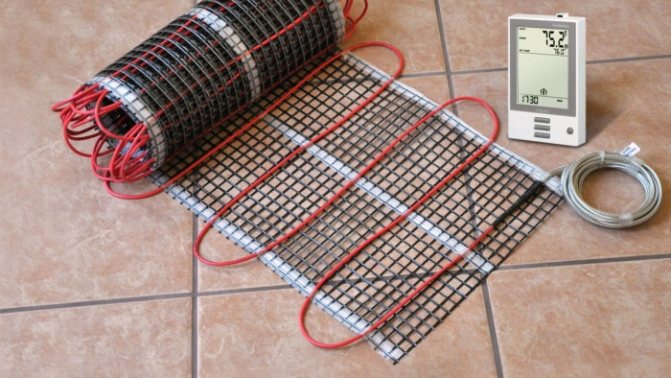
- heating mats, the design of which is almost the same as cable systems;
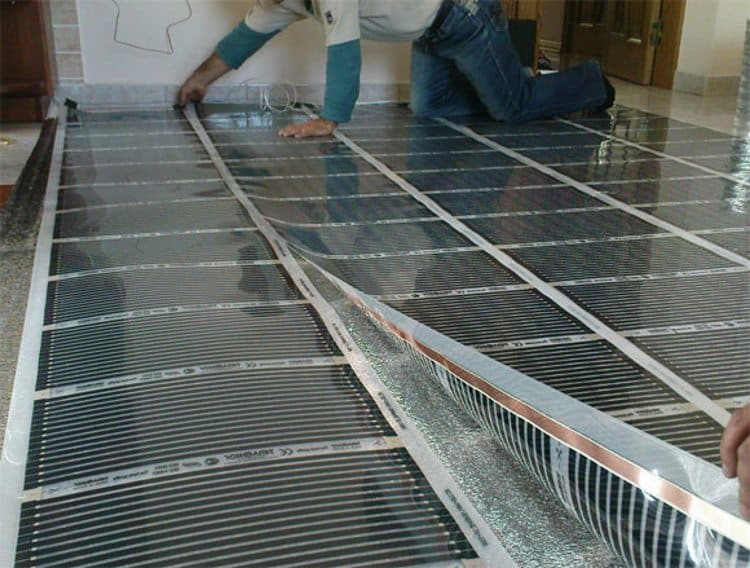
- an infrared floor representing a film that has conductive carbon stripes;
- rod, in the role of a heating element, which is a carbon rod.
Also, warm electric floors differ in the way they transfer heat. So, for example, a cable system transfers heat using convection, and a rod or film system using infrared radiation. A distinctive feature is the size of the proportions of the given heat energy.
Cable warm electric floors
The basis is a wire made of special alloys. It is selected in such a way as to efficiently transform electrical energy into heat. There are both single-core and two-core systems. Also, floors of this type can be produced as separate technological parts or assembled into mats.
Low prices and a fairly simple device have single-core underfloor heating. They are quite versatile, and therefore are in demand for use under a screed in rooms for almost any purpose. They can act as both the main and additional heat source.
The performance characteristics of various systems depend largely on the manufacturer. Available in different lengths and power. But the maximum indicator of the specific power is the value - 20 W per one running meter.
Despite its simplicity, installation has a number of nuances. The fact is that the floor device implies the need to lay both ends of the wire to one mounting point, where the entire system is connected to the mains.
In terms of the main technological parameters, a two-core cable is in many ways similar to a single-core "colleague". It also has a heating element equipped with a screen and insulation. Due to the fact that the design device implies the presence of two conductive cores, this greatly simplifies the installation process. The conductors on one side are interconnected, which makes it possible not to lead the second wire to the electricity connection point.
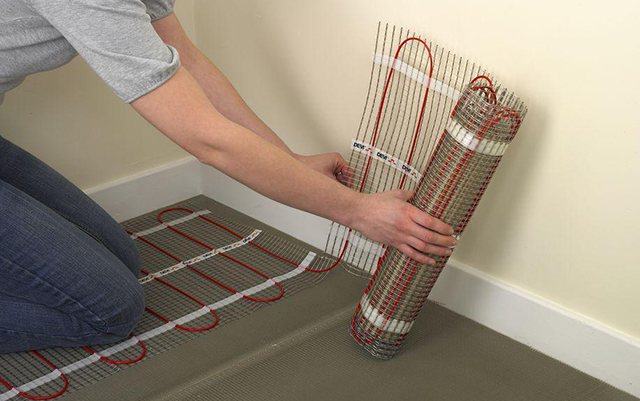
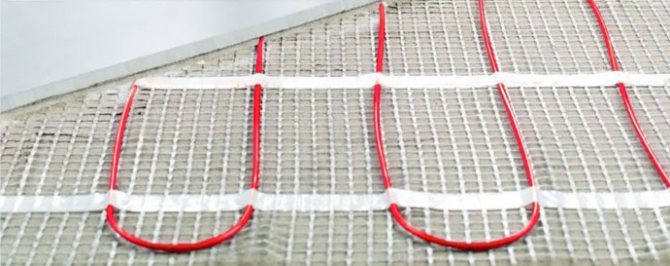
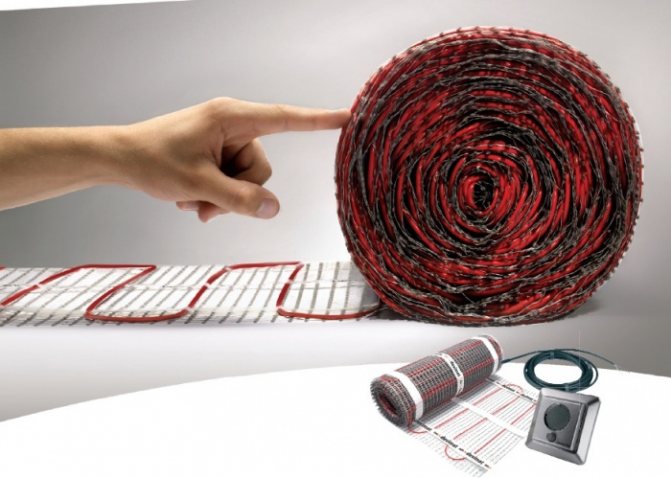
A two-core cable is most often the basis for the manufacture of heating mats. They consist of a mesh in which the heating cable is fixed with an optimal pitch. The optimal width of an electric mat is half a meter, and the length depends on the manufacturer's brand.
A small diameter cable is used in the manufacture of the mat. This makes it possible to mount the mat on an adhesive base under the tiles. In the case of a single or two-core cable, a screed with a thickness of at least 3 cm will be required.
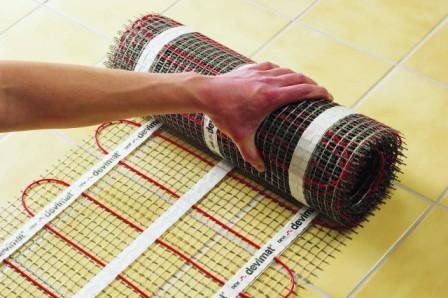
Electric mats can be fully installed in an adhesive layer of only 10 mm. At the same time, many models of mats are already equipped with an adhesive layer, therefore, unlike cable systems with a step-by-step layout of the heating element, the mat sheet is simply rolled over the surface.
One of the relatively new types is the self-regulating cable. Its distinctive feature lies in the fact that the role of a conductive core is assigned to a semiconductor. It has the property of changing the strength of its resistance depending on the room temperature.
This is great in terms of saving power consumption, but does not extend the operating life of the entire system. However, this same characteristic acts as an additional plus, since such systems are not able to overheat, even if the fundamental conditions were violated during installation (installation technology and / or close arrangement of turns).
The main advantages of such underfloor heating include a long service life relative to the same water heated floors, the non-use of pipes and an electric boiler, as well as relatively low electricity costs during operation.Despite the fact that cable systems operate completely from the electrical network, they consume this resource in small quantities, which is financially more profitable than when arranging and using water systems.
The main disadvantage is considered to be the generation of electromagnetic radiation. But this disadvantage applies exclusively to cheap electric underfloor heating systems. For recognized manufacturers, this indicator is within acceptable regulatory limits.
Therefore, when buying, you should definitely ask the seller for a document confirming the environmental safety of ISO 14000, as well as a KIMA certificate, and only after that make a final decision about what kind of electric underfloor heating you need.
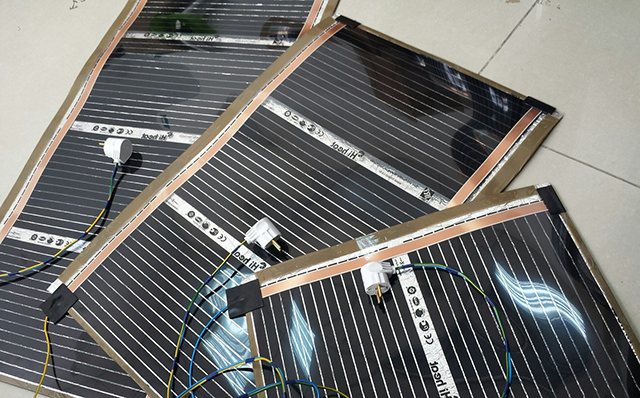
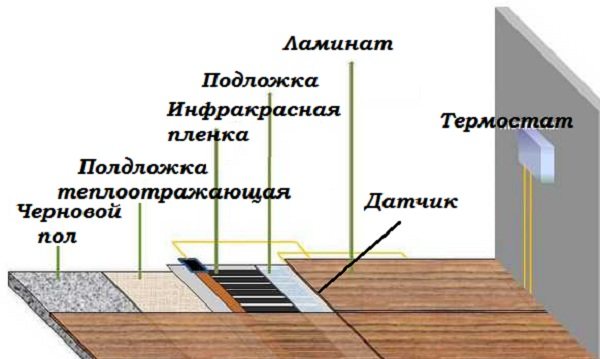
Film type of heating
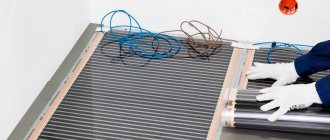
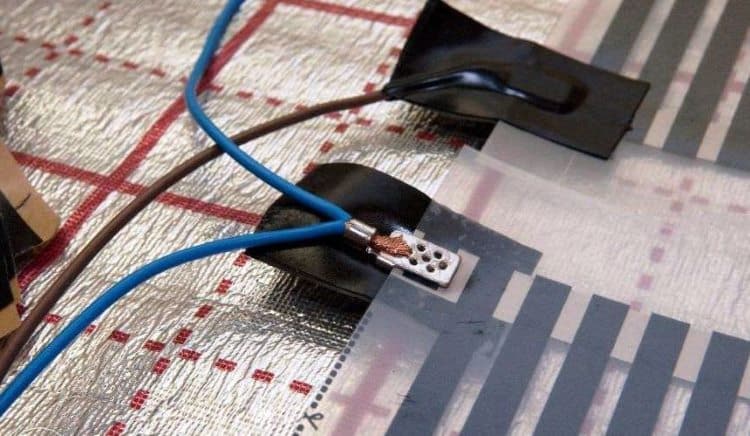
It is an infrared multilayer film equipped with carbon strips that act as a heating element.
Structurally, the film system can be represented by a combination of:
- a substrate made of a non-conductive material;
- carbon strips or solid carbon cloth;
- copper or silver conductive conductors;
- layer that performs a protective function.
A distinctive feature of the IR film is its small thickness. Moreover, during the operation of a warm electric floor of this type, it is capable of heating up to only 50 C.
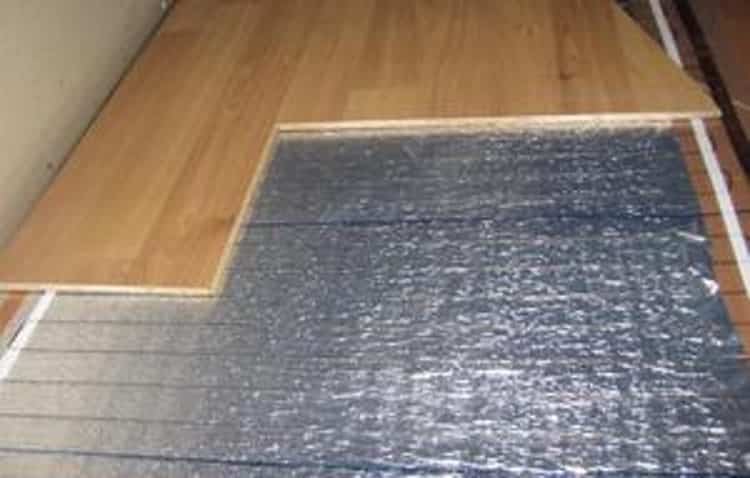
The combination of these factors makes it possible to lay infrared film heating under such decorative coatings as laminate, parquet, linoleum, porcelain stoneware, carpet and much more. But the film can also be used under the screed, having previously insulated with a special material.
In addition to the versatility of use, a distinctive feature is the portability of IR films. It can be temporarily fixed, for example, on the seamy side of a carpet located on the floor, and can also be easily removed if there is no need for additional heating.
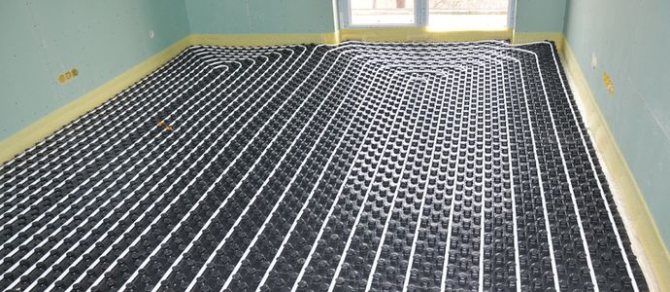
Intelligent floor heating
This is the name given to the rod heating system. It is produced in the form of mats, the heating element of which is an infrared carbon rod. Installation can be carried out both under the screed and in the adhesive composition.
The rod gives off energy in the form of infrared radiation, which is a common feature with IR film floors. At the same time, the rods of the system do not heat up much, which unites them with cable systems, because the average performance does not exceed 60 C.
Benefits:
- During installation, there is no need for additional planning when arranging furniture and equipment. Unlike other underfloor heating systems, the rods function perfectly and smoothly even under furniture. Overheating and breakage do not threaten them.
- The contact of working elements with various cement or adhesives is absolutely safe for complete installation and subsequent operation.
- The possibility of using in rooms with high humidity levels, as well as use in open areas, for example, terraces.
The key disadvantages include the criterion "how much it costs" when compared with other systems of additional floor heating. Sufficient high demand for the product also pushes many unscrupulous manufacturers to release low quality systems, which significantly affects the safety of operation. Therefore, when purchasing a core system, you should demand from the seller the entire package of necessary certificates.
Preparatory work before installation
Before starting work, let's sketch out a small action plan:
At the initial stage of installation, it is necessary to decide on the place where the thermostat will be installed. The thermostat is installed on the wall, like a regular switch, in the most convenient place at a height of at least 30 cm from the floor.
A hole is drilled in the place marked on the wall for installing the thermostat.Perpendicular to the floor, from the installation site of the thermostat, a groove is made in the wall for laying the power wire and the wire of the floor temperature sensor in plastic tubes or corrugation.
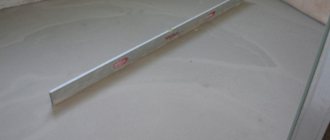
First of all, the surface is cleaned of dust and debris, it should initially be flat, without pits and drops. If necessary, the surface is leveled with a screed, the thickness of the screed should be at least 3 cm, if the layer is thinner, the screed will crack. The optimum screed thickness is 3-7 cm.
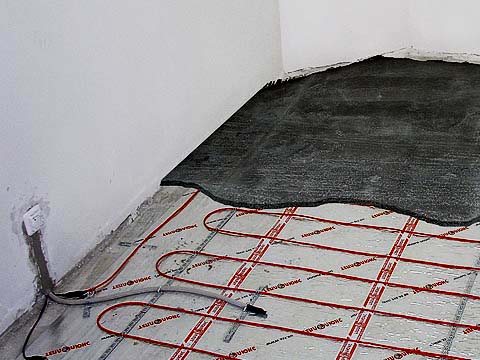
Before pouring the screed, it is necessary to treat the floor with a primer, this will improve the contact of the surface with the cement-sand screed. After the primer dries, you need to mark the places where the installation of a heated floor is not required (stationary furniture), also the indents from the walls to the heating cable (at least 5 cm) are taken into account.
To make heating the room more economical, it is necessary to reduce heat losses. For this, a layer of thermal insulation is placed between the concrete base of the floor and the heating cable. The insulating layer will make it possible to reduce heat loss by up to 30%.
VERTICAL - along the perimeter of all walls at the base of the floor. For this purpose, thermal insulation in the form of a special damper tape or ordinary polystyrene sheets 15-20 cm wide and about 1 cm thick is suitable. The insulation laid in this way will reduce heat loss through the outer walls of the room;
HORIZONTAL - on the concrete base of the floor, close to the vertical insulation, sheets of heat-insulating material with a thickness of at least 2 cm are laid.
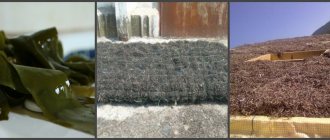
The thermal insulation material must be mechanically strong and resistant to thermal influences. You can use material from such compositions as expanded polystyrene, expanded propylene, cork agglomerate, fiber-mineral boards, etc.
If an electric underfloor heating is installed in rooms with high humidity, a waterproofing layer is laid on top of the thermal insulation. This will prevent moisture from entering the subfloor. It is especially important in apartments so that in the future there will be no problems with neighbors below.
Preparation for styling
Before starting the calculation, a certain work plan should be carried out, consisting of the following steps:
- Preparing the area for the thermostatic device and sensor.
The technology of installing an electric underfloor heating begins with determining the zone in which the thermostatic device will be installed. It is wall-mounted like a standard switch in the most accessible area (height not less than 300 mm from the floor surface).
Stages of installation of a warm floor
A hole is drilled first. Then a strobe is made from this place perpendicular to the floor. There will be laid the power wires of the temperature sensor in the corrugation or plastic tubes.
- Surface treatment.
First of all, you should clean the area from any debris and dust. It should not have drops, but be even. If necessary, it should be leveled with a screed, the thickness of which must be at least 3 cm. With a thin layer, the screed will crack. It is best if it has a thickness of 30 - 70 mm.
Before pouring the screed, it is necessary to treat the floor with a primer. This will improve the contact between the sandy cement screed and the surface. After the primer has dried, places are marked where it is not necessary to make a heating floor. This is where the massive furniture will stand. In addition, the indents from the walls are taken into account - not less than 50 mm.
- Layout of isolation.
For more economical heating, thermal losses must be minimized. Between the heating cable and the base of the concrete floor, a heat-insulating layer is laid. It can reduce losses by up to 30%.
Thermal insulation can be laid out in 2 variations:
- Horizontally. Heat-insulating sheets (height not less than 20 mm) are laid out against the insulation on a concrete base.Thermal insulating material should be distinguished by the following characteristics - resistance to thermal effects and strength. You can use expanded polypropylene, expanded polystyrene, mineral fiber boards, cork agglomerate and so on.
- Vertically. The material is laid out at the base of the floor along the perimeter of the walls. For this, a special damper tape or standard polystyrene sheets will fit - a thickness of about 10 mm and a width of 150-200 mm. This option of thermal insulation will reduce heat losses through the outer walls of the room.
When the room has significant humidity, waterproofing must be provided on top of the thermal insulation. This will prevent moisture from penetrating into the subfloor. This is especially important for apartments.
Before laying the heating cable on the thermal insulation, a sand and cement screed is poured. The screed layer makes it possible to prevent overheating of the heating cable and create the strongest foundation for laying the cable.
Underfloor heating installation
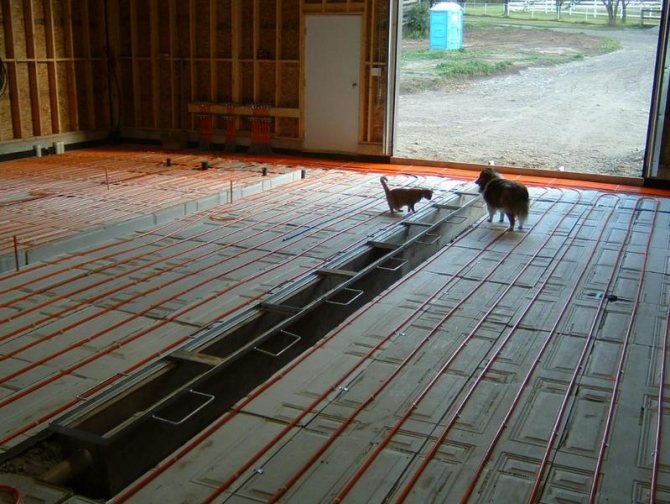
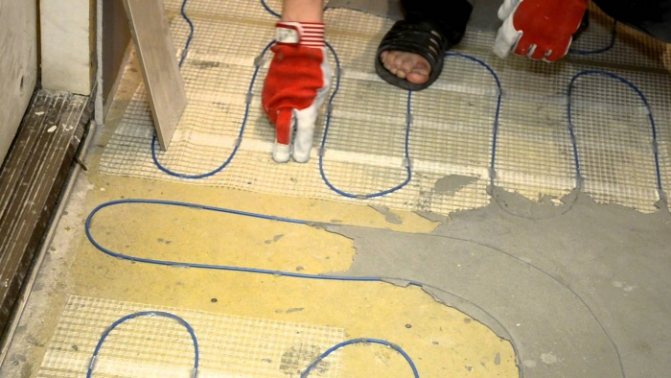
If it is not possible to make a preliminary tie, then the cable can be laid out on top of the thermal insulation on a metal mesh (cells 10 - 25 mm). The mesh, together with the heating cable, is filled with a screed. The metal mesh makes the coating solid and strong.
After the sand and cement screed hardens perfectly, the floor is covered with a special mounting foil. It covers the surface completely. At the borders, it is laid out with a reserve, and the edges are glued with foil tape. This is necessary so that the edges are not wrapped when installing the cable.
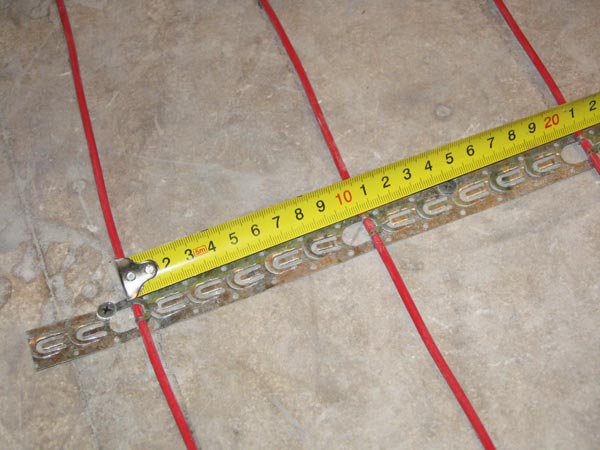
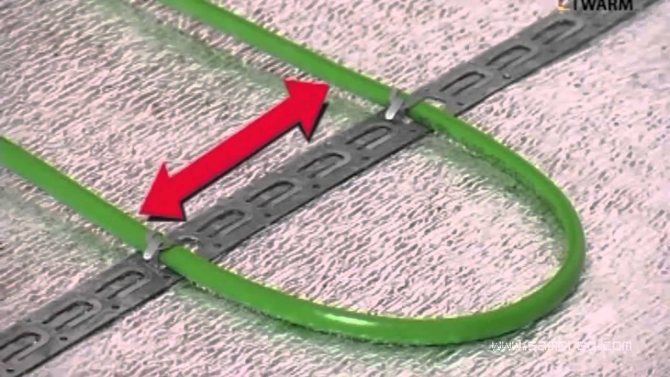
This leveling screen promotes an equal distribution of heat over the entire floor area. In order to securely fix the heating cable, a mounting tape is used, which is laid every 500 mm and fixed with self-tapping screws or studs.
There are brackets on the mounting tape for fixing, the distance between which is the same, usually 2.5 cm. Such devices allow you to observe equivalent steps for laying out cables.
Preliminary cement-sand screed and fastening of the mounting tape
Before laying the heating cable, a cement-sand screed is poured onto the surface with thermal insulation. The screed layer will help prevent overheating of the heating cable and will also provide a solid base for laying the heating cable.
If for some reason it is not possible to organize a preliminary tie, you can lay the cable on a metal mesh spread over the thermal insulation (with a small cell of 1-2.5 cm). The mesh, in this case, together with the heating cable laid on top of it, is poured with a finishing tie in one step. Due to the metal mesh, the screed is strong and monolithic.
After sufficient hardening of the cement-sand screed, the floor is covered with special foil-clad thermal insulation (mounting foil). The entire surface of the floor is covered with foil, at the joints it is laid with a margin, and the edges are glued with foil tape so that they do not wrap up during the installation of the cable.
Such a foil-shaped heat-leveling shield will help to evenly distribute heat over the entire surface of the warm floor.
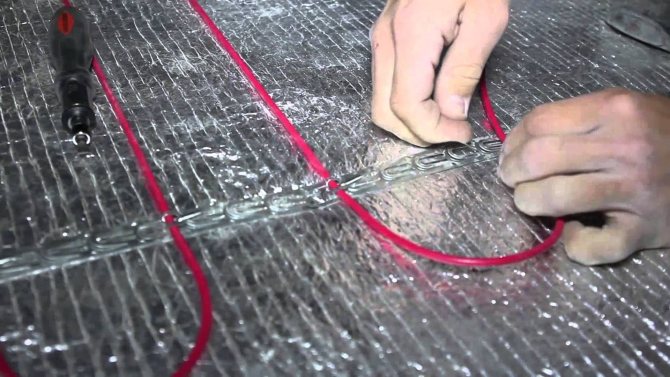
Mounting tape is used to securely fix the heating cable. An installation tape is laid on the floor surface every 50 cm and fixed with ordinary nails or self-tapping screws.
To fix the cable on the mounting tape, special brackets are provided, located at an equal pitch from each other throughout the entire length (usually 25 mm). With these brackets it is easy to follow the required cable routing pitch.
Installation of heating sections
First, you need to return to the previously drawn up plan for laying the heating cable, carefully study such details as the order and step of laying.
Before unwinding the cable, you need to check its resistance.
The value of the measured resistance is recorded in the warranty card. It must match the one indicated on the cable gland label. The permissible discrepancy is ± 10%.
The cold end of the two-core heating cable is pushed into the corrugation and installed in the initially prepared groove. The connecting sleeve and the beginning of the cable are fixed on the floor to the mounting tape, and from this point the laying of the cable begins.
Moreover, the connecting sleeve must be located on the floor in such a way that it is completely filled with concrete screed.
In the process of laying, it is necessary to ensure that the cable lines do not touch or intersect, and also strictly observe a constant laying step throughout the entire heating area. In places where cable bending is required, the bending radius should not be less than 5 cm.
The end sleeve of the two-core heating cable is fixed on the mounting tape with the same condition as the connecting tape - it must be completely covered with a concrete screed. If a single-core heating cable is used for the installation of a cable heating system, then when drawing up a laying scheme, it must be borne in mind that both ends of the cable will be connected to the thermostat.
How to install heating sections
First, the installation scheme for electric underfloor heating is determined, and in addition, the sequence and distance of the layout. Before unwinding the wire, the resistance must be checked. The parameters of the measuring resistance are written in the guarantee check. They should be the same as on the coupling tag. Deviation is allowed within + -10%.
The cold edge of the heating wire must be led into a corrugated pipe and placed in a groove prepared in advance. The initial cable base and the joint sleeve are attached to a special tape for mounting on the floor surface. This is the initial phase of cable installation. Moreover, the connection sleeve must be positioned so that it is fully filled with a coupler.
When laying out, you must strictly ensure that the cable lines do not cross or touch. In addition, it is important to maintain the consistency of the laying pitch throughout the floor space. Where there is a cable bend, the radius may not be less than 50 mm.
Preparation for laying underfloor heating
The end sleeve of the heating wire must be fixed to the mounting tape, as well as the connecting tape.
Installing and fixing the temperature sensor and thermostat.
When the cable is laid completely over the entire surface, you need to install the temperature sensor. It is mounted in a corrugated tube and installed together with the supply end of the heating cable in one strobe. At the end of the tube, where the thermostat will be located, a plug is placed so that the solution does not get into it.
The tube with the sensor is laid on the floor, without crossing them between the heating cable lines.
In order for the temperature sensor to function normally, it is fixed together with the tube in the middle of the cable lines on the mounting tape. The floor sensor with a tube must be located along the cable at least 50-100cm in length.
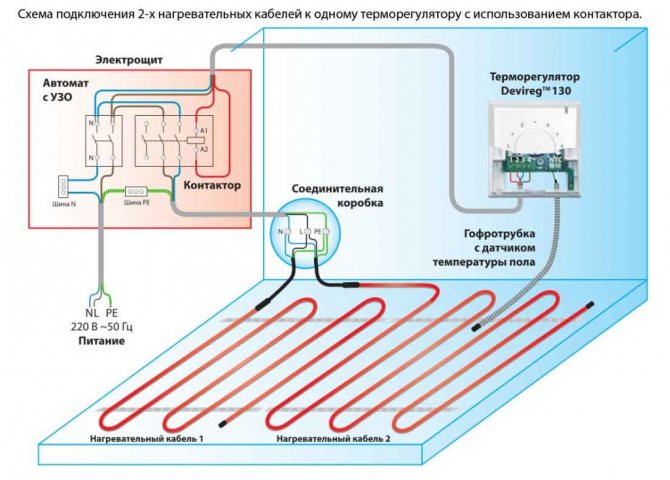
The thermostat is installed and connected after three wires are connected to the junction box: the floor temperature sensor wire, the heating cable supply wire and the 220 V power cord. The thermostat must not be placed in rooms with high humidity. It's not safe!
At this stage, the installation of the electric underfloor heating is over. You can start filling the cable heating system with a cement-sand screed.
Energy consumption of underfloor heating
Installation of an electric underfloor heating is not profitable in all rooms. It is important to take into account many factors from which the amount of energy spent on heating is formed:
- the climate of the area in which the room is located;
- private or multi-apartment building;
- the size of the room;
- type of overlap and floor covering;
- the quality of thermal insulation of walls, ceilings and door and window openings;
- type of premises (office, residential building, outbuilding);
- the purpose of the installation (will be used as an additional or as the main source of heating);
- the warmth of the household.
According to professionals and owners of underfloor heating, the power of the structure as a central heating system fluctuates in the range of 160-210 W / m2, and as an additional one from 100 to 160 W / m2.
The device is a cement-sand screed or self-leveling floor.
Before filling the cable heating system with a screed, it is necessary to make sure that it is working properly. For this, the warm floor is switched on for a short time. The layout of the warm floor with the placement of couplings and end couplings must be sketched, or better photographed and put into the warranty card.
It is better to prepare a screed for an electric warm one from mixtures specially designed for this. It is necessary to pour the liquid cement-sand mixture over the floor surface evenly and accurately, without damaging the cable insulation.
It is necessary to ensure that air pockets do not appear during the pouring of the screed, as they impair the heat transfer from the heating cable.
The thickness of the screed should be approximately 3-5 cm. The time for complete drying of the screed is indicated by the manufacturer of the mixture (approximately 28 days).
After the screed has hardened along the walls, it is necessary to cut off the protruding parts of the insulation (if any). Then you can start laying the flooring (ceramic tiles, etc.).

If during its service life the temperature sensor fails, it can be easily replaced by pulling it out of the corrugation through the thermostat box. That is why the temperature sensor must be installed in the tube.
Underfloor heating with electric and water heating is becoming more and more popular.
The latter often serve as the main heating system for private houses, and electric floors are widely used for additional heating of rooms. This factor, as well as a number of other reasons, made electric heating more in demand.
We propose to consider the design, principle of operation, as well as the possibility of independent arrangement of electric underfloor heating.
Advantages and disadvantages
First you need to generally understand how it stands out from the background of other types of floors. What are the disadvantages of a warm electric floor system.
- This type of heating is not as economical as hot water heating. You will have to spend a lot of energy on his work.
- Of course, there is the possibility of electric shock. Because of this, during installation, you need to be extremely careful, correctly calculate the calculation so that there are no major health problems. You have to put it down slowly.
- An electromagnetic field can be generated from the cable. Formed during its operation, when heated.
- The system is unique and can be combined with many coatings, it cannot be placed under wooden floors or on the same parquet. This is physically possible, but there is a high probability that the floor will simply dry out due to the rapid formation of cracks in the wood.
- The height of the room will decrease slightly due to the fact that there will be a certain layer of heating elements below.
- Additional 100% wiring requirements.
The cons are detailed and clear. Everything is very clear, the main points that are best avoided are highlighted. What about the strengths of this gender?
- It can be used as the main source of heat for the living area and can be used as an additional one.
- Heats the surface evenly, not in parts.
- It is possible to install heating in any room and any building structure.
- Suitable for various surfaces (carpet, linoleum).
- This is a great opportunity to personally adjust the floor temperature in a private home.In addition, if such a floor system is installed throughout the apartment, you can set up each room separately.
- You can set the heating to a timer or vice versa.
- If the hot water floor technology requires additional equipment, then there is no need for an electrically heated floor.
- Easy installation.
- Looks very attractive, clean structure right under your feet.
- The service life is very long if everything is installed correctly.
Types and device, as well as features of heating elements
As a heating element for an electric floor, a single-core wire or a two-core cable is often used.
The first option is notable for its low cost, but the increased background EMR imposes restrictions on its use in residential premises. The heating cable has two cores, one of which acts as a normal conductor, and the other as a heating element. This design allows you to significantly reduce electromagnetic radiation, but increases the cost of the product.
More detailed information about the above heating elements can be found on the pages of our website.
Installation can be greatly simplified by using a heating mat. This design is nothing more than an ordinary thermal cable, laid with a certain step width on a reinforcing mesh.
As a rule, the width of the mats is about 0.45-0.5 m, and the length can vary from 0.5 to 12.0 m (accordingly, the maximum heating area for one segment is limited). There is no standard for the size of the mats, so they may vary slightly from manufacturer to manufacturer. An electromat, like a thermal cable, is a one-piece structure, the footage of which cannot be changed arbitrarily.
Bar structures are considered a subspecies of electric mats. They use special carbon rods with the addition of copper and silver as heating elements. Heating elements are connected in parallel with a certain pitch.
The main advantage of this design is self-regulation. That is, if the temperature on any rod has risen due to poor heat transfer (for example, furniture has been installed), then the heat release decreases. Thanks to this property, the mat can be laid over the entire area of the room.
Infrared film. This heating element is widely available relatively recently, literally at the beginning of the century.
Used in the title, the term "infrared" is a marketing ploy aimed at distinguishing this product from a number of other heating elements.
As you know from the school physics course, infrared emitters are also called thermal, therefore, any heating device can be attributed to this category. The design of a film infrared underfloor heating element is shown in the figure below.
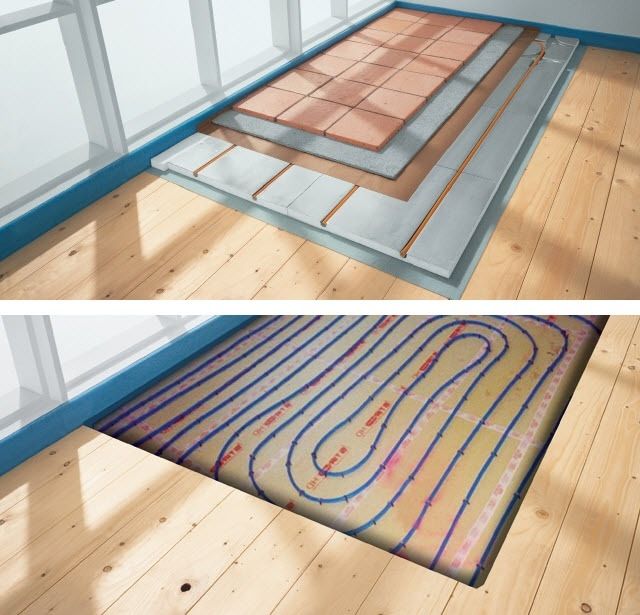
Types of flooring
Underfloor heating is a heating system without the usual radiators. The electrical cable in this system or the water flowing through the pipes is a heating element. They are placed over the entire floor area. In this way, the room is evenly warmed up.
The "warm floor" system is enriched with several types of coverage, combined into groups based on installation features:
- sets designed for rooms covered with laminate, carpet, parquet or linoleum;
- selection of heating elements for floor coverings with tiles and porcelain stoneware;
- heating cable for installation in a cement screed.
For the installation of different materials, there are different installation methods for heating elements.
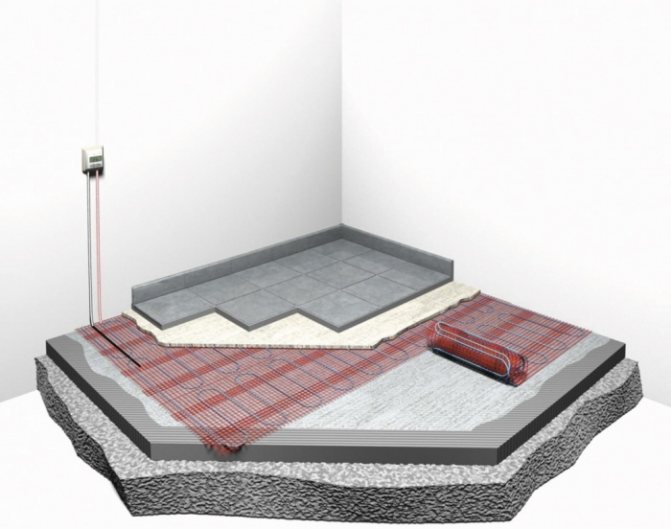
Underfloor heating has differences in design, but basically all types are similar in multi-layered construction. An insulating layer is placed on the base, and heating devices are installed on top of it.
Then the cement screed is set up (if necessary) and only then the floor covering is laid out.

Hot water floors are heated and controlled by means of a mixing unit. The heat carrier circulates along the closed circuit of the pipes - hot water, which is heated in the boiler and moves into the pipes, passing through the mixing unit.
This option is recommended for private houses, for apartments with separate heating. Most often they are installed in the initial period of construction. The base is isolated from water flows and insulated, and then pipes are installed on it.
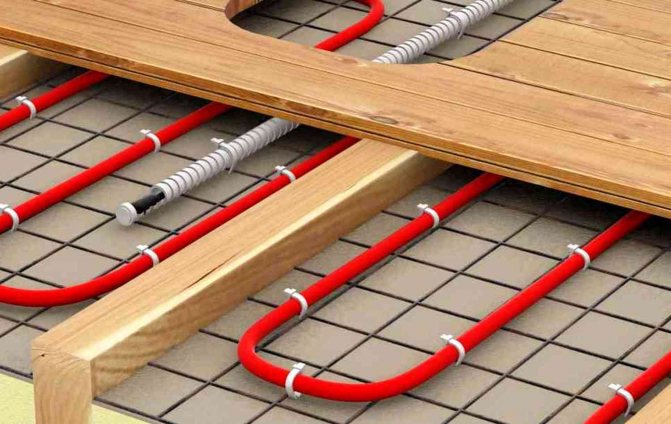
We recommend: How to install the warm floor on the boards?
By connecting them to the manifold cabinet, the structure is poured with concrete. The finishing coating is laid from above along the screed.
Typical technologies for laying electric underfloor heating
Before giving several laying schemes, it is necessary to explain what affects the design. These factors include:
It should be taken into account that the minimum thickness of the thermal coating is selected based on strength criteria. At the same time, the installation technology does not allow an unreasonable increase in the thickness of the screed, since this affects the inertness (time) of heating (the floor heats up for a long time). Accordingly, the sensor of such a system may not have time to respond to the difference in daily temperature.
On the other hand, a 60-100 mm coating in such a situation can accumulate heat. With this option, you can make a supply of heat, including underfloor heating at night, when a preferential tariff is in effect.
Instructions for laying an electric floor on an old base
If you make fasteners on concrete, then the heat loss in percentage will be about 30-35%.
Provided that the axis of the thermal cable will be at a distance of 10.0 mm from the base, and the pitch will be 70.0-75.0 mm. In this case, you should opt for a cable with a nominal value of 10.0 watts per meter. The cable is fastened to the base on the mounting tape (first, you need to lay the insulation on the base).
On top, an even layer of tile adhesive is applied. When it dries, you can lay a tile without a screed or other coating in compliance with the technology of its installation, for example, pre-lay a layer under the laminate before installing it.
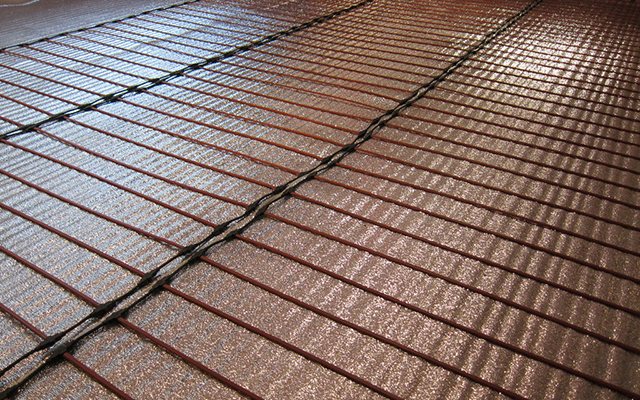
Laying in grooves
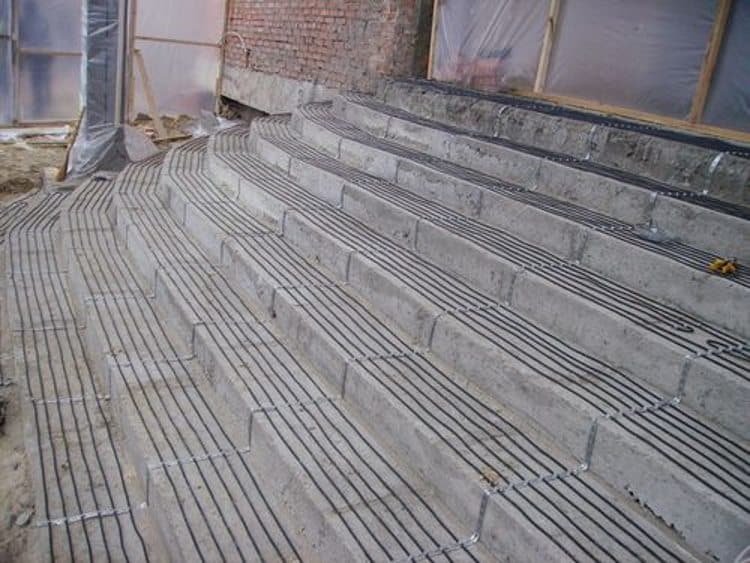
If the conditions do not allow raising the floor to the required level, it is allowed to brick the thermal cable into the grooves. It should be noted that this technology is unacceptable for shell rock, foam concrete or other material that has low thermal conductivity.
This method is not acceptable for insulating load-bearing floors, since it violates their strength. As a rule, it is used to warm up open areas.
The technical characteristics of the thermal cable in such cases are selected based on the depth of the strobes. If they are not more than 10.0 mm, then you can use a low-power heating element for a warm floor. When the depth exceeds 20.0 mm, the power consumption can be increased to 17.0-18.0 watts per meter.
Correct laying of the intermediate screed
This method can significantly reduce heat loss. Below is a table of heat losses.
Based on the above table, it can be stated that the maximum screed thickness may not exceed 20.0 mm. If the base is located above an unheated area (for example, a balcony, loggia, etc.), it is advisable to increase the heat-insulating layer to 40.0-50.0 mm.
The best solution is to reinforce the intermediate screed with polypropylene fiber. The further procedure is the same as for point 1 (installation on an old base).
Thermal insulation application
Heating elements of the electric floor are mounted on an insulated surface (GVL, polystyrene or PVC plates, etc.).
It is desirable that the insulator has a foil surface. It should be located in the border area, between the cement base and the self-leveling screed.
It should be noted that this installation option is not durable and reliable, but, nevertheless, its popularity is quite high, since it is easy to install.
Applying a mounting grid
It is most correct to lay a wired underfloor heating element in this way. In this case, you need to fasten the cable to the mesh with plastic clamps, as shown below.
After the term installation has been completed, the assembled structure rises somewhat above the base (you need to put it on some kind of support of the appropriate size), after which it is poured. As a result, we get a thin layer of reinforced concrete, inside which there is a heating wiring.
This method of termo installation allows you to create an economical and reliable warm floor with a minimum inertness of the heating temperature.
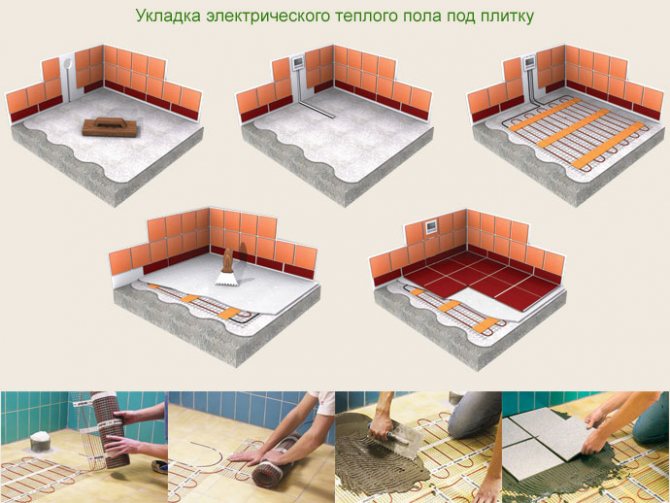
Underfloor heating independently under tiles and porcelain stoneware
Rooms with tiled and porcelain stoneware floors are recommended to be insulated with heating mats; a core insulated floor is also used. Heating systems are fairly easy to install.
We recommend: Is it possible to use underfloor heating as the main heating?
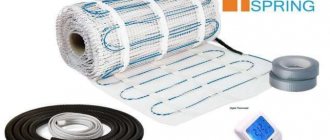
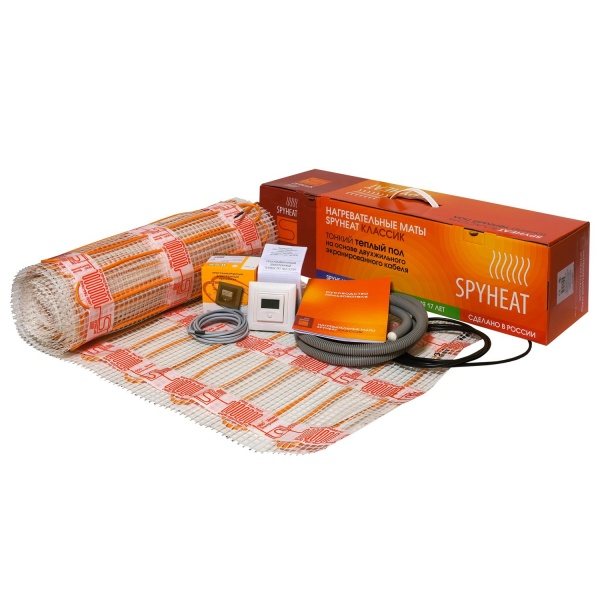
The kit contains:
- roll of heating mat;
- corrugated tube;
- printed installation instructions;
- warranty card.
For operation, a thermostat is required as a control element.
Considering the design features of the heating mats (they are not shortened, they cannot be lengthened), therefore, you need to choose the right set.
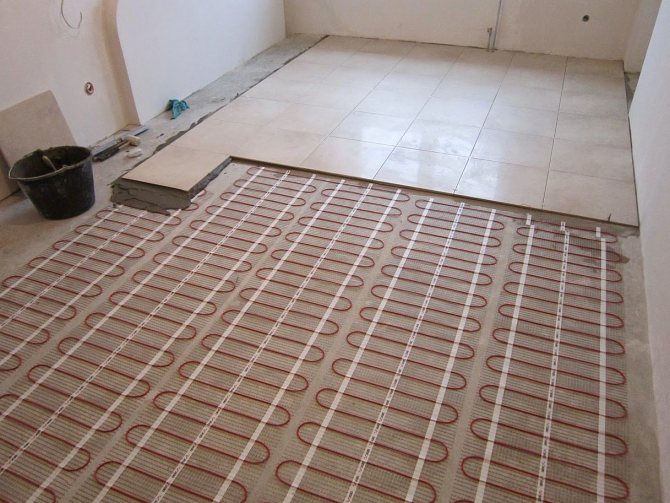
This heating system is simply mounted on a place free of furniture. The mesh is cut where the cable is located. Some models are equipped with a self-adhesive base. Installation is a simple process.
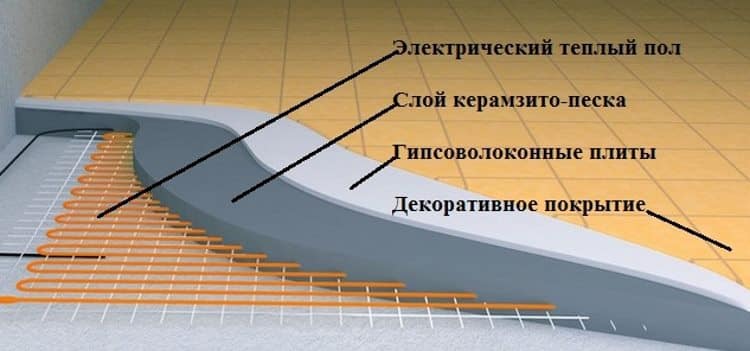
Dry screed technology
This option is no less reliable than the one described above. It is called dry, because during the manufacturing process it does not need to be poured with concrete-sand mortar. Below is a brief step-by-step instruction for assembling and laying with your own hands an electric floor in a house or apartment:
Concluding the topic of laying an electric floor, one should refute the false statement about the impossibility of its use in a wooden house (or from a bar). Below is an example of a circuit for such an installation.
Laying infrared thermal film.
Concluding the section on laying an electric floor, it makes sense to describe in detail this process for a film coating due to its popularity. From the materials we need:
When everything is ready, we proceed with the installation, provided that the horizontal of the floor is leveled, the algorithm of actions will be as follows:
This completes the process. Please note that this option of an electric underfloor heating makes it possible to repair it (replacement of heating elements). To do this, it is enough to remove the cover.
Laying heating mats
How to install an electric underfloor heating? Thanks to the advent of this system, the installation of a warm electric floor has been greatly simplified, since manufacturers produce heating mats with different cable pitch and different power. It is enough to calculate what parameters are needed to heat the room and buy a ready-made system.
The mats are based on a polymer mesh on which a thin wire is fixed. The material is sold in rolls and is easy to install and connect.
Such an electric floor heating device on a concrete base does not need additional protection, like a conventional cable.
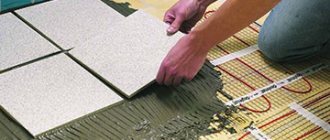
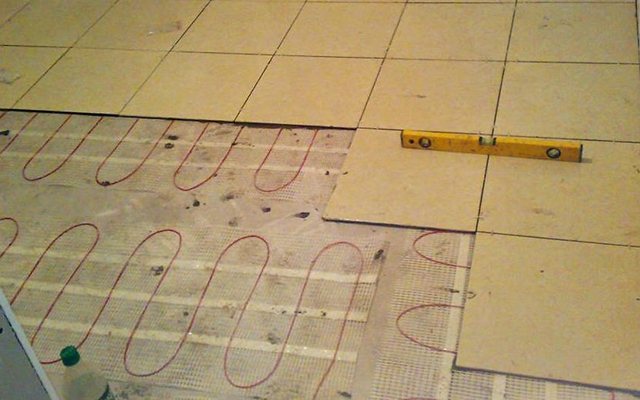
How to lay tiles on a warm electric floor? It is enough to apply a layer of tile adhesive and immediately start laying the tiles.
The installation of a thermostat for heating mats follows the same system as for cable floors.
When installing warm electric floors, it is forbidden to turn on the mats until the tile adhesive is completely dry.As practice shows, this is an excellent electric underfloor heating under the tiles. Installation of the system does not require a screed, it is enough to evenly cover it with glue, which maintains the height of the room, which is not the case when laying the cable in the traditional way.
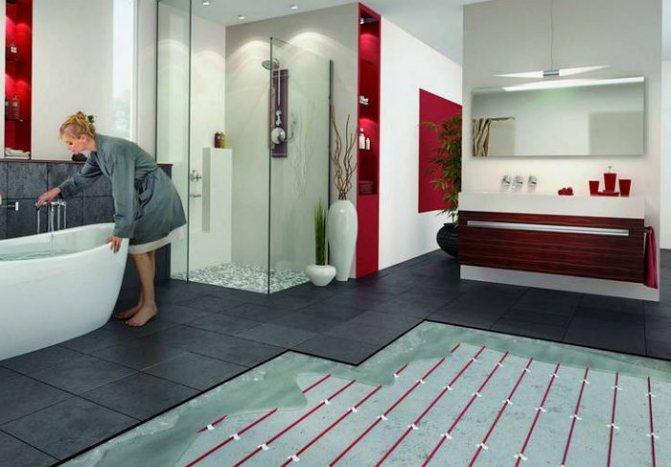
Areas of application of the electric floor
Due to its specificity, underfloor heating is used in conjunction with centralized heating in houses and apartments. Here are some examples of its effective use:
Heating of the kitchen and rooms. This type of space heating helps to normalize humidity and temperature. Uniform heating of the floor surface prevents convection currents, and the electronic thermostat automatically maintains the set parameters.
Application in damp rooms. If you correctly connect the system (via an RCD or a differential machine), as well as ensure reliable grounding of the electric floor and install waterproofing, then you can take a shower without a pallet or rubber mat.
Balconies and loggias. Even on a glazed balcony or loggia, you can get a cold in the winter, you can fix the situation by supplying them with electric floors. It is wiser than making a radiator there.
Benefits and features of underfloor heating
If we compare this technology with its water analogue, for example, XL - PIPE, then the first thing that catches the eye is the price level.
Water systems are significantly more expensive than electrical counterparts. This is due to the fact that it is necessary to install expensive equipment, a liquid thermostat for controlling the system, a boiler or boiler, etc., for all this you will have to pay a lot of money.
It is also worth mentioning the setting of the parameters of the thermostats of water systems, you will not be able to use the remote control for this, you will need the help of a specialist. The electrical concept makes it possible to adjust the controller yourself. The termite operating instructions describe in detail how to do this.
On the remote control, you can set the warm-up time, set the maximum temperature, check the health of the main units, etc.
Features.
It is believed that the electric floor is harmful due to the high level of EMI. This is not entirely true, a good European manufacturer will never launch a product on the market that does not meet the accepted standards. Actually, this is the answer to the question of which manufacturers are better.
The system is practically beyond repair, you can check the serviceability, search for a break, but the cable heater is such that it is not supposed to be repaired.
On the other hand, the technology is designed to operate the system for 15-20 years. This is the period that assumes that new renovations will be carried out. Therefore, if the system barely heats up or the heat spreads in places, it is dismantled to the base (tiles, adhesive coating are removed), after which a new installation of the warm floor is done.
It should be noted that this feature is also typical for water systems.
Note that in some options for a dry electric floor heating it is possible to dismantle the coating, therefore, repair (to be precise, replace) the heating element.
Actually, the only serious drawback of underfloor heating is high energy consumption. The operation of the water system is much cheaper.
Well, now it's time to finish the article. All the material that I wanted to share is reviewed. I hope it will be useful to you, and you will use it if you need to install a warm electric floor with your own hands Improve your own practical skills and gain all the new knowledge, as they say: "It's never too late to learn!" That's all, thanks for your attention, successful and easy repair!
Underfloor heating installation
The installation of a warm floor is carried out in several stages:
- drawing up a project and calculating costs;
- checking electrical communications in the house;
- selection of system components;
- installation of a thermostat;
- floor installation;
- trial run of the structure;
- pouring solution;
- installation of fine finishing.
After installing the flooring, the system can be used at full capacity.
Drafting a project
The creation of the plan consists in the selection of the components of the warm floor, namely the heating element. On this basis, floors are divided into: cables, heating mats and film. The former are heated by a cable that is mounted in the base of the floor. For work, special fasteners and a mesh are required.
The construction of the heating mats consists of a cable located inside the mat made of heat-conducting material. The soft frames make it very easy to install the system. Film floors are similar to mats, but the base is a special film, inside of which there are already heating elements.
Note! The technology of installing a warm floor involves curling the walls. This is necessary to bring an independent cable.
Laying methods
At the stage of creating a project for a heated floor, it is worth considering that there are several types of structures that differ from each other in the cable installation scheme:
- installation directly into the screed;
- installation on a screed using adhesives, for finishing;
- laying on a screed under the final floor (infrared systems).
Note! The cable is not installed where there is furniture, other sources of heating or bulky appliances.
Please note that in the future it will not be possible to rearrange the furniture in the room. Because heavy objects must not be placed on the cable, this may damage them.
Checking the wiring in the house
The underfloor heating system consumes a lot of electricity. Therefore, before installing it, a thorough diagnostics of the wiring in the room is necessary. This will ensure that the communications will withstand the installation. Remember that the electric floor cannot be powered directly from an outlet.

Diagnostics can show that the installed wiring is not designed for loads from a heated floor (cable cores do not correspond to technical characteristics). To make the systems compatible, they replace the wiring or install an additional cable directly from the shield. It is specially designed to power underfloor heating.
Note! The installation of safety devices is required to protect the system.
Selection of system components
The standard construction of an electric floor includes:
- a heating element;
- connecting wiring;
- temperature sensors;
- control relay;
- circuit breakers;
- copper cable;
- fasteners and related materials (dowel-nails, marking pencil).
Among other things, for work you need a hammer, a puncher, a metal cutting tool, a tape measure and a set of screwdrivers.
Surface preparation
Before installing the floor, carefully level the work surface. For this, ready-made quick-drying liquid mixtures are used.
Advice! If you purchased a warm floor in the form of a heating cable, then mark with chalk the location of its location. This method is considered the best for a novice builder.
After marking the floor, the thermostat is mounted. It is installed at a distance of one meter from the floor. In the resulting place, a groove is made with a puncher to fit the size of the mounting box. In addition, a hole is bridged up to the floor for cable installation.

An insulating layer is placed under the electric floor. One of the most popular insulators is penofol. It has a heat-reflecting foil and a self-adhesive layer. Due to the adhesive base, the insulation does not crawl during cable laying.
Penofol is laid up with a foil layer, gluing the joints with tape. Sometimes non-combustible materials based on polystyrene with a sheet thickness of 2-2.5 cm are used as insulation. On balconies and loggias, the layer of insulation is made 4-5 times larger.
Note! According to the regulations, it is necessary to make an indent between the insulation and the wall: 5 mm for thin materials, and 1 cm for thick ones.
When the insulation is laid along the perimeter of the room, an edge tape is glued, which compensates for the movement of the finish during heating.
Installing a temperature sensor and thermostat
Thanks to the thermostat, you can control the degree of heating of the premises and the cost of electricity. The device is connected to the power supply and to the floor cable through wires. They must be immersed in the corrugation. It will allow you to carry out repair work without destroying the screed. Before immersing the cable in the corrugation, check its resistance. The permissible resistance value is stated in the technical document of the underfloor heating.
The thermal sensor is also mounted in the corrugation. It, in turn, is recessed into cut insulation. When laying, check the bend angle of the corrugation, it should be smooth. Its junction with the screed is sealed with a sealant.
Cabling
After installing the sensors, you can lay the cable. The electric floor in heating mats is very easy to install. The mats are attached to the thermal insulation with tape. The step between the individual heating elements is 5-10 cm, and between the mats and the wall - 15-20 cm.
An ordinary tape with a cable is laid with a snake, so that there is approximately the same distance between the loops. It is important to avoid kinking in this process. Plastic clips are used to fasten the cable to the tape; they cannot be tightened very tightly.

If there is a junction of floor slabs on the floor, the cable in such an area is laid only in corrugation.
Advice! During installation, make a diagram, or better take a picture of the installation system for the warm floor. This will greatly help you out in the event of a repair.
Trial run
Before pouring the screed, check the serviceability of the warm floor. The procedure is a measurement of the resistance of a wire. If there are no significant deviations, the screed can be poured.
A tester or multimeter is used to measure resistance. A megohmmeter is also required. They measure high resistances, more than a thousand volts. The result obtained should not exceed 10 megohms.

Pouring screed and finishing
Pouring the screed is needed when using mats or heating cables. The foil floor does not need it. To fill the floor, use a standard concrete screed or self-leveling floor. If you plan to lay tiles on a warm floor, then tile glue is used.

Important! Only fine crushed stone is suitable as a filler in the screed. Perlite and expanded clay can cause severe overheating of the floor.
The height of the screed from any material should not exceed 5 cm, the standard is considered to be a thickness of 4-5 cm. Details of filling the screed and preparing the solution can be seen in the video:
When the screed is dry, you can start laying the finishing. Remember that all materials are suitable for this, except those that contain wood.