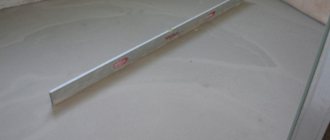
If the house has a basement
To insulate the floor in a wooden house with your own hands, you must take into account the peculiarities of the construction. If there is a basement under the living space, and it is not insulated, it will always be cold in such a house, regardless of the number of radiators. It is worthwhile at the construction stage to carry out insulation work, using extruded polystyrene foam for thermal insulation of the foundation, covering the entire foundation up to the base, and for walls mineral wool, which is attached to tile adhesive. This insulation will be sufficient to minimize heat loss.
How to choose a heater?
For floor insulation in a wooden house, materials with a high thermal insulation coefficient are used. The weight of the insulation should not weigh down the structure.
Heat loss diagram in a wooden house
The weight and thickness of the material have no effect on its thermal insulation properties. Only the raw materials from which the insulation was made matters, which ensures the appropriate coefficient of thermal conductivity. Penoplex and foil-clad polystyrene foam have the smallest coefficient.
The thickness of the thermal insulation layer is calculated taking into account the following factors:
- average indoor and outdoor temperature;
- the volume of the room;
- the selected material;
- required indoor temperature.
To preserve heat in the house, you can use both traditional, one might say, classic options, and modern ones based on extrusion, foaming of certain compositions, which prevents the penetration of cold air.
VIDEO: Installation process
Varieties of materials
Loose heaters
- sand;
- expanded clay;
- sawdust;
- granular sawdust heaters.
The main advantage is the environmental friendliness and low cost of these materials. They are easy to fill up the space between the lag or in the gap. High hygroscopicity allows to reduce humidity and thus helps to preserve timber structures.
It is worth remembering that sawdust or sand cakes over time and loses the property of hygroscopicity, so they need to be changed.
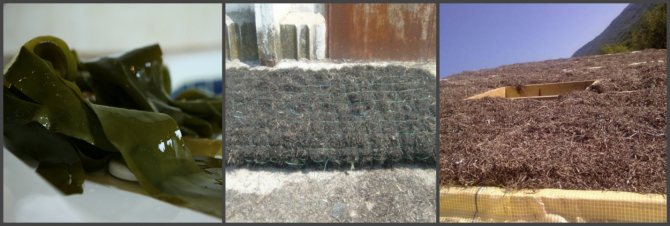
In the southern regions, for the same purpose, kamka is used - dry seaweed, which are ideal for isolation, while saturating the air with useful substances even after years of operation.
Dry seaweed (kamka)
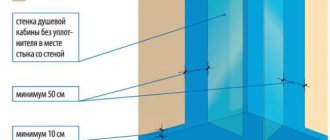
On the Black Sea coast, this is the most popular and demanded option for insulation. Yes, someone will call it imperfect, since for high-quality insulation there should be a layer of about 50 cm. But, firstly, there is no shortage of such material on the seashore. Secondly, taking into account the southern climate, it is this thickness and such material that is quite enough.
Among the main advantages, it is worth highlighting:
- an environmentally friendly product - and this is not just a loud expression, but a 100% statement;
- the grass does not emit any harmful substances even when smoldering;
- does not rot for 50 years or more, and thanks to modern processing, fungus and other pathogens are not attacked;
- does not burn - when any burning objects hit from a match to a burning log, the process of self-extinguishing occurs;
- saturates the indoor air with useful compounds;
- mice, rats and other rodents do not eat damask or even come close to it, which becomes a clear advantage over modern insulating materials.
We listed the disadvantages of such a material earlier - a large number and the ability to use only on the coast, where there is no shortage of such almost exotic.
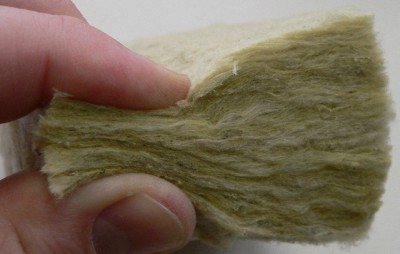
Mineral wool
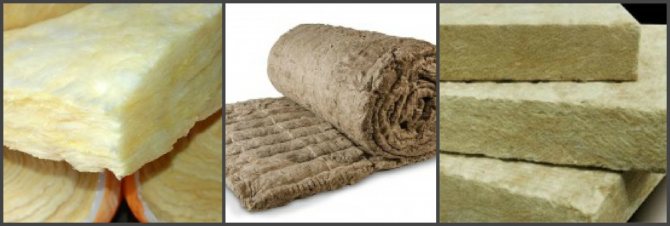
It is a compound of numerous fibers obtained by spraying remelted glass, blast furnace slag or rocks.
Taking into account the peculiarities of production, several types are distinguished:
The advantage of mineral wool is that it has low thermal conductivity, does not rot, mold or mildew, and is fireproof.
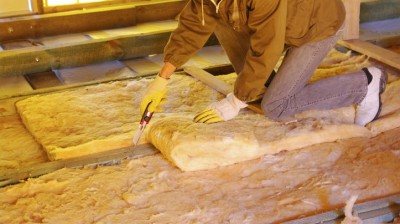
It should be borne in mind that to insulate the floor in a wooden house using mineral wool, an additional vapor barrier layer is required, since when moisture is absorbed, mineral wool loses its thermal insulation properties.
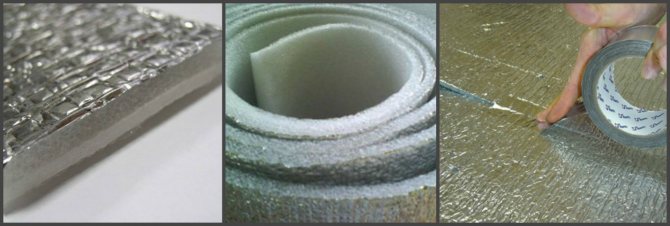
It has a fibrous structure and is made of polyethylene foam. It is perfect for thermal insulation of the floor in a wooden house. There are two types of this material:
- foil (one or both sides are covered with aluminum foil);
- normal, uncoated.
Foil-clad penofol is most often used, since it has good strength, steam and thermal insulation.
- easy and quick to install - just roll out the roll and cut to size;
- resistant to mechanical stress, not compressed under the weight of the flooring;
- does not require additional vapor or waterproofing;
- durable.
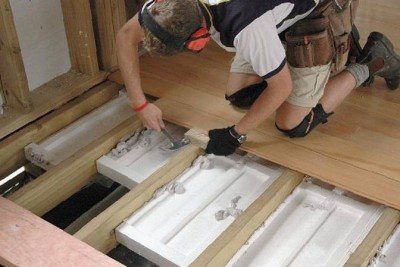
Styrofoam or Styrofoam
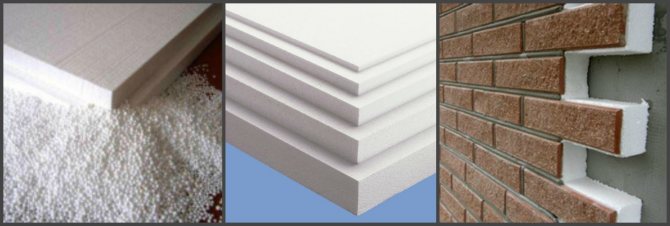
Polystyrene, as a floor insulation in a wooden house, is very popular. High heat-insulating qualities and relatively low cost allow it to be used both for thermal insulation of the floor above the basement and for insulation along the ground.
- rigidity and strength allows you to lay it on any surface;
- does not lose properties during long-term use;
- not affected by the environment;
- susceptible to moisture, therefore requires additional waterproofing.
The main disadvantage of polystyrene is that it releases toxic substances that are harmful to the human body.
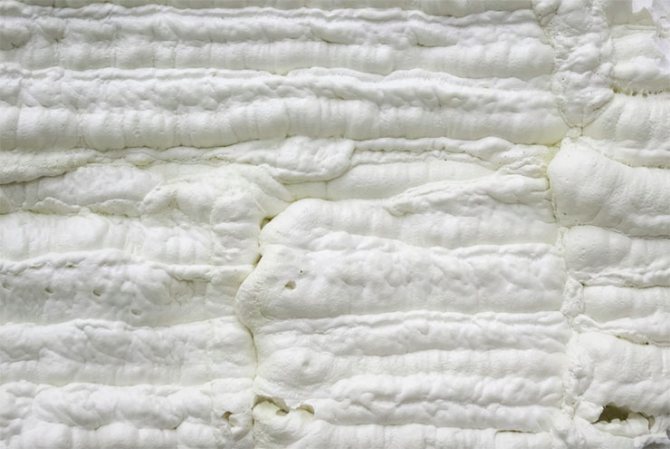
It consists of cellulose fibers and is produced by recycling waste paper with the addition of natural antiseptics and fire retardants, which increase resistance to environmental influences and fire safety.
The main advantage of ecowool is environmental friendliness. The disadvantage is the high cost.
It is applied in two ways:
- fits dry;
- ecowool is mixed with paste and the resulting mixture is applied to the surface to be insulated.
Ecowool is laid by hand or using blowing machines.
Polyurethane foam
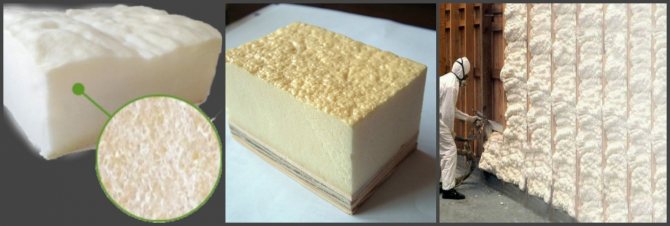
Filling the space between lags or cracks with polyurethane foam is a quick and easy way to insulate a floor in a wooden house. The foam forms a monolithic thermal insulation layer, covering all gaps, joints and irregularities. Polyurethane foam also provides excellent waterproofing properties. Can be applied to any surface. The service life of polyurethane foam exceeds 30 years.
Stages of thermal insulation work
Floor insulation works are carried out taking into account the structural features of the structure.
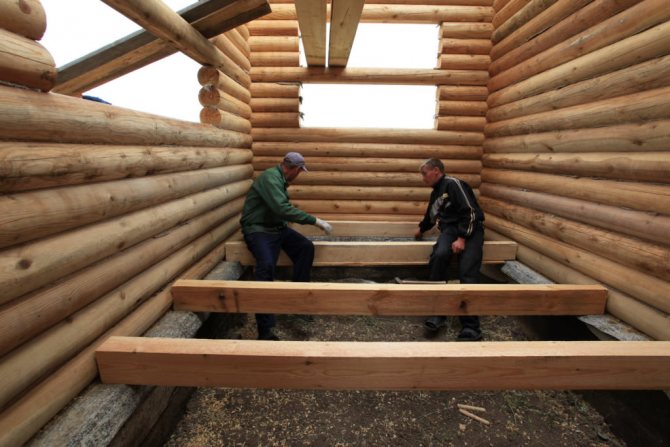
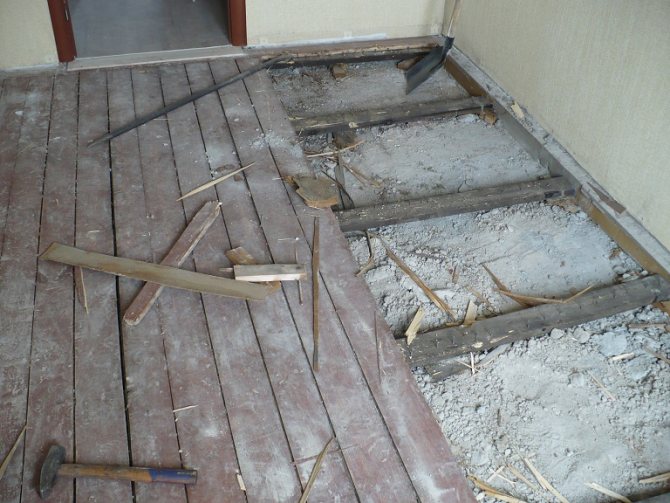
If your home has a low underground, then the stages of work will look like this:
- Dismantling the flooring. If you are not going to change the coating, then when dismantling, try to act carefully, removing the boards in a certain sequence, so as not to confuse where they lay.
- Deformed and rotted sections of the log should be replaced with new bars.
- An additional bar is installed under the logs as a support.
- Rough flooring is being assembled. For this, raw boards are suitable, which must be laid on the supporting structure.
- A vapor barrier layer is placed on top of the rough flooring.
- Then logs are installed for finishing flooring.
- A heat-insulating layer is laid, which should also be covered with a vapor barrier material.
- Counter-rails for ventilation are installed.
- Installation of finishing flooring.
To insulate the floor above the basement, it will be enough to install thermal insulation on the basement ceiling.
- A waterproofing film is attached to the ceiling.
- Support bars or galvanized profiles are installed along the entire perimeter of the ceiling.
- The insulation is attached by means of transverse slats to the previously installed support beams.
- We cover the entire structure with an insulating film.
- If necessary, we mount the topcoat.
When carrying out any work related to the thermal insulation of a room, the main thing is not to leave gaps and cracks in the insulating layer. The insulation is overlapped, or its joints are fixed with polyurethane foam. This creates an extra cushion of air to keep the cold out of your home.
VIDEO: How to properly insulate a wooden floor
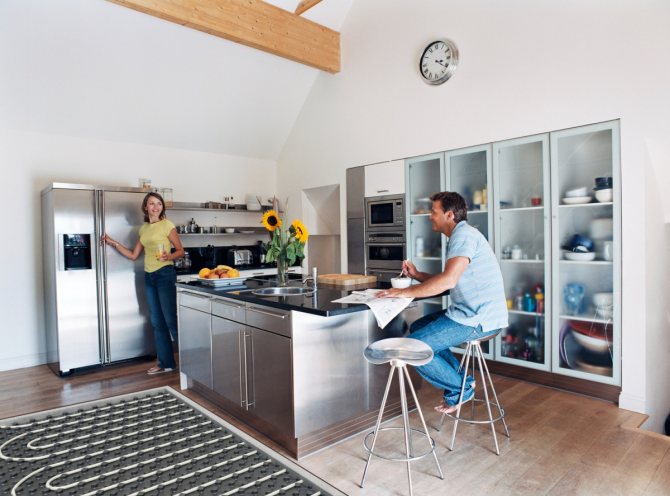
Why it is worth taking care of a warm field in the kitchen
Do-it-yourself warm floor in the garage, water, electric and insulation
Most install floor heating systems or simply insulate the basement just so that the surface of the flooring is always warm and colds bypass the family. But underfloor heating is not only comfort, because radiator batteries of the same quality are often installed. But there are also cases when you simply cannot do without installing such equipment:
- First of all, this applies to houses where there is an individual type of heating. It is installed even at the initial stages of repair work, so you simply should not miss such a chance. If it is possible to make one continuous heating structure out of the floor covering, why not do it? After all, it is simply impossible to come up with a more economical solution.
- Another situation can be attributed to the moment when it comes to redevelopment, in which the territory will expand due to a previously unheated loggia or balcony. In this case, underfloor heating in the kitchen will become a kind of continuation of the general system, which will stretch right up to the balcony. The battery is dismantled, and its further placement on the territory of the balcony is not possible, because this would be a direct violation of the current legislation. After removal, the riser is hidden in the wall, after which a floor heating device is installed.
- Most people prefer to fill the space allotted under the countertop with various shelves and drawers, which reduce all the functionality of the original idea to a minimum. A closed battery will only heat the wall, but not the room. You can resort to a trick by making additional holes, but such solutions are also not effective. The transferred battery will still get in the way, and people will constantly bump into it.

The necessary installation work can be done independently, simply by following the attached instructions. In any case, you can get additional advice from the supplier or directly from the manufacturer of your chosen underfloor heating device in the kitchen.
In addition to the obvious advantages, it is worth paying attention to a number of disadvantages that are also present. Unfortunately, it is only one and deals with power consumption
This will lead to an increase in electricity bills by about 25-30%, provided that a high-quality thermostat has been additionally installed. Therefore, before buying the necessary equipment, it is worth considering all aspects once again. Residents of the apartment will have to either completely abandon centralized heating, or pay extra for it too. When installing additional equipment, such expenses can be halved, and conventional heating can be completely abandoned.
Do-it-yourself floor insulation in a wooden private house
Wood is a traditional material that has been used by people since ancient times for the construction of dwellings and outbuildings. However, due to its versatility, environmental friendliness, strength and excellent performance characteristics, it has not lost its relevance at the present time.
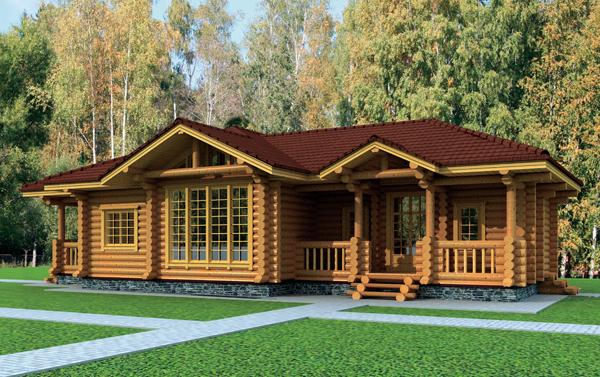
Modern wooden house
Wood is characterized by high thermal insulation properties (the coefficient of thermal conductivity, depending on the type of wood, varies from 0.1 to 0.23 W / (m * K))
... But even in houses made of this material, the floor is a weak point that requires special attention.
Warmed air is lighter than cold air, so it always strives to rise up - every student knows about this. In this regard, the floor, especially on the ground floor, often needs to be additionally insulated.
Pros and cons of warm systems
Heated roofing is a special system for heating various premises. It should be noted that this system can not only directly heat the floor, but also take over the function of heating the entire room. Depending on the selected function, the underfloor heating system must have a different power.
Starting renovations in the kitchen, many cannot decide for themselves: should they make a heated floor in the kitchen? To make it easier to make a choice, you need to know, firstly, what it is. Warm coatings are divided into two types: electrical and water-based.
Heating floor
A water heat-insulated floor is a variant of a radiator heating system. It can be connected autonomously, it can also be operated from a central heating system.
Plus - it does not require large expenses. The downside is the impossibility of adjusting the temperature.
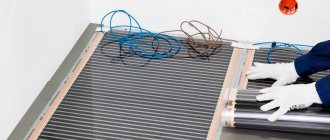
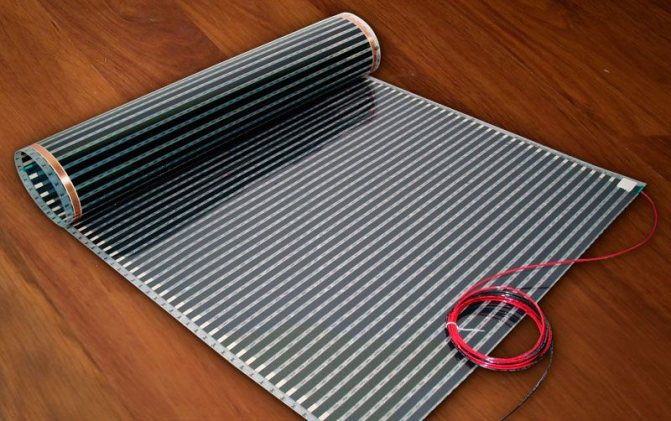
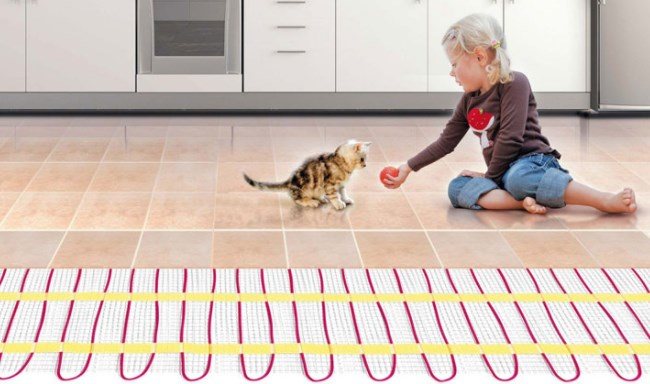
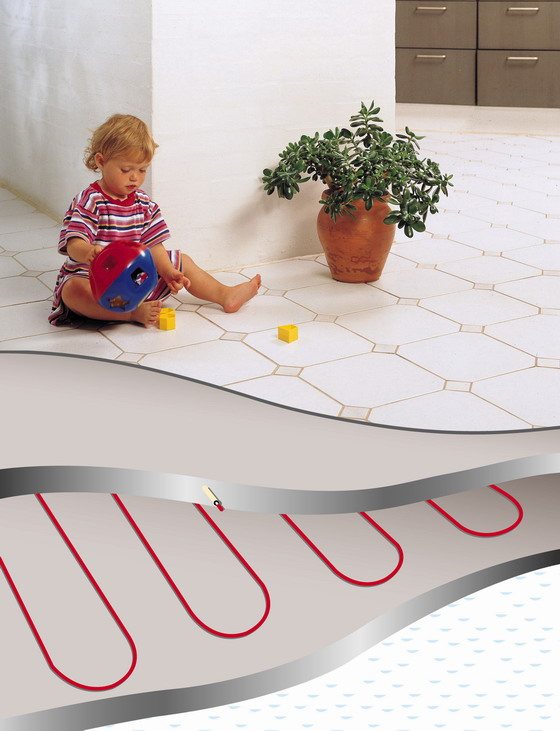
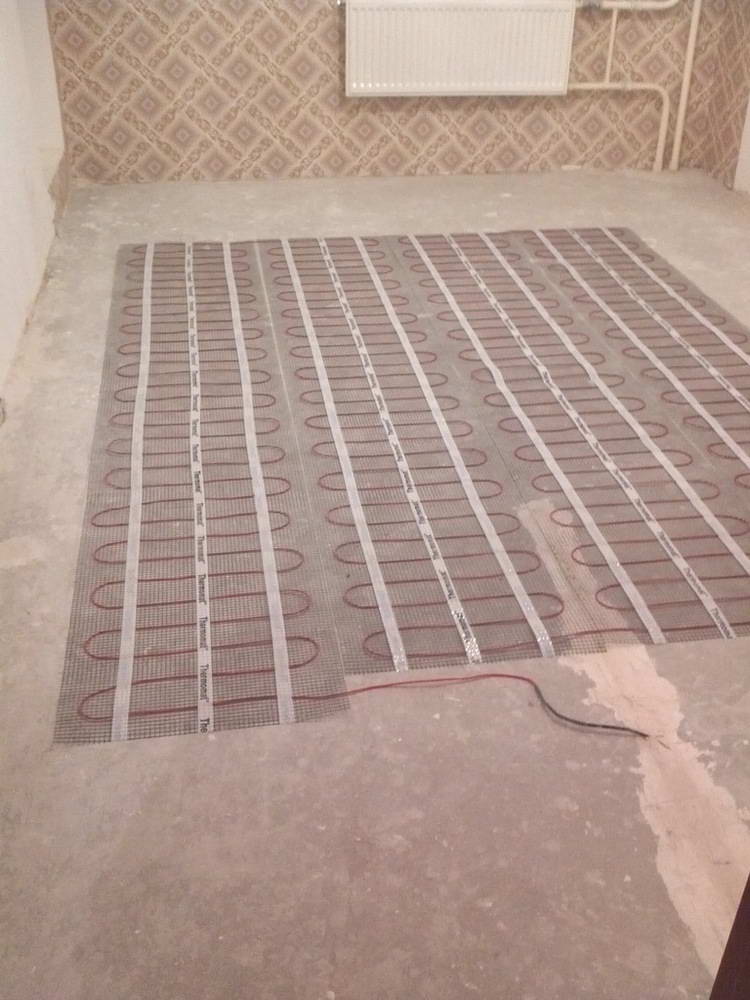
An electric underfloor heating works by using electricity to heat a heat cable, heating mat or bi-metallic and carbon film located under the cover. The disadvantage is additional electricity costs.
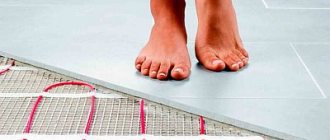
If you like to walk around the apartment barefoot, you have a child in your family, and you want to make the flooring in the kitchen tiled, then, of course, your choice should be in favor of heated flooring.
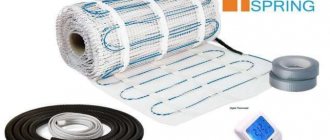
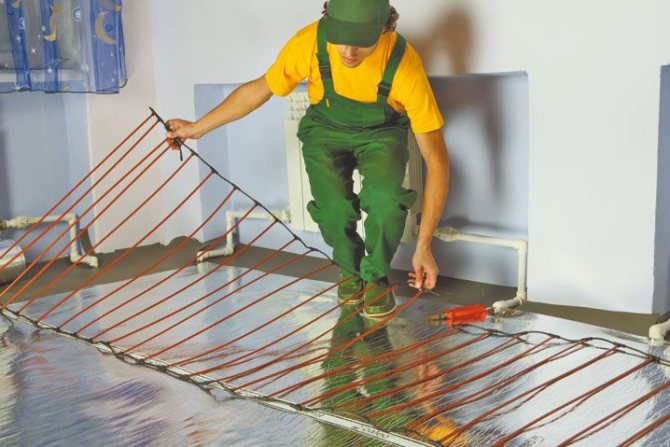
Installation of electric underfloor heating
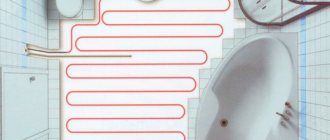
The first thing to do is to put on the plan the layout of the cable for the future warm floor and the thermostat with the sensor, mark where the connection to the electrical cable will be.
Then you need to install a thermal insulation and, if necessary, a waterproofing substrate. The thermal underlay will need to reflect heat into your kitchen, not the apartment below.
On the floor, we mark the cable laying scheme (the cable does not fit where the built-in kitchen will then be).
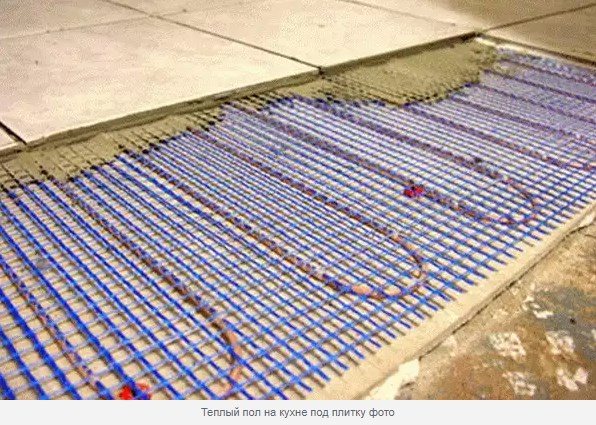
The next step is to lay the cable directly with the selected distance between the strips (snake). It can be fixed either with mounting tape or with plastic brackets.
Underfloor heating: scheme
You can calculate the length of the cable and the required step between the strips using the formula: h = S / Lx100, where S is the area on which the cable will be located, L is the length of the heating cable in meters, h is the step between the cable strips.
When the cable is laid and the connections are checked, you can tackle the concrete screed. Its thickness should be 3-4 centimeters, there should be no voids in it.
In this case, the cable should not rise to the surface, and the distance between the stripes should remain unchanged.
When the tie is poured, once again you need to check the correctness of the cable connection.
When the screed is completely dry, and this will happen in 3-4 weeks, you can connect the temperature sensor and the underfloor heating according to the wiring diagram.
When deciding to install underfloor heating in your kitchen, you will have to be more careful when choosing a floor covering, since some of them can withstand a certain temperature.It is worthwhile to additionally consult with specialists on this issue.
The choice of insulation
Thermal insulation materials used for arranging a wooden house must have a number of properties that affect not only the microclimate in the room, but also the safety during its operation. These include: 1. fire resistance; 2. incombustibility; 3. safety for human health.
The most frequently used materials for insulating a wooden house are: • sawdust; • expanded clay; • mineral wool; • ecowool; • Styrofoam; • penofol. Each of them has its own advantages and disadvantages. The choice of the method of insulation in each case should be approached individually.
Preparatory work and the sequence of the insulation
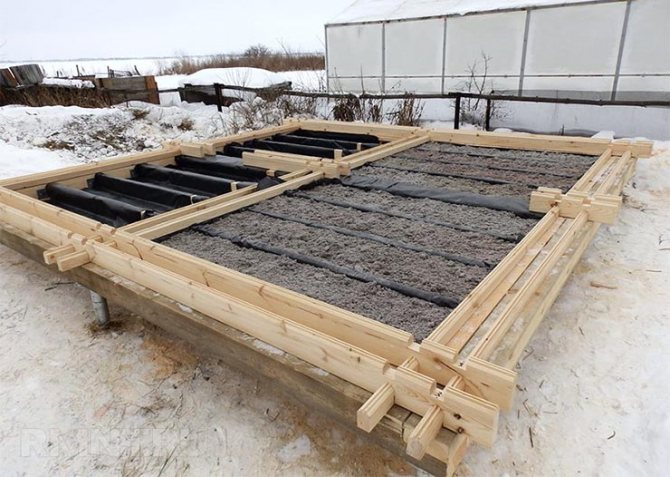
Even at the stage of developing a project for a new house or during the insulation of an existing structure, you should think about creating a two-level floor:
1. the first level (draft), on which the layers of thermal insulation will be laid in the future. It consists of rough planks attached to beams; 2. the second level (finishing) will serve as the basis for laying the topcoat or will itself be it.
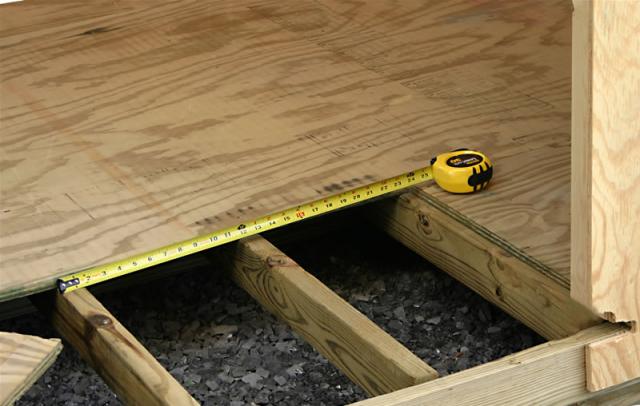
Two-level floor
When proceeding with the thermal insulation of the floor, you should take care of additional waterproofing. For this purpose, you can use plastic wrap, which must be spread over the entire surface of the subfloor, including logs. Butt seams should be securely glued with tape.
Next, a heater is laid on top of the waterproofing layer, which is then covered with a vapor barrier (glassine is one of the options). However, for some types of thermal insulation materials, hygroscopicity is not characteristic. The final stage is the installation of the finished floor.
Benefits of using floor heating devices
It is worth paying attention to the fact that any device allows you to set different temperature conditions for each of the rooms. Why heat what no one uses? ...
Infrared heating devices
Based on the many reviews, most people will advise exactly infrared underfloor heating under the tiles in the kitchen. First of all, it depends:
- From the durability of the structure. Even if one of the sections breaks down, the rest will not stop working.
- Pricing policy. The cost of the material used is more than affordable. The necessary rolls can be purchased at almost any store.
- The economic aspect. Power consumption is several times less compared to cable structures.
- Easy to install. There is no need to level the surface or lay a special base. The mats can even be installed on old flooring.
Electric heating structures
They can be safely called a practical and highly effective alternative to water structures that can be installed in the kitchen. An agreement is required to carry out installation work from the relevant authorities, but in new buildings it may not be required at all. Before installation, it is necessary to make the necessary calculations in order to understand: whether the existing wiring will withstand such technology. The device works thanks to a heating cable that heats up along its entire length.
Can be found:
- two-core;
- single core.
You will also need to install a thermostat, which will allow you to control the operation of the entire system and set the required temperature regime.
Water heating structures
The main advantage is considered:
- Durability of the main structure. If you install underfloor heating in the kitchen correctly, then repairs will be needed no earlier than twenty years later.
- The ability to adjust the level of heating intensity.
- The efficiency of the device when compared with its electrical counterparts.
But the disadvantages can be called:
- Continuous cooling.The coolant at the time of circulation gives off heat, thereby cooling. Regular heating is required.
- Renovation work poses a real challenge. To establish the location of the breakdown and carry out further repairs, you will need to remove the top layer of the screed and the coating itself.
- Installation work can only be done by specialists with extensive experience.
- Equipment and installation costs. In addition to expensive equipment, you will need materials to level the base.
Characteristics of the most common thermal insulation materials
Sawdust
- available material that is a by-product of the woodworking industry. They can be used both as an independent heat-insulating material, and as a basis for the preparation of various mixtures, which may include, for example, cement or sand.
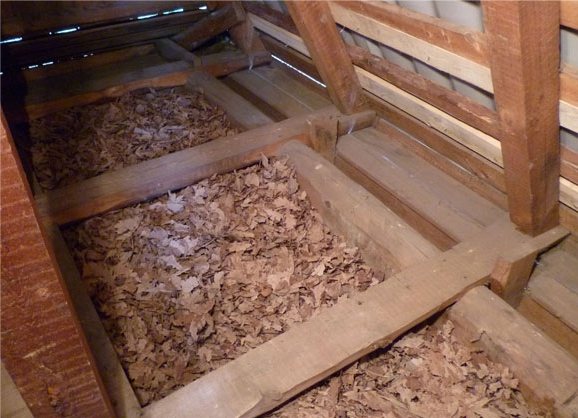
Floor insulation with sawdust
However, such insulation may soon become a refuge for small rodents and other pests.
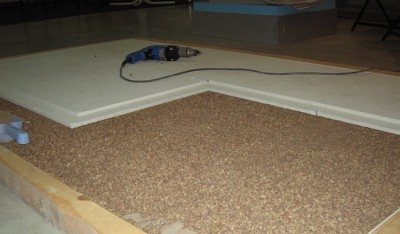
Expanded clay
- a common insulation, obtained by swelling light types of clay. There are several types of it: ► gravel; ► crushed stone; ► sand. Such fractions differ in shape, size and value of the thermal conductivity coefficient. However, to achieve the most effective insulation, a mixture of them is used.
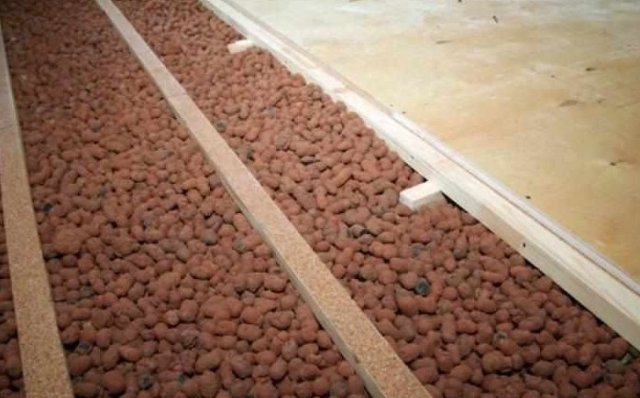
Thermal insulation of the floor with expanded clay
Expanded clay has a number of valuable properties: ✓ can be used in a fairly wide range of temperatures; ✓ does not harm human health; ✓ unattractive to insects and rodents; ✓ characterized by excellent sound and heat insulation properties. But it easily absorbs moisture, which is why the quality of such a heater can significantly decrease over time.
This problem is solved by laying hydro and vapor barrier.
The height of the expanded clay layer reaches 20 cm. In this regard, its use may be limited by the insufficient height of the walls in the room. Expanded clay can be used as an independent heat-insulating material, or mixed with cement mortar.
Mineral wool
available in three types: 1. glass wool (glass wool); 2. stone (basalt) wool; 3. slag wool.
The advantages of such insulation include: • incombustibility; • vapor tightness; • resistance to significant temperature changes; • high soundproofing properties; • absence of mold, fungi, rodents and small insects.
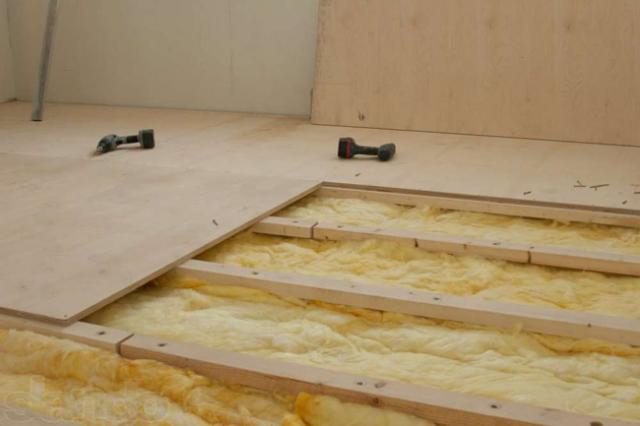
Stacked mineral wool
When using mats, plates, rolls of mineral wool, it should be remembered that such insulation is a hygroscopic material. Therefore, you will definitely have to lay steam and thermal insulation. Important: when assembling the final floor level, it is necessary to avoid creasing or artificial compaction of mineral wool. Otherwise, the effectiveness of such a heater will significantly decrease.
Important: when working with mineral wool, you will have to use personal protective equipment (glasses, gloves, respirator).
Ecowool
... unlike mineral wool, it is absolutely harmless, as it is made from sawdust. Using it as a heater, you need to take care of steam and heat insulation. The high cost of such material may also be a surprise.
Styrofoam
- foamed polymer material, produced mainly in the form of plates. It is characterized by a low value of the thermal conductivity coefficient and does not absorb moisture at all. Under normal conditions, the foam is not harmful to human health. However, it is highly flammable and burns.

Styrofoam laid between the lags
Penofol
- a foam material consisting of a polymer layer and foil, bonded at the production stage. Such insulation does not need additional waterproofing.
Information: Penofol must be laid with the foil side up.In this case, heat is reflected (returned) into the room.
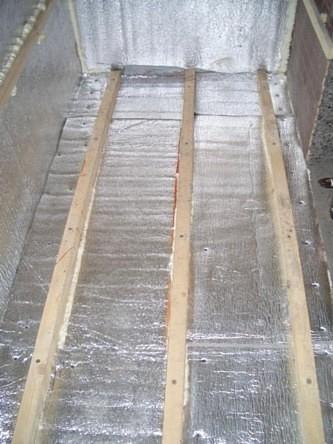
An example of laying penofol
Floor insulation is a time consuming and rather costly process. But, having spent once, in the future you can save on heating and avoid unwanted health problems.
Related video: Do-it-yourself floor insulation in a wooden house
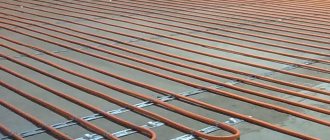
Warm water floor for the kitchen
Underfloor heating, for the device of which pipes with hot water are used, is an excellent heating option. With such a floor, you don't have to worry about additional heat sources. In addition, when using a water floor, unlike an electrically heated floor, there is no harmful effect of an electromagnetic field. As a result of water circulation, all areas of such a floor are warmed up evenly.
A warm water floor is best suited for private households, since in apartments it is not so convenient to connect it to a centralized heating system.
The warm water floor scheme includes:
- The pipeline through which the coolant enters all sections and heats the pipes that give off heat. The pipes are made of metal-polymer materials.
- Installation work
Damper tape. It is necessary when laying floors on a concrete screed. The tape is made of a foamed composition and has a thickness of up to two centimeters, it is glued over the entire area of the room. This tape ensures the integrity of the covering material. - Heat-reflecting coating. It is necessary so that the heat energy is directed to the outside of the floor covering. The reflector is usually laid together with a reinforcing mesh, which is needed when fastening pipes.
- The plasticizer helps to avoid the formation of defects and cracks in the screed. This material is usually added to concrete for temperature resistance.
- A manifold that allows the floors to be connected to the heating system. With its help, the temperature regime is regulated.
The system is reliably hidden under the floor and does not violate the design of the room, and also does not contradict any architectural solutions. In addition to aesthetic advantages, a water-heated floor has economic ones: it allows you to significantly save energy.
Benefits of underfloor heating in the kitchen
You want to enjoy the warmth and comfort in your home in any room. After all, the house is being built to become a reliable family haven. Today it may even seem surprising to someone that the floors in the house are not heated everywhere.
In many homes, this is really not the case. But do not forget that underfloor heating is not a tribute to fashion, but a very useful device that meets modern requirements and ideas.
The main advantage of underfloor heating in the kitchen is the ability to adjust the temperature. In the presence of such a system, convection air currents are not formed, in such a room dust and microparticles are less mobile, and the air becomes cleaner.
Today warm floors are most often used in the kitchen, bathroom or loggia. The choice of one or another type of underfloor heating depends largely on the type of room, its design characteristics.
You just need to remember that the construction of an electric floor entails a slightly greater thickness compared to the usual one. As a result, a threshold may form between the kitchen and other rooms.
If carpet or linoleum is chosen as a floor covering, then it is worth giving preference to such a modern type of warm floor as infrared film. In addition, it is quite possible to mount it with your own hands.
The warmth in the house is decisive. You can have an exquisite interior, equip an apartment with the latest technology, but without warmth it will still seem uncomfortable. The device in the kitchen underfloor heating will help you solve this problem.
How to insulate the floor in a wooden house yourself - selection and installation of insulation, advice on typical solutions
Wood is the material that provides comfort. It is environmentally friendly, easy to process, strong and durable. The house from it turns out to be beautiful, safe and warm. However, winter frost at one fine time can make you think about additional insulation of your home. If you have two floors, then the first one must be insulated.
Naturally, this procedure is best done at the initial stage of construction, but if this did not happen, then try to get the job done as quickly as possible. But keep in mind that insulation in a wooden house has some nuances.
Varieties of heaters and their features
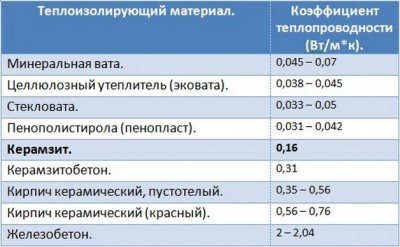
The lower the coefficient of thermal conductivity, the more heat is retained by the material
Before insulating the floor in a wooden structure, you must choose the right material. There are such types of insulation:
- Minvata. This product has a low thermal conductivity, practically does not ignite, protects the house from excessive noise, and ensures the vapor permeability of the floor (which is especially important in wooden buildings). It can be installed very quickly and has good environmental characteristics.
If the floor succumbs to moisture, then it is better not to insulate it with mineral wool. The fact is that this material, as a result of contact with water, loses its technical qualities and can deform. Good waterproofing will help eliminate the problem. This material is well suited for insulating the second floor.
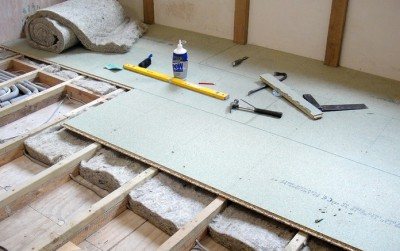
- Dry screed. This insulation can only be used if the floor has already shrunk. The advantages of such a material include resistance to fire, a high level of insulation, speed and ease of installation, small thickness of sheets, good protection against noise, as well as the ability to use under any topcoat. There are also disadvantages: the possibility of mold, fragility and a relatively high cost. In addition, one bag of mix can only be used for 1 m2 of area.
- Glass wool. Such insulation, along with mineral wool, is excellent for arranging floors in wooden houses. It is safe, easy to install and does not burn. But it must be laid carefully, hands at this time must be reliably protected, because the material contains the smallest particles of glass. The disadvantage of the insulation is its rapid shrinkage, which worsens the thermal insulation qualities. In addition, glass wool has poor moisture resistance.
- Styrofoam. This material is cheap and easy to install. It has good technical characteristics, but has a high level of fragility.
Styrofoam does not allow the tree to "breathe", as it does not let air through. Therefore, if you choose this type of material for a wooden house, then try to take this feature into account.
- Expanded polystyrene. It is non-flammable, resistant to temperature changes and moisture, protects well against excessive noise, and is highly durable. But its cost can scare away the user.
If you have decided on the material, then you can start laying it.
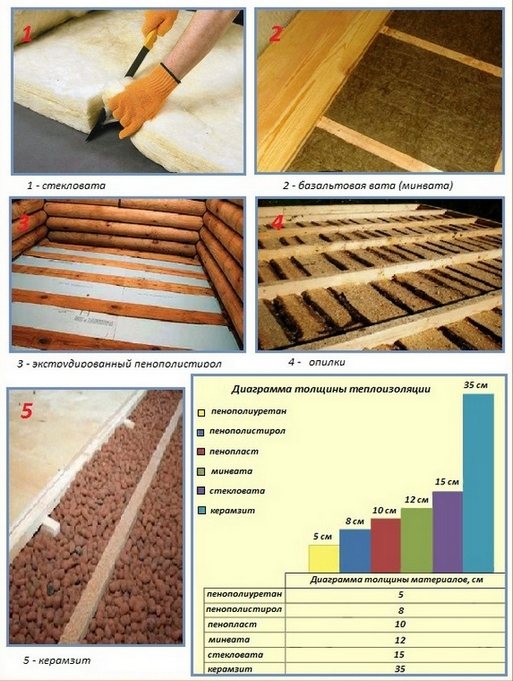
Some types of floor insulation and the required thickness of the thermal insulation layer
We install electric heating
The stages of installing heating in the kitchen will be as follows:
- Preparing a place for a thermostat. For this purpose, a recess is made in the wall with a punch. From it downward, a strobe is formed for cables - power or electrical, as well as for the sensor.
- A corrugated pipe is placed in it so that it ends with a blind end 6 cm from the wall. The strobe is sealed with a plaster-based mixture.
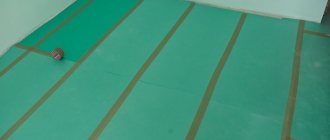
- After careful leveling of the subfloor, a layer of reflective heat insulator is laid on it with the foil part on top. Joints are worked out with scotch tape.
- To fix the heating sections, a mounting tape is attached to the heat insulator with dowels.
- The cable is laid evenly without sharp bends and kinks.
- After completing the installation, the floor is poured with concrete.
Preparing the base
The installation of an electric floor in the kitchen must begin with an accurate calculation. The area that needs to be heated is calculated. Draws up a detailed drawing of the room, on it the places where furniture and household appliances are located are marked. Heating is not needed under them.
The length of the heating system is calculated by multiplying the calculated area by the power density of the floor. If the heating is auxiliary, then the power should not exceed 120 W per 1 m2, and if the main one, then no more than 150 W per 1 m2.
To prepare the surface in the kitchen for ceramic tiles or other coating, the old coating must be dismantled, the sub-floor is leveled.
Cabling
The heating section is powered by electricity, therefore, first of all, it is necessary to think over the place for the thermostat. This device controls the operation of underfloor heating. It has a built-in thermostat in the form of a metal plate, which is sensitive to temperature changes. It closes or disconnects the electrical network. The sensitivity can be 2-1 degrees or 0.5 degrees.
The thermostat is installed at a distance of at least 30 cm from the floor. If the sections are laid in several circuits, then it is recommended to provide a junction box. The regulator is selected with the appropriate number of outputs for the local network.
The ends of the heating cable are laid in a corrugated tube and fed to a control device. For corrugation on the wall and on the floor, a strobe is provided.
The temperature sensor measures the floor temperature. It is located in a separate corrugation. For the sensor, choose a place between the turns of the cable. The distance from the boundary of the heated surface must be at least 30 cm.
The cable is recommended to be removed from the place where the thermostat is installed. The section is installed according to the marking, maintaining a step of 10-15 cm. In places of bending, a loop radius of 10 cm is observed. In order for the floor to warm up evenly in all areas, the section is taken out with a double "snail" or double "snake".
A single-core conductor is connected with two ends to the thermostat. A two-core cable is connected to the network at one end. "Warm floor" in the kitchen from the section is laid under the tiles.
Installation of mats
Cable mats are a mesh on which a conductor is fastened with a snake. The carbon rods are connected at both ends with a wire. The mats are produced in rolls. They are rolled out over the floor surface.
If you need to lay 2 tapes, then the mats are turned, but the cable or rods are not cut. It is not recommended to violate the integrity of the heating elements. Cut the mesh or wire that holds the rods or cable.
The cable on the mesh remains unchanged. An additional connection is used to connect to the thermostat. Carbon tapes are required to be connected together in a parallel circuit. For this, use the UKC connection kit.
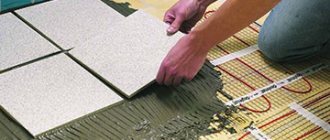
The conductor from the first mat is connected to the thermostat. Cover the mats with a 4-5 cm screed or tile adhesive. In this case, the floor cladding is immediately carried out.
Thermal film laying
The thermal film is produced in rolls. It is placed on a flat base. Cutting the film is allowed only along the dotted lines. The conductor is a copper plate and a silver plating. The tapes are connected in parallel to each other; use the crab terminals. All joints are insulated with bitumen tape.
The temperature sensor and the connecting cable from the tapes are laid in corrugated tubes, brought along the strobe to the thermostat. Before connecting, it is necessary to check the resistance of materials. The indicator is indicated on the regulator panel, on the tape and on the power outlet.
Read on the topic: Tile hog on the kitchen apron: selection, installation
If the result is positive, the system is connected and tested. I close the film with a backing.Its thickness should not exceed 3 mm. Next, the floor cladding is formed.
Liquid heating is used for underfloor heating only in country houses. The water line is connected to the manifold. From it, the circuit is diverted to the heat exchanger. The system is equipped with automation. It is represented by a three-way valve with a thermal head.
A circulation pump is installed on the comb. The mains are taken out on the rough floor on their own, it is recommended to entrust the connection to the comb and to the boiler to professionals.
Electric heating systems are used in city apartments. If there is no skill in working with electricity, then they turn to qualified specialists.
Underfloor heating in 1 hour with your own hands when repairing a room in an apartment
General rules for installing insulation
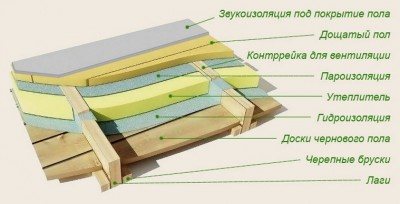
"Pie" of the insulated wooden floor
Do-it-yourself floor insulation in a wooden house is done quickly and easily. To do everything right, you need to follow a certain sequence of work:
- Arrangement of the subfloor on top of the log. In this case, almost any insulation can be applied. since it does not experience mechanical stress. It is not difficult to do it correctly: treat the rough boards or boards with an antiseptic, then lay the logs, to which the material is nailed.
- Installation of thermal insulation. It should fit snugly against the base. The mounting location depends on the type of material selected.
- Steam insulation installation. This stage is mandatory if the floors will succumb to moisture, and a material that is weakly resistant to moisture will be used as thermal insulation.
- Finishing the floor.
Warm kitchen floor
The choice of a kitchen floor heating system depends on the planned flooring.
- If linoleum is planned, then an electric underfloor heating with a heat cable will do. It fits on the heat insulator with loops with a calculated step in the store. The cable does not fit under the furniture. To regulate the floor temperature, a temperature sensor with a regulator is installed. From this regulator, the laying of the cable begins. A two-core cable is laid in a closed circuit, a four-core cable is laid without returning to the thermostat.
- If the kitchen is planning to have tiles on the floor, electric warm mats are the best choice. No screed is made on them, and the tiles are laid on top of the mats with tile adhesive.
- If parquet is planned in the kitchen, then you can make a complex system of water heated floor.
- If you are planning a laminate, then the only choice is infrared floor heating, with a film.
What if the house has a low underground?
The warming process in this case has some peculiarities. The fact is that you will not be able to attach insulation from below on the logs, since the height of the subfloor is small. Therefore, in most cases, the old flooring has to be removed. All work consists of the following stages:
- Remove the old flooring and baseboards in the ground floor rooms. If you do not want to replace the boards, then dismantle them as carefully as possible.
- Carefully examine the condition of the bar. If there are rotten elements, then they must be replaced. For fastening wooden parts, it is better to use galvanized self-tapping screws, which do not corrode and rust.
- Screwing the support bar from the bottom of the lag.
- Blank boards for the installation of rough flooring. For the first, as well as for the second floor, an unedged board is suitable. The length of the elements should not exceed the step between the lags. It should be 2 cm smaller. This flooring layer can be laid loosely.
- Installation of a rough cover. In this case, screwing the timber to the boards is not necessary.
- Laying the vapor barrier. If the house is built on an area where there is a high level of groundwater, then the area of the first floor may suffer from exposure to excess moisture. You need to protect the floors with glassine or roofing material.This material must be overlapped, and the joints must be glued with construction tape.
- Laying the lag of the finished floor. Further, insulation is made with mineral wool or other material.
- Laying another layer of waterproofing.
- Creation of a ventilation gap between the "pie" and the finished floor covering using counter battens.
- Installation of new flooring or old boards.
Types of warm floors in the kitchen
Insulation of sewer pipes of an external sewage system
Today, warm floors have become as commonplace as high-quality wallpaper or stretch ceilings. But the main thing is that their installation is another opportunity to create a comfortable environment in the house and directly in the kitchen.
For floor heating, two main heating systems are most often used:
- Water, which operates on the principle of connecting to the central system, which does not require special additional investments.
- Electric, which is arranged with a special heating cable for heating, installed under the floor covering.
Requirements for the floor surface to create a warm floor
Regardless of the type of underfloor heating, before installing the underfloor heating system, it is necessary to check the level of inclination of the base. This is due to the following reasons:
- Almost any type of flooring can be laid on a flat surface.
- Thanks to a high-quality base, the service life of the coating increases, which also affects the quality of the entire system of underfloor heating.
- With a proper arrangement of the underfloor heating system, you can mount built-in appliances and not be afraid that it will fail for some unknown reason.
How to insulate floors over a high cellar?
Insulation of the second floor is carried out in the same way as in the previous instructions. All work is done quickly. As for the first floor, there are some nuances, especially if there is a cellar under the floor. In an old house, insulation should be started precisely with the inspection and processing of this place.
In order to do everything right, try to follow the following repair rules:
- In this case, you can attach the insulation to the ceiling of the cellar. All work must be done from below. The first step will be to fix the waterproofing film.
- Next, you will have to fasten the support bar or rails to the sides of the beams. If dampness is observed in the cellar, then use a galvanized profile instead of a bar. In this case, mineral wool insulation will be the best option. But it must be well protected from the influence of moisture.
- Cut the insulation into pieces. Their width should be several millimeters larger than the pitch of the lag. This will make it possible to fix the thermal insulation well.
- Fasten the cross bar from the bottom of the previously screwed one. It will help to securely fix the insulation.
- Now attach another layer of waterproofing and proceed with the finishing of the cellar ceiling.
In the same way, insulation can be made from the side of the residential floor. The sequence of work is the same.
Warm floors with electric heating
Electric heating is a well-established, well-proven, almost universal floor heating system. Heating is carried out using a special cable laid directly in the concrete screed.
However, in recent years, the method of laying the heating cable without a screed has been increasingly used. That is, this element is embedded in a special substrate that is attached directly to the laminate or tile.
The electric floor thus becomes an integral part of the traditional heating system. And if the temperature outside the window is already above zero and the main heating is turned off, you can use the warm floor as additional heating.
One of the advantages of an underfloor heating with electric heating is the ability to adjust the temperature mode, and in some cases also set the heating on and off times.For this, special thermostats are built into the system, which can be automatic. With their help, you can easily manage the entire system, moreover, if necessary, they are easy to replace.
But, choosing this type of underfloor heating, you need to imagine the costs and installation features associated with the technological system.
Installing an electrically heated floor
The electric cable for the warm floor in the kitchen is laid along the perimeter and over the entire surface area from the bottom of the floor covering. First of all, you need to make the correct layout for laying, determine the place of connection of the system and the location of the thermostat and sensors. Next, you need to lay the thermal and waterproofing layers.
After that, the marking should be transferred according to the laying scheme. In addition, you need to determine the places where the built-in appliances will be located.
The cable is mounted in separate strips and fixed at regular intervals on a metal mesh. Fastening is done using special plastic brackets or mounting tape.
If the installation is carried out on a ready-made concrete screed, then initially it is worth checking all the contacts. The fill thickness must be at least 4 cm
It is also important to keep the distance between the cable lines and not allow them to touch or cross.
The cable tie must be free of voids, otherwise air pockets may overheat the cable and damage it. The temperature sensor is installed not earlier than the moment when the filling is completely dry.