The main pros and cons of electric floors
Before making underfloor heating with your own hands, it is important to study all the strong and weak edges of this coating, in order for the installed underfloor heating so that they serve you for a long time.
The undoubted advantages of this product include:
- The ability to use a warm electric floor, both as the main source of heat and as an auxiliary one;
- Smooth and most importantly correct heating of the entire room;
- A wide range of applications in various kinds of rooms, from ordinary living quarters to offices;
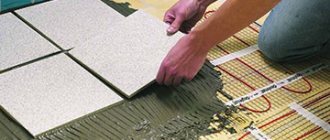
- Electric underfloor heating is organically compiled with all kinds of final layers, for example, tiles, laminated floors, linoleum;
- It is permissible to regulate the temperature regime and heating, both in the whole room and in individual zones;
- The installed heat-insulated floor of this type does not require additional installation of special equipment;
- No specialized knowledge is required to install an electric floor;
- Stealth. Installation of electric underfloor heating is done under the finishing layer, which means that the finished circuit is completely hidden;
- Quite a long period of operation with all the recommendations for operation.
Since any modern product, unfortunately, in addition to the pros is endowed with minuses, then when you decide to make an electric warm floor with your own hands, you need to take them into account.
How to install a warm electric floor - a step by step diagram
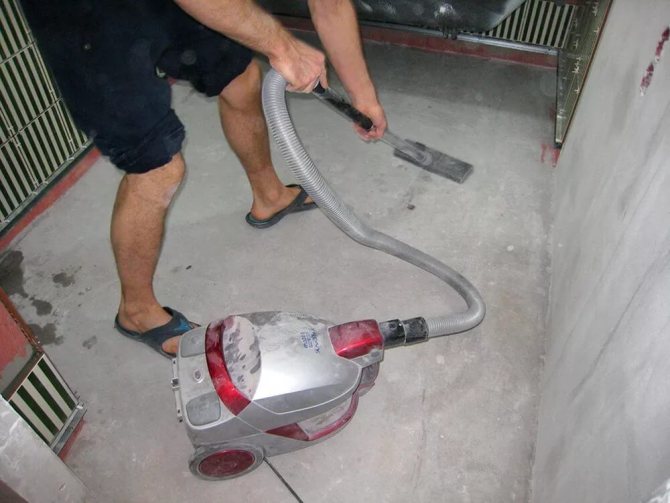
Step 1: preparation
To begin with, it is customary to carry out all manipulations with the floor only after the repair of the ceiling and walls has been completed. Installation should be carried out on a clean base and preferably so that it is as level as possible. Therefore, we sweep everything, wipe it, and if necessary, then equal it, even though we will do the screed. Its quality is important for the future flooring, but for laying the cable, a surface without differences is also very desirable. After that, you need to walk along the contour with a heat-insulating tape no more than 1 mm thick. Any artificial material can be used. In this way, we insulate the walls from the screed that will be heated in the future. The principle of tape application can be seen in our video. Naturally, the skirting boards should not interfere with you, but by this time you hardly had time to put them.
Step 2: Isolation
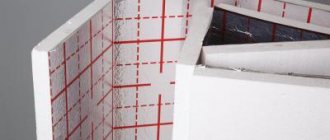
After hygienic and leveling procedures, we proceed to laying the substrate made of heat-insulating material. This is necessary so that the heat from the cable goes up, in an even stream and in no case does it heat the neighbor's ceiling from below. A special material with a reflective silver coating is used as such a base. For apartments located in multi-storey buildings, the thickness of such insulation of 3-4 mm will be quite sufficient. The material is fixed with a stapler and mounting tape. The main thing is that the joints between the sheets are minimal, and they themselves do not warp during installation. By the way, if you are thinking of installing underfloor heating with a cable heater in a private house, you can take thicker insulation.
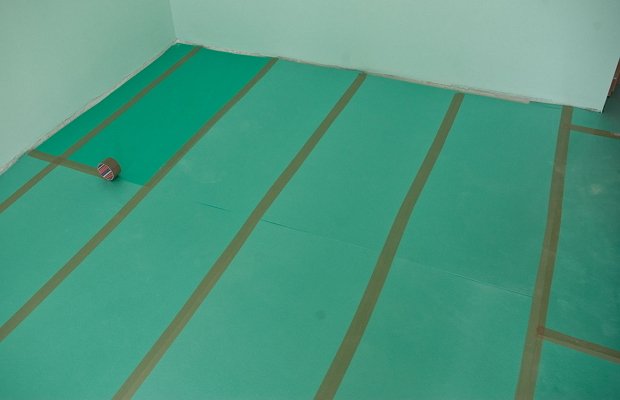
Laying the backing made of heat-insulating material
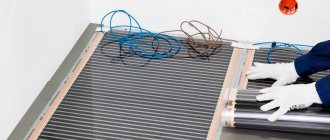
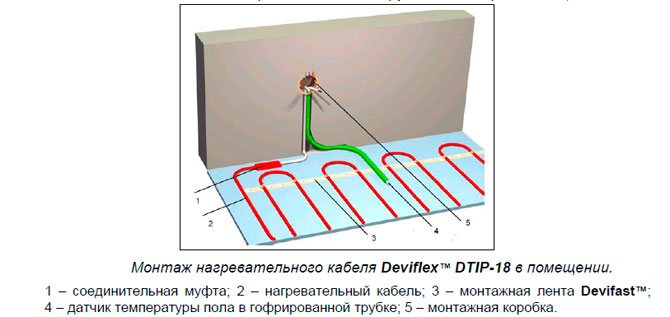
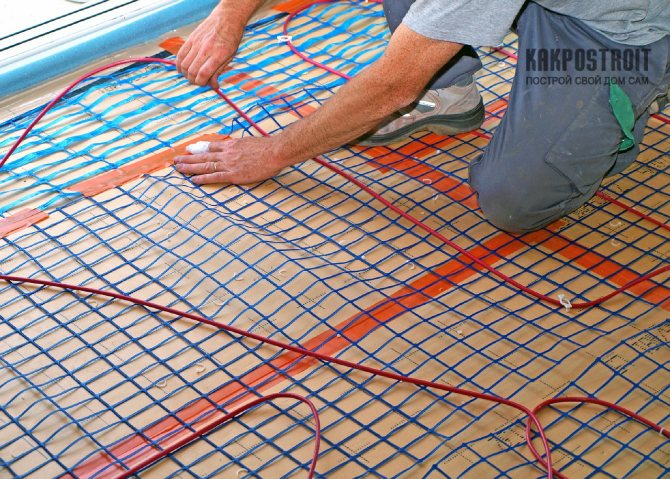
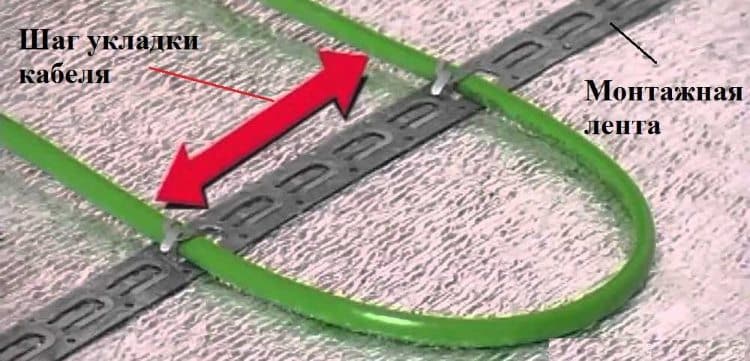
Step 3: stretch the cable
Then the cable is laid, which is fixed on the surface of the heat insulator with special clamps. There may be variations here. So, for example, one technology provides for the stage of laying a waterproofing layer on top of a heat-reflecting material, on the other - a heating cable is placed on a plastic layer, and fixed on top with polyethylene strips.Other types of work are quite possible, so only one thing can be said here: carefully read the instructions. And, of course, this stage of work was not left without a demo video, check it out.
It is important to note that if it is decided to install an armored cable, then there should be no problems, but when using a single heating wire, the following parameters must be taken into account:
- the pitch of the electric cable for underfloor heating during installation should be 80–150 mm;
- distance from wall to wire - 50–100 mm, from water and gas pipes - 100–150 mm;
- cable bending during installation is not allowed less than 50 mm;
- the wire connections are always located in the area where the screed is poured.
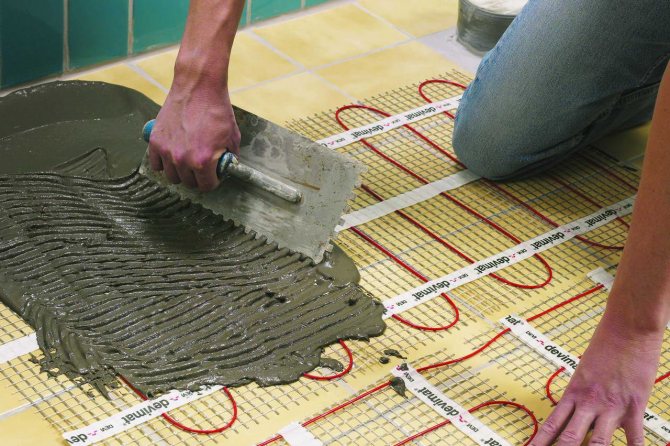
Step 4: screed
This is followed by filling the cable heater with a layer of screed, immediately a floor covering or a moisture insulating layer. Here you need to look at many factors: wire diameter, room characteristics, number of storeys, floor material, and so on. By and large, this is where the main work on installing the cable floor ends. This is followed by the installation of the thermostat and control system. It has its own subtleties, which are also indicated in the technical documentation, and how this will happen in general terms, look at the attached video. Only one rule is unchanged: checking the performance of a warm floor lasts about a day. If everything is functioning normally, you can proceed to the final part.

Filling the cable heater with a layer of screed
It should also be noted that when pouring the screed, a small but very unpleasant catch can await: air particles, if the proportion of substances for preparing the solution is violated, can form "pores" that can have a negative effect on the cable, and it may well overheat. To prevent this from happening, some cunning builders during installation use an additive in the form of PVA glue in a proportion of 1 kg of substance per 1 bag of cement. Thanks to this "compote", the layer becomes almost monolithic, and the heat emanating from the heating element is directed strictly according to its intended purpose.
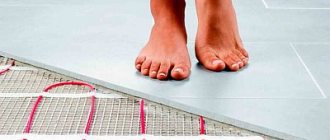
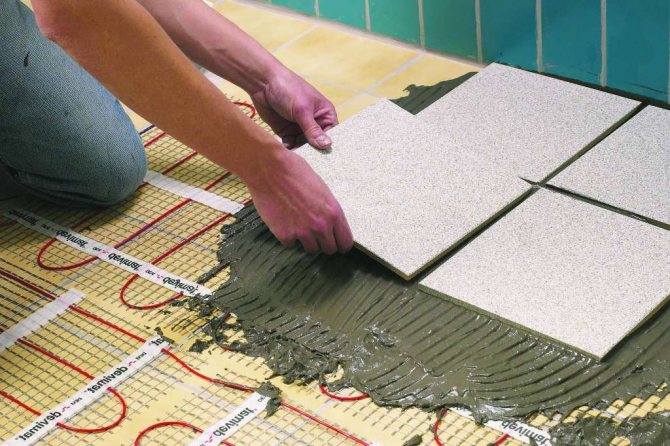
Step 5: finishing
Now the final finish remains. If the floors were prepared for tiles, then the final pouring of the concrete screed is to be done. Then it remains to wait until it is completely dry. There is one unpleasant moment: depending on the type of material used for pouring, you will have to wait a very long time for it to harden. Sometimes it takes 20 to 30 days! But do not be horrified at once, but just calculate all the options. The industry does not stand still, and, quite possibly, materials will soon appear, thanks to which the screed dries much faster. Finally, the moment comes when the final coating can already be done. Whether it is tile, linoleum, laminate or carpet - it's up to you.
Basic methods of laying an electric floor
The ways how it is permissible to lay an electric warm floor with your own hands are divided into three types:
- Direct installation in the screed, and then the final layer (cable underfloor heating) is mounted.
- Laying on top of the screed under the tiles (electric mats).
- And direct installation under the flooring (infrared heated floors).
The above types of execution allow you to lay an electric heat-insulated floor in absolutely different rooms of your house or apartment.
Video on how to lay the cable floor under the screed:
Video on how to install the heating mat:


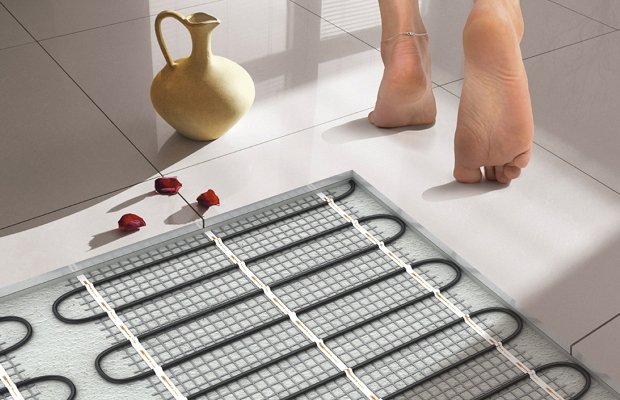
Electric floor heating with your own hands. Video, editing, device
Very often in modern apartments, electric floors are installed in the bathrooms, which quickly and efficiently heat the floor. Electric floors are a rather complex engineering structure, which includes a heating cable, heating mat, thermostat, thermal insulation and guides. A weak electrical current is transmitted through the heating cable.Under its action, the cable heats up and begins to radiate heat.
Preparation of the base
When we make an electric underfloor heating with our own hands, it is important to carefully prepare the base.
At the stage of preparing the foundation, we carry out the following activities:
- We remove the old coating and revise the screed. In the event that it is required to mount an infrared thermal floor and the screed is in a satisfactory condition, then the surface is simply thoroughly cleaned from dirt and dust. If the installation of a wired underfloor heating is needed, then it will not be possible to do without removing the old base, since a new screed is required in order to hide the cable, and this will "eat" the height of the ceilings.
- The next stage is the laying of a moisture-proof coating, a polyethylene layer is widely used in this regard, but if desired, it is permissible to use your own version, for example, roofing material. Further, a damper film is attached to the walls of the room. It guarantees compensation for thermal expansion during heating.
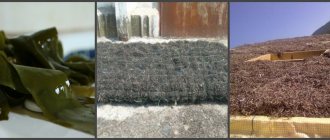
- Then a heat-shielding layer is laid. Laying this layer will significantly reduce heat losses through the base of the floor. The type of thermal protection is selected depending on the orientation of the room and the type of base.
- If there is an unheated room under the floor, then the thickness of the insulating material should be at least ten centimeters, if a warm basement or other living rooms are made under the ceiling, then it is permissible to do with a thickness of five or two cm.
- Further, if the cable type of the underfloor heating is laid, then the cable is laid with further filling of the screed, and if it is just necessary to level the surface, then self-leveling floors or screed are made.
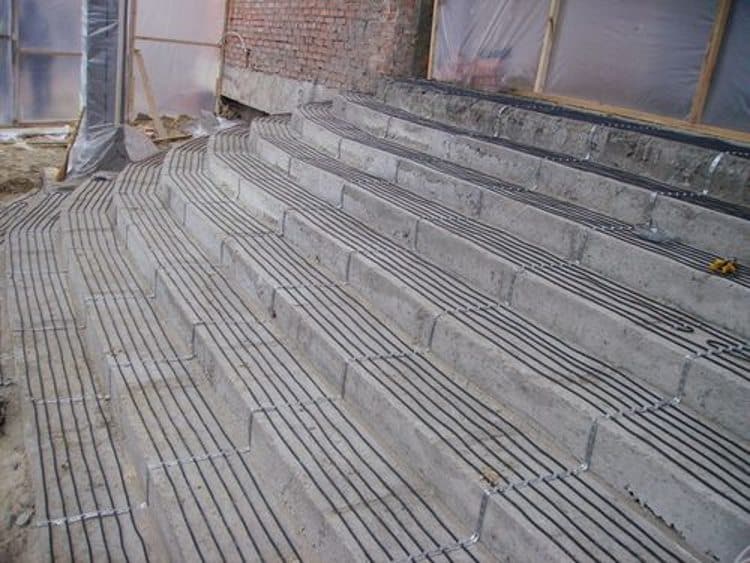
What is the technology for heating a cable floor?
The subconscious fear that, despite all the guarantees of reliability, water-heated floors can flood, if not you, then the neighbors below, makes you give preference to the second option. The most difficult thing is the installation, which is connected with the broaching of the electric heating cable. Here it is necessary to accurately maintain the distance between the "steps" of the wire and handle it quite carefully, avoiding damage to the insulating sheath and the central wire. After laying the heating element in accordance with the instructions, it is poured with concrete (layer thickness 3-5 cm). The power of the electric cable can be up to 18 W per 1 meter. That's all. Editing verbally seems simple and straightforward.
Water heated floors
The wire can also be used with a wooden floor. In this case, the maximum power of the heating system must be at most 10 W per meter.
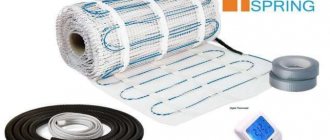
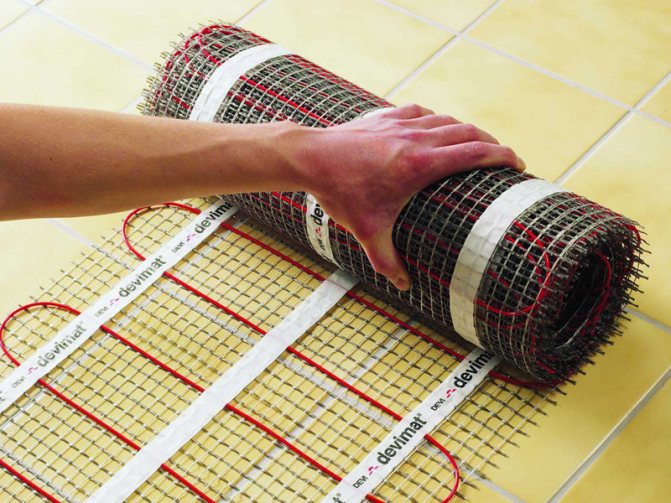
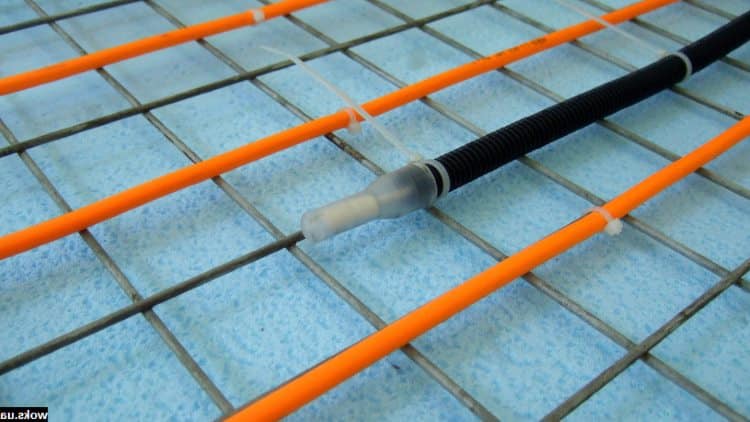
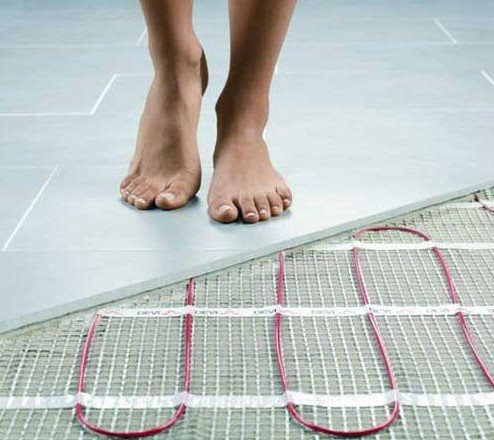
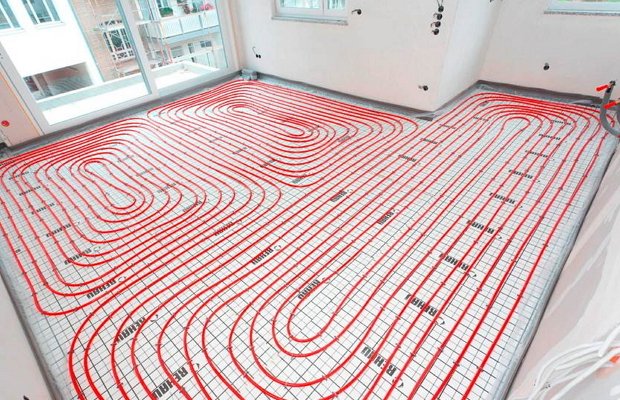
More modern technologies make it possible to no longer arrange dances with tambourines when laying a single heating element, measuring centimeters between the turns with a ruler. The installation of underfloor heating with a reinforced mesh has become a significant progress. It is a wide tape made of cellular material, inside which a cable is laid in a snake. Convenience lies in the fact that you do not have to suffer, unwinding a coil with a wire, writing out zigzags for them. You simply unwind the roll, cut off pieces of tape to the desired length, and then connect the ends of the electrical cable underneath the net. This type of warm floor is also called "matte", because the covering of the reinforced parts fastened to each other really create a kind of layer, similar to a mat.
Installation of underfloor heating with reinforced mesh
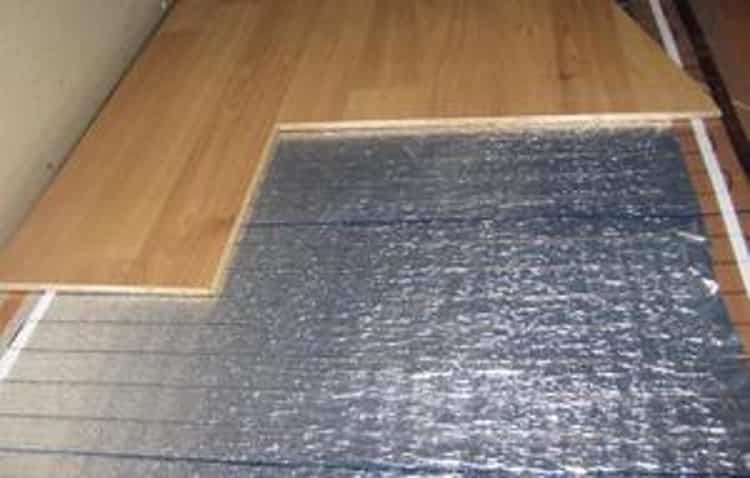
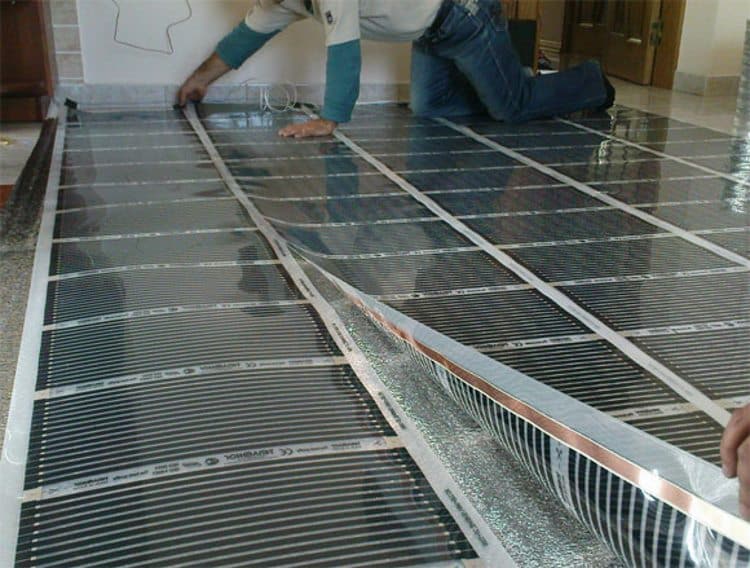
And, finally, a later and, one might say, perfect invention - the infrared floor. It consists of two layers of polyester, between which there are electric heating strips made of carbon. The film looks like solar cells. Its thickness is only 0.5 mm, that is, a little more than a sheet of paper.It is fixed like an ordinary sticker on any flat surface. This is the easiest way of installation, it is within the power of each of us to do it, and there is no need to wait until the screed hardens. The flooring is laid down and furniture can be placed on it immediately. Another advantage of infrared electric underfloor heating is that it is the most economical and energy efficient alternative to other options.
Installation of underfloor heating elements
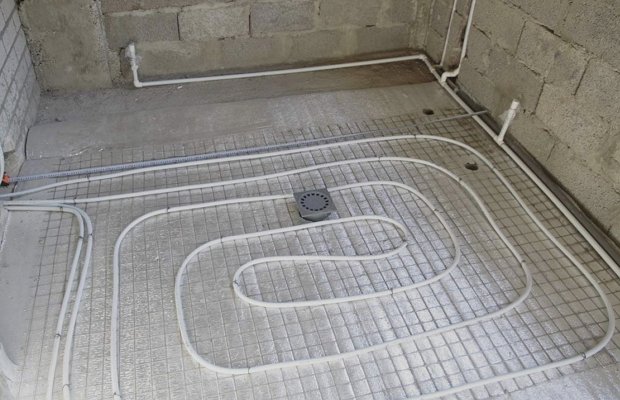
A competent layout of the heating elements provides for a distance of 15 cm from the wall, and 10 cm from the subsequent heating units.
- If a thermal cable floor is chosen, then the cable is laid with a selected step throughout the room, it is fastened to the base and connected to the mains and a mandatory check with a multi-ammeter for the correct connection, then the screed is poured.
- If energy mats or foils are chosen, then it is necessary to put them in places where furniture and plumbing will not be placed.
- The laid mats and infrared film are also connected to the mains and checked for serviceability.
Do-it-yourself electric underfloor heating is not difficult to do, especially if it is an IR film. During installation, the film is attached to the base with special tape, and the heating mats have their own adhesive layer.
When installing the wire, make sure that it is not stretched, and the bends are smooth and without kinks. This will ensure a long service life for the floor.
After checking the correct installation of the connected systems, you can proceed with the installation of the final coating.
Algorithm for laying heating mats
In this article, we examined how to install and how to lay a warm electric floor. Knowing all the subtleties and nuances, you can easily carry out this procedure without outside help.
Varieties of underfloor heating
If someone is sure that the concept of "warm" (more precisely - heated) floor has appeared recently, then let them get ready to be surprised: systems of such coatings were known in prehistoric times. So, for example, one of the first mentions refers to Ancient Rome. The famous baths, known from the 5th grade of high school, were equipped with a similar stone cover, in which hot air circulated through channels. The world-famous Russian and Turkish baths can also boast of such inventions. But we have not antiquity, but the time of new technologies, and therefore the methods of floor heating in current apartments have gone far ahead.
Heating Coating System
Today no one will be pulling pipes under the parquet floor and filling them with steam. The idea submitted by the ancients has changed and exists as underfloor heating with circulating water or a heating cable. In short, the water heating system is a system of flexible pipes laid under the upper layer of the floor covering, and the principle of operation is the same as that of ordinary cast-iron radiator batteries installed under the windows. By the way, connecting to central heating is one of the ways this floor functions. The second way to raise the temperature underfoot is with an electric heating cable. We will dwell on its description, we will analyze how the installation proceeds, and we will not do without numerous videos.
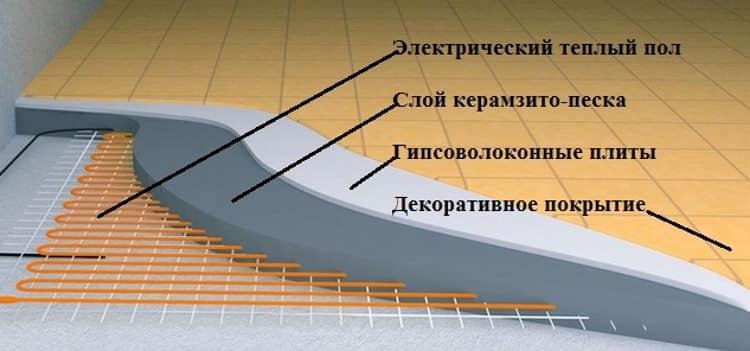
Device and principle of operation
Any electric floor, in the most general case, represents multilayer structure. It can include a layer of thermal insulation, a base layer, installed heating elements, reinforcing layer on which the flooring is laid. Depending on the elements used in the system, the place of its installation and a number of factors, has its own characteristics in a layer-by-layer device of electric underfloor heating.
The release of heat occurs as a result of the passage electric current through distributed heating elements with high resistive resistance. Such thermoelectric heaters are made in the form of resistive (with one or two cores) or self-regulating cables, films with carbon and bimetallic coating, heating rods.
Heat generated as a result electricity conversion in resistive heaters (cables, rods, films), can be easily adjusted. For this, the systems use automatic and manual thermostats. One of the advantages of warm electric floors is ease of automation temperature control. The ability to program the operation of the underfloor heating at any time, significantly increases the comfort of its operation.
The use of automatic blocks allows significant (up to 50%) increase efficiency energy consumption. However, manual setting of the temperature on the block, with the possibility of its operation in thermostat mode, also provides significant (at least 30%) energy savings.
Technology and video of the installation process of electric underfloor heating of the film type
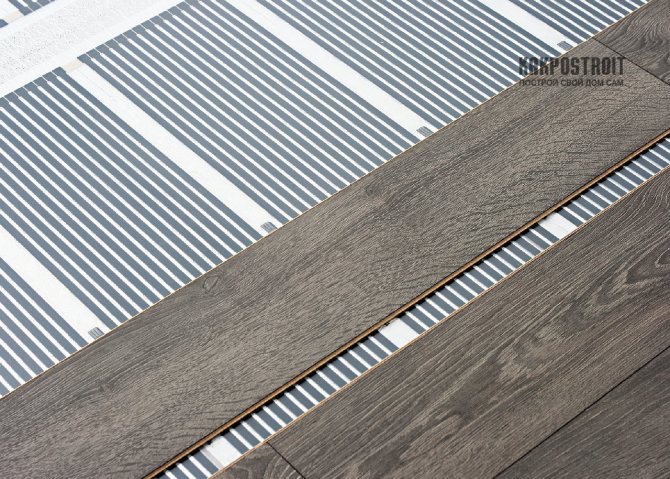
Film IR heaters combine the maximum set of positive characteristics: they are easy to install, quickly warm up the room, and are energy efficient. The main advantage is that when using laminate, linoleum, carpet and other quickly mounted materials as a topcoat, the system can be immediately put into operation.
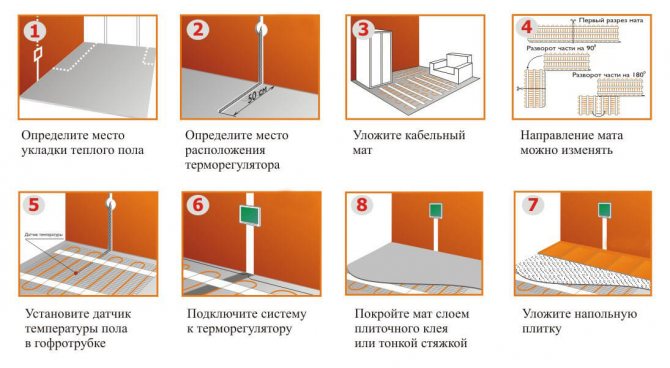
Film heater installation technology:
- Arrange a junction box for installing the thermostat and grind a groove in the wall.
- Clean and, if necessary, level the floor.
- Install thermal insulation based on polypropylene or metallized film (aluminum foil is not allowed!) with a reflective layer upwards, covering the joints with construction tape. When forming an electric film underfloor heating, reviews strongly recommend assessing the condition of the base. If the floor is wet, a waterproofing layer should be made using PET film, and only then covered with thermal insulation.
- Cut the heater strips of a certain length (no more than 10 m), departing from the walls by 200-300 mm. Cutting is allowed only along the boundary line (dashed) with subsequent insulation of copper contacts.
- Set the strips in the working position: the copper busbars are in contact with the thermal insulation (they look down), the strips are not superimposed and do not cross each other (the distance between them is about 100 mm).
- Secure heating elements with tape.
- Install rivets on the connecting wires - always under the foil (the strips are connected in parallel). The configuration of the rivets and the type of device for their clamping are determined by a specific manufacturer.
- Connect the connectors with copper busbars and insulate the joints with bitumen tape.
- Connect the unit to the thermostat. Connect film underfloor heating electric video recommend only after measuring the resistance and sketching the layout of the heating elements. At this stage, it is also possible to estimate the power of the installation, which should be 20% lower than the maximum possible load of the thermostat: P = U2 / R, where U is the voltage, 220 V.
- Install the temperature sensor directly under the heating strip, preferably in the least loaded place (the wires can be hidden under the thermal insulation, after gluing them with tape).
- System test.
- Laying the finishing layer. When installing laminate, linoleum or carpet, it is recommended to waterproof the heating elements with thick polyethylene (about 80 microns) or lay a substrate. Before laying the tiles, the mesh should be mounted over the film heater, fixing it in places where there are no stripes.
By constructing an electric underfloor heating based on film heating elements with your own hands, should be borne in mind:
- It is prohibited to violate the integrity of the graphite elements!
- When installing laminate or linoleum, it is necessary to maintain a gap between the wall.
- Installing stripes under furniture and other items, especially when using a pliable topcoat, is strongly discouraged.
- After laying the tiles, it is forbidden to activate the heating function for three weeks.
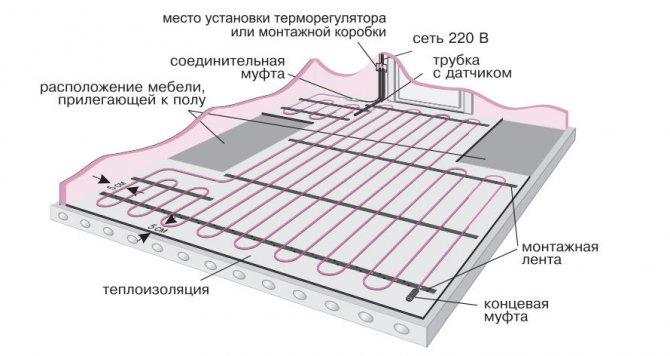
Installation of an electric floor
Before proceeding with the installation of heating elements, it is necessary to draw up an installation plan on paper, on which to distribute the heating cables and elements in an optimal way. It is necessary to take into account the features of the room, the placement of furniture and plumbing, the place of laying pipes, electrical communications and other details. It is necessary to distribute the heating elements to those zones in which they will be most effective. After the layout has been thought out on paper, it is necessary to put it into practice. The temperature regulator should be placed on the wall in a convenient place. Electric cables are laid from it and a wire with a temperature sensor is laid. If a heated floor under a tile is installed in a bathroom, grounding must be provided. The first layer is reflective thermal insulation, the reflective side up, after which a layer of waterproofing film is laid with a small overlay on the walls. Edge insulation is installed along the perimeter of the floor.
Before laying, it is necessary to check the functionality of the electrical cable and the entire system. Underfloor heating elements are fastened with a special fastening tape. Tape infrared floors are laid on top of a layer of insulation and fixed with adhesive tape.

After laying and connecting the cables, it is necessary to check the performance of the system, the insulation and measure the resistance of the system using special devices. Next, a concrete screed is made. This is the easiest way to make a warm concrete floor.
Calculation features
Before making an electric underfloor heating, you should decide whether the system will be used as the main or additional source of heat. The calculation directly depends on this. If floor heating is additional, there will be one requirement - there must be enough power to heat the floor to a comfortable temperature level. As a rule, it is +29 degrees. But if the installation is to be used for the main heating, the heat should be enough to compensate for the heat loss of the building. Calculations are indispensable here. The calculation of an electric underfloor heating can be performed in two ways.
The first way to calculate an electric floor heating
The essence of the first is that first the heat loss of the apartment is determined, taking into account a number of factors. For example, the type of glazing, the size of the windows, the area, the material and the thickness of the exterior walls all affect how much heat a room loses. Different building materials have different degrees of heat loss. Of course, such a calculation is complicated. But on the other hand, it is the most accurate.
It is important to remember that the heated surface must be at least 70% of the area of the room. Where it is planned to place furniture, large household appliances, heating elements cannot be laid. And this should also be taken into account when calculating.
To carry out the correct calculation of a warm electric floor - an online calculator will be very useful. You can also ask for help from specialists.
Second calculation method
The second calculation option is somewhat simpler. It is carried out according to average statistical data. So, for the main heating for all rooms in the house, the required power is 180 W / m2. But, if a warm floor is supposed to be installed as an additional source of heat, then the indicators will differ for different rooms.So, for living rooms, a kitchen located on the ground floor, as well as for a bathroom, the required power is 140-150 W / m2. If the living rooms and the kitchen are on the second floor or higher, the required power will be slightly less - 120-130 W / sq.m. For a balcony, the value is 180 W / m2.
To calculate a warm electric floor, the area not occupied by pieces of furniture should be multiplied by the given rate. As a result, the maximum power consumption is obtained, which is necessary in order to efficiently and efficiently heat the floor.