There are many ways to make underfloor heating in an apartment or private house, but using a heating cable is the simplest and most inexpensive option, so it is in great demand.

Electric cable underfloor heating
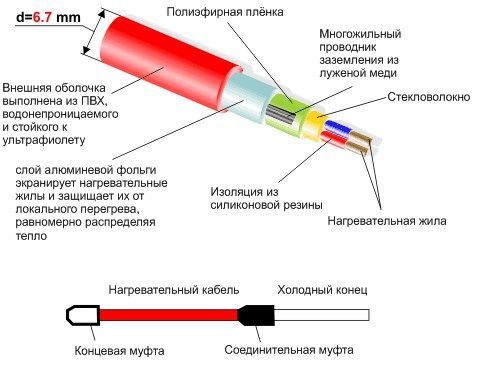
The heating cable is a copper wire that carries an electric current. To increase performance, it is placed in a special fiber winding and heat-resistant polyvinylethylene. Thanks to this design, the safety of its use is also ensured. Electric current, passing through the wire, releases thermal energy, due to which the surface is heated.
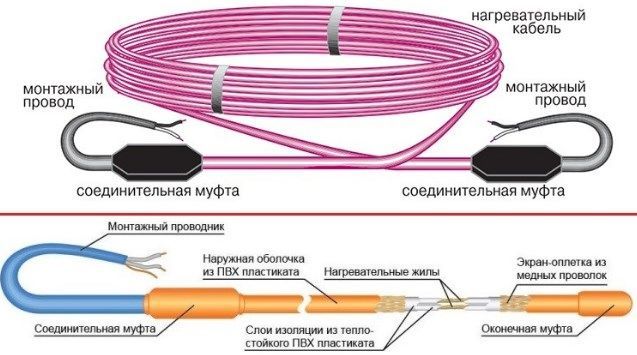
Heating cable device
Electric cables for concrete screed have different power: from 15 to 40 W / m, can be heated up to 90 ° C. Galvanized steel or copper acts as a conductor - cores. Any wire is designed for a traditional electrical network with a voltage of 220 V.
Resistive heating cable
An electrical wire of a resistive type for a warm floor has one or two cores, which are placed in an insulating sheath, and couplings are installed at both ends, with the help of which it is connected to the electrical network. If a single-core wire is used under the screed, then a closed circuit must be provided. This means that the cable must be placed on the floor so that both ends fit into the back box.
Raychem T2BLUE resistive cable
If a two-wire wire is used, then the presence of a second conductor ensures that the current circuit is closed, therefore only one end is placed in the box, and a plug is mounted on the other.
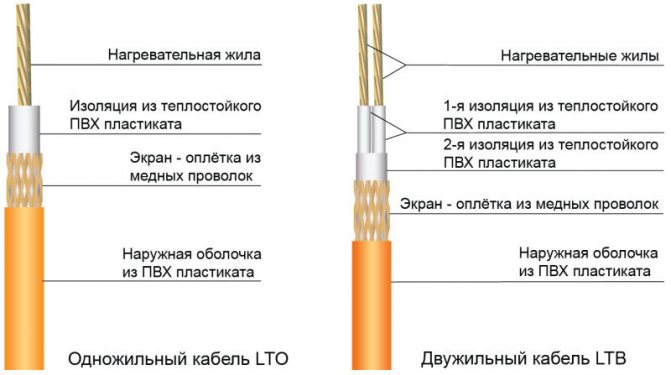
A two-core cable has a more complex structure:
Two-core heating cable for underfloor heating
- both cores are enclosed in an insulating material such as silicone rubber;
- two wires are combined with fiberglass;
- tinned copper conductor is used for grounding;
- aluminum foil protects the conductor from local overheating;
- the whole structure is enclosed in an outer shell made of polyvinyl chloride.
A single-core cable has one significant advantage - the price, while a two-core cable is 20% more expensive. The two-core cable is simply laid under the screed - you can use any convenient method, without having to return the other end to the box.
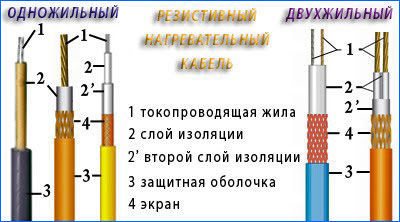
Single-core and double-core cable
The resistive wire constantly emits heat when connected to the mains - this is its main disadvantage. Because, if heat energy is cut off the output, it will contribute to overheating of the wire and a short circuit will occur. You cannot lay such wires in those places where you plan to arrange furniture.
Types of electric floors
A modern underfloor heating, connected to the power grid, is presented in the form of a system of cables, or heating elements, connected in mats. A separate group consists of innovative designs, which include infrared rods, and film models.
But all of these options have a number of common features:
- The base of the floor must be dry before installation;
- Be sure to need grounding and thermal insulation;
- The equipment has a thermostat;
- The service life is quite long.
But there are also differences, presented by the features of the installation, the quality of the generated heat, interaction with floor coverings.
Cable underfloor heating
- Such a system has already become a classic, since the design is very convenient and reliable.
- Such a floor consists of a cable cut into sections, a temperature control sensor and a thermostat.
- Thus, the system is turned on only after the temperature has dropped below a certain level.
Important! You can use both simple thermostats and more complex devices that monitor not only the temperature of the floor, but also the temperature outside.
Thermomat (thin cable floor on a mesh):
- In the manufacture, a very thin cable is used, fixed on a fiberglass mesh.
- The heating core in the cable is surrounded by a shield, insulation and a protective sheath.
- The cable in the mats can be one- and two-core. Two-wire models are used to heat rooms in which people are constantly, since they have a low level of electromagnetic radiation.
Important! The thin cable floor is laid on old tiles or finished screed. For laying under tiles, this option will be the most optimal.
Infrared floor heating
In this type of floor, the heating element, through which an electric current passes, begins to emit electromagnetic waves, due to which the temperature of all objects that are in their path rises. In this, there is a similarity between the infrared floor and the rays of the sun. The heat from the conductive element passes into the floor covering, which lies on top, and the air is already heated from it.
Different types of underfloor heating require a different finish floor covering:
- Cable floors and thermomats - choose ceramic tiles, laminate or porcelain stoneware;
- Infrared film and carbon rods - laminate, carpet, linoleum or wood.
Self-regulating cable
A shielded or self-regulating cable for underfloor heating is a matrix, inside which there are two conductors, and between them - a layer of polymer, which releases the necessary thermal energy. The peculiarity of this cable is that it regulates the heating due to the resistance of the polymer. As the temperature rises, the resistance also rises, which leads to a decrease in the current strength and, as a result, the amount of heat generated decreases.
Self-regulating heating cable braid
Thanks to this structure, the self-regulating cable is also quite economical, therefore, over time, it will justify the funds invested in its purchase.
Shielded wire composition:
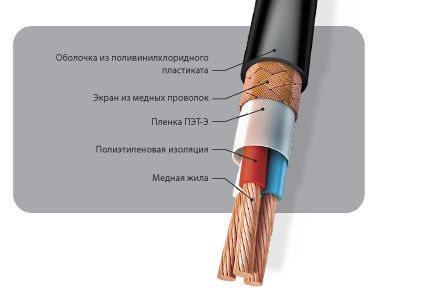
Shielded heating cable design
- carbon conductor;
- polymer;
- insulation;
- reinforcing braid;
- external PVC insulation.
Despite the ability to control overheating, such a cable is also not recommended to be laid under furniture, since this will increase electricity consumption, but will not provide the desired effect - it makes no sense to heat the cabinet.
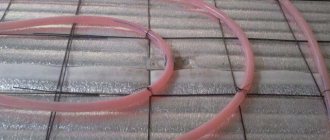
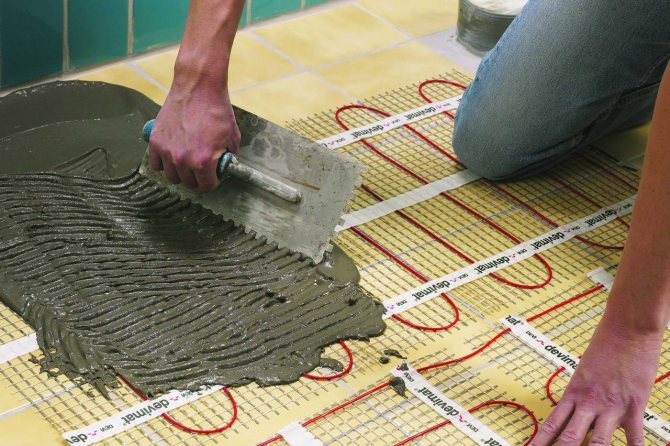
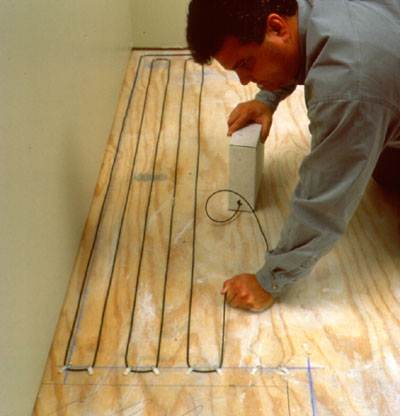
We lay the cable
Before making an electric underfloor heating, you need to study the rules for laying the cable. It fits in the form of a snake, while the previously measured step must be observed:
- We lay the cable, fix it with plastic ties.
- Check how efficient the system is.
- To mount the screed, a 3 to 1 mixture of sand and cement is used.
Important! The solution can be supplemented with appropriate plasticizers or ready-mixed mixtures. Fiber may be added.
- The mortar, which is laid on the mesh with the cable, must have a thickness of at least 4-5 cm.
- When the screed is dry, the floor covering is laid.
Important! For at least a month, it is forbidden to turn on the warm floor, since the screed will not have time to completely dry out.
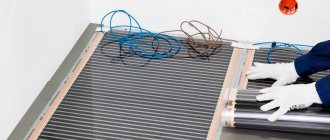
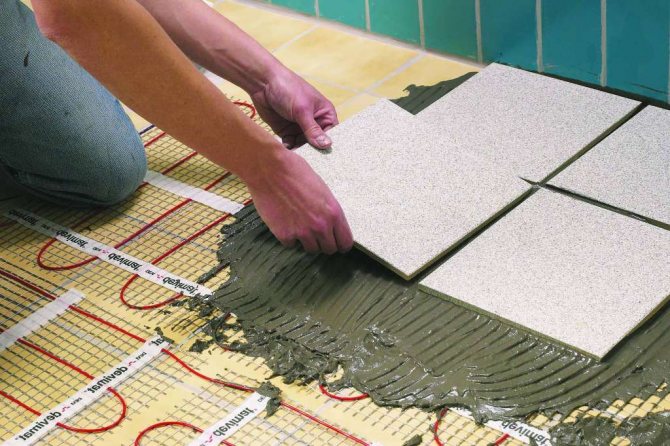
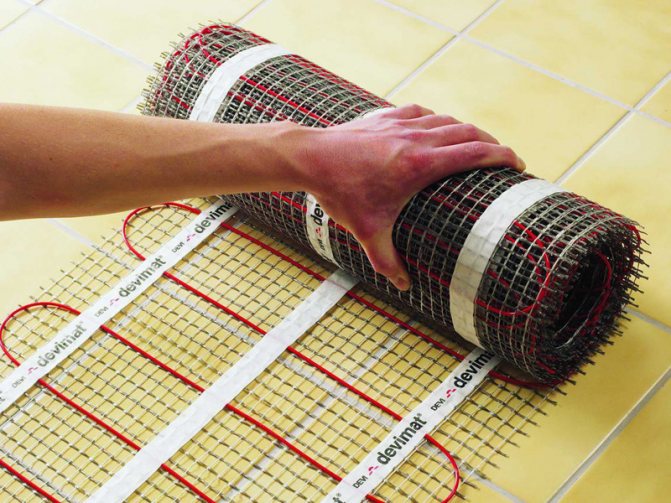
Heating mats
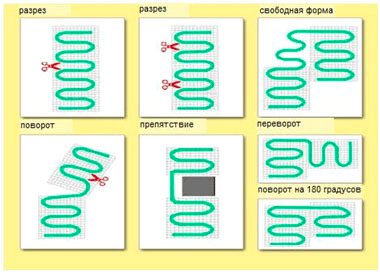
Methods for cutting and bending the heating mat
To simplify the installation of underfloor heating using a heating cable, special mats have been developed.They consist of a mesh base on which the heating elements are fixed.
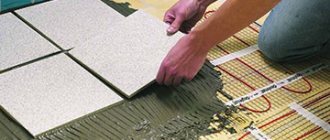
The main advantage of this design is that it is possible not to make a concrete screed, but it is allowed to immediately lay the finishing layer on top (tiles are most often used).
The installation of the mats is very convenient, since it is easy to change the direction; they can be laid in any order, bypassing the places where the furniture is located. Most often, a resistive two-wire cable is placed in the mats.
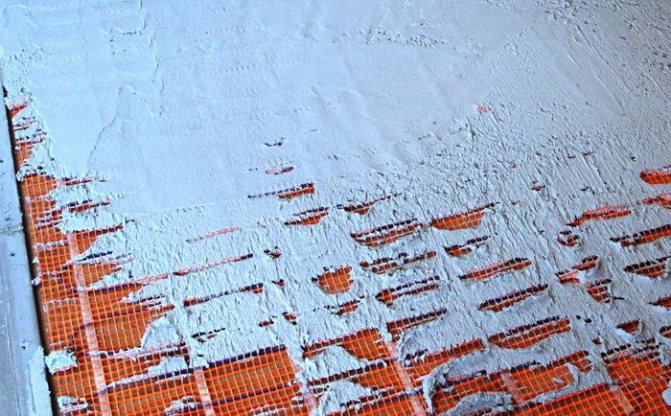
Laying the heating mat

Preparation of the base
If there is a need to remove the old screed, we do it to the very base and thoroughly clean the surface from debris. Now we are laying the waterproofing layer with a grip of about 10 cm on the wall. To compensate for thermal expansion during heating, we fix a damping tape on the wall. After laying the warm electric floor, it will be possible to cut off the residues.
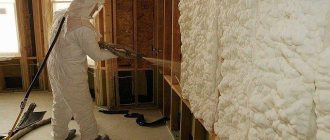
To prevent the heat from going down, we do the thermal insulation of the base with our own hands. Insulation must be chosen taking into account the type of surface, the location of the room and the purpose of the installation. The following options are possible.
- If a warm electric floor will be used as an additional source of heat, you can use polyethylene foam with a layer of foil to reflect the heat.
- When installing a warm floor above a heated room, it is best to use expanded polystyrene. Its thickness should be in the range from 20 to 50 mm.
- For loggias and verandas, a layer of insulation of mineral wool or expanded polystyrene with a thickness of up to 100 mm should be formed.
A reinforcing mesh should be placed on the insulation, but this step can be replaced by adding microfiber or plasticizer to the solution.
The most common brands of heating cables and their characteristics
On the Russian market, there are both domestic manufacturers of electric cables for underfloor heating under screed, and imported ones.
| Brand | Section length, m | Power, W / m | Maximum operating temperature, оС | Service life, years |
| Single core cable | ||||
| National comfort, NK-250 | 17 | 15 | 90 | 15 |
| Teplolux | 10 | 14 | 90 | 25 |
| Neoclima | 5 | 15,2 | 100 | 35 |
| Two-core cable | ||||
| Ceilhit | 8,1 | 18 | 100 | 25 |
| Teplolux Elite | 15 | 27 | 90 | 30 |
| Raychem t2 | 14 | 20 | 100 | 35 |
| Self-regulating cable | ||||
| Optiheat 15/30 | 15 | 30 | 100 | 40 |
| Devi-pipeguard 25 | 25 | 30 | 85 | 30 |
| Heating mat | ||||
| NeoClima | 0.65 m2 | 105 | 80 | 25 |
| Electrolux EEFM | 2 m2 | 150 | 80 | 35 |
| National comfort | 0,5 m2 | 130 | 90 | 25 |
Nuances
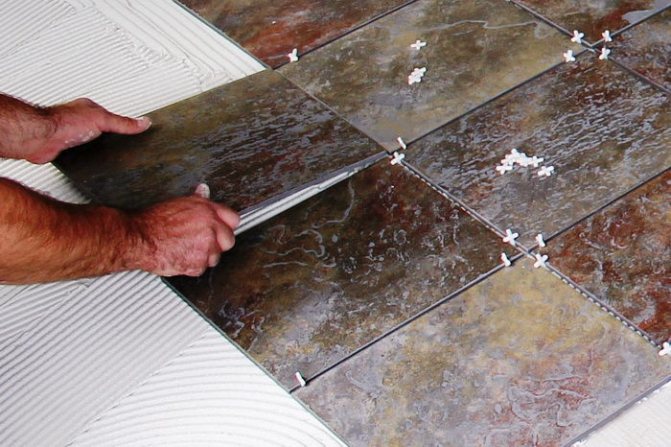
Photos of laying an electric underfloor heating with your own hands are reflected in our article and will serve as an aid when performing work. The difference between laying a warm electric floor under a tile and under a laminate is that the tiles can be mounted on a minimal screed directly on the heating cables, at the same time, it is recommended to make a layer of screed between the cable and the covering of at least 20 mm under the laminate, to ensure that the laminate does not deform.
Having arranged a warm floor with the help of our recommendations at home, you can safely give recommendations to your relatives and friends how to install an electric heated floor with your own hands without involving outsiders. At the same time, the quality of work will depend only on your efforts, and the reward will be a warm, comfortable floor, the heating system of which, at the same time, is the most natural and environmentally friendly. The pleasure of the result obtained will outweigh all the inconveniences associated with the performance of the work.
Rules for installing a warm floor with an electric wire
For an electric underfloor heating, it is necessary to provide a perfectly flat surface of the rough base, since there may be air in the voids, which will lead to the burnout of the resistive element. On the subfloor, a thin screed from 3 to 5 cm is recommended.
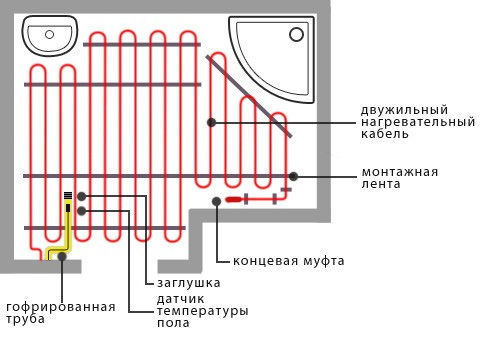
Installation diagram of the electric cable on the floor
Next comes thermal insulation. The thickness of the material should be at least 2 cm, but if this is an apartment on the ground floor, it is better to choose a thicker one. When choosing a material, you should pay attention to heat resistance - it must withstand heating up to 100 ° C.It is better not to use a foil-coated material - the foil will quickly deteriorate under the influence of constantly high temperatures. An alternative is a metallized coating - it will reflect heat and direct it upward.
Self-installation of an electric underfloor heating
Both rolled insulation and slabs are used. One condition is that you must not allow cracks in honey with canvases. If underfloor heating is installed in a bathroom or kitchen, waterproofing materials should be used. They will prevent the penetration of unwanted moisture.
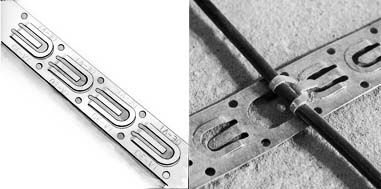
Thick plastic sheeting is most commonly used. The next stage is the installation of heating elements. It can be carried out on a special mounting tape, which has fasteners for the cable. You can replace it with a reinforcing mesh, the cells of which do not exceed 1.5 cm.
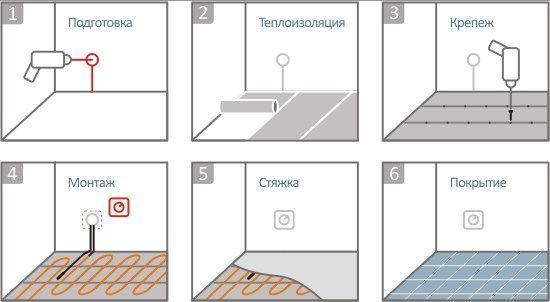
Stages of installing a warm floor with an electric wire
The next stage is the screed. Any material that can withstand high temperatures can be used. This is either a concrete composition with the addition of polymers, or ready-made dry mixes for a warm floor. Before pouring the screed, it is necessary to check the performance of the heating system. The test is carried out using a tester that measures the maximum resistance. Deviations within 10% of the data specified in the wire passport are allowed.

Infrared underfloor heating construction
The heating element of infrared underfloor heating is a special heating film, which exhibits a high degree of resistance to mechanical damage. Such a film is made using dense polymers - polyurethane or lavsan. The base consists of two layers, between which elements that provide heating are located. They are carbon or bimetallic.
On the edges of each heating element there are conductors to which the power cables are connected. This is complemented by the included thermostat, which allows you to control the heating level using sensors placed on the floor.
Comparison with other underfloor heating systems:
- Infrared underfloor heating is incompatible with ceramic tiles;
- It can be used as the main source of heating for an apartment;
- Infrared heating system provides uniform heating of the room;
- Laying should be done on areas of the floor that will be free of heavy furniture. In addition to the fact that wooden furniture will gradually dry out, it can also deform the underfloor heating film;
- The infrared floor ionizes the air in the room, which is beneficial for the health of the residents;
- You can install an IR floor with your own hands in 1 day.
How to install an infrared underfloor heating
Rules and features of the operation of an infrared warm floor
The film infrared floor belongs to the class of low-temperature heaters, therefore its temperature should not be set above 35-40 ° C - this can create discomfort for the feet of residents. This type of warm floors is well combined with such finishing materials as laminate, linoleum and carpet, tiles are incompatible with it. Using a thermal sensor, you can set the required temperature, it is not recommended to exceed the values of 27-28 ° C, otherwise the laminate may dry out under the influence of temperature.
Sometimes, in order to feel comfortable and cozy in your apartment, the main heating is not enough, and walking on a cold floor is completely unpleasant. In this case, a suitable choice would be an electric warm floor, which can be assembled with your own hands without much difficulty. This option is especially relevant for heating tiles in the bathroom, heating a bath, veranda or loggia. Due to the affordable cost of the material, everyone can make warm floors in their apartment.
Installing the thermostat
A thermostat should be used to save energy and make the underfloor heating more efficient. It must be installed before laying the heating elements. It is mounted in a convenient place, stepping back from the floor at least 30 cm. In the wall, you need to make a niche for installing the box and draw a strobe to the base of the floor, in which a corrugation or pipe is placed. The corrugation should pass another 0.5-1 m along the base of the floor, connecting wires from the heating elements are placed in it.

The right place to mount the thermostat
The cable ends must be brought into the thermostat in such a way that the sleeves remain in the tie.
Installing a thermostat
We act as follows:
- We prepare a hole in the wall, we cut a furrow to the floor.
- Insert the mounting box into the hole, fix it with alabaster.
- The corrugated tube coming out of the box is placed in the furrow and covered with alabaster on top.
- The end of the tube is led out into the heating zone and is located between the cable loops so that the thermostat is in the center.
Important! We lay the pipe without bends; at the location of the temperature sensor, it is necessary to create an elevation using a wooden block. This is done in order to achieve the location of the sensor immediately under the floor, which means - for the correctness of its readings.
- We wrap the end of the tube tightly with insulating tape so that the solution does not get into it.
Cabling
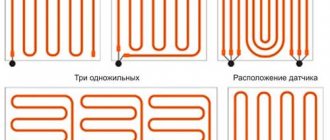
There are several options for routing cables:
- snail;
- snake;
- double or triple snake.

Heating cable routing options
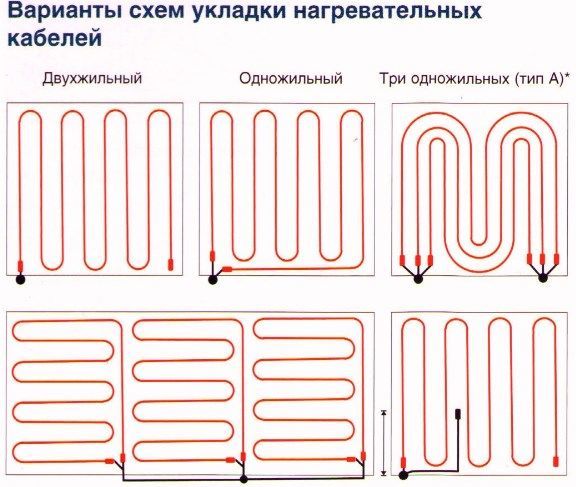
The snail layout is less popular, especially if resistive elements are used. The step between the turns is chosen independently, depending on the required power per 1 m2. The minimum allowable distance is 5 cm, the maximum is 30 cm.
How can you calculate the required amount of wire per 1 m2?
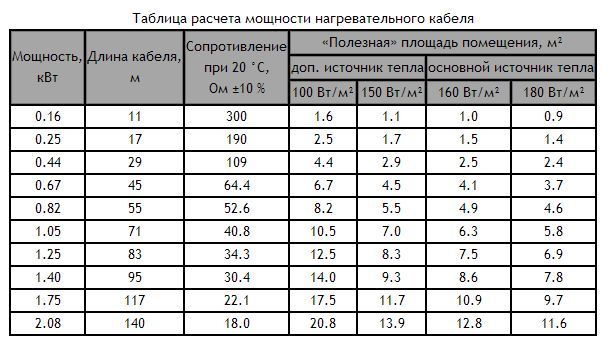
Heating cable power calculation table
- First, you need to decide whether it will be the main heating in the room or auxiliary. If the main one, then you need to provide a power of 150 W and above, and when the warm floor is only an additional system, 110 W. will be enough.
- Secondly, the degree of floor insulation is taken into account - if this is an apartment on the first floor, then you need to provide 140-150 W, even with additional heating. More powerful elements should be installed on the balcony or loggia - up to 180 watts.
- Thirdly, the definition of the heated area is approximately 70% of the floor, taking into account the location of the furniture (the wire does not fit under it).
The cable length can now be calculated. For example, the coverage area is 10m2, it is necessary to organize a power of 140 W per 1m2. There is a heating cable for underfloor heating with a power of 16 watts. We calculate the maximum consumption: 140 * 10 = 1400 W. Determine the length of the cable: 1400/16 = 87.5 m. Now you need to select such a number of coils or sections that are as close as possible to this value, since shortening the heating cable for a warm floor is very problematic.
Cable underfloor heating construction
Heating technology with cable underfloor heating is based on converting the power of electricity into heat. The underfloor heating cable can be heated up to a temperature of 60-70 ° C. Such a heated floor must be installed in a screed or tile adhesive.
The heating circuit diagram is quite simple - a resistive single-core, two-core or self-regulating wire with a cross section of 2.6 mm is placed on a special mesh mat, where it is fixed. Before laying the cable electric floor, the power and step are calculated.
In some cases, it can be laid under plaster or ceramic tiles, or along the wall. The cable floor diagram consists of a temperature sensor to which the control unit is connected.The cable and sensor are connected to a wall-mounted thermostat. When a signal is sent from the sensor, the thermostat turns on or off the heating circuit from the mains.
Comparison with other underfloor heating systems:
- Cable heat-insulated floor, unlike pivot one, cannot be laid in those areas of the room where furniture or plumbing equipment will be placed;
- Cable underfloor heating can be installed in a room with high humidity. Infrared or bar floor such conditions can be harmful;
- Tiled products are easier to lay on top of an electric cable, film counterparts have a low degree of adhesion to tile adhesive;
- The cost of the device and installation of a cable underfloor heating is relatively low;
- The instruction requires mandatory grounding of the cable underfloor heating;
- Cable underfloor heating does not need a large number of additional devices, just installing a thermostat is enough;
- The cable floor is optimal in rooms with a small area; it will be problematic to install a water analogue in such rooms.
How to shorten the cable?
The question of how to shorten the heating cable may arise in the event that the incorrect calculation of the footage is performed, and there is nowhere to put the excess (you must remember the minimum allowable distance between the turns - 5 cm). The wire is sold in coils that have several sections. Couplings are installed at the ends of the cable in the section. A certain resistance is created within each section. If you cut the wire yourself, the balance will be upset: the resistance will decrease, the current will increase.
Heating cable information diagram
As a result, the cable will simply burn out, so you should use the entire footage for the coverage. But if, nevertheless, such a need arose, then it is better to entrust the pruning to a professional. It will determine how much resistance is lost and install a current limiting resistor to compensate.
Installation of heating sections
First, you need to return to the previously drawn up plan for laying the heating cable, carefully study such details as the order and step of laying.
Before unwinding the cable, you need to check its resistance. The value of the measured resistance is recorded in the warranty card. It must match the one indicated on the cable gland label. The permissible discrepancy is ± 10%.
The cold end of the two-core heating cable is pushed into the corrugation and installed in the initially prepared groove. The connecting sleeve and the beginning of the cable are fixed on the floor to the mounting tape, and from this point the laying of the cable begins. Moreover, the connecting sleeve must be located on the floor in such a way that it is completely filled with concrete screed.
In the process of laying, it is necessary to ensure that the cable lines do not touch or intersect, and also strictly observe a constant laying step throughout the entire heating area. In places where cable bending is required, the bending radius should not be less than 5 cm.
The end sleeve of the two-core heating cable is fixed on the mounting tape with the same condition as the connecting tape - it must be completely covered with a concrete screed. If a single-core heating cable is used for the installation of a cable heating system, then when drawing up a laying scheme, it must be borne in mind that both ends of the cable will be connected to the thermostat.
Installing and fixing the temperature sensor and thermostat.
When the cable is laid completely over the entire surface, you need to install the temperature sensor. It is mounted in a corrugated tube and installed together with the supply end of the heating cable in one strobe. At the end of the tube, where the thermostat will be located, a plug is placed so that the solution does not get into it.
The tube with the sensor is laid on the floor, without crossing them between the heating cable lines.In order for the temperature sensor to function normally, it is fixed together with the tube in the middle of the cable lines on the mounting tape. The floor sensor with a tube must be located along the cable at least 50-100cm in length.
The thermostat is installed and connected after three wires are connected to the junction box: the floor temperature sensor wire, the heating cable supply wire and the 220 V power cord. The thermostat must not be placed in rooms with high humidity. It's not safe!
At this stage, the installation of the electric underfloor heating is over. You can start filling the cable heating system with a cement-sand screed.
The device is a cement-sand screed or self-leveling floor.
Before filling the cable heating system with a screed, it is necessary to make sure that it is working properly. For this, the warm floor is switched on for a short time. Underfloor heating installation scheme
with the placement of couplings and end couplings, it is necessary to sketch, and it is better to photograph and attach to the warranty card.
Screed under electric underfloor heating
it is better to cook from mixtures specially designed for this. It is necessary to pour the liquid cement-sand mixture over the floor surface evenly and accurately, without damaging the cable insulation. It is necessary to ensure that no air pockets arise during the pouring of the screed, as they impair the heat transfer from the heating cable.
The thickness of the screed should be approximately 3-5 cm. The time for complete drying of the screed is indicated by the manufacturer of the mixture (approximately 28 days).
After the screed has hardened along the walls, it is necessary to cut off the protruding parts of the insulation (if any). Then you can start laying the flooring (ceramic tiles, etc.).
Similar materials on the site:
Alexey Shamborsky, 09/06/2014
Many owners of apartments and private houses at the construction stage and during renovations decide to equip more comfortable living conditions. The device of warm floors of various modifications has been especially popular lately. From the point of view of safety, ease of use and cost, electric underfloor heating is beyond competition.
The only thing that confuses homeowners is the rather high cost of work, the main component of which is the remuneration of the installers. But in this case, there is an opportunity to drastically save on the services of hired workers by making an electric heated floor with your own hands. For this, on sale there are many different sets of electric floors of various capacities suitable for all types of coatings and for different sizes of area, from which you can choose the ideal one for your home.
Technology
If you think that creating coziness and comfort in a house or apartment is possible only with the help of professional workers, then you are sharply negatively mistaken. Subject to certain rules, and following practical advice, you can do a high-quality installation of a warm floor with your own hands. Of course, before making such a floor, it will take time to study and patience, but the result will definitely please you.
Structure
Any electric underfloor heating consists of three components:
- Basics - heating cables, films, mesh, mats, etc.
- Power consumption points are the places where the entire structure is connected to a 220 or 380 volt network.
- Thermostat, which is designed to control the set temperature.
For your information There are single-core and double-core cables. The second option is slightly more expensive, as it is considered safer due to the reduced level of electromagnetic radiation. Therefore, it is used to insulate bedrooms, living rooms and children's rooms. In fact, this fact is unprovable.
In order
The very first step in arranging additional heating is to carefully level the work surface.
Do-it-yourself electric underfloor heating on a flat surface is not only more convenient, but also fairer.
- Preparation of the base.
If you notice significant drops in its level or deep cracks and irregularities, you will have to do a roughing. This will allow in the future to lay the heating elements and insulation evenly and efficiently. The absence of sagging of the cables and, accordingly, their forced deformation under the pressure of your body is guaranteed.
For the screed, a cement mortar is used, which is leveled as much as possible, and it is allowed to dry thoroughly to gain the design strength.
- Garbage removal.
It is necessary to thoroughly clean the base from debris and dust. The best option would be a vacuum cleaner, but it is advisable to use an industrial model, not a household one.
- Insulation laying.
Laying a layer of thermal insulation material, which should reduce heat loss and ensure the return of temperature up, on, and not down, onto the floor slabs.
Advice When choosing insulation, pay attention to the size and heat loss of the room. For rooms with a small area and a relatively comfortable thermal regime, it will be quite enough to use foil polypropylene foam with a thickness of 3 to 5 mm. If the room is cold and spacious, use a cork backing or the same polypropylene, but with a thickness of 15-20 mm. This will be enough to save heat.
- Installation.
After the preparatory work has been carried out, you can install a warm electric floor with your own hands and install a heat regulator.
Important! Consider the location of the heating element before thorough installation! It is not recommended to install too heavy furniture on it. If you used foil-clad material as a heat insulator, then the heating cable can be laid directly on the insulator. When using a different type of insulation, you will have to make a thin (about 1 cm) concrete screed to exclude its contact with the heating cable.
Retreat
For high-quality laying of a warm floor, a metal reinforcing mesh is used, which will provide additional strength and will not allow it to expand when the temperature rises.
Before starting the installation of the electrical heating cable, be sure to check it for possible damage or breakage. To do this, it is enough to measure its resistance.
Ideally, it should match the parameters indicated by the instructions for using the heating element.
- Be sure to lay it, strictly following the scheme!
- Do not kink or kink the cable!
- Under no circumstances should the two-core cable be cut!
- After completing the installation process, check the resistance of the entire system again. It must match the passport values that are indicated in the instructions.
- Do not carry out any work on installed electrical heating elements. This could damage them.
Continuation
- The final stage.
Now is the time to start with the main finishing screed. For this, a prepared solution of sand and cement is used again.
Do not make a mixture that is too thick or too liquid. In the first case, it will be very difficult to perfectly level the surface, in the second case, cracking of the dried floor is possible. We'll have to work hard and find an average between the first and second cases.
After the surface of the screed is leveled with the rule, it should be left to dry completely. If the room has a high temperature and low humidity, experts advise to slightly moisten the screed with water for two to three days in order to avoid the appearance of cracks. It usually takes 25-30 days for a cement screed to dry thoroughly. Do not turn on the heating system until this moment!
- The first trial operation of an electric underfloor heating should not exceed 3-5 hours. The temperature regime is increased gradually, starting from 20 degrees and adding 3-4 degrees daily.
- If everything went well, you have no complaints about the operation of the heating system and are satisfied with the quality of the screed, you can start laying the floor covering. Perhaps it will be parquet, laminate, tiles or just carpet. It all depends only on your taste and choice.
Important! Another crucial moment in the underfloor heating device is connecting it to the electrical network. Unfortunately, not everyone has sufficient knowledge in electrical work. That is why, in order to ensure complete safety, it is advisable to entrust this process to a professional electrician. It will not take much time, but it will give a guarantee of high-quality operation of the system in the future. Perhaps this is the only moment that it is better not to do on your own. The price for the work of a professional justifies any consequences.
As you can see, it is not so difficult to carry out the correct and competent installation of the warm floor with your own hands. It is enough to have basic skills in handling construction tools, follow all instructions and recommendations for installing this system.
After all the work is done with high quality, you will definitely be satisfied with the result. After all, coziness and a comfortable indoor climate are the basis for good health and a positive mood for your family and friends. Well, if you are not at all confident in your abilities, there is an opportunity to contact a professional company that deals with this issue. As they say - any whim for your money!