The concept and purpose of crimping
Pressure testing is carried out before pouring the screed in order to identify leaks in advance
Installation of underfloor heating requires a high-quality system - pipes without defects and leaks. Pressure testing is the creation of excess pressure, which allows you to detect breaks in connections and hidden pipe problems. At the end of the work, you can correct the existing problems and fill the screed.
Testing the pipeline by pressure is necessary to check:
- hidden factory defects of pipes;
- strength and integrity of radiator casings, heat exchangers, reinforcement elements;
- quality of fasteners;
- holding valves, gate valves, manometers and taps.
Through complex measures, you can check the quality of hot water supply, sewer drain, well.
Pressing is allowed to be performed in the unconnected boiler mode or when one room is ready.
Why do you need underfloor heating crimping?
Why is it necessary to pressurize the system? The manufacturer gives a guarantee for a good pipe. However, the pipe may have defects that cannot be seen in any way (for example, a sink in the pipe wall); such a pipe will not break immediately, but during operation, a leak will appear under pressure.
That is, pressure testing helps to check not only the tightness at the joints of pipes and fittings, but also the quality of the material.
Even if the boiler has not yet been connected or only part of the heating system has been made (one room), it is still possible to check the integrity of the pipeline by pressure testing the underfloor heating.
How it's done? There are two ways.
Crimping technology
In order not to dismantle the water heated floor, it is possible to create conditions of increased pressure before starting. Testing is also done post-assembly to determine leaks, breaks, and corroded areas. The procedure consists of pressure testing and flushing the line, checking and replacing units, restoring the insulation coating. Depending on the state of communications, you can select the appropriate technology.
Using water
Excessive pressure in the pipes should be 2 times higher than the norm. The system must withstand 2 days in this mode.
Before pressing the warm floor, install the collector box and connect the water circuits for heating. The system is filled with water from the supply valve - the caps are screwed on the return manifold, in the supply mode the valve is brought to the open position. Fluid enters the line, displacing air through the vent, as evidenced by a hiss.
To bleed the air masses, the return valve of one or more circuits is opened. The steps must be repeated until air is pumped out of the pipes. At the end of the bleeding, the manifold inlet valve is closed.
The hydraulic method is also divided into several types.
Control check produced with a gradual increase in operating temperature. Initially, +20 degrees water is supplied to the circuit, after a few hours the temperature indicator rises by 5 degrees. After that, joints, external sections of the pipeline, and attachment points are checked.
If there are leaks, the water is drained from the system and the malfunctions are rectified. After re-supplying the coolant and reaching the desired temperature, the system is not operated for 2 days. Breakdowns are determined visually, the temperature is lowered to a cool state, then the screed is poured.
Overpressure injection created by filling the line with cold water. The pressure parameters should exceed the norm by 1.5-2 times. The valves are closed, the circuit is not operated for 24 hours.
During this time, water flows out of ruptured pipes or connections. The damaged areas are determined visually. The repair is started after the coolant has been removed. At the end of the work, re-control is carried out and the system is filled.
The optimal pressure indicator is from 2.3 to 2.8 atm.
Air pressure testing
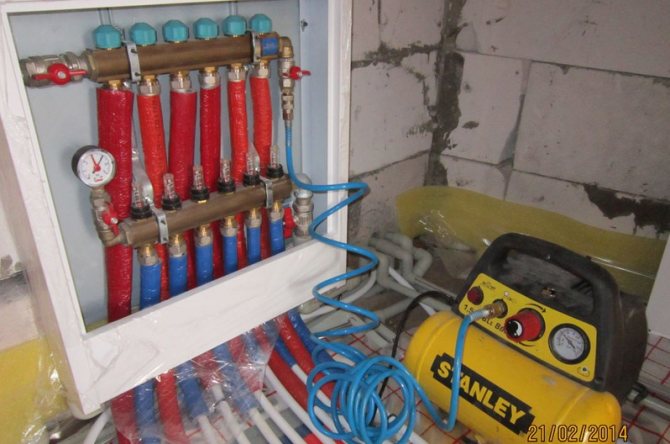
If there is no water in the house, pneumatic pressure testing is carried out, increasing the pressure by 2 times
The procedure for crimping the underfloor heating system with air is performed when it is not possible to test them with water. To create excess pressure, a floor compressor, an automobile pump or a sprayer with a pressure gauge is used. The air pressing technology is implemented as follows:
- Checking the condition of the cranes. They are hermetically sealed.
- Removing the automatic air vent, installing a temporary plug in its place.
- Connecting a pressure supply device. A hose is attached through the fitting, and then a tap.
- Creation of increased pressure. They work only with pipes, the area from the collector to the boiler is not tested so as not to damage the heating devices.
- Shutting off the valve after the required pressure is reached. The line remains in the received condition for 24 hours. The pressure indicator is constantly monitored.
- Inspection and clarification of damage. Leaky joints are treated with soapy water. Soap bubbles indicate the need for repair.
- If the pressure test is successful, the air remains in the communications until the screed is poured.
If the system operates under a pressure of 1.5 to 2 atm., It is necessary to test at a pressure of 4 to 5 atm.
Crimping underfloor heating with water
The underfloor heating pipe must already be rolled out and connected to the collector.
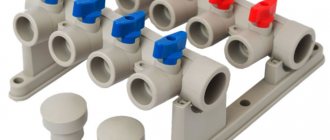
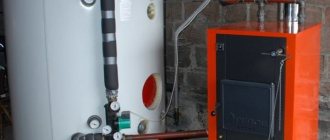
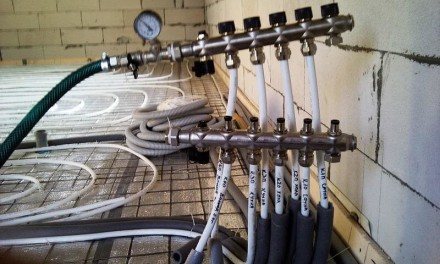
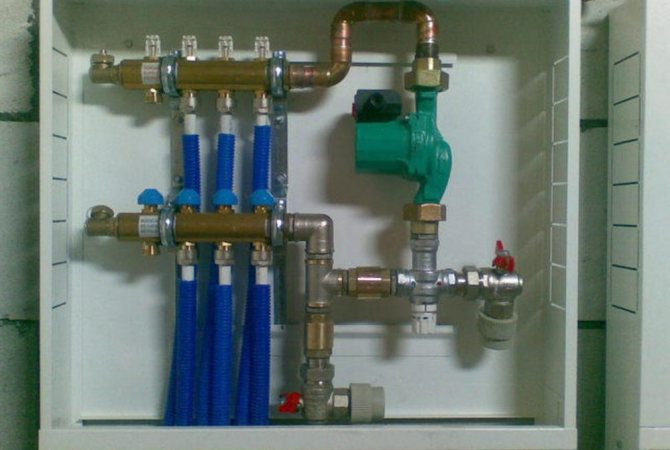
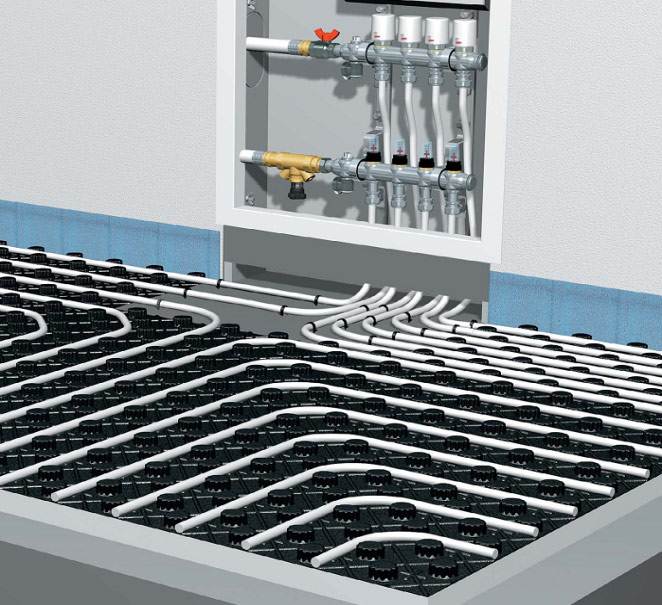
The manifold (see photo) must have shut-off ball valves (indicated by arrows):
There are also valves for the inlet-drain of the system (they are not visible in the photo, they are there on the right). So, the system can be filled through any of the installed taps by connecting a hose from the water supply system. The pressure to be created must be 2.5 ... 2.8 atm. (if so much does not work for some reason, then at least 2 atm.)
In the photo above, the manifold is already with the pipes connected, flow sensors, and a mixing unit. At the very beginning, the ball valves are closed (it is assumed that the coolant has already reached the mixing unit, is in it).
The warm floor is filled in the direction of movement of the coolant, that is, from the supply. First of all, close all the caps (which are blue in the photo) on the return manifold. Then we open the ball valve to the supply manifold (just this moment in the photo). As the pipes are filled with coolant, a hissing sound will appear - the air exits through the Mayevsky cock (or automatic air vent) installed on the supply manifold.
We open one of the taps on the return and bleed the air through the tap to drain the system on the return manifold.
We close this circuit on the return line and open the next circuit here ... And so on, let us release air from all circuits.
Then we close the valve in front of the supply manifold, and open it before the return ...
After filling the system and bleeding the air, we leave it under pressure, observing whether there is a leak or not. (Of course, if there is a leak, we will fix it.)
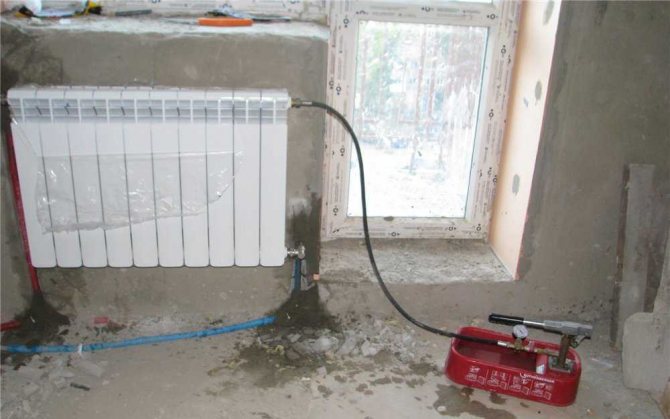
Pressure testing of a warm floor with water, if there is no water supply
If the water supply system has not yet been connected, but desalination needs to be done, then it is still possible. You will need a pump of the "Kid" or "Trickle" type, a pair of hose with a diameter of 20 mm and a pair of clamps for fastening the hose.
Pour the clean coolant into a clean container, lower the pump into it.
The ball valves in front of the manifold must be closed.
We connect the pump and manifold fittings with a hose:
- fastening the hose with clamps.
Attention! The caps on the air vents are unscrewed. The ball valve on the manifold union is open before starting the pump.
We start the pump.
The scheme is the same as described above in the presence of a water supply.
Air will escape from the air vents with a hiss. And we monitor the reading of the manometer and the presence of water in the tank. If necessary, stop the pump and add water.
When there is little air in the pipes, the pressure gauge will begin to show an increase in pressure. When the required pressure is reached, turn off the pump and close the ball valve. The caps on the air vents must be screwed on slightly.
Nuances of choosing technology
Before pouring the screed, the hot coolant circulates in the system for several days, then it is poured with concrete
To press underfloor heating correctly, you should take into account the features of the pipeline. In the presence of metal-plastic fittings, the test is carried out with cold water at a pressure of up to 6 bar and leave them for a day. In the absence of pressure changes, a screed is made.
A polyethylene pipe is tested with a pressure of 2 times the working pressure, but not less than 6 bar. 30 minutes after the decrease in the indicator, the working value is restored.
Before starting to fill the coolant, the check is done twice. At its end, the pressure indicator is returned to its primary state, the pipes are kept for at least 48 hours. An indicator of less than 1.5 bar indicates a successful test, the health of the heating.
After water pressure testing, re-work must be carried out. A hot coolant is pumped into the communications, which is heated gradually. The circuit functions in this way for several days. When leaks are formed, the joints are tightened. If the system is in good working order, the water in the pipes is cooled and re-pumped without a decrease in the pressure indicator.
Air pressure testing is the best option for the cold season, because with the onset of a cold snap, water can freeze and burst pipes.
Stages of crimping
The sequence of the preparatory and main stages is discussed above.
Next, a visual check of all existing connections for sagging or bubbling is performed. Moreover, it is necessary to check not only all the connection points, but also the contours along their entire length in order to identify the possible presence of defective pipe sections.
If the underfloor heating pipes were pressurized with water, then quite often its test run is also performed, which gives an additional guarantee of the reliability of the assembly, until all the pipes have "gone" into the screed.
Pressing a water floor in a private house is performed as follows:
- A valve in front of the collector cuts off part of the system so that water can circulate exclusively along the ring. First, the pump starts, followed by the boiler (but not at full capacity). A visual check of the integrity of the connections is performed;
- The floor loop opens, which is the most distant from the boiler. We are waiting for the difference in the water temperature on the return and in the supply line to be 5 - 10 degrees. then the next circuit is opened. Each time the next circuit is connected, air will escape through the air vent. And so on until all the stitched loops are launched;
- After that, the supply temperature rises to 60 degrees (if your floors are the only source of heating in the house);
- With combined heating, the required circuit temperature must be set on the thermostats. At this maximum temperature, the system operates for 6 hours or more.
After making sure that everything works fine, we fill in the screed (option, we carry out the flooring of the clean floors).
Water pressure testing process
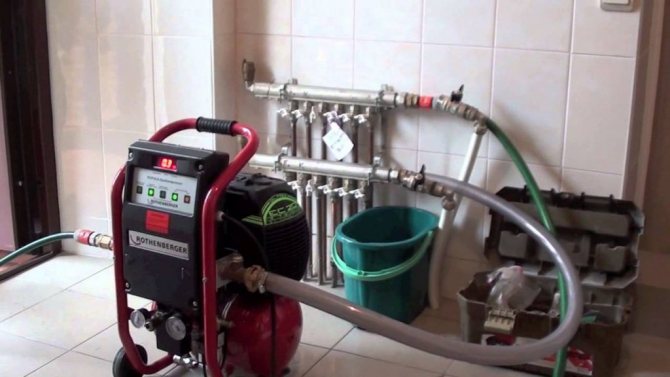
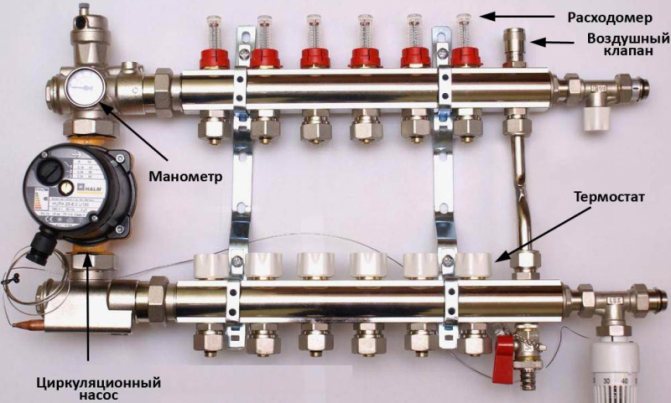
Professional equipment is used for crimping
The use of the hydraulic method provides for pressurization up to 6 bar, but in fact the indicator in the system is 3 bar. Several devices are used to obtain the optimum level.
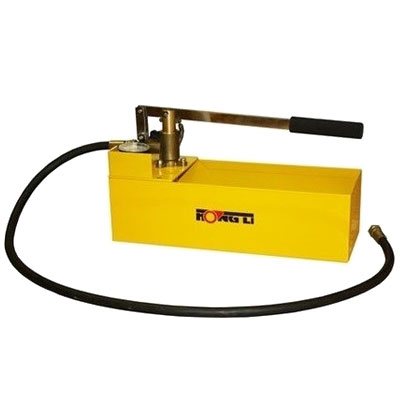
Pressure Operator - Professional Equipment
Manufacturers produce manual and electric models, the main difference between which is cost. It is advisable for a home craftsman to use a manual crimper:
- The hose of the device is connected to the system, water is poured into a special container.
- Pumping is performed in manual mode with periodic opening and closing of the valve.
When working with an electric pressurizer, you will need to connect it to a water supply system or a water tank. Further actions are carried out according to the manufacturer's instructions.
Garden sprayer
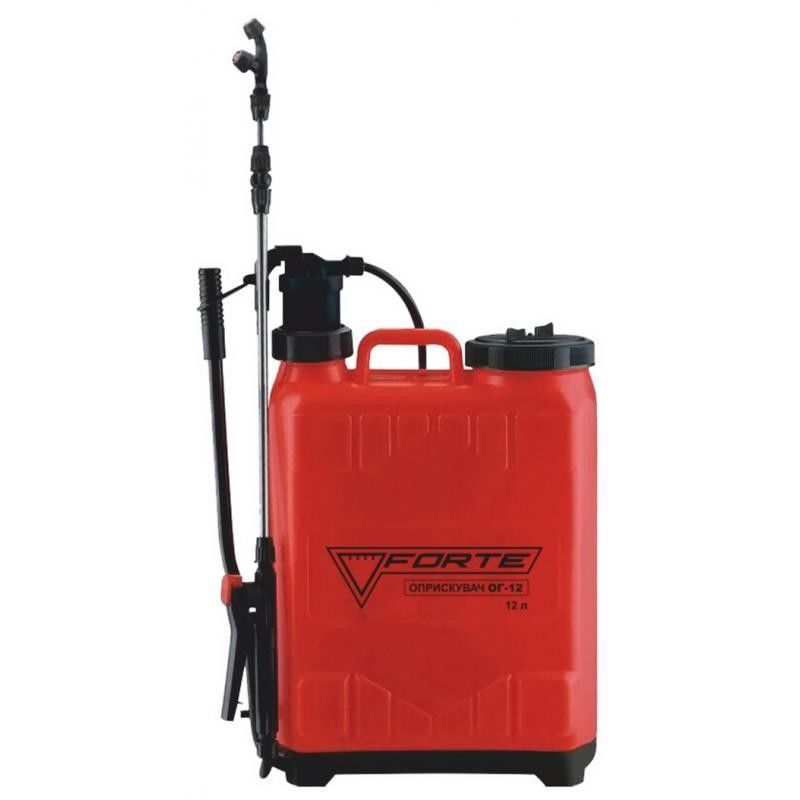
You can use a garden sprayer
The device is selected according to the working pressure parameters indicated on the body or in the passport. In the process of using the sprayer you need:
- Pour water into the tank.
- Connect the hose of the device to the supply valve.
- Create a pressure of 4 to 6 bar - one full tank is enough for this.
- Pump it manually until the required pressure is reached.
One filled container is enough for one circuit.
Deep Well Vibrating Pump
The devices create pressure up to 6 atm., Therefore, they are excellent for crimping. The work is carried out with an assistant - one person opens the taps, and the second monitors the pump. The vibrator hose is connected to the manifold.
The pump is activated after opening the valve. The return hose is connected to the complete container. After complete bleeding of air from the circuit, the return valve is closed. Next, you need to monitor the indicator of the manometer until a pressure of up to 6 atm appears. After that, the supply tap closes and at the same time the pump turns on.
The maximum level of pressure drop during pressure testing for metal-plastic pipes is 0.2 atm., For polyethylene pipes - 0.5 atm.
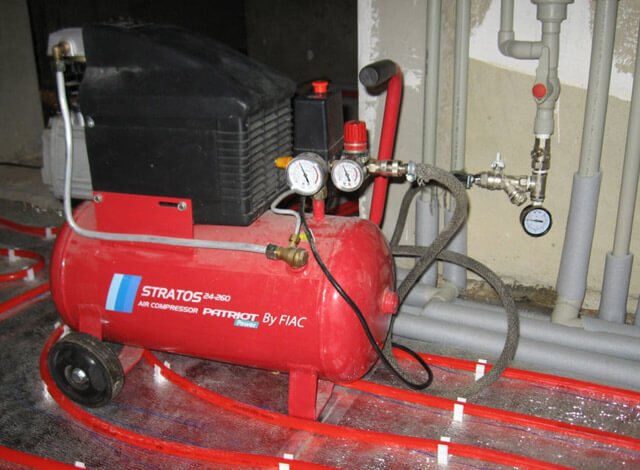
Crimping the warm floor with air
If it is not possible to fill in water, the underfloor heating can be pressurized with air.
We check whether all the taps are hermetically closed, including drain taps, Mayevsky taps, etc. At the time of air pressure testing, unscrew the automatic air vent and put a plug in its place.
To create pressure, you will need a compressor, a car pump with a pressure gauge, or the like. sway).
The recommended pressure during air pressure testing is 2-3 times higher than the operating pressure. That is, if the working pressure is 1.5-2 atmospheres, then during pressure testing it is about 4. 5 atm.
Important! The pressure is 4-5 atm. is created only in a warm floor, and NOT in the area from the boiler to the collector. Reason: many boilers are designed for pressures up to 3 atm., Higher pressure can damage the boiler. Then we check the section "boiler - collector" separately at the pressure permissible for the boiler.
There are special pressure operators:
- however, this pleasure is not cheap, if we make a system for ourselves, then it makes no sense to shell out for one time.
So, we pumped air to a pressure of 4 atm., Then close the tap and leave the system under pressure for a day, observe the pressure drop. There should not be a drop in pressure, but it will still be a little bit, because during pumping, the compressor heats up the air a little, which will then cool down.
Attention! We leave the pressure in the warm floor until the end of the pouring of the finishing screed.
After the pressure has been created, you need to wash all the connections, with soapy water, you can even use a glass cleaner. So, by the air bubbles that appear, we will see where the connection is not tight.
Verification and test run
After assembling the system, you need to find out its operability and eliminate installation defects. The check is carried out at the end of flushing and filling with a coolant. If successful, the system is operated in a test mode.
Testing methods
You can find the flaws in the installation of underfloor heating and check the communications as follows:
- Run at operating temperature. The indicator rises gradually to 20 degrees, and after 2-3 hours it rises by another 5 degrees. If there is a leak, the system stops, breakdowns are eliminated. The coolant is brought to the design temperature, the line is kept for 2-3 days.
- Overpressure testing. Water works at a standard temperature, but the pressure rises 1.5-2 times. If it falls by no more than 1.5 bar, there is no leak.
- Dry pressure testing. Air is pumped into the pipeline at a pressure 2-3 times higher than the norm. The work is performed before pouring the screed with the design water temperature.
Air pressure testing is not suitable for underfloor heating with antifreeze due to its increased fluidity.
Test run sequence
The system is tested at full operating temperature for 2 - 3 days, eliminating leaks if they form
Before hiding the contours under the screed, a test run of the system is performed:
- The valves are closed up to the distributor and the circulation of the "boiler - collector" zone is organized. The heating boiler is connected, but not at maximum power, and the circulation pump. The fastener points are inspected.
- The circuit valves open. After the boiler has heated up, the temperature difference between the supply and return zones should be 5-10 degrees.
- The second circuit opens, as evidenced by a hiss.
- The temperature regime of warm floors is brought to a maximum of 60 degrees, if it is the only source of heat.
- In the presence of a combined heating system, the operating temperature mode is set on the thermostats.
- The system is at a maximum temperature of 6 hours.
The screed is started to be poured only after pressure testing and test run.
What is crimping?
If the installation itself does not raise any questions, then not all home craftsmen know what crimping is, especially if they have not had a chance to install this heating system. However, this procedure is extremely important and it is necessary to approach it no less responsibly than to installation.
The meaning of crimping is reduced to checking the system's performance before screed. For this, the pipes are filled with liquid or air, after which the warm floor is under operating pressure for some time. If no leak is detected in the system, then a screed is performed; otherwise, the malfunctions should be removed before pouring the floor.
We will tell you more about this operation below.
Do-it-yourself crimping features
Leaks are additionally crimped with fittings
It is possible to pressurize a water-heated floor made by hand using a hydraulic or pneumatic method.
- Preparation taking into account the type of coating. For concrete screed, pressure testing is performed before pouring. In the presence of a polystyrene or wooden surface - but closing the heating main with plywood or gypsum board.
- Communication testing. All heating circuits are connected to a manifold and tested individually. The areas are filled with water until the air is completely expelled. For regulation, return and supply valves are used.
- Cold testing of metal-plastic communications. It can be made with a cold coolant with a pressure of 6 bar and the system can be kept for 24 hours. If the pressure has not increased, the line is in good order.
- Inspection of polyethylene pipes. The system is loaded with a pressure of 2 times the standard pressure, but not less than 6 bar. After 30 minutes, the indicator is restored. The operation is carried out three times, then the pressure is brought into the pressure test mode and left for 24 hours.If the reading has dropped by less than 1.5 bar, the system is working properly.
Additional testing is performed by injecting the pressure of the heat carrier, which is at a temperature of 81-86 degrees for 30 minutes. At this time, the fittings are inspected, if they are loosened, they are tightened.
Before operating a water-heated floor, it is necessary to fill it with a coolant. The line is brought to the operating temperature mode gradually, with preliminary pressure testing. The work allows you to identify breakdowns, leaks, installation defects.
Installation of a warm water floor
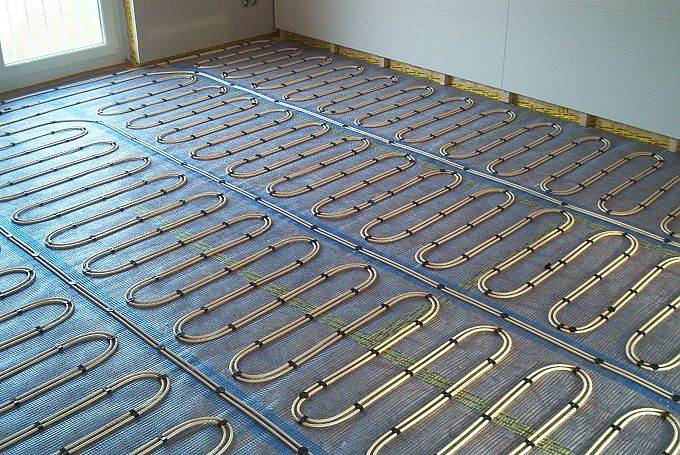
Today, the concrete water floor installation system is the most common. In this case, the pipes of the circuits are closed by a concrete screed, as a result of which additional heat separators are not required.
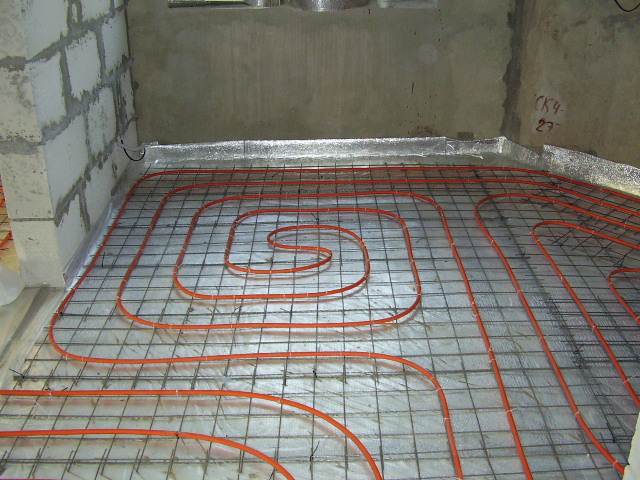
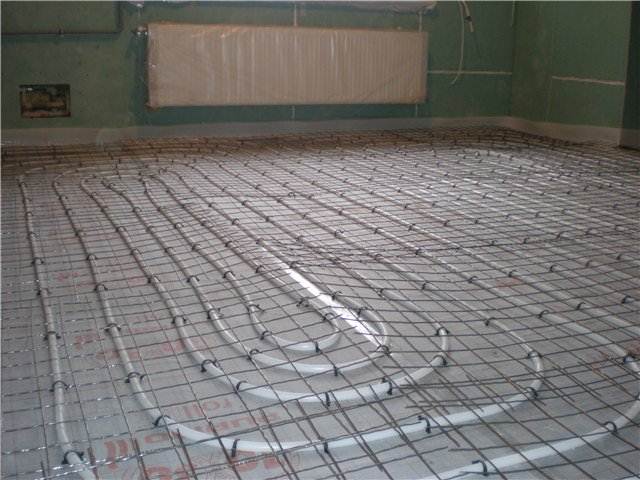
In the photo - heating circuits laid on a reinforcing mesh
The system installation technology is divided into several stages:
- Division of the floor area into sections of no more than 40 square meters (if the installation is carried out in a large room).
- Covering the floor surface with insulating material.
- Installation of reinforcement mesh and laying of pipe contours.
- Crimping.
- Concrete screed.
- Finishing the floor with topcoat.
Division of coverage into sections
A large room must be divided into fields. Their number depends on the geometry and floor area. The marking is necessary in connection with the fact that the screed will expand as a result of the effect of temperature, which must be compensated to prevent cracking of the surface.
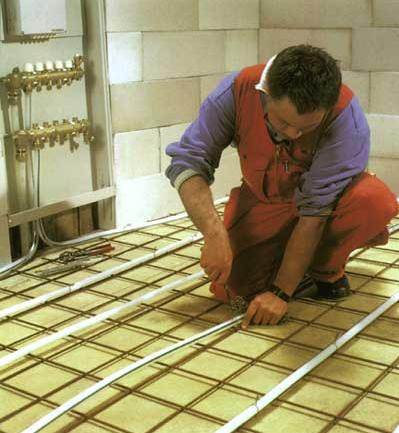
Fastening pipes with clamps to the reinforcement mesh
Surface coating with insulating materials
Before proceeding directly with the installation of the heating system, it is necessary to lay a heat-insulating coating on the rough floor. Thanks to this, the heat will not go down, but will be evenly distributed over the screed.
As thermal insulation, different materials can be used that are allowed in construction for use for these purposes, however, the most common heat insulator is polystyrene and polystyrene foam.
Note! The thickness of the heat-insulating layer should be 30-150 mm, depending on the level of heat loss, and its density should be at least 35 kg / m³.

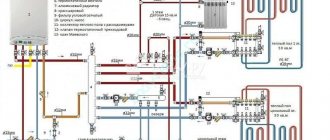
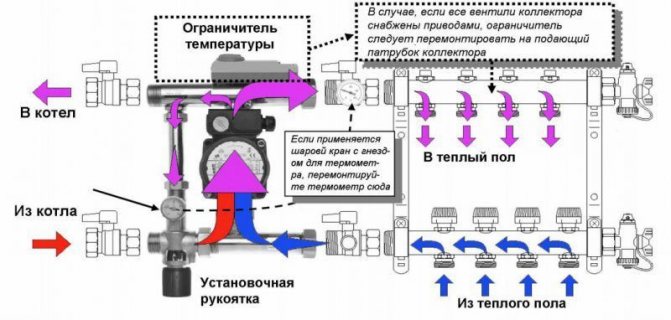
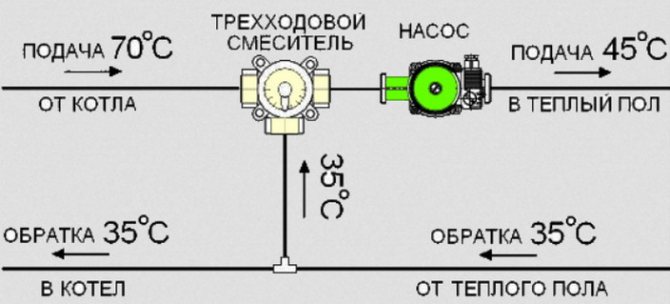
Heating connection diagram
A damper tape must be laid between the sectors and around the perimeter of the room, which will compensate for the expansion of the concrete screed. It is necessary to cover the heat-insulating layer with a plastic wrap.
Installation of reinforcement mesh and pipes
Usually, when arranging underfloor heating, a reinforcing mesh with cells of 150 × 150 mm and a bar section of 4-5 mm is used. Sometimes double reinforcement is used, in which case the second layer of mesh is laid on top of the mounted pipe.
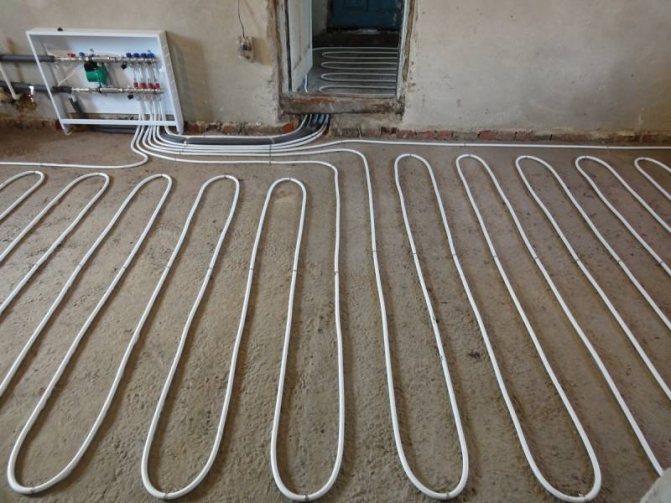
After that, the installation of pipes for a warm water floor is carried out. The contour is laid in increments of 75-300 mm, depending on your project.
There are several pipe laying schemes:
- Double snake;
- Common snake;
- Spiral with an offset center;
- The usual spiral.
Double reinforcement
The contour is attached with plastic clamps to the reinforcement mesh. In the places where the pipe is adjacent to the expansion joints, a corrugated tube should be put on the heating pipe to protect it from damage.
Advice! When installing the circuit near an outer wall, the step should be reduced, since heat losses are increased in this place. In addition, the feeding part of the circuit should be laid along the wall.
The approximate pipe consumption per square meter, with a step of 200 mm, is approximately five running meters.
Note! When equipping large rooms with underfloor heating, it is unacceptable to lay whips with a length of more than 100 meters, since there will be high heat losses at the end of the circuit.
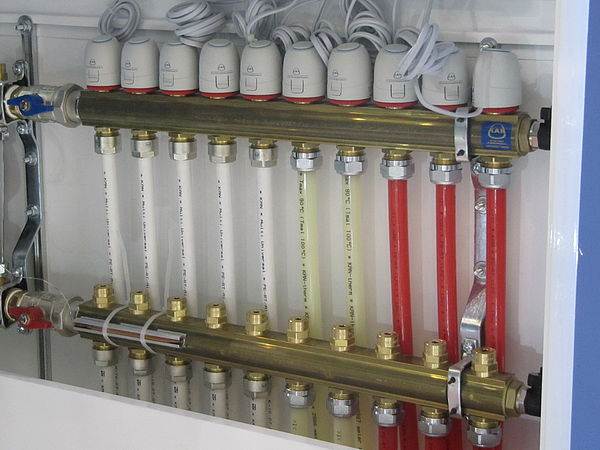
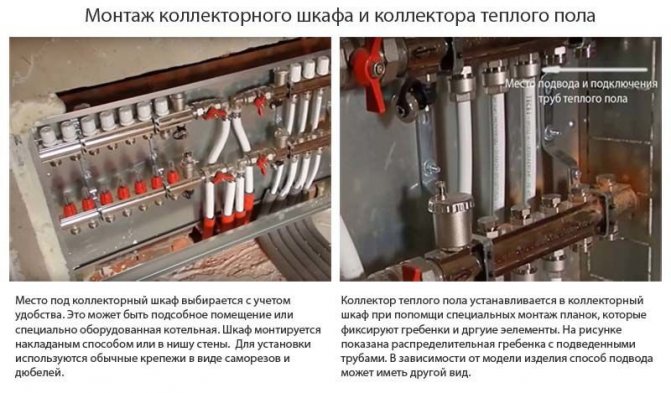
Underfloor heating distribution board
Crimping
By the time of pressure testing, a cabinet with a distribution manifold must be installed and all heating circuits connected to it..
Pressure testing begins with filling each heating circuit with water through the supply manifold until all air has been displaced from the system. To do this, open the control valves and all flow meters one by one.
The further procedure depends on which pipes are used:
- If metal-plastic pipes are used as circuits, then the system is pressurized with cold water at a pressure of 6 bar. If after a day the pressure has not changed, then the test can be considered successful. In this case, without lowering the pressure in the pipes, they are poured with concrete.
- If the pipes are made of cross-linked polyethylene, then the crimping instructions look a little different - the system is loaded with a pressure that is twice the working pressure, but not less than 6 Bar. Half an hour later, after the pressure has subsided, it must be restored, then this procedure is repeated two more times.
The system can be considered tested if, after a day, the pressure has dropped by less than one and a half bar.
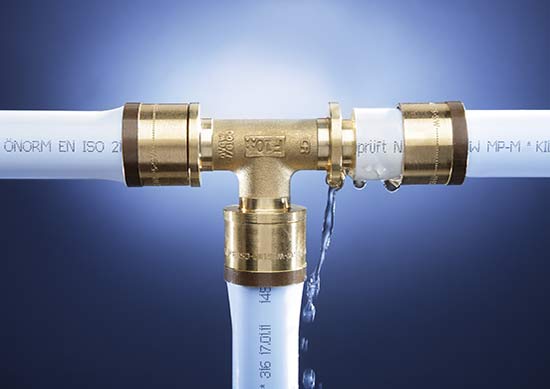
According to the German standard, after testing the system with cold water pressure, the heating must also be checked with the maximum temperature. To do this, the system should be warmed up to 80-85 degrees Celsius, after which it is necessary to make sure that the pipes are tight and especially pay attention to the collet connections.

Pressure during testing 6 bar.
If necessary, the connections should be tightened. In addition, heating is useful for relieving stress in pipes that occurs during installation. After the contours have cooled down, they are poured with concrete without reducing the pressure.
In practice, it is not always possible to warm up the system, but this is not necessary. The situation with pressure testing the system in the summer is much more complicated if it is connected to central heating.
The fact is that it usually does not work to expel water from the pipes after the screed is completed, and it may happen that with the onset of the first cold weather, heating will not be supplied to the room. In this case, there is a possibility of freezing of the system and rupture of pipes.
Therefore, if you are not sure that the heating will be supplied on time, and the installation was carried out not by your own hands, but by experienced specialists, then it is better to pressurize the system with air.
Note! During pressure testing, from the moment of filling the circuits until its completion, the automatic air vents must be closed. This is due to the fact that particles of debris and dust will come out of the circuits along with the air, which can render the air vent unusable.
The screed should be carried out using special mixtures for warm floors, with a layer thickness of 50-70 mm. After the screed has dried, it can be finished with linoleum, laminate or ceramic tiles.
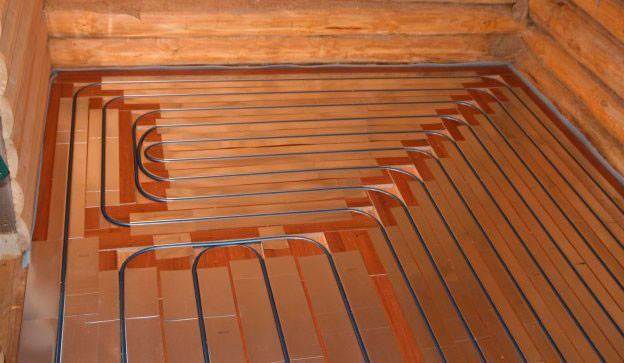
Pipes laid on polystyrene boards
Installation of a polystyrene system
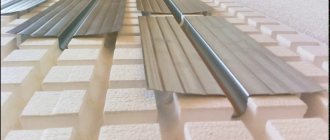
The polystyrene system is perhaps the easiest to install. It is a polystyrene plate with grooves, into which special aluminum plates are mounted. The pipes of the underfloor heating contours are simply snapped into them, thus, they do not even need to be fixed somehow additionally.
Then, after assembling the system, crimping is performed in the same way, after which, without the use of a screed, a finishing coating is laid on a special moisture-absorbing layer. If linoleum is laid on top or ceramic tiles are laid, then it is necessary to use GVLV plates with a thickness of at least 10 mm.
Wooden water floor heating system
The wooden floor heating system is divided into:
- Rack;
- Modular.
As a rule, all these systems are used in panel board modular houses, in which case the heating is mounted on a rough floor or wooden logs.
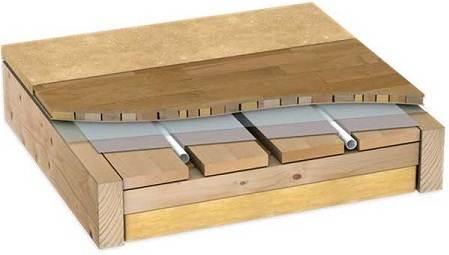
Modular underfloor heating installation
With modular laying, ready-made chipboard plates are used, in which channels are pre-made.In such a design, a heat insulator must be provided in the floor itself. The strips are laid according to the design documentation at intervals of 20 mm.
They can be 130 - 280 mm wide, depending on the contour pitch. The aluminum plates have special pipe snaps, resulting in increased heat transfer efficiency between the pipe and the plate.
GVLV slabs are laid on top of the plates. This layer can be neglected if the floor will be finished with laminate or parquet.
For rack and pinion mounting, accordingly, wooden battens 28 mm thick are used. Such a system is installed directly on the logs. In this case, the distance between the lags should be 300 -600 mm. In between, it is necessary to lay mineral wool or polystyrene.
Rack installation system for underfloor heating
For rack mounting, aluminum plates are also used and all the basic principles of laying discussed above are preserved. Accordingly, after installing the circuits and connecting them to the switch cabinet, it is necessary to carry out a pressure test as described above.