A pleasant stay in an apartment or a private house is primarily due to the fact that the room should be cozy and comfortable. And this is possible only on condition that the living space is warm. Many people ask the question: what is needed for a warm floor? How to do it yourself, without resorting to the help of specialists? The answers are given in the article.
What is needed for a warm floor
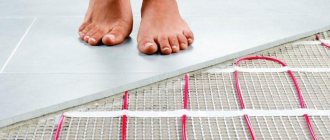
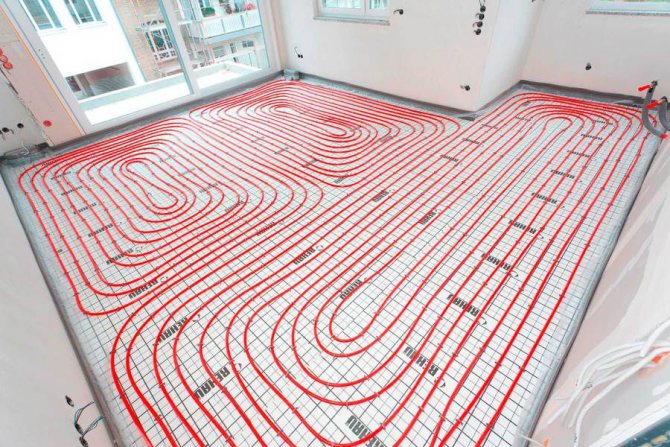
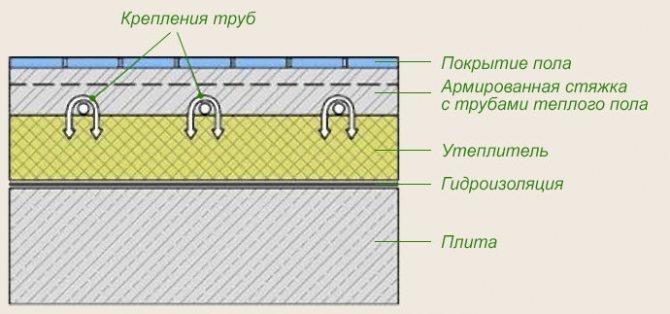
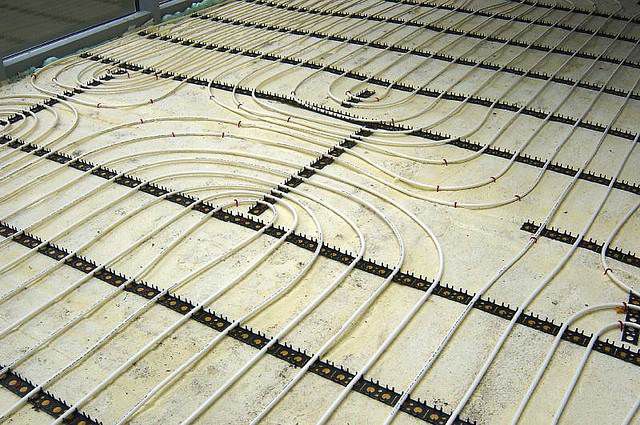
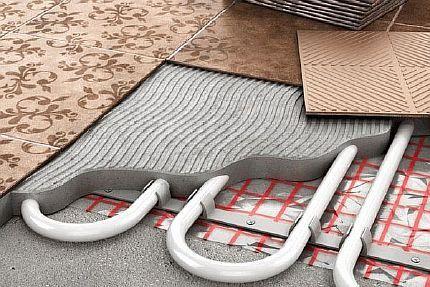
Water heat-insulated floor in the apartment
Device and principle of operation
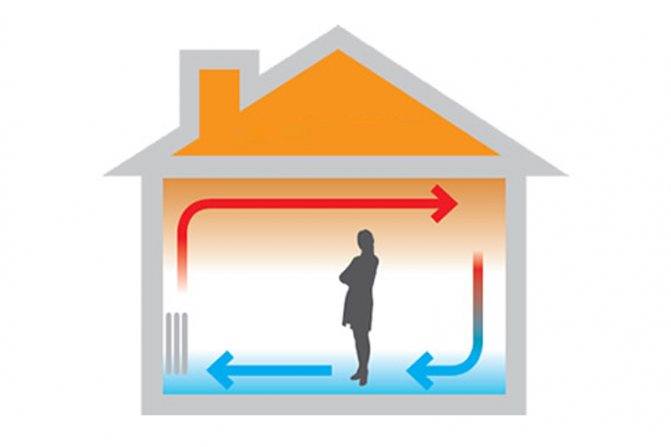
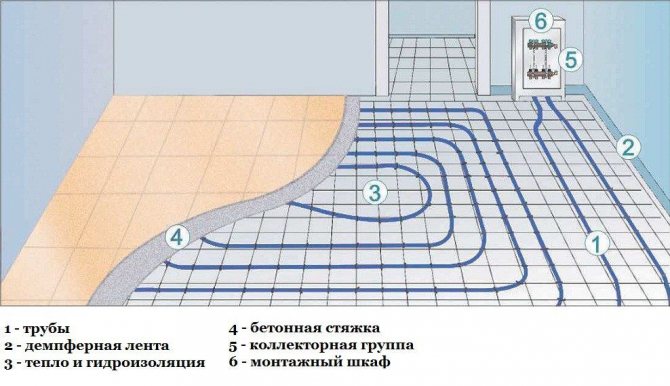
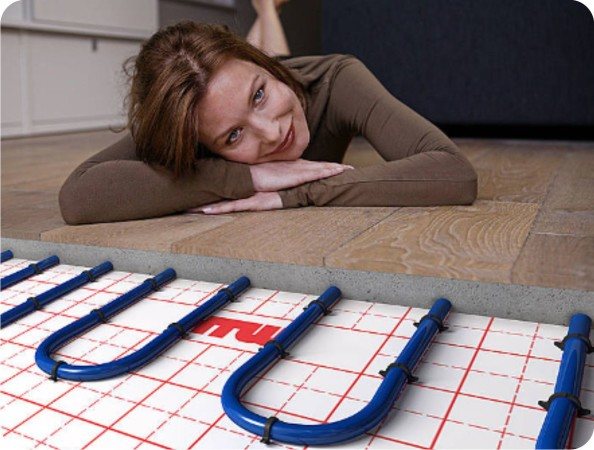
Before starting to study information about what materials may be needed for arranging a warm floor on your own, you should understand what is the principle of operation of this system. So, a warm floor is a system of pipes of small diameter assembled and laid in a certain way, inside of which there is and circulates the coolant supplied by means of a pump. The carrier of heat is ordinary water heated in a special device. During installation, pipes are laid under the floor covering or directly into the screed, depending on the installation method.
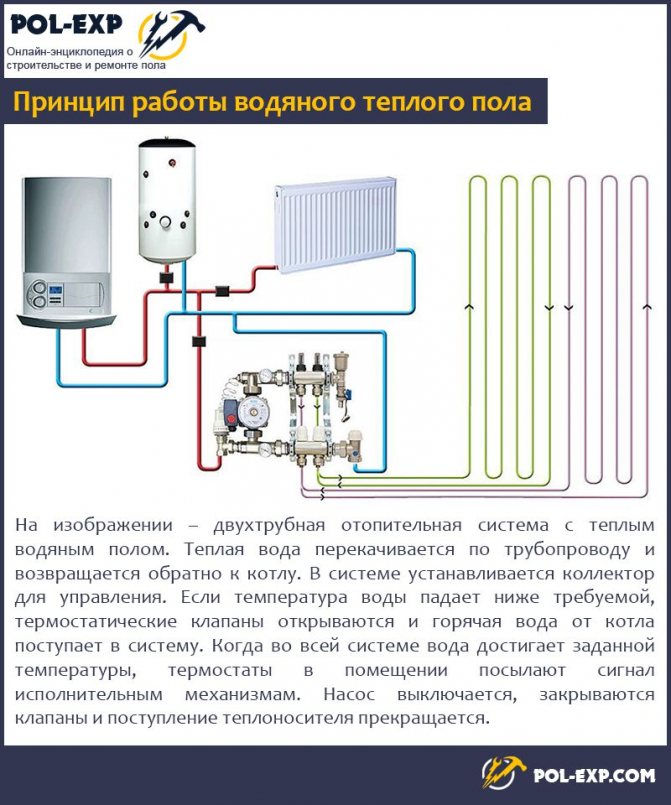
The principle of operation of a water-heated floor
Expert opinion
Afanasyev E.V.
Chief editor of the pol-exp.com project Engineer.
To make it pleasant to walk barefoot on the floor, the temperature of the coolant should not be high - no more than + 40-45 degrees. In this case, the floor covering itself will warm up to only + 25-28 degrees. However, heating equipment usually warms up the water more - up to + 60-65 degrees.
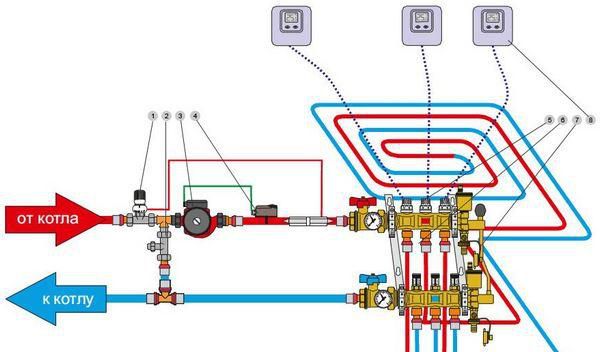
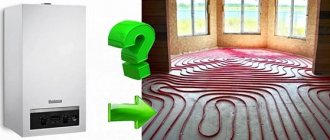
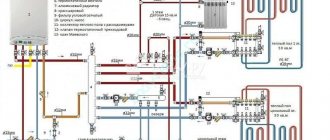
Wiring diagram for connecting a water-heated floor to the boiler
That is why it is necessary to regulate the temperature of the coolant. In a cottage, a gas condensing boiler will help to provide the ability to adjust, which, even at low temperatures, is highly efficient. Here, water will be supplied directly to the heating system. For some other types of boilers, it is necessary to use a specially designed mixing unit, thanks to which cooled water will be supplied to the heated water.
Traditional radiator heating
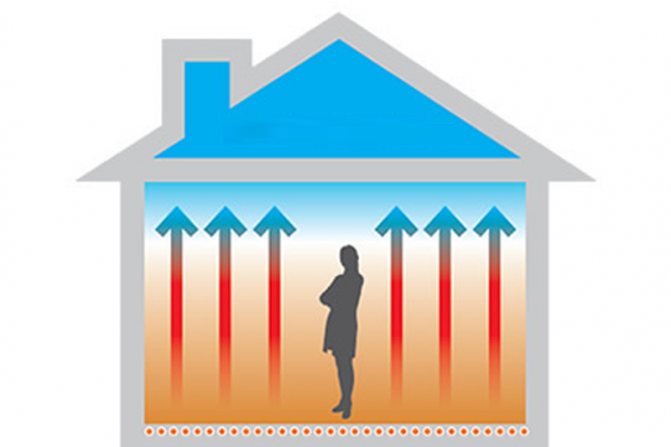
Traditional radiator heating
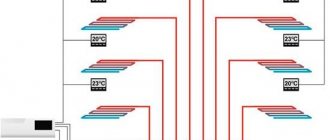
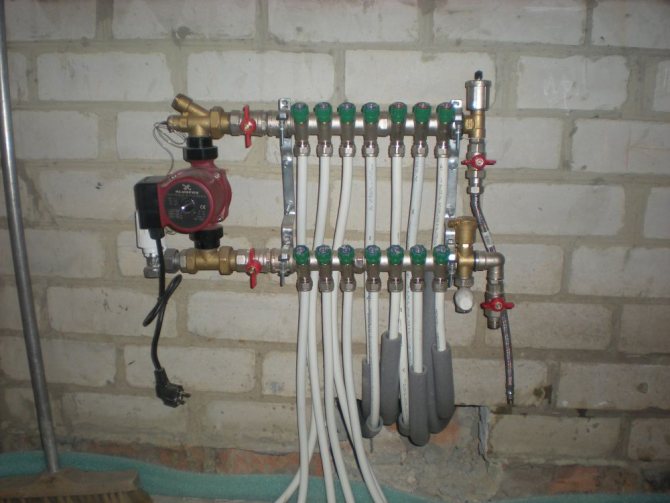
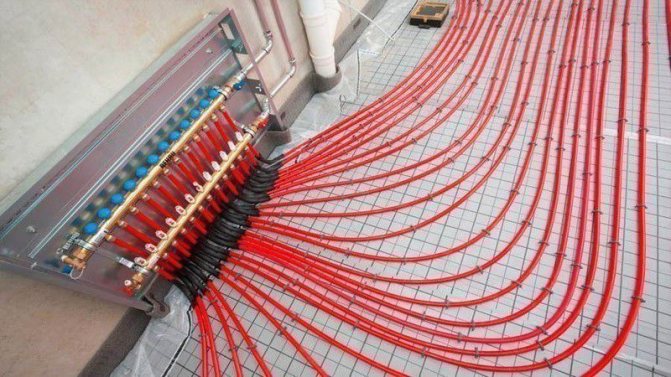
Further, water begins to be distributed along the heating circuit using a distribution manifold - a pipe branching system. It is also called a collector. It consists of two pipes - supply and "return" - which supply and collect water from the branches of the system.
On a note! The distribution manifold may be absent if the underfloor heating is equipped in a small room.
Underfloor heating collector
Types of screed, which one to choose for a warm floor
As a screed on a warm floor, various ready-made compounds are used, of which there are many in the construction market. Depending on the characteristics of the mixture, they are designed for different conditions. There are two types of screed - wet (concrete or cement based) and dry.
Wet is popular today, as it is not expensive, keeps heat well and almost anyone can make it with their own hands. But the duration of installation increases, since it takes time for the composition to dry (a month), which is a big disadvantage.
Dry is a light bulk material, on top of which sheets of chipboard or plywood are laid. Installation is simple, the ability to make a thin layer, especially suitable for low room heights. The mixtures are immediately ready for use and do not require time to dry.
A polyethylene film is spread on the floor, onto which dry material is poured.It is leveled, after which you can proceed with the installation of the topcoat.
Since there is no water in the composition, it can be laid at any temperature, including at sub-zero temperatures. The main disadvantage of this screed is the fear of water, so it is not suitable for wet rooms and for water-heated floors.
Disadvantages of underfloor heating
Unfortunately, in multi-storey buildings built decades ago, it will be quite difficult to make a warm water supply - such apartments (or rather, the heating system in them) are simply not suitable for this technological solution. If such a floor is installed, then in winter the neighbors will complain about the cold in the apartment. And the homeowner is unlikely to be satisfied with the temperature readings at home. The management company, too, most likely will not give permission for the installation of a warm floor. In this case, it is best to install an electric underfloor heating - it does not need a permit.
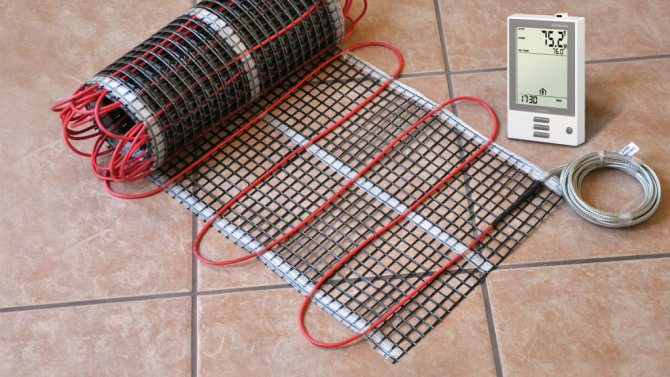
Electric underfloor heating
On a note! In new buildings, now, as a rule, a special heating system is installed, which allows you to connect heated floors to it. In such buildings, you don't even have to ask permission from the ZhKO for installation.
Thermal insulation and thermal conductivity
Schemes for laying the pipeline for a warm water floor.
If your apartment is located in a multi-storey building above the first floor, then it is natural that the floor of your room, being a reinforced concrete slab of very considerable dimensions, simultaneously plays the role of a ceiling in the apartment of a neighbor who lives below you on the floor below. And by heating your floor, you warm up your neighbor's ceiling.
Of course, none of the neighbors (even the bad ones) will refuse a source of additional heat that is free for them, but not for you. But if you live on the first floor, then under you will be a basement room that you do not intend to heat, unless it is yours.
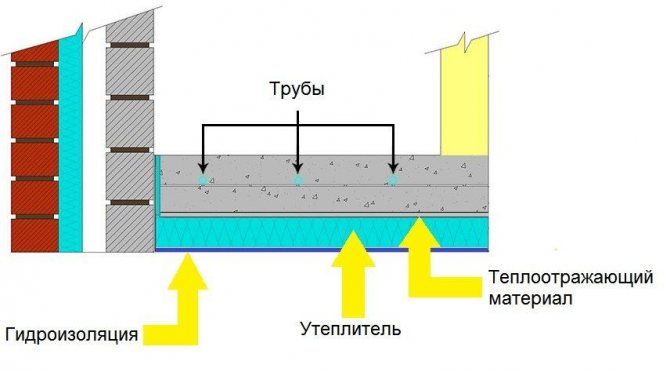
To solve the problem, it is necessary to apply thermal insulation of the entire surface of the floor, on which the elements of the heat floor will be installed. Various materials are suitable for this, one of which is glass wool. This material has been successfully used for many years for thermal insulation of objects and structures.
The next problem is the thermal conductivity of the materials used. The higher it is, the better. For example, if you fill the pipes with a 10-centimeter layer of concrete, lay a 3-5-centimeter board on top with several layers of insulation, and cover the floor with a thick woolen carpet, then you will never see the effect of your heating system.
To increase the efficiency of heat transfer of a water floor, you need to use materials as thin as possible with a high coefficient of thermal conductivity. Then the effectiveness of your floor will be visible. The choice of materials depends on your imagination, but it's a good idea to consult with experts.
Underfloor heating materials
The scheme of such a floor in the picture always looks rather complicated - there are a lot of communications connected to each other, along which, moreover, water flows. However, in reality, the system does not include such an extensive list of elements.
Materials for a water-heated floor
Components for a water-heated floor:
- if there is no possibility of connection to the centralized heating system - heating boiler;
- pump, which is either built into the boiler or purchased separately. It will pump water into the system;
- directly pipesalong which the coolant will move;
- collector, which will be responsible for the distribution of water through the pipes (not always necessary);
- for collectors will need a special cabinet, splitters that distribute cold and hot water, as well as valves, an emergency drain system, devices for venting air from the system;
- fittings, ball valves etc.
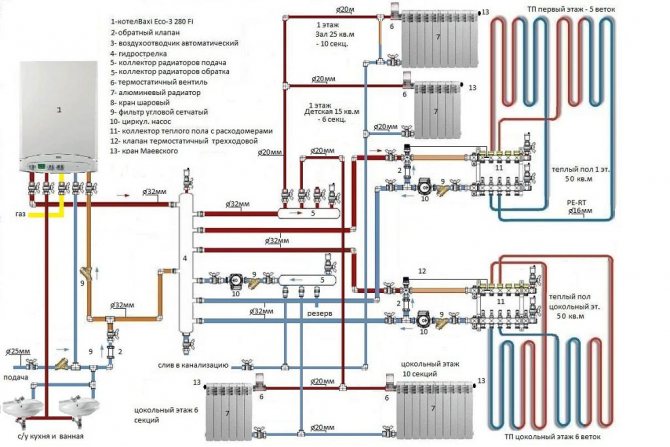
One of the options for the heating scheme in a private house with underfloor heating on the ground floor
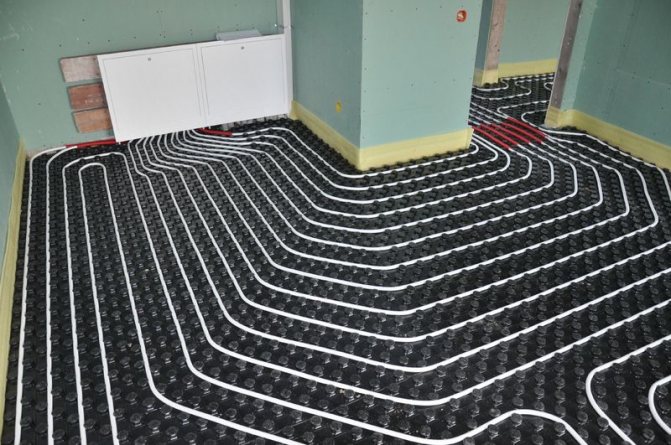
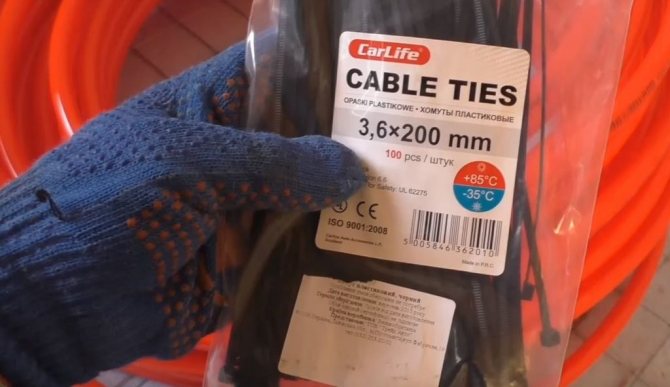
Also, for arranging a warm floor, you will need material for thermal insulation, fasteners, a reinforcing mesh, a damper tape. If a crude installation method is performed, then there is also a concrete mixture from which the screed will be made.
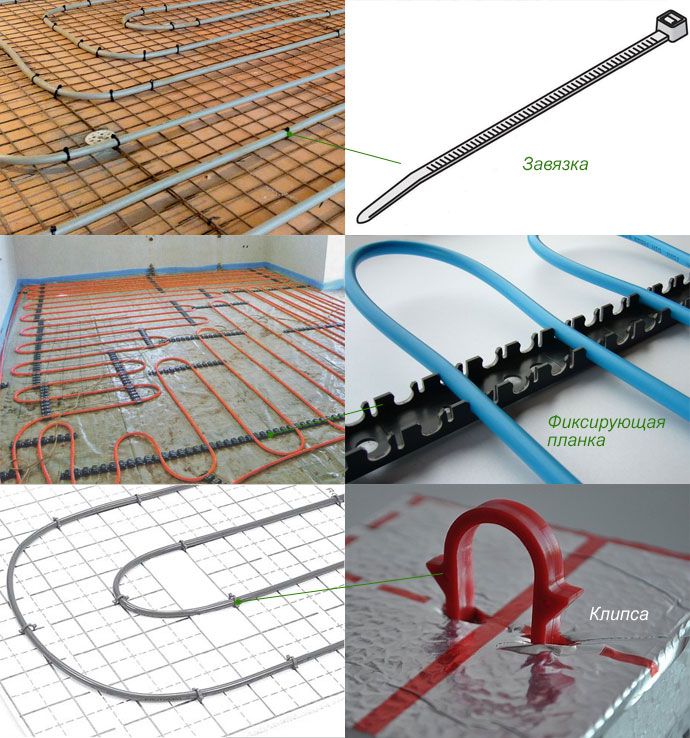
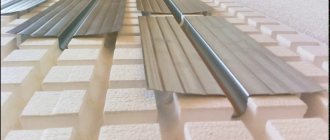
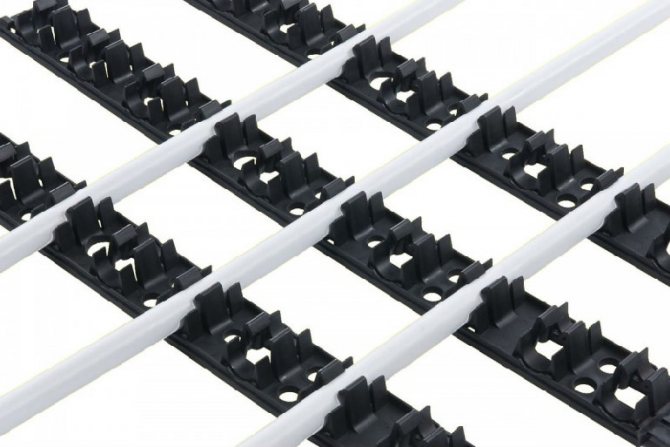
Fasteners for water floor heating pipes
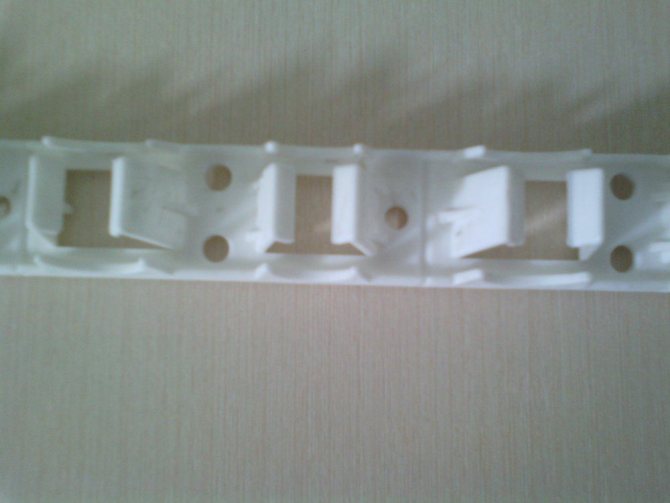
Mounting bar for underfloor heating
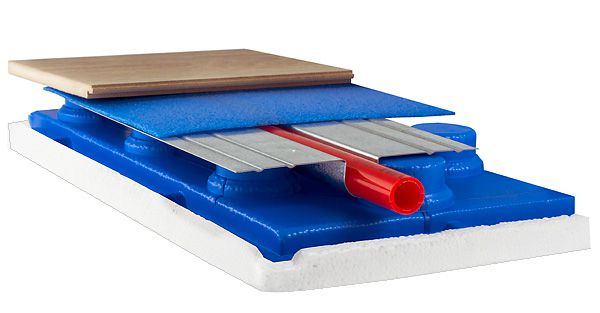
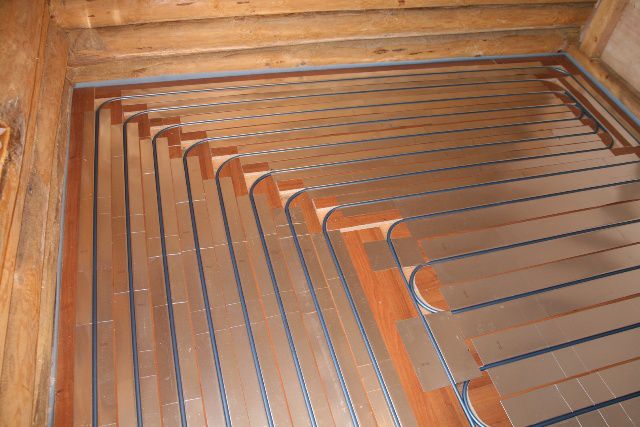
The choice of materials and tools for the underfloor heating system will often depend on the installation method. There are two types of equipment laying - dry and wet.
- Wet technology provides for the use of insulation, fastening system, pipes, concrete screed. After all the elements are filled with a screed, the floor covering itself is laid on top. A damper tape must be laid along the perimeter of the room. It is advisable to place a waterproofing layer under the insulation in case of water leakage - it will protect the neighbors from a possible flood.

Water heated floors. Water floor scheme
- Dry technology... In this case, the heating system is laid on wooden plates or polystyrene mats in specially made channels. Sheets of plywood or gypsum fiber board are laid on top of the system. A floor covering is mounted on top. By the way, do not lay on top of the chipboard or OSB system, since they contain substances that, under the influence of elevated temperatures, begin to evaporate and negatively affect the human body.
Warm floor without screed
Neither the first nor the second method is ideal - each has its own advantages and disadvantages. However, it is the wet method that is most often used, when the underfloor heating system is laid in a screed. The reason is simple - cheapness, although this type is rather difficult to maintain. For example, repairing screed pipes will not be easy.
Screed for underfloor heating
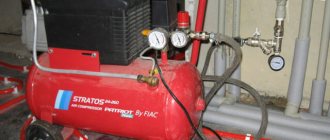
Gas-burner

A gas burner is used in various cases: for heating and connecting certain elements, for drying the surface, for cutting and soldering metal elements, etc.
When choosing this tool, you should pay attention to:
- Design: it must include a unit for attaching a cylinder, a burner head, nozzles, a reducer with a regulator, a holder for installing dishes.
- The presence of piezo ignition, wind protection, adapters for various mountings of a cylinder, a transport cover.
Distribution manifold and cabinet for it
It makes sense to install a distribution manifold or manifold inside a cabinet specially designed for this, so that the mass of pipes does not catch the eye and does not spoil the appearance of the room. The width of such a structure should be about 12-15 cm, but the rest of the parameters will largely depend on what dimensions the entire communication system has - the larger it is, the larger the cabinet. When arranging it, the need for space for bending pipes supplied to the collector system must also be taken into account.
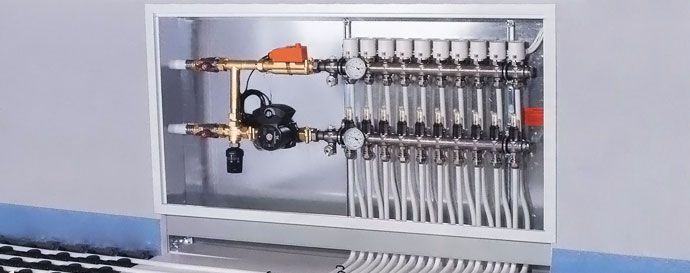
Collector in a niche
Important! If the underfloor heating system is divided into two rooms, then the box with the collector should be in the middle between them. In this case, it is better to install equipment that allows you to regulate the heating temperature.
collector for underfloor heating
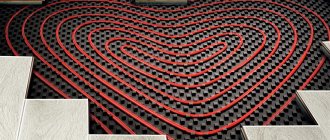
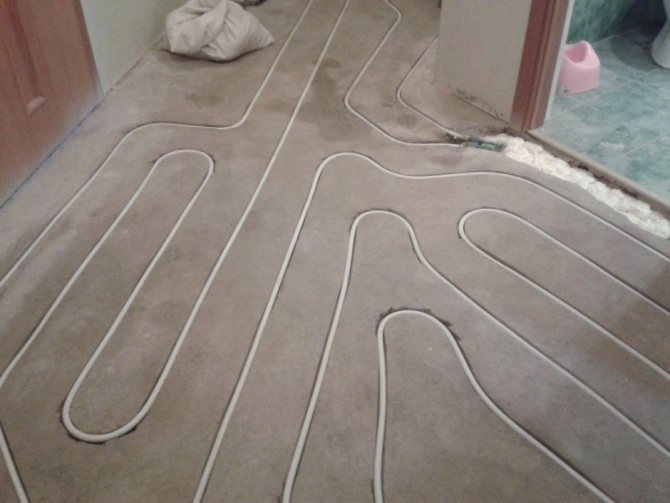
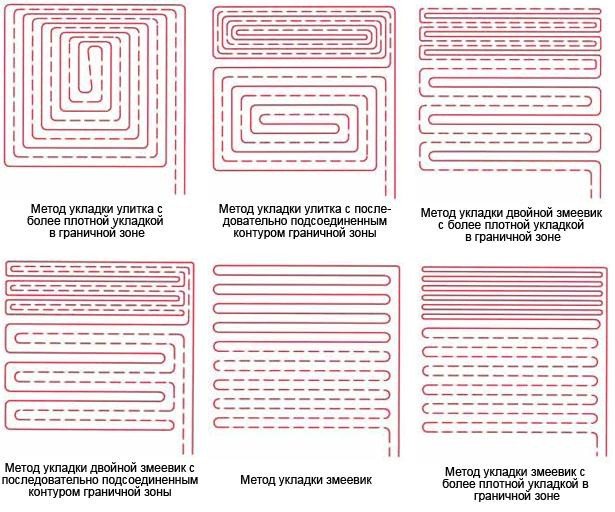
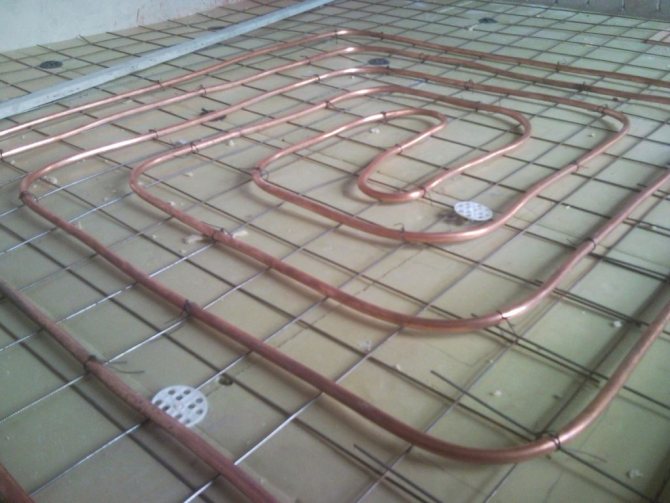
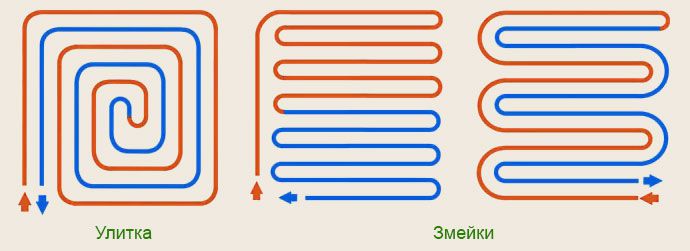
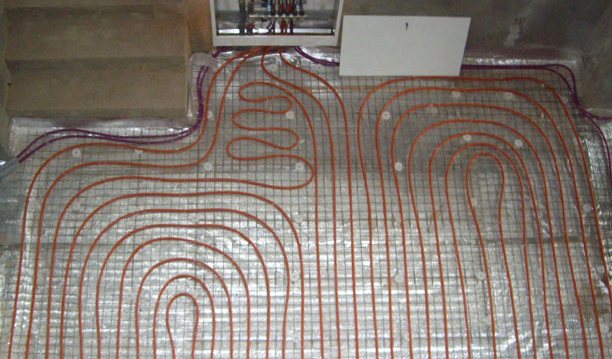
Methods for installing water circuits
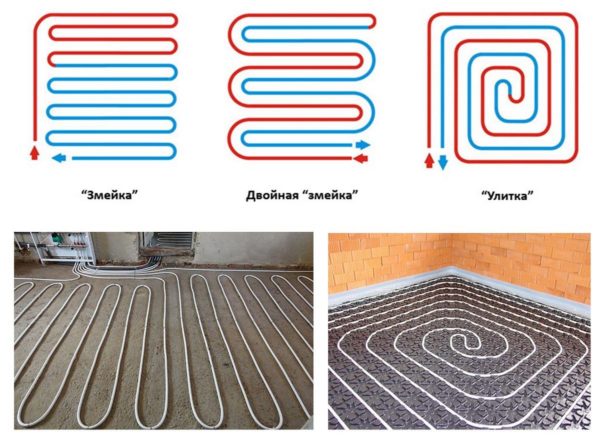
There are two most common methods for installing the water circuits of the underfloor heating system:
- spiral;
- coil.
The most popular of all is pipe-laying in a spiral. This is due to the fact that this installation method contributes to a more even distribution of warm water throughout the system and prevents heat loss. Thus, it has the best energy efficiency.
The second type of styling is “snake”. Compared to the spiral, it works much worse. Due to the fact that hot water enters from one end and exits from the other, while overcoming a considerable distance inside the tubes, a lot of heat is lost. Nevertheless, the "snake" is widely used.The fact is that when laying in a spiral it is very difficult to get around obstacles. For example, it is very difficult to lay pipes in a spiral manner in a room with a complex layout. But with the "snake" there are no special problems.
There is a third, less common type of styling - a double "snake". When using it, the pipe is folded in two, and only then a coil is formed from it. The installation of such a system is somewhat simpler, and the heat loss is slightly lower compared to a traditional coil. However, its implementation requires a longer tube length, so it is somewhat more expensive.
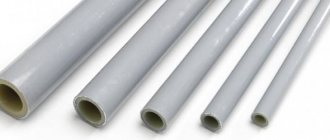
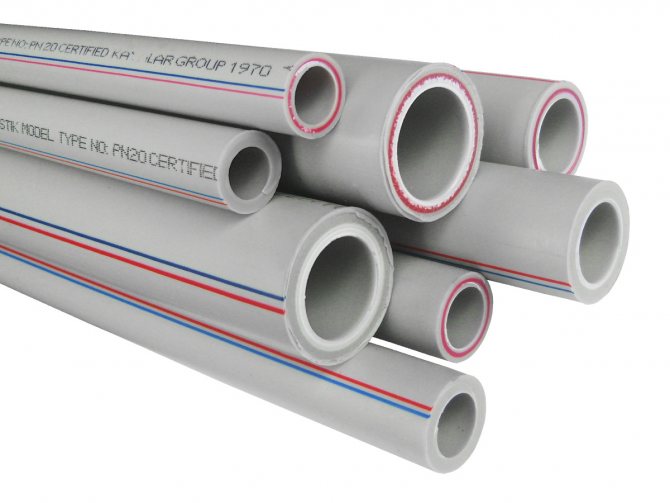
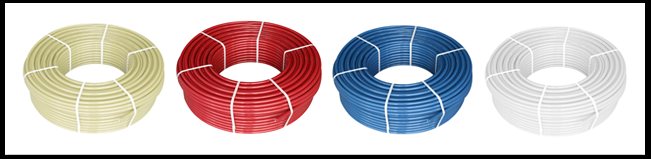
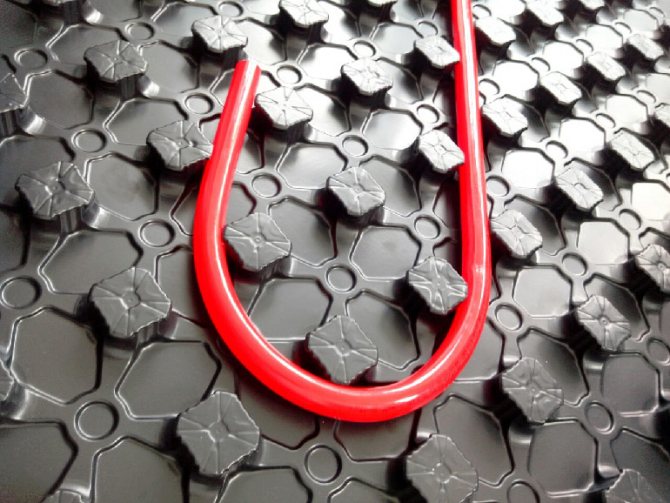
Pipes
The pipes in the underfloor heating system are the most important element. After all, it is along them that the heated water will move. They must be chosen correctly.
Choosing pipes for a warm floor
Table. Types of pipes for underfloor heating.
| View | Description |
| Copper | Very nice but also very expensive view. Ideal for installing a warm floor, but that's what the pipes themselves, that the components for them are very expensive. The underfloor heating system turns out to be reliable, capable of withstanding almost any load and very high heating temperatures, does not burst during hypothermia. |
| RE-X or XLPE | Frequently encountered pipes are quite durable and can withstand heating up to +125 degrees. When water flows through them, it is practically inaudible due to the high sound absorption of the material. Elastic and pleasant material. |
| Metal-plastic | Consists of 3-5 layers, which are interconnected with special glue. The center of the pipe is foiled, due to which the thermal conductivity of the material increases. The pipes bend well. |
Polypropylene | A cheap option, which is almost never used for installing a warm floor, since it bends poorly. It will not work to lay it with the necessary step, and its thermal conductivity is poor. |
Aluminum pipes for underfloor heating - another possible option
Copper pipes have many advantages
Advice! It is best to purchase XLPE pipes - this is the best value for money.
pipes for underfloor heating
The recommended pipe diameter for underfloor heating is 16-20 mm. In this case, the material must withstand heating up to +95 degrees and pressure up to 10 bar.
KAN-therm pipes for underfloor heating
Pipe-laying patterns are different, but the most commonly used are snake, double snake and snail spiral. The first is simple to perform, but as it passes through the circuit, the coolant has time to cool down significantly. In this case, the installation is carried out from the cold zone to the warm one - for example, from the window to the wall. The spiral and double snake are more difficult to install, but more efficient in terms of heating.
How to make a water heat-insulated floor - installation schemes
Styling tips
- The contour should always start only from the coldest wall - from the external load-bearing or equipped with a window.
- If the room does not have a common wall with the street, then the system can be laid from the edges of the room to its center.
- A snake will provide a gradual heating of the floor.
The step of laying the pipe system is usually about 10-30 cm: where the heat loss is large, the step should be 15 cm, and where they are normal or minimal - 30 cm.
The sequence of installation of a warm water floor
The number of pipes will have to be calculated individually for each room. This takes into account the dimensions of the room, the pitch between the pipes, the boiler power, the pipe cross-section and a lot of other small nuances.
Pipe laying
Advice! The easiest, fastest and most accurate way is to calculate the number of pipes using special computer programs.
If an error is made in the calculations, then various problems may subsequently arise:
- poor water circulation;
- heat zebra effect - alternation of warm and cold areas on the floor;
- heat leakage.
Warm floor
Floor heating pipe contour length calculator
Go to calculations
Installation technology
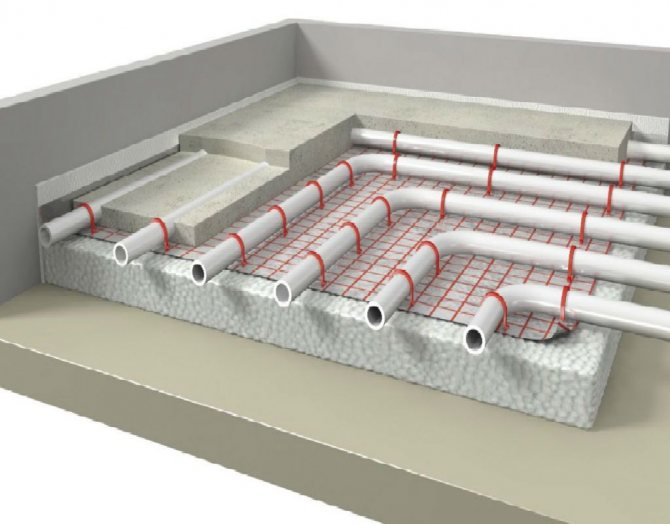
The device of a water heat-insulated floor.
The technological process of installing a water floor is based on the classical laying of pipeline elements directly on the floor or a heat-insulating lining followed by pouring with cement or concrete mortar. Laying in a solution is necessary because:
- In general, underfloor heating pipes are not made of metal, and laying is necessary to ensure proper load distribution and protection.
- The surface area of the pipes is very small. Air itself is a heat insulator. To heat such a mass of air, it is necessary that it be in contact with the largest heated surface, which is a cement or concrete screed.
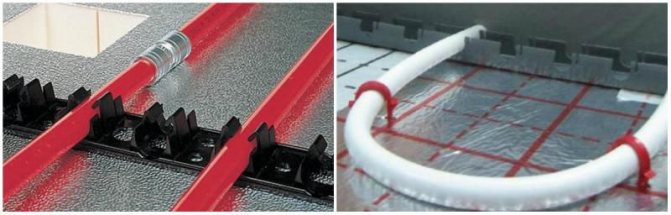
When installing the pipeline, as a rule, the question arises about fixing the elements to the floor. The fastening technology can be different, and it is performed either in one way, or in several in a complex, which, subject to correct installation, is much more effective. Here are some ways to attach pipes:
- The clamps are nailed or screwed with dowels to the floor directly through the insulation layer.
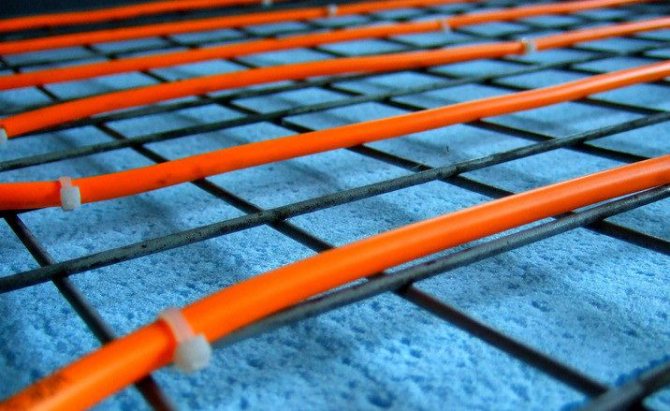
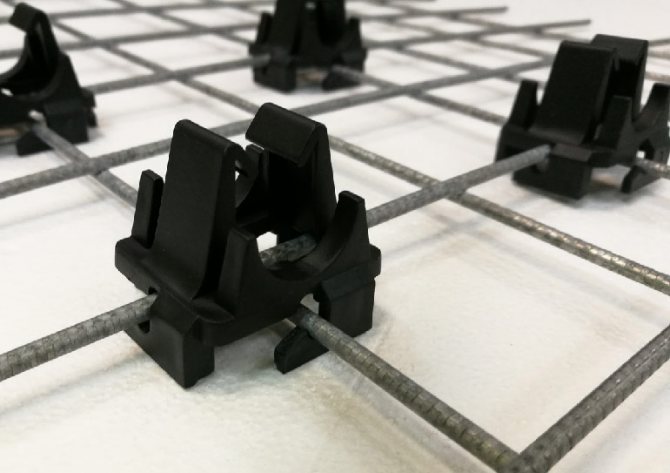
- Reinforcement mesh is laid on the thermal insulation. A pipeline is attached to it with simple wires. The grid is convenient for marking the distance between elements and at the same time acts as a reinforcing element when pouring with mortar.
- In stores, you can buy double-sided tape or special clamps that hold the pipes directly to the layer of thermal insulation without the participation of the floor in this process.
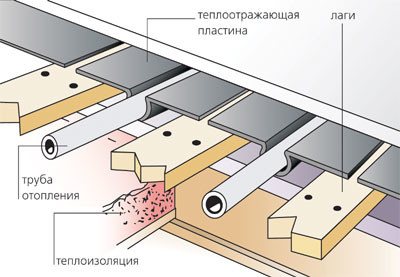
Diagram of the rack heating device.
The pipeline is fastened every 1 m of length. When using the wire screwing method, leave a small gap. If you screw the pipes tightly, then with excessive pressure, dents will remain on them, which will lead to chafing and the appearance of a leak in this place due to the different thermal conductivity of the pipe and wire material.
Experts advise at first only to "grab" the pipeline, connect it to your system, turn it on at full capacity, wait about half an hour and then clamp the fasteners to the desired level. In this case, the pipes will increase to their working volume. If after turning off the system there is a gap, remember: do not "tighten the nuts" under any circumstances.
There are several rules for making the most efficient use and getting the maximum temperature from such floors.
The maximum length of one pipeline circuit should not exceed 90 meters (optimal - 60 meters). But if this length is not enough, you need to install a second circuit.
Remember that the length of the contours must be the same for even heating of the floor.
Therefore, the length of 60 + 60 meters is much better than 90 + 30 meters.
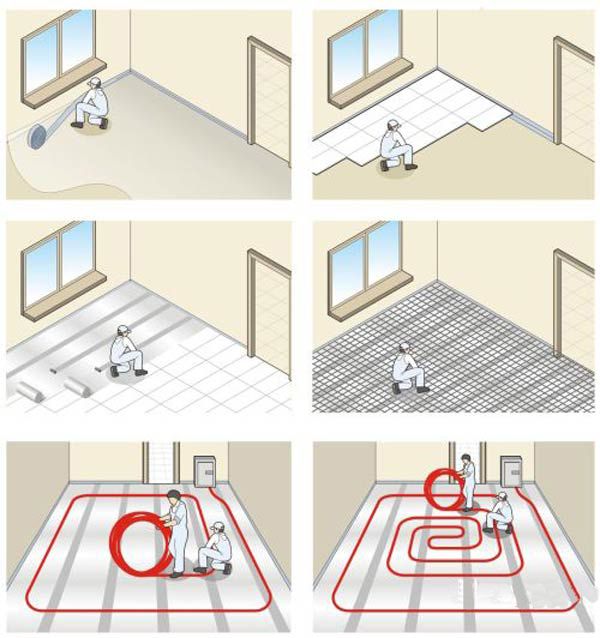
Installation begins like this:
- A heat insulator is laid.
- A contour diagram is drawn on the heat insulator, for example, a spiral or a broken line.
- Connect the beginning of the pipe to the system and lay one circuit (up to 90 meters) in one piece.
- Then connect the other end of the pipeline to the system.
If a second circuit is needed, then plumbing tees are used when connecting the ends of the pipe.
http:
Before pouring the solution, the warm floor must be checked twice:
- Turn on the system. Hot water is injected under a pressure of more than 0.6 MPa for 30 minutes. During this time, the pressure can only drop by 0.06 MPa.
- The second test is carried out at a pressure of 1 MPa. Within 2 hours, the pressure should not drop by more than 0.02 MPa at the same temperature.
After checking, everything is poured with a layer of solution, but not higher than 7 centimeters. The screed is carried out using cement grade above 300 and any plasticizer.
http:
Underfloor heating fasteners
If underfloor heating, operating on the basis of electricity, is quite simple to install - cable or roll heaters are simply fixed with ordinary tape under the floor covering level - then the system of fastening a warm floor on water is more complicated.
Methods of fastening pipes for underfloor heating
The coolant system can be fixed:
- using a grid, to which the pipes are attached with wire or clamps.The step between the rods is 5 cm;
Fastening pipes with a mounting mesh and plastic clamps
- with clamps, which are used together with the thermal insulation layer. The clamps are mounted on the subfloor according to a previously developed pipe laying scheme;
- mounting tape, polymer or metal... In the first case, there are special grips, in the second, there are petals that bend back and then wrap around the pipe;
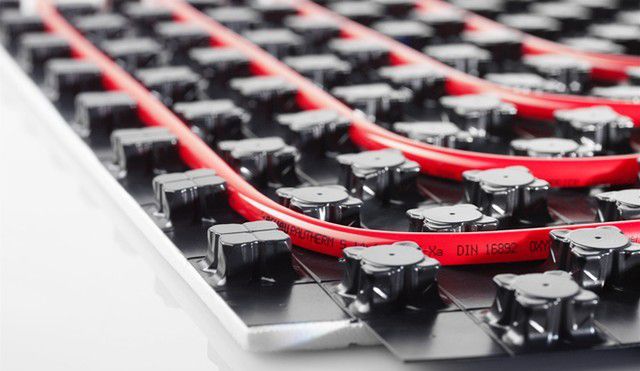
- in expanded polystyrene plates or underfloor heating matsin which the retainers are already formed. The most expensive fastening method. But this method allows you to combine the thermal insulation layer with the fastening system.
The cheapest option is a reinforcing mesh, and the most expensive is expanded polystyrene.
Installation of the underfloor heating pipe system (without screed)
Rack type of installation of a water underfloor heating

System operation with a boiler
Remember that when using the boiler, the system is installed in two ways:
- using a pump;
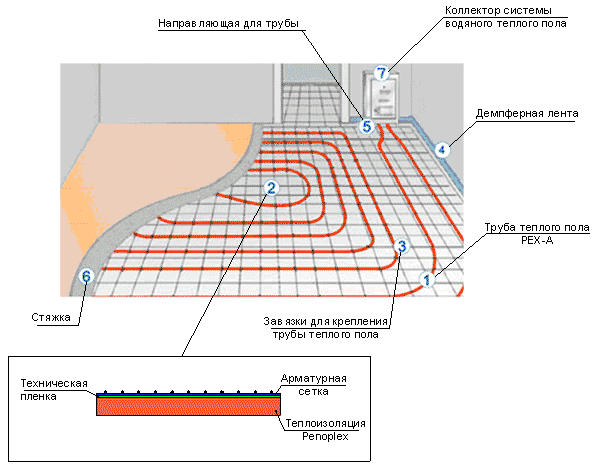
Diagram of connecting pipes to the manifold.
Hot water from a heated boiler under steam pressure goes through the pipes of a closed system, which provides it back to the boiler. In case of a drop in pressure (gas supply has dropped due to clogged valve or pipes), an electric pump is provided, which, automatically turning on, provides water supply to the boiler.
- without pump, with natural drain.
Water enters the boiler and is heated in it to a certain temperature. The pressure that arises in the boiler displaces hot water into the underfloor heating system. Water, going through the pipes, heats them up. The pressure in the boiler drops and a new portion of cold water automatically flows into the boiler.
To ensure a constant pressure in the boiler, a valve with a temperature difference sensor is provided at the drain point, which opens to release cold water when the pressure in the system is exceeded. When the temperature you set is reached or when it decreases, the sensor is triggered and shuts off or allows the water supply to the boiler.
Heat insulation for underfloor heating
Thermal insulation is an important element when installing a warm floor. It will allow you to avoid heat loss and increase the efficiency of the system. It is laid on the floor itself, and a damper tape is mounted along the walls, which will compensate for the thermal expansion of the screed, and reduce heat loss.
Thermal insulation for underfloor heating pipes
Advice! It is advisable to lay a heat-reflecting layer - thanks to it, the heat directed downward will be reflected and returned upward.
The thickness of the insulating layer will mainly depend on how well the subfloor is insulated. For example, if there is a heated room below the floor, then a layer thickness of only 1-2 cm will suffice.If the housing is located on the ground floor or above an unheated room, then the thermal insulation layer should be at least 5-10 cm, especially in the northern regions of the country.
Screed device for underfloor heating
Structure and thickness
Before carrying out work, it is also worth finding out what thickness is optimal for screed a warm water floor. It all depends on the design of the screed itself, as well as on the nature of the room in which the warm floor is installed.
Minimum
According to SNiP, this indicator can be 20 mm above the pipes of the system, but this is only when reinforcement is used. In the absence of such, it is recommended to lay a screed with a thickness of at least 40 mm. Thus, taking into account the pipe diameter, the total thickness of the screed without reinforcement will be about 60-70 mm.
Minimum
You should not install a thin-layer screed in technical rooms (for example, in a garage), as well as do a screed with expanded clay, in rooms where the floors are exposed to more significant loads (hallway, bathroom, kitchen).
Maximum
SNiP does not provide information on what should be the maximum layer above the heating elements.
The consequences can be as follows:
- an increase in the consumption of materials and, as a result, additional financial costs;
- longer surface heating period;
- reduction of the living space of the room.
Most often, pouring a thicker layer is due to the need to level the surface or form a floor, the level of which will coincide with the floors in adjacent rooms. How to choose a glue for tiles with a warm water floor, read here.
Maximum
To solve these problems, it is better to use a rough screed (the base on which the "warm floor" system is laid), which will help to avoid an increase in inertia in the process of heating the surface.
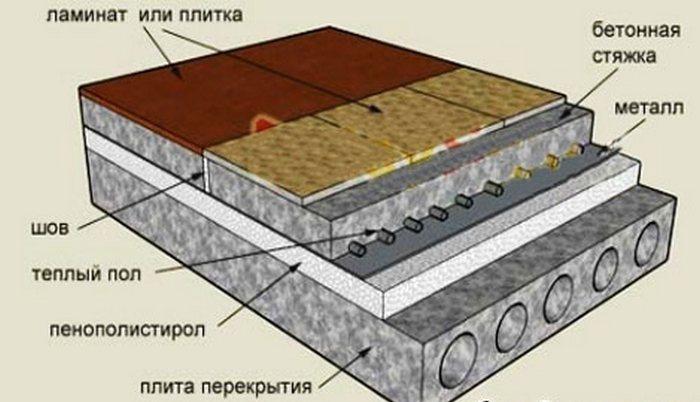
Underfloor heating under the screed - multi-layer construction. A rough layer is mounted below, designed to level the unevenness of the base. If the base is a concrete floor slab, and it is even, then this layer can not be poured.
The second layer is done only with the electric type of floors, it is poured onto the waterproofing. The third is mandatory for any type of warm floor, a finishing coating is laid on it.
Most popular wet screeds:
- Concrete with small fractions - used for installation of subfloors or hot water systems.
- Compositions based on cement and sand - these are the mixtures with the addition of plasticizers that are used when installing warm electric floors.
When installed as a finishing linoleum or carpet, the proportion is as follows: sand, cement and water (1 - 4 - 0.7). If crushed stone is added to the screed, then: cement - 1 part, sand - 3, crushed stone - 5.
There are no special requirements for the screed technology, however there are a number of rules on which the reliability of the entire structure depends. Firstly, it must have a certain thickness and be even, otherwise there may be malfunctions in the functioning of the system. This can be expressed in the formation of cracks, uneven heating of the floor, which will provoke overheating of the heating elements.
The installation of underfloor heating is poured with a concrete screed, in residential premises with a thickness of 3 - 7 cm, and in industrial premises up to 10 cm. When installing a water system, the layer size above the pipes is from 4 to 7 cm. A coating with a thickness of 3 to 5 cm makes it possible almost immediately, and evenly heat the floor and the room as soon as the heating is switched on.
With a low ceiling height, which does not allow making a screed of 3 or more centimeters, it is recommended to use self-leveling mixtures, applying them to pipes with a layer of 2.5 cm is sufficient for the strength of the structure.
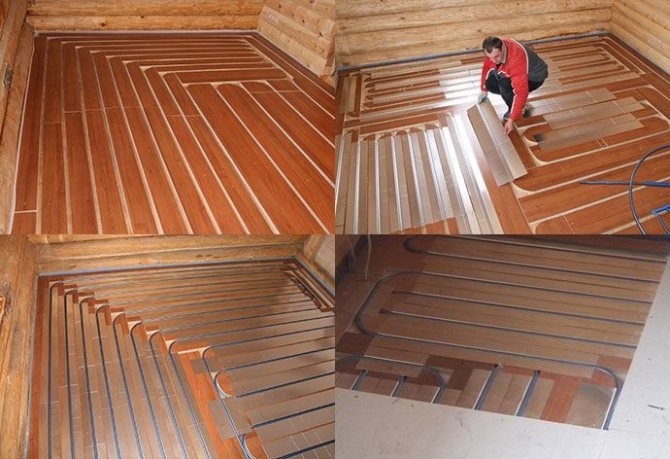
How to make a water heat-insulated floor
Making a simple water-heated floor in a small room is quite simple, even without the help of specialists. The technology for laying a water floor is as follows.
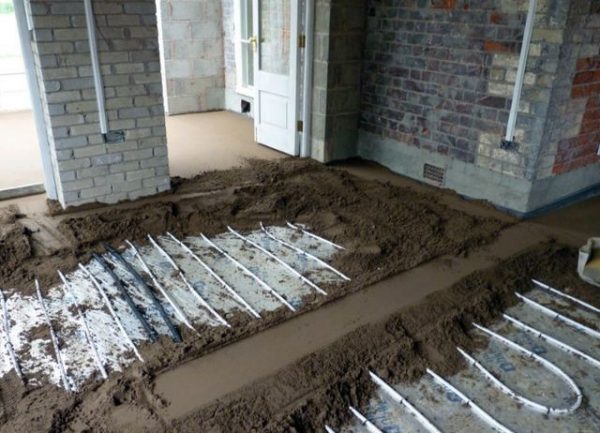
Step 1. The base is being prepared - a thin layer of sand is poured onto the rough floor, rammed and leveled.
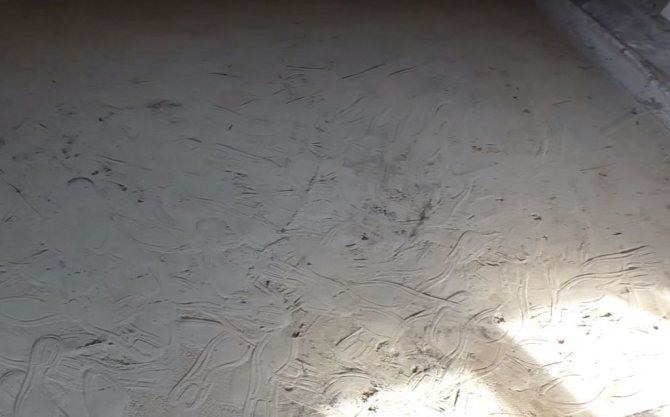
Preparation of the base
Step 2. A layer of waterproofing material is laid - for example, a polyethylene construction film.
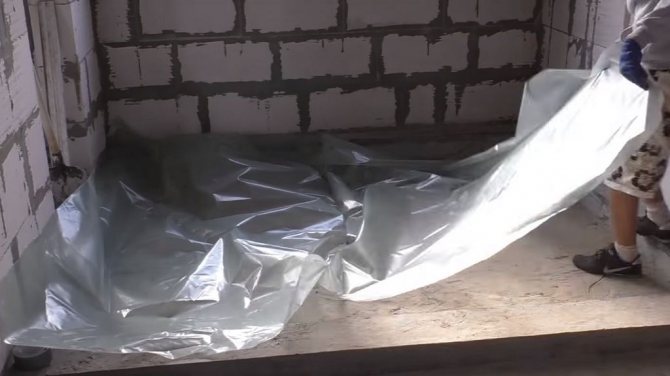
Laying plastic wrap
Step 3. A heat-insulating layer is laid on top - expanded polystyrene with a thickness of 5 cm. If necessary, the material is cut to the required size.
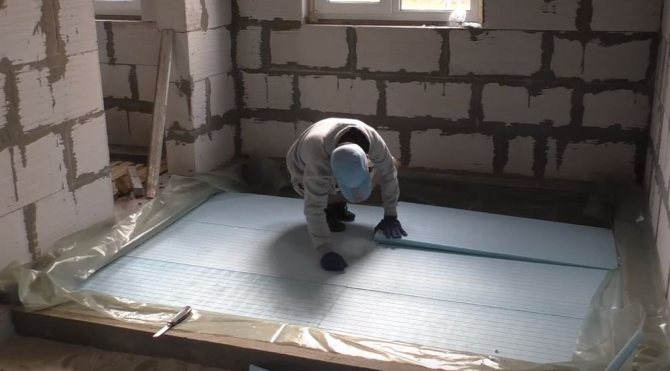
Styrofoam laying
Step 4. A damper tape is attached around the perimeter of the room.

Attaching the damper tape
Step 5. Reinforcing mesh is laid.
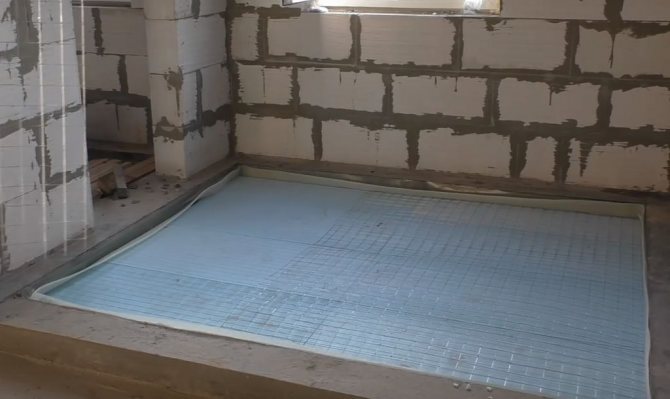
Reinforcing mesh laying
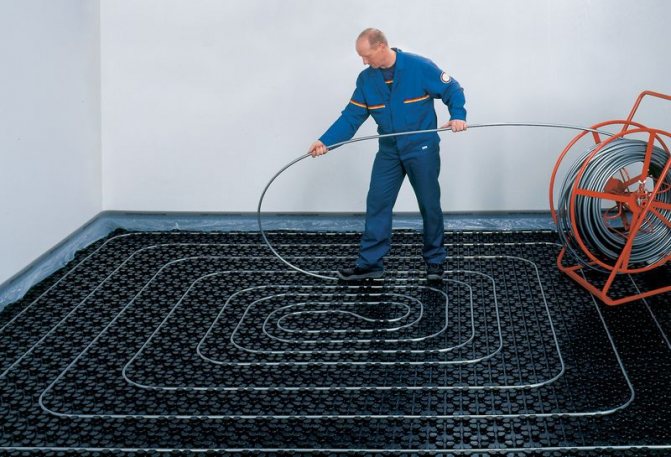
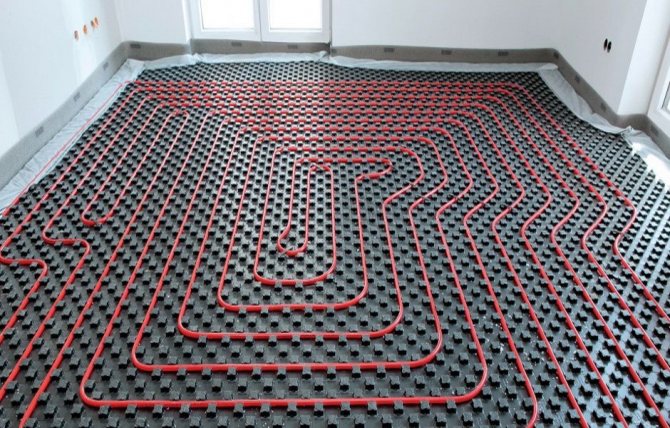
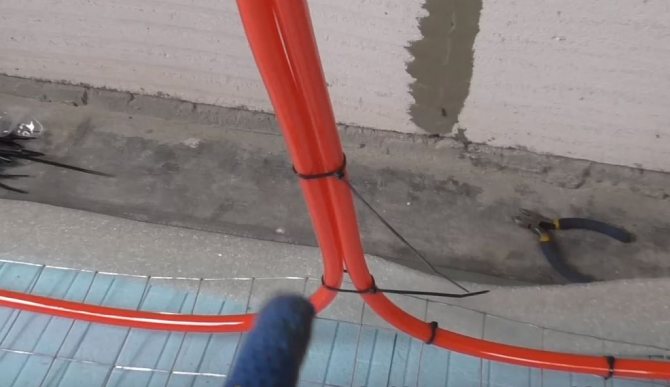
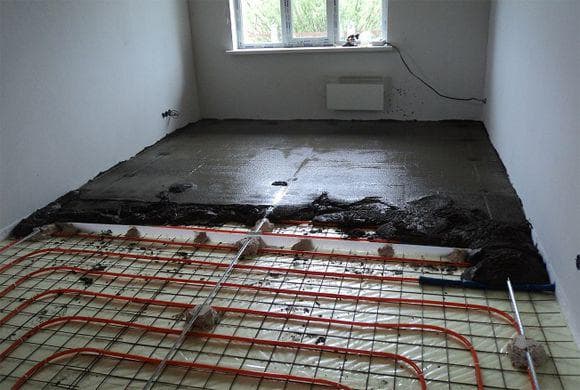
Step 6. According to the chosen scheme, a pipe is laid along which water - a heat carrier - will run.
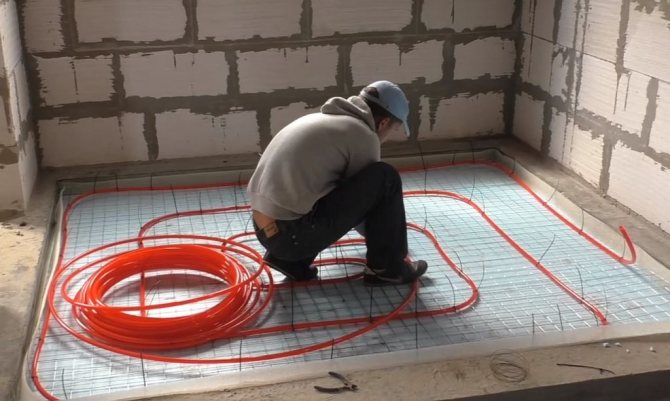
Laying water floor heating pipes
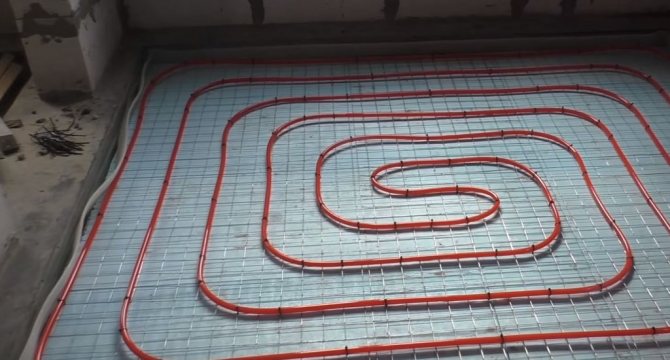
All is ready
Step 7. The pipe is fastened with plastic clamps.
Plastic clamps
Step 8. The withdrawal of supply and "return" from the system is made.
Withdrawal of supply and "return" from the system
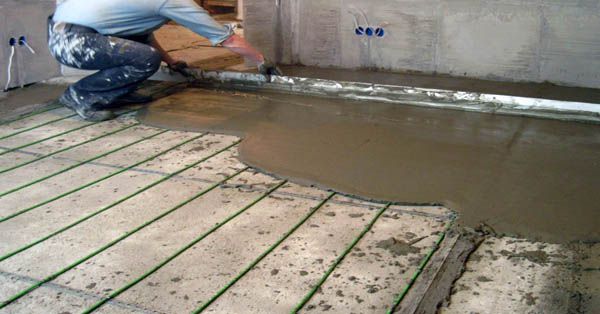
Step 9. Next, work is carried out on the laying of the cement screed and its leveling.
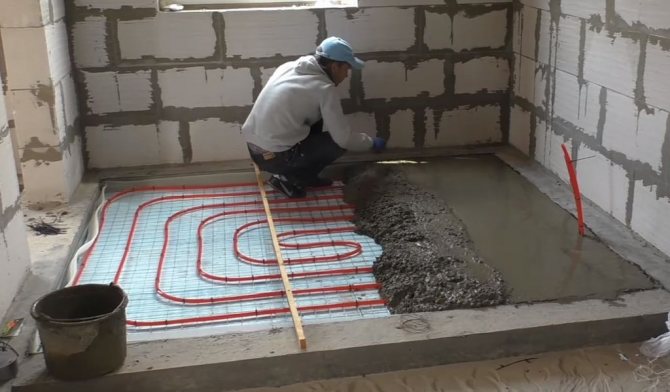
Cement screed device
Attention! It is worth remembering that the layer of concrete above the underfloor heating system must be at least 3 cm.In this case, the screed should be poured after filling the system with water.
A thermostatic column for underfloor heating is installed on the "return", which will regulate the temperature of the water in it ("return"). The work is completed by connecting the system to heating. It will be possible to use the warm floor after it has been laid in a wet way only after the concrete has dried well. The approximate period is 28-30 days.
Video - Laying a warm water floor
Calculation of the cost of a warm water floor
The cost of a warm water floor depends on four main factors:
- materials used in the work;
- in addition, work is being carried out with the involvement of a contractor or independently;
- the area of the room where the structure is mounted;
- installation method and system features.
If we assume that materials of the middle price category will be used during installation, the assembly will be done on our own, and the structure will include a thermostat for automatic temperature control, then the cost of the installation, taking into account the area of the room, will look like this.
| Room area (in square meters) | Total assembly cost (in rubles) |
| 5-12 | Up to 15,000 |
| 12-20 | Up to 27,000 |
| 20-50 | Up to 60,000 |
| 50-100 | Up to 120,000 |
It should be borne in mind that the table shows approximate average prices. In different regions of the Russian Federation, they may differ (sometimes quite significantly). In addition, when working with premises of a large area, it is possible to purchase building materials at wholesale or close to them prices, which significantly reduces the total cost of work. Therefore, the calculation in each case will be individual.
Screed materials
The screed will meet the requirements and perform well if the grout is properly mixed. But you must first purchase the required materials for it. You can also purchase ready-made dry mixes and dilute them with water in accordance with the instructions that are attached to them by the manufacturer. But a screed made from dry mixes is more expensive than concrete.
Ready mix for screed
If you do the cement mortar yourself you will need:
- 50 kg of cement from M400 and above;
- 200 kg of sand, fraction 0.8 mm;
- water 5 buckets of 10 liters, you can pour in a little less so that the solution does not turn out to be very liquid, and if necessary, add the required amount of liquid;
- plasticizer (liquid soap) for the elasticity of the screed, it is recommended to add 150 grams of plasticizer;
- expanded polystyrene plates to create an insulating layer;
- metal profile 20x40 is used as beacons.
When we make a classic cement-sand mortar, first pour water into the concrete mixer. Its amount is calculated by the amount of cement. If 3 buckets of cement are used, then add 3 buckets of water. In order not to get a liquid solution, we leave a little water. Pour out the rest of the water after pouring all the ingredients into the concrete mixer.
We suggest that you familiarize yourself with Installing a hygienic shower in the toilet with your own hands
For the underfloor heating system, experts recommend using a floating screed. She settles down on a heat-insulating layer.
Selection and installation of the topcoat
Porcelain stoneware is ideal for underfloor heating systems
For the underfloor heating system, any floor covering with good thermal conductivity is used. The ideal option is considered to be porcelain stoneware or ceramic tiles, which have the highest heat transfer. In addition, this material has high performance characteristics, has wear resistance and durability.
Most often in living quarters, laminate is laid on the screed. Now many manufacturers, for example, Parador, Wineo, Tarkett, produce laminate categories designed specifically for warm floors.
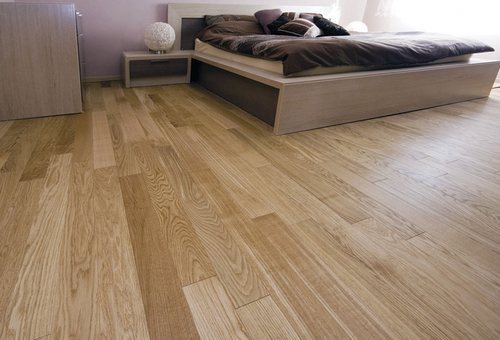
Warm floor under the laminate
Linoleum can be laid on a warm floor if it is made from natural raw materials.If the flooring has a non-woven base, when heated, such linoleum will emit carcinogens.
Natural coatings such as cork, parquet can be combined with water floors, if these are certified products and the manufacturer allows these coatings to be laid on the underfloor heating screed.
How best to install an electric underfloor heating depends on the type of heating elements. For any underfloor heating, it is important to ensure that the heating elements do not touch the thermal insulation. To do this, they are separated from it by a reinforcing mesh.
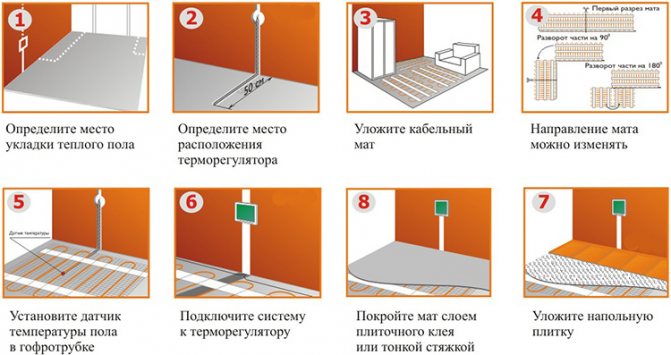
Cabling
The location of the thermostat is selected. It is fixed at a height of more than 30 cm from the floor. If the device is of a hidden type, grooves are made in the wall under it, as well as under the power and temperature sensor wires. In places with high humidity, thermostats are not installed. They are taken out to neighboring rooms.

On the base, an assembly tape is attached at intervals of 50-100 cm and with an indent from the walls by 30 cm. Markings are made on the floor, taking into account the indents from the furniture. The distance from the walls is 10 cm, and from pipes and radiators - 15 cm. Then the heating cable is connected to the power cable using a coupling, and then it is attached to the mounting tape.
The power cable is led out through the groove prepared in the wall to the thermostat, and the heating cable is laid according to the diagram. In this case, the radius at the bending points should not be less than 5 cm. The bends are made smooth, without unnecessary tension. Fixation is done with staples or mounting tape. Contact or crossing of turns is not allowed. The convergence should not be less than 8 cm. All indents are strictly observed according to the scheme, which is developed in advance.
Laying cable underfloor heating with indents
The temperature sensor fits freely inside the corrugated pipe together with the lead wires. The corrugation at one end is hermetically sealed with a plug so that cement mortar does not get inside. A pipe with a temperature sensor is located between the cable turns at a distance of at least 50 cm from the wall and fits into the prepared groove, after which the wires are connected to the thermostat.
The grooves are sealed with mortar or putty, and after hardening, the performance of the underfloor heating system is checked.
Heating mats are easier to install as the cable is already fixed on a mesh backing that only needs to be spread on the base. In places of rotation, the mesh is neatly cut without violating the integrity of the cable. In places where obstacles are located, the mesh is removed, and the cable is laid in compliance with the distance from adjacent turns within 6-8 cm.
We offer you to familiarize yourself with Painting the walls in the bathroom (47 photos): how to paint the walls in the bathroom with your own hands, how to level the surface and what paint color to choose
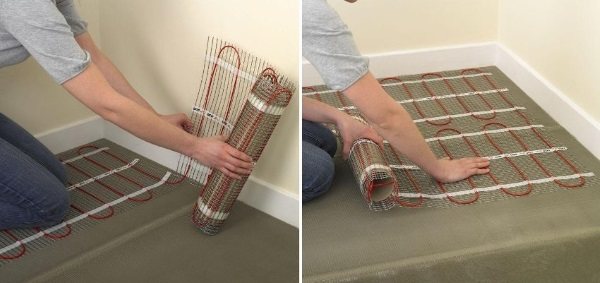
Reversing the heating mat when laying
An important advantage of the heating mat is its small thickness, which makes it possible to pour a thin screed or lay heating elements in a layer of tile adhesive. Then the thickness of the fill will be only 8-10 cm, which will allow not to occupy the extra volume of the room.
Rod infrared heaters look like a rope ladder. They contain transverse heaters and 2 longitudinal connecting wires through which power is supplied.
The core roll is rolled on the floor, starting from the thermostat. At the turning points, the connecting wire is cut, after which it is necessary to reconnect the ends with a piece of wire. This reduces the reliability of the warm floor. It is advisable to select rolls of suitable length. Then you don't have to cut anything.

Core underfloor heating
After laying in the insulation, the windows are cut out in a checkerboard pattern for better adhesion of the screed to the base. All connections must be carefully insulated.
After completing all the preparatory steps, you can proceed to the installation of the heating system.
Water heat-insulated floor
When laying a water floor, pipes made of metal or polyethylene are used, they have good thermal conductivity, bend easily, are sold in coils, which is convenient, since there are no joints inside the slab.
The main stages of the process of laying a warm floor in a screed are as follows:
- Layout of pipes according to the prepared scheme. Popular ways to place the pipeline in the form of a snake or snail. The pipes are laid at a distance of 10 - 30 cm from each other. It is recommended to make the maximum loop length no more than 80 meters. Turns should be smooth, sharp can lead to pipe burst. It is especially necessary to carefully bend metal pipes, it is convenient to do this using a special spring.
- Pinning elements. This can be done using a fastening profile, which is mounted to the floor with dowels, fixed to a reinforcing mesh or laid on polystyrene foam mats.
- Connecting the supply and return pipelines of the floor. It is done using a manifold distribution unit, this is the best way. The pipes are connected to the manifold with clamping fittings. First, one edge of the contour is connected, and upon completion of laying the second.
- Design test. The procedure must be carried out before the screed is poured. To do this, the pressure in the system should be brought to 4 BAR, and further monitoring should be carried out. If the pressure remains normal, then the screed can be poured.
In the electric floor, the heating element is a cable.
Stages of installing a cable underfloor heating in a screed:
- System layout. The location of the cables and the pitch of the elements are determined. You need to retreat from the wall at least 5 - 10 cm, as well as from heating appliances and furniture.
- Preparing a place for a temperature sensor and thermostat. Grooves are prepared for the corrugated pipe, in which the sensor and wires will be located at the time of concreting, otherwise the floor will be uneven.
- Laying system. If you plan to mount the cable, then a cement-sand mortar will be required, and when using a heating mat, a cement pad is not needed.
The cable is laid, starting with fixing its beginning and the coupling with mounting tape. Then it is laid out according to the scheme over the entire area. The sections of turns, if the cable is not fixed on the grid, are made with a radius of at least 5 cm. Intersection of the cable is not allowed.
- Securing the cable. When installing a warm electric floor on a reinforcing mesh, the cable is fastened with it. Another way is to attach with staples and mounting tape.
- System connection. The cable is connected to the power element and hides in the sleeve. Then, the power cable is connected to the thermostat.
- Checking the electric underfloor heating. After connecting all the wires, the device is checked for operability by connecting it to the power supply, and only then can you start pouring.
You need to choose a topcoat taking into account the requirements that a heated floor imposes on them. Such coatings have a designation on the packaging, which indicates its compatibility with underfloor heating.
In addition, the product should be selected depending on the purpose of the room. In a bathroom with high humidity, it is better to lay ceramic tiles, as they are not afraid of water, chemical detergents and are easy to clean.
In addition, tiles are the best heat-conducting material and are most suitable for any type of underfloor heating. The tile is fixed with a special glue, which is applied to it with a layer of 50 mm. Crosses are placed at its corners, they serve as a guide for placing the next product.
When choosing wood, it is worth noting that it is a poor conductor of heat, so it is better to take exotic tree species. Laminate, linoleum and carpet - also in terms of thermal conductivity are lower than ceramics, and are less environmentally friendly. But in terms of aesthetic indicators, they are more suitable, and are able to create an excellent interior.It is preferable to lay them on a warm electric floor.
The laminate is mounted on a heated floor, a thin substrate is laid on top of the screed. The principle of laminate installation is standard, by snapping in the lock of two adjacent boards.
Linoleum or carpet is very easy to fit. As soon as the surface dries, it must be cleaned of dust, and waterproofing (plastic film) should be laid on top of it. After that, you can spread the material.
If the area is large and several strips are needed, then they are placed in a joint and connected by cold welding. As you can see, it is not difficult to install a warm floor in a screed on your own, and everyone can do it. The main thing is to correctly draw up a design diagram and choose the right material.
To determine which screed is best for a warm water floor, it is worth considering how to make it.
Concrete
For mixing the solution, cement of a brand not lower than M-300 is used, mixing it with sand or screening. The mixture is diluted with water, bringing to a state in which the finished solution looks like sour cream. Find out about the consumption of cement-sand mixture per 1 m2 here.
Concrete
The advantages of such a screed are higher strength and relatively low construction costs. The disadvantage is a long period of complete drying (about one month). This link will tell you about the consumption of fiber for a concrete floor screed.