The question of how to choose an electric warm floor under the tiles is increasingly being heard in stores and on forums. You can endlessly read the reviews, but you can only find out which warm electric floors under the tiles are better to choose and how to make the installation, only by understanding the system of each.
Ceramic tiles can rightfully be called the most popular option for decorating the floor in the bathroom, toilet, kitchen or hallway. All its advantages are perfectly complemented by the electric underfloor heating system, which is especially relevant in these premises.
And whether there is a choice of ceramics largely depends on the repair budget and personal preferences, then you can choose a suitable warm floor only after familiarizing yourself with the possible options, their advantages, disadvantages and installation features.
Electric underfloor heating under tiles: possible options, which one to choose
One of the advantages of electric underfloor heating is the possibility of year-round operation, which is undoubtedly important for apartments that depend on the heating season. But apart from this, electric floors in multi-storey buildings are the only possible option for additional heating.
When choosing which one is better, they take into account the possibility of performing a screed, if needed, and the permissible height to which the floor can be raised, the price range and compatibility with the selected flooring.
Underwater rocks
The main mistakes of inexperienced installers of an electrical heating system:
- incorrect calculation of the required power,
- laying cables or mats on closed floor areas,
- the presence of air voids when pouring a screed or laying tiles,
all this leads to a sharp decrease in efficiency or even to its failure.
If we consider it from the point of view of economy, then the disadvantage of such a system will be a rather high payment for the consumed energy, in comparison with gas heating.
You can find complaints about the electric floor heating, as a source of increased electromagnetic radiation. This is more typical of single-core cables.
However, this drawback cannot be taken seriously - the intensity of the generated electromagnetic field is tens and hundreds of times lower than the maximum permissible norms, and is not even comparable to the geomagnetic background of the Earth.
Cable underfloor heating
The most common arrangement of a cable underfloor heating is a special single-core or two-core cables immersed in a cement-sand screed 2-3 cm high.And together with the floor covering and the preparation of the base, the floor sometimes rises by almost 10 cm.
It should be noted right away that those electromagnetic fields, which are constantly mentioned by reviews, do indeed take place and are produced by single-core cables to a much greater extent than by two-core cables.
The installation of conventional cable floors requires certain qualifications, and the system can be turned on only after a month. This option has long lost its position in the market, and its place was taken by thermomats.
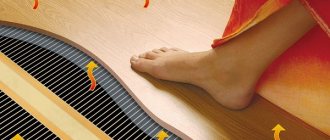
Film floor compatibility with tiles
Bimetallic floor heating is not recommended to be laid under tiles or porcelain stoneware. Carbon can be done if a few “But's” don't matter.
The problem is that the tile adhesive does not create the necessary adhesion to the film and the installation of the system has to be done in a more laborious and costly way.
In addition, many reviews talk about a decrease in the effectiveness of the film floor under the tiles, which, combined with the high cost, makes this option not very attractive.
If the choice is made in favor of the film floor, then it is worth considering two possible installation methods and choosing the most suitable one.
Distinctive features

Ceramic tiles go well with water-type floor heating in bathrooms, in the kitchen and in the corridor. The coating promotes even heat distribution.- The disadvantage is expressed in the complexity of the installation of the system, but it is compensated by the ease of operation.
- The water heat-insulated floor is characterized by a high complexity of installation work. For heating small areas, the most suitable would be a film infrared floor for tiles - its installation is easy to do with your own hands and the thickness of such a floor will be much lower compared to a water one.
- During operation, a warm water floor under a tile consumes a relatively small amount of electricity compared to a rod or cable, even if an electric boiler is used for heating.
- A water floor installed under a tile heats up several times faster than an electric floor.
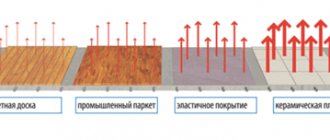
- The efficiency of a water floor is higher than that of an infrared or rod floor due to the constant circulation of the coolant along the contour. The efficiency is enhanced by the ability of the tile to slowly release the body.
- The thickness of the screed of the water floor with tiles is 6.5 cm, along with this, electrical and rod systems practically do not need to be raised and, accordingly, have a smaller thickness.
- A water heated floor covered with ceramic tiles, as opposed to infrared, can be used as the main source of heating.
When choosing a tile for a warm floor, you should pay attention to its indicators of wear resistance, water resistance and strength. The surface is selected rough - this contributes to more efficient heat transfer of the product. Vinyl tiles can be used, the thickness of the protective coating of which is 0.2-0.3 mm. In addition, vinyl tiles cost less than their ceramic counterparts.
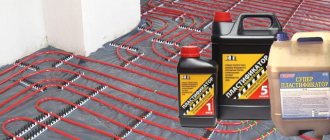
When choosing tile adhesive, it is better to pay attention to the products of leading companies. It can be Eunice glue, specially designed for underfloor heating, Ceresit CM 11 or Knauf, which is great for fastening even large-sized items.
Rod infrared underfloor heating
These systems have appeared recently and have not yet become very widespread. The heating element in them is a flexible rod made of a composite material based on carbon, silver and graphite.
The rod electric floor is available in the form of a flexible wide thermomat. The rods are placed in parallel with a pitch of 10 cm and are fixed on both sides on black conductive bars.
The uniqueness of the rod systems is that they are not afraid of being locked by furniture, subsequent overheating and can creep under any floor covering. In addition, reviews speak of their cost-effectiveness. The installation of a rod underfloor heating is practically no different from the installation of thermomats.
Do-it-yourself installation of an electric underfloor heating under a tile
Before proceeding with the installation of the underfloor heating system, you need to draw up a plan for its layout on paper.
The floor areas on which household appliances or furniture will be placed are excluded from the total area; they also create a buffer zone between the electric heating system and heating pipes or other heat sources, if any.
The result is likely to be an irregular shape that fits into a square or rectangular room. Think over the place of installation of the thermostat. Sometimes for a warm floor you have to lay a dedicated wiring line with a suitable power.
Evgeny Filimonov
Ask a Question
The layout of the room, which will have a warm floor, needs to be thought out very well, since further rearrangement may affect the performance of the system. Preparation of the base
The installation of an electric underfloor heating begins with the preparation of the base. Any system is laid on a clean, flat surface; if necessary, complete dismantling of the old coating is carried out and the floor is leveled with a screed. A layer of waterproofing material is laid on the base with an overlap on the wall.
A damper tape is fixed to the wall along the perimeter of the floor, it will compensate for the thermal expansion between the floor and the wall. For waterproofing, foamed polyethylene foam, ordinary or extruded polystyrene foam with a thickness of 20-50 mm are used.
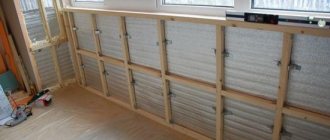
Advice! If the installation of a warm floor is provided on a veranda or loggia, a layer of insulation is laid in front of the waterproofing, it can be mineral wool or expanded polystyrene 10 cm thick.
Features of installation of cable or rod underfloor heating under tiles
Installation of thermomat under the tile differs in that it is installed without thermal insulation. Laying on old tiles is also allowed. The core floors are laid on a foil base. Further installation is carried out according to a single scheme.
The installation of a warm floor begins with the preparation of the base. After that, the thermostat is installed. The temperature sensor is placed in a corrugated pipe with a diameter of 9-16 mm, and so that the pipe is flush with the floor, a strobe is made for it.
They work in the following sequence:
- It is recommended to apply a layer of deep-penetrating primer on a clean and even surface, which will improve the adhesion of the floor to the tile adhesive.
- When the primer is dry, they begin to roll out the roll of the thermomat, placing it according to a previously prepared scheme. This will be a trial, draft layout.
- In the process, in order to rotate the strip, you will have to cut the mesh. This must be done with extreme caution so as not to damage the cable.
- When the thermomat covers the entire area, it is folded again.
- The next layout will be finishing, finishing. As it spreads, the protective strip is removed from the bottom side of the net, exposing the adhesive layer so that the newly rolled roll adheres to the entire floor surface. There is no adhesive base provided. Thermomats are glued to the floor with pieces of masking tape.
- Connect the electric floor to the network through a thermostat.
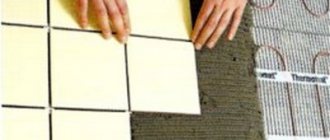
- After that, the thermomats are covered with tile glue, the layer of which should not exceed 7 cm.
- When the screed is dry, you can start laying the floor covering on the minimum layer.
Evgeny Filimonov
Ask a Question
It is possible to turn on the warm floor not earlier than the complete drying of the tile glue.
Installation and connection instructions for C&F Technics Heating Mat
Before installing the heating mat, measure testimony resistance and write them down on the inspection card (attached to the instructions). (See point 6).
Connection cable "Cold end»Can be lengthened or shortened, but cannot be shorter than 0.5 meters from the connection to the heating cable.
ATTENTION! Heating cables laid on fiberglass mesh must not be shortened.
Heating mats it is impossible lay on top of each other, heating cables must not cross each other!
Cable sleeve "COUPLING"- the transition of the resistance of the cable of the" heating section of the mat "to the power cable" cold connection "located on the heating mat must be marked on the inspection card.
Distance from the wall 10 - 20 cm should be taken into account. The heating mat should not be installed under fixed objects such as walls, partition elements, kitchen furniture sets, bathtubs or showers, as well as other objects that interfere with the unhindered heat transfer. The heating mat must be placed on free from furniture and stationary objects of the area.Since bathrooms mainly consist of a small free common area, a heating mat can be installed as additional heating. If you are interested in basic heating, please consult your underfloor heating supplier in addition.
All electrical devices must be wired through a suitable automation and protection system (MCB or RCCD). All electrical devices (including underfloor heating and thermostats) in wet rooms must be connected to the electrical network through RCD corresponding power with a leakage current not exceeding 30 ma according to the instructions supplied with the thermostat. All connections must be made by a licensed, qualified electrician in accordance with local codes of practice for the safe use of electrical installations.
The heating mat has a thickness of 3 - 4 mm and is poured into tile adhesive or self-leveling mixture (self-leveling floor), suitable for warm floors. See this information on the packaging of the mixture manufacturers or consult when purchasing a mixture. The heating mat has a 3.5 meter connecting cable (Two-core shielded cable with grounding) connected by a heat-shrink sleeve to the mat, ATTENTION! never damage the coupling. The connecting cable can be shortened, but not shorter than 0.5 meters of the connecting wire. ATTENTION! Never plug the heating mat into the mains before, during and immediately after installation.
If it is necessary to install several heating mats in the room, then they must be connected in parallel, in a junction box and one cable can go to the thermostat. The maximum power for the thermostat is 16 amperes. If the combined heating area exceeds 20 m², it is necessary to connect through the Contactor. The thermostat must be installed by a competent electrician.
The floor sensor can be lengthened or shortened as required. The sensor should be installed in the middle of the cable snake for optimal temperature recording. The sensor is installed correctly if it is inserted at least 50 cm into the area of the heating cable or other heating systems. DThe sensor must always be mounted in a mounting tube. A sensor with a connecting wire is inserted into the tube. The end of the mounting tube is closed with a cap. The mounting tube allows you to fix the sensor at the desired point of the warm floor and replace the sensor, if necessary.
The heating mat is primarily designed for installation on concrete floors. When installed on wood floors, all surfaces must be covered with a cement screed that is compatible with hot floor systems. For example: Cover the floor with 15mm OSB or moisture resistant plywood, fix with 200mm long screws and then pour 2-3mm of self-leveling mixture and proceed as installation for a cement base.
Utilities, heating pipes, hot water supply categorically prohibited cross with a heating cable. In such cases, it is necessary to use several separate sets of heating mat.
Laying underfloor heating in a "dry" way
As mentioned above, the tile adhesive does not adhere to the film, therefore there must be an intermediate material between the heating system and the tile. It can be drywall or glass-magnesite sheet, which today is considered a worthy alternative to the first.
Installation of electric floor heating is performed in the form of a "sandwich":
- Heat-reflecting material is laid on the main floor;
- The next layer will be the warm floor itself (it is recommended to cover it on top with a thick plastic wrap);
- Drywall or LSU is cut, laid on the floor and screwed to the primary base, taking care not to damage the heating elements.
- Before gluing the tiles, it is advisable to apply a deep-penetrating primer on drywall or LSU, for example, concrete contact.
Types of electric floors
Electric underfloor heating for tiles is classified depending on the type of heating element:
- mats;
- cable;
- film.
Each device is reliable and safe. Manufacturers give a guarantee up to 20 years. In this case, it is the floor that is heated, which is the most energy efficient. The device can be used as an additional or main heating system.
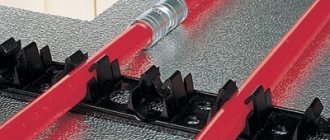
Cable floor
If you lay this type of floor, a special cable will lead the heating. It should be laid with a snake with a certain step. Fixation is carried out with mounting tape. After installation, the element and the corrugated tube are poured with a concrete screed. Its thickness should be 3-5 centimeters.
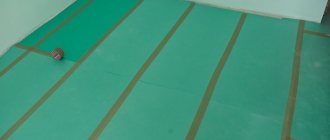
Film floor
The do-it-yourself laying technology of the presented product can go not only on the floor, but even on the walls and ceiling. The heating element is a special material. It is enough to install the film on the floor, no screed is required. Any tile material can be laid on top with glue.
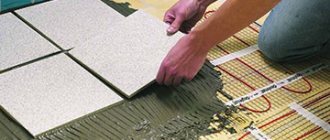
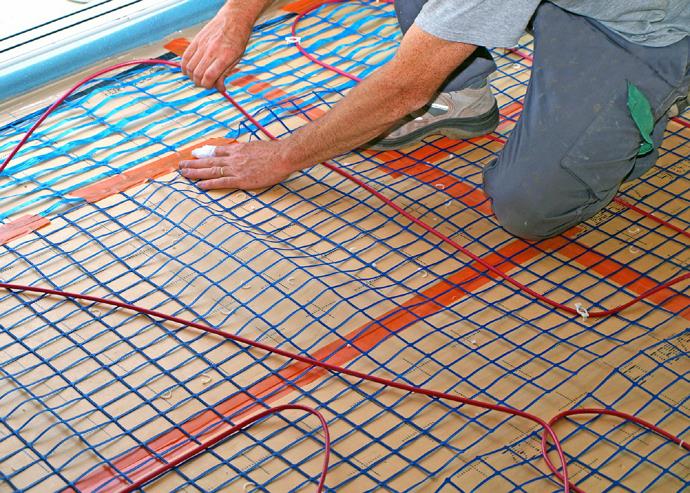
Mats
Mats have been used not so long ago, but their popularity is growing steadily. It is based on the cable system. It is based on a shielded two-wire cable. Its thickness is 2.5 millimeters. It is easy to lay the product - it is filled with mortar without screed.
Wet installation technology (screed filling)
Rigid non-loadable insulation serves as a substrate; it can be a rolled technical plug with a thickness of 2 mm, foil insulation or izolon.
- The insulating material is cut to the width of the thermal film and placed directly under each strip. Where there are cutouts in the film, they should also be on the substrate.
- A heat-reflecting material is laid on top and a heating element is glued to it with tape.
- The next layer will be plastic wrap.
- To reinforce the sand-concrete screed, a plastic mesh with a cell of 5 * 5 or 10 * 10 mm is laid on the film, which is attached to the primary screed, trying not to damage the thermal film.
- When the mesh is fixed, a thin layer of screed about 5 mm high is applied on top, it should cover only the technological holes.
- A day later, after the screed has dried, you can glue the tiles or porcelain stoneware.
Evgeny Filimonov
Ask a Question
In the installation of a film underfloor heating, due to the lack of grounding, conductive materials should not be used. For example, heat reflectors based on aluminum foil or reinforcing metal mesh.