The underfloor heating system is fundamentally changing the belief of many homeowners that only a radiator can serve as a source of warmth and comfort. Underfloor heating is a system for generating environmentally friendly heat at a decent price.
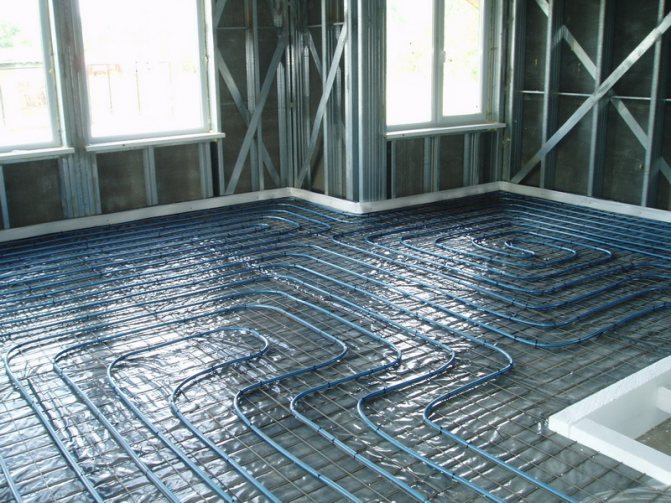
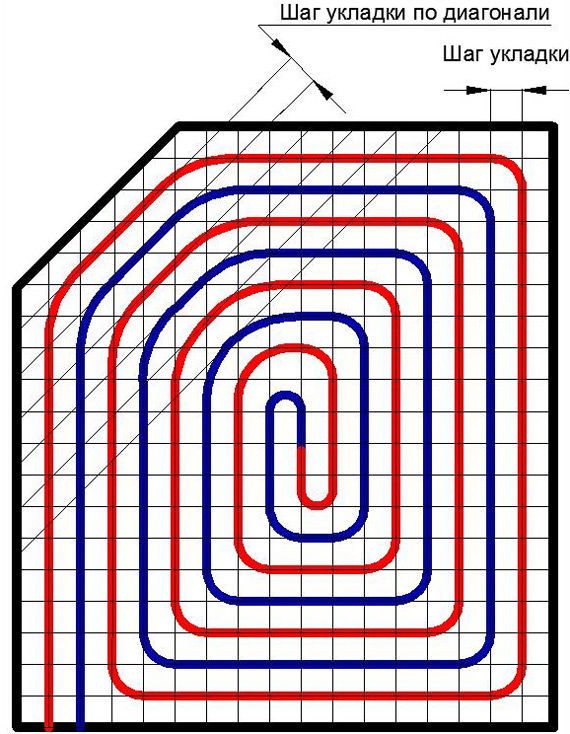
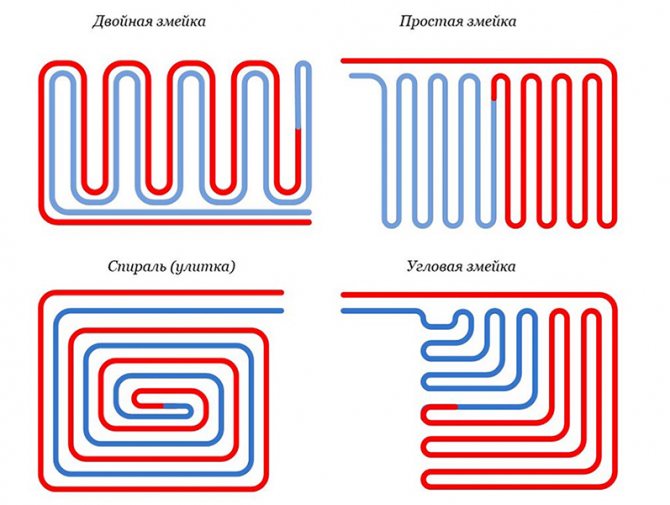
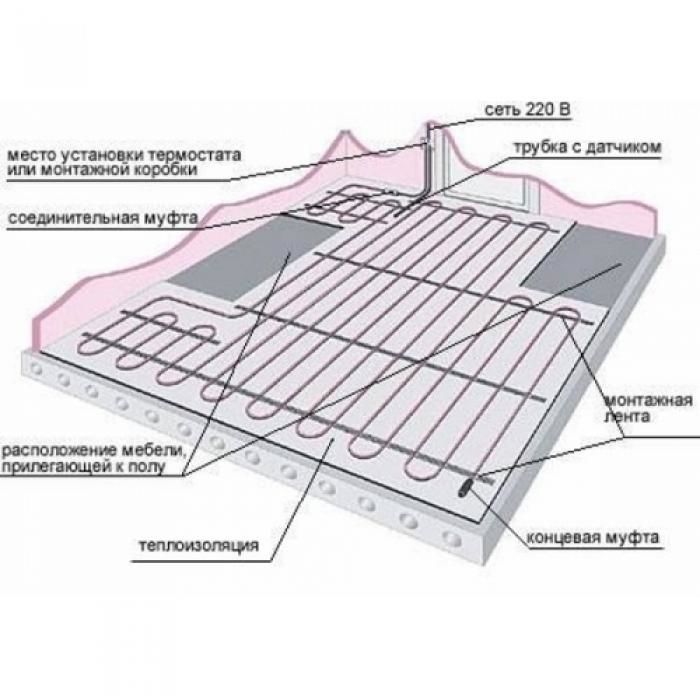
Each scheme for laying the underfloor heating water circuit assumes the use of a maximum area for heating, free of heavy furniture, fireplace, safe, etc. If the area of the room exceeds 40 sq. m, then it is divided into sections. Installation of a water floor pipe in a room or at each site is carried out according to two schemes: a spiral (snail) and a snake. The "spiral" scheme is easier to implement, since the pipes of the circuit are laid with a bend of 90 degrees. In a loop, mounted according to the "snake" scheme, the pipe bend is 180 degrees, which slightly complicates the installation. When heating large rooms, a double snake scheme is used. The heating circuit, created according to one or another scheme, must be laid from a solid pipe, not have overlaps or any damage.
A properly equipped warm floor will be safe for others, work efficiently and provide maximum comfort.
Rules for laying an electric underfloor heating:
- Heating electrical elements should be laid without deviating from the manufacturer's recommendations.
- The heating system must correspond to the recommended power per 1 m2 of floor
- It is forbidden to change the dimensions and subject the heating elements to mechanical stretching during the installation.
- In order not to break the tightness of the heating element, the installation should be carried out very carefully - do not step on it, do not allow sharp objects and debris to fall on it
- Carry out grounding of the cable in accordance with PES and building codes
- Install a thermostat - this will ensure automatic shutdown of the system in case of overheating
- It is forbidden to connect to the network a non-expanded heating element, regardless of its type - a cable in a coil or heating mats and films in a roll.
- Install the system at room temperature not lower than -5 degrees C
The distance between the pipe lines determines both the magnitude of the heat load created by the heat circuit and the uniformity of its distribution on the surface of the clean coating. The step of laying pipe lines is determined based on the accepted pipe diameter (16, 20, 25 mm), and is in the range from 100 to 500 mm. In practice, the step is taken: 150, 300, 400 mm. The optimum size between the pipeline axes for heating loads up to 50 W / m2 is 300 mm. On sections of the floor located along the line of the outer walls, where heat loss is more significant, the pitch of pipes for a warm floor can have a smaller value, 200 mm. For thermal loads of about 80 W / m2, the recommended step size is 150 mm.
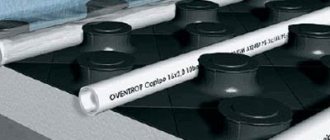
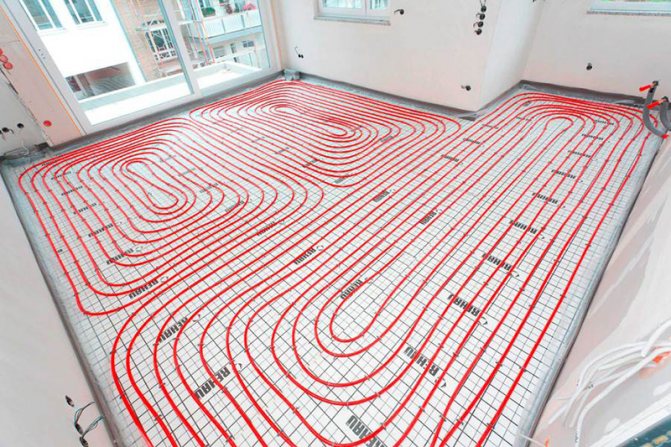
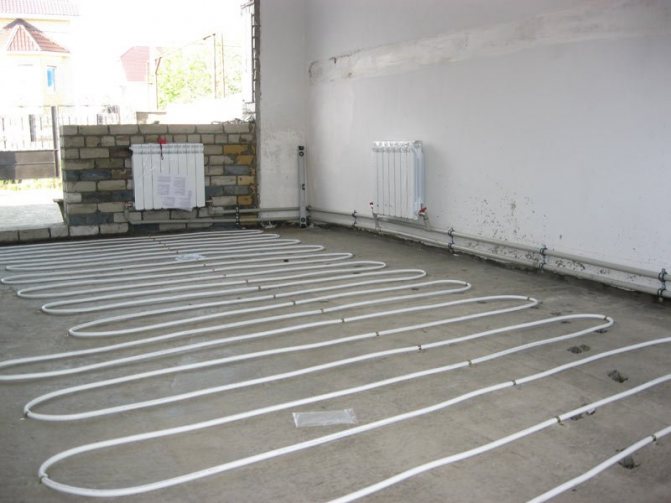
After laying the pipes for the coolant water and laying the damper tape along the perimeter of the walls, the stage of the screed device begins. The screed height above the pipe must be at least 45 mm. The screed, poured between the pipes and aligned with the beacons, must fit snugly against the pipes. Air bubbles are removed with a needle roller. The surface of the dried screed is thoroughly cleaned and tile adhesive is evenly applied. The tiles are laid with a distance of 10 mm from the walls. This is an expansion joint. Subsequently, it is covered with a plinth.
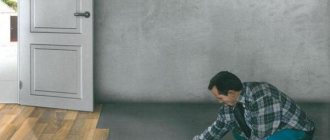
A special category laminate is used as a covering for the warm floor. You can recognize such a laminate by the special icons on the packaging.Before installing the floor covering, it is necessary to turn on the heating and warm up the screed for 72 hours at the maximum temperature for the floor. Turn off the heating 2 days before laying the flooring. On the screed cooled to 18 degrees Celsius, a plastic wrap is laid, which will serve as waterproofing. On top of the film, a gasket (substrate) is laid under the coating - isolon, foam rubber, technical cork. Then comes the laying phase of the laminate.
A layer of heat-reflecting material is laid on a flat and cleaned surface of the base. This layer will prevent heat from going down through the screed. An infrared film is laid on top of the thermal insulation. The sheets are stacked parallel, the overlap of the edges of the sheets is not allowed. Further, either a thin screed is performed with the laying of a polymer mesh, or glass-magnesite or gypsum-fiber sheets are laid on top of the heating film. Then tile glue is applied to the dried screed or sheets, and I lay ceramic or marble tiles.
Arrangement of a floor heating system in an apartment or in a country house allows the owner of a home to completely or partially abandon wall radiators, while increasing the degree of comfort in the premises. And if he has such an opportunity, then it is important to realize it as soon as possible.
Laying scheme for a water-heated floor video
Floor heating began to be used as a full-fledged heating in ancient Rome. Considering that in those days there were no radiators yet, the Romans placed stoves in the basements, heated with wood, which heated the room with warm air. Such heating systems have come to the modern market since the introduction of the technology for the production of plastic pipes, which not only reduced the cost of the heating system itself, but also extended its service life.
The choice of a heating system as a guarantee of comfort
Despite the growing popularity of such designs, most residents of private houses are in no hurry to abandon traditional radiators. Meanwhile, the operation of the underfloor heating system has undeniable advantages. To evaluate them, you need to understand the features of both heating methods.
Of course, alternative heating is not without its drawbacks. But there are very few of them, and they are as follows:
Installation of radiator heating requires careful calculation. The efficiency of such heating depends on many factors, one of which is the height of the radiators above the floor level. It should also be borne in mind that the installation of radiators is carried out in such a way that a certain distance remains between the window sill and the battery, as well as between the wall and the heating device. Therefore, it is very important to choose the correct size of the radiators, otherwise they will have to be changed.
Warm floor: what is taken into account when calculating
To organize the efficient operation of heating, it is necessary to correctly calculate the distance between the pipes of the underfloor heating - the step of laying the pipe. This indicator depends on the coefficient of thermal conductivity of the material from which it is made and its diameter, as well as the place of laying and possible heat loss. An incorrect calculation will lead either to overheating of the surface or to discomfort associated with temperature changes.
Calculation of water floor heating, materials
Coefficient of thermal conductivity
Determining the distance between the loops of the contour must begin with the selection of the main consumable. To do this, you need to determine which pipes best conduct heat and are traditionally used to organize a warm water floor, arranging them in descending order.
The step between pipes made of materials with a high thermal conductivity is always larger. Copper and steel corrugated pipes conduct heat best. However, they are used very rarely in the arrangement of a water-heated floor due to their high cost.And worst of all, polypropylene conducts heat, which is rarely used due to its poor elasticity.
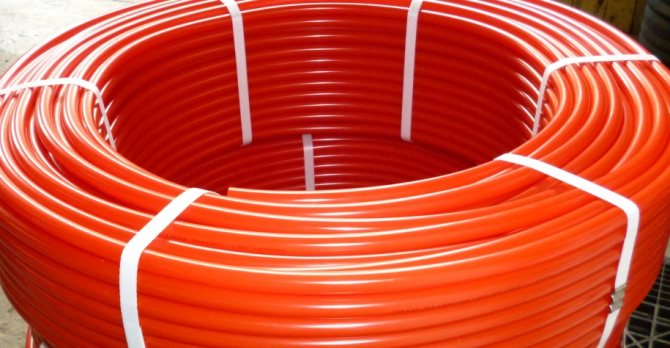
The most popular materials are cross-linked polyethylene and metal-reinforced plastic.
Pipe diameter
The smaller the diameter of the main element of the system, the less you need to make the distance between the loops in the contour. When using a pipe with a larger diameter, the laying step in the contour increases accordingly.
Underfloor heating pipes
Heat loss and location
The step between the loops in the water floor heating circuit can be constant or variable. A constant step is usually observed in industrial premises and in rooms that have strict air temperature requirements, for example, in bathrooms.
- In large industrial areas, as well as swimming pools and water parks, the distance between the hinges should be 20 cm (provided that a consumable with a diameter of 20 mm is used).
- In bathrooms, the laying step should be 15 cm.
- In all other cases, a variable step is used. The minimum distance between the turns is observed along the walls in contact with the street, since it is in these places that the greatest heat loss is observed. As the distance from the outer walls increases, the laying step increases.
- In general, the optimal laying step size is determined based on the calculated heat loss power.
- If the heat loss is less than 50 W / m², the installation spacing in the contour can be 30 cm.
- If the heat load exceeds 80 W / m², then the minimum step is observed.


How to calculate pipe flow
L = S / N * 1.1, which means the following:
- L indicates the length of the pipe;
- S is an indicator that determines the area of the room;
- N is the distance between the loops of the system;
- 1.1 is a coefficient equal to 10%, and indicates the additional flow of the pipe for turns.
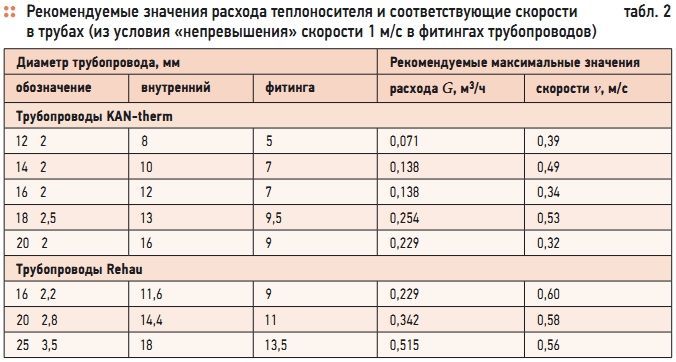
Recommended values of the flow rate of the heating agent and the corresponding speeds in the pipes
Since both ends of the circuit are connected to a collector located on the wall, the length of the supply section should also be included in the calculation - a segment that goes from the collector to the distribution of the water heated floor.
READ MORE: Do-it-yourself garage floor heating
The calculation of the usable area of the premises should be made, adhering to certain rules:
- If you plan to install massive furniture in the room, then you do not need to lay a pipe under it. Otherwise, it will not be possible to calculate the optimal energy consumption. In addition, heating will not affect the furniture itself in the best way.
- The distance from the contour to the walls and interior partitions should be 30 cm.
Installation of a water heated floor
After it was possible to calculate the usable area, you can make the basic calculation, taking into account the rest of the requirements. To understand how much material is required, you can use an illustrative example, which is considered a room with a usable area of 18 m2, a 5 m long supply section (if we take into account that both ends will be connected to it, it will turn out to be 10 m), as well as a laying step equal to 15 cm or 0.15 m.
Total: 18 / 0.15 * 1.1 10 = 142 m.
An increase in the distance between the hinges leads to a reduction in the amount of consumables during the installation of a water-heated floor. In general, the calculation of this indicator is made according to the plan, which is drawn up at the initial stage of work.
Calculation of the cost of underfloor heating
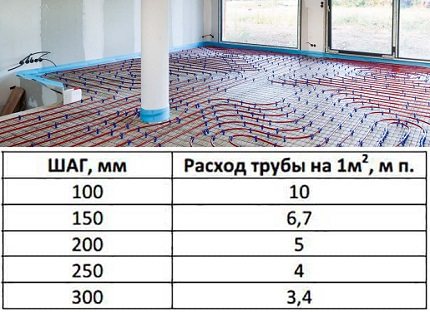
The pipe consumption for 1 m² is calculated based on the distance between the loops.
- With a distance of 10 cm, this parameter will be 10 m p .;
- If this indicator increases to 15 cm, the amount of consumable material decreases to 6.7 m p .;
- 20 cm - 5 m p.;
- 25 cm - 4 m p.;
- With a maximum distance of 30 cm - 3.4 m p.
Combined heating
Each heating method has its own advantages and disadvantages.The use of radiators is more effective in places where cold air traditionally circulates (for example, under windows). In this case, they create a thermal curtain, but provided that a distance of 10 cm is observed between them and the window sill, and the height of the radiator above the floor is 12 cm.
And it is more expedient to use alternative heating in places where, for some reason, the installation of radiators is impossible. These areas include utility rooms, toilets and bathrooms, as well as hallways and corridors.
If the system of a warm water floor is planned to be used as an additional source of heat, during its installation it is necessary to take into account some of the features associated with the operation of radiators.
Installation of a warm water floor is most often done by pouring a concrete screed, which increases the thickness of the floor by several centimeters. In order for the height of the radiators from the level of the finishing coating to be the optimal parameter, their contours should be installed after the installation of underfloor heating.
Video: Simple Secrets of Pipe Laying
Secrets of joint pain treatment from our regular reader.
Hello!
My name is Gennady Alekseevich. I am a stove-maker with over 20 years of experience. I am engaged in both the repair and construction of Russian stoves and fireplaces. I always perform the work very efficiently and carefully, which negatively affects the condition of the joints. With age, the pains started getting stronger, up to the point where I could no longer work. Having tried a lot of both medicinal and alternative methods of treatment, I realized how serious my disease is, since there was no positive effect. Until I came across one tool, which I want to tell you about.
It is a unique blend of the rarest and most powerful natural healing substances. This tool has proven its effectiveness not only for patients, but also for science, which has recognized it as an effective drug. Joint and back pain go away in 10-15 days, studies have shown. The main thing is to clearly follow the instructions in the methodology. You can order the product in its original packaging, with a quality guarantee, at
One of the key components of a warm water floor seems to be pipes, the efficiency and practicality of the built-in heating being organized largely depends on the correct choice and correct layout.
How to choose pipes for a water-heated floor? How to calculate the footage of a pipe? We will talk about this in the article.
Having caught fire with the idea of the main or additional heating of a room or dwelling as a whole, it is worth choosing pipes underneath as responsibly as possible. The idea that it is quite possible to get by with leftovers and scraps, cheaper material, should immediately be swept aside.
The level of comfort in the home, the economy of the system, its durability and reliability ultimately depend on the quality, parameters and correct calculation of the components.
Not every option is able to satisfy a number of requirements due to the very specifics, as well as the operation of the selected heating system:
The durability of the heated floor system, usually laid under the screed, should be commensurate with the life of the building itself, at least until it is overhauled. Despite the fact that today there are methods for installing circuits without, the screed is preferable, since it provides more reliable protection to pipes from damage, as well as softer, more uniform heating, distribution and heat transfer.
In order to reduce the hydraulic resistance of the system, increase the efficiency of its operation, experts recommend adhering to the relationship between the pipe diameter for a warm water floor and the length of the circuit:
- 16 mm
- the maximum pipe length for a warm water floor (for 1 circuit) within 60-70 m; - 20 mm
- up to 80-90 m; - 25 mm
- up to 100-120 m.
The greater the distance between the pipes of the water-heated floor, or the step in each circuit, the larger the pipe diameter is chosen.
In calculating how many pipes a warm water floor will require, it is necessary to determine the number of circuits. There is a rule according to which the area heated by the circuit should not exceed 20 square meters. If the area of the room is larger, several contours should be organized.
What pipes to use for a warm water floor?
In the construction market, the following types of pipes for a warm water floor are available to the consumer, characterized by their advantages and disadvantages:
Pipe calculation method
In order not to get confused in the calculations, we propose to divide the solution of the issue into several stages. First of all, it is necessary to assess the heat loss of the room, determine the laying step, and then calculate the length of the heating circuit.
Circuit design principles
Before starting calculations and creating a sketch, you should familiarize yourself with the basic rules for the location of the water circuit:
- It is advisable to lay pipes along the window opening - this will significantly reduce the heat loss of the building.
- The recommended area of coverage with one water circuit is 20 sq. m. In large rooms, it is necessary to divide the space into zones and lay a separate heating branch for each.
- The distance from the wall to the first branch is 25 cm. The permissible pitch of pipe turns in the center of the room is up to 30 cm, along the edges and in cold zones - 10-15 cm.
- The determination of the maximum pipe length for underfloor heating should be based on the diameter of the coil.
For a circuit with a cross section of 16 mm, no more than 90 m is permissible, the limitation for a pipeline with a thickness of 20 mm is 120 m. Compliance with the standards will ensure normal hydraulic pressure in the system.
The table shows the approximate flow rate of the pipe, depending on the loop pitch. To obtain more accurate data, you should take into account the headroom for turns and the distance to the collector.
Basic formula with explanations
The calculation of the length of the underfloor heating circuit is carried out according to the formula:
L = S / n * 1.1 + k,
Where:
- L - the required length of the heating main;
- S - covered floor area;
- n - laying step;
- 1,1 - standard factor of 10% bend margin;
- k - remoteness of the collector from the floor - the distance to the distribution of the circuit at the supply and return is taken into account.
The coverage area and the pitch of the turns will play a decisive role.
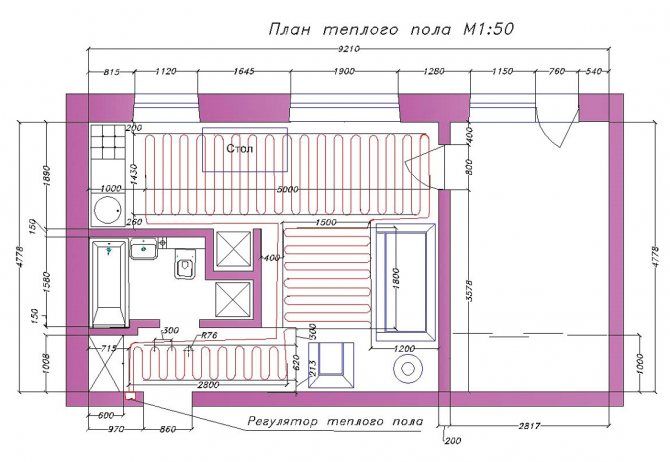
For clarity, on paper, you need to draw up a plan of the room indicating the exact dimensions and indicate the passage of the water circuit
It should be remembered that the placement of heating pipes is not recommended under large household appliances and built-in furniture. The parameters of the designated items must be subtracted from the total area.
To select the optimal distance between the branches, it is necessary to carry out more complex mathematical manipulations, operating with the heat loss of the room.
Thermal calculation with the determination of the contour step
The density of pipes placement directly affects the amount of heat flow emanating from the heating system. To determine the required load, it is necessary to calculate the heat consumption in winter.
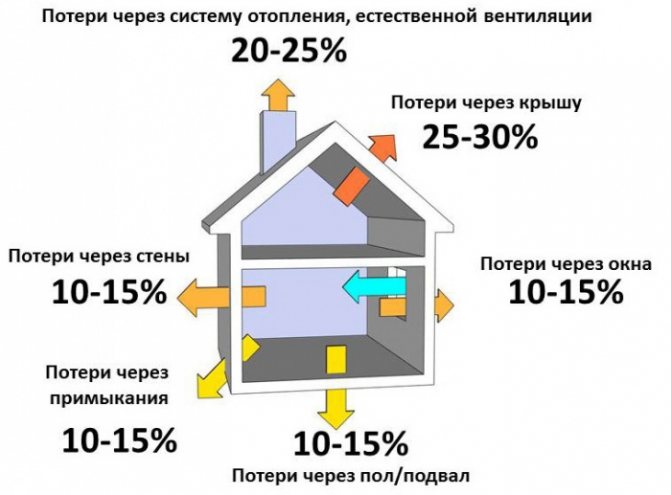
Heat costs through the structural elements of the building and ventilation must be fully compensated for by the generated heat energy of the water circuit
The power of the heating system is determined by the formula:
M = 1.2 * Q,
Where:
- M - performance of the circuit;
- Q - general heat loss of the room.
The value of Q can be decomposed into components: energy consumption through the enclosing structures and costs due to the operation of the ventilation system. Let's figure out how to calculate each of the indicators.
Heat loss through building elements
It is necessary to determine the heat consumption for all enclosing structures: walls, ceiling, windows, doors, etc. Calculation formula:
Q1 = (S / R) * Δt,
Where:
- S - element area;
- R - thermal resistance;
- Δt - the difference between indoor and outdoor temperatures.
When determining Δt, the indicator for the coldest season is used.
Thermal resistance is calculated as follows:
R = A / Kt,
Where:
- AND - layer thickness, m;
- CT - coefficient of thermal conductivity, W / m * K.
For combined elements of a structure, the resistance of all layers must be summed up.

The thermal conductivity coefficient of building materials and heaters can be taken from a reference book or viewed in the accompanying documentation for a specific product
We have given more values of the thermal conductivity coefficient for the most popular building materials in the table contained in the next article.
Ventilation heat loss
To calculate the indicator, the formula is used:
Q2 = (V * K / 3600) * C * P * Δt,
Where:
- V - the volume of the room, cubic meters m;
- K - the frequency of air exchange;
- C - specific heat capacity of air, J / kg * K;
- P - air density at normal room temperature - 20 ° С.
The air exchange rate in most rooms is equal to one. The exception is houses with internal vapor barrier - to maintain a normal microclimate, the air must be renewed twice an hour.
Specific heat is a reference indicator. At standard temperature without pressure, the value is 1005 J / kg * K.
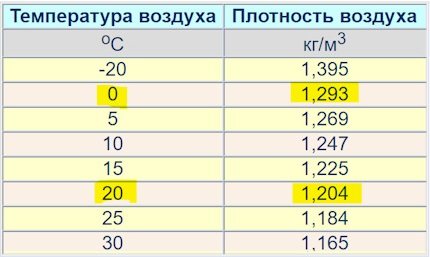
The table shows the dependence of air density on ambient temperature under atmospheric pressure - 1.0132 bar (1 atm)
Total heat loss
The total amount of heat loss in the room will be equal to: Q = Q1 * 1.1 + Q2... Coefficient 1.1 - an increase in energy consumption by 10% due to air infiltration through cracks, leaks in building structures.
Multiplying the resulting value by 1.2, we obtain the required power of the warm floor to compensate for heat loss. Using the graph of the dependence of the heat flux on the temperature of the coolant, you can determine the appropriate pitch and pipe diameter.
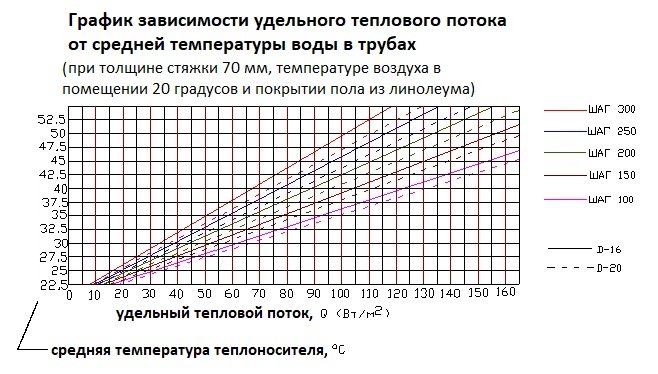
The vertical scale is the average temperature regime of the water circuit, the horizontal scale is the indicator of heat production by the heating system per 1 sq. m
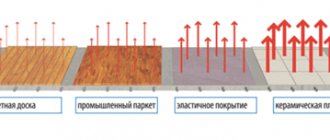
The data is relevant for underfloor heating on a sand-cement screed with a thickness of 7 mm, the coating material is ceramic tiles. For other conditions, the values must be adjusted to take into account the thermal conductivity of the finish.
For example, when laying carpet, the temperature of the coolant should be increased by 4-5 ° C. Each additional centimeter of the screed reduces heat transfer by 5-8%.
Final choice of contour length
Knowing the pitch of the coils and the area to be covered, it is easy to determine the pipe flow rate. If the obtained value is greater than the permissible value, then it is necessary to equip several circuits.
It is optimal if the loops are of the same length - there is no need to adjust or balance anything. However, in practice, it is more often necessary to break the heating main into different sections.
The scatter of the contour lengths should remain within 30-40%. Depending on the purpose, the shape of the room can be "played" with the loop pitch and pipe diameters
Calculation before laying
It is necessary to decide on. There are 2 main options - snake and snail (spiral). Further, on graph paper, taking into account the size of the room on a scale, a diagram of the layout of the contours is drawn up. The calculations will most likely have to be done several times. Therefore, in the calculation of pipes for a warm floor, an online calculator will be able to provide invaluable help.
The diagram should include the location of the furniture. It is impractical to arrange built-in heating under large heavy furniture.
The distance from the wall to the first thread is 20 cm or more. It is possible to determine what is the distance between the pipes of a water-heated floor (step) based on the size of the diameter, as well as the required heat transfer, taking into account the total heat loss of the room and the purpose of the system (additional, main).
In order to avoid uneven heating and cold zones, the pipe pitch for a warm water floor should not exceed 35 cm. 16 mm diameter is enough for normal heating up to 15 cm of the surface in both directions.
How to calculate the length of the pipe for a warm floor
Today it is difficult to imagine a country house without floor heating. Before starting the installation of heating, it is necessary to calculate the length of the pipe that is used for the warm floor. Almost every country house has its own heating system, the owners of such houses independently install a water floor - if this is provided for by the layout of the premises. Of course, it is possible to install such a warm floor in apartments, but such a process can bring a lot of trouble to both apartment owners and employees. This is due to the fact that it is impossible to bring a warm floor to the heating system, and it is problematic to install an additional boiler.

The size and shape of a pipe for a warm floor can be different, therefore, in order to understand how to calculate a warm floor, you need to understand in more detail the system and structure of such a system.
The main parameters affecting the determination of the pipe layout pitch
The distance between the underfloor heating pipes is determined based on the following parameters, which are the main ones:
- room area;
- the type and diameter of pipes used in the heating system;
Determining the area of the room
Area = width * length.
Experts recommend reducing the resulting figure by the area occupied by large furniture. Heating the floor under the furniture is not advisable, as it can lead to deformation, and reducing the area will save money required for arranging the floor.
Taking into account the results obtained, it is possible to determine the most optimal step for laying the turns of the pipeline.
Influence of the species
The pitch of the pipes of a water-heated floor is also determined based on the material of the product, or rather on the coefficient of its thermal conductivity, and the pipe.
Copper and corrugated stainless pipes have the highest coefficient value. Further, the decrease of the considered parameter occurs according to the following scheme:
- polyethylene;
- polypropylene.
That is, the lowest heat transfer coefficient is possessed by polypropylene pipes, which are recommended to be used for organizing the heating system only in exceptional cases.
The higher the heat transfer coefficient, the greater the distance the pipes can be laid and vice versa. Thus, the smaller the pipe diameter is used, the smaller the laying step should be.
The relationship between the step and the temperature of the coolant is presented in the table.
For a certain pipe diameter, the laying step should be the higher, the higher the average temperature of the coolant in the system.
The most popular are pipes with a diameter of 16 mm. In this case, the laying step is 250 mm - 300 mm in a living room, 100 mm - 150 mm in a bathroom and 300 mm - 350 mm in rooms for other purposes.
Determining the length of the contour
First, you need to decide what a warm floor contour is. This definition refers to a pipe through which a single heat flow moves. The calculation of its length is influenced by the following parameters:
- material used in the manufacture of the pipe;
- pipe diameter.
Calculation of the length for a water-heated floor
Features of installing a water-heated floor in a wooden house
- The most common cross-sectional diameters of metal-plastic are 16 and 20 mm. In the first case, the maximum loop length is 100 meters. However, the optimal length is 80 meters. In the second case, this value can be from 120 to 125 meters.
- The most common diameter for XLPE is 18 mm. In this case, the length of the contour can reach 120 meters.However, the optimal recommended length is limited to 80-100 meters.
Extra options
Among the additional parameters that affect the distance between the pipes of a warm water floor, one can single out:
- the customer's wishes about the average temperature in the heated room;
- method of laying the pipeline.
Indoor temperature
The comfortable temperature for living in various rooms has been determined by experts.
The data from the table are determined for central Russia, where the temperature rarely drops below 30 ° C in the cold season. For the northern regions, the presented indicators are recommended to be increased by 2 ° C - 4 ° C.
Any customer can increase or decrease the temperature in the heating system at will. To do this, when installing the floor, it is enough to reduce or increase the pipe laying spacing, respectively.
Calculation rules and styling options
The material consumption and thermal efficiency of the finished system directly depend on the chosen method of installation.
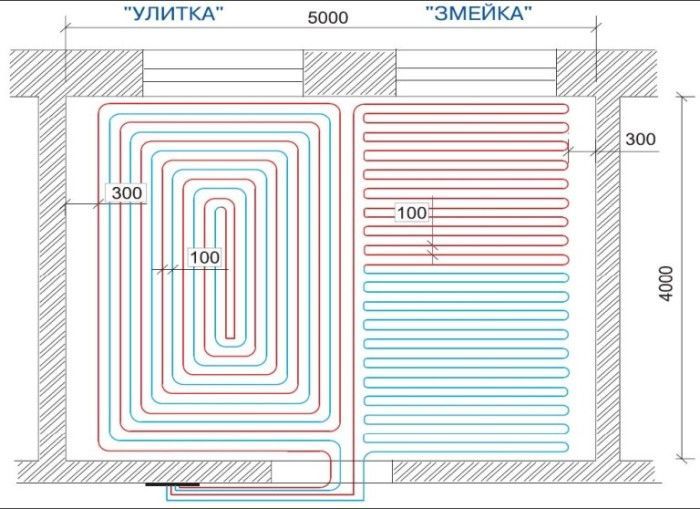
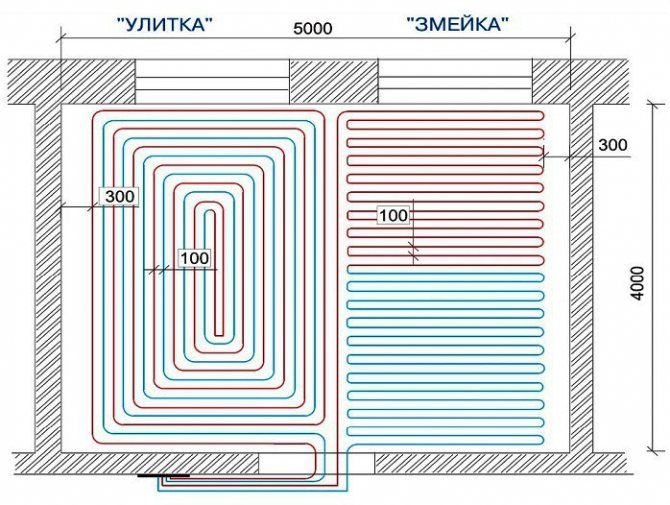
There are three ways of placing pipes: snake, snail and combined.
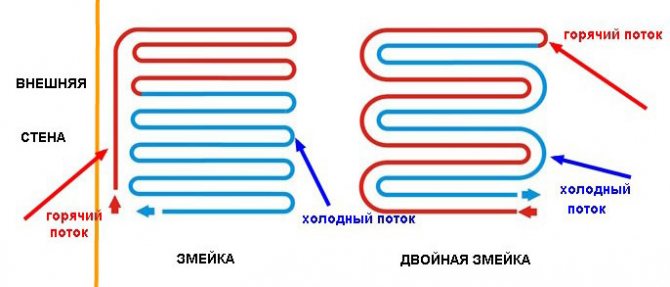
Snake
The method is distinguished by simplicity of calculations and ease of installation, which makes it very popular. This scheme is best suited for industrial buildings, premises with low heat loss and facilities that require year-round heating.
We recommend that you familiarize yourself with: The height of the ventilation ducts above the roof: 5 factors affecting the calculation
Note! The value of the maximum temperature in the room is regulated by SNiP, and is + 25 ° С for objects with constant presence of people and + 32 ° С - with periodic ones.
The main disadvantage of this installation method is the tangible temperature difference in different parts of the floor. In addition, pipes are often bent at sufficiently large angles, which makes it difficult to implement projects with a small pitch. The use of a steel spring will help to partially solve this problem, which is pulled over the place of the future bend, and prevents the formation of a kink.
Snail
There is also the designation "spiral" or "shell". In such a scheme, the temperature field is distributed over the floor surface more evenly, since the pipes of the direct and reverse circuit are laid alternately.
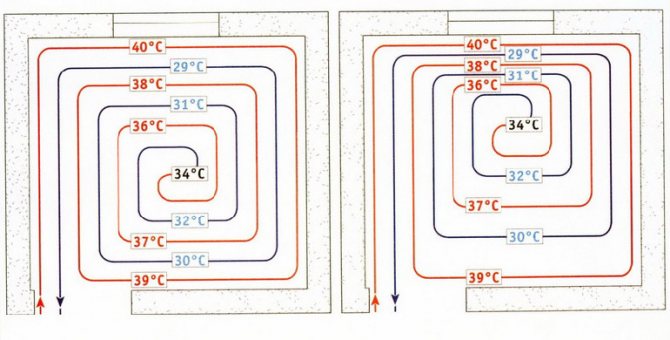
The pipes are placed in parallel and mounted from the walls towards the center. In the middle of the room, the supply line ends with a loop that turns into a return circuit, which, on the contrary, goes from the center to the collector.
The advantages of this styling method:
- Uniform heating of the room.
- Absence of sharp bends and, as a result, low hydraulic resistance.
- Reduced consumption of pipe material.
This method is considered the most time consuming in design and for practical implementation.
Combined method
As a rule, this installation method is chosen for large rooms, the floor surface of which is divided into separate zones. At the same time, for each zone, the optimal way of placing the pipes is selected: in the area of windows, doors and around the perimeter - with a snake, in the center of the room - with a spiral.
Pipes are laid using a flat or concrete method:
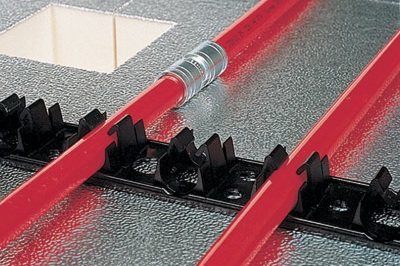
- In the first case, ready-made slats or modular panels are used, equipped with grooves and posts for convenient fixing of pipes. After the pipes have been laid, the structure is covered with gypsum fiber boards and flooring. Despite the convenience and speed of installation, this method has not yet become widespread.
- Installation in a concrete screed will take much longer. It will take at least 28 days to dry and harden the concrete layer alone (depending on the thickness of the layer).
We recommend that you familiarize yourself with: PVC-U pipe for arranging outdoor sewerage
The screed laying procedure is performed in the following sequence:
- Waterproofing layer. Fits into the lower part of the structure, prevents the formation of condensation.
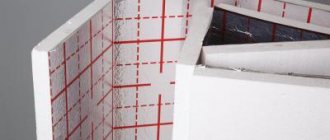
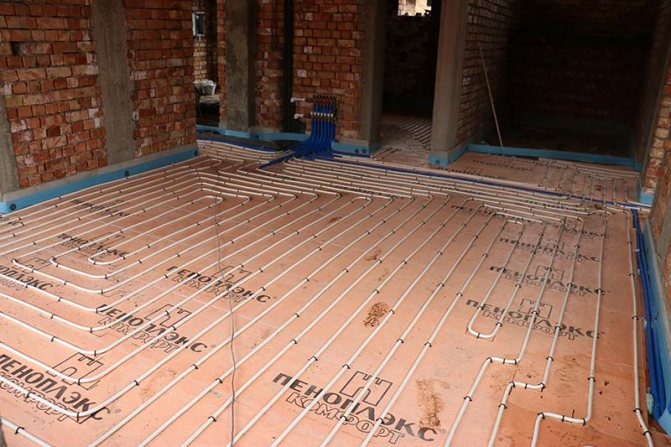
- Thermal insulation.Any sheet of heat-insulating material will do. Its task is to prevent heat leakage downward, and the thickness of the layer is determined in accordance with the external climatic conditions.
- Foil film. Redirects the maximum volume of warm air into the room, saving on heating agent consumption.
- Reinforcing mesh. Provides the screed with the necessary strength.
- Pipeline installation. One or more circuits through which the coolant circulates.
- Control tests. A coolant is supplied to the mounted system.
- Screed. Filling the finished pipeline with a cement-sand mixture. The layer thickness usually does not exceed 35-50 mm.
- Flooring. The best indicators of heat transfer are shown by ceramic tiles.