Home comfort is largely due to the microclimate that prevails in the house. However, the central heating system does not always allow to create the desired conditions, therefore, often the best solution is a warm floor system, which effectively copes with its task even in severe cold, providing fast and high-quality heating. The room warms up most evenly, in apartments on the ground floors this is a real salvation. In this article, you will learn how to properly connect a water-heated floor to central heating using a plate heat exchanger.
The device of the heat exchanger as an intermediary
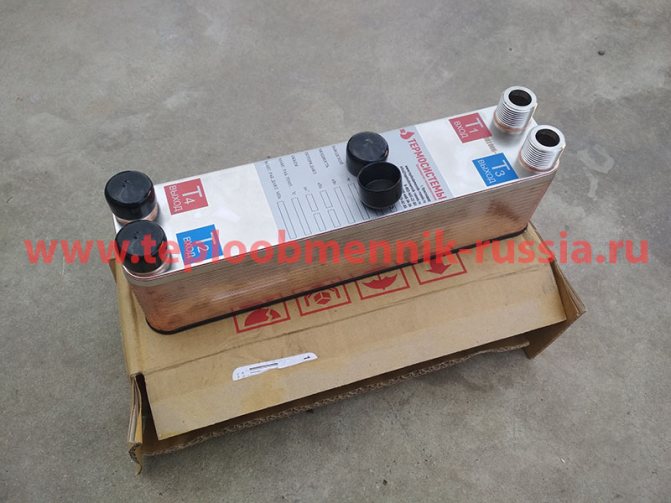
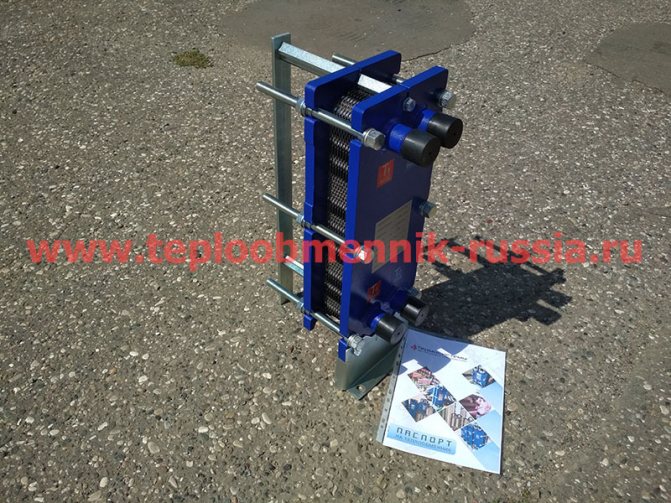
But first, let's take a closer look at exactly how it works. So, heat exchangers of this type are divided into non-separable (brazed) and collapsible, they are made from a variety of materials. Steel and brass are suitable for use under high pressure. Copper versions are used with great success in the beer industry, they are convenient for sharp cooling of beer, there is no high pressure, but a good rate of thermal conductivity is needed, which this non-ferrous metal possesses. Therefore, this heat exchanger is suitable for connecting a hot water floor to central heating.
In general, such heat exchangers have a wide range of applications, they are successfully used in cooling systems, heating, when working with chemicals, together with solar collectors when connected to a boiler and also when connected water underfloor heating to central heating.
The nuances of installing a warm floor without a mixing unit

In some cases, installation of a collector for a warm floor is not justified.
The main disadvantage of installing a system without a collector is the need to minimize the loss of the coolant temperature on the path "coolant heater - pipeline" and in the system itself. You also need to maintain the required temperature on the floor area. Therefore, it is recommended to consider the following requirements:
- Insulation of the walls of the room;
- Laying thermal insulation on the floor;
- Availability of high-quality window systems;
- Laying the floor in the immediate vicinity of the heating element;
- The area of the room is no more than 20-25 m2.
The main and common mistake when installing such a system without a collector assembly is an attempt to install it on too large an area.
Important! It is necessary to calculate the length of the circuit and its circuit so that the return temperature of the heating medium is not too low. Otherwise, a large amount of condensate will form on the boiler heat exchanger, which will lead to a quick breakdown of the device.
However, some masters argue that in a situation where the "return" in any case will be cold, the installation of a condensate boiler can save. It has a high efficiency and such a device is not afraid of low temperatures for heating.
What is a heat exchanger for?
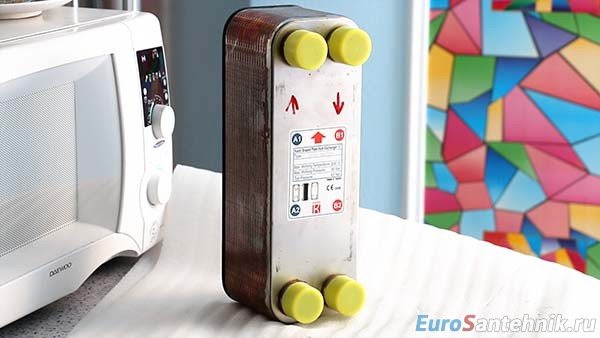
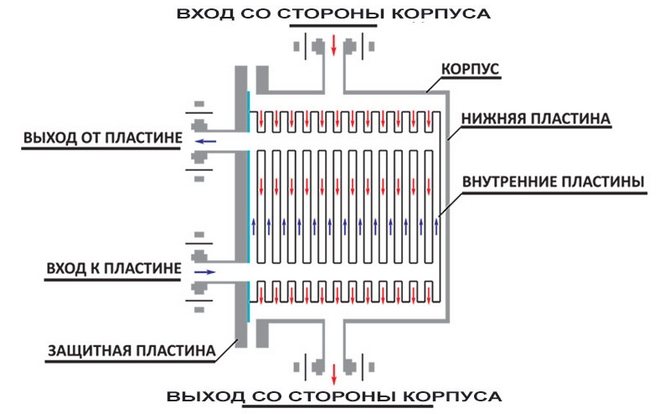
Consider a non-separable plate heat exchanger. There are four outputs on the body, that is, two circuits. The device divides flows according to pressure, temperature, etc., can be used for cooling, however, we need it for heating in order to ensure the correct connection of underfloor heating. This system is connected to one circuit, and CHP is connected to the other. Direct connection of a water underfloor heating to central heating may be associated with the danger of a quick failure of underfloor heating, since high temperatures, strong pressure are characteristic of the heat carrier of a CHP plant, there are also special chemicals and a lot of debris... All these factors clearly will not contribute to the extension of the service life of underfloor heating.
So, the heat exchanger allows you to create at home an autonomous floor heating system with uncontaminated water and optimal pressure. On one side of the plate, there is dirty water from the CHP plant with high pressure, and on the other - clean water from our autonomous system with low pressure. Such a plate provides a clear hermetic separation, high-quality heat transfer, mixing of streams is completely excluded. The number of such thin plates determines the power characteristics of the heat exchanger.
Installation instructions for underfloor heating
If you have settled all the questions regarding the laying of the "pie" and the choice of the wiring diagram, you can proceed to pouring the heating plates. First, find out the required heat output of the circuits, the diameter and distance between the pipes, using our instructions.
Level the surface and carefully remove debris before installation. When installing a screed on the ground, prepare a tamped sand cushion or foundation 4 cm thick.The technology of pouring a monolithic warm floor looks like this:
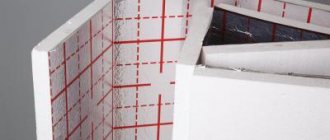
- Perform waterproofing from sheets of film, laid out over the entire area of the room with an overlap of 100-150 mm. Glue the joints with good quality tape, along the edges, make gaps on the walls up to the level of the future clean floor.
- Cover the lower part of the walls in contact with the screed with damper tape around the entire perimeter, as shown in the photo. The overlap of the waterproofing film must remain on top of the strip.
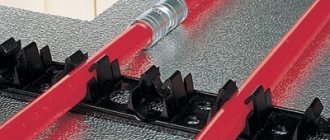
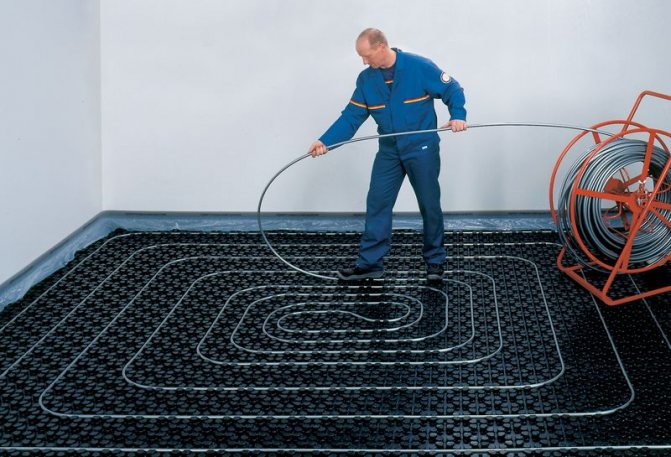
A damper strip is glued to the walls, and an expansion joint is arranged between the monoliths - Lay the insulation boards tightly against each other. Unrolling the coil and straightening the pipe, unfold the loops of the heating circuits with the required pitch. Fixation of the pipeline to the insulation is done with plastic brackets at intervals of 35-40 cm.
- Bring the ends of the loops to the connection point - the collector or radiator heating lines. Before the final assembly of the circuit, fill the circuit with water, expel the air and check the tightness with a pressure of 3-4 bar.
Note. If you intend to pour a thin screed (6 cm), lay a reinforcing mesh on top of the polystyrene plates. Do not connect pipes inside the future monolith - put only solid ones, without joints.
Leaving the hinges filled with water (so as not to float and crumple under the weight of the concrete), make a cement-sand mortar from the ready-made dry mix for floors and fill the screed. Continue working after about 4 weeks - that much is required for complete hardening. The technology of installing a floor heating system without a cement screed is described in detail in our other publication.
Selection of a heat exchanger for connecting a CHP
In order to choose the right heat exchanger for connecting a water-heated floor to central heating, you need to determine the degree of contamination of the coolant in order to understand how much water needs to be purified. If the plaque is small, then a coarse filter that retains chips and scale will be enough. Such a filter can be cleaned with special means if after some time it becomes dirty and requires cleaning.
Each heat exchanger must have information about the type of product, the manufacturer, the maximum and test pressure, the maximum operating temperature, the mounting location diagram, the designation of the contours, which can be located both diagonally and in the vertical plane, is mandatory. A special arrow shows the direction of installation of the product, that is, in which exact position it should be installed. It is important to understand how the coolant flows out. The circulation itself is carried out by the so-called circulation pump.
On the diagram in the passport, you can usually find how to properly carry out the installation.For example, one of the options is to press the product to the wall with a fixing tape or console and, using a special corner, screw it on. Filters are mandatory, at least a coarse filter is required.
Underfloor heating without a pump - inkmilk.ru
21.08.2017
Dear! I would like to make warm floors on three floors of the cottage. At the same time, it is necessary to do with domestic boilers and do not rely on electricity: pumps, servos, sensors, electric ignition, etc. Is this possible, did anyone do it and what kind of rake could it be? I plan to use a 20mm metal-plastic pipe, a two-inch main riser (which is from the boiler) and a regular domestic AOGV-23.
The house must be warm - foam concrete blocks + facing, double-glazed windows 2-chamber. Heated area of about 170 sq.m
K-19 May 04, 2003
Hello! I have to upset you. in the form indicated by you, the heating system WILL NOT work properly. It will take a long time to explain what will happen, but it is enough that the boiler will constantly operate according to temperature, having worked at most for a minute. Trust me, it's checked! That is, only a circulation pump. But then AOGV (of any number) will work under increased pressure. Your static pressure will already be about 0.8, the pump will create a head of 0.4. 0.8. and all aogvshki work only up to 1 kg / cm2. Then they break, with all the ensuing consequences. One more nuance. when using underfloor heating and natural circulation (without a pump), there is a very high probability of air locks in the system, and it will be VERY problematic to remove air. In my practice, there was a similar case. At the very beginning of winter, the client came running with a request to put in the pump.
Good luck!
Thank you for answering my question about warm floors.
I have three more questions:
1. If AOGV cannot withstand the pressure, what would you recommend which is not too expensive boiler suitable for work with a pump? Friends recommend Ferroli or Bosch. It is interesting to know your opinion.
2. Is such a construction of the system based on AOGV possible: the boiler at the inlet and outlet is muffled by ball valves; an ordinary (non-diaphragm) expansion tank is muffled by a valve; there is a membrane-type tank (for which - see below); a circulation pump is connected by a bypass (in parallel with the boiler, but BEYOND the taps that shut off the boiler); the pump turns on at full speed for the Nth time to "knock out" the air from their system; air is removed through special. valves at the top of the system; the pump stops; a conventional expansion tank is muffled; the boiler is also muted;
the system is ready for natural circulation.
All fictions are only due to the fact that I am afraid to freeze myself and freeze the system if the electricity is cut off for a long time in winter. Therefore, I am afraid to install a boiler that does not work without electricity.
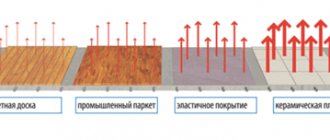
3. I am planning to lay parquet in the rooms and am afraid that the wood will interfere with the full heating of the air from the warm floor. I expressed these considerations to my comrade, who will decorate the premises. He proposed a tried-and-true option (in his practice), when a 33x33cm tile is laid on the floor along the perimeter (or only along the outer walls) of the room, along which a pipe with a coolant passes in a loop. Something like a recumbent radiator is formed with a rather large heat-emitting area and decent thermal conductivity inherent in ceramics. Naturally, the temperature of such a "radiator" will be noticeably higher than t of the surface of a "classic" warm floor. What is your opinion about such a heating design? My house should be quite warm: gas silicate walls + cladding.
Regards, Dada Sasa - dada sasa
Plumbers Forum - Water Supply and Heating - 8 (912) 66-88-912
Alexander- »01 Feb 2020, 10:34
please tell me - there is a gas boiler in the apartment, radiator heating. connection diagram two-pipe polypropylene 25 mm. the number of radiators 6 pcs. the length of the route in one end is 18 m.
In general, this is possible, but some peculiarities should be taken into account:
In order to have sufficient circulation of the heat carrier (taking into account the pressure) over the warm water floor, it is necessary to make a short circuit within 30-50 meters. It is still in question what kind of pressure the main pipeline will give you, depending on the entire system.
Such heating is acceptable, but does not give good control of the temperature of the warm floor. There is a way to control the temperature using a thermal valve on the return line. Discussed: viewtopic.php? F = 2 & t = 82
Engineer Posts: 1215 Joined: 16 Oct 2014 14:18
Alexander- »03 Feb 2020, 13:09
I drew a diagram of my heating now. I showed it where it is possible to put a mixing unit with combs. I can convert the system to Leningrad, and loop the last radiator. On the comb, 4 branches are obtained - a corridor with a kitchen, a bedroom, a nursery, a hall. I can more accurately calculate the total area underfloor heating, but I think, taking into account the furniture, 25-30 squares will come out. in general, I would probably like to divide the radiator and so on. In the summer, I turned off the radiators and so it works. the apartment has wooden floors, the floor is wooden. I removed the rustic floor in one room, leveled the lags and reduced the distance between them to 300 mm. I covered it with expanded clay, I plan sewn polyethylene on top of it. With foil wrapping, then another layer of gas fire and laminate on top. It turns out 4 layers of gas fire and laminate. Comment on, since there is not enough experience in building on the GSP. I also wanted to ask if you wereher radiators? How do you read the diameter of the washer? can there be a table?
I drew a diagram of my heating now. I showed it where it is possible to put a mixing unit with combs. I can convert the system to Leningrad, and loop the last radiator. On the comb, 4 branches are obtained - a corridor with a kitchen, a bedroom, a nursery, a hall. I can more accurately calculate the total area warm floor, but I think, taking into account the furniture, 25-30 squares will come out.
I agree that Leningrad (one-pipe) is better. After the last radiator, put the cooled coolant into a warm water floor. after underfloor heating into the boiler. You will kill two birds with one stone at once. It is necessary to take into account bypasses to maintain costs if the warm water floor is overlapped.
Engineer Posts: 1215 Joined: 16 Oct 2014 14:18
in general, I would probably like to separate the radiator and so on. that in the summer I turned off the radiators and so it works.
This is not a problem with a Leningrad woman. Make bypass pipes with taps.
Engineer Posts: 1215 Joined: 16 Oct 2014 14:18
Installation of a water underfloor heating without mixing unit
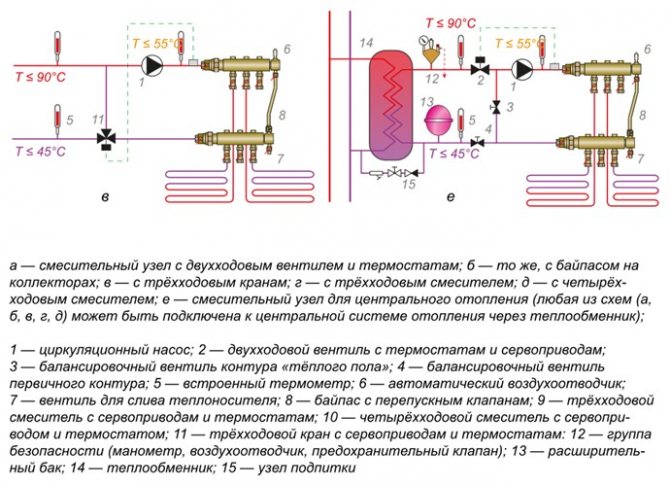
A mixing unit, or collector, in a warm water floor system is needed to adjust the temperature of the coolant. The latter is heated by the boiler according to the parameters set by the device program. Typically, the supply temperature of the heating medium is 55 ° C. This is enough for the warm floor to warm up to a temperature of 30 ° C. This is the most comfortable value for the cold season.
In the presence of a collector, the high supply temperature does not matter - the mixer itself will lower it to the desired value by mixing in cold water. Accordingly, if a water floor without a collector is planned, then the coolant must be supplied at a predetermined temperature, from which it can be concluded that a separate boiler must be installed for a warm floor without a mixing unit.
Thus, for individual radiator heating, you need a second boiler or a centralized common-house radiator system.According to state regulations, the temperature of the coolant supply to the radiators is on average 70-80 ° C, which is 20 ° C higher than the required for a warm floor.
The nuances of installing a warm floor without a mixing unit
In some cases, installation of a collector for a warm floor is not justified.
The main disadvantage of installing a system without a collector is the need to minimize the loss of the coolant temperature on the path "coolant heater - pipeline" and in the system itself. You also need to maintain the required temperature on the floor area. Therefore, it is recommended to consider the following requirements:
- Insulation of the walls of the room;
- Laying thermal insulation on the floor;
- Availability of high-quality window systems;
- Laying the floor in the immediate vicinity of the heating element;
- The area of the room is not more than 20-25 m 2.
The main and common mistake when installing such a system without a collector assembly is an attempt to install it on too large an area.
Important! It is necessary to calculate the length of the circuit and its circuit so that the return temperature of the heating medium is not too low. Otherwise, a large amount of condensate will form on the boiler heat exchanger, which will lead to a quick breakdown of the device.
However, some masters argue that in a situation where the "return" in any case will be cold, the installation of a condensate boiler can save. It has a high efficiency and such a device is not afraid of low temperatures for heating.
Methods for installing a warm floor without a collector
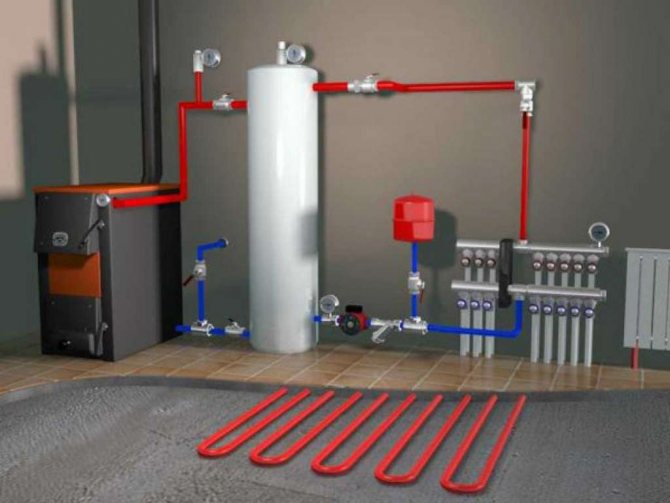
Installation diagram of underfloor heating without mixing unit
You will need the following materials and devices:
- Pipeline;
- Accessories for the pipeline;
- Boiler;
- Three-way thermostatic valve;
- Pump assembly.
Some are trying to use the simplest installation method - to embed the underfloor heating system directly into the central heating system. However, this approach threatens with serious pipeline breakdowns. the temperature for the radiators is much higher than that for the floor. Also, upon detection of such a "self-made device" by the supervisory authorities, the apartment owner is threatened with serious penalties and an order to completely dismantle the warm water floor.
There are two preferred options for laying the pipeline without a collector: a snail and a snake. Moreover, both schemes should consist of a double pipeline: 2 parallel loops on a warm floor - supply and return.
The advantage of the "snake" is that you can distribute heating zones. For example, bypass furniture or plumbing. The advantage of the "snail" is a more uniform heating of the entire area.
After laying the pipeline, it must be connected to the boiler. First, it is necessary to calculate the pump power. The following formula is used:
where G - system capacity (l / h),
Q - system power (W),
0.86 - conversion factor to Kcal / h,
Δt - temperature difference "supply-return" (° C).
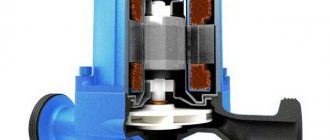
The pump is needed to ensure the speed of movement of the coolant through the pipes. Depending on the type of pump, it can be controlled either manually or automatically. The device is mounted on the supply pipeline. In a system without a mixing unit, the pump device is located under the boiler. The circuit between the piping with the pump and the boiler is closed by a three-way thermostatic valve.
In order for the warm floor to work stably without installing a mixing unit, you should choose a high-quality powerful boiler. Electric or gas - does not really matter. The main thing is that the power of the device is designed specifically for the designed warm floor. Masters recommend choosing models with a pump.
Valve installation for a system without a manifold
The valve is installed on the pipe with the supplying heat carrier, a jumper is mounted to the return flow. The purpose of the three-way thermostatic valve is to regulate the temperature of the heating medium supplied to the pump.In fact, this is a mixer, inside of which a thermosensitive element is located.
The valve protects the system from overheating, and in the event of a breakdown and interruption of the return flow, it automatically shuts off the supply. The valve also eliminates the possibility of reverse flow of the supply flow. Thus, the valve partly takes on the role of a manifold.
If the floor area is large and there is serious heat loss on the "return", it is recommended to install a valve at the cold inlet end. This prevents excess condensation from forming in the heat exchanger.
Installation of underfloor heating without pump and mixing unit
There is no need to install a pump if the boiler is equipped with a powerful circulation pump and the heating area is minimal. The main advantage of a boiler with a built-in pump is a well-chosen equipment. That is, there is no need to choose a boiler according to the individual characteristics of the pump, it is enough to decide on its total power.
How to make water underfloor heating without installing a pump in the system?
I will not say in the last instance, but you cannot do without installing a circulation pump in the heating system. And I want to confirm my conclusions with the following:
- Warm floors will be located in a horizontal plane over a large area and "pump9"; such a system due to gravity from a solid fuel boiler is unlikely to succeed. For such a system to work, at least a minimal slope is needed.
- It will also not work to create excess pressure due to the height of the riser - the floors are on the second floor.
- I made in my 5-storey building a water-heated floor in the bathroom (area no more than 3 m2) from the central heating - the system works, but it is very capricious - it is very afraid of air jams. At the slightest ingress of air, it begins to mope and does not save the height of the riser column (4 floors above), and does not save the high pressure in the central heating system). You constantly have to bleed air through the manifold.
But if you still want a warm floor, find an opportunity to purchase and install a circulation pump in your system. In addition, the efficiency of the boiler will increase, the system will work efficiently and consume less fuel.
the author of the question chose this answer as the best one
Unfortunately for underfloor heating you need to install a pump without any conditions. One line of the pipeline can be no more than 80 meters, about 6 meters of pipe goes for one square meter. For heating 20 sq. meters You will need two lines of 60 meters. It is imperative to install a pump on each thread, water will not flow by gravity along such a length, moreover, with mandatory heating. The installation of pumps for water floors is one of the main tasks, therefore, water floors and their installation are considered expensive devices. The pump installed in the floor system creates the correct circulation.
add to favorites link thank
how to connect a warm water floor without a pump?
The best answer
Answers (16)
The trick is that the boiler is old, it has a 2.5 ″ pipe for heating inside, which is heated by direct fire, due to this, a lot of pressure is created. The level of the pipe at the outlet is 1.2 meters high. At the exit, the transition is 0.5 ″ and goes down under the floor. Then there is a parallel connection like a radiator, then a spiral and goes into the next room with a connection to a radiator, a zigzag, a radiator, the next room. etc. The return flow, of course, enters the boiler but through the expansion barrels. The main thing is to put the expansion barrel at the end of the turnover and a strong fire. The higher the temperature, the higher the pressure, it is not difficult to draw a parallel. When heating a larger volume and with the release of hot water to a smaller volume, the pressure increases, this makes the chilled water rise back 1.2 meters back to the boiler.In general, if you have a modern boiler, but it allows you to remove the temperature limitation and there are no gas meters, the heating volume is 2 times greater than at the outlet - along the drum where you connect it. Pushing will not be foolish. If you have a blunt 0.5 ″ coil, it will not pump. And the expansion barrel is exactly at the end of the system, in front of the boiler, otherwise I have seen enough over the years where they will put it in the middle, where at the beginning, the main thing is that the water is poured there, and the fact that the air should go out is not important, it will come out over the winter.
As for the boiler, it turns out that it is with a storage tank, if it is possible to install this, then you will not have to worry about the 1st floor.
I want to put a two-circuit boiler, two floors + a floor on the first one in the kitchen and in the bathroom + an entrance hall (questionable), do you think this whole thing will take me, about 100 m2.
I want to put a two-circuit boiler, two floors + a floor on the first in the kitchen and in the bathroom + an entrance hall (questionable), do you think this whole thing will take me, about 100 m2.
Underfloor heating without pump Link to main publication
inkmilk.ru
Heat exchanger installation
Installation is most often carried out vertically. Connection diameter, dimensions and power of connection of a water-heated floor to central heating may be different in different devices. I would like to pay special attention to the connection diameters. It is better to take power with a margin, because this parameter does not correspond to the size, the difference can be only a few centimeters. This increases the inertia of heat removal. This is especially true in cases where the temperature from the CHP is not too high, for example, if it is no more than seventy degrees.
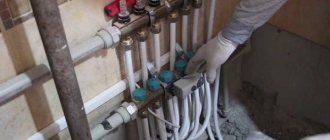
After the underfloor heating distributor is installed, a pump with a three-way valve is assembled on it. Next, the electric boiler is installed (for off-season use), including the necessary attachments. That is, first, the supply of the heat exchanger from the boiler is connected, then the tees are cut in, the distributor with the valve is connected, thermometers are placed and an expansion tank is installed in the most convenient place, for example, you can do this under the sink. It is necessary to carry out installation in such a way that easy access to all equipment is provided.
Watch a detailed video on how to connect a hot water floor to central heating through a heat exchanger:
If the circuit was mounted incorrectly, then the consequences can be negative, therefore, mistakes should not be made in any case. It is better to entrust this work to experienced professionals who are aware of all possible nuances.
Pipes of a water-heated floor: what can be
The peculiarity of water floor heating is that the pipes are usually walled up in the screed. That is, in order to replace them (in old age) or eliminate the leak, you will have to break the concrete. First, of course, you need to remove the final finishing of the floor, and then pick the concrete. A bleak prospect. To avoid this, all pipes for underfloor heating, first of all, are considered from the point of view of reliability and durability. It is also important that they bend well, since they have to be laid according to a certain pattern, in which there are bends.
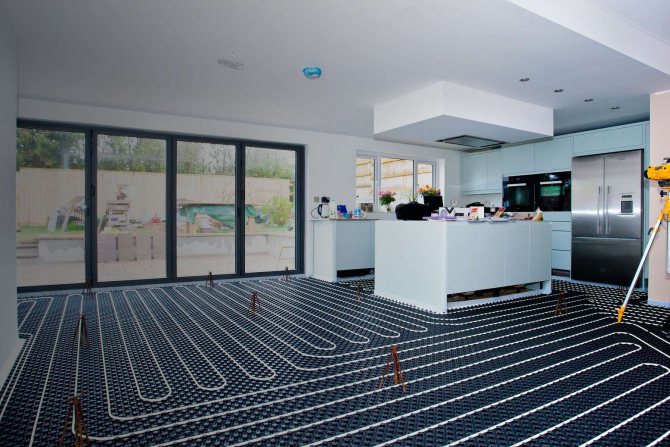
It will take a lot of pipes for a water-heated floor
Also, the material of pipes for underfloor heating should not allow oxygen to pass through. Otherwise, it will oxidize the metal components of the heating system. Well, the walls must be strong enough to withstand the constant pressure of the screed. What's more important is the price. A lot of pipes are required (more than a hundred meters for a small room), so the price is important. But the priority is reliability and durability. As you can see, there are many requirements, but there is plenty to choose from.
Reinforced-plastic pipes
This is a combined type of pipes. The plastic layer is filled with metal foil. The pipe turns out to be quite flexible (the minimum bend is 8 radii), and does not allow oxygen to pass through much. But:
- Service life is about 20 years. And this is subject to the operating conditions.
- The price is quite high. You can save money if you lay pipes without joining the pieces - the fittings are expensive.
- Lots of fakes.
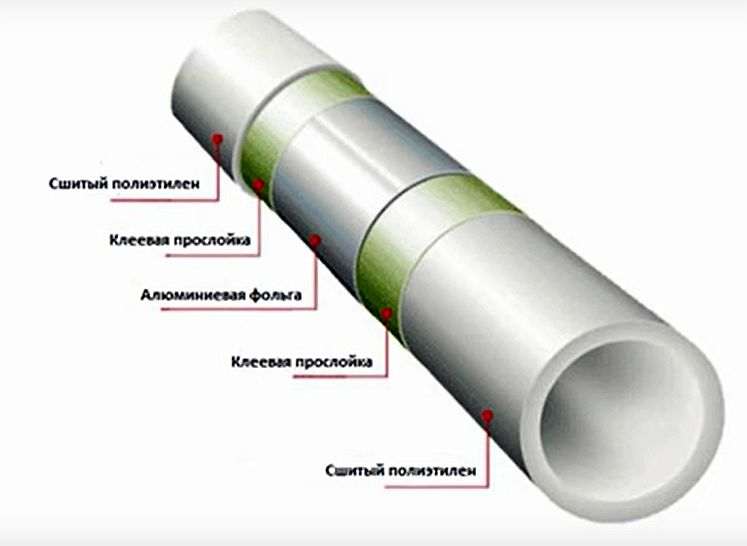
Reinforced plastic pipes are placed in the screed only reinforced with aluminum
MP pipes are produced in the form of coils. The most common length is 20-30 meters, but it is possible to find a length of 60-70 meters "on order". A decade ago, it was quite a popular option, but today there is a pipe for the same (approximately) price, but with better characteristics.
Polypropylene - not very comfortable
Only reinforced polypropylene pipes are placed in the screed. Others simply will not be able to withstand such a load. This means that they hardly bend. In places where they are folded, they are cut and fittings are installed, but the connections in the screed are dangerous. There is another option. Choose a scheme with a small number of turns and bend the pipe before heating it up. So it can be bent, but the bending radius will be at least 8 diameters, which is quite a lot.
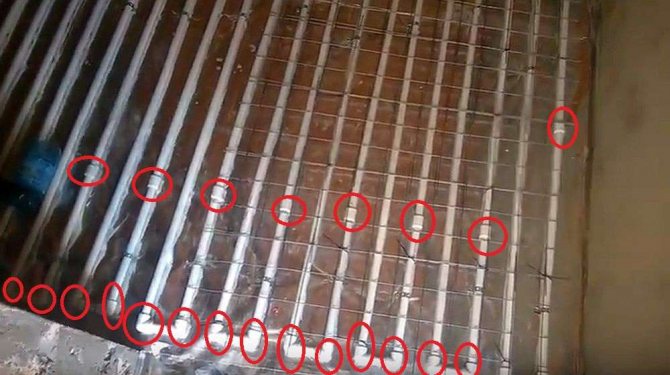
Too many connections. Pouring into the screed is risky
The advantages of using polypropylene pipes for underfloor heating are that they are durable, not too expensive, and can freeze several times. But the mechanical strength is not too high, so the minimum screed above the pipe surface is 5 cm.Considering that the walls of the PP pipe are also considerable, the total concrete layer will be at least 7 cm.This is an increased load on the floor, and additional costs to the solution. In general, this type of pipes for a warm water floor is of little use.
Copper pipes for underfloor heating
Copper is reliable, does not allow oxygen to pass through, bends well. The coils can be several tens of meters in length, which reduces the number of welded seams. In principle, you can do without them, but the collection group will be large (and expensive).
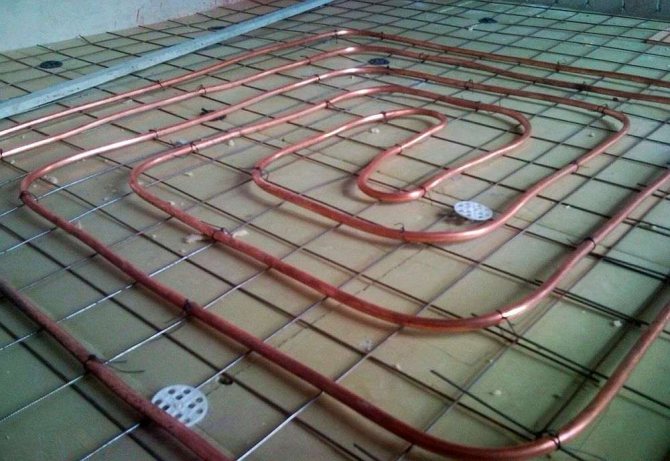
Elements of a warm water floor: a copper pipe - it is better not to pour it into the screed
The disadvantages of using a copper pipe include cost and electrochemical corrosion, which occurs if copper is left in a layer of concrete. With the cost, everything is clear. Copper is expensive. And corrosion is a process as a result of which the pipe walls erode. Therefore, copper is usually not poured into the screed. This pipe is used in a "dry" water floor. This is if the pipes are laid in special plates, and a plank floor is laid on top. For this, copper is ideal. She gives off warmth well. Best of all polymers. So when using a dry underfloor heating system, it is advisable to splurge on copper pipes.
Cross-linked polyethylene: PEX and PERT
For underfloor heating, specially processed polyethylene is used - sewn. Crosslinking means a special treatment of this polymer, as a result of which the strength is increased and the ability to withstand high temperatures appears.
PEX pipes
For underfloor heating, it is recommended to use cross-linked polyethylene such as PEXa, PEXb PEXc. PEXa is preferred as it has more stable characteristics.
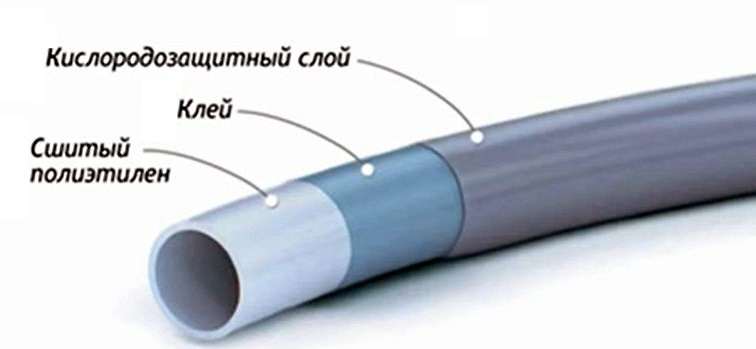
This is what a XLPE pipe usually looks like.
In general, they are good: inexpensive, flexible, durable. However, it is worth remembering that the material is resilient. The minimum bending radius is small - 3-4 diameters. But in order to hold the pipe, it must be tied very well. That is, the installation is not the easiest. But at any speed of movement of the coolant, such a warm floor does not make noise (which can happen with a copper and polypropylene pipe). And the price is not more expensive than metal-plastic.
PERT pipes
There is another type of polyethylene pipe for underfloor heating - PERT. It differs from PEX in that additives are introduced into the starting material that improve strength, increase resistance to temperature. The pipe itself is cheaper, the characteristics are more stable. But only on condition that the coolant is no warmer than 70 ° C. From this temperature, a sharp loss of properties begins. For a warm floor, this is not critical, because the temperature of the coolant should be no higher than 50 ° C.Although it is controlled by automatics, failures happen to it.
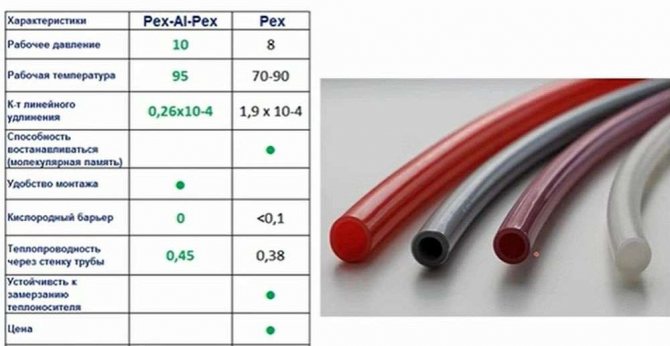
Comparison table for different types of XLPE pipes
So if the choice is between PEX and PERT, it makes sense to use the former in tandem with boilers that are not too automated. These are wood and coal. Due to its nature, the outlet temperature is more difficult to control. The PEX pipe can withstand overheating for a short time (up to 110 ° C) without consequences. PERT is rapidly aging and decaying. Therefore, this type of pipe makes sense to use in systems with automated boilers.
The disadvantages of XLPE pipes include a large linear expansion when heated (1000 mm per 100 meters of pipe). Cast in a screed, they cannot go anywhere. They can only shrink. And this reduces the pipe lumen, increases the hydraulic resistance. To avoid this, the screed is poured when the polyethylene pipes are under overpressure. It is 30-50% higher than the worker. This is a test of strength, and the pipes will be partially elongated. So when heated, they will not shrink so much.
How to fix
Small, but important components for a warm water floor - pipe fittings. Correctly chosen, it speeds up editing. At the same time, the quality of fixation does not suffer. Here's how you can fix water floor pipes:
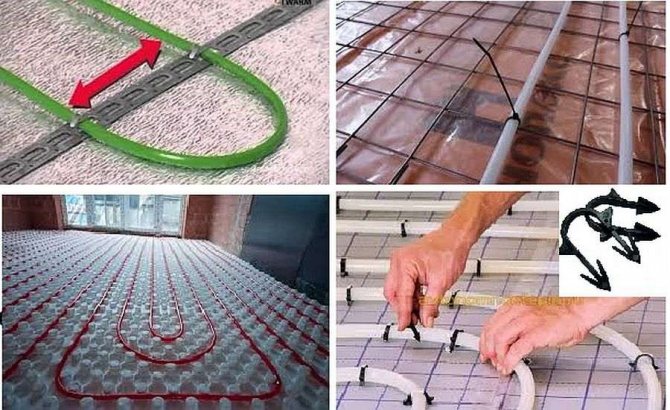
Types of pipe fasteners
- Plastic clamps to a metal reinforcing mesh.
- Special plastic staples for expanded polystyrene (EPS).
- Using metal plates for fixing, which are attached to the primary screed or insulation in increments of 20-40 cm.
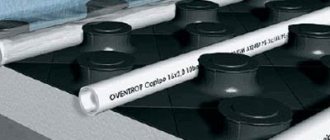
- If you need underfloor heating, you can buy mats with bosses. These are the protrusions molded onto the surface that hold the pipe in place.
These are the main ways of fixing the underfloor heating pipe. The most economical - to the mesh with ties. Ties can be replaced with wire, but it will only be cheaper if you have a free wire.
Plate heat exchanger for a warm water floor - why is it needed in an apartment
When equipping their home, everyone tries to make it as comfortable, cozy and safe as possible. Water heated floors have appeared relatively recently, but their popularity is increasing every year, and many prefer just such a heating system.
- Operating principle
- Benefits of using a heat exchanger
A water heat-insulated floor is more reliable, safe and economical, unlike an electric one.
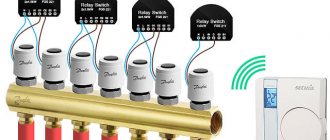
When it is arranged from a central heating system, a collector system for supplying a coolant is often used. However, along with the pumps, collector systems, a heat exchanger is installed.
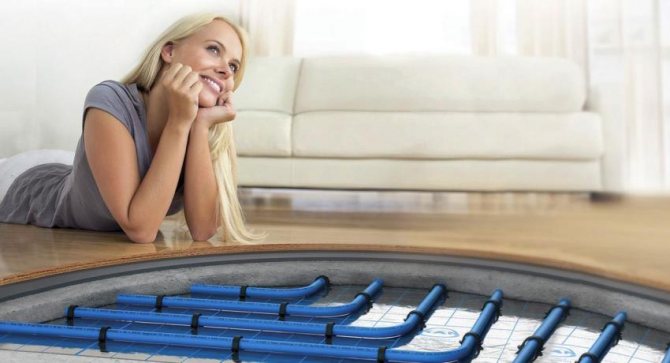
Underfloor heating system with heat exchanger
Operating principle
A heat exchanger is a device through which heat is exchanged in floor and central heating systems. The principle of its operation is based on the fact that the water passing through the central water supply system transfers heat to the liquid circulating in the warm floors.
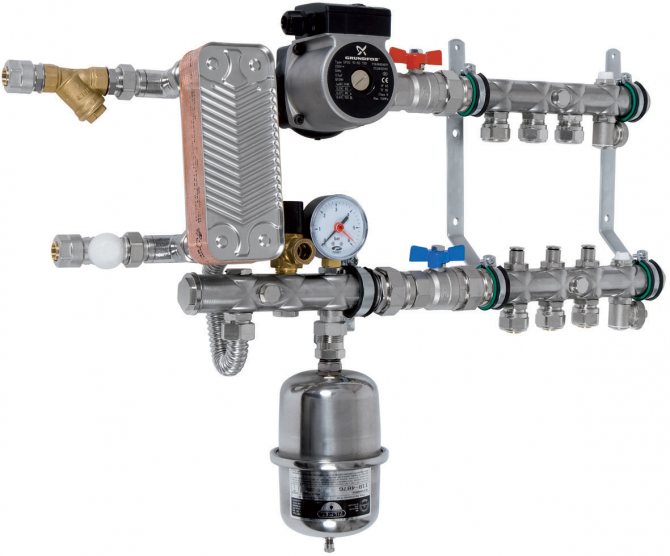
Heat exchanger for warm water floor
Thus, if the central heating in your house is turned off or there is no central heating at all, then this will not affect the floor temperature in any way. But it is worth considering that you will need not only a heat exchanger, but also an expansion tank, a unit with a sump and a safety group.
The most elementary examples of heat exchangers look like a tube-in-tube design.
The underfloor heating water in the apartment functions with a carrier whose temperature is up to 45 °. Working at such a low temperature creates a more favorable climate and the air is saturated with positive ions.
The heat exchanger is most often installed vertically. When installing the device, you need to pay attention to the connection diameters.
The most common is the plate heat exchanger. It consists of plate elements with an original stamped configuration.These elements are parallel to each other and two circuits are created inside the device: one gives off thermal energy, the other gains. External structural elements are separated from those parts that conduct heat. This means that practically no energy is wasted and you do not have to worry that someone from your family will get burned if they accidentally touch the heat exchanger. Plate heat exchangers are manufactured from high quality steels that are chemically inert and resistant to corrosion.
The principle of operation of the plate heat exchanger
Benefits of using a heat exchanger
Using a heat exchanger when heating an apartment with a warm water floor, you can get many advantages:
- A water floor is much more profitable than an electric floor, and with a heat exchanger you will not depend on central heating and can heat the floors at any time.
It is recommended to take the heat exchanger power for a warm floor with a margin.
- Such a heating system does not require large energy costs and is more economical.
- The functioning of the heat exchanger is designed in such a way that its temperature will not decrease and the pressure in the system will not decrease.
- There will be no rusty water in the pipes.
All this allows us to conclude that it is necessary to install a heat exchanger when installing a warm water floor.
teplofan.ru