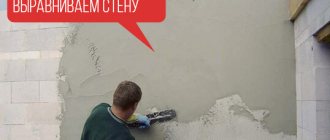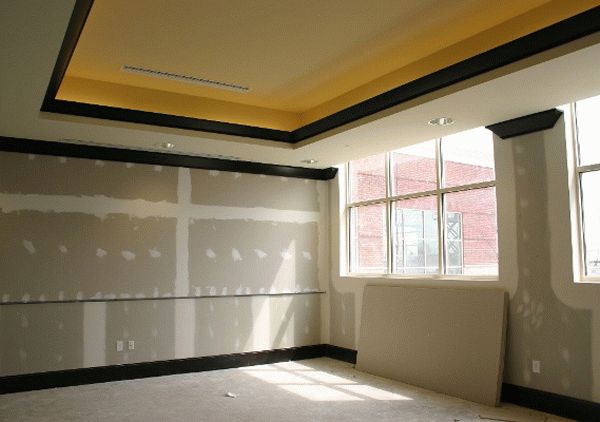

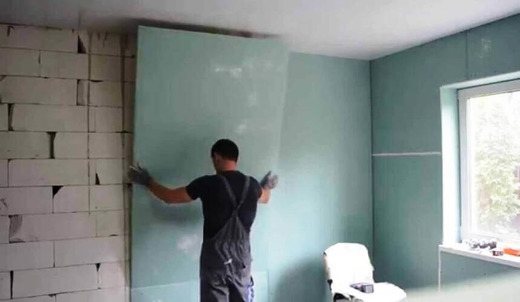
When it is necessary to quickly align the walls, then drywall comes to the rescue. This is an excellent material for interior work, which is available to everyone. With a sheet format, it allows you to create large, flat areas. As a result, it remains only to close up the joints, carry out a small finish if necessary, and apply a decorative coating.
But we must not forget that the criterion for high-quality plasterboard finishing of walls will be two conditions: installation of an even, reliable frame and subsequent treatment of gypsum board (sealing of seams, applying a topcoat). Therefore, if you plan to carry out all the work with your own hands, you need to adhere to certain rules and recommendations.
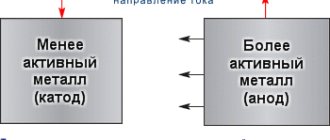
Variety of fastening the lathing
Installation of the battens to the walls is the main difference when working with drywall in a wooden house. The traditional method of fastening, when the lathing is attached to the walls using suspensions and the CD 60 profile or directly the CW profile to the wall, is used for walls made of laminated veneer lumber, which is not subject to shrinkage. These structures are designed for small deformations and are compensated by a suspension system.
For movable walls of a log house and walls made of timber with natural moisture, the structure is complicated by "sliding" suspensions that prevent shrinkage processes. It is impossible to rigidly fasten the crate to the ceiling, as with the traditional method. The vertical shrinkage of the walls can be about 2 cm, and this deforms the drywall, provoking the appearance of cracks and internal stress. In order to prevent this from happening, the lathing should end 2-3 cm from the rough ceiling. The resulting gap will be hidden by a clean ceiling and will not be noticeable.
The ceiling lathing is attached to the rough ceiling if there is no rigid attachment around the perimeter. It is necessary that the crate adjoins the drywall on the walls as tightly as possible, but at the same time is not rigidly attached to it. When shrinking, the sliding "false wall" will remain unchanged, and the ceiling with overlap is deformed. A gap is inevitable along the perimeter of the abutment to the ceiling, but it can be easily masked with a decorative cornice or baguette.
Having created such an independent structure using high-quality materials and adhering to the puttying technology, there is no need to fear cracks.
Back to the table of contents
Preparatory work
When it comes to the frameless method of attaching drywall, they consider the option with a special adhesive mixture. Such a mixture is applied to a sheet, which is attached to the wall with its help. Therefore, the surface of the wall must be carefully prepared.
- The first step is to remove the old finish (paint, wallpaper, etc.).
- All loose plaster is removed if the walls were previously plastered.
- If there are chips or areas where a lot of plaster has fallen off, they need to be putty to level the wall. The same goes for cracks.
- The surface is cleaned of dust, dirt and grease stains.
- The wall is primed two times (a new layer is applied if the previous one has already dried). An antiseptic primer is usually used.
These four steps will ensure that the drywall cladding without a frame will work as efficiently as possible. Further work should be started only after the primer is completely dry.
Wooden base for fixing drywall
In wooden houses, drywall installation can be carried out in one layer to a metal profile or in two layers to a wooden surface.In this case, the thickness of the structure must comply with the rules of operation: the walls for wall cabinets and bookshelves must be fixed in a more reliable way.
To create a frame from metal profiles, they make a skip of the planes. On the ceiling along the walls, draw a straight line parallel to the wall. Then a plumb line is lowered from this line at the corners of the ceiling, the line is transferred to the floor. With the help of U-shaped and CD profiles, a frame is made. In addition to metal profiles, you can take a wooden profile (slats, beams). It turns out a wooden crate, which serves as a frame. It is an economical and environmentally friendly option.
The following can act as a basis for fastening:
- walls made of wood;
- wooden slats;
- wooden bars;
- wooden beams;
- wooden lathing;
- wooden frame;
- wooden wall.
Installation on wooden slats is suitable for walls with communications, which it is desirable to hide or create additional sound or heat insulation from the inside. For this you will need:
- slats (soft wood; section 75x50 mm and 100x50 mm);
- self-tapping screws;
- dowels;
- drill;
- screwdriver;
- saw;
- drywall.
Sheathe a house from a bar with plasterboard is a pretty practical solution. The use of this type of material allows to reduce the time of interior decoration and costs. But, an acceptable quality of repair can only be obtained by observing the technology, taking into account the peculiarities of the construction from a wooden bar. Otherwise, the end result will not meet expectations.
Finishing and interior of a house from a bar with plasterboard
Wood is one of the first building materials used by mankind. It has not lost its relevance today. And the use of modern processing and construction technology allows you to quickly build a house according to all quality requirements. However, the interior decoration has its own nuances, without which, all the advantages of the building will simply turn into disadvantages:
- Firstly, it is worth remembering that it is worth starting internal work in a house made of wood after at least 6 months. During this time, the house will "sit down", and the movements of the load-bearing walls and ceilings will not spoil the interior decoration.

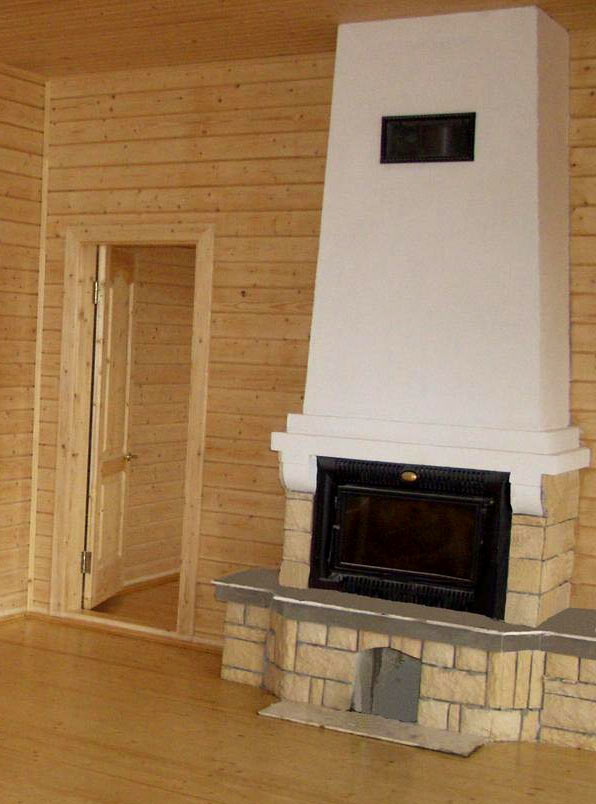
Fireplace decoration with plasterboard in a log house - Secondly, despite the natural finish of wood, in any case, additional finishing of the external surfaces of the premises will be required: a bathroom, a bathroom and a kitchen. The walls of these rooms will be exposed to higher humidity, which will deteriorate the material.
- And thirdly, it is difficult to lay communications in the walls and ceilings of a wooden house.
What are the advantages of finishing a house from a bar with plasterboard, taking into account these nuances of construction?
What to look for when preparing for work
When starting to arrange the insulation, which it is planned to equip a frame house, you should really assess your capabilities, since their implementation will require not only some special tools, but also certain skills.
Preparation of tools and materials
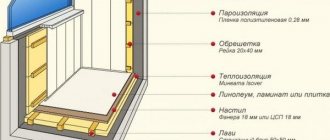
Arrangement of insulation using sawdust requires:
- a sufficient amount of sawdust and shavings, which is quite natural;
- lime;
- cement;
- boric acid or other antiseptic;
- shovels, watering cans and mixing containers.
Calculation of the required amount of sawdust
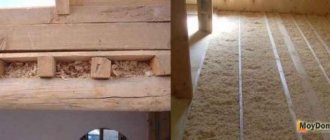
Sawdust as insulation is best suited for frame houses. The calculation of the required amount of this material is made taking into account both the climatic characteristics of the location of the house, and the purpose of the structure itself.
If you have erected a light country house and it is not your intention to live in it permanently, then sawdust insulation with a thickness of about 15 cm will be enough in full. When insulating a residential building, the approach should be different: the thickness of the heat insulator should be doubled and brought to 30 cm.Only then can one hope that warmth and comfort will always reign in the house where people will constantly live.
Don't forget about safety
Before starting work, you should find those elements in the house that can cause a fire. As a rule, they are mainly represented by electrical wiring and chimneys. To protect yourself from a possible fire, the chimney pipe must be lined with suitable refractory materials, and the wires must be enclosed in a metal hose or in a box.
The advantages of plasterboard finishing in a house from a bar
In addition to the simplicity, speed and low cost of assembling structures, interior plasterboard finishing in this way gives an advantage precisely taking into account the specifics of the building.
Option for finishing a wooden attic with drywall sheets
Pros of using drywall:
And, most importantly, the finishing material will not load the supporting structures. With a large margin of safety, drywall has a low weight in comparison with other materials. Yes, and it is difficult to use the classic methods of construction and decoration in a house from a bar.
How to choose the right materials
When choosing materials for decorating a house from a bar with plasterboard, several fair questions arise:
Frame or frameless ways
To the surface of the walls is easier and faster, but many factors are required.
GKL can be mounted directly on the walls if the planes do not have significant differences. Perfectly flat walls in a wooden house are very rare, even in a new building. After all, the wood dries out and shrinks along with the movement.
And the laying of communications in this case is much more difficult. For example, under the wiring, you will have to cut directly the supporting structures.
Scheme for frameless drywall installation
The frame, on the other hand, makes it possible to align any differences and unevenness of the walls to the ideal value, and it will not be difficult at all to lay engineering lines under the plasterboard sheets. In addition, if planned, structures on a solid foundation can withstand the load much better.
Metal or wood
In houses made of timber, both wooden slats and metal profiles can be used as a frame material. Moreover, in the first option, it is permissible to build a simpler structure by attaching the bars under the gypsum board directly to the walls (again, taking into account the differences). But, the quality of lumber must be at a high level. Only wood that has been well dried and treated with protective compounds is used. The cross-section of the racks of such a frame should be exactly maintained 50 × 25, the same criterion for the crossbars, but the guide bars - 75 × 25 at least!
Mounted wooden frame for drywall in a house made of timber The process of fastening wooden frame racks
Metal types of profiles are also suitable for use in timber construction. With their help, you can build a solid foundation that does not lend itself to such influences as humidity and temperature drops.
An example of fastening a metal frame in a house from a bar Metal frame on the ceiling
To do this, you need ready-made elements and. In terms of cost, metal "parts" of the frame will be cheaper in comparison with high-quality wooden slats. The video shows how to mount a metal frame on timber walls.
Which drywall to choose
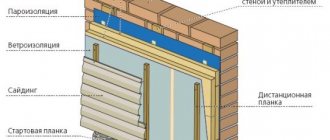
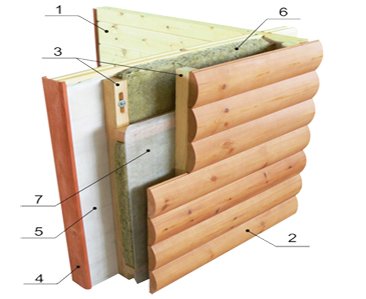
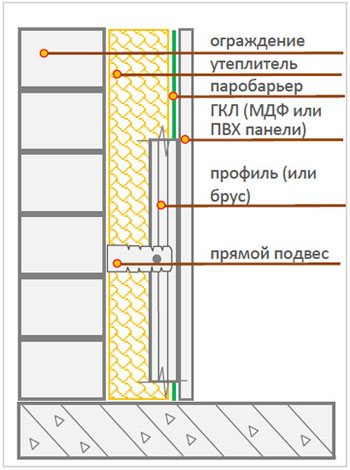
The type of drywall for finishing a wooden house is selected depending on the purpose of the room. In the bathroom, bathroom and kitchen, there must be a moisture-resistant sheet, in living rooms the wall version is quite suitable, and the fire-resistant one is used for finishing structures that may be exposed to temperatures. In addition to the above features of the selection of material in a house from a bar, it is imperative to use a vapor barrier.
Cured gypsum is hard and brittle. In the gypsum board, it is reinforced with cardboard located outside. The smooth surface of the sheet is ideal for quick and budget leveling of walls. Drywall in a wooden house has recently been used. It used to be thought that movable wood and durable gypsum were incompatible. Thanks to the metal profile and suspension systems, plasterboard is now widely used by builders and amateurs to make repairs on their own.
Wall lathing for installation with plasterboard
Advantages of frameless wall alignment with drywall
This leveling method is otherwise called dry plaster. Unlike the traditional method of fixing drywall to the frame, the frameless method is faster and saves more free space.
This alignment method can be performed under the following conditions:
- if the plane difference does not exceed 5 cm;
- if the laying of hidden communications and electrical wires is not supposed;
- if internal heat and sound insulation of the room is not expected;
- if the area of the room is too small and does not allow the construction of a frame structure, which will require more than 10 cm of additional space.
The advantages of frameless leveling of the base with drywall include the following:
- small thickness of the material saves free space;
- the ability to create a perfectly flat base for any finishing material;
- GKL sheet can be attached to a surface of any material;
- additional insulation and soundproofing of the room;
- high speed of work and easy installation;
- the cost of work is lower, since you do not need to buy materials for the frame.
The frameless method has its drawbacks:
- since no free space is formed between the base and the sheet, it will not work to hide the wiring or additionally insulate the room;
- depending on the base material, additional fixing of the panel may be required using self-tapping screws or dowels;
- after the glue is applied to the surface of the sheet, its weight increases, and it becomes problematic to do the work on your own - you cannot do without an assistant.
Note! To ensure a strong fixation of the gypsum board sheet to the base, it is necessary to choose the right adhesive.
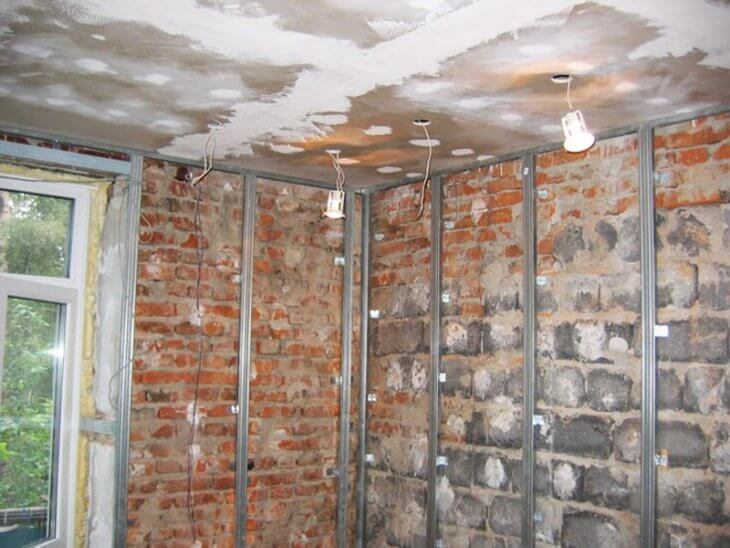
The metal profile allows you to sheathe a wooden house from the inside with plasterboard
Self-contained wall lathing
Given the ability of gypsum to absorb moisture even from the air, it is possible to sheathe walls from the inside with plasterboard only in houses with heating and year-round living. Otherwise, after 3 - 4 winters, repairs will have to be done again and fight against mold.
Wood is an ideal building material for your home. It retains heat well, absorbs noise, and purifies the air. The complexity of the finish consists in the peculiarity of the tree constantly changing its size - to breathe. This must be taken into account when installing drywall in a wooden house. GKL are attached only to the crate. Even on walls made of laminated veneer lumber, drywall is not glued directly to the surface.
It is possible to sheathe the ceiling and walls with plasterboard inside if they are flat and do not sit down. This is a clutch of:
- aerated concrete;
- foam concrete;
- bricks;
- cinder block.
Artificial stone should have even corners without chips. The surface should be flat, the seams are thin, without excess mortar.
Immediately after the completion of construction, it is impossible to sheathe a wooden house inside with drywall. It should settle, shrink. A year is enough for brick buildings. The tree takes more time. Small deformations will occur constantly. It is enough to cover the stone and plaster with a primer so that it does not sprinkle, then sheathe it. The tree goes through several stages of treatment with antipyrine and antifungal compounds.
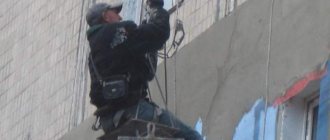
Sheathing the house with plasterboard from the outside is not cost-effective. Special moisture resistant sheets are required. They are much more expensive than conventional ones.The facade of the house is treated with special compounds that protect the wood from moisture, mold, insects and fire. At the end, the entire facade must be putty and primed and painted.
Drywall
In fact, this popular material is nothing more than dry gypsum plaster in slabs reinforced with cardboard on both sides. Therefore, drywall can be viewed both as wall panels for lathing installation and as large tiles that can be attached to walls with gypsum glue.
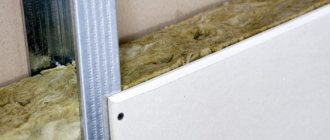
Crate installation
There are two types of lathing materials: wooden beams and metal profiles.
Wooden beams
Working with a wooden beam and attaching a gypsum board to it is simple. But it must be dry, and for rooms with high humidity - treated with an antiseptic.
If the walls are even, then the timber is attached directly to the foam block.
To align the cladding on uneven walls in level in the horizontal and vertical planes, the timber is attached to the foam block on straight hangers for the CD ceiling profile.
The pitch of the beam is 60 cm. In this case, each standard sheet with a width of 1200 mm will rest on the crate in the center and with the edges in the middle of the beam. The most common sheet height is 2500 mm. But if the ceilings are higher than 2.5 m, so as not to "pick up" the cladding in pieces, you can order a gypsum board with a height of 3000 mm or 4000 mm.
The width of the timber must be at least 60 mm. This is a necessary condition for the location of the screws from the edge of the sheet and the edge of the bar. The thickness of the timber must be sufficient for the self-tapping screw to enter it without exiting from the other side - 30 or 40 mm.
Profile
For finishing foam blocks with drywall, metal profiles CD and UD are more often used. The reason is stable geometry, proven technology of assembly and nodal connections.
The process of installing the crate looks like this:
- Beat off on the ceiling and floor two parallel lines lying in the plane of the sheathing.
- UD profiles are mounted along these lines.
- In accordance with the layout step (600 mm), vertical lines are beaten off the walls, along which straight suspensions are attached for mounting the CD profile. Suffice it 3-4 suspensions per profile with a ceiling height of up to three meters.
- Screw the profile to the CD hangers. Check the level of the crate and the distance between adjacent elements. Finally, they are fixed to the guide profiles.
- In places where heavy objects are hung on walls, embedded elements are mounted.
After installing the lathing, they proceed to plastering the walls with plasterboard.
Often, as an advantage of plasterboard sheathing on the crate, they cite the possibility of insulating the outer walls from the inside. Internal insulation is not directly prohibited by regulations, but not recommended. And as a prerequisite, the requirement is put forward for a continuous and reliable vapor barrier layer that protects the insulation from the side of the room. Otherwise, it will get wet and lose its properties, fungus will appear on the walls. It is extremely difficult to create such a layer. Therefore, this option is not an advantage, but a forced measure, when it is impossible to insulate the walls from the outside.
Glue mounting
If the walls are even, then drywall is attached to them with glue. Especially for these purposes, Knauf produces the Perlfix dry mixture, which must be diluted with water according to the instructions on the package. But before finishing the walls in the house from foam blocks inside, the surface must be prepared. The procedure is standard:
- cleaning walls;
- filling seams and chips with mortar;
- leveling with a grater for aerated concrete;
- applying a primer.
The adhesive is applied to the sheet using a trowel with "flat cakes". One trowel - one portion. Along the perimeter, portions of glue are laid out end-to-end, stepping back a few centimeters from the edge. Another strip is laid out in the middle of the sheet (along the horizon), but already thinned out - with a distance between portions of about 35 cm.
Then the sheet is put in place, a wooden lath is placed, and the sheet is aligned in the sheathing plane by lightly tapping on it.
!! The "life" of the prepared solution is no more than 30 minutes. This must be taken into account in the process of work. It is useless to dilute dried gypsum glue with water. !!
Finishing plasterboard
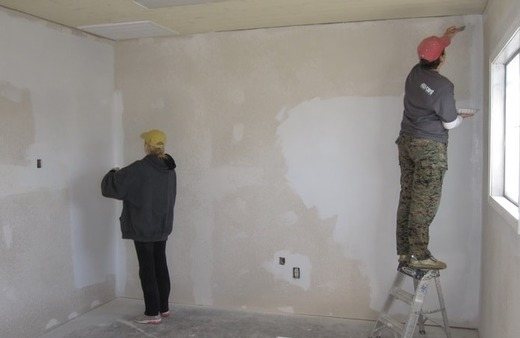
Any drywall finishing is not complete without "wet" work.
This is natural if the decoration of apartments in foam block houses is carried out using decorative plaster or tiles. But for painting or wallpapering, drywall must be plastered.
Even if the paint has good hiding power, surface irregularities and seams can show through two coats of finishing. The wallpaper has a different reason. When carrying out cosmetic repairs, they cannot be removed without damaging the cardboard, if there is no separating layer of putty.
First, we plaster the ceiling with plasterboard using suspensions
We sheathe the ceiling with plasterboard
Plasterboard alignment starts from the ceiling of the house. It is necessary to sheathe it so that there is a gap between the sheets and the walls. The metal profile frame is mounted on the floor beams. The sequence of works is standard.
- Make markings all over the ceiling.
- Fasten the PP guide profile along the perimeter. It cannot be rigidly fixed to the ceiling. You need to use suspensions. If the house was built more than 5 years ago and there are no living quarters at the top, you can get by with black wood screws and not tighten them tightly, leave a gap under the hat. The hole in the profile must be larger so that the bolt shank can move. The best option is to use special spring plates.
- Planks are inserted into the guides on which the sheets will be attached. They are fixed to the ceiling using hangers or perforated strips.
- Inside, wires are laid and communications are carried out, the places of installation of the lamps are marked, fastening is made for them.
- It remains to sheathe the ceiling. The holes for the lamps should be 2 to 3 mm larger. The same gap is also around the entire perimeter of the ceiling and between the sheets of drywall. Sheets are attached to the profile with self-tapping screws.
Attention! For a frame made of wooden slats, a 50x50 bar and spring brackets should be used. In the hole in the center of the arc, the screw is screwed into the bar, the edges are fixed to the ceiling.
Sealing and filling is done after all surfaces inside the room and even at home have been sheathed.
Fastening the sheet to the wall with mounting foam
Wall cladding in this way is more laborious, but it will provide greater reliability of fastening regardless of the curvature of the surface.
- GKL sheet is pressed against the wall. At its corners, and in 4-6 more places, holes are drilled in the wall, making marks. The sheet is pushed aside, and the resulting marks are drilled out and dowels are driven into them.
- On the sheet, stepping back from the holes by 10-15 centimeters, pieces of the shock absorber (foam rubber, foam rubber) are glued. This distance is needed for the foam to expand freely. The thickness of the sponge depends on the differences in the wall. Ideally, they should be the same.
- The sheet is placed against the wall. Screws with wide heads or a washer are screwed into the dowels. They also regulate the level, creating a flat surface. The installation of the remaining sheets is carried out in a similar way.
- After control by the rule, a hole is drilled near each self-tapping screw. The pipe for pumping the polyurethane foam should enter it without effort. Foam is pumped into the cavity through the hole. It should form a cushion between the wall and the sheet. The amount of foam is determined empirically in advance. After the foam has hardened, the screws are removed.
Take your time to start decorating the wall with decorative materials. The glue base sets quickly, but it will take at least a day to dry completely.
Plasterboard cladding of log walls inside the house
Lathing on wooden walls
Sanded and varnished or waxed wood has its own unique pattern. It goes well with most modern styles. Some harmoniously complements, others emphasize with its contrast of smooth lines and shapes. Sheathe the house from the inside should be in several cases:
- there is no way to regularly care for the tree;
- the wood darkened over time and lost its attractive appearance;
- wall insulation;
- additional sound insulation;
- the need to hide communications;
- you need a solid, even base for tiles and other finishes.
There may be other reasons for plasterboarding a wooden house inside. This mainly concerns interior decoration and furnishing changes. Partitions are made from gypsum plasterboard in houses during redevelopment.
When making a crate for drywall in a wooden house, several rules should be followed:
- it is necessary to clearly maintain the horizontal and vertical position of the frame and cladding elements;
- when screwing the suspensions, a gap should be left;
- the distance between the vertical struts of the structure is equal to half the width of the drywall sheet - 60 cm;
- the length profile is fixed to the wall at a distance of no more than 50 cm;
- when joining sheets along the length, horizontal crossbeams from the profile are placed at the joints;
- covered, black self-tapping screws are used for wood;
- leave a gap of 2 - 3 mm between the sheets.
Advice! Don't use nails. They do not stick well in the tree and soon begin to fall out. The screw connection is much stronger.
A starting profile is attached around the perimeter of the room, and vertical posts are inserted into it. The sheet is screwed along the edges and in the center at a distance of 15 - 20 cm. The screw heads are recessed. They are hidden when leveling with putty.
After fixing the sheathing, the corners of the sheets should be cut off slightly. They can fluff up and protrude beyond the plane. It is advisable to immediately cover the entire wall with a primer. Then a reinforcing paint net is glued to the joints and the gaps are leveled with putty. The bolt heads are spattered crosswise with a narrow trowel.
Under the wallpaper, it is enough to clean up the irregularities and cover everything with a primer again. Painting requires a smoother surface. The entire wall is treated with a finishing putty, sanded and, if necessary, applied several layers.
The tile is heavy. A base is made under it from a thick waterproof sheet of drywall. After sealing the joints, they are primed twice with a deep penetration compound. Then an adhesive solution is applied and the tiles are laid. The starting profile for the first row does not touch the floor and is attached to the wall.


Additional wall treatment
Proper wall treatment before attaching drywall sheets to a non-framed wall is extremely important.
- Conduct an audit of the wall itself - close up the cracks, fill in the holes from the old communications, cover the places from where large pieces of plaster fell out with mortar.
- Grind out grooves for sockets, switches and wiring if necessary. The installation of wires and junction boxes must be made.
Insulation of wires of the latest generation makes it possible not to pack them in a fireproof corrugation, so it is enough to simply attach them to the wall with clamps.
- Remove debris by brushing or vacuuming to remove dust from walls and floors.
- In order for the glue to firmly adhere to the surface of the wall, it is evenly primed. In areas with fresh plaster, the primer is absorbed more strongly, so here it is applied in two or even three layers.
During installation, a poorly ventilated air gap remains under the sheets of gypsum board. In rooms with high humidity, optimal conditions are created there for the development of various kinds of rot and fungus. Treatment of the base wall with an antiseptic will help to avoid this danger.
- Since the GKL sheet has large (2500 x 1200 mm) dimensions, free up a suitable flat area on the floor for working with it.
GKL can be mounted only when the wall is completely dry, after all the procedures performed.
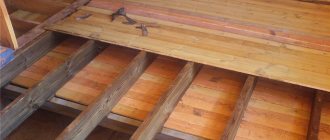
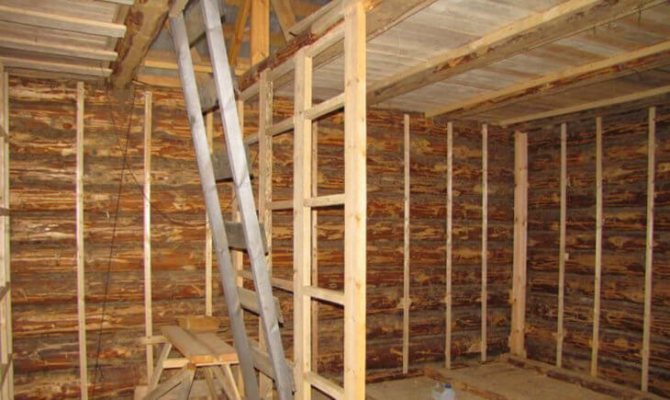
Lathing made of wooden beams for the inner lining of the house with plasterboard
Wooden lathing
Sheathing the house from the inside with plasterboard can also be done on a wooden crate. It should be chosen for racks and a cross bar of 50x50 mm. Use a 70 mm wide plank as a starting point. The screws are fitted with washers and are not tightened.
Lack of timber frame in complex timber preparation. It is necessary to treat with fire retardants, soak in antistatic agents. The service life of such a cladding is much shorter than that of metal, and soon you will have to sheathe the house inside again. Even well-dried wood can lead to processing. The beams should be carefully checked for curvature.
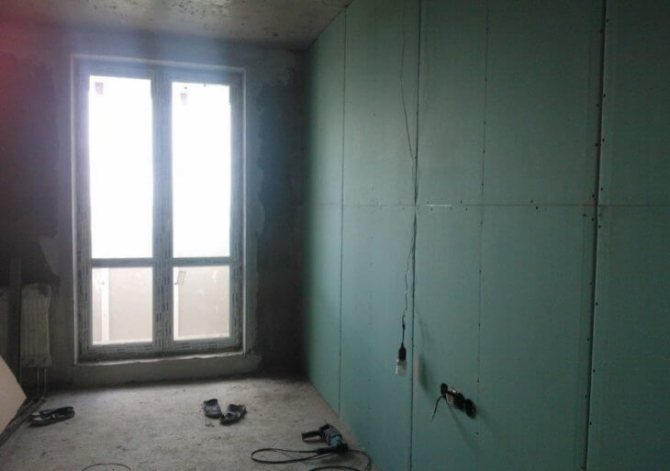
Frameless plasterboard cladding inside the house
We sheathe the walls with plasterboard without lathing
A frameless method of installing gypsum plasterboards inside the house is possible on stable, even surfaces. This is mainly plaster. The masonry must have irregularities within 5 mm. If the wall does not need to be aligned vertically, then the house can be sheathed from the inside with drywall without lathing.
The surface of the walls of the house must be cleaned of dust and other contaminants. Cover in 2 coats with deep penetration primer. The starting profile is installed below. It serves as a support and helps to align the sheets horizontally. The adhesive is applied with a notched trowel. The advantage of this mounting method:
- sheathing is done faster;
- the useful area of the room is preserved along the entire perimeter;
- the cost of finishing is much lower.
The disadvantages include the inability to hide communications under the cladding, and to make the internal insulation of the house.
The owners of wooden log cabins are rightfully proud of their acquisitions (or the results of the construction undertaken). The house turns out to be cozy, beautiful and ecologically sound - complete order! But when it comes to interior decoration of a wooden house, and even with their own hands, people sometimes get lost. In some areas of the building, there is simply no way to leave the tree intact. For example, in the kitchen, it will quickly smoke up, and possibly begin to crack. And in the bathroom it will swell from moisture, threatening the tenants with mold. You just can't put the same tile on a bar or a log: either it won't hold on at all, or very soon it will start to "walk" because of the breath of the tree. And here drywall can come to the rescue: in a wooden house, it will perform the functions of a supporting base for finishing.
Installation instructions
To understand how to attach drywall to the wall, step-by-step instructions will help.
- Stage 1. Measurements of the wall and planning of the placement of plasterboard sheets are carried out.
Avoid cross-shaped joints; place sheets with an offset.
- Stage 2. Preparing the surface. If the wall is porous, it must be primed.
- Stage 3. GCR is cut out. In addition to solid sheets, pre-prepared inserts are also useful.
Straight cuts are best done with a sharp construction knife, and a jigsaw will help when making curves and radius lines.
- Stage 4. Glue is being prepared. It is permissible to use gypsum mixtures that set slowly, such as a starter putty.
In order to extend the setting time of the mixtures, wallpaper glue or PVA can be added to the dilution water.
- Stage 5. Plasterboard sheets are glued to the wall.
If you are worried about how to secure drywall securely, then know that this type of fastening does not require any additional actions.
It is important that seams 5–7 mm wide and gaps of 7–10 mm from the floor and 3–5 mm from the ceiling are left between the sheets. For this, pre-prepared wood wedges are used.
Wooden lathing
It is especially appropriate if you are installing drywall in an old wooden house.Its shrinkage is complete, and the walls are probably not too even. But the main thing is that they are just breathing and will not change much in size.
- A bar with dimensions of 75x25 mm is taken under the support posts. More is possible, less - in no case. Naturally, the lathing is made of lumber treated with fire retardants and antiseptics, followed by drying.
- For guides and crossbars, 50x25 mm strips are sufficient.
- The support posts are attached in increments of 1.2 meters, that is, in the width of the gypsum board sheet. At least one guide is mounted between them. If you want more structural strength, fill them more often. The main thing is that there is a support stand at the center of the sheet, and a guide at the junction of the plates.
- The crossbars are packed in such an order that they are at the place where the narrow sides of the gypsum board meet. Do not forget that horizontal seams should not line up: drywall is mounted in a checkerboard pattern, or at least with a noticeable displacement.
All slats are level-checked. The largest protrusion of the wall is taken as the reference point. In the places of the depressions, wedges are placed, hewn to the required thickness. When decorating your house with plasterboard on a wooden frame, the slats are attached to the lumber with screws and a washer at a distance of 20-30 cm. Do not tighten them too much so that the sheathing does not deform with natural movements of the walls.
Preparing the walls
Substrate preparation is the very first and most important stage in surface design.
It includes the following steps:
- Cleaning the surface from old coatings, dirt, dust. Surface Requirements:
- absence of large defects, deformations;
- strength;
- the wall should not be frozen or wet;
- Priming the wall.
This is necessary in order to increase the adhesion of parts to the surface during installation. - Determination and measurements of the depth of wall irregularities.
This is done using a building level that is applied to the surface, or a plumb line. Depending on the value of these parameters, the method of work is selected. - The wall is marked
, that is, those places are highlighted to which the gypsum board will be glued. - The locations of the electrical wiring are established
, switches, sockets. - Cutting drywall sheets.
For this, the material is applied to the wall, leveled, cut into sheets of the required size. It is necessary to cut the sheet about 1 centimeter less than the height of the wall to create gaps.
Metal carcass
It may well be used for such a cladding of log cabins. However, for new, not completely settled, buildings, it is better to use a mobile version.
- Vertical posts from the profile are placed according to the general rules, with a calculated step and level check. However, they are mounted on a rigidly fixed wooden crate.
- Horizontal crossbars are fastened with self-tapping screws through oval grooves in the bearing profile. This will give them the ability to rise / fall as the tree moves.
Plasterboard wall cladding made in this way maintains independence from the walls, while having sufficient strength even for tiling. This method is somewhat more expensive than fastening on a wooden crate, since both it and a metal profile are required. But it gives more reliable results.
But finishing a wooden house with plasterboard from the inside, carried out directly on the lumber, honestly, is not the best option. Yes, if the walls are flat enough, you can glue the sheets directly to the surface. However, they will inevitably be led in the process of tree breathing, and compensation gaps will not save them either. Another option - the creation of a false wall - can only be used in large rooms, since it “eats away” a significant amount of space. In this case, the frame is mounted at some distance from the wall and sheathed with sheets. In fact, this creates a solid partition, as in a redevelopment.
Today, there is still no room that can compare with its environmental friendliness and originality with a wooden structure built of glued or profiled timber.
One of the ways to increase the service life of such an object is to carry out high-quality interior decoration.
To the brick wall
Brick has a number of disadvantages that prevent the use of glue or the screwing method when fastening drywall: brittleness of the material and pronounced unevenness of the masonry. Installation of gypsum board in such cases is advisable to carry out using polyurethane foam.
There are 2 methods of foam mounting:
- fixing sheets on the wall with filling the gaps with foam;
- applying foam to the sheet.
The latter method is used more often, it allows you to control the amount of foam used. The assembly tool continues to expand during solidification, therefore, when using the first method, there is a risk of deformation of the structure under its pressure.
Advice.
For fixing the gypsum board to brickwork, it is better to use foam for installing expanded polystyrene. It has good adhesion and does not expand as much.
Fixing with screws and foam
The use of this method requires careful measurements and a certain experience in the use of polyurethane foam. Before starting work, you should evaluate the curvature of the walls and select screws of different lengths in order to level the level differences.
- GKL is reamed for screws at 9-12 points.
- The sheet is applied to the wall and the fixation points are marked on the brickwork.
- On the gypsum board, in a circle from the holes drilled for self-tapping screws, pieces of foam rubber are glued at the moment for shock absorption when screwing.
- The points marked on the wall are drilled out, dowels are driven into them.
- The drywall sheet is fixed to the wall with self-tapping screws with wide washers. In the process of screwing in, the position of the gypsum board should be monitored using a level.
- Next to each fastener, holes of 5-6 mm are drilled in the drywall sheet for the nozzle of the polyurethane foam cylinder.
- A balloon nozzle is inserted into the holes and the gap is carefully filled with foam. Contact spots should be about 10-15 cm.
When the foam dries, you can unscrew the screws and remove the washers. After that, the sheet is again fixed with fasteners so that the caps slightly drown in the drywall, and all the joints and grooves.
Bonding sheets
If the brickwork is flat enough, you can glue the gypsum board with foam directly to the wall. Height differences of no more than 20 mm will ensure uniform pressure of the composition and fixation of the sheet.
Important.
Polyurethane foam is fire hazardous, therefore, the wiring should not pass through this material, a fire will lead to the release of toxic substances hazardous to life.
- Polyurethane foam is applied directly from the balloon around the perimeter of the sheet, and then distributed with a snake over the entire surface area.
- Wait 15 minutes for the foam to spread over the surface and begin to expand again.
- The sheet is carefully applied to the wall in the intended place and is fixed with a system of spacers until the installation compound is completely solidified.
So that the gypsum board does not deform due to the secondary expansion of the polyurethane foam, a chipboard sheet can be placed under the spacers, approximately. After hardening, the joints are closed with putty.
What manufacturers of finishing materials offer us
It is unlikely that anyone will be interested in the interior decoration of a house made of laminated veneer lumber, since there is no need to cover such material with anything. Therefore, we will continue to talk about the interior of the house from ordinary and profiled material. In this case, it will be described in detail how it will help keep the house warm and strengthen its walls.
What options for interior decoration of a house from a bar can manufacturers offer us:
- fake diamond;
- lining made of plastic and wood;
- block house;
- panel siding;
- drywall.
If you look at the photos of various interiors of a wooden house, combined options are very often found here.Moreover, each finishing material complements the other, forming a complete project. There is an original and interesting interior decoration of a log house, striking in its practicality.
Fake diamond
The second name of the material is decorative stone. The correct interior decoration of the walls of a house from a bar with the placement of accents can transform a boring room and give exclusivity to a bright interior.
What we need to know about the material:
- it is analogous to natural stone;
- durable and moisture resistant;
- the components from which it is made are not harmful;
- it makes it possible to create original and even unique interiors in wooden buildings, this is especially noticeable in combination with wood;
- its surface does not absorb various dirt and is easy to clean, a damp cloth is enough.
Advice: it is forbidden to clean the surface of the artificial stone with abrasive products. They can damage it and spoil its appearance.
- Prepare the wooden base before placing the artificial stone on it.
- Close the gaps in the profiled timber walls resulting from the masonry. To do this, make caulking with linen-jute thread or use other materials suitable for these purposes. Do not rush, do everything carefully, since the finishing part of the finish cannot be started until at least the slightest drafts are eliminated.
- Level the wall surface with plasterboard or plaster, you can also use OSB board or thin plywood sheet.
- When preparing dry plaster, use the instructions on the package, which will indicate the exact amount of water required.
- Do not confuse starting and finishing plaster, as they have different functions. The first evens out the surfaces, and the second is needed to hide the defects of the starting layer and for decorative functions.
Tip: when used for leveling drywall walls, a metal frame from a special profile is required. You should get a crate, on which the sheets of plasterboard are installed.
Prepare materials for the installation of artificial stone:
- cement-based mortar or special glue;
- two small spatulas;
- building level;
- grout if necessary.
Technology
Below is a suggested instruction:
- The installation process depends on the size of the finishing material. The cement or glue mortar is applied to the wall and to the smooth side of the stone with a trowel.
- Use a second spatula to remove excess mortar from the surface. With a seamless masonry method, the stone should be installed from the bottom up, pressing tightly against each other. When the laying is supposed to be with a seam, then from top to bottom.
- Traditionally, the installation of each element on the level, although it all depends on their size. Sometimes it can be stacked in a chaotic manner. In this case, first measure the required area of the cladding and draw it on the surface.
- Rub all the seams after installation with a special grout on artificial stone, it will not work for tiles. You can add dyes to the solution and carry out installation and surface finishing at the same time.
In fact, do-it-yourself interior decoration of a house from a bar is not difficult for beginners, since the back of the stone is flat.
Block house or lining made of wood
What you need to know about materials:
- wood absorbs moisture, therefore, without processing, it is not used in points with high humidity;
- they are practical and environmentally friendly, the interior with their participation looks great in a wooden structure;
- to protect them from dirt and insects, they are varnished;
- they are strong and durable, most often used to decorate a bedroom or living room;
- interestingly combined with natural and artificial stone.
Prepare materials and tools for installation:
- screwdriver;
- wooden bars;
- wood screws;
- building level.
- Install a wooden starter strip on the wall. The material will then be installed on it.
- Make a wooden crate and place insulation in its cells. Thus, at the same time, insulation and interior decoration of houses from a bar will take place.
Siding and plastic lining
These materials for interior decoration of a house from a bar do not absorb moisture, therefore they are used in the sanitary and kitchen areas.
Features:
- the surface of materials does not absorb dirt, therefore it is easily cleaned of it;
- installation does not cause difficulties, and it is possible to do it yourself, without the involvement of a specialist. Thus, it will be possible to save the family budget;
- the price of finishing materials is affordable when compared with artificial stone or lining made of wood.
Prepare tools and materials:
- boards and wooden blocks;
- wood screws of various sizes;
- sealant;
- screwdriver;
- construction stapler.
Installation:
- Create a batten from wooden blocks in the first step. Attach them directly to the wall with self-tapping screws.
- Establish a starting strip around the perimeter. It sets the direction of installation of the material.
- Insert panels into it and connect to each other according to the “tongue-and-groove” system. Attach to the crate with a construction stapler.
Tip: Use a sealant for the strength of each joint.
Drywall
Interior decoration with plasterboard of a house made of timber is popular for decorating wooden houses, but it has some nuances. Typically, such walls shrink, and can also deform due to external factors.
This must be taken into account, otherwise cracks will appear at the joints of the drywall, which cannot be removed.
In this case, the installation of drywall in such a situation differs in the method of attaching the battens to the wall.
- In a house made of laminated veneer lumber, which practically does not shrink, the lathing is fixed in the usual way using the CD 60 profile, and the suspensions are mounted directly to the wall using the CW profile. The gypsum plasterboard structure is able to withstand minor changes to the base due to the suspension system.
- If it is required to finish with plasterboard movable walls made of timber of natural moisture, it is better to equip it with "sliding" suspensions that do not depend on shrinkage and impede the process.
- The lathing cannot be rigidly fixed to the ceiling. It is installed in such a way that it does not reach the rough ceiling by 20-30 mm.
Is it true that sawdust is truly the ideal insulation?
We immediately answer: sawdust is not at all ideal, but just a good and cheap heat-insulating material. Wood sawdust and shavings have great advantages in the role of insulation, but they are not devoid of disadvantages.
Wood waste is attractive because:
- they have fairly good thermal insulation properties;
- due to their price, they are one of the cheapest heaters;
- it is quite easy to find and purchase them;
- their environmental safety is beyond doubt, which is important both for those who will live in an insulated house and for those involved in insulation.
However, the listed advantages cannot be fully attributed to the waste of processing boards such as fiberboard and MDF. They contain a large amount of dust, which complicates the performance of insulation and reduces the environmental characteristics of the insulation obtained with their help.
Quite recently, the required amount of sawdust could be collected in any carpentry workshop, the management of which even thanked for freeing the premises from materials that were considered garbage at that time. Now, woodworking waste is, although inexpensive, but still a commodity that, in addition to individual builders, is widely demanded by smoking and sausage industries. In Perm, for example, woodworking enterprises offer sawdust at a price of 10 to 20 rubles per bag.
The disadvantages of sawdust are as follows:
- sawdust and shaving mass must be processed with the help of special substances that prevent their defeat by the ubiquitous rodents and insects;
- the preparation of the insulation and its installation are quite lengthy processes.