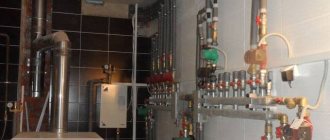
Gas
- Is it possible to hide gas pipes in an apartment
?
Where there are no threaded connections on them - of course. Gas-fired steel pipes, provided the paint is preserved on their surface, do not rust or wear out, their service life is practically unlimited.
Exception: do not close the steel gas pipe at the entrance to a private house. In winter, when the temperature outside is noticeably lower than in the house, cooling the bushing with gas consumption will cause condensation to drop out on it. On an open pipe, it will quickly evaporate, and on a closed pipe, it will eventually lead to rust.
- Is it possible to close gas pipes with plasterboard on a galvanized frame
?
The material of the box or niche at a distance from the stove does not matter. Absolutely any finishing materials can be used - gypsum board, gypsum plasterboard, wall panels, plywood, OSB, etc. But near the slab for the box, it is better to use non-combustible materials, including drywall.
- Is it possible to sew up a gas pipe at the connection with a gas meter
?
Not. All threads, taps in front of gas appliances and the meter itself must be accessible for dismantling and maintenance. If there is a leak at any connection, the accumulation of gas in the box is simply dangerous, and besides, it will interfere with identifying this leak and carrying out repair work. Do not forget about the need to check the meter: after a few years it will have to be removed.
What you need to know
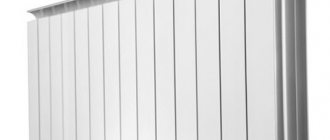
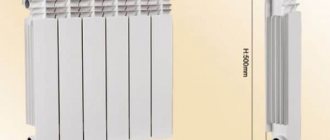
There are many options for hiding a radiator. You can, of course, purchase custom-made designer radiators to match a particular style. But the main disadvantage of such a heater is considered to be a very high price.
It is inconvenient to sew up batteries, for example, with drywall, because in the event of an accident or a routine inspection, you will have to perform complex dismantling.
This article offers several options for devices that help to inexpensively and beautifully design a heating radiator in any room.
However, when decorating, one should not forget about the direct purpose of the heating system, which, first of all, should warm up the home, and not only attract attention with an original and stylish design. Therefore, when thinking about how to hide a battery in a room, several important aspects must be taken into account:
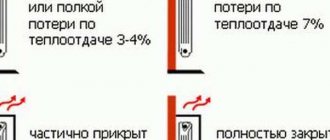
- Convection air currents should not have obstacles in their path. This will ensure uniform heating of the room and prevent the windows from fogging up.
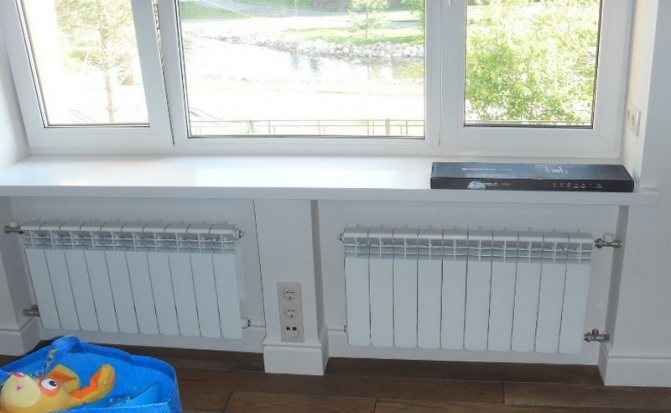
- Threaded connections and radiators must be within the reach; for this, when making a decorative structure, a window or removable elements (for example, a small hinged door) should be provided.
- The thermal head, valve and other adjusting parts of the system must be accessible for repair work.
Heating
Central
- Is it possible to close the heating riser under the drywall
?
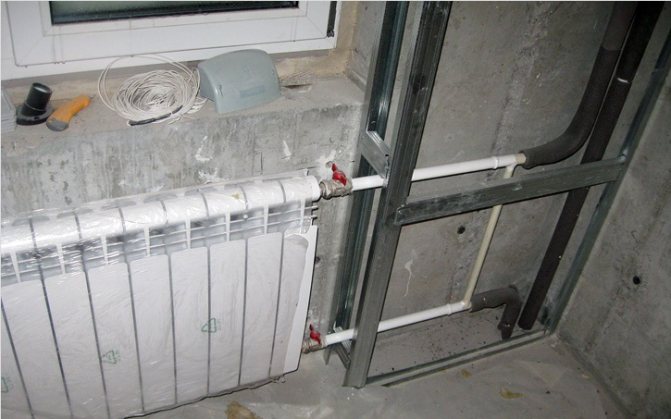
It is possible, but with a number of restrictions. The steel riser should be replaced with a corrugated stainless pipe with maintenance-free compression fittings and only on it, and not only from floor to ceiling, but also in both ceilings - common with the lower and upper neighbors.
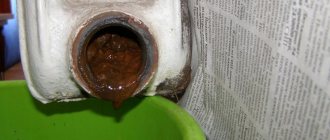
Steel pipes are known to corrode. The first through holes appear where the metal is thinner - on the threads of the connections and on the welds.
In addition, a solid pipe with a constant wall thickness rusts the fastest in the ceiling - with quite predictable consequences.
Replacing black steel pipes with galvanized steel increases the service life of the riser and connections many times: after half a century of operation, opened pipes in stalinks do not differ from new ones. However, they can only be assembled on the threads: in the area of the weld, the zinc completely burns out.
Reference: the melting point of steel is 1300 - 1400C. The boiling point of zinc is about 900C. Welding galvanized steel, you get a pipeline, which has only the price of galvanized steel: the seams will rust just like a black steel pipe.
Well, each thread is a place of potential leakage: flax burns out over time, and synthetic windings often leak at the slightest reverse thread (for example, if a neighbor slightly turns the riser when replacing the battery or starts cutting threads on it).
The photo shows a threaded liner from a galvanized pipe.
All polymer and metal-polymer pipes are not resistant to water hammer, which are not uncommon when starting heating. Sufficiently for an inexperienced locksmith quickly open house valves
when filling the circuit - and the pressure at the front of the water flow at a certain moment will reach 30 - 40 kgf / cm2, while reinforced polypropylene is designed for 25 atmospheres, and metal-plastic - for 10 - 16 at all.
A good alternative to corrugated stainless steel would be copper on soldered joints, but the problem is that it forms a galvanic pair with aluminum, which leads to an electrochemical one of the metals, and aluminum radiators are not uncommon in heating systems.
Note: the water in the central heating system is an electrolyte due to the mineral salts and metal oxides dissolved in it. For the occurrence of electrochemical processes, the metals forming the galvanic pair must only be at a small distance from each other in a common circuit filled with electrolyte.

- Is it possible to sew up the battery with drywall or other materials
?
There are different opinions on this, but I, in the past, a plumber with solid experience, consider the construction of a box around a radiator to be the greatest nonsense.
There are several reasons:
- The radiator connections are detachable and leak from time to time. Doing repairs inside a box that does not allow turning the union nut or radiator plug with a wrench is not ice;
- On the upper floors, radiators are supplied with air vents. The box deprives the owner of free access to the Mayevsky crane;
- The batteries need to be flushed from time to time. Installing a flush valve inside the box and connecting a hose to it ... let's say politely, it's not easy;
- All sectional radiators suffer from leakage between sections. They are most typical for cast iron batteries, but aluminum ones are also not alien to this problem. The box will not allow you to remove the heater or sort it out on the spot;
- Finally, think for yourself: how to sew a battery without reducing its heat transfer? Heat is transferred by convection and heat radiation; A solid box of any design will limit the transfer of thermal energy in both ways.
- How to close the heater without reducing its heat transfer and keeping free access to it?
But this is the right question.
Use a removable decorative screen. It should be dismantled as simply as possible, if possible without tools and be mesh or lattice from all sides, including from above.
Autonomous
- Is it possible to close or sink heating pipes in the wall in an autonomous system with its own heating boiler?
Yes - provided the pipe connections are maintenance-free. These include:
- Welded socket joints of polypropylene and PE-RT pipes;
- Brazed copper pipe joints;
- Connections of the notorious corrugated stainless steel on compression fittings;
- Press fittings on metal-plastic;
- XLPE on sleeved fittings.
The choice of pipes in this case is a matter of taste for the owner: with its minimum rationality, the parameters of the heating system are completely controlled and stable. The pressure in the autonomous circuit does not exceed 2.5 kgf / cm2.
If you close steel pipes or any material with serviceable joints (for example, metal-plastic on compression fittings), then you will create problems for yourself with your own hands. The box will have to be disassembled at the first leak.
Stages of plating pipes and batteries
All work is carried out according to a sketch, and best of all, an exact diagram of the future structure: a frame, a box or a screen.
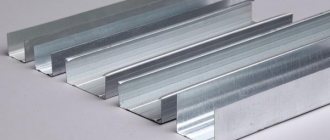
- First of all, you should prepare the necessary tools and materials, as well as fasteners. To work with metal posts and profiles, you will need a drill, screwdriver, screws, screws or bolts. Lightweight materials are assembled and attached using dowels, self-tapping screws, a hacksaw and a drill. In any case, a screwdriver comes in handy.
- Next, you should measure the surfaces of the wall for the manufacture of the frame, which it is desirable to make a little more than the received measurements. This will ensure normal air circulation.
- On liquid nails, a guide is attached to the floor along the wall. Parallel to it on the wall, slightly above the pipes that need to be masked, the same bar is attached.
- The pieces of the profile are inserted into the lower guide and fixed with screws. The distance between them is about 35 cm. On them, for the strength of the frame, another guide is attached.
- The same steps are carried out for the rail on the wall. The ends of the upper profiles are fastened to the lower profiles. The base is done.
- Then it remains only to sheathe the frame with the prepared material, observing the basic rules of access to the heat and pressure regulators.
Water supply
- Is it possible to sew up the pipes responsible for the water supply in the toilet
?
If you have a centralized hot water supply, then the same restrictions apply to the DHW riser as in the case of central heating. In no case should the steel risers of hot water and cold water be sewn up: after the first leak, you will have to make repeated repairs.
I will clarify: in cold water, to replace the riser, which will be removed into a niche, you can safely use any pipes with maintenance-free connections. Due to the peculiarities of the configuration of the cold water system, a water hammer is impossible in it: the air in the risers and connections during filling plays the role of a damper, while the hot water system at startup is often bypassed for reset.
If, at the same time, the permeability of the vent is lower than that of the valve element through which the circuit is filled, then a water hammer occurs at the moment when the remaining air is displaced from the circuit.
- And the pipes in the bathroom should be put in a box.
?
Again, in the event that all connections of the cold water supply and hot water supply are maintenance-free. Steel pipes cannot be sewn up with a non-separable box.
- How to sew up pipes in a toilet so that condensation does not collect on them
?
Install ventilation grilles above the floor and ceiling. Convection through them will provide heating of the air with a hot water riser.
Installation of a wooden frame for a box
Do not forget about such material as wood. To assemble such a frame, you can use a beam of 40 × 40 millimeters. This structure is assembled as follows:
- The lower part is assembled in the form of a rectangle. The connections can be made according to the tenon-groove pattern.
- The resulting base is rigidly fixed on a dowel or anchor to the floor.
- In the corners, using the mounting corners, the racks are installed.
- The top can be assembled in the same way as the bottom. The upper part is also attached to the corners.
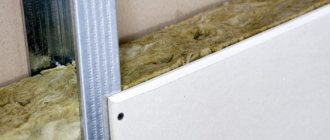
The resulting wooden structure is treated with an antiseptic or simply painted and sheathed with plasterboard.
Sewerage
- Is it possible to close sewer pipes in an apartment with a non-separable box
?
In principle, yes, but with a couple of caveats:
- Socket connections must be assembled on silicone. Rubber sealing rings dry out and leak when the drain system is idle for a long time without water, while the sealant will retain water;
- Siphon connections to plumbing fixtures must be accessible. Through the sockets, the sewage system is cleared when blockages.
In addition, SNiP 2.04.01-85 mentions another instruction: a hatch with a size of at least 30x40 cm must be installed opposite the revision in the sewer riser.
However: it is much easier to clean the fat plugs not with a cable, but simply by disassembling the pipes and shaking out the fat into the trash can. Of course, this can only be done with an open sewer installation.
- How to close pipes with plasterboard in a private house when they are long
?
The difference from the apartment is one: every 8-10 meters of the sewer bed, it should be torn by tees or revisions for cleaning, opposite which hatches are mounted in the box.
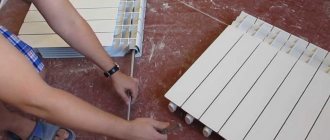
Installing drywall to cover batteries
The next step in the installation is cutting the plasterboard sheets into pieces of a suitable size. To sheathe the battery with drywall, you need to attach the cut elements to the frame with self-tapping screws in increments of 15 cm. You need to tighten the screws very carefully - at high screwdriver speed, damage to the drywall can occur. In addition, the hats of the mounts can simply fall into the material and thereby render it unusable.
However, if you work carefully, then no problems will arise - it is very easy to interact with drywall. In the equipped box, the outer part will remain empty, inside which the battery will be visible. The formed window is closed with a decorative screen, which ensures full heat transfer to the room.
Finishing
After the box is assembled, all the seams are closed, the corners are reinforced with corners, mesh and putty. Putty is applied, then a corner, mesh is attached, then putty again. After drying, the surface is rubbed with sandpaper. The final step will be painting or wallpapering your screen.
In some apartments, it may be more expedient not to install a screen, but to completely close the heating battery together with pipes with a plasterboard false wall.
Watch the video how the installation of such a false wall is performed
It is not necessary to do it yourself Installing the screen on the battery can be made to order, but only yours.
Perhaps the purchased screen will not fit well into your interior, and the drywall will make up a single whole.
The apartments, built by the hands of Soviet workers, as well as in some modern buildings, have cast-iron heating radiators. These elements are not always suitable for the general interior of the room - in this situation, you need to think about how to close the battery with drywall and not reduce the level of heat transfer.
According to the existing housing code and redevelopment rules, heating systems cannot be hidden directly into the wall. But you can close them with an additional wall made of an alternative material.
How to hang a battery - on drywall and removable screen
Plasterboard finishing of batteries is more often used - this material allows you to quickly and easily hide the flaw in the room, to make the appearance more attractive.
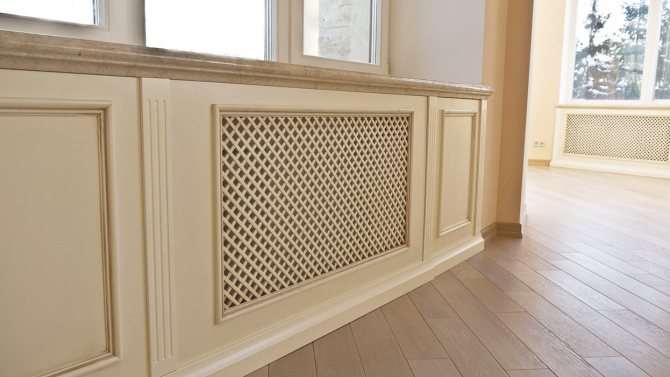
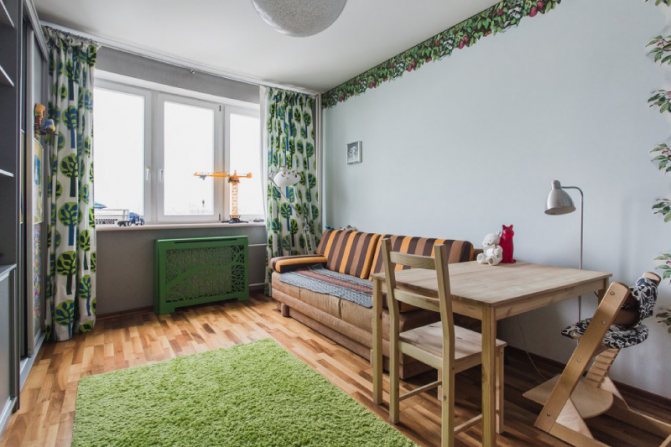
Battery screen
This option is the simplest and most popular. Screens can be of different appearance. Often there are structures made of metal. There are two types:
- Hanging. They are simply superimposed on the battery without any additional attachment. Therefore, with any contact, they can fall.
- Embedded. They are inserted into specially prepared boxes made of wood or drywall. A very convenient option. In addition to those made of metal, there are plastic, wood and HDF (high density fiberboard).
Which of the options to choose depends on the specific situation.
Markup
The marking of the future structure is carried out using:
- measuring tool
- tape measure, ruler, corner; - descriptive instrument
- a simple pencil, marker; - precision instrument
- building or laser level.
During this stage, it is advisable to adhere to the exact dimensions, limited to whole centimeters. Millimeters are used only in the case of a particularly precise design, for example, for an established interior project.
Before you sew up the battery with drywall and get rid of its unpleasant appearance, you need to decide for which method of termination to carry out the marking:
- a box is a simpler and faster method of work (only the area of the battery is sealed and, literally, 12-20 cm outside it);
- wall is a more time-consuming method (the wall with the radiator installed is completely sealed; if the heating device is installed near the window, slopes must be made).
In terms of the volume of work, the termination of batteries according to the first method is simpler: less material is used and a small number of construction processes are carried out. In the second case, even fewer construction processes are used, but more material is used.
Box
When installing a box, the structure takes up little space, covering a little more space than the radiator itself. The depth of such a box depends on the width of the heater (most radiators are narrower than batteries with metal plates).
Note! The edges of the structure should protrude at least 10 cm beyond the edge of the radiator - otherwise, it will not be possible to install a removable screen on the front side.
Instructions for marking the box:
- Depending on the required position of the structure, a horizontal strip is drawn. If the box hangs, measure the distance from the floor and draw a marking line using a level. If the structure rests on the floor, there will be 3 lines (two at the edges - depth, one front - the edge of the structure).
- It is necessary to set a corner to the bottom edge and draw vertical marks - we achieve a right angle. Using the level, we bring the vertical lines to the required size.
- The same marks are marked on the vertical lines, between which a connecting segment is drawn.
The result should be a square or rectangle (in the case of support on the floor - additional marking of the base).
Wall
Analyzing the room and thinking how to close the radiators and pipes with plasterboard and do it correctly, the decision to install an alternative wall comes naturally.
The essence of the solution - together with the radiator, the entire surface to which it is attached is covered. This method is wasteful, since you can get by with small amounts of material by arranging a point box. But the wall is the only way to hide the heater from the room with your own hands completely.
For the wall device, the frame is built to the entire height of the room:
- With the help of the level, several vertical lines are drawn on the base for the frame. Step - 60-100 cm. Mandatory lines for profiles in the corners of the room.
- From each vertical line it is necessary to draw a continuation to the floor. For this, a corner is used. The depth of the floor lines is equal to the width between the main wall and the alternate wall.
- Similar to the floor ones, lines are drawn on the ceiling - of equal depth and strictly parallel.
- The last marking lines are drawn above and below the heater, at a distance of 7-10 cm.
On the sides of the radiator, markings are also carried out - along the perimeter of the device, profiles are needed into which a removable screen will be installed. But to get rid of unnecessary work, you can draw the main markings (which are for the entire height of the room) directly on the sides of the radiator.
Some features
In most cases, drywall is used to finish the battery.This material makes it possible to hide the lack of space, to create a beautiful appearance. Before installation, the markup of the conceived design is done. For this, a variety of tools are used, from a simple tape measure to a laser level.
When marking out the structure, you need to make accurate measurements in centimeters. Millimeters are needed if a very precise design is made, for example, for an existing interior. Before closing the battery with drywall, to create a beautiful appearance, it is necessary to determine what the seal will be, and for this method to do measurement work. The simplest and fastest way is to make a box. This method is used when you need to seal only the battery itself and 20 centimeters outside of it.
The most time consuming method is the wall. In this case, the entire wall where the radiator is located is completely sealed. For the battery near the window, you need to make slopes.
The least amount of work is required for finishing according to the box method.
A small amount of material will be required, the construction process consists of several operations. For the second case, much more building material is required. The box design requires little space. It just covers the radiator and the small area next to it. The depth of such a box is calculated based on the available width of the radiator. Basically, radiators are much narrower than batteries made of metal plates.
Share on
Any communications that have been laid or are in plain sight have always been a problem. It can be very difficult to fit them into the overall interior of the room. But especially often there is a problem - how to properly close the heating battery in the room. After all, an important condition must be preserved - nothing should be an obstacle to good heat transfer.
There are many ways that you can close heating radiators and at the same time provide a comfortable temperature.
If this is not possible, then the options for creating a screen are perfect. Namely - the design of the radiator in various ways that allow you to hide it. Several options should be highlighted:
- Installation of a hinged screen.
- Creation of a wooden - removable element.
- The use of plasterboard boards - for the box.
It should be noted that the last point is the most popular at the moment. At the same time, he cannot be considered as the most ideal. The fact is that the creation of a solid box is a rather controversial decision. Indeed, in case of any breakdown, leakage, you will have to disassemble it completely, which is very inconvenient.
Therefore, the first step is to audit the heating system. Check joints and connections, inspect the radiator for the possibility of leakage or blockage. Only after such preventive work and replacement of damaged areas begin the direct installation of the structure that will cover the battery.
The design for hiding the radiator must meet the following parameters:
- Warm air currents should not encounter obstacles in their path. This ensures uniform heating of the entire room.
- All threaded connections and air and water relief valves - must be easily accessible.
Attention! Very often the option is allowed, which can be found in some apartments. It lies in the fact that the heating radiators are completely hidden by the gypsum boards. This is invalid.
Frame device
Before you close the heating battery with plasterboard, decorating the interior of the room with this, you need to arrange a frame. For its construction, channel-shaped metal profiles, 60-70 mm wide, are used.
In total, in the process of doing the work you will need:
- profiles - as the main frame;
- screws (40-60 mm) - fastening the structure;
- dowels (40-60 mm) - fastening in the surface;
- metal scissors - for cuts, if necessary, bending metal;
- pliers, screwdriver, drill or hammer drill - an auxiliary tool.
The profiles that are attached to the wall are attached first.
On our website you can watch a lot of videos on the construction of drywall frames, but the basic instructions are as follows:
- a metal profile is attached by either side or center to the marking line;
- a small outline is left on the wall with a screwdriver;
- a perforator makes a recess for the size of the mount;
- a dowel is inserted into the hole made;
- a profile is attached to the prepared place;
- the screw is fastened.
After adhering the metal to the wall, the outlines are made in 15-25 cm increments. The holes are prepared immediately for the entire profile.
All the necessary parts of the frame are attached by the described process. In the case of fixing a corner of two elements, you need to trim the necessary parts with metal scissors.
When the parts that are attached to the wall are installed, go to the depth of the frame:
- we cut parts of the profiles of the required size;
- cut both edges of the element at the bend by 4-5 cm;
- bend the middle down, and cut the sides to the width of the profile channel shelf;
- we attach the segments to the edges of the main long elements at an angle of 90 degrees towards the room.
The last part - connecting the upper and lower short parts, elements.
Note! When installing a wall covering the battery, long vertical metal elements are used, so two short ones at the top and bottom will not be enough - at least 4-5 pieces are needed.
The finished frame should represent a strong structure, not stagger. If the frame is wobbling, it means that the fastening was not done well, or there are not enough additional short elements.
How to attach a curtain rod to a drywall wall
The renovation is complete, the ceiling and walls have been decorated with plasterboard. And the question arises of how to fix the cornice on such a surface.
Of course, it would be better to think about providing a cornice before installing drywall, and lay a wooden beam or profile under it, but which was subsequently fixed by the cornice. But this was not done, and, accordingly, it is necessary to go the other way. Let's analyze the method of attaching the cornice to the drywall.
First, let's decide what we need for work:
- For direct fastening of the structure, a butterfly dowel is used.
- Since the attachment is carried out at a height, a ladder or stepladder is needed.
- You will also need a drill or hammer drill, since the work requires creating holes.
- Metal elements will be used in the work, for example, a profile, so you need a hacksaw for metal or a grinder.
- A tape measure is used for measurement.
- You will need pliers for clamping and fastening in use.
- If you want to make the cornice even, use a building level.
- Use a marker or pencil to create marks
- Safety glasses are also useful.
- And finally, for the final fixing, you will need screwdrivers or a screwdriver.
So, we figured out the tool, it's time to go directly to work:
When starting to perform work, you must protect yourself with glasses and a protective mask. Gypsum gives off dust during work, and it is not good for health. The first thing is to determine the place where the cornice will hang. Usually, the fastening is carried out 10-15 centimeters above the window. Using a level and a ruler, measure the distance and make marks on the sides of the window opening, in the places where the brackets will be located. We make holes, mount the dowels, and then attach the brackets (they must be fixed in a horizontal state). We attach the cornice itself directly to the brackets, after which we hang curtains and tulle on it.
Advice: when fixing the cornice to the ceiling, also use this type of fastening, only the distance should be 15-20 centimeters from the wall. In this case, you can use a lambrequin to hide the cornice itself.
Installation of the structure
The most difficult stages of solving the question of how to close the heating battery with drywall and not deprive the room of heat are left behind.If everything is prepared, installation is a simple procedure.
Fastening of drywall is carried out according to the following method:
- a sheet of material is attached to the metal base;
- the cutting point is marked with a descriptive tool - this is how the material is marked into the necessary pieces;
- the prepared part is attached to the corresponding part of the frame and fastened with a screw.
The pitch of the screws when fastening the material in the battery box is 10-15 cm, an example of the location of the fasteners can be seen in the photo above.
It is better to prepare and fix one part of the material, if you cook everything at once, you can make a mistake because of the corners protruding in some places.
Note! When screwing in the screw, it is important to feel the measure - if you put the fastener too deep, you can damage the front side of the drywall.
A removable screen should cover the radiator for ventilation and heat transfer to the room. The first part, the inner one, is attached to the metal even before working with drywall. Then the main material is arranged, and the last stage is to put on the removable, external, part of the screen.
Selecting a sketch of a box
Before you sew up the battery with drywall, you need to choose the type of construction. There are three trim options.
- A hinged screen that is hung on hook brackets attached to the wall. The advantage is the ability to remove it at any time and gain access to the battery. Disadvantage - the structure of the frame of the box must be rigid and self-supporting, and given the weight and fragility of the drywall sheet, this is difficult to implement in practice
Data-lazy-type = "image" data-src = "https://remontcap.ru/wp-content/uploads/2017/08/001..jpg 625w, https://remontcap.ru/wp-content/ uploads / 2017/08 / 001-300 × 225..jpg 174w, https://remontcap.ru/wp-content/uploads/2017/08/001-70Ч53.jpg 70w "sizes =" (max-width : 625px) 100vw, 625px ">
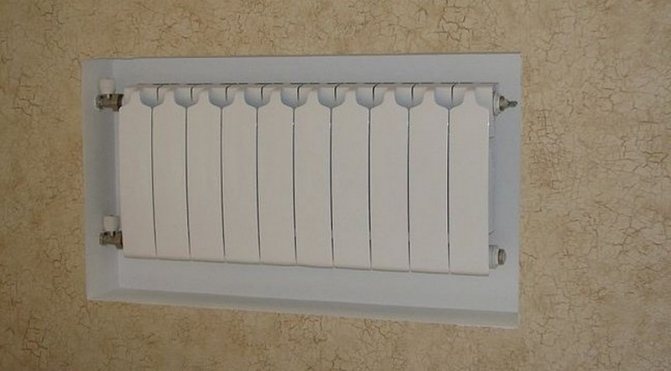
- Installed screen. The method consists in finishing the radiator niche with plasterboard. The easiest option to implement if the battery does not go beyond the niche and the screen is part of the wall cladding. During the overhaul, such a technique allows in a complex to solve the problem of "how to close the heating batteries and pipes with plasterboard"
Data-lazy-type = "image" data-src = "https://remontcap.ru/wp-content/uploads/2017/08/004..jpg 625w, https://remontcap.ru/wp-content/ uploads / 2017/08 / 004-300 × 225..jpg 174w, https://remontcap.ru/wp-content/uploads/2017/08/004-70Ч53.jpg 70w "sizes =" (max-width : 625px) 100vw, 625px ">
- Floor box. The structure is a cabinet rigidly fixed to the wall and floor, sheathed with plasterboard, the upper plane of which can serve as a window sill. This option is most popular when it is necessary to close the battery without carrying out complex repairs. But if in the second method, in order to sew a niche for a plasterboard heating radiator, you only need to make (or buy) a front panel, then in this case it is necessary to develop a design sketch and detailing with dimensions
Data-lazy-type = "image" data-src = "https://remontcap.ru/wp-content/uploads/2017/08/Ekran-korob..jpg 500w, https://remontcap.ru/wp- content / uploads / 2017/08 / Ekran-korob-300 × 225..jpg 174w, https://remontcap.ru/wp-content/uploads/2017/08/Ekran-korob-70Ч53.jpg 70w »sizes = "(Max-width: 500px) 100vw, 500px">
The main requirements for the dimensions of the box:
- Height - the top panel must be at least 50 mm higher than the radiator surface (the standard for the location of the battery relative to the window sill)
- Length - at the front, the radiator should not occupy more than 75% of this linear size of the box (standard for the position of the battery in the niche under the window)
- Depth - the front panel of the box should be 10 cm from the battery.
How to sheathe the battery under the window with plasterboard - with an overhanging sill or with a top plasterboard panel and slots for warm air, depends on the characteristics of the window and glass. Usually the window sill is installed so that it does not overlap the battery and hangs over it no more than 2/3 of its width. It is more aesthetically pleasing if the box fits completely in width under the window sill, in which case it will have to be changed. And it is possible that such a decision will lead to the appearance of frost and ice on the window - the warm air from the radiator will not blow over the glass, and it will freeze over. This will not happen if there are triple-glazed windows or energy efficient glasses are installed in them. Do I need to somehow sheathe the walls behind the battery with plasterboard if it is covered with a box? There is no such need if the rest of the wall was not leveled and the plasterboard was not sewn up.
Finishing work
Dealing with the question of how to close the battery in the room with drywall and not spoil the interior, it is important not to use radically new colors. The best option is to arrange a box or an alternative wall in the general colors of the room. But first you need to prepare the surface for final finishing.
The finishing process proceeds according to the following principle:
- Sealing joints between parts of drywall (see also article on). To do this, a small piece of a serpyanka mesh is applied to the seam, then the joint is covered with putty.
- Sealing the fastener. It is carried out according to a similar method - serpyanka and putty.
- Putty of the entire structure (see also article). With the help of spatulas, the entire surface of the product is putty, whether it be a box or a wall. When the mixture dries, it is leveled by sanding it with fine sandpaper.
The final stage is the finishing of the product - often it is painting or wallpapering. It is better to use the material that is more consistent with the overall interior of the room, if its price, of course, is within the intended budget.
Very often, when completing repairs, people are faced with a situation where the appearance of a room is spoiled by a battery. However, many are afraid that closing it will lead to a loss of heat in the house and therefore leave everything as it is. Nevertheless, there are technologies and materials that will help not only avoid heat loss, but also make the room complete and beautiful.
Today, there are a wide variety of options and materials to beautifully
sew up the battery. According to the features of the covering structure, experts distinguish the following groups of decorative finishes:
- hinged screens with a cover. Cast iron batteries can be closed;
- hinged screens without a cover. With their help it is also possible finishing
cast iron batteries;
- flat screens. They can be used to sheathe modern radiators. In such a situation, the radiator is located deep in the niche;
- attachment box. With its help, you can completely hide not only the heater itself, but also the place of its attachment.
Finishing of radiators is possible with the following materials:
- metal;
- plastic;
- glass;
- tree;
- drywall.
Since an increasing number of people prefer to use drywall in repairs, it is used quite often for battery sheathing. Moreover, you can sew the battery with drywall with your own hands. Drywall in terms of finishing heating devices has gained such popularity due to its advantages:
- environmental friendliness of the material. Interior decoration with such material is completely safe;
- gypsum plasterboards have excellent physical and mechanical properties, so they can be used both in the room and in the bathroom or kitchen;
- low price;
- ease of installation. You can easily make a screen with your own hands;
- the ability to embody any fantasies in interior decoration.
When working with drywall, the following options for closing radiators are possible:
- box. The fastest and easiest way. In this case, the finish of the battery exceeds its dimensions on each side by 12-29 cm;
- building a plasterboard wall in front of the heater. More costly and time consuming method.
The choice of a design designed to close the battery should be made based on your own capabilities and desires.
Mirror
There are several ways to attach a mirror to a drywall wall:
- Glue with double-sided tape. This method is suitable for mirrors with a small area, as the tape will not withstand a heavy load and the mirror may fall over time. But if the mirror is small, this method does not require much time and effort. It is enough to glue the back surface of the mirror with tape and attach it to the wall.
- With glue. The glue method, very reliable, does not need to have special skills.It is quite easy to glue the mirror, for this special glue is used (there should be a mark on the tube for gluing mirrors). Glue is applied to the back of the mirror and glued to the wall. You just need to remember that this method will last for a long time, and then the mirror cannot be removed and moved to another place. The glue holds the mirror tightly.
- Screwing with self-tapping screws. In this case, the mirror can easily be moved to other walls, as it is attached to 4 screws, which can be easily removed later. Of the advantages, it is possible to single out the maintenance of relatively large weights. Below we will take a closer look at this mount.
Related article: How to make a hole in the wall without a drill
It is better to hang large mirrors on self-tapping screws, it is much more reliable. It is advisable to know where the mirror will hang before installing the plasterboard wall and provide guides for it so that the self-tapping screws are attached to them. In this case, the mount will be most reliable. If the wall is already ready, it's okay, we will fix it directly into the drywall, but in this case it is better that the mirror does not exceed 20-30 kg.
Measure and mark at least 4 attachment points - 2 at the bottom and 2 at the top. If the design of the mirror requires a different number of mounts, follow the instructions of the mirror manufacturer.
For mounting on a plasterboard wall, butterfly dowels are used. Withstand loads up to 10 kg alone.
The holes are ready, now dowels are inserted into them, so that the gypsum does not crumble, you can smear the butterflies with PVA glue. Now the mirror can be hung on the wall. Using self-tapping screws that will be equal in size to the length of the butterfly.
The mirror is ready to be screwed onto the bushings with decorative nuts, if any. And the work is ready.
Necessary tools and materials
To make a drywall box yourself, you must have the following tools with you:
- building level;
- drill with screwdriver nozzle;
- screws and dowels;
- metal knife;
- puncher;
- pliers;
- tape measure and pencil;
- ruler corner.
Required tools and materials
In addition, to close the radiator, you will need the following materials:
- drywall sheets. You can use both ceiling and wall;
- metal profiles with a U-shaped section;
- putty.
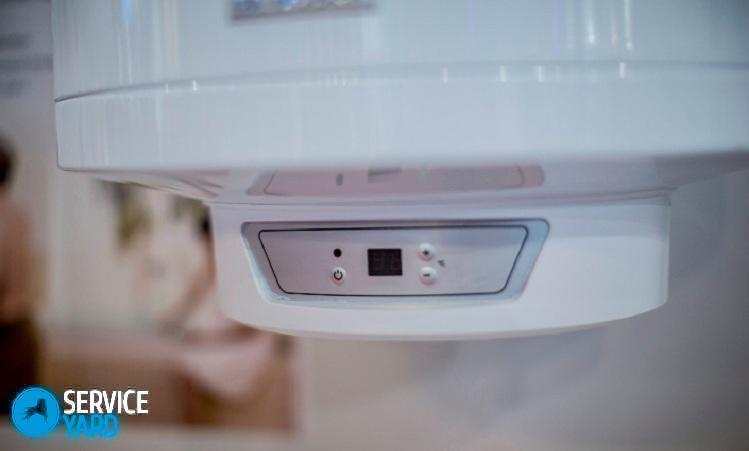
The procedure for hanging the boiler on the wall
A boiler is a device with a rather large mass. Therefore, when hanging the boiler, you must adhere to the precautionary rules. There are several options for conducting work.
Method 1:
- Apply construction tape near the perimeter markings. This will make it possible to reduce the amount of construction dust in the air.
- Drill the profile and drywall according to the markings. Based on the size of the dowel, select the width of the drill.
- Insert the dowels into the holes obtained.
- Fit the bracket system or hanging hooks. The first option (with brackets) is more reliable.
Important! This method is suitable for hanging a light boiler on the wall.
Method 2
In this case, the boiler is installed on a specially made shelf. The work algorithm is as follows:
- Manufacturing of a shelf for the device. You can use both a finished product and a self-made drywall shelf.
- Drill holes at the desired distance with a drill.
- Insert the dowels into the hole.
- Hang the shelf on the dowels with screws and place the appliance on top.
Important! Since modern models, as a rule, are distinguished by solid dimensions, the option with a shelf is safer and more reliable.
Preparatory stage
After the material and design option has been selected, you should proceed to the work itself. First of all, you need to do the final preparation of the battery, which consists in painting it. Since after the finishing is completed, this procedure will not be possible to carry out.When the paint has dried, you can start marking. We will consider this procedure using the example of a plasterboard box. For this you need:
- measure all the parameters of the device. Measurement accuracy - up to a centimeter. The exceptions are projects that require millimeter accuracy;
- since the box is small, its depth and width are determined by the dimensions of the radiator. Remember that you need to make a minimum indent of 10 cm from the edges of the device;
- taking into account the position of the box, you need to draw a horizontal line;
Calculation for the box
Note! All markings should be applied using a level. Otherwise, it will be very problematic to create an even and correct design.
- if the box will stand on the floor in a room or kitchen, then you need to draw three lines: two on the sides (depth) and one that will connect them (the front edge of the structure);
- a square should be attached to the lower edge of the device and vertical lines should be drawn along the wall at right angles. They should be brought up using a level;
- above the battery, these lines must be connected with a horizontal segment.
If everything was done correctly, then at the end of the markup you will receive a rectangle or a square (depending on the length of the radiator). If the box will stand on the floor, for example in a kitchen, then the markings on it should reflect its base. When deciding to close the radiator with a plasterboard wall in order to hide the pipe, the markings are done as follows:
- markup is drawn from floor to ceiling. Vertical lines are marked on the wall. The distance between them is half a meter or a whole meter. Don't forget to use the level;
- the vertical line with the help of a corner is extended to the floor. The distance between them depends on the planned distance from the battery;
- similar markings are made on the wall. Lines are drawn strictly opposite to the floor ones and parallel to them;
- then draw two lines above and below the radiator. In this case, you need to retreat 10 cm;
- on the right and left sides of the heater, lines are also drawn for the profile.
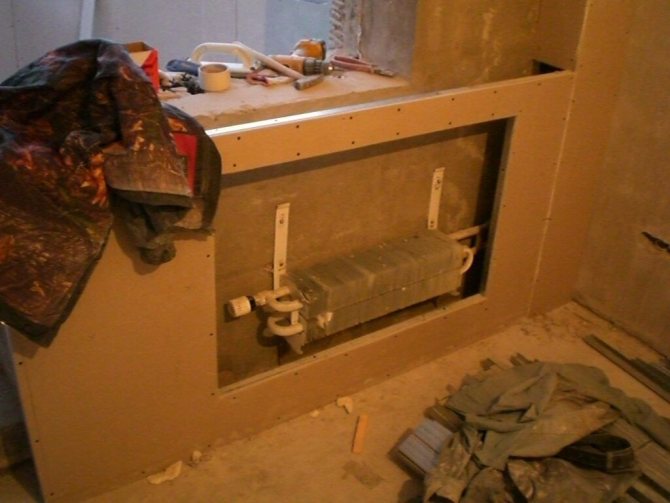
Creating a GKL box for a built-in screen
This option is the most common. It is quite convenient to make a box while decorating the walls with plasterboard, then you can immediately create a frame for it, which will be part of the overall structure.
Stage one: preparation
Before you hide the heating radiator, you need to prepare it. It is very convenient when modern batteries are used, but with cast iron - you have to tinker.
- Remove the old paint layer with an iron brush.
- The surface is degreased.
- Check joints, nuts and seams. If necessary, tighten or change.
- The surface is painted with metal paints with a high temperature threshold.
Usually, through the holes in the structure covering the battery, it is still partially visible, so the finish of the device itself cannot be ignored.
Prepare the necessary tool:
- hammer drill with drill or hammer drill with drills;
- screwdriver, metal scissors or jigsaw;
- construction knife and level;
- sandpaper with a bar;
- hacksaw;
- brushes;
- capacity and a set of trowels;
- ruler (tape measure) and pencil.
You will need the following materials:
- Plasterboard boards.
- Perforated corner.
- Metallic profile.
- The grid is a serpyanka.
- Self-tapping screws and dowels.
- Primer.
- Putty.
On a note! Sewing up a battery with drywall is not as easy as it seems. At least minimal experience with metal profiles and gypsum boards is required.
Stage two: markup
It is determined how the box will look like - to hang in the air or stand on the floor:
- When the box joins the flooring, then immediately measure and mark three main lines - two side and front.
- If it hangs, then beat off the distance from the floor. A line is marked on the wall and checked by level.
Then they mark the walls. Do not forget that from the edge of the erected box to the edge of the radiator - there must be at least ten centimeters.
As a result, a rectangle is obtained, which will indicate the edges of the fastening of the future structure.
Stage three: creating the wireframe
Frame from a profile for a box
For this, a metal profile is used. Installation technology:
- The profile guides are applied to the lines marked on the wall. They are cut in advance at the desired height. Several mounting holes are drilled with a drill. They do this so that the outline remains on the wall.
- According to these points, holes are drilled into which the dowels are inserted.
- The profile is placed on the attachment points and fixed with screws.
- Thus, all parts of the metal frame are installed. Do not forget to hold them together with connecting elements.
Advice! A special cushioning material should be laid between the metal profile and the surface.
You should get a metal frame that will be securely attached to the base. It will be better to close the heating pipes right away - for greater convenience, they are thinking over a removable option.
Stage four: sheathing
The further process will be completely simple when compared with the work that has already been carried out.
The sequence is as follows:
- To close the heating point in the room, markings are made in advance on a drywall sheet. Using a hacksaw (electric jigsaw), cut it into the desired elements. Small pieces can be easily cut with a construction knife.
- The space for the screen is also calculated immediately. It can be of different sizes, most often they use 60 * 90 cm and 60 * 120 cm. It is better to measure the selected option according to the inner frame. A couple of millimeters are removed from the result.
- For greater convenience, each cut out section is marked on the seamy side. Or they do it differently - they immediately install them.
- The details are used to cover the necessary places. For this, self-tapping screws are used. They are screwed in in fifteen centimeters increments.
- The screws are screwed in flush with the surface.
Stage five: finishing
The final stage of finishing begins. It consists in the fact that the created box is treated with putty. You need to close all the seams well. The process looks like this:
- The seams are embroidered a little; a construction knife is suitable for this.
- The trimmed areas are primed.
- Perforated corners are applied to the corners.
- The outer seams are coated with a mixture and a serpyanka mesh is applied.
- A finishing layer of putty is applied to the surface.
The result is a structure that has a "window" into which the screen is inserted. Thus, it is possible to close any heating battery.
On a note! Very often it is possible to create a fairly large box that can be used to store unnecessary things.
If a wooden structure is more suitable for a room, then it can be made completely removable (shown in the photo below). So, it is possible to close the heating radiator and not carry out numerous works.
Do the following:
- The markup is removed. Take into account the pipe supply points.
- A box is made of wood, which is immediately equipped with an external crate.
- Corner hooks are installed along the outer perimeter, the hinged part of which is screwed to the wall.
Now it remains to put the box in its place. Removing it will be just as easy.
Stages of installation work
Finishing the battery with plasterboard (or any other finishing material) with your own hands is possible only after the completion of the preparatory work. When the markup is ready, you can start mounting the profile frame. For this you need:
- first, you should fix the profiles that should be located on the walls;
- marks are made in the wall with a screwdriver, and the necessary holes are drilled with a perforator along the entire length of the profile. Dowels are inserted into them;
- press the profile to the holes and screw them with screws.Mounts must be installed every 15-25 cm;
- further, by analogy, you should fix the guides that are adjacent to the wall;
- after that, you need to install the profiles in the depth of the structure. To do this, they should be cut into suitable segments and attached to long guides that run vertically;
- we connect the profile from above and below with long segments.
Finished frame
After creating the frame, you can proceed to fastening the material. Plasterboard finishing involves the following actions:
- we attach sheets to profiles and make notes in the places of the cuts;
- cut the sheets into the desired pieces;
- we fasten them to the frame with screws. The interval between them should be 10-15 cm;
- to create even and neat corners, use an aluminum corner and putty.
At the end of the installation work, the plasterboard box is ready for final finishing. It can be painted, wallpapered or tiled. Installation of a plasterboard wall frame involves the use of longer profiles that will run vertically. In all other respects, installation work is carried out in a similar way. You can sew up any heating device using drywall with your own hands. To do this, you only need to correctly markup and carry out installation. Thanks to this, your battery will be hidden from view, while it will continue to heat the room, as before.
Installing a water heater - getting ready for work correctly
Some people, having collected the necessary list of tools and materials, do not know how to start installing an electrical appliance. To start installing the boiler on the wall, you must first clear the place of the future installation and mark the wall. In order for the markings to correspond to reality and help to correctly hang any water heater, certain calculations should be carried out.
Note! Each boiler has its own dimensions, so you should only buy brackets that correspond to a specific model.
Before applying the markings, you need to find metal profiles or a wooden frame. It is recommended to use them as a support, since the option of installing the anchor in drywall will not help here. The use of an anchor will not be appropriate without a profile, since the distance between the starting wall and the drywall is less than 5 cm, and the sheet thickness is only 12.5 mm. Such an installation will simply be ripped out with the "meat". With the help of magnets, the location of the metal frame can be determined very easily. If you plan to hang a water heater on a metal frame, then there are no weight restrictions. If the drywall was attached to wooden slats, then the restrictions on the weight of the model mean the much lower strength and durability of the tree.
It is very important that the fastening elements hit the profile. Therefore, calculations must be carried out taking into account this requirement. The markup is done as follows: • measure the length and width of the appliance; • measure the distance between the fasteners of the bracket system; • we put calculations on the wall.
A detailed examination of the rear wall of the water heater will help to do all the above calculations correctly. Here you will find two holes that should be attached to the bracket system. Then you can take a regular ruler or tape measure and easily measure the distance between the holes.
Note! Each boiler, depending on its size and weight, will have a different distance between the fixing holes.
Now the preparation is complete and you can safely pick up the drill and proceed with the installation.
Installation of a water heater
A boiler is a fairly weighty electrical appliance. Therefore, the method of hanging on a plasterboard wall for heavy things is appropriate here.The best and only correct option would be to use a special bracket system purchased for a specific model.
There are several options for hanging the water heater on the wall. The first method involves the following actions: • glue construction tape near the markings along their perimeter. It will reduce the amount of debris on the floor and dust in the air; • carefully drill drywall and profile along the marks. We choose the width of the drill based on the dowel used; • insert the dowels into the holes obtained; • then we install the hooks or bracket system. In this situation, it will be more reliable to use brackets.
If the frame was wooden, then you can additionally drive two strong nails or wedges into them. Second way. Here it is necessary to install one bracket from the system into the wall at the level of the frame. It is better that it is made of wooden slats. The second bracket can be attached to the frame, or in close proximity to it. All other actions are carried out by analogy with the first method. This method is applicable for hanging not too large and weighty models on drywall.
In general, both of these methods are only suitable for a lightweight appliance. If you need to hang a very large and heavy boiler, then you will need to mount a special shelf under it. It is she who will bear the brunt of the water heater, and not the wall.
To do this, we do the following: • form a shelf for the device. Here you can use both ready-made hinged shelves, and make it yourself from the remains of drywall sheets; • if we use a purchased shelf, then we install it at the height at which the boiler should be located; • we drill holes with a drill at a distance necessary for its installation; • insert dowels into the holes; • then we hang the shelf on the dowels using screws and install the electrical appliance on top.
That's it, now all that remains is to connect the water heater to water pipes and electricity (or gas) and start enjoying the benefits of civilization - hot water at any time of the day and time of the year.
Note! The shelf must also be fixed to metal profiles. So that the resulting structure can withstand the required weight and distribute it to the rigid elements of the metal frame. Since there has been a recent trend towards buying more voluminous water heaters, the shelf method will be the right solution to the installation problem.
What are the nuances The procedure for hanging a boiler on drywall walls has certain nuances. In our selection, we have collected all the points to which you need to pay attention: • at the stage of sheathing the frame with plasterboard sheets, if you intend to install a water heater in the future, sheets with a greater thickness should be used. Thin slabs can be damaged or deformed when hanging the device, even with a small weight; • in the place of the future localization of the electrical appliance, you can make a blank in the form of a wooden bar or an extra profile. Also, additional reinforcement of the frame in this place with transverse jumpers will not be superfluous; • use only long and strong brackets and nails; • the choice of a specific model should be determined based on the volume of consumed hot water. It is not necessary to take a boiler of large volume and weight for one or two people. A small amount of water is enough here. This will save not only time and money, but also make installation much easier; • anchor bolts or butterfly dowels can be used as fasteners; • the shelf used as a base for the water heater must be strong and free from defects or cracks.Otherwise, it may simply fall apart under the weight of the device; • since the boiler can be gas or electric, safety measures must be taken into account when installing it. Install it at a sufficient height so that children cannot reach it; • it is possible to use a special coating under the boiler in a specific place on the wall to prevent fire. The use of drywall with high fire-resistant properties is allowed. Such sheets have a red tint and will help prevent the material from igniting when the device is closed; • you can additionally build in or buy a floor stand in the water heater. She will insure the electrical appliance from falling from a great height. In addition, it will be possible to store things necessary in everyday life in it.
Related article: Preparing walls for tiles in the bathroom
In addition, especially if the gas model is used, periodically check the serviceability of all systems of the apparatus. It is not recommended to use it beyond measure and in inappropriate conditions. The connection of the device system to the means of communication, especially the gas pipe, should be done only by a professional - a utility worker. Remember that it is on the correct connection that your safety and the duration of the device's operation will depend.
From all of the above, we can conclude that if you follow certain rules and recommendations, then beauty and comfort will always be in your home. Even such a difficult, as it seemed at first glance, question, how to install a water heater on a plasterboard wall, will be easy and without unnecessary problems.