What is waterproofing
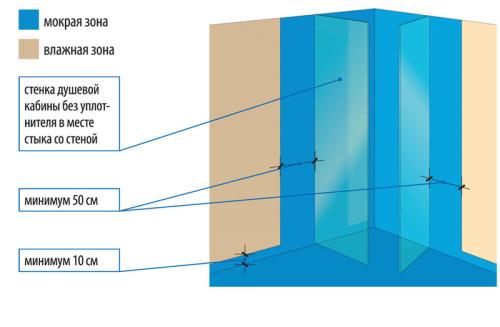
The main waterproofing zones of the shower stall
Waterproofing is understood as the protection of building structures from moisture ingress. Due to this, the service life is increased, the strength characteristics of the material are preserved. Water, not being able to get into the structure, bypassing ways reaches the holes leading to the sewer.
Before proceeding with waterproofing a shower without a tray, you will need to determine the wet areas. Most often they are called areas of special attention. It is in them that moisture usually penetrates. These include:
- very often during the shower, a lot of water gets on the floor;
- cockpit glass;
- areas between the floor and tiles;
- wall, or rather, its lower part;
- tiles next to the shower;
- risers and pipes, the surface of which collects condensate water vapor after using the shower;
- pipe tie-in points.
The zones listed above require their provision with waterproofing in order to avoid further unpleasant consequences after water gets into them.
Choosing materials

Bituminous coating waterproofing
Determination of the material for waterproofing a shower stall without a pallet depends on what the surfaces of the walls and floors in the room are made of. Also, the design is of no small importance. Most often, one type of material is suitable to provide waterproofing, only occasionally they resort to using the complex.
There are several groups of waterproofing materials:
- Coating. One of the modern options, bituminous mastics are used. Sometimes this type is called liquid rubber and the main advantage is elasticity, which will allow the material to fit without any irregularities. In addition, bituminous mastic has good adhesion, due to which a long service life is achieved. Many workers put a cement screed on top of the mastic during moisture isolation with coating materials.
- Penetrating type. Most often they are made from various polymers. Due to their composition, they provide good protection. Also, the effect is achieved due to the deep penetration of the elements into the structure of the shower stall, thereby increasing the waterproof performance.
- Roll. The process is carried out through the combined use of reinforced polyester and polymers. Sometimes the first material is replaced with bitumen fiberglass. The final version can be self-adhesive or weldable. In the first case, there is no need to use any tools or devices to ensure fasteners and work of the material. The second involves the use of a burner. Roll materials require responsible use and set specific requirements. For example, the unevenness of the roll should not be more than 2 mm when waterproofing a shower cabin without a pallet.
- Polymer-cement compositions. Sold as dry powder. For use, it must be diluted with water. Only walls or floors can be insulated with this mixture. It is not necessary to do the screed, since the material has a high degree of elasticity.
Sometimes elastic waterproofing materials are distinguished as a separate group.
Necessary materials
In order to carry out work on the construction of a floor for a shower stall, not only certain materials will be required, but also some skills and accuracy.
A room with high humidity requires a special approach to installation, since the slightest neglect threatens with a lot of trouble for residents and neighbors of the lower floors with constant operation of the cabin. To carry out the work, you will need the following tools:
- building level;
- roulette;
- water based markers;
- trowel;
- container for diluting concrete solution;
- tile cutter (if mosaic tiling is supposed, then this item is skipped).
This is just a list of the necessary tools, without which work is not possible.
Also interesting: Plastic panels for a bathroom from Leroy Merlin - a reasonable economy?
In addition, the building materials themselves will be required, which must be moisture resistant and suitable for the climatic conditions of the bathroom:
- waterproofing mastic (preferably bituminous);
- roofing material;
- siphon;
- plastic pipes required to connect the drain and sewer;
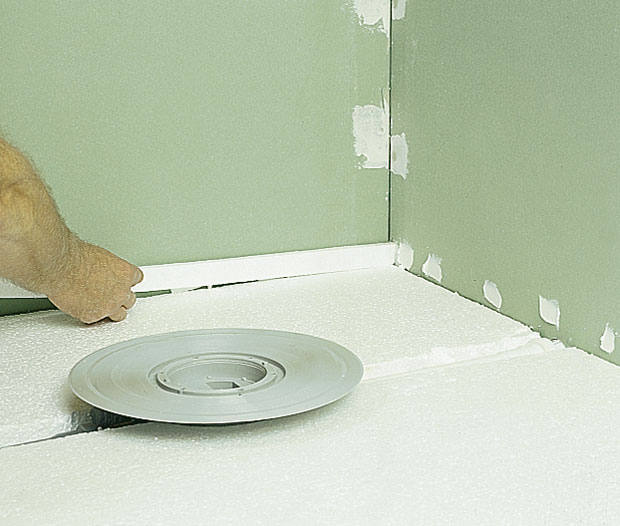
- expanded polystyrene sheets with a thickness of at least 50 mm;
- dry mixes for cement mortar (cement and sand without impurities);
- waterproofing tape;
- tile waterproof adhesive;
- tile grout;
- spatula and rubber sponges;
- silicone sealant.
The specific designation of the quantity in the list will not be given, since the projected structures of shower cabins are different for everyone, and the costs of materials will be calculated based on these features.
The only thing you need to know is the scheme for setting up the cement slurry. To do this, you need to take 4 parts of sand to 1 part of dry cement and dilute with water until a thick mixture is formed.
It takes at least 3-4 days to completely solidify the solution, but it must be prepared immediately before starting work.
Important!
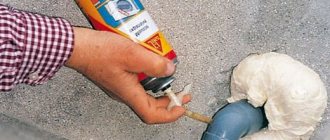
A silicone sealant is required to seal seams and joints to provide waterproofing. In any case, you will get a sealed and reliable design, but it is better to protect yourself and play it safe.
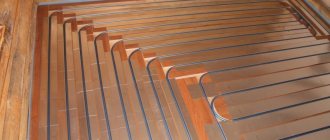
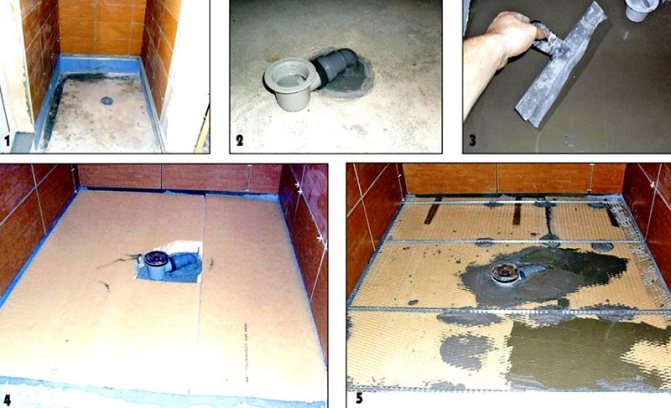
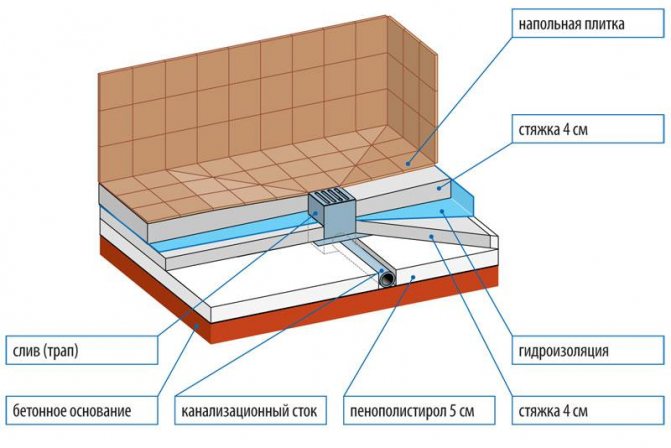
How is the floor waterproofing done?
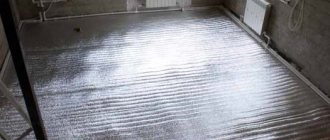
Shower floor waterproofing
Any waterproofing of a shower stall should begin with the preparation of the surface of the structure. For example, if the floor is uneven, then you must first get rid of this problem with a cement screed. Otherwise, the waterproofing material will not cope with the task assigned to it and the floor will begin to rot from the inside.
Surface preparation depends on what will be used to further waterproof the shower. If the floor, walls and shower room will be covered with a roll, it is not necessary to carry out a particularly thorough preparation of the surfaces.
But if bituminous mastic is used, then three main indicators of the floor should be taken into account to complete the process. It should be:
- clean;
- dry;
- even.
The last point requires special attention. The screed will need to be allowed to dry, and this will take a long time. The process is necessary in order for unnecessary moisture to evaporate. Only then can the leveled surface be cleaned, primed, and then covered with mastic.
Liquid rubber is also applied on a flat floor. But in this case, there is no need to wait for the screed to dry. It will only be necessary to clean the floor surface from dust and make a priming. If large cracks were not noticed, it is recommended to seal them with a special compound.
Only after the preparatory work has been completed, you can proceed to the next step. The process is not complicated and depends solely on the material chosen. The sequence of actions for each species will be as follows:
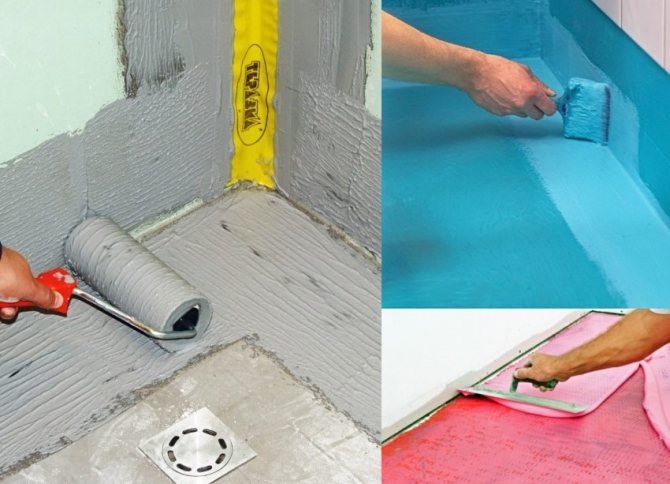
- Bituminous mastic. First, the mixture must be thoroughly mixed, and then pour a little kerosene into it. The joints between the wall and the floor are smeared with mastic, as well as the places where the pipes exit from. Apply by brush or roller.But only after this process, the tools can be thrown away, since they are unlikely to be washed. To achieve maximum effect, you need to coat the floor twice.
- Liquid rubber. There are two ways to apply this waterproofing material. The first involves the use of a brush, while applying the material carefully, smearing every centimeter. The second way is to use a spray gun designed just for this kind of action.
- Dry mix. To apply it, you need to stir it with water, only thoroughly, so that later you get a mass without lumps. The floor is slightly moistened before application. This is necessary to ensure strong adhesion of the material to the surface. After that, the mixture is applied to the prepared areas with a brush or spatula. The choice of tool depends on the thickness of the solution.
- Roll material. In this case, the strip of the required length is measured. The length is selected based on the size of the bathroom. While the segments are being prepared, you can smear the joints between the walls and the floor, as well as the sections of the pipe exit. This is done with mastic or liquid rubber. When everything is ready, you need to remove the protective film from the surface of the roll material and attach it to the area with the adhesive side, then carefully roll it with a roller.
During the execution of the work, you should pay attention to some points:
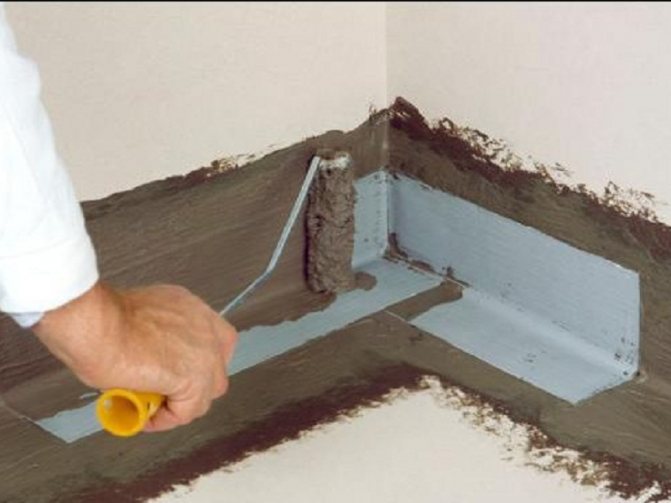
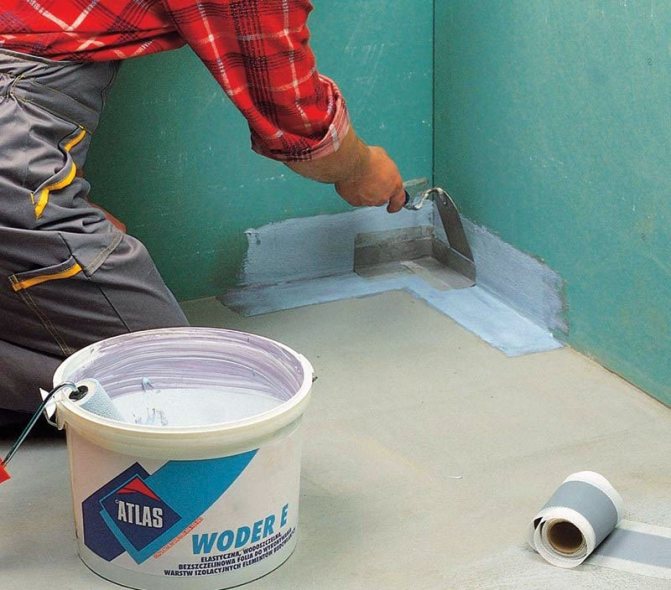
- It is necessary to isolate both the floor and walls from the liquid. It is best to treat wall surfaces up to 15 cm from field level.
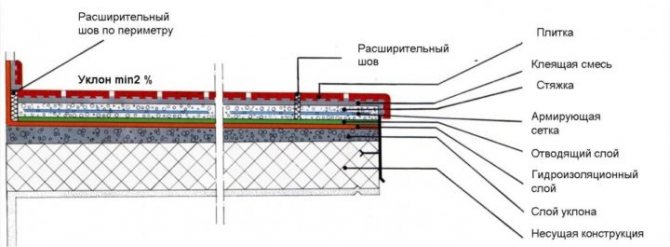
- It is important to provide a continuous and continuous layer of waterproofing on the shower floor. It is necessary that it be without cracks or voids.
- If there is a deviation of more than 20 mm, it is required to first install beacons next to it, and then repeat the filling of the floor with a cement screed.
- If there are seams or depressions in the structure, they must be sealed in advance.
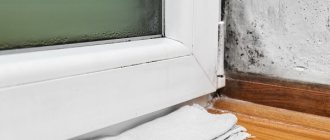
A correctly executed process will avoid the occurrence of mold or mildew in the bathroom in an apartment or house. For this, it is necessary to select the right materials. Pasting and coating types are very popular.


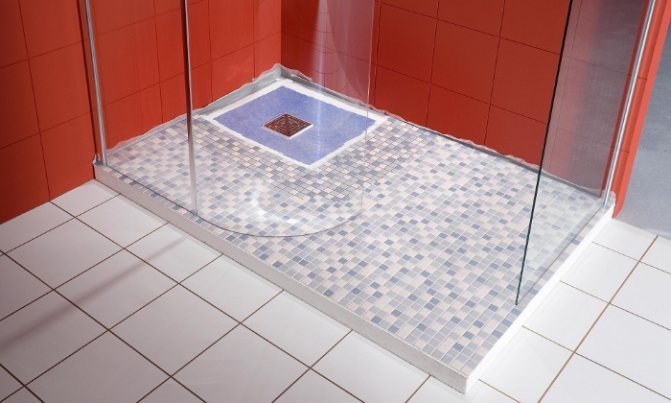
Shower waterproofing without tray
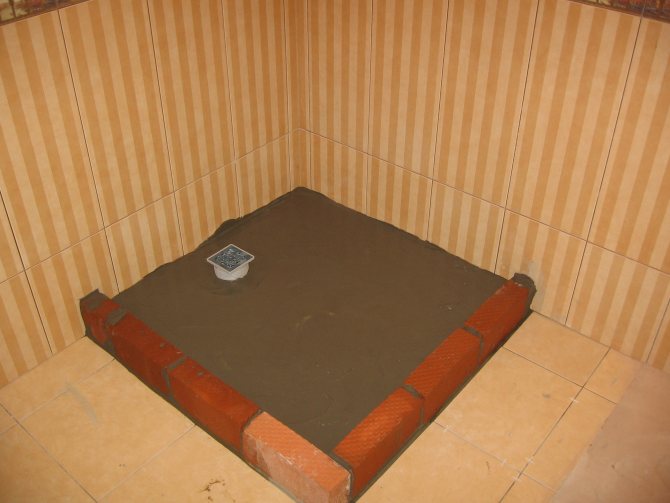
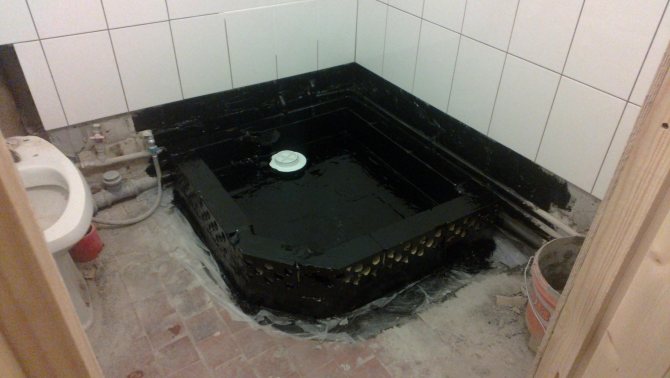
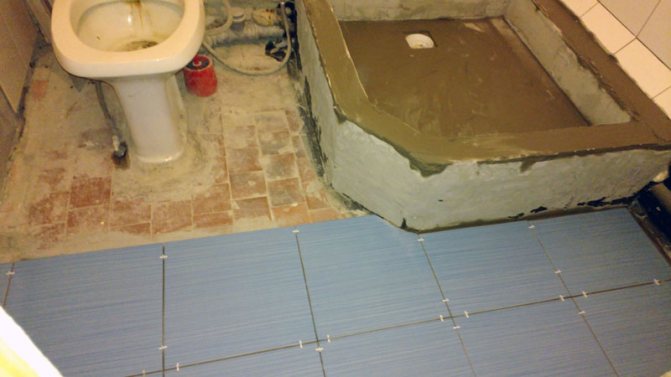
The lack of a pallet means that a separate corner of the room is used as a shower, where water and sewage are supplied. The floor is relatively flat and does not rise above the general level. To prevent water leakage throughout the room, a threshold is used that protrudes 5 cm above the surface.
For such waterproofing, you need to pay attention to the threshold, which should be prepared from moisture-resistant cement. Protective materials are applied to the improvised "bowl" itself, to the threshold (on each side), adjacent walls. In parallel, the floor is insulated, the material necessarily captures some part of the wall, where there will be a lot of water, 20 cm is enough.

The algorithm of actions is as follows:
- Initially, all dust and dirt is removed from the working surface, this part is very important, otherwise the efficiency and durability will be significantly reduced;
- Apply mastic or roll material to the leveled and cleaned surface using a roller / brush;
- The material is used to process other wet areas: bidet, shower, toilet, sink, joints;
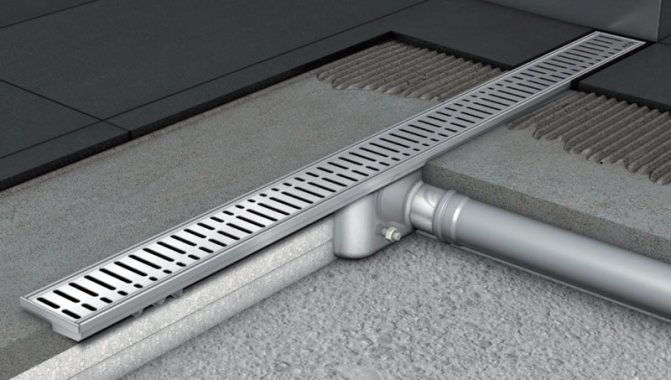
- After the material has dried, an ebb and a protective grill are mounted on the pipe. Do not forget about the polymer pad to seal the connection. Silicone or bitumen is used for sealing.
It will be interesting: Choosing a remedy for rusty streaks and plaque in the toilet
Important! Material application should be consistent, chaotic coating often leads to leaks. It is recommended to apply parallel to some wall, and the second layer of coating is laid perpendicularly.
DIY penetrating waterproofing
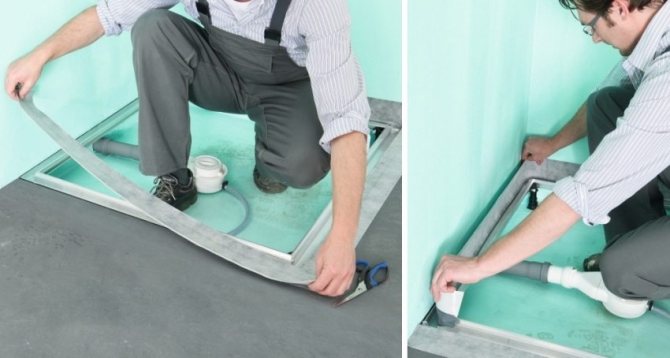
The device of the built-in ladder in the absence of a pallet
Penetrating waterproofing is a material that has recently gained popularity in the construction market. The advantage is ease of use, and the technology of the device is considered to be the simplest. The sequence of actions is as follows:
- The mixture is diluted with some warm water.
- Stir until smooth.
- Using a brush, it is applied to a previously cleaned base.
In this case, more attention should be paid to the places of abutment of the pipes. Also, do not walk past the walls. First, they need to be cleaned of sagging, old paint and other various contaminants, after which cracks, potholes or other defects should be repaired with an insulating compound.
It will be enough to apply the coating waterproofing in one layer. But in places of increased danger, where moisture gets regularly, it is better to make an additional layer in order to avoid possible unpleasant consequences in the form of rotting of the floor surface, walls, corrosion of pipes.