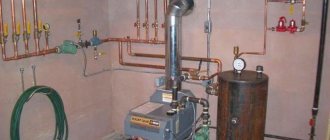
Earlier, we conducted a review in which we thoroughly covered SѓSЃS‚ройство РїСЂРѕС‚РѕС ‡ РЅРѕРіРѕ РІРѕРґРѕРЅР ° гревР° теля, as well as recommendations for selection.
Installation and connection of an instantaneous water heater to the water supply and power supply
So, the new "protochnik" is spared from the packaging, the instructions have been read and now is the time to think about where it is better to install the instantaneous water heater.
It is advisable to choose a place for installing an instantaneous water heater based on the following considerations:
- whether splashes from the shower will fall on the device in this place;
- how convenient it will be to turn on / off the device;
- how convenient it will be to use the shower (or tap) of the device.
Before proceeding with the installation, you need to decide:
- whether it will be convenient to use the device directly at the place of taking a shower (or, say, washing dishes);
- whether it will be convenient to use different operating modes (if there are such adjustments);
- whether moisture or water will get on the device (after all, there are clean 220V!).
- It is also necessary to take into account the future water supply - how convenient it will be to connect the instantaneous water heater to the water supply. There will be no special conditions for the wall - the weight of the device is small. Naturally, it will be somewhat more difficult to mount the device on curved and very uneven walls.
Diy instantaneous water heater installation
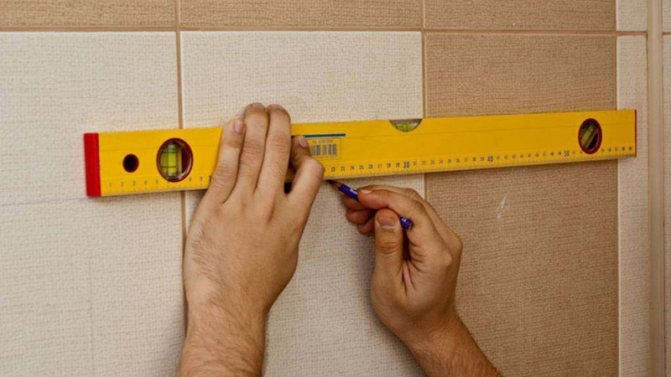
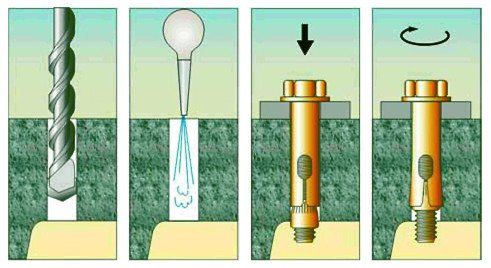
Installation begins with determining the location. We take a level, a pencil and mark the place of the future installation. We remove the top cover from the water heater and apply it to the wall, draw the horizontal with a level and mark the future holes. Using a drill, we drill holes for dowels (or plugs - as you like). We install the dowels and fasten the device to the wall with screws.
Usually, the kit contains the necessary fasteners, but it often happens that the dowels themselves are short (for example, there is a thick layer of plaster on the wall) and the screws themselves are short, so I would recommend purchasing the necessary fasteners of the required dimension in advance. At this, the installation can be considered complete.
Installation and connection of an instantaneous water heater to the water supply and power supply
Preparatory work
Preparation for installation begins with checking the power supply. Actually, this must be done even before the purchase of the device. Otherwise, you can waste your money - buy a powerful water heater, and then find out that the networks of your apartment simply will not pull it.
The stores sell flow-through water heaters with a capacity of 3 to 27 kW.
According to the number of phases, the flutes are divided into:
- single-phase: their power does not exceed 8 kW. These devices are suitable for installation in apartments;
- three-phase - for 12-27 kW. With their help, you can provide hot water to a country house or a public building.
Usually, a 6 kW water heater is installed in city apartments.
Its operation requires a current of 27 A. In old houses, electricity meters are designed for 32-40 A.
But after all, not only the flow pipe will work in the house: a large number of electrical appliances are used in everyday life.
If the low-power device can withstand the old wiring, then you will have to lay a new one under a powerful water heater.
Therefore, a separate cable of the appropriate cross-section is laid under the water heater.
For example, for a 6 kW device, this parameter will be 4 mm2. For a seven to eight kilowatt cable, a 5 mm2 cable is required. For a more powerful device - 13-16 kW - a line with a section of 10-16 kW is being laid.
You can check the permissible network power as follows:
- Find out which circuit breaker is installed in front of the electricity meter - at the entrance to the apartment.
- Multiply two values: the rated current of the machine and the operating voltage of the network.
So, with a 16 A machine, the permissible power will be:
16 x 220 = 3520 (3.52 kW).
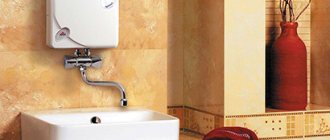
Place of installation of the device
Next, decide on where to install the heater. This decision is greatly influenced by the type of device. Non-pressure heaters are installed at the point of draw-off - above or below the sink, or on the side of the tap. In this case, it is advisable to place the electrical appliance in such a way as to exclude the possibility of flooding it with water. Although the IP24 and IP25 models have good moisture protection.
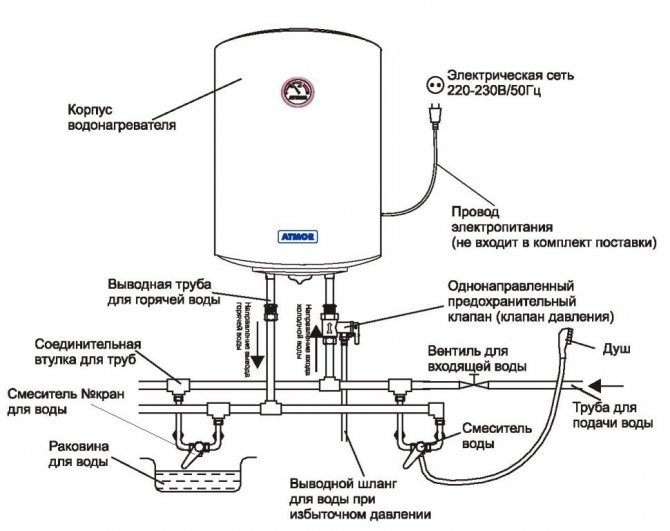
Water heater
The place of installation should be chosen in such a way that switching on, mechanical adjustment of pressure and temperature does not cause inconvenience to the user.
If you plan to install the heater permanently, check the condition of the piping.
Drilling holes for brackets
The preparatory stage ends with drilling holes and installing dowels in them.
Brackets for hanging the water heater are included in the kit, so you just have to mark the mounting points on them.
This is done like this:
- Take a level and a pencil in your hands, and mark the location of the groove.
- Remove the top cover from the device, attach it to the wall, leveling out the horizontal and marking the centers of future holes.
- Use a drill to drill the holes for the fasteners.
- Install the wall plugs and screw the water heater to the wall.
The factory delivery of grooves is usually completed with fasteners. But in some cases they are not suitable - for example, when hanging the device on a wall with a thick layer of plaster. Therefore, decide in advance how long the hardware you need and buy them separately.
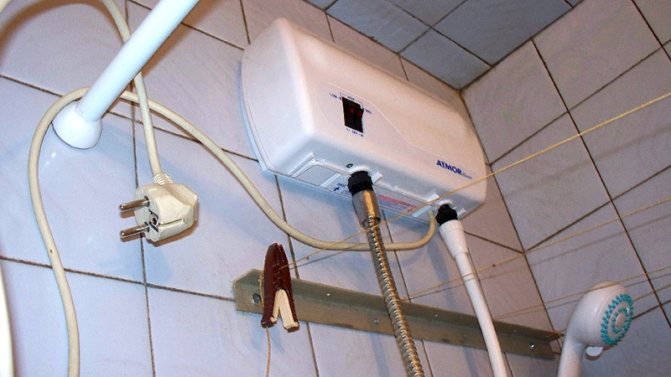
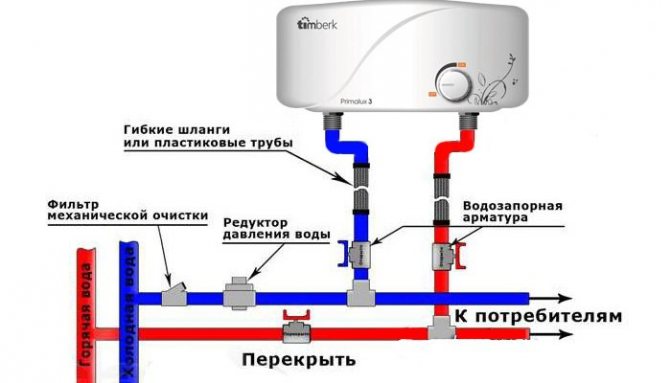
Connecting an instantaneous water heater to the water supply
An electric instantaneous water heater can be connected to water in several ways.
Method one is simple
We take the shower hose, unscrew the "watering can" and connect the hose to the cold water inlet to the water heater. Now, having set the handle of the mixer to the "shower" position, we can use the water heater. If we put the handle in the "tap" position, then cold water comes out of the tap, bypassing the heater. As soon as the centralized hot water supply is restored, we turn off the water heater from the "shower", screw the "watering can" back on the shower and then enjoy the benefits of civilization.
The second method is more complicated, but more correct.
Connecting the water heater to the water supply of the apartment through the outlet for the washing machine. To do this, we use a threesome and a skein of fumlent or thread. After the tee, a tap is needed to disconnect the water heater from the water and to adjust the pressure and temperature of the water from the water heater.
When installing the crane, you should also pay attention to the ease of use of the latter. After all, we will repeatedly open and close it in the future.
The section of our water supply system from the tap to the water heater can be mounted using various pipes: from metal-plastic and PVC to ordinary flexible pipes. The fastest way, of course, is to make the liner using flexible hoses. If necessary, our plumbing can be fixed to the wall (or other surfaces) using brackets or any other means of fastening.
Installation and connection of an instantaneous water heater to the water supply and power supply
Connection diagrams
We already know how to install an instantaneous water heater with our own hands and ensure its correct connection. Now we will briefly go over the basic connection diagrams.
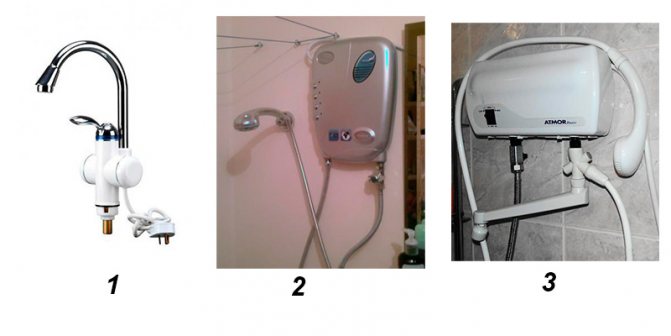
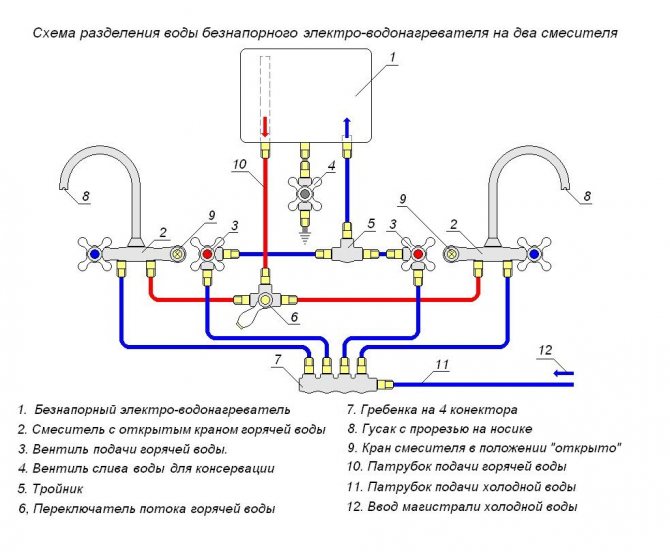
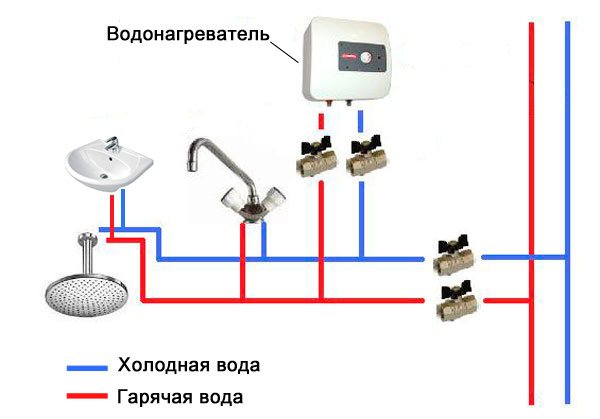
Three options for using an electric water heater: 1. Water heater tap - installed directly on a sink or washbasin. 2. A hose from the shower head is connected to the inlet of the device, and a hose with a shower head is connected to the outlet. 3. Cold water is connected to the inlet of the device from the riser through a soft hose, to the outlet using a special tee, a faucet for a washbasin and a shower head.
In some cases, hot water is needed exclusively for washing dishes. Here we can install a tap-heater, for example Delimano, or a water heater right at the tap, in a pipe break. But you can do it easier by choosing a model with a built-in faucet with a watering can - such water heaters are installed right above the sinks. The connection is made through a tee or instead of a tap (in this case, it is enough to remove the tap and screw a flexible hose to it, through which water will flow into our system).
The following diagram for connecting a flow-through water heater in an apartment is temporary. To do this, unscrew the shower head and connect the shower hose directly to the heater. We connect another hose with a watering can to the outlet of the device - now you can take a shower. As soon as the hot water supply from the mains is restored, the system can be restored to its original form.
If there is no hot water supply in the house at all, but you need to organize hot water in the shower, we can make a direct connection to a cold water pipe, and connect a hose with a shower head to the outlet of the device. In some cases, a small tee is placed here, allowing you to switch the hot water outlet to a shower head or tap.
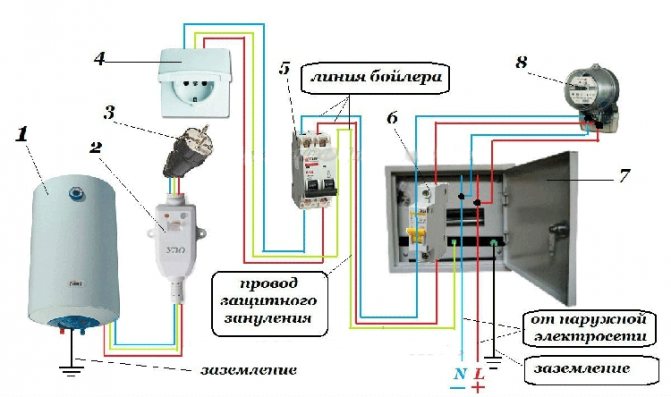
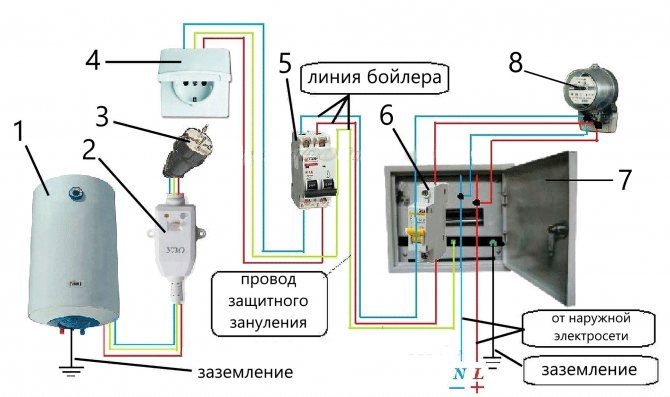
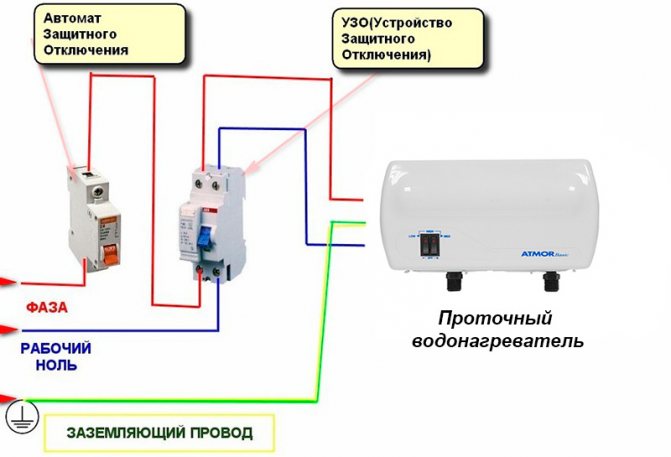
Connecting an instantaneous water heater to the mains
As a rule, household single-phase flow-through water heaters are very powerful devices - from 3 to 9 kW. Accordingly, for the correct connection, a dedicated line is required (necessarily with a separate RCD for emergency shutdown), since the usual one will not withstand such a voltage.
It is forbidden to use standard sockets for power supply, since in most cases they do not have proper grounding.
When connecting wires to screw terminals, the phasing must be observed:
- L, A or P1 - phase;
- N, B or P2 - zero.
It is not recommended to carry out electrical work on your own; it is better to use the services of a specialist.
Tags:
Water heater
moydomik.net
Advantages and disadvantages of an instantaneous water heater
Installation of a water heater
Benefits
- Compact dimensions. The flow heater does not take up much space. At the same time, models of heaters are available for sale, complete with a mixer and a shower head, which allows additional savings.
- Fast heating. Unlike storage-type models, flow-through heaters begin to produce warm water already 30-60 seconds after starting.
- No restrictions on the volume of heated water. The user can get exactly as much hot water as he needs, in contrast to the storage tanks, the volume of which is limited.
- Relatively low price.
disadvantages
- Relatively high power consumption.
- Demanding wiring, machine and meter.
- Limited performance. This drawback is relevant only for low-power and compact budget models that can prepare hot water exclusively for the bathroom. If you need to arrange the wiring and the kitchen, you will have to spend more money to buy a more energy-intensive and dimensional model.
- Comparatively expensive operation due to significant electricity consumption.

Diy water heater installation
Instantaneous water heaters are best suited for houses and apartments equipped with electric stoves. In this case, the meter and wiring will already comply with regulatory requirements.
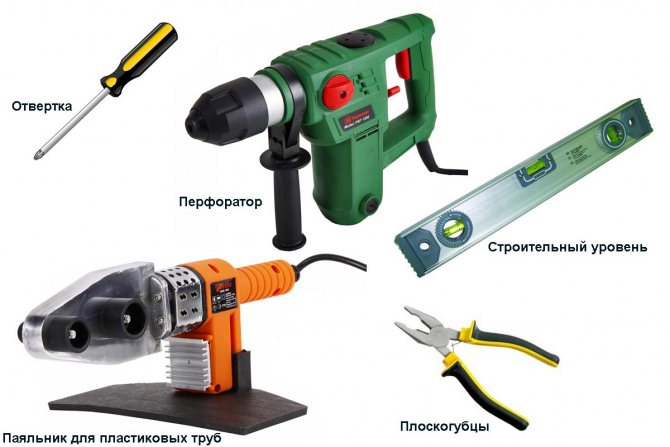
Required tools and materials
The instantaneous water heater must be connected using suitable tools and materials. The whole process is divided into three major stages:
- the connected element is mounted on a selected place on the wall of the dwelling;
- it connects to electricity;
- further connected to the cold water supply system.
Circuits of instantaneous water heaters of different types have practically the same parameters, therefore, tools and materials are required for installation of any type:
- for the installation of the structure, a drill is required, equipped with suitable drills, and their choice depends on what material the wall of the room is made of, where it is planned to carry out the installation work, since standard concrete drills will not be suitable for tiling;
- for fastening the device, dowels with self-tapping screws are required;
- to connect to electricity, a copper wire with three cores is required, equipped with high-quality double insulation, and the cross-section must be at least 2.5 sq mm;
- hammer, screwdrivers, gas wrench, pliers, open-end wrench;
- FUM tape is used to seal various joints;
- to connect an instantaneous water heater to a cold water supply system, a pipe is required, and metal-plastic products are considered the best choice.
When choosing the location of the structure, it is taken into account that it should be at the level of the head of adults in order to prevent overheating of the equipment or its filling with water.
Stages of connecting an instantaneous water heater
After the preparatory work, you can proceed to the direct installation. It is divided into several large stages, and each of them is significant and important, since the ideal work result depends on the competent performance of all tasks.
Seat selection
Initially, it is important to determine the location of the equipment. It is necessary to install an instantaneous water heater correctly, therefore, when choosing an installation site, the recommendations of specialists are taken into account:
- it is important that it is convenient to use the structure for direct users, since usually there are different buttons on the external panel for controlling the boiler;
- it is not allowed that moisture gets on the device during operation, as this can cause a short circuit, as well as damage to expensive equipment;
- when choosing a place, the convenience of connecting electrical wiring and cold water pipes to the water heater is taken into account;
- it is allowed to install on any wall, since the flow-through products are not large, so the wall will not be significantly affected.
As soon as the optimal location for installing an instantaneous water heater with your own hands is chosen, markings are applied to it. To do this, you need to use a level and a pencil.
A lot of attention is paid to marking, since it is not allowed that the water heater is installed with any distortions or irregularities, since this will negatively affect the efficiency of its use, as well as its service life. On the cover of the product, the locations of the holes for fastening are marked on the wall. After that, using dowels and self-tapping screws, the structure is attached to the wall of the room when orienting to the previously applied markings.
Most often, instantaneous water heaters are produced complete with all the necessary elements for fastening, but often you have to deal with the fact that the dowels are too short, so it is impossible to attach the equipment to walls on which there is a significant layer of plaster. Therefore, you will have to additionally buy suitable fasteners.
Water connection
Next, you need to figure out how to connect an instantaneous water heater in an apartment to a cold water supply system. For this, one of the possible methods is selected. The simple method is usually used by beginners. It assumes that it is initially unscrewed from the shower hose of the watering can, after which it is attached to the water inlet of the equipment. The mixer is then set to the shower position, after which you can use the heater for its intended purpose. If the handle closes to the tap position, cold water will flow from the tap. This method is usually used to temporarily solve a problem associated with a lack of hot water in an apartment, for example, when a breakdown occurs in a centralized system. For the main method of obtaining hot water, it is considered unsuitable.
The second rather complicated method involves the installation of boilers, which are used as the main elements for obtaining hot water. For this, a tap is used to connect the washing machine. A tee is purchased, and a fum tape is prepared. After attaching the tee to the outlet, a tap is installed that allows you to regulate the flow of cold water to the water heater, and this will also facilitate the control of the set temperature in the equipment. When choosing the location of the crane, it is taken into account that it must be in an accessible and convenient place, and it is also not allowed to be blocked by any boxes or other elements. A pipeline is laid to this tap from the water heater, and most often metal-plastic pipes are used for this. It is allowed to use plastic pipes or use flexible pipes.
For the aesthetic appearance of the entire room, it is advisable to lay pipes in such a way that they are not visible, and if this is not possible, then they are closed with boxes.
Thus, having figured out how to connect instantaneous water heaters to the water supply system, each owner of residential real estate can easily cope with this process on their own. If pipes are used for connection, then all threaded connections must remain freely accessible, therefore they cannot be walled up in walls or closed with any hermetic and integral structures.
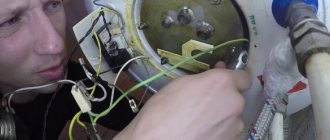
Electricity connection
How to install a flow heater? To do this, it is necessary not only to connect it to cold water supply, but also to electricity. Most modern equipment is powerful. Their power can vary from 3 to 9 kW. Therefore, for their competent installation, it is advisable to allocate a separate electrical line equipped with an RCD automatic device, so that in the event of any unforeseen power outage, the device is automatically disconnected from electricity. It is not allowed to use ordinary sockets for such a powerful electrical device, since most often the grounding in them is of poor quality.
Since a separate electrical line is allocated for the equipment, it is advisable to carry out all work in the process of overhauling a house or apartment. To do this, all the wires are hidden in grooves made in the walls of the premises. It is advisable to lay all cables in special boxes that provide protection against fire. A high-quality socket with good grounding is certainly chosen.
When connecting the wires to the terminals, the correct phase must be taken into account. Connecting a durable water heater to electricity is certainly carried out until the moment the water comes in. The very process of working with electrical wiring is considered quite complicated, so if the owner of the premises does not have work experience, then it is advisable to entrust the procedure to specialists. The wiring diagram is simple for qualified electricians only.
For proper installation, it is recommended to follow the advice of specialists:
- during operation, only those nozzles are used that are sold in the kit to the equipment;
- the device should be connected directly to the electrical panel of the house, since if this process is carried out to a regular outlet, then various problems in the power supply of the house are possible;
- for work, it is recommended to choose a copper cable that provides a high quality installation;
- an RCD is necessarily mounted as a safety device, since you have to work with a powerful and complex device;
- it is advisable to initially choose a place of installation that will be optimal not only for using the device for its intended purpose, but also for connecting it to different systems, so that no difficulties arise during operation;
- it is impossible for a stove or refrigerator, as well as other electrical equipment, to be located under the heater, since if a leak occurs during operation, the devices may break, and the wiring in the apartment may also be disturbed.
Thus, if you follow the basic recommendations of specialists, then a quick and high-quality installation is ensured. If you follow the instructions exactly, there will be no problems, and even during the operation of the device, there will be no difficulties.
Fastening and connection
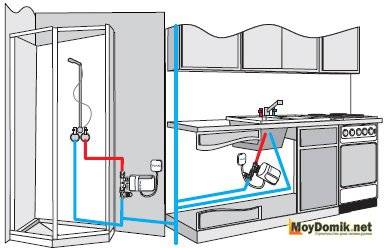
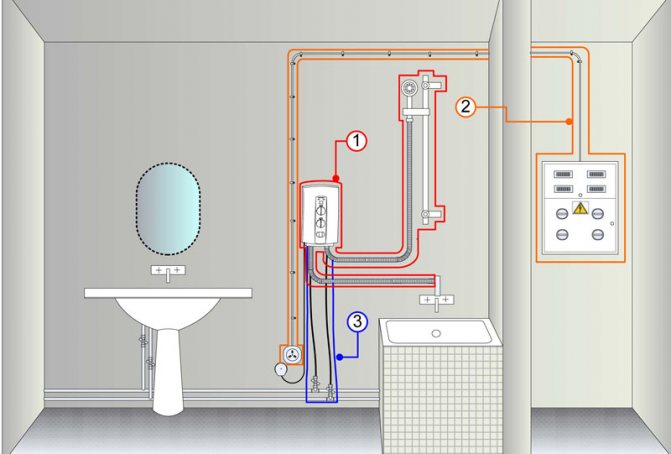
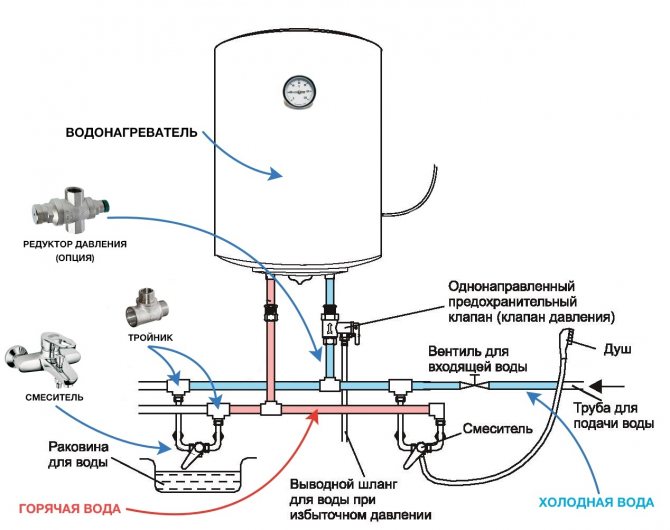
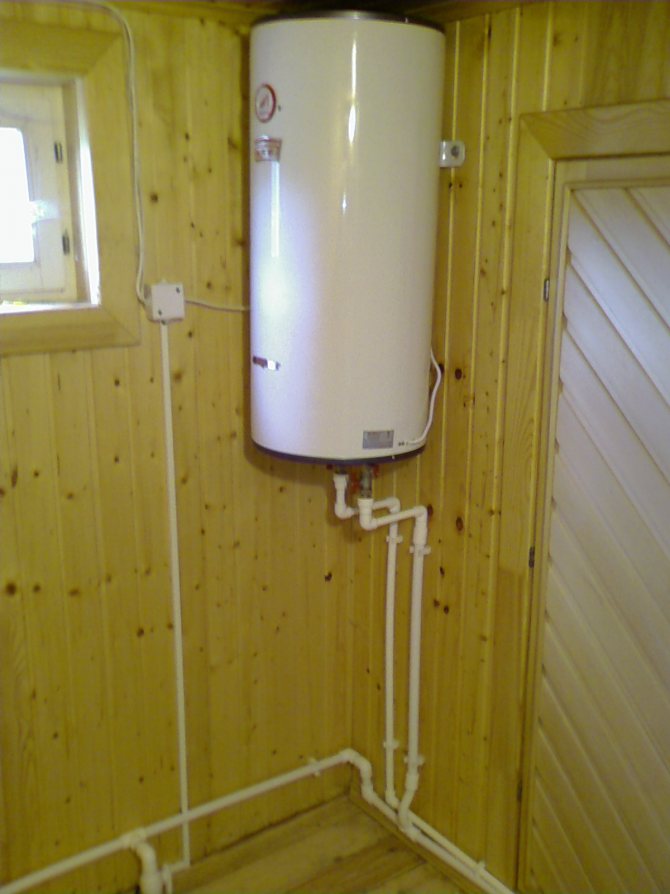
Connection diagram of an instantaneous water heater with three points of water intake.
In our review, we will consider the process of installing your chosen instantaneous electric water heater with your own hands in a system with several points of water intake - these will be a shower, a washbasin and a sink in the kitchen. It is also assumed that the apartment is already connected to hot water supply, but it needs to be duplicated (relevant in the summer, when planned work is being carried out to repair water supply systems).
To begin with, we need to decide on the place of installation - the connection diagram of an instantaneous water heater in an apartment should be such that all consumers can use hot water. Therefore we will install a water heater where hot and cold water pipes pass nearby.
Using a pencil, mark the holes for attaching our water heater
We take a pencil in our hands and mark on the wall the places where we will drill holes for the dowels - for this you need to look at the back wall of the water heater, where the mounting holes are. After that, we take a drill in our hands and start drilling. We drive the dowels into the finished holes, then use a screwdriver to tighten the screws and hang the water heater on them.
In some models, you need to remove the front cover and fix the device with screws from the inside. There is no need to use powerful screws or anchor bolts - unlike storage water heaters, flow-through models weigh very little.
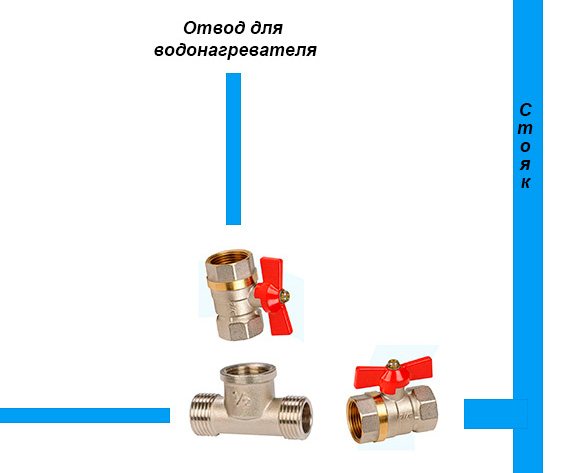
To connect cold water to an instantaneous water heater, it is necessary to attach a tee to the tap coming from the riser (if there is no tap, then it must be embedded). We connect the old water supply system to one outlet of the tee, and to the second, through another tap, we connect the water heater.
At the next stage, we supply cold water. To do this, we cut a crane into the pipe, and after it - a tee. A tap is necessary to completely disconnect the entire system from the water supply (as a rule, it is already in the apartment). From the tee we make a branch to the water heater, we use fum tape to seal the connections. It is advisable to install another tap in the outlet to the heater.
From the outlet of the water heater, hot water is sent to the draw-off points. We cut a tee into the pipe with hot water, put a tap in front of it, which will cut off the central hot water supply. On the pipe leading from the heater to the water supply, we put another tap (everything is done by analogy with the inlet pipes).
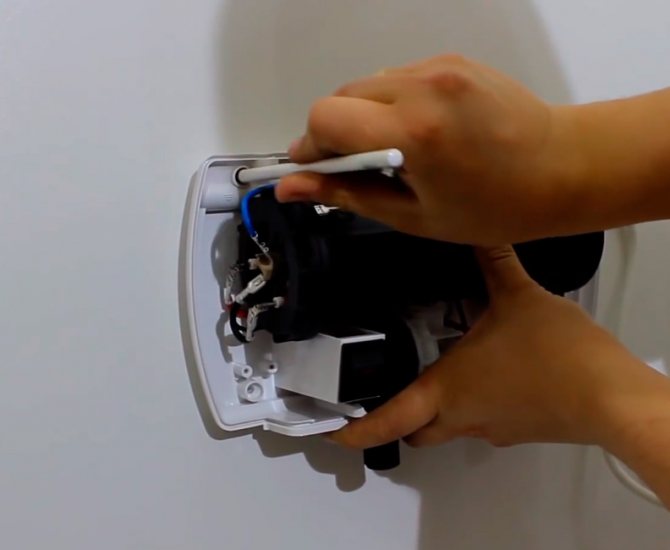
We connect the instantaneous water heater to the home electrical network through an RCD.
At the next stage, we connect to the electrical network. Since we have several draw-off points, a powerful water heater is needed. Therefore, we need to lay a separate stranded wire from the electrical panel with a cross section of at least 6 mm - through such a wire, loads up to 10 kW are connected (with a maximum current of up to 40 A). Do not forget to install an additional RCD machine on this wire.
If you have no experience with electrical panels and wiring, invite an experienced technician. When working with an electrical panel, remember to follow the safety instructions.
Once everything is ready, you can start testing the system. We need to make sure our connections are free of leaks. Before turning on the instantaneous water heater, make sure that there is water in the pipes - it is impossible to turn on the heater in a "dry" state, as this will lead to its failure.
How to use this whole system?
In the summer, when there is no hot water supply, you need to turn off the hot water supply and open the taps at the inlet and outlet of the water heater. After that, we turn on the RCD machine and set the required heating temperature (if there are such adjustments). Remember that when using two taps at once, the water temperature may vary slightly.
When restoring the centralized hot water supply, you need to turn off the RCD machine, turn off the taps at the inlet to the water heater and at the outlet, and then open the hot water supply tap from the central water supply. In case of repeated interruptions in hot water supply, we will be able to switch back to the instantaneous water heater.
Frequent mistakes
It is actually very easy to connect an instantaneous water heater to different communication systems, however, if you do not understand this issue in advance, and also do not have experience, then there is a high probability of making several serious mistakes. They negatively affect the performance and service life of all equipment.
The most common mistakes are:
- such powerful equipment is connected to the existing electrical system without a separate line, which leads to a reboot of the system, since it cannot cope with such a load, therefore, it often knocks out plugs, and there is also instability in the operation of various electrical devices;
- the device is turned on before it is connected to the water supply system, which may lead to disruption of its operation;
- unsuitable pipes or other elements are used to connect it to the water supply;
- pipes are laid in a convenient way, but it is not taken into account that they significantly spoil the appearance of any room, therefore, after installing the heater, the interior of the room may deteriorate;
- the power of the device is incorrectly calculated, therefore cold or hot water flows from the tap, which leads to a lack of comfort in its constant use for its intended purpose;
- electrical wires were connected incorrectly, therefore, short circuits or other problems in the performance of the equipment occur;
- the location of the water heater is illiterate, therefore, difficulties and inconveniences appear in the process of using it, due to the lack of the ability to freely regulate its functions.
Thus, each person who independently installed an instantaneous water heater on their own faced certain difficulties, therefore, in order to prevent possible mistakes, it is recommended to carefully study the correct instructions beforehand. As a result, a competent installation of the device is ensured, which guarantees a constant flow of warm water into residential real estate.This significantly increases the comfort of living in any apartment or house in which there is no connection to the central hot water supply. Often, an instantaneous water heater is installed as an auxiliary source of hot water in case there are problems in the central system.
vannayasovety.ru
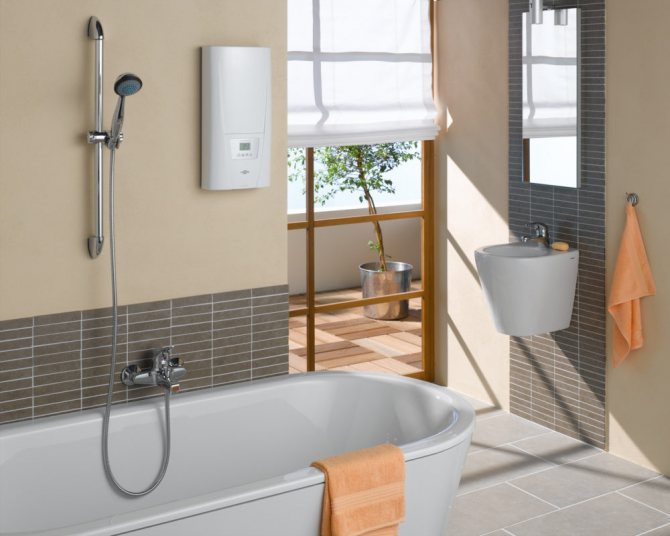
Bathroom water heaters: under-bath installation
Few people even guess about such a solution to the issue, but, nevertheless, it exists and, in my opinion, this option is the most correct. At least in this place he will definitely not bother anyone. Installing a water heater under the bathtub is possible only by adhering to certain conditions.
- The dimensions of the tank itself. Here you can go in two ways - in one case, you can put a couple of small tanks under the bath (such as those installed under the kitchen sink - they fit perfectly on the side of the bath), and in the other case, you can put a flat tank under the bath.
- In both the first and second cases, the bath will have to be installed slightly above the standard level - the distance between the bottom and the floor will need to be increased to 350mm. This step will not cause much inconvenience in using the bath.
- The bath, or rather its adherence to the walls, will need to be sealed very efficiently. You must understand that if moisture penetrates under the bath, then the tank will not last long there. For the same purposes, you need to take care of the ventilation of the space under the bathroom.
- Take care of proper grounding. With such a solution to the question of how to hide a water heater in the bathroom, grounding and electrical safety should be in the foreground - for the same reason, it is better to equip the tank and all electrical wiring in the bathroom with a residual current device (RCD).
- Do not forget about the space between the tank and the floor. In general, for normal ventilation, there should be five centimeters of free space at the bottom and top of the tank.
How to put a water heater in the bathroom
Ideally, such an installation of a water heating tank in the bathroom should be carried out on a rubber lining - this is done, again, for electrical safety purposes.
About signs of living comfort
The presence of hot water in the house is one of the main signs of a comfortable home.
In apartment buildings, hot water supply is often centralized. Water is heated separately in the boiler room and supplied to all apartments.
However, now such a water supply is economically ineffective, moreover, it has many disadvantages in the form of a possible shutdown of the hot water supply during pipeline ruptures or maintenance work in the boiler room.
The owners of private houses, and such provision of warm water is not available, so they have to solve the problem with the supply themselves.
The way out is to use an autonomous hot water supply. A water heater is installed in the house, which provides heating.
This method of providing hot water is becoming so popular that apartment owners often abandon centralized supply in favor of an autonomous one.
Water heaters provide housing with hot water in the right amount, it is available at any time, and it is economically viable.
How to check if the boiler is working properly?
After the water heater is installed, it is necessary to check its functionality. It is quite simple to do this, no special knowledge and actions are required. It is enough to open the central valve, carefully inspect all the joints for leaks. At this time, you should listen well as the tank begins to gradually fill with water. No traces of leaks should be visible on the surface of the body, water should not flow out or drip at the joints of the pipes.
When the tank is full, you can connect the water heater to the electrical network. But this can be done only after the container is completely filled in order to avoid damage to the heating element. If the equipment has a thermostat, then you must immediately set it to the required value. It may take a long time for the first full heating of the water in the tank, often up to 3-4 hours - it all depends on the boiler model. Some units heat water quickly, but the required temperature level must also be taken into account. After the boiler has been checked, you can use it as usual.
To ensure an uninterrupted supply of hot water to the home, today many people use water heaters. They can have a different design, differ in volume, the principle of water heating. Most often, storage tanks are used in city apartments, which allow you to constantly have a certain supply of hot water in a volume of 10 to 100 liters. Instantaneous heaters are also popular, which do not have a tank, but provide heating only when the tap is turned on.
Types of water heaters
The main types of water heaters that are currently in use are electric and gas.
In turn, electric water heaters are divided into storage and flow-through.
However, they have one method of heating water - with the help of heating elements.
In gas heaters, the water temperature is raised due to the combustion of the gas.
It should also be noted that the work on installing a water heater in the house is not so difficult, it is quite possible to do it on your own, with not very many tools and equipment at hand.
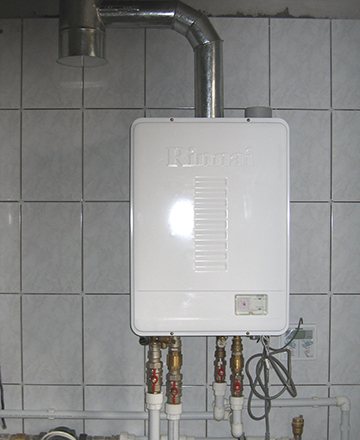
Of course, the situation with gas water heaters is somewhat more complicated, but more about it below.
Criteria for choosing a water heater
The main parameter of the device is power consumption. It depends on how much electricity it will consume and how hot the water will be. For an apartment during seasonal outages, devices for 3-7 kW are suitable. They are connected to a household outlet of 220 V. For a private house or industrial premises, it is better to buy a unit from 18 kW, it operates from a 380 V.
Instantaneous water heater does not impose restrictions on the volume of heated water.
According to the control method, water heaters are divided into electronic and hydraulic. The former are controlled by microcontrollers, all parameters are fine-tuned. Their disadvantage is their high price. The hydraulics switch modes with water pressure. It is easier to operate and repair.
Popular models
For an apartment, it is better to choose the Thermex Stream 700 device. It comes with a shower head, a faucet with an adapter and a set of fasteners. The device is simple - on the left side there is an inlet for cold water, on the right - an outlet for hot water. There is a filter that will trap particles larger than 2 mm. The maximum temperature is 50 ° C.
Another good model for an apartment is the Electrolux NPX6 Aquatronic Digital. Power - 5.7 kW, which is enough for a small family. The device is electronically controlled. The advantage is stable heating and easy installation. The disadvantage of the device is low power for the winter period.
Positive and negative qualities
By installing a water heater yourself, you can save a lot, this is the main advantage. But self-assembly also has other advantages.
Since the work is carried out by the owner of the house himself, then when servicing or needing to replace a faulty water heater, you will not need to understand the connection system.
In the future, replacing the heater will be completely simple. In addition, installation work will improve your skills in performing various household chores.
Among the disadvantages of self-installation of a water heater, we can note the possible occurrence of problems with the connection both to the water supply system and with energy or gas supply.
In addition, improper performance of the work can lead to the fact that the system will not work.
Before carrying out work on the installation of the water heater, several factors should be taken into account.
1. You need to immediately decide on the type of water heater.
An electric storage heater, also known as a "boiler", consumes less electricity, but it has rather large dimensions, so you should immediately determine whether there is a place for its installation.
A flow-through electric water heater is much more compact and it is easier to find a place for it. But it consumes more electricity.
2. When choosing a storage heater, you should immediately decide whether the wall on which it will be located will withstand a significant weight.
3. Immediately you need to inquire about the wiring of the house. If it is old, it is unlikely to withstand a heavy load. Therefore, it may be necessary to replace the electrical network at home.
The cross-section of the wire will help to calculate whether the wiring can hold the load.
So that the wiring can withstand the load created by the 2 kW boiler, a wire with a cross section of at least 2.5 mm is required. If a flow heater is installed, the wiring must be even thicker.
4. The water supply system should also be inquired. If, during its laying, separate leads were provided for connection, then this is very good.
If they are not there, but the system consists of plastic pipes, then it is not so difficult to insert the leads. The hardest part will be with metal pipes.
But if the water supply system is already outdated, then it is quite possible that it will have to be completely changed. It is also important to know how you can install an outlet in your bathroom.
The device of water heaters and their varieties
First, you should select the type of heating device that is most suitable for your case. To do this, it is worth analyzing and determining what requirements the product must meet, as well as its parameters and functions.

An uninterrupted hot water supply is very important for modern life.
Water heating devices can differ in the type of power supply and in the functional device. The power source in water heaters can be natural gas or electricity. By the type of action, the units are under running water and with a storage tank.
Cumulative water heaters
Water in storage systems is heated in a tank connected to the water supply. This type of heating device is especially popular. This can be argued by the affordable cost of devices, as well as the lack of special conditions for the device of electrical equipment.
Having installed the storage system, you will have to wait until the water heats up to the desired temperature
Flow type devices
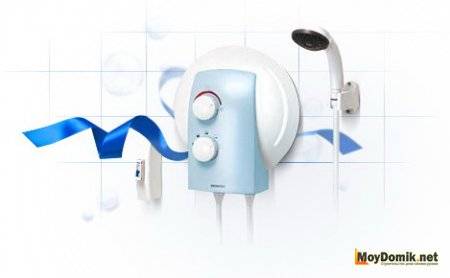
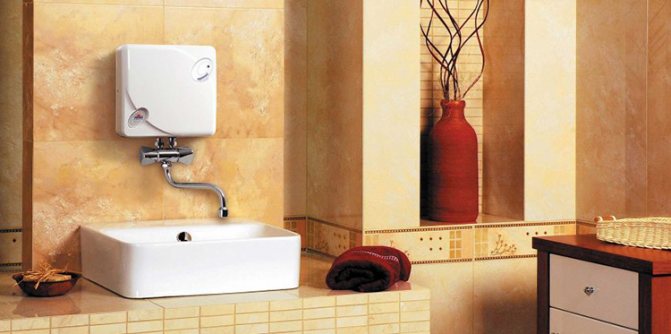
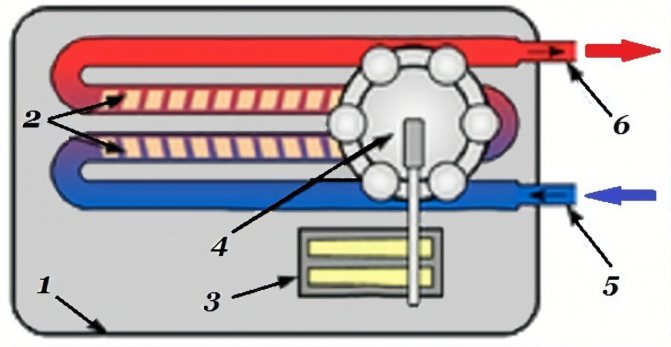
The functional device of instantaneous water heaters is that the water is heated by passing through a special sleeve equipped with an electric thermoelement. Products of this type are mounted directly on the mixer, which is connected to the water supply.
This system provides heating of water within 30 degrees. A significant disadvantage of such devices is that electrical devices have high energy consumption. This is disadvantageous in terms of economy. In addition, not all houses have electrical wiring that allows such powerful water heaters to be used.
Instantaneous water heaters are powerful electrical appliances that allow you to get hot water when you need it
According to the class of energy consumption, flow-through heating systems are divided into two types - single-phase and two-phase. Another difference is what type of heating element is used in the appliance. It can be a heating coil or a thermoelectric heater. In the event that tap water has a high salt content, the best choice would be to install an instantaneous water heater equipped with a spiral.In addition, devices with heating elements consume 20-30% more electricity. The internal heating system will be the best option for seasonal use, for example, in a country house.
One of the main advantages of flow-through devices is the convenience and ease of installation. This type of work can be performed by a completely unprepared person. This does not require any skills in either plumbing or electrical engineering.
For most of these devices, the design provides for placement on the wall in close proximity to the mixer in the kitchen area or in a combined bathroom in order to reduce heat loss. Flow-through heating devices have a low mass, and therefore they do not require capital fasteners, as in the case when a boiler is installed in a bathroom. For this, you can use simple fasteners and hardware. Depending on the model, the heaters can be located above the mixer or under the sink. One of the advantages of such devices is the possibility of concealed installation. For this, you can use plastic wall panels.
You can find out how to install an instantaneous water heater in a bathroom by reading the instructions supplied with the product. It must be completed with a connection diagram for the instantaneous water heating system.
Heaters operating on this principle have the following drawbacks:
- high energy intensity - from 5 to 30 kilowatts;
- for the correct operation of the equipment it is required a certain level of pressure in the water supply system; this excludes the possibility of using instantaneous water heaters on the last floors of apartment buildings.
Related article: Finishing the balcony with polycarbonate
Flow-through devices are optimal for installation in small rooms with a small number of residents. In this case, the apartment should be located on the lower floors.
Required tools and materials
If the house wiring is quite capable of working with water heaters and it is possible to connect it to the water supply system or make a tie-in, then you can start work.
Of the tools you need:
- Perforator with a drill of the required thickness;
- Roulette;
- Keys set;
- Screwdrivers;
- Pliers;
- Hammer, etc.
Additionally, you may need a soldering iron for plastic pipes or a die for threading metal pipes.
These tools are needed if you need a tie-in with a water supply system.
You will also need the following materials:
- Tow with a paste for sealing the joint or fum tape;
- Shut-off valves (quantity - from 1 to 3 pcs.);
- Tees (plastic or metal);
- Mounting hooks;
- Connecting hoses (if not included in the kit);
- Safety valve (for boiler);
- 3-core cable (it should be long enough to reach the meter);
- Circuit breaker or socket.
Next, we will consider the sequence of steps for installing and connecting different types of water heaters.
Installation of a water heater in the bathroom
To install and cut into the common pipeline of heating equipment, you will need the following tools:
Tools necessary for installing the water heater: a hammer drill, a soldering iron for plastic pipes, pliers, a building level and a screwdriver.
- hammer drill or hammer drill;
- concrete drill / drill-drill;
- building level;
- wrench;
- pliers;
- soldering machine;
- fasteners;
- screwdriver.
Each water heater has an individual mounting principle specified by the manufacturer. But most often a metal bracket is nailed to the wall, on which the boiler is hung or a bar is screwed onto the tank itself, followed by fixing with bolts.
The power (diameter) of the fasteners increases with the displacement of the tank.Responsible manufacturers with equipment always complete a set of necessary fasteners that can withstand the load of a given tank. When purchasing consumables on your own, remember that 6 mm dowels-nails are suitable for hanging a small tank of 30 liters.
Make a marking of the position of the boiler and its attachment points. Drill dowel holes at the marked points.
Note: ceramic tiles can be drilled with a drill in concrete by resetting the mode to a conventional drill. A gentle and gentle pressure when drilling will help prevent tiles from splitting.
Insert the dowels and fix the bracket or other parts specified by the manufacturer under this boiler. Place the water heater in the desired position.
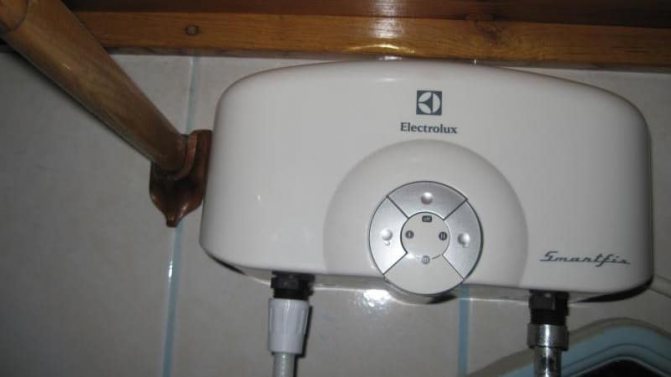
Installation of instantaneous water heater
The first will be flow-through water heaters. These heaters are divided into portable and stationary.
With portable water heaters, there should be no installation problems at all. Often, water is supplied to them from a shower hose with a previously removed spray nozzle.
To install, just select its location. Then measure the attachment points. In this case, you need to take into account the length of the wiring, it should be enough to the nearest outlet.
Further, in the marked places, you need to drill holes in the wall with a puncher and screw the mounting hooks into them.
Then hang the heater on the hooks, connect the shower hose to the inlet outlet and connect it to the socket.
This completes the installation. Below are examples of work.
The complexity of installing a stationary instantaneous water heater depends mainly on the water supply system of the house.
If only a pipeline with cold water enters the house, then installation will be easier, and if with cold and hot water, additional work will be required.
First, consider the first case.
The first step, again, will need to determine the location of the heater. But here you need to focus on the pipeline with water, the heater should be located not far from it.
Next, the device is fixed in the selected place. The installation process is identical to that described.
If the water pipe has an outlet with a shut-off valve for connection, then it will be easy to ensure the water supply.
It is enough to connect a flexible hose to the shut-off valve and to the supply outlet of the heater itself.
But you should also worry about the heater outlet. You also need to connect a flexible hose to it, and the other end to the mixer.
If there are several points of water intake, then it will be necessary to lay plastic pipelines to them, and then connect the hose from the heater to this pipeline.
If there is no separate conclusion in the security system, then you will have to make one.
If the pipes are plastic, then from the tools you will additionally need a soldering iron for plastic pipes, scissors for cutting them, and from materials - a tee and a shut-off valve.
Before starting work, you need to shut off the water supply to the system and drain its residues.
Then cut the pipe in the place closest to the location of the device.
Using a soldering iron, solder the tee into the cut, and connect the tap to it. Then connect the hoses to the device.
If the pipes are metal, then for the tie-in, you will need a die for threading the pipes.
The sequence of work is the same as for plastic ones: the pipe is cut, a thread is cut at its ends, a tee is screwed in, and a shut-off valve is screwed onto it.
After installation, check the tightness of all connections. To do this, the water supply is turned on and the connections are checked for leaks.
Next, the device is plugged into an outlet and the system is checked for functionality.
Second case.
If a pipeline with hot water also enters the house, then in addition to connecting the supply to the heater from the pipeline with cold water, it will be necessary to install two additional stopcocks and one tee.
The tee cuts into the hot water supply line. The first tap is installed in front of it, and the second is at the outlet of the heater.
This will ensure the connection and disconnection of hot water from different sources.
When using hot water from a centralized supply, the taps at the inlet and outlet to the heater are closed.
If water heated by the device is used, then the taps leading to it open, and the valve installed in front of the tee, embedded in the hot water pipeline, is closed.
Boiler installation
Most often, a storage boiler is used for the house, which has a certain amount of water. It is quite possible to connect such equipment on your own; this does not require special experience. When deciding how to install a boiler, it is necessary to pay enough attention to exactly where it will be located. Usually, a place is found for a tank in a bathroom or toilet. To complete the installation correctly, experts advise using the following guidelines:
Storage boiler connection diagram.
- the equipment should be placed in such a way that it is located near the water distribution system. Usually this is a toilet or bathroom, the device itself is placed above the toilet or above the sink;
- the boiler should not be far from the water supply system, since it is not recommended to pull pipes from the heater to the sink;
- the boiler should not interfere with anyone. When deciding how to install a boiler, do not forget about convenience. What do you have to pay attention to? The tank should be installed based on its shape, volume, convenient place for connection. If the boiler is flat, then it can be easily installed above the sink at any height. If it has the shape of a cylinder, then everything is much more complicated, it is necessary to look for a place for installation so as not to hit your head when washing. Volume also plays a big role. If the tank is small, then it is easy to find a place for it, but for equipment of large volume, it is already necessary to look for a suitable free space;
- when choosing a place on the wall, you need to make sure that it withstands the device. The tank not only itself has a fairly large weight, but it also needs to additionally add weight from the water. The container can only be attached to the main walls. You cannot mount the tank on partitions, plasterboard walls, on a surface that is lined with decorative panels. Fasteners must be selected appropriately, large anchors, reliable self-tapping screws, metal fastening plates are suitable.
Wall mounting of the water heater
The sequence of fastening with anchor bolts.
To install the water heater, you must first attach it to the wall surface. For this work, you should take dowels with self-tapping screws or anchors, you may additionally need a metal plate. You need to start by marking the fastening points on the wall. It is more convenient to work together, one person will hold the boiler, and the second will do the marking. The weight of even an empty tank is decent; this must be taken into account when selecting fasteners.
For work, you will need a drill with an impact function or a perforator, the choice of drills depends on the material of the wall itself. After the marks are made, you can drill holes, install dowels, attach plates. This should be done in such a way that the attachment points on the wall coincide with the attachment points of the tank itself.
When deciding how to install the boiler, do not forget that all screws must be fixed as tightly as possible. After the heater is installed on the wall, it is necessary to check the reliability of the fasteners again, the tank should not stagger, move away from the wall. There should be no shedding of material in the places of fasteners.This is dangerous and can lead to an emergency.
Water connection
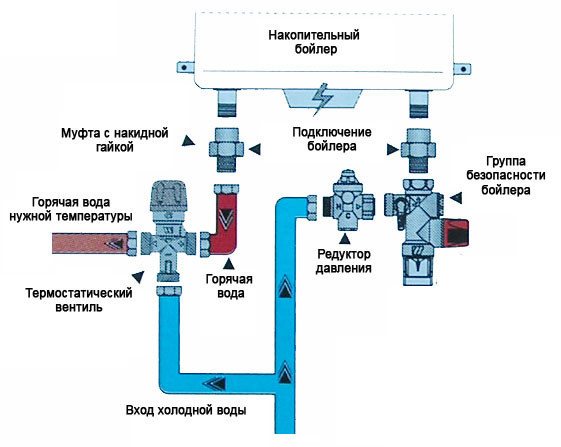
Installation diagram of pipes and shut-off valves for the boiler.
You can connect the water heater to the water supply yourself. To install the boiler, it is necessary to use special flexible water hoses, they are produced in various sizes. They are designed for cold or hot water. It is important to remember that installing the boiler is easy if you choose the right flexible hoses. It is necessary to inspect the boiler exits in advance, they can be "daddy-daddy", "daddy-mommy", "mommy-mommy". Most often, the latter connection is used, but it is better to check this beforehand so as not to send it back to the store. There must be a nut at the end of each connection hose.
To install the boiler, you first need to connect one hose to the hot water outlets from the boiler. Sealing gaskets do not need to be purchased separately, they are already included in the kit. After that, the hose is mounted, but it is not necessary to clamp it strongly. A similar procedure is completely repeated for the second outlet, designed to supply cold water to the heater.
A valve should also be provided, it allows you to shut off the water supply to the device. Such equipment may be needed if it becomes necessary to completely drain the water from the tank for prevention, cleaning, and repair work. This completes the connection to the water supply.
Installation of a storage water heater
The installation of a storage water heater is approximately the same.
First, the location of the boiler is selected. It must be easily accessible for maintenance.
Then all measurements and holes are drilled to install the mounting hooks.
Additionally, it may be necessary to install safety bolts.
Another way.
Then the water supply is connected. If only a pipeline with cold water enters the house, then a tee cuts into it, and a shut-off valve is already on it.
A safety valve must be located at the supply outlet to the boiler, which ensures the maintenance of the required pressure in the boiler.
Since this valve has a water outlet, a silicone tube will need to be connected to it, the end of which is led out into the drain.
A hose is connected to the boiler outlet, through which hot water will be supplied to the pipeline leading to the consumers.
Therefore, it is advisable to lay this pipeline in advance.
After that, the heater is connected to the electrical network. It is best to connect to the junction box closest to the meter. Now for these purposes, you can use smart sockets, but you need to know the models that can withstand a heavy load.
It is advisable to lay the wire in a groove with its subsequent termination. Not far from the boiler, a circuit breaker must be installed in the wiring.
Schematic diagram of the boiler installation.
If a pipeline with hot water also enters the house, then it will be necessary to insert the outlet pipe from the boiler into this pipeline and install another tee and two additional taps.
After that, you will need to pump the heater with water. To do this, you need to open one of the taps of the consumption point, and after that - the tap for supplying water to the heater.
If there is a connection to the centralized hot water pipeline, the tap installed in front of the tee must be closed and the tap at the outlet from the boiler must be opened.
Water, filling the system, will push out the air in the system and it will come out through the tap of the consumption point.
During pumping, all pipeline connections should be inspected for leaks.
If necessary, the connections can be tightened. If the leak persists after tightening, it is better to repack the connection, having previously shut off all the supply taps and drained the water from the system.
Boiler installation examples.
After filling the systems with water, the boiler is connected to the network.
elektrikexpert.ru
How to install a boiler in an apartment
Almost all high-rise apartments are often characterized by a lack of free space. And if the bathroom is tiled, and plumbing is installed in it, then the issue of where to install the boiler will be really difficult. We can call a specialist at home. He would have dealt with this issue (of course, not for free), but in most such cases, the heater is installed on the back wall of the toilet, where, as you know, there should be a wall cabinet. We store various little things and cleaning agents in it, and we use it to close unseemly sewer pipes.
Standard boiler installation
Stage 1. In a word, we will install a boiler in this cabinet. An important fact is that boilers for 5-10 liters are suitable for this, larger ones simply will not fit in the cabinet. To begin with, we free it as much as possible - we extract all the contents, remove the shelves, doors, bottom and top cover. This will allow us to access the sewers.
Stage 2. Further, with the utmost accuracy, we mark the center-to-center distance of the fasteners. We also note the height of the cabinet and the distance between it and the wall. Having received all the necessary dimensions, we arm ourselves with a tape measure and mark the surface of the wall. Then, having decided on the attachment points, we drill holes with a puncher, insert the dowels there, and screw the anchors into them.
Stage 3. We hang the boiler on the anchors.
Stage 4... We put the door back on the cabinet. Of course, we no longer use the shelves and the bottom. Next, we connect the water heater to the water supply and the network in the same way as in the previous version.