Some subtleties of heating the garage
The garage belongs to non-residential premises, so the optimal temperature is much lower here. In order not to harm the car, it is enough to maintain 150C. If a person is dressed in appropriate clothes, then under such conditions he will feel quite comfortable. In addition, a large amount of energy is required for strong heating, which is disadvantageous from the economic point of view.
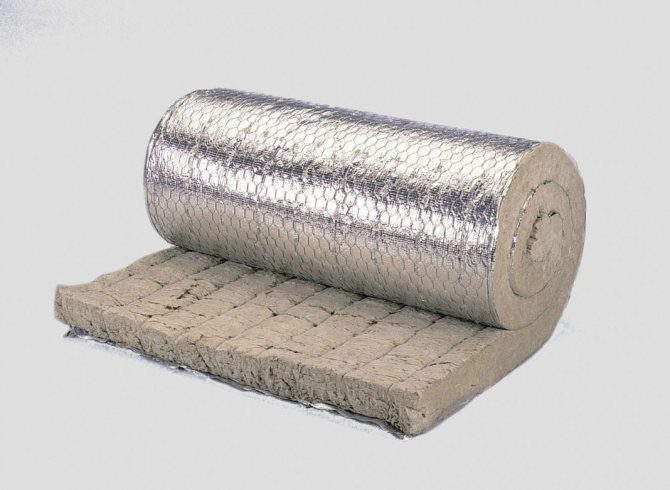
The thermal insulation of the garage also deserves attention, because it will be very difficult to maintain a comfortable temperature in an uninsulated room with thin walls and a large number of cracks. For wall insulation, you can use any insulation, for example, penofol. You should not save on thermal insulation, this cost item quickly pays off due to energy savings.
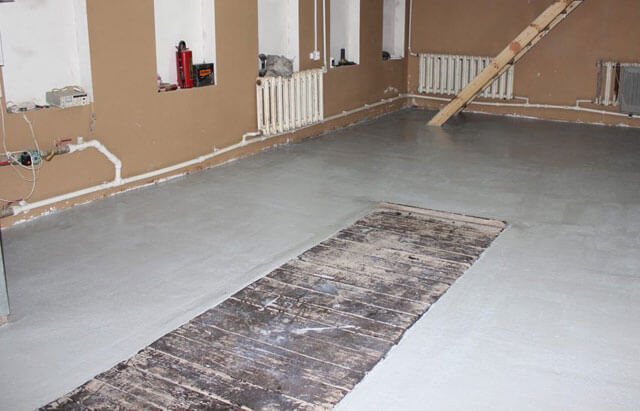
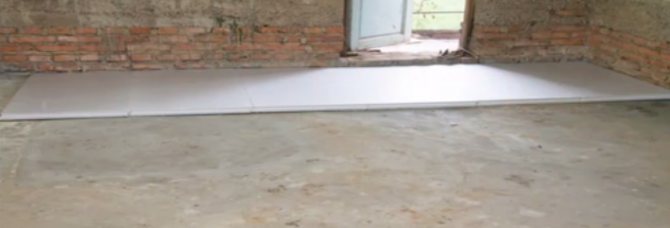
In contrast to living quarters, increased loads are placed on the floor surface in the garage. This includes the impact of the machine wheels and unexpected impacts from tools and parts. Consequently, the screed over the heating elements must be high enough, the optimal value is 4-8 cm. Such a thickness makes the use of an infrared heating film unprofitable, which in these conditions will give an insignificant amount of heat.
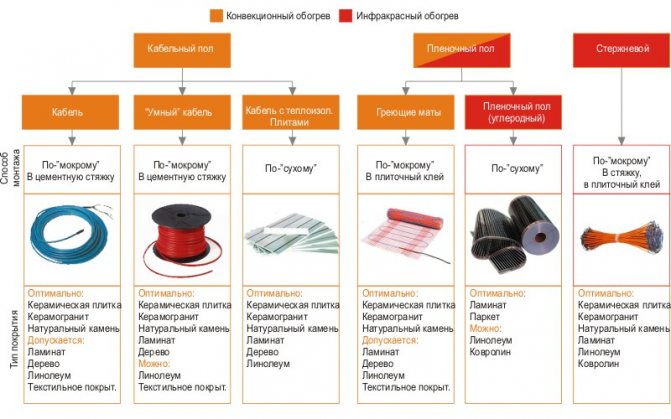
Most often, they install electrical systems or a water-heated floor in the garage with their own hands. In the first case, a heating cable is used as a heating element, in the second, steel pipes. Each type of heating is characterized by its own advantages and disadvantages, which should be discussed in more detail.
Warm floor for car service. Non-standard solution
Take, for example, a small car service station, car wash, or manufacturing facility. This is probably the most obvious example of the fact that it is impossible to establish the ideal room temperature with the help of a traditional heating system. Permanent link https://www.domidei.ru/node/876\ Strong convection flows (simply drafts), and the heating system operating at the limit of its capabilities does not save, however, from damp air and puddles on the floor, or even ice in the zone entrance gate. Warm zones are formed only under the ceiling itself or in the immediate vicinity of heating devices. There is a completely natural and reasonable solution: the floor must be heated. This will create the warmest zones at floor level, that is, where you really need it. Get rid of puddles on the floor and drafts. And it will also allow you to regulate the heat by zones, that is, in different parts of the same room it will be possible to create a different temperature regime. Such systems are widespread today. These are mainly electrical cable systems, inexpensive in terms of configuration and quite workable on small areas of the floor. However, high energy consumption creates additional problems both in terms of heating costs and in terms of the available dedicated power. There is also water floor heating, the combination of which with traditional heating devices is more economical. A serious disadvantage of this solution is the high cost of assembly and installation costs. A standard water underfloor heating is a low-temperature heating system that requires a heat carrier with a temperature of the order of + 35-45 ° С. To obtain it and maintain the temperature at the proper level, special circuits are used, including three-way valves.Each of these elements is a rather expensive device (the simplest of them costs about 7-12 thousand rubles). Therefore, a reasonable question arises whether it is possible to do without them. That is, connect the system directly to an existing hot water source such as a boiler or central heating system. The main problem is that, firstly, the underfloor heating system due to the high length of the pipeline has a high hydraulic resistance, and you just can't connect it - the water won't go there. And secondly, the coolant even in the heating return has a temperature of about 70C, that is, it will be impossible to walk on such a floor. The underfloor heating system itself consists of several separate circuits, placed based on the tasks of heating certain areas of the room. It is mounted in accordance with all the rules for the installation of a hydraulic underfloor heating. Reinforcement mesh is laid out directly over the layer of thermal insulation and a "coil" of pipes of the required diameter is attached. The layout step is taken as standard, 200 mm. The heating circuit is poured with a layer of concrete screed, then the floor covering is laid over it. Each heating circuit is connected to the existing high temperature heating system via its own circulation pump. To control the pump, a thermostat of the electric underfloor heating system is used. The sensor can measure the degree of heating of the screed itself or the air temperature at a certain level from the floor. Automation turns on the pump when the temperature drops and turns it off when the required heat level is reached. Thus, despite the fact that hot water flows through the pipes, it becomes possible to maintain the floor temperature at the proper level without turning it into a hot frying pan. The thickness of the concrete screed in this particular case is the main parameter that allows you to achieve a more even distribution of heat. The thicker it is, the less "striping" of the floor will be felt. Of course, such a system "accelerates" more slowly than a conventional radiator system with the same power of the heat source. But the large inertia of the water heated floor in this case is a big plus and ensures the emergency stability of the system. Therefore, after opening / closing the gate (if the "ventilation" is not cooled
Underfloor heating electrical system
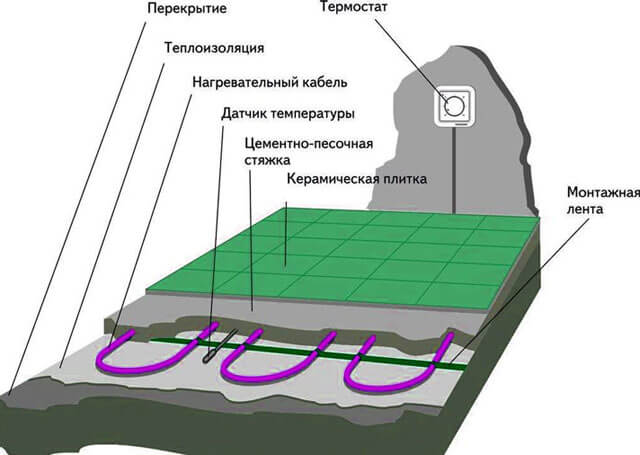
In this case, when an electric current passes through a flexible conductor, heat is released. The screed heats up from the conductor, which in turn transfers heat to the room.
Electric underfloor heating is characterized by simple installation and high reliability. However, electricity costs with this type of heating are quite high, especially in cold winters.
To reduce costs, it is important to make high-quality thermal insulation of the walls and ceiling. The optimum insulation thickness for these garage surfaces should be more than 6 cm. Floor insulation should also be considered.
When drawing up a project for an electric underfloor heating in a garage, it is important to take into account the load that will be exerted on the electrical network of the garage. The calculations are based on the amount of energy required to heat 1 m2 of the room, which is 120-140 W. If this value is multiplied by the area of the garage, then you get the required amount of energy. In the process of arranging a warm floor, it is important to be sure that the wiring in the garage can withstand such a load for a long time.

Foundation preparation rules
Most often, there is soil under the garage floor, therefore, before making warm floors from water heating or electricity, you should pay attention to thermal insulation. The fact is that improper insulation can lead to significant heat losses, up to 30%, which are associated with warming up the soil.
The insulation process is as follows:
- The soil is carefully leveled and compacted.
- A rough concrete screed is poured over it. It is important to control this stage so that the surface is as flat as possible without sudden changes in height.
- The screed is left to solidify, after which the insulation material is laid.
Thermal insulation of electric underfloor heating
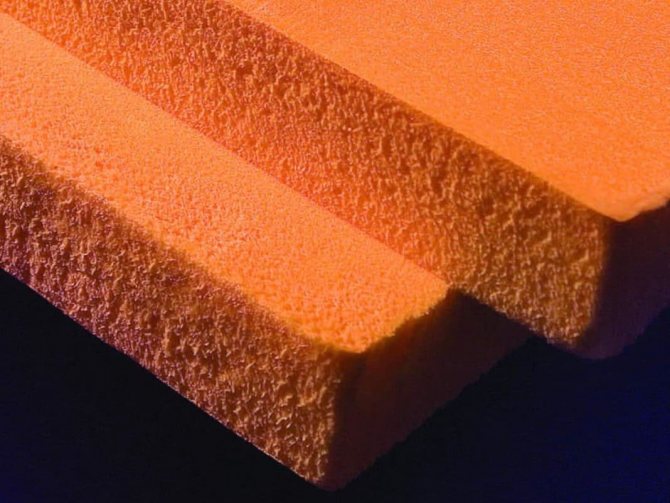
The best option for insulating a warm floor with your own hands in the garage is considered to be penoplex or polystyrene. For high-quality thermal insulation, the material must have a thickness of 3-8 cm, which is determined by the severity of the local climate. For example, insulation with a thickness of 3 cm can be used in regions where the air temperature does not fall below -150C. If the region experiences severe winters, then it is better to use material up to 8 cm thick.
When insulating a floor with a heating element in the form of a cable, a special mounting tape is laid on top of the insulation to fix the coils of the cable. The recommended distance between strips of tape is 0.5 meters. The tape is fastened with dowels to the rough screed. If mats are used as a heater, then the mounting tape is not required, so you can immediately start the installation work.
Leading sales company
Many residents of Moscow and other large cities opt for Teplolux floors. Such products are perfectly used with parquet boards, linoleum, laminate and tiles. It is quite easy to fold and unfold such a floor.
We recommend: How is expanded polystyrene used for underfloor heating?
The front layer of the cover is made of elastic felt. It is an artificial but very durable material. The weight of such a product is less than 3 kilograms. Floor power is equal to the interval from 300 to 560 watts. A 2.5 meter long wire acts as an accessory.
Before you start using such a floor, you need to study the instructions for its use.
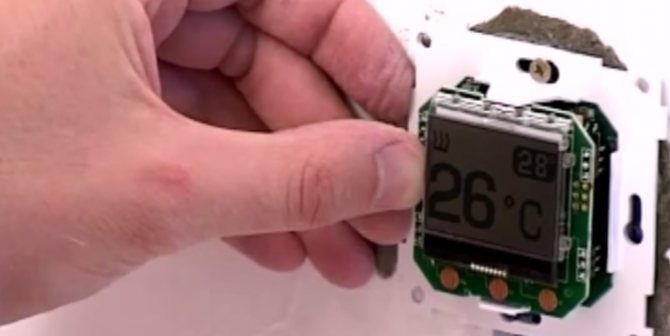
Thanks to the new thermostat, the control system has become the most simple. Thanks to her, it is possible to set different modes for each day of the week. This floor saves energy up to 70%. Warming up can be carried out at any time of the day.
- Similar posts
- How to set up an underfloor heating?
- How to install Eastec underfloor heating?
- Features of underfloor heating made of metal-plastic pipes
- Is it possible to lay underfloor heating under linoleum?
- How to install an electric underfloor heating?
- How are PEX pipes for underfloor heating connected?
Laying the heating element
Installation of underfloor heating with heating cable is carried out as follows:
- The wire is laid in coils, maintaining a distance of 0.3 meters between them.
- Each turn is fixed with special antennae on the mounting tape.
- In the process of laying, it is necessary to ensure that the turns are parallel to each other.
- It is not recommended to bend the wires less than 90 degrees or to pull them too tight.
- The heating element is placed in places where there are no pieces of furniture. In other words, no wire should be laid under shelves or a workbench to avoid interfering with the warm air flow.
- When performing installation work, it is not recommended to step on the cable in order not to damage the insulation.
- Use only solid wires, no twisting or soldering. Otherwise, the service life of such a floor, as well as its reliability, is significantly reduced. In case of damage to a single section of the cable, the entire circuit must be replaced.
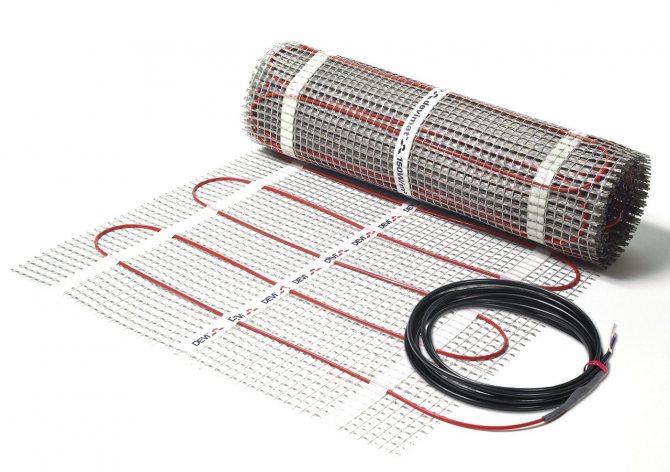
Installation of underfloor heating in a garage with heating mats is easier, since it consists of cable coils, laid according to certain rules and fixed on a reinforcing mesh. The installation process consists of laying the heating mats on the floor. After that, they immediately start connecting the system.
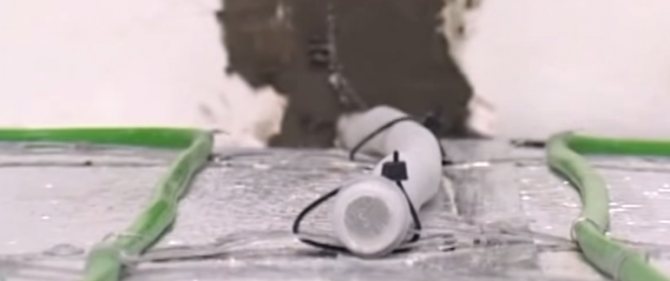
After laying the heating elements, they begin to install the temperature sensor, for this they perform the following actions:
- Having retreated from the wall about 0.5 meters, a small depression is made in the heat-insulating layer.
- A corrugated pipe is placed in it, the diameter of which is 2 cm. Thanks to the pipe, the sensor can be replaced even after the screed is poured.
- A thermal sensor is placed in this pipe.
Further, at a height of 0.3 meters from the floor surface, a thermostat is mounted.
Electric floor laying technology
Having decided to install an electric underfloor heating in the garage, you need to consider all possible options for saving energy. To do this, pay attention to the area of the room, the already existing insulation, the quality of the insulation of doors and windows, as well as the type of floor. The less heat leakage, the less electricity will be required for full heating.
Tools and materials
When preparing the necessary tools and materials for laying TP in the garage, the first thing they pay attention to is the heating element. There are several options:
- heating mat - flexible tape, completely ready for installation, with braided cores;
- resistive cable - is a one- or two-core element that heats up to a certain temperature;
- self-regulating heating element. The installation of such a cable is rational only if there is an air gap between the floor and the objects installed on it for heat dissipation;
- infrared cable with a film - it also consists of two layers of dense polyethylene, between which heating elements are laid;
- infrared rod - consists of flexible rods-emitters laid between two conductors with a pitch of 9-10 cm.
In addition to heating elements, you will need the following materials:
- connecting wires;
- mechanical or electronic thermostat;
- RCD
- grounding cable;
- damper tape;
- screed materials;
- fasteners.
Of the tools you will need:
- puncher;
- chisel;
- scissors for metal;
- Screwdriver Set;
- roulette;
- level;
- level.
When everything you need is at hand, you can start preparing the floor.
Preparatory work
Any garage stands on the ground, so that some of the heat does not go into the ground, the floor must be prepared.
- The first layer of the screed is poured, making it as even as possible
- After the first layer has dried, a layer of foam or polystyrene thermal insulation is laid. The layer is made 7-10 cm.
- If a heating cable is used, then a tape is mounted under it to securely lay the wire. If mats are used, it is not necessary to glue the tape.
The preparatory work includes floor insulation with penoplex
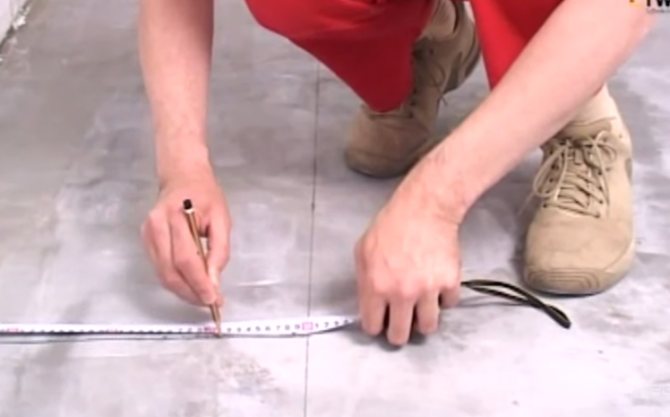
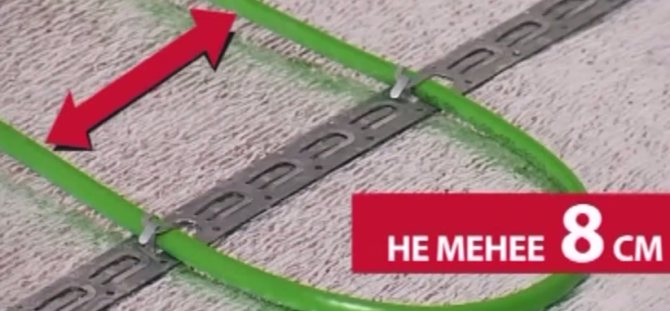
The heating wire is laid in a zigzag pattern with a step of 25 cm. Intersection and bending of the heating cable is not allowed.
Installation instructions
It is possible for everyone to cope with the installation of a warm floor in the garage with their own hands, even without work experience. The heating cable is laid as described above and fixed with special clamps on the mounting tape. The turns of the wire are laid parallel to each other without excessive tension. Bitumen mastic is used to isolate the junction of wires and contacts.
After the heating elements are laid, the temperature sensor must be installed. For this, a small recess is made in the thermal insulation at a distance of about 50 cm from the wall and 30 cm from the floor, into which a corrugated pipe with a diameter of 2 cm is laid. The thermostat is placed in it. The pipe allows the sensor to be replaced after the screed has been filled.
Connections of the elements of the warm floor are made with a copper wire. The system can be connected to the mains only through its own residual current switch. After connection, the system is checked for operability. If everything is working properly, the finishing layer of the screed is poured.
Connecting the "warm floor" system
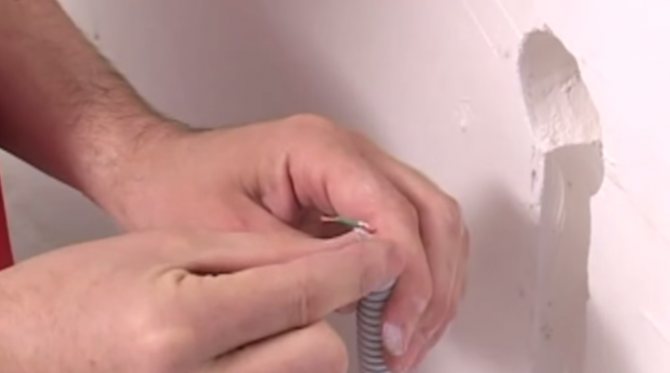
It is recommended to connect the electric underfloor heating system only using copper wires, the cross-section of which is determined by the final load.
A thermostat is installed on the wall and a heating element and a temperature sensor are connected to it. The work is carried out in strict accordance with the instructions that the manufacturer attached to the regulator.
It is strictly forbidden to check the electric underfloor heating by supplying voltage to the system. To ensure the integrity of the insulation and the correct connection, before connecting to the thermostat, measure the resistance of the heating element and compare the result with the recommended value. The difference should not exceed 10%.
To connect the electric underfloor heating to the network, use its own differential current switch.
Voltage supply to the "warm floor" system is carried out only after the screed has completely solidified.
As a final option, it is recommended to use a special screed for a warm floor, which is characterized by the best thermal conductivity coefficient. In addition, it is allowed to use ordinary concrete screed or self-leveling floors. The height of the screed is determined by the weight of the vehicle and the planned work in the garage. The optimal height is 3-5 cm above the heating element. Taking into account the thickness of the used thermal insulation material of about 5 cm, the minimum height of the screed should be 5 cm. The optimal screed thickness is selected after assessing the intensity of the load on the heated floor surface.
When deciding how to make a warm water floor in a garage, it should be remembered that it is possible to turn on the underfloor heating system into the power supply only after 28 days. During this time, the screed over the heating element will completely solidify.
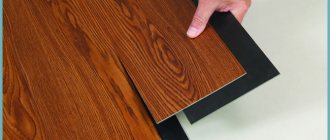
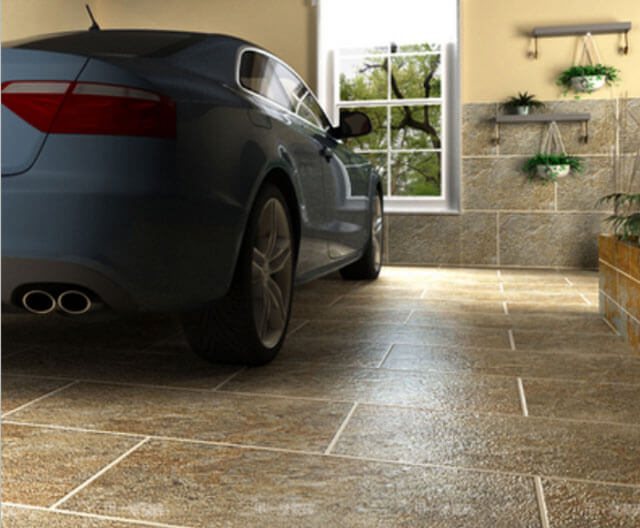
The concrete screed can act as a finishing coating; it is also possible to install a warm floor under the tiles in the garage. In any case, the heating properties of the floor will not change from this.
Coating features
The mobile warm floor is presented in the form of a carpet, on the back of which a special heating element is installed. The modern structure makes it possible to use it under a variety of floor coverings (carpet, laminate).
Subtleties in use:
- the concept of "mobility" implies that the dimensions of the carpet allow it to be laid anywhere in the living space. Its dimensions are 1.8-2.8 meters in length and 0.6-2 meters in width. The weight of the carpet is from 300 grams to 2 kilograms;
- it is very economical to use. The power ranges from 0.25 kW to 0.56. The operating time can reach 50,000 hours. These are pretty high rates;
- underfloor heating is resistant to mechanical damage. A breakdown of one heating element in the system will not lead to the failure of the entire heating system. She continues to work, using only those that remain intact and working;
- the mat is completely safe to use. The highest temperature is 55 degrees Celsius. This means that the room temperature will not rise too high. An important fact should be taken into account - carpet can withstand temperatures of 30 degrees. Has a good grounding, due to which it prevents the consumer from receiving an electric shock;
- distributes heat correctly over the entire surface of the floor;
- the warranty is about 7 years.
We recommend: How to install a water-heated floor?
Depending on the type of mobile warm floor under the carpet, the Thermolux is divided into 2 categories:
- infrared. This type of floor looks like a diaper on which there are individual strips of carbon mixtures. The current is supplied to the heating section and is in the form of infrared radiation. Electric waves have a length of 5-20 microns. They are able to heat not only the surface of the carpet, but also the air.In order to distribute the heat correctly, the device is equipped with a foil on the underside. Such a carpet is comfortable in any position;
- resistive. The presented device consists of metal-type tracks. It has a high level of resistance. In parallel, 2 wires are connected to the tracks, which conduct an electric current. With such a device, the entire system does not fail even if one of the elements becomes inoperative. The gap between the metal tracks is one millimeter. Such an arrangement of the heating parts makes it possible to evenly warm up the entire surface of the film system. The resistive mobile floor device has several layers: a polymer base, resistive metal tracks and a protective plastic cover layer.
Water system "warm floor" in the garage
A water-heated floor in a garage is considered a more economical heating option, but for its operation it is necessary to install a boiler or crash into the heating system in the house. It is this fact that makes the installation process more difficult and costly in material terms.
However, do-it-yourself warm water floors are considered beneficial as they do not require high energy costs compared to electric underfloor heating.
It is recommended to install the boiler if it is impossible to use other options, which is due to large financial investments.
When drawing up a project, attention should be paid to the connection diagram of the warm floor to the general heating circuit and to correctly determine the location of the distribution unit. Also, in the process of solving the problem of how to make a warm floor in a garage, it is necessary to calculate the length of the pipes in accordance with the area of the garage and select a pump of the appropriate power for the flawless operation of the system.
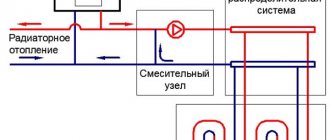
When connecting to a radiator heating system, an excessively high temperature of the medium in the circuit must be taken into account. To reduce this parameter, a mixing unit is installed. Here, the heated coolant will mix with the cooled liquid that has passed through the entire system. When using a separate boiler for the underfloor heating system, the temperature values can be adjusted directly on the boiler.
The distribution unit includes a mixing unit, a collector group and a pump for forced circulation of the coolant. All of this is housed in a control cabinet, which can be purchased at any specialty store. In this case, you can choose a cabinet of a certain capacity, assembled and tested at the manufacturer. The selected cabinet is installed in the most suitable place and connected to the general heating system. After that, the warm floor is connected to the collector group.
Scope of use
A mobile floor is a special equipment that can be used in absolutely any place where electrical networks are used. It can be mounted to heat the living area, in bathrooms, on balconies and loggias.
Most of the people are covered with warm floors in office and household premises, as well as country houses and kiosks. The use of a warm floor, which can be installed in absolutely any place, allows you to make the room more cozy and comfortable.
They also produce variants of carpets that can be used in cars. They have an adapter in the kit, which allows the workflow to be carried out from a battery.
Advantages and disadvantages
There are many positive features of this coverage:
- easy to use;
- there is no need to install a warm floor;
- oxygen is not burned during heating;
- safe to use;
- does not produce harmful secretions that would cause an allergic reaction;
- uniform and fast heating;
- high efficiency rate;
- average heating temperature;
- acceptable cost.
We recommend: How to install the underfloor heating film?
Like any other equipment, the mobile floor has its own disadvantages. One of these is operating costs. Also, when using it, it is imperative to follow the safety rules.
Base for a water-heated floor
In general, the base for all types of the "warm floor" system is prepared according to the same scheme. In the case of a warm floor in a garage from heating, it should be borne in mind that the height differences should not exceed half the diameter of the pipe. In this case, it is possible to prevent the formation of air jams that impede the normal circulation of the coolant and the warm floor from the heating will work as it should.
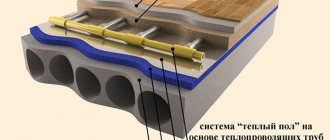
A distinctive feature of the water underfloor heating system is the presence of special thermal insulation, which makes pipe laying easier. The upper layer of insulation is equipped with small staggered protrusions, in which the tubes of the water circuit are laid. It should be noted that the price of this option will be higher.
When using conventional insulation with a height of 3-8 cm, the pipes are distributed on the mounting grid.
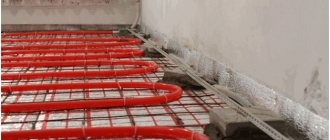
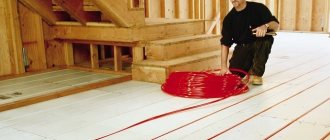
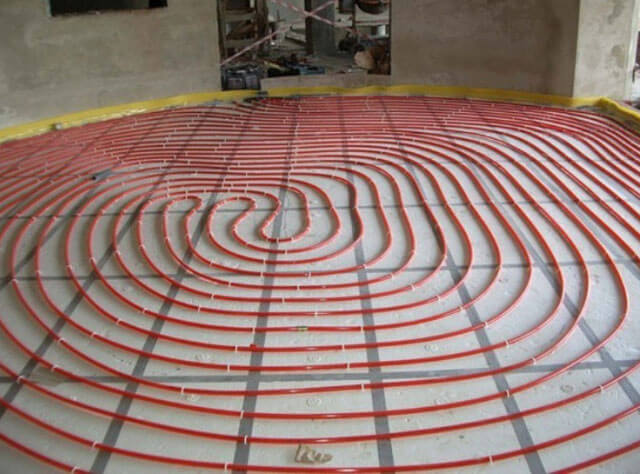
Laying the water floor
The warm water floor in the garage can be installed on any existing base. Installation begins with design: calculating the thermal power and length of the circuit, choosing materials and controlling devices.
Materials and tools
On sale you can find standard water floor kits with automatic temperature control. Typically, such systems are designed to heat a room from 60 to 80 square meters.
For work, you will need the following materials and tools:
- metal-plastic pipe;
- plasticizer;
- heat insulating mats;
- three-way mixing valve;
- circulation pump;
- thermostat;
- fittings for plastic pipes;
- servomotor for mixing valve.
For laying a water-heated floor in a garage, you will need heat-insulating mats.
You will also need a standard set of tools for installing a warm floor in the garage with your own hands.
Calculations
The calculation consists of a pipe laying scheme. It is important to consider the distance between the turns and their length. If the TP in the garage is the only source of heat, it is recommended to take a step of 10 cm.If other heating elements are present, then you can install it in steps of 30 cm.
To calculate a warm floor with a heat carrier, special calculators and formulas are used. Self-calculations can be performed with average values, which are often used for installing floors in garages. The calculation includes:
- cross-section of a metal-plastic pipe - 1.6 cm;
- length of a heating circuit for a garage with an area of 60 sq. m. - 70-80 m;
- circulating pump power - not less than 2 l / s.
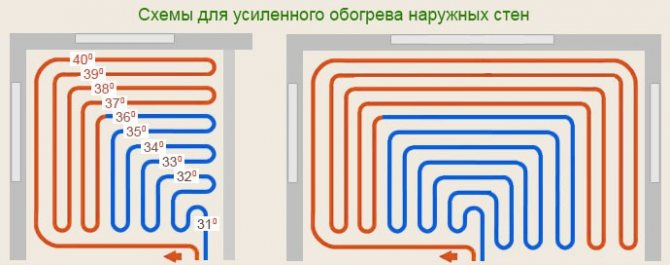
At the walls and gates, pipe loops are laid with a smaller step. Closer to the middle, it increases. The supply pipeline is laid closer to the outer walls.
Preparatory activities
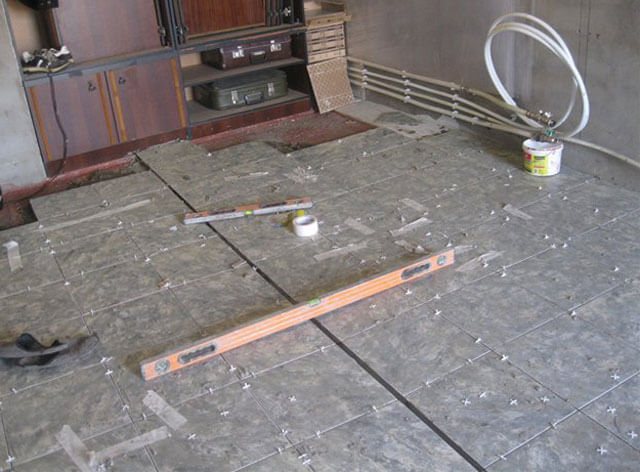
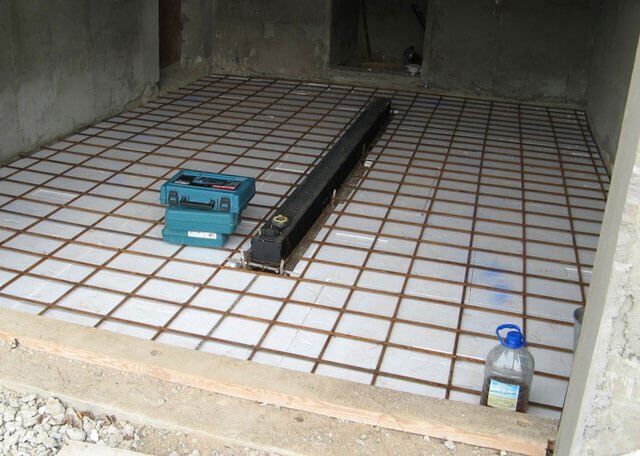
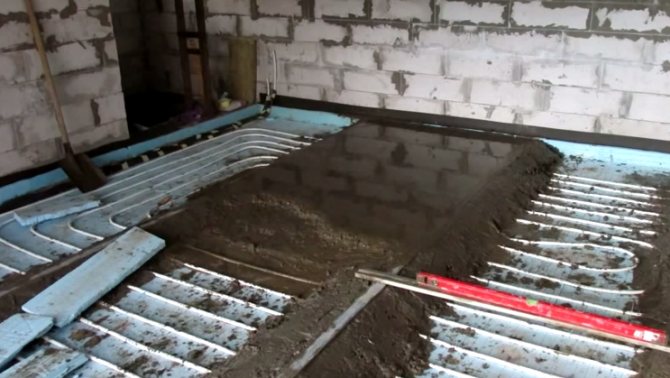
The preparatory work before installing the water TP includes cleaning and leveling the base surface. For this, the floor is poured with a layer of concrete screed and left to dry completely.
A heat-insulating material with a thickness of no more than 3 cm is laid on a flat floor surface. From above, it is fixed along the perimeter with a damper tape. This compensates for the thermal expansion of the screed.
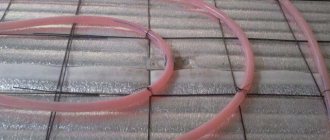
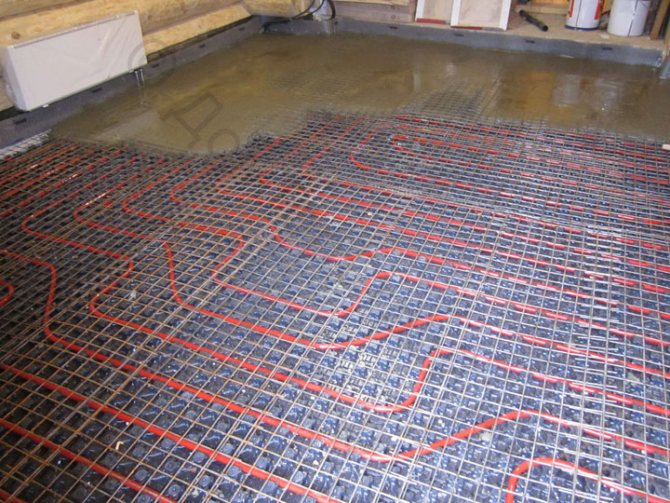
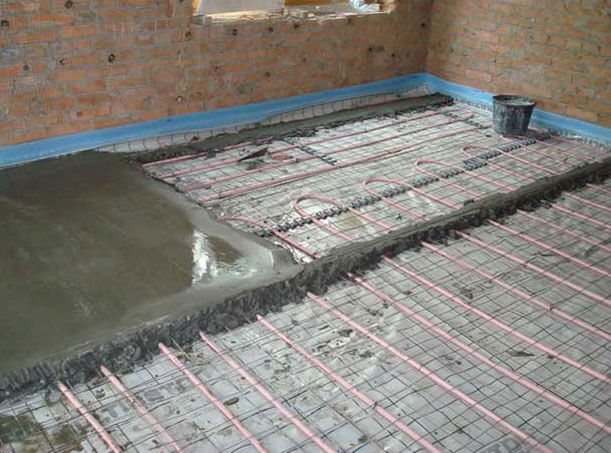
The next layer will be the laying of a dense polyethylene film and a reinforced mesh, to which the heating pipe will be attached.
Installation steps
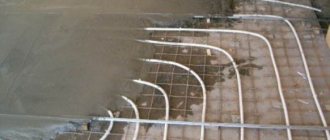
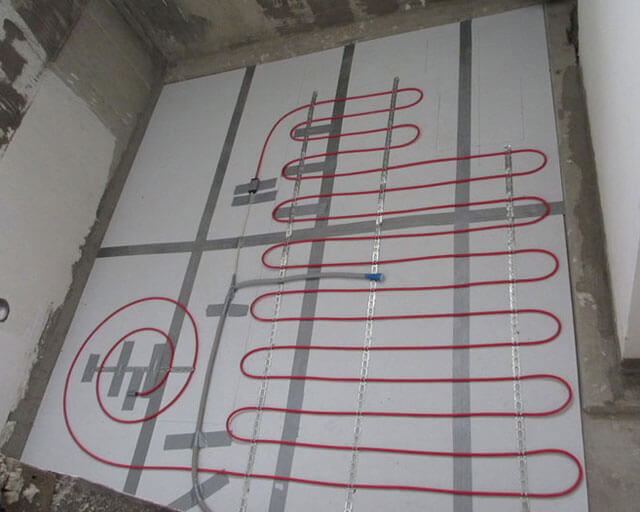
Installation of pipes through which the coolant will move is carried out in one of the ways: "snail" or "snake". Next, the following connection steps are performed.
- The pipe is attached to the reinforcing mesh with plastic clamps.
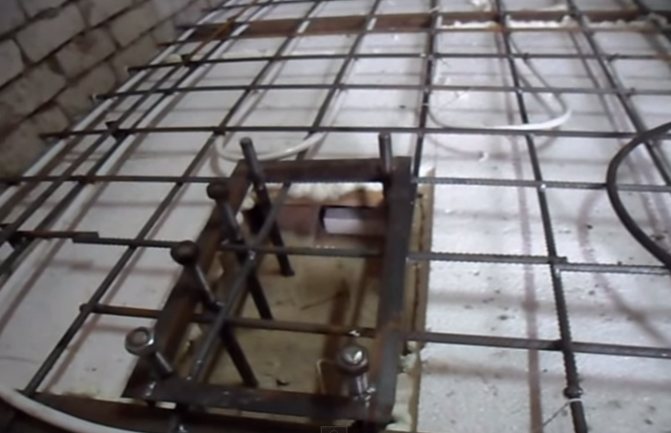
- A valve is installed to discharge water from the system.
- The system is checked for operability and its tightness. For a coolant is pumped under a pressure 2.5 times higher than the operating parameter. If the pressure has not dropped within 24 hours, then the system is hermetically sealed.
- A layer of screed with a thickness of at least 10 centimeters is poured from above.
- The floor is covered with a foil for proper curing of the screed.
- After a month, you can conduct a test run of the system.
As a decorative finish for the floor in the garage, you can use porcelain stoneware tiles or paint the surface.
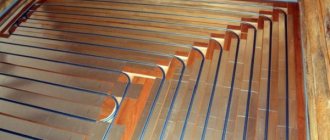
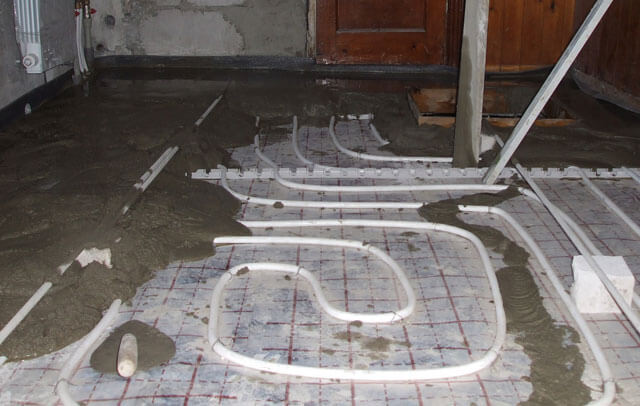
Pipe laying
Pipes of a water-heated floor are most often laid by the "snake" method with a parallel distribution of turns over the entire area of the room. The pipes are fastened with clamps or wire.
With a large garage area, pipes are laid using the "spiral" method. In this case, the area warms up more evenly, although laying is considered more laborious.

In the process of laying pipes, it is forbidden to bend the pipes at an angle of less than 90 degrees by any method, so as not to damage the heating element. For the same reason, you must not step on the pipes and allow them to be damaged. If any section is damaged, the entire circulation circuit must be replaced.
Testing the water floor heating system
To identify problem areas in the water circuit, it is necessary to test the system. To do this, a coolant is supplied to it, and a pressure is set on the pump, which exceeds the operating values by 1.5-2 times. In most cases, this parameter is 5 bar. The test lasts about a day at a stable pressure, during this time no wet spots should appear on the floor. By the end of the test period, the pressure should be at operating values.
The maximum temperature value is set on the boiler or mixing unit. After a certain time, all parts of the underfloor heating system should warm up. After about a day, in a normally functioning circuit, the pressure and temperature should remain unchanged. Only under these conditions can you start pouring the screed.
Pouring a fine screed
It is possible to fill in a finishing screed only if there are no defects in the system. Before direct filling, the circuit is filled with a coolant, but not heated. Experts recommend maintaining the temperature in the circuit at the same temperature as the room air. Filling the screed with a heated fluid in the system is a violation of safety rules.
Ready-made compounds for underfloor heating screed can most often be used at temperatures above 0 degrees. Therefore, you should purchase a screed that is optimal for certain conditions. You can find out about this on the packaging from the manufacturer. In addition, it is important to remember that you can increase the temperature in the room in any way, with the exception of using the "warm floor" system.
The height of the screed is selected individually for each case, although its thickness may be the same for an electric underfloor heating or a water circuit. The system can be turned on only after the screed has completely solidified.