What is special about ondulin roofing
In the composition of ondulin there are no components harmful to the environment, which is achieved by the use of the latest technologies in its production. Onduline sheets are made on the basis of cellulose and some additives. To make this roofing hard and waterproof, a special bituminous material is used for its processing, with the addition of resin. For coloring the finished sheets, special compositions are used, which make them very aesthetic and more resistant to external influences.
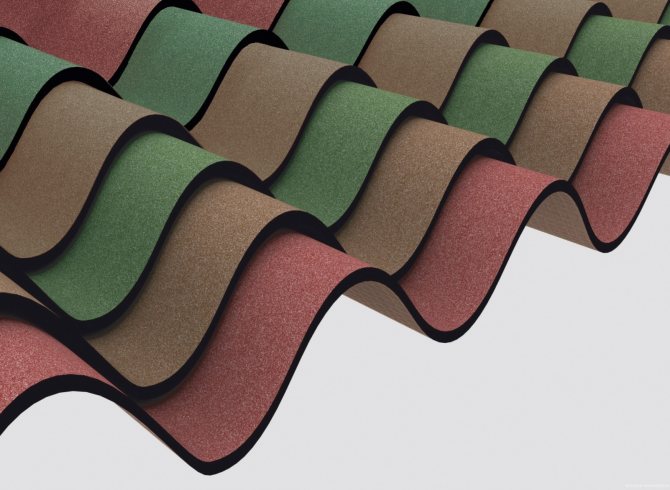
Ondulin looks like ceramic and ordinary tiles, or like slate. At the same time, the quality characteristics of both coatings do not particularly differ. Imitation slate is produced in a size of 200x95 cm; smaller parameters are used for tiles. Tiled imitation of ondulin is mainly used to decorate roofs with complex shapes, which significantly reduces the number of scraps. Simple roofs are equipped with ondulin slate: the ease of laying the material allows you to cover the roof with ondulin with your own hands in a very short time.
The need for a device for a passage through the roof
If it is impossible to equip the chimney from the outside, it is carried out through the roof
The passage through the roof for the chimney may be needed when building a building, installing a boiler or stove in it, or when overhauling the roof. When building a house from scratch, there are usually no difficulties with the correct arrangement of the chimney, since the work is organized in accordance with the project and the instructions attached to it. If the tenant decided to install heating equipment in an already operated building, the question arises of organizing the passage of the chimney through the roof in compliance with fire safety standards and high-quality insulation of damaged sections of the roofing from moisture.
If the design of the unit allows, the chimney unit can be made outside the building. This is especially advisable when using fuel oil or diesel fuel, as it will help rid the inhabitants of the dwelling from the specific smell of these substances.
Strengths and weaknesses of the material
Ondulin is very resistant to destructive weathering. It is easy to install, resulting in a very aesthetic roof surface. The financial costs of purchasing the material are not very high.
Ondulin has the following positive qualities:
- Excellent environmental friendliness.
- Long service life.
- External aesthetics.
- Rich colors.
- Simple and quick installation.
- Convenient dimensions to minimize waste while increasing the speed of roof cladding.
Thanks to these indicators, ondulin has gained high popularity in the field of private housing construction. Since there are no harmful components in the material, it is often used to cover wooden buildings. With the help of ondulin, old roofs are often repaired without removing the old roofing. This becomes possible due to the low weight of ondulin (3 kg / m2), therefore, a significant increase in the load on the rafter system and the structure of the house generally does not occur.
Basically, this cladding comes with a 15-year warranty. However, practical experience shows that, subject to the rules of installation and maintenance, such a roof can last many times more. Moreover, what is important, during operation, the external decorative qualities of the coating practically do not change, retaining the initial freshness for a long time.
However, the main advantage of the material is the ability to lay the ondulin roof with your own hands. The procedure for this work is very similar to the installation of slate sheets, while ondulin is lighter, stronger and more environmentally friendly.
As for the disadvantages of ondulin, the main one is the ability of the material to ignite in the event of direct exposure to a flame. For this reason, the treatment of onduline sheets with special fireproof impregnations is practiced to reduce their flammability. It is also important to understand that a significant period of operation leads to the fact that the color of the roof gradually fades: this is especially true for dark shades.


Fire safety
Consequences of improper installation of a chimney passing through the roof
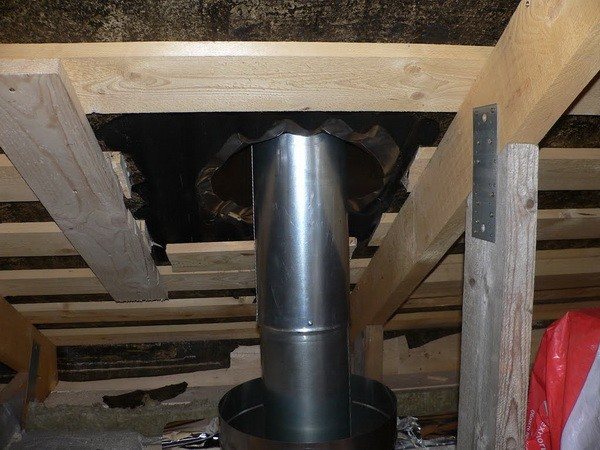
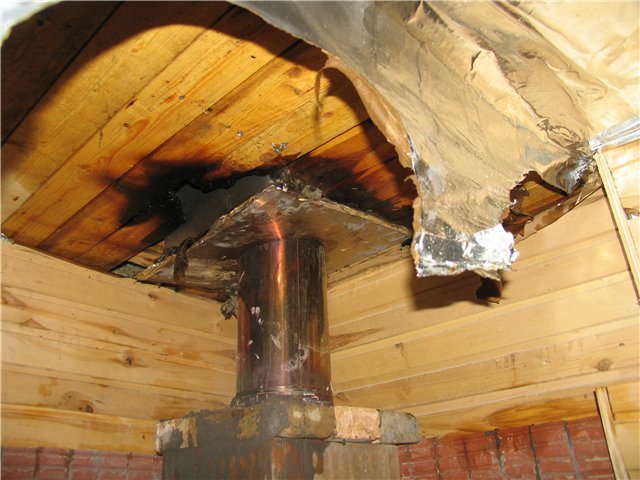
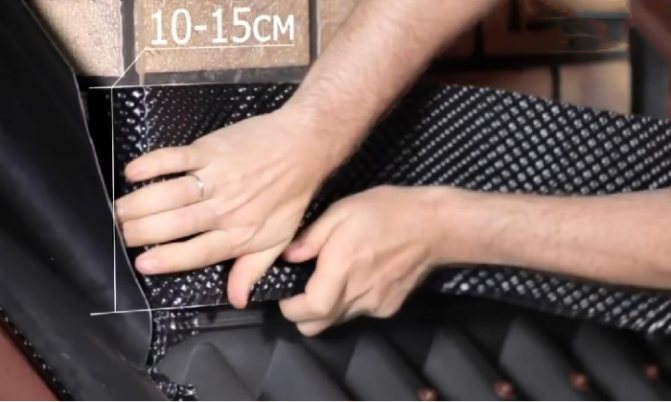
The rafter system, as well as the steam and waterproofing layers of the roof, can melt or ignite when heated. To close the components vulnerable to the action of fire, a protective box made of a block of wood treated with anti-flammable and anti-rotting compounds is mounted around the perimeter of the hole. It is installed from the outside on the same level with the crate. Insulation layers must be fixed around the perimeter. The canvas is cut with a cross and triangles are wrapped inward. The material is fixed with staples or large nails. To seal, the joint can be treated with a special compound.
The passage of the pipe through the roof presupposes the isolation of the chimney from temperature effects: for this, the corresponding sections must be sheathed with a non-combustible gasket, for example, from basalt wool. For the organization of penetration, it is forbidden to use parts that do not have heat resistance.
Signs of quality ondulin
Unfortunately, on the market for construction products, there are quite a few low-quality fakes of ondulin.
The following tips will help you distinguish real from fake material:
- There is always a black mesh on the back of a real ondulin.
- The number of waves of the original sheet is always fixed - 10 pieces.
- The waves have a stable height of 36 mm.
- The outer surface of the material has a characteristic roughness like gauze.
- High-quality sheets are characterized by rich matte shades.
- The extreme wave is always provided with a seal with the manufacturer's mark.
- The material has an accompanying brand certificate and a 15-year warranty card.
Fire insulation equipment
The release of new building materials and the development of advanced technologies are a guarantee of effective thermal insulation. The choice of materials for this purpose is largely determined by the shape of the chimney, the way of wrapping the pipe that removes hot gaseous substances during fuel combustion.
The main difficulty is not to allow the materials adjacent to the chimney to heat up unnecessarily, so that they do not ignite in any type of building.
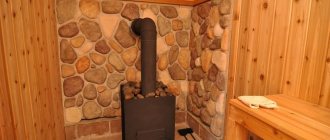
Most buildings in private households have a chimney coming from:
- solid fuel boiler;
- fireplace;
- ovens;
- cooking plates.
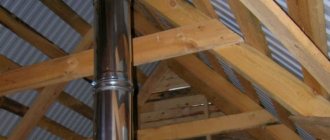
They have a different degree of load and the level of heating to the maximum temperature, but insulation is needed in each case. A prefabricated or modular chimney, produced as a sandwich system, presupposes ready-made insulation of double pipes with a layer of basalt wool. It is effective both for thermal insulation, to reduce the likelihood of condensation, and as protection against overheating of roofing materials exiting through the roof. It remains to properly organize the tightness of this passage so that moisture does not enter the house.
Ceramic chimney kit
Before insulating a pipe in a bathhouse or a residential building, you should choose the option most suitable for your design. The ceramic chimney is no less effective and durable; it is used for a fireplace or a bath. The assembly of the finished structure includes components made of fire-fighting materials.Some of them adjoin directly to the pipe or cover it, others are designed to seal the passage through the roof.
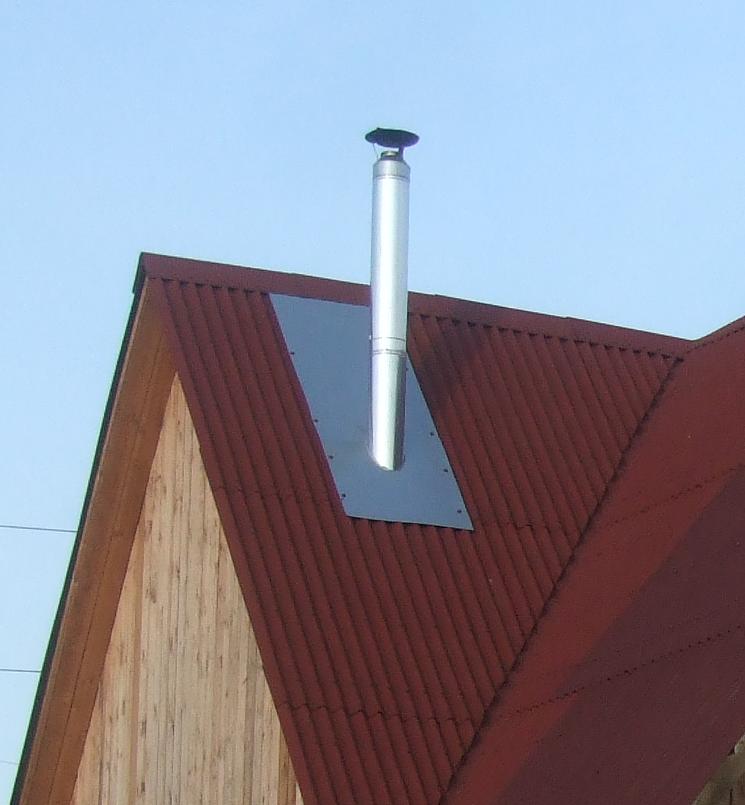
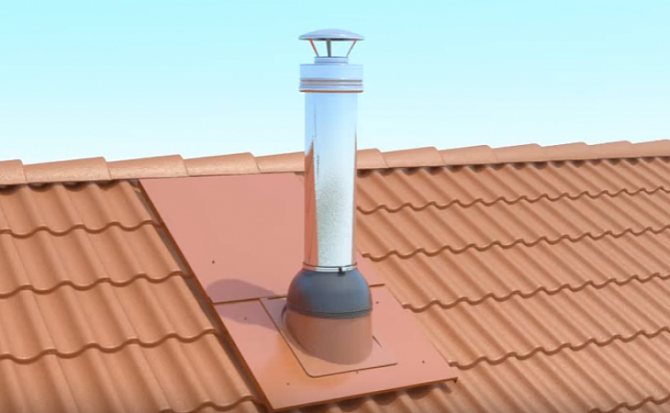
The choice of the place for the outlet of the chimney should be such as to facilitate the insulation work. But the pipe should rise 30-40 cm above the ridge, in order to avoid back draft in strong winds, so the pipe is often taken out through the ridge.
Installation recommendations - fixing diagram
In order to minimize the time of laying the material and the amount of losses for trimming it, while achieving a significant service life, it is recommended to adopt a few simple rules on how to properly install ondulin. It is very important that during the installation activities, the temperature regime was in the range from 0 to +30 degrees. The heat provokes softening of the bitumen, due to which the sheets are deformed. Frost makes the ondulin very brittle, which increases the risk of cracking when moving the installer or hammering in nails. Some manufacturers allow slight frosts when laying the material, but it is better not to experiment with this.
If, during the installation of a roof made of ondulin, hot weather is established with your own hands, it is important to avoid stretching the sheets: after the temperature drops, the installation areas of the fasteners may deform or become covered with cracks. It is best to cut the ondulin with a hacksaw on wood, be sure to grease it with oil: this will avoid the tool getting stuck. A circular saw can also be used for these purposes.
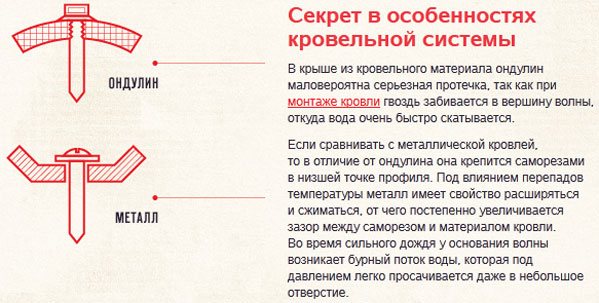
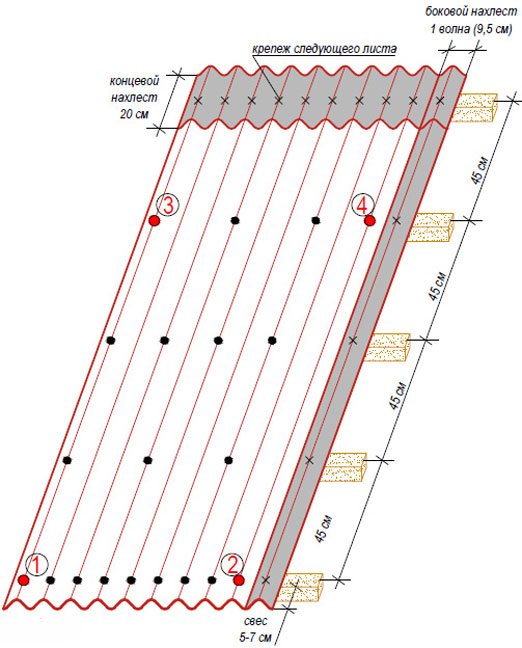
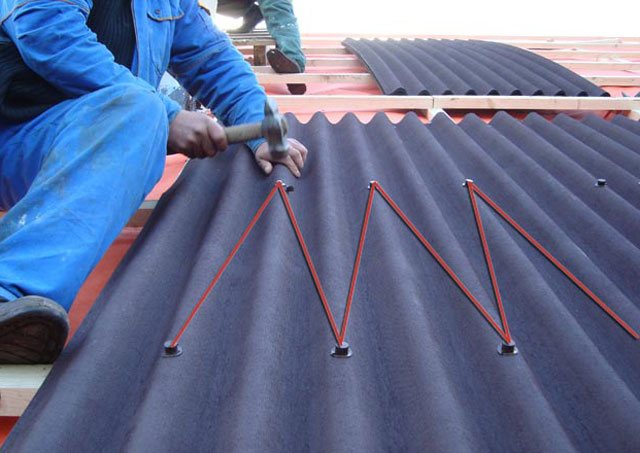
It is better to refrain from using a grinder, since the place of the cut in this case begins to melt. Onduline sheets are fixed on the lathing using special roofing nails included in the cladding package. The ondulin fastening scheme requires 20 such fasteners: 10 from below, 5 - from above and 5 - in the middle.
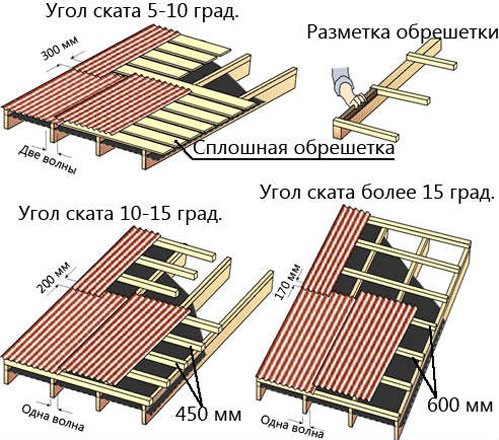
When arranging the lathing, it is very important to take into account the slope of the slope. If we are talking about a slight slope of up to 10 degrees, a solid, reliable crate is used, made of tongue-and-groove boards or plywood.
With a slope of 10-15 degrees on the crate, a step is made between the jumpers of 45 cm.And if the slope is inclined by more than 15 degrees, the step of the crate elements is increased to 60 cm.
Any frame lathing in the area of ribs, valleys and ridge is made solid, due to increased requirements for insulation.
Laying on a finished roof
The instruction is as follows:
- A hole for the pipe is made in the selected place.

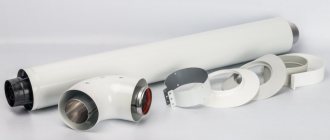
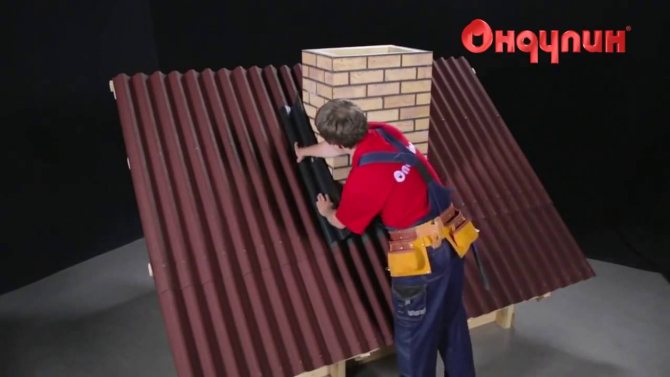
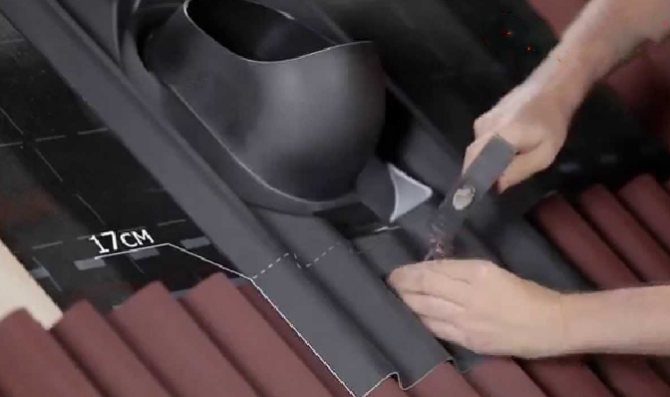
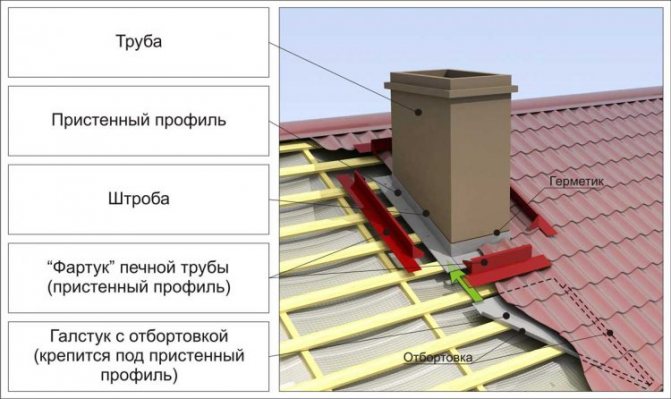
- Now you can install the pipe through a special apron. The edges of the apron are tucked in under the ondulin sheet, and the gaps at the abutment points are sealed with the Onduflesh tape.
- The apron is nailed to the battens and reinforced with a lining on the inside of the roof.
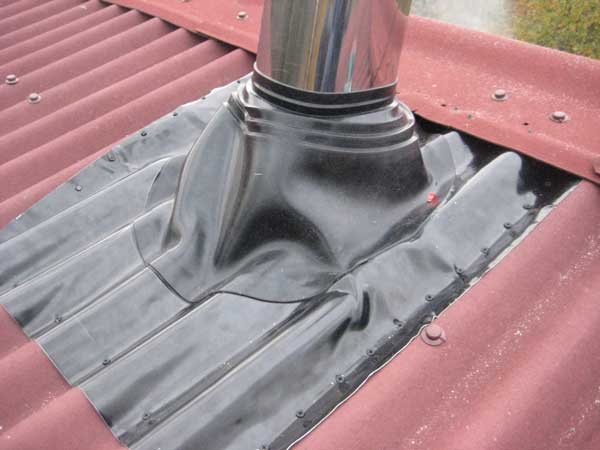
Note! If the apron is universal, then the angle of inclination of the roof is unimportant. Sometimes the angles don't match. In this case, the adapter is made by hand from galvanized steel or a sheet of copper.
How to cover the roof with your own hands - step by step installation
Stage 1... The installation of ondulin on the roof begins with equipping the rafters with a crate over the previously laid vapor barrier film. The same vapor barrier can be installed from the attic side. To fill the gaps of the lathing, insulation is used, closed over the rafter legs with a waterproofing film. On top of the lathing, a counter-lattice is equipped with slats, which makes it possible to create a technological ventilation cavity.
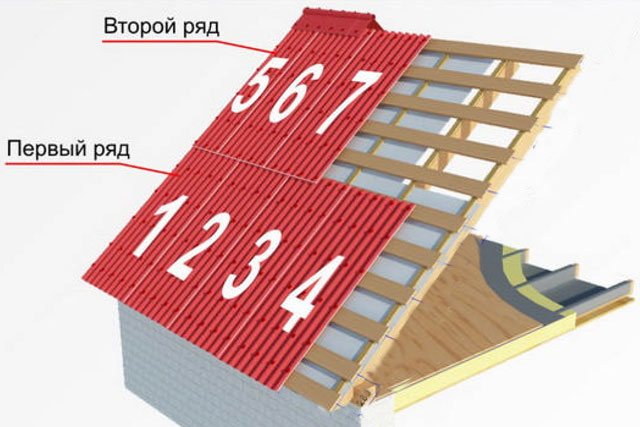
Stage 2... Do-it-yourself ondulin roofing starts from the first row, from the roof slopes. It is better to choose the leeward side for this in order to avoid blowing under the roof cladding. When fastening the sheets, it is important to achieve that their lower edges extend beyond the cornice board. The protrusion is selected individually: the main thing is that the water is effectively drained outside the roof, to the middle of the gutter.In any case, the projection must not exceed 70 mm. When laying ondulin, an overlap is made by one wave. The size of the longitudinal overlap is influenced by the degree of slope of the slope: usually they are in the range of 17-30 cm. Each sheet takes 20 roofing nails, which are hammered in the center of the sheet through a wave.
Stage 3... Laying of the second and each next sheet is carried out from its half, in order to achieve the expansion of the roof joints in adjacent rows. This installation scheme is used up to the roof ridge.
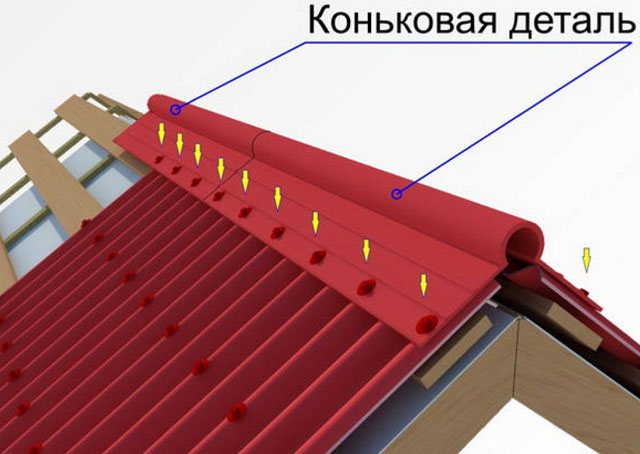
Stage 4... Before laying the last rows, an additional lathing is mounted under the ridge profile.
For these purposes, it is best to use a standard profile made by the same company as the onduline coating. The size of the profile overlapping each other is 12.5 cm. The roof ridge is nailed onto each wave.
Stage 5... If the wall and the roof structure are joined, it is designed with a standard profile from the same manufacturer. The same principle applies to the design of the connection areas of the individual planes of the roofing surface (valley).
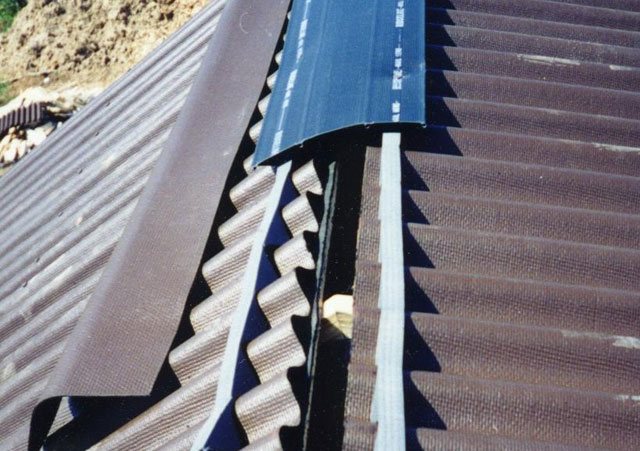
Stage 6... The place where the roof joins the gable board must be well protected from moisture. This is done in one of two ways. One of them involves folding the edge of the onduline sheet, which is nailed to the pediment board. The second technique is realized by overlaying the roof edge with a rectangular profile, or a tong: this also allows you to make the docking place more aesthetically pleasing.
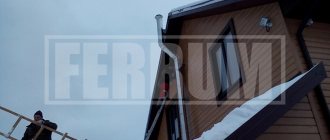
Choosing a place for a chimney on the roof
The pipe should be near the highest point of the roof
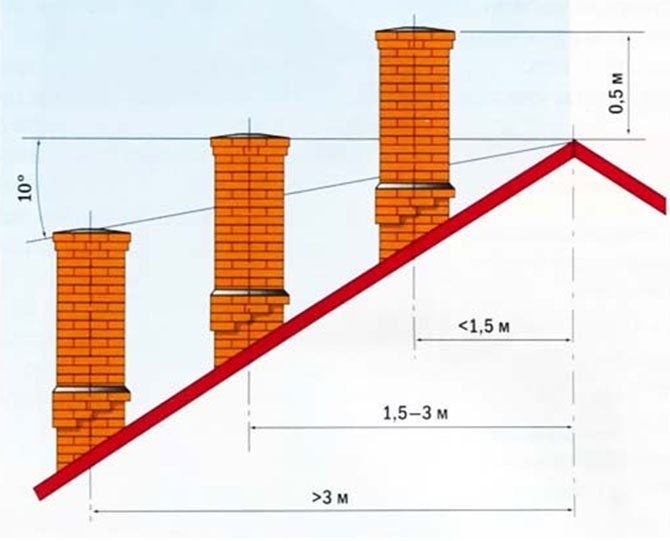
When organizing the passage for the chimney, it is important to choose the correct location for the outlet duct on the roof. The pipe should be close to the highest point of the roof. In this case, a number of fire safety requirements must be observed:
- the dimensions of the section and the height are selected based on the advice of the manufacturer of the heating equipment used;
- it is necessary to remember about the direct correlation between the height of the chimney duct and the resulting thrust force of the unit;
- the channel should end 0.5-1.5 m above the roof ridge;
- in order not to damage the rafter system, the exit is placed between its components;
- if the pipe is low on a slope, you need to make it long in order to fit into the recommendations for elevation above the roof elements;
- the structure is composed mainly of vertical parts of the tubes (the length of the horizontal ones is no more than 1 m).
Nodes of passage should not be placed next to the windows of the attic, otherwise the products of fuel combustion will be blown into it by the wind. At the places where the slopes form the inner corner, this is also not worth doing. It is difficult to achieve a good connection to the pipe there. In addition, snow accumulations appear in these areas in winter. It is impossible to rigidly fasten the chimney structure to the roof: if the latter is damaged, the pipe may collapse. It also increases the likelihood of fire.
How to care for an ondulin roof
If the process of laying the sheets was carried out in accordance with all the rules, special care for them during operation will not be required. All that will need to be done is to timely remove various dirt from the roof of the country house from ondulin so that it can serve as long as possible. After a certain time, a gradual loss of the original freshness of color is observed by ondulin. To restore the former attractiveness of the coating, painting is usually used, using a special material for this.
As you can see from the description, making a roof of a house from ondulin with your own hands is a quite feasible task. All that is required in this case is to strictly observe the laying technology and some recommendations that make it possible to increase the duration of the roof service by an order of magnitude.
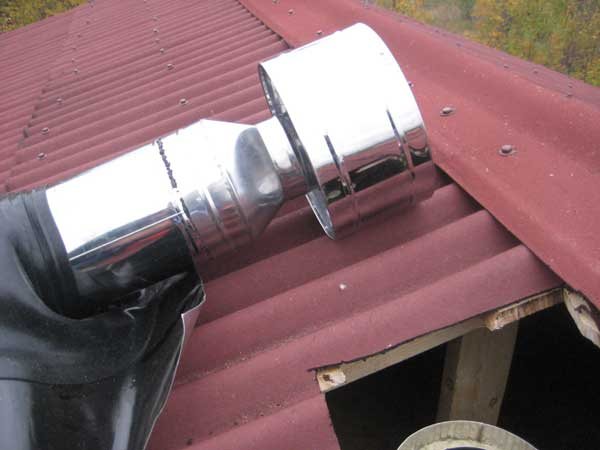
Options for the passage of the chimney through the roof
When passing near wooden rafters, the wood is treated with fire retardant impregnations
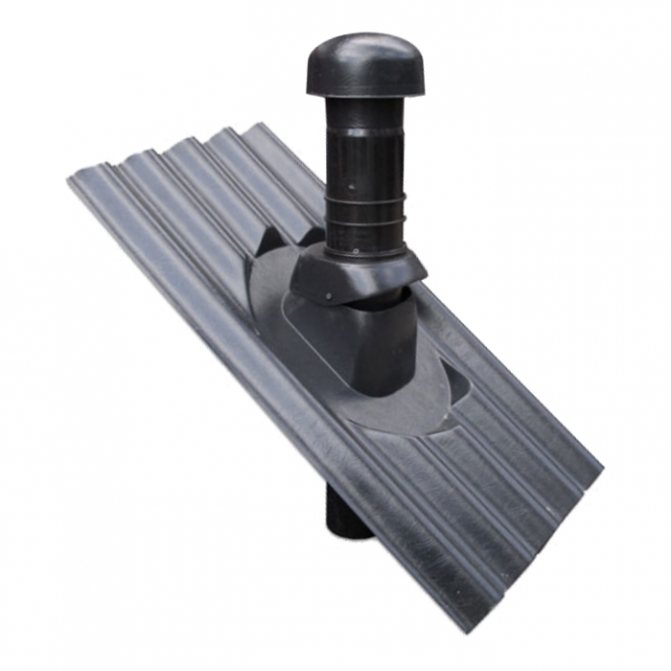
To lead the chimney through the roof, you need to make a hole in it. For a brick pipe, its diameter should exceed the diameter of the chimney by 0.25 m. If the roof is made of non-combustible material (for example, asbestos-cement slate), the indicator can be reduced by 3-5 cm.
If the roof is lined with tiles, an additional structural element of rafters and lathing will need to be installed when making the penetration. Wooden parts must be treated with a fire-prevention impregnation and insulated with a fire-resistant material - for example, soft mineral wool is suitable. A protective apron is placed under the tube next to the ridge beam. If it is removed from the ridge, the apron is inserted from one side onto the chimney structure, and from the other it is hidden under the roof.
Correct implementation of the passage of the chimney through the roof minimizes the likelihood of fire. When calculating the dimensions of the structure, it is necessary to comply with the norms of SNiP.
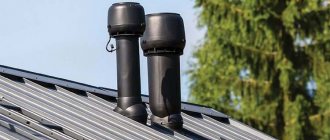
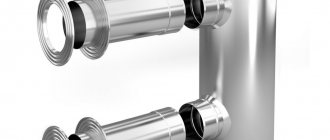
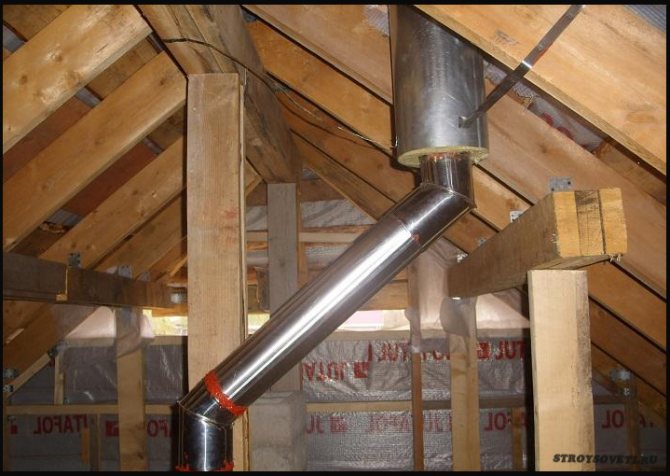
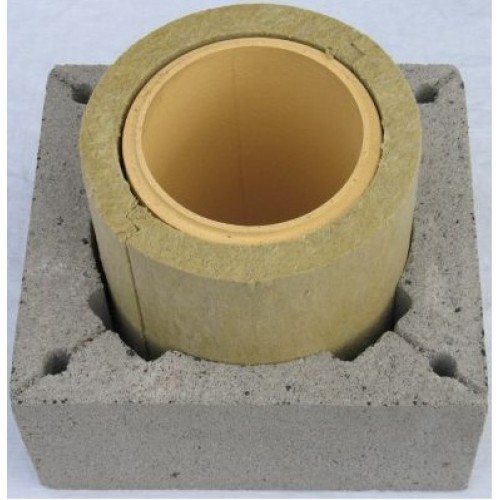
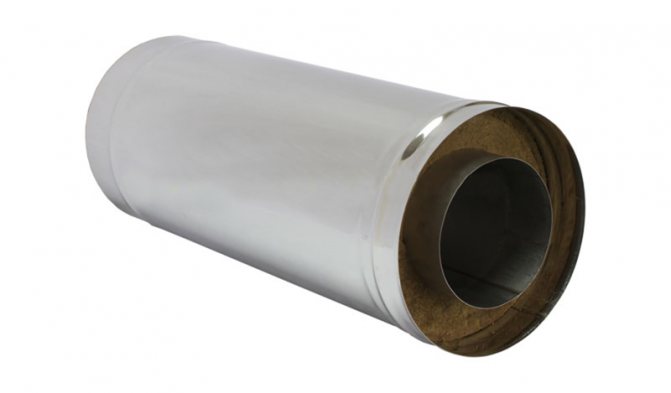
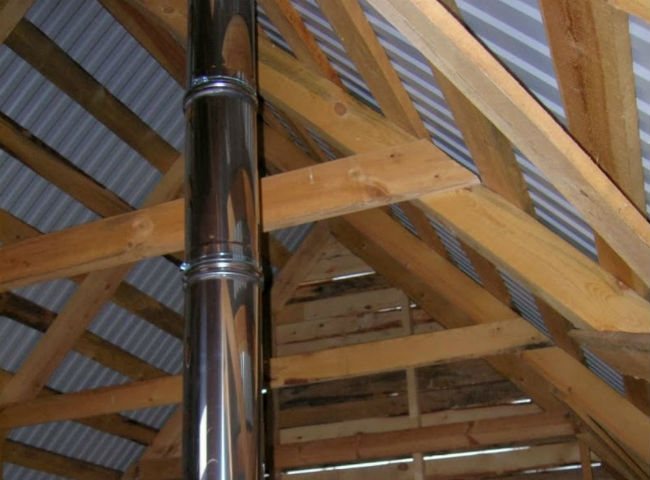
What is a sandwich pipe
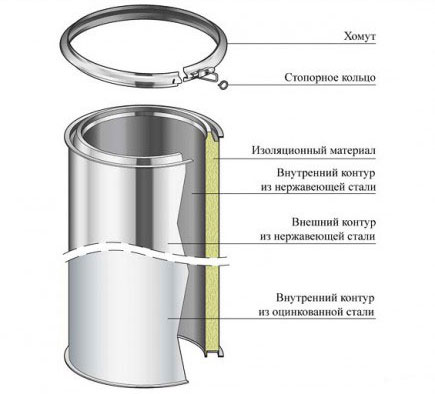
Sandwich - this type of pipe received this name for its layering by analogy with the named product. The inner and outer layers of such pipes are represented by metal cylinders, and the middle layer is a layer of thermal insulation.
Metal for the chimney began to be used for a long time. A simple example is the pipe of an ordinary potbelly stove. However, soon after commissioning, it became clear that metal pipes have a number of disadvantages. The problem was that metals, having good thermal conductivity, quickly heat up and give off heat to the environment, and there is always a danger of ignition.
The solution turned out to be simple - the metal pipe was wrapped in a layer of thermal protective material. However, such material does not tolerate environmental conditions well and is not very attractive from an aesthetic point of view.
Sandwich pipes are the next solution in the evolution of metal chimneys. Another metal pipe is placed on top of the thermal insulation layer, which protects the inner two layers from external influences and does not spoil the appearance of the building.
It is important! Sandwich pipes can be purchased ready-made, but you can do it yourself by choosing the materials of the required parameters. It should be remembered that the inner pipe should be more expensive and of better quality than the outer one, but smaller in diameter, and the thicker the thermal insulation layer, the higher the combustion temperature of the fuel in the heater.
The inner cylinder is made of stainless steel. This material is less corroded by combustion products. The steel must be of high quality and high-tech. They give preference to those options, the seams of which are welded using the TIG method - the most reliable and wear-resistant, but also the most expensive.
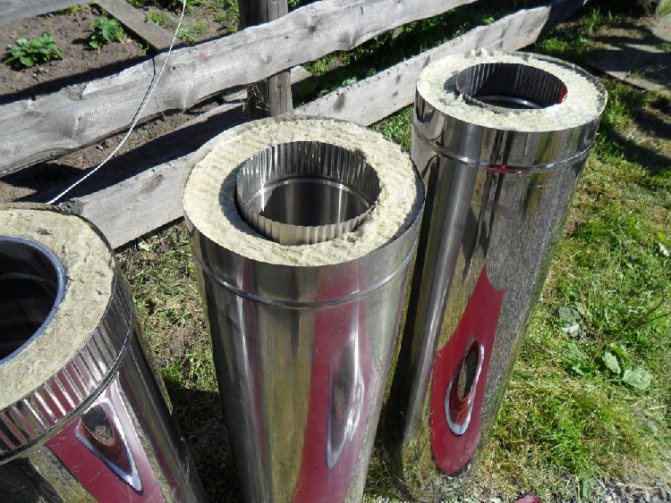
The middle layer provides thermal insulation and protects the surrounding surfaces from heat. For these purposes, mineral wool is used, the density of which is not less than 120 kg / m3. The thickness of this layer depends on the temperature inside the chimney. This parameter should be selected individually.
The outer cylinder is also made of steel. It is worth giving preference to stainless material, but to save money, you can choose galvanized steel. The durability of the chimney will depend on its quality to a lesser extent than on the quality of the inner cylinder. In addition, there are sandwich pipes with decorative outer cylinders on sale.
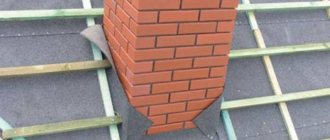
How to get a brick chimney through the roof
In order for the work to be performed efficiently, and not to have to redo your own mistakes, you need to follow a few simple guidelines:
- Layout - even with "spontaneous" repairs, there should still be a time when you should stop and think over: where exactly the stove will be located, how the smoke removal system will be executed. Where will the chimney run on the roof.The calculation will make it possible to calculate what height of the chimney above the roof will be sufficient to provide the necessary traction.
- Chimney Location - There is a general rule of thumb that the better the wind blows the chimney, the stronger the draft in the furnace. The chimney, following this, is tried to be placed as close as possible to the center of the roof - to the ridge. The height above the ridge depends on how far the pipe is from it.
- Sealing and insulation of the chimney on the roof - a single-layer metal chimney can heat up during intense combustion, the brick does not heat up so intensely, but it still requires the use of thermal insulation at the place where the roofing cake passes. The outlet through the roof of the chimney must be carefully insulated so that moisture does not pass through the opening.
These three tasks are the main and priority ones and the quality of their implementation depends on the professionalism of the master.
Conclusion of the pipe through the roofing pie in accordance with all fire safety standards
The separation of the chimney and the multilayer roofing cake (with insulation, hydro and vapor insulation) is carried out according to all modern standards:
It might be interesting
Thermal insulation
Distinctive features and variety of ceiling tiles ...
Thermal insulation
How to insulate the ceiling in a wooden house?
Thermal insulation
What is a heating cable?
Thermal insulation
Warm "pie" for a metal chimney
- for double metal pipes, internal insulation with mineral wool is provided;
- a single pipe is covered with a finished insulating shell of the required diameter and protected from the outside;
- in brickwork, it is important to increase the wall thickness of the order (38-40 cm) and protect the contact surfaces with special plaster.
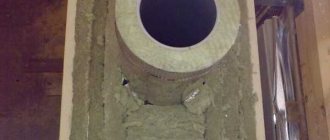
The box for the outlet of the chimney is constructed from a cross beam and rafters, keeping the distance from the wooden structure to the metal chimney at least 15 cm. The gap between them is filled with basalt wool.
The fire regulations state that the temperature in the contact circle of the chimney should not be higher than 50 ° C. Film membranes inside the roofing cake can be made of flammable materials, therefore, a gap and additional insulation with non-combustible mineral wool is required between them and the pipe.
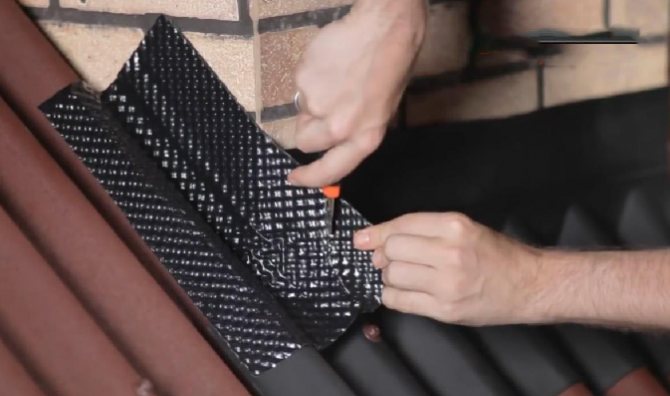
The membranes of the roofing cake cut at the exit of the pipe must be carefully cut and rolled up. Then they are pressed with a crate and fixed along the edges of the box with nails. For complete tightness of the roof, the pipe in this place must be wrapped with a special sealing tape.
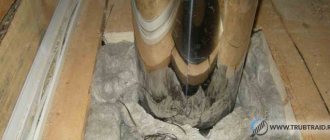
When the chimney runs through an unheated attic, and not in a residential attic, the risk of overheating of the roofing elements is reduced. Complete tightness of the insulation is necessary in any case, but it is better to additionally wrap the pipe with a special tape. Competent installation of the inner waterproofing and the outer cap will ensure reliable sealing after the thermal insulation of the chimney is installed in the opening of the roof covering.
Exiting the pipe through the roof