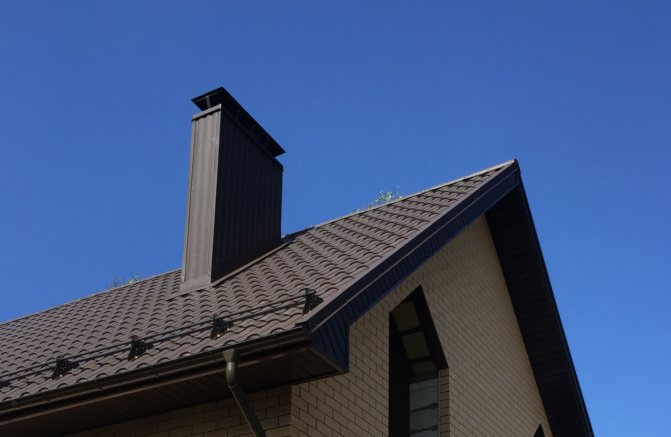
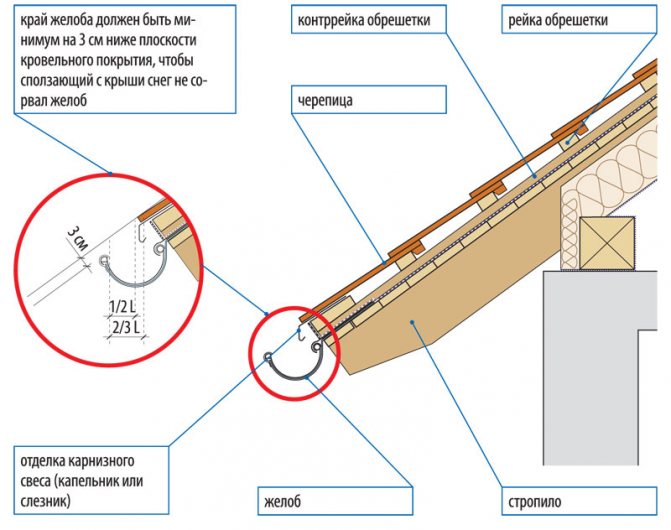
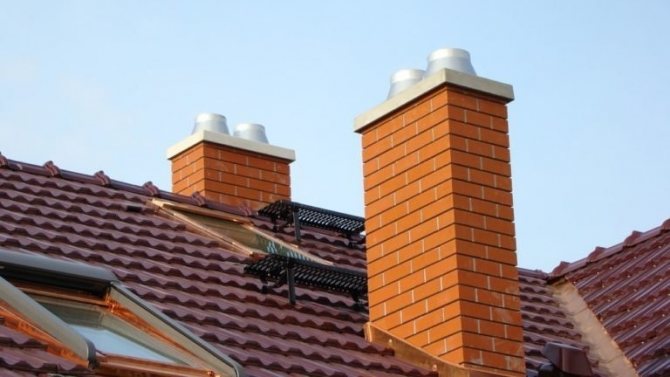
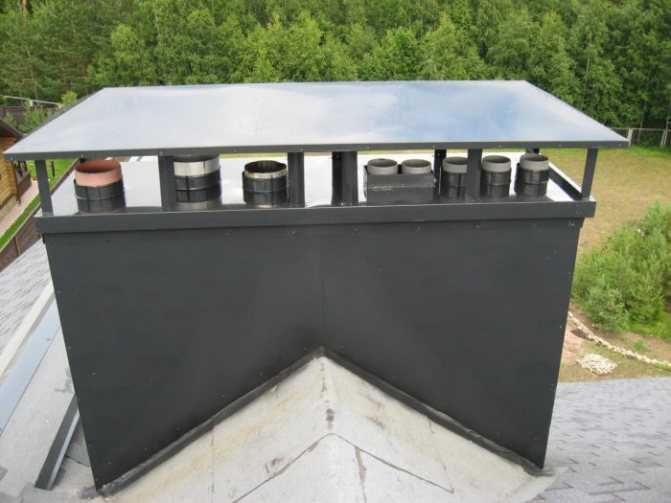
Brick Chimney Roof with Rigid Metal Roof
How to fix the roof around the pipe on the roof made of metal, standing seam roofing or corrugated board?
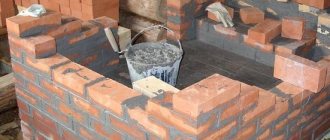
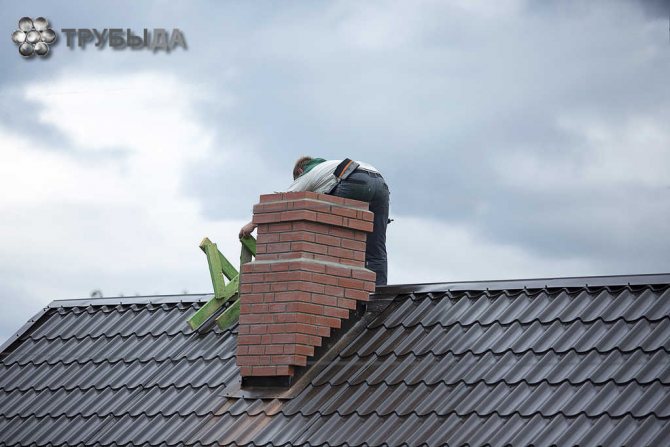
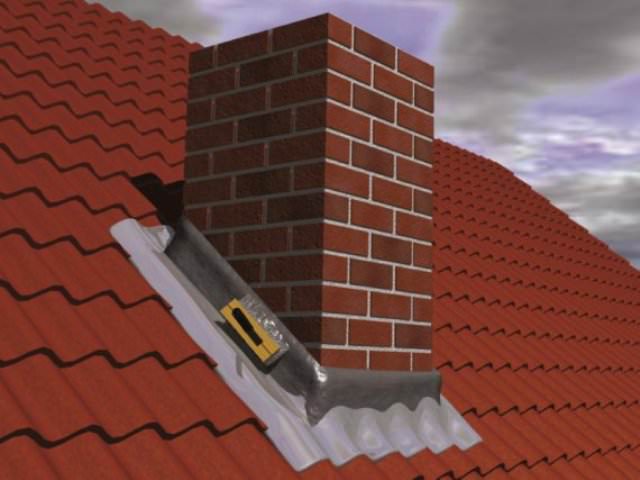
Consider a method of embedding for a brick pipe of rectangular section.
- The traditional method of embedding involves the installation of an apron around the pipe of four special L-shaped elements made of galvanized steel. The finished fittings are applied to the pipe and with a construction marker directly on its walls they mark where the grooves will pass under the upper limbs of the junctions.
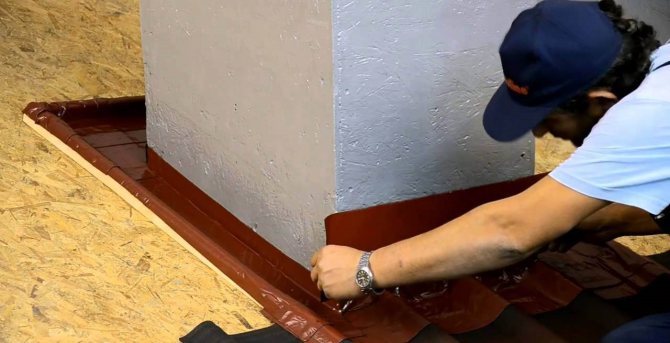
- To form grooves, they pass along the marked lines with a cutting machine with a disc over the stone. The installation of the apron begins with the installation of the lower abutment, while winding its upper limb directly into the groove.
- Likewise, with an overlap: side and top abutments are installed. In this case, the lower horizontal parts of the abutments are attached to the crate with self-tapping screws.
- The grooves on the pipe are sealed with silicone sealant.
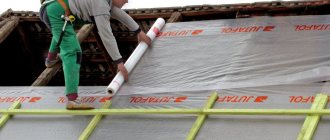
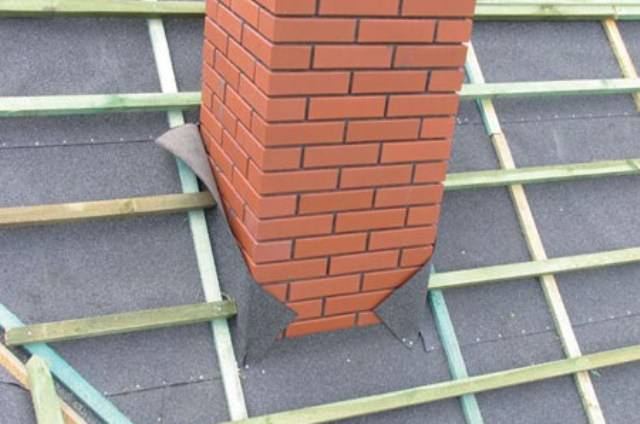
- Then they arrange the so-called. "Tie" made of waterproofing material, installed directly on the lower abutment and so that moisture drains into the drainage elements of the roof.
- Roofing material is mounted on top of the abutments and "tie".

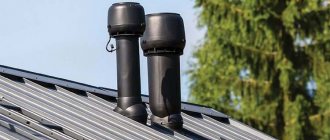
Arrangement of the exit of the chimney through the roof made of metal tiles
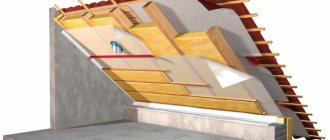
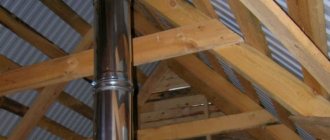
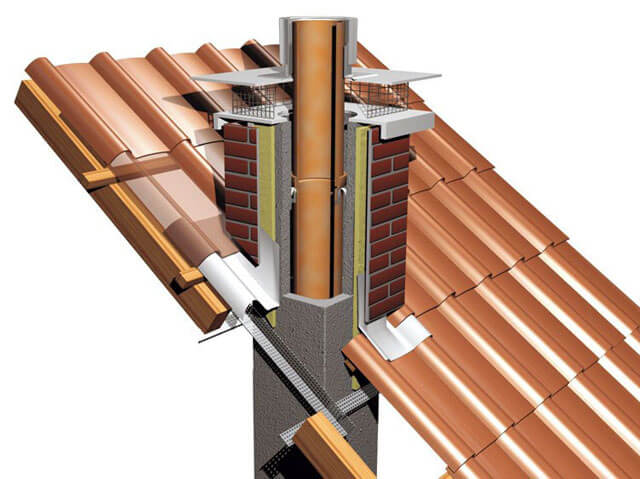
Insulated roofs usually do not have a very high fire safety, because they include a layer of waterproofing, thermal insulation and vapor barrier. The presence of a wooden crate also does not contribute to its increase. According to building codes, the distance between these structural elements and a pipe made of bricks, ceramics or concrete must be at least 13 cm.If the ceramic chimney does not have thermal insulation, then the distance increases to 25 cm.
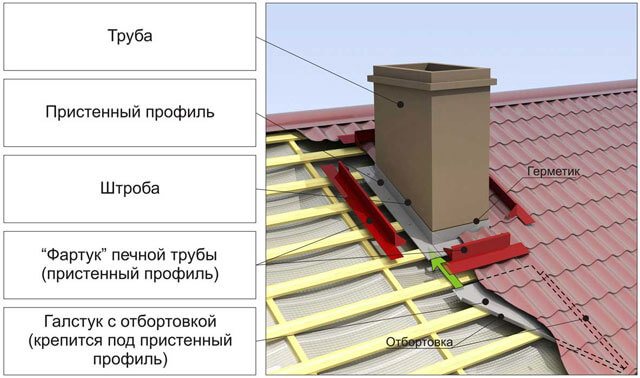
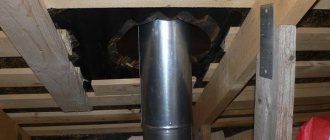
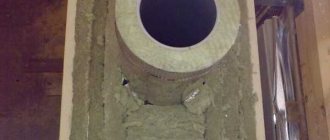
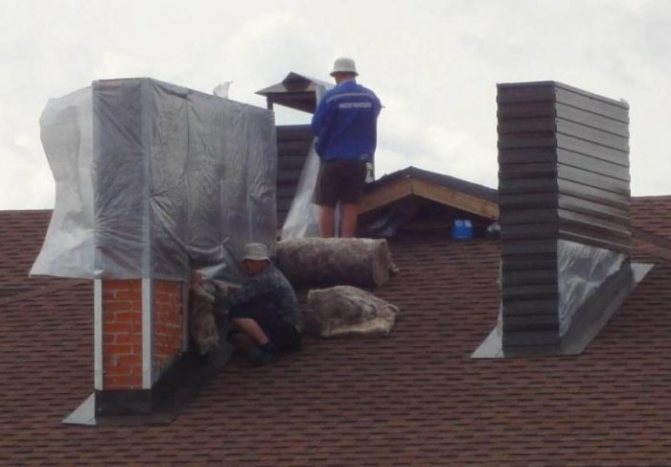
The area where the chimney passes through the metal tile and the roofing cake is characterized by increased heat loss and the appearance of condensation in the insulation. In order to avoid such phenomena, it is necessary to build your own rafter structure specially for the pipe. Basalt mineral wool is used to fill the void between the chimney and the roof. When arranging a smoke outlet in a residential building, steam and waterproofing is cut out in the form of an envelope, with folding and fixing the edges to the rafter structure. When using rectangular or square pipes, it is necessary to make external aprons: these elements ensure good tightness of the joints between the chimney and the metal tile.
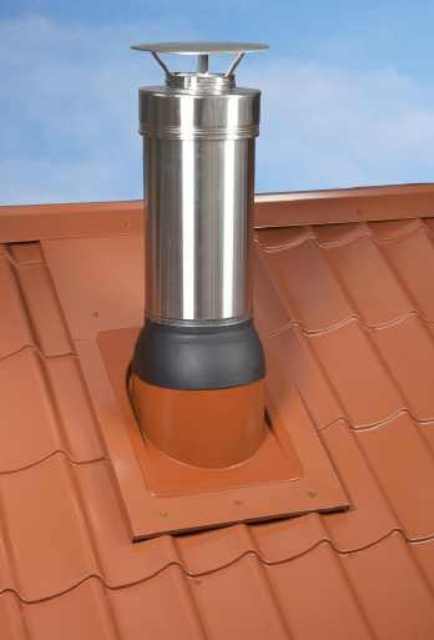
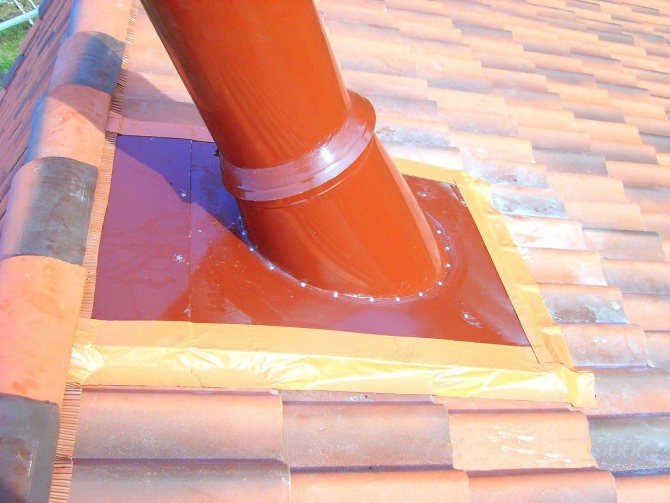
Round roof tube with rigid metal roof
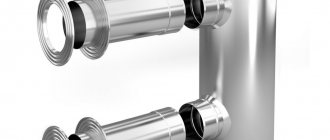
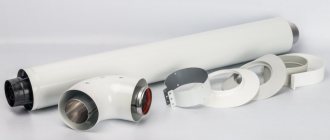
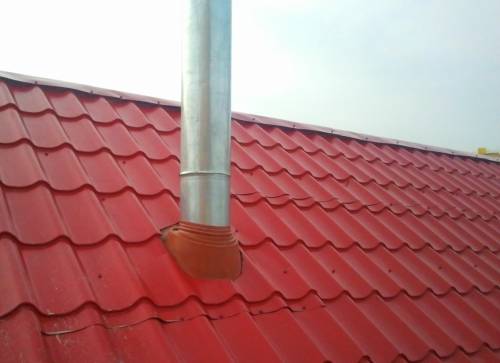
- Many oven manufacturers produce round multilayer chimneys. To seal such a chimney, there are ready-made aprons-caps on the roof, which are a metal sheet with an opening closed by a cap in the form of an oblique (relative to the plane of the sheet) truncated cone. The sheet is attached to the crate, the pipe is passed through the hood. The top of the hood is pressed against the pipe with a steel clamp with a heat-resistant gasket.
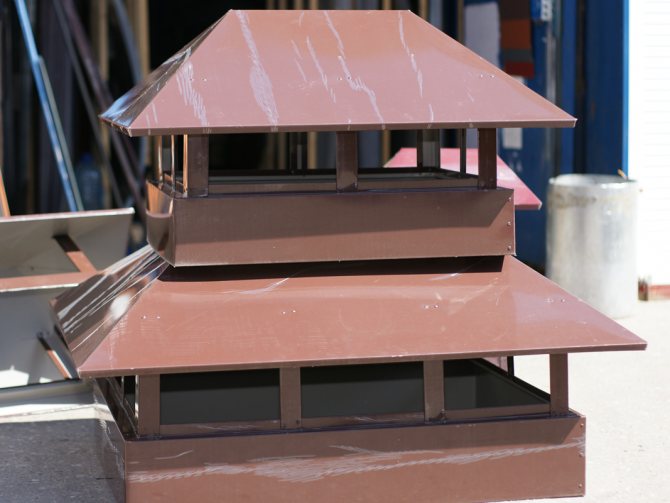
- In addition to the rigid metal cap aprons, there is also a special flexible pipe fitting on the market called Master Flush. It is a flexible device that allows you to quickly and efficiently seal pipes on the roof. Its area of application is sealing not only chimneys, but also various other additional elements of roofs, such as: antennas, ventilation pipes, lamps.
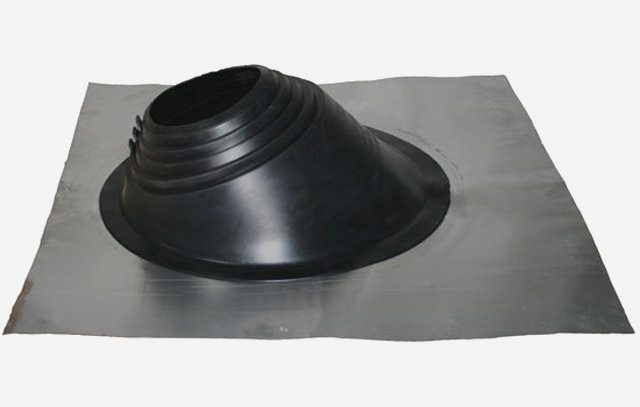
Outwardly, Master Flash looks like a stepped pyramid.The materials for its production are silicone or rubber, the base is made of aluminum. It should be remembered that the operating temperature range of the rubber Master Flash is - 50 ° С - (+ 130 ° С). In more detail about the chimney, this article will tell.
The silicone model works in the temperature range - 70 ° C - (+ 250 ° C) and can be used on any roof and in any climate.
The described material is easy to install and has a long service life.
- A hole with a diameter slightly smaller than the diameter of the pipe should be cut into its base.
- Pull the Master Flush onto the pipe, give it the correct shape, put a gasket under the base.
- Under the base, apply a layer of special sealant along its edge, and attach it to the roof made of corrugated board with special screws.
- If the joints between the roof and the pipe do leak, then it is good to seal them up with aluminum or copper self-adhesive tape with an adhesive layer based on bitumen modified with polymers and covered with a protective film. Such a layer does not need to be preheated; it adheres well to wood, metal, plastic, cement screed and other materials. Previously, the place where the tape will be attached is cleaned, and after removing the protective film, it itself is strongly pressed against the surface. It can be used to glue the attachment points of the apron-cap to the roof lathing.

How to close the gap between the pipe and the roof
When installing a chimney, the target moment is to remove the flowing sediments. To prevent moisture from entering the floors, protective materials are used:
- apron;
- umbrella;
- sealants.
How to make a metal apron
Sheet aluminum is used in the manufacture of the apron. The material is divided into 4 parts:
- lateral;
- front and back.
Apron collection process:
- The elements are bent so that some of the strips sit on the pipe, and the rest is connected to the crate.
- An edge is made in a brick pipe, where a strobe is inserted. For this, a grinder is used. Everything is lubricated with a sealant.
- To exclude leaks, a "tie" is laid. This construction is in the form of a metal sheet with concave sides, which is mounted under the front area of the apron.
- When using metal roof tiles, it is recommended to install an apron, the upper end of which sits above the roof row to prevent leaks. Moreover, if the pipe is located near the ridge, then the structure is filled directly under it, or bent to the other side.
How to seal seams and joints
Sealing of joints and seams is performed taking into account the materials of the roof, chimney:
- self-adhesive tape on bitumen and silicone is applied to the seams and the area of connection of the cap with the pipe. The material adheres perfectly to all types of surfaces: metal, wood, plastics, etc .;
- wide slots are filled with ropes / linen. Materials are impregnated with oil paint;
- coat the gaps with a solution of cement and sand, but keep in mind that over time, the surface will crack;
- small cracks are covered with sealant.
The use of penetration on the roof of different materials
Manufacturers often produce chimneys with penetration. The finished product is made of a material identical to the chimney and is connected with a special cap. The chimney passes through such a bell. And the junction of the chimney and the apron is combined with a steel clamp.
Yulia Petrichenko, expert
Also, the penetration can be made in the form of an aluminum flange (factory):
- A flexible part is attached to the structure, which is made of rubber or silicone.
- Components similar to the corrugated area are applied to the flange. The edges of the penetration have grooves where the gaps are filled with sealant.
- Determine various parameters (diameter, thickness, etc.) and angles of inclination of the factory penetration.
Installation of the penetration is simple:
- The corrugation is cut with scissors in accordance with the pipe diameter.
- After that, the product is put on the chimney (the penetration should be dressed tightly, tightly in contact with the chimney; for convenience, it is possible to apply soap to the surface).
- Then a flange is formed, the grooves of which are treated with a sealant.
- The product is fastened by means of self-tapping screws. When installing the penetration on a non-metallic roof, it is recommended to use longer screws or dowels, so that the parts reach the lathing area.
Installing the chimney umbrella
Installation of an umbrella is not required if the chimney is made of bricks. The raw material absorbs moisture by itself.
If the chimney is made of metal or asbestos-cement materials, then it is necessary to make an umbrella as follows:
- Make a drawing on cardboard and cut out a "pattern" in accordance with the dimensions.
- Cut metal parts based on the pattern.
- Mount the umbrella on the pipe, connecting it with clamps.
- Cover the gap between the parts (pipe / umbrella) with sealant.
What technologies have you encountered? Share your skill in chimney installation in the comments.
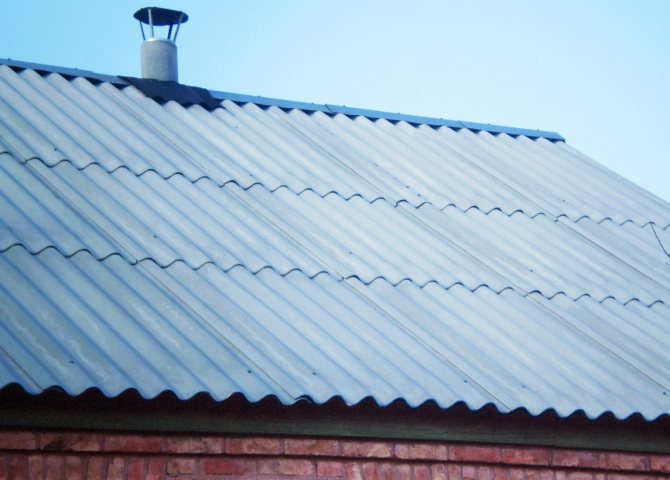
Round roof tube with natural tile roof
On such a roof around the pipe, the so-called. "Otter" from a cement-sand mortar in the following sequence:
- In the gap between the pipe and the tiles, galvanized "collars" are laid.
- A cement-sand mortar is placed in the prepared gap, forming a collar around the pipe protruding above the roof. The collar should fit tightly with the lower expanded part of the tile, and with the upper one - with the pipe.
- For drainage on the collar from the side of the ridge, a ledge is formed having two inclined planes.
This work must be done with the utmost care to prevent cracking.
What is a roofing "pie"
A modern roof consists of several layers: insulating, steam and waterproofing. Such a multi-layer structure protects against moisture, but the joints between the individual elements still remain. Depending on the type of roofing material (slate, metal tile, corrugated board), the cross-section of the pipe (round, square), waterproofing methods will differ.
The waterproofing barrier must not be installed end-to-end with the chimney. Mandatory clearance between the pipe and the combustible insulating material is a safety requirement. The sheet roofing material is also not laid close to the chimney walls. Precipitation flows through the cracks that appear. To prevent leaks, various sealing methods are used.
Round pipe on slate
When the pipe is located close to the ridge, it is closed in the following sequence:
- One of the steel sheets, with which the ridge is formed, is lowered down to the overlap of the pipe section.
- A round cut is made in the sheet for the pipe with a flanging of its edge two centimeters up.
- An asbestos-cement ring is put on the pipe.
- To fix the ring along the height of the pipe, insert a pin into its side hole.
- The ring is set parallel to the ramp using a wedge.
- The edges of the cut in the steel sheet are led inside the ring.
- The joint is covered with a mixture of cement and fluffed asbestos (1: 2).
This method is excellent for protecting the roof from rain, but snow accumulates in the gap between the slate and the pipe. You can find out about the tightness of the chimney roof.
In order for the pipe and slate to join hermetically, do the following:
- A cardboard cylinder wrapped in plastic wrap is inserted into the gap between the slate and the pipe.
- A clay or plasticine border is formed on a steel sheet. The distance between the flange and the cardboard cylinder should not be more than 10 mm.
- The resulting gap is filled with an asbestos-cement mixture.
- After the mixture has hardened, the cylinder with the restrictive rim is removed;
- An asbestos ring is put on the pipe (see above).
Placement and decoration recommendations
It is not recommended to run the pipe near the roof windows, as the wind will blow the combustion waste into the attic. It is best to install a chimney near the ridge, because even in snowy winters a little snow accumulates there, and the threat of leaks is minimal. Also, finishing the chimney pipe on the roof can be done without much difficulty. The height of the pipe with this location is the smallest, which significantly reduces the degree of climatic impact on its surface. This is especially true in the cold period, when condensation can accumulate inside the chimney.
When implementing this placement option, certain difficulties arise: you have to either abandon the ridge beam altogether, or make a break in it. As a result, the overall strength of the ridge structure is seriously affected. A way out of this situation is the installation of additional support nodes under the rafters: this is not always good, because in many cases an attic floor is equipped in the attic. In this case, it is better to remove the pipe in the area of the ridge girder. Flat roofs are equipped with chimneys with a height of 500 mm.
If there is a ridge on the roof, then when organizing the passage of a pipe through a roof made of metal tiles, the height of the chimney will depend on the distance to the ridge:
- A distance of up to 150 cm implies the need to bring the chimney to a height of at least 50 cm above the ridge.
- With a distance of 150-300 cm to the ridge, the pipe is made flush with the ridge.
- If this parameter exceeds 300 cm, the height of the pipe is calculated by drawing a line at an angle of 10 degrees between the ridge section and the horizon.
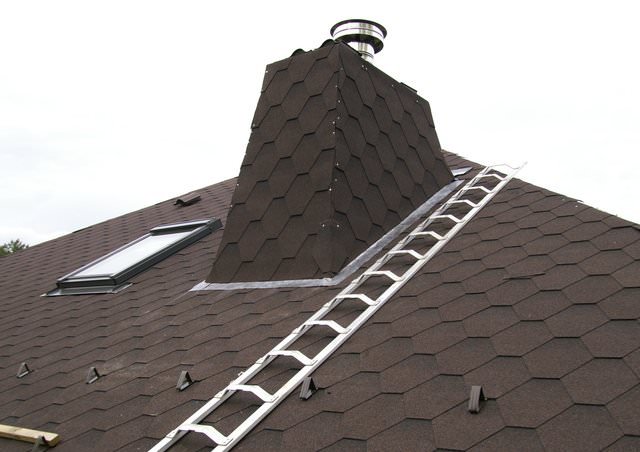
Sealing pipes on a soft roof
Around brick pipes on a soft roof, cutting is performed in the form of an apron from ready-made abutments made of soft roofing material (for example, ondulin). The abutments are fastened to the lathing with nails, and to the walls of the pipe with Wacaflex or Onduflesh-super roofing tape. The joints of the abutments with the crate are also glued with the same tape.
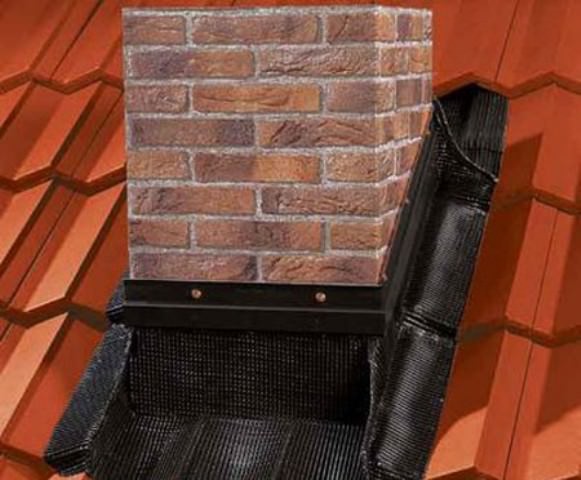
Round pipes on a soft rabbit are sealed with ready-made aprons-caps. The joints of the base sheets of the aprons with the roof are also glued with roofing tapes.
As you can see, there are quite a few ways to seal the pipe on the roof. They have one thing in common: all these works must be done with high quality. This is the only way to obtain reliable roof leakage protection.
How is the passage of the pipe through the metal tile divided now?
With the advent of new materials and technologies, it has become very rare to cover roofs with slate. New requirements have been introduced for the external appearance of the roof. As a beautiful framing of the pipe, the upper apron made of metal is still widely used in construction today. The inner apron, nicknamed the "tie", has not been forgotten either.
However, many do not understand the principle of laying and the purpose of these elements of the roof.
When visiting one of the construction sites, I had the opportunity to lift the pipe bypass apron on the roof. The water flowing down from the ramp installed above the pipe went directly under the roofing.
“We do it according to the instructions,” the foreman explained, noticing my bewilderment. It is worth saying that I was on the roof of an industrial building under construction, which does not have waterproofing at all, the pipe bypass was performed using a lower apron with a "tie". The result could be predicted in advance: the floors were constantly wet. The good thing was that there was no need to worry about a good finish on the lower floor.
And is it any wonder, because in the instructions of some manufacturers it is recommended to drain water from the pipes using a similar apron. At the same time, it is called the main method of water drainage, and after all, an apron was installed on slate roofs only for safety reasons.
An interesting analogy comes to mind: did any parachutist want to jump, taking only a reserve parachute with him, deliberately abandoning the main one? There is no denying the likelihood that he will survive and not even receive serious injuries, but you must admit that it is unreasonable to neglect the main parachute if it is available.
It would be interesting to know if anyone tried to calculate how much water will get under the cover during the year? I'll try to do this using one of the examples.
In the vicinity of Moscow, an average of 670 mm of precipitation falls annually, in other words, 670 liters of water are poured per square meter. As a result of multiplying the width of the pipe 0.8 m by the length of the slope above the pipe in the projection of 4.8 m, we get a roof section with an area of 3.84 sq m.It is not difficult to calculate that it receives 2568 liters of water per year. And all of it flows under the cover!
In spring and autumn, the following happens: the water that previously drained freezes, the snow lying on the roof quickly turns into water under the rays of the sun, and since ice melts slowly on the inner apron, the water is forced to run around the apron. In this case, one has to hope for a well-equipped waterproofing. If the water manages to find even a tiny crack, then it will not be difficult for it to enter the room, at the same time making the insulation wet.
Connection methods
Note. The place of abutment of the roofing material to the chimney or ventilation pipe can be called one of the most important nodes of the entire roof. The entire value of the roof as a waterproofing material depends on the correctness and quality of its installation.
General Provisions
Adjoining to metal tiles
- Let's start with the fact that such a familiar expression as "bypassing the pipe on the roof" is not entirely correct, since this is the abutment of the roofing material to the walls of the chimney or ventilation... The main task here is that the place of this very joint turns out to be very well sealed with some kind of material in order to prevent water from entering the attic.
- It is not difficult to make a hole for the chimney with your own hands and it is usually cut out with a grinder or roofing scissors - this can be done both during the installation of the roofing material and after it - basically it all depends on the desire... It is much more difficult to implement the second moment - the very abutment with the help of an apron (it is most often made of galvanized sheet metal), as well as the sealing of the joint, where the function of a sealant can be performed by various silicones, as well as cement-sand mortar, tile adhesive and even bitumen.
- To accomplish this task, the material with which the abutment is carried out must correspond to the roofing material.... For example, for slate, the instruction recommends using galvanized sheet metal and bituminous mastic, for bituminous tiles, an end carpet is needed, and for ondulin, a material corresponding to its structure.
Adjoining to a metal roof
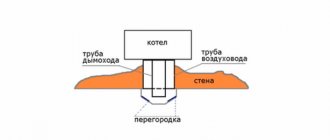
Now we will consider how to make an abutment on a slope if the chimney or ventilation pipe does not exceed 80 cm in width. Here you need to solve two main problems, the first of which is to intercept the water that will flow down the slope and redirect it over the roof, but already below the chimney (see also the article "Diameter and height of the pipe above the roof for arranging ventilation").
But the second part of the task concerns the walls of the pipe itself, through which water again flows - it also needs to be intercepted and redirected to the lower part of the slope, preventing it from entering the attic.
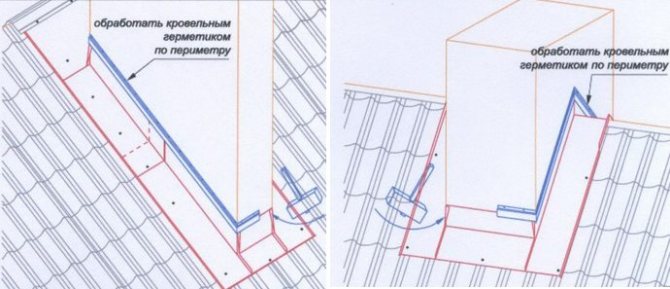
Installation of the seal on the slope
Now the cutting of the pipe on the roof will depend on the apron, which we need to make of galvanized sheet, and around the perimeter it should overlap approximately 200-300 mm of the roof slope, and the twist on the chimney should be about 100-150 mm.Depending on the cross-section of the chimney or air duct, you can use sheets that correspond to GOST 14918-80 and have a thickness of 0.4 mm, where the perimeter will be either 1000 × 2000 mm or 1250 × 2500 mm.
Apron installation
In this situation, it is important that the metal tile or corrugated board is cut correctly, that is, the metal sheet should not rest against the pipe, which will cause its deformation and create conditions for water flow, but at the same time, the gap should not be made too large - completely 3-5 mm is enough.
When the apron is ready, you should take care of its sealing and for this you can use a special bituminous waterproofing, which you can buy in the store, but if its price seems too high to you, then you can melt ordinary resin.
You can, of course, just pour this resin under the apron at the junction, but this will stain the roofing material that is nearby, therefore, you should equip something like a gasket on which the metal apron will lie. Jute fabric is best suited for this purpose, that is, ordinary burlap from old jute bags.
From this fabric, a litter and a cushioning tape are cut out to the place where the metal adjoins the pipe and, having smeared it all with hot resin, an apron is placed on top. While the resin hardens, you should use clamping bars, which can be made from any old battens.
Installation of the apron under the ridge and on the ridge
It is very good when the chimney or ventilation is located in the immediate vicinity of the ridge - this way you get the opportunity to bring the upper part of the apron under the ridge rib and thereby get rid of leakage. But the pipe can also be on the ridge, which also somewhat facilitates the task, since the apron is located on both slopes, therefore, there is simply no leakage from above, because the water will spread over both slopes of the apron.
Note. If necessary, the sheet metal is fixed to the chimney and roofing material using self-tapping screws with a press washer.
Soft roof

End carpet ICOPAL Pinta Ultra
For a soft roof, for example, for bituminous tiles, two types of abutment are used - open and closed, although the second option is used very rarely, since it is rather difficult to install and not entirely practical in operation, therefore, we will pay attention to the first method. In this situation, both ventilation pipes on the roof and chimneys are adjacent to the roofing material according to the same principle as metal tiles, that is, with the help of an apron and various kinds of sealants (see also the article "Pipe fittings: types and device") ...
Only for a soft roof, the apron is not made of metal, but of the valley carpet, which is placed under the shingles.
Glue K-36 from Katepal
The principle of laying a soft apron is that the tiles merge with it into one whole, and there are no leaks in the places where the roofing material adjoins to the carpet, and water should not drain into the attic through a pipe, therefore, an overflow is made from the carpet to the chimney.
For fixation, various bituminous mastics are used here, but not all of them justify themselves - after a certain period of time, delamination occurs and then water penetrates through the cracks.
Practice suggests that K-36 glue from Katepal is very suitable for this purpose, which lasts long enough, is not afraid of temperature changes, ultraviolet radiation and moisture.
Note. There is one very important point here - this is the adhesion of the carpet to the chimney - if adhesion is excellent with bituminous tiles, then the same cannot be said about the brick wall of the chimney. Therefore, in order to create conditions for adhesion, the pipe at the junction is treated with a primer and allowed to dry completely.
Ondulin
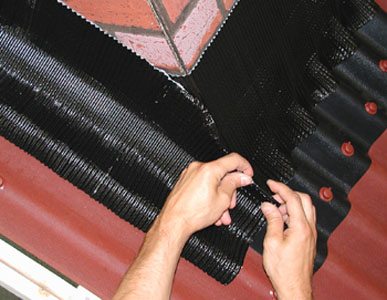
Waterproofing of the chimney junction on the ondulin roof
To seal the abutments on the roof covered with ondulin, you can use proprietary materials, such as Onduflesh-Super electrical tape and Ondulin coating apron. The installation principle remains the same as for a soft or hard roof - it is important to observe the sealing of the junction here, as shown in the photo above.
The installation of the apron is carried out not only with the help of an insulating tape, but also with self-tapping screws with a press washer, with which the apron is fixed to the ondulin (if necessary, you can also use various mastics or the same K-36 glue from Katepal).
Positive and negative qualities of slate
Before you buy slate for roofing, you need to weigh the pros and cons of such material.
| Dignity | disadvantages |
| Long service life. May be half a century. It is considered the most durable of all roofing materials. | Great weight. |
| Not afraid of mechanical stress. For its manufacture, cement, chrysotile and water are used, which affects its strength. To improve this indicator, the slate is made wavy. | May be damaged if struck against hard objects. |
| It tolerates significant temperature changes. In extreme heat and severe frosts, slate does not crack or deform. It has a decent thermal conductivity coefficient. | Over time, the waterproofing properties decrease. |
| Avalanche hazard is eliminated due to low thermal conductivity. | Moss may form in places that are constantly in the shade. |
| Meets all fire safety requirements. Does not burn, does not support combustion, withstands temperatures up to +600 degrees, but acquires significant fragility. It is much easier and safer to extinguish a fire in a building with a slate roof than with a different roof covering. | |
| Waterproof. When choosing a standard 6mm slate sheet, it is able to withstand any precipitation. | |
| Noise isolation. Does not let third-party noise through, absorbs sounds well, blocks the roar of hail and rain. | |
| There is no need to equip a vapor barrier, which reduces the cost of the structure being built. | |
| Ecological cleanliness. Does not contain toxic substances, does not pose a danger to human life and health. | |
| Easy to handle and lay. To work with slate, you do not need to have extensive experience and special education. It is enough to have the appropriate skills in construction. The sheets are cut using a grinding machine that has a saw blade for stone. In the absence of such a tool, you can use a conventional saw. To make the mounting holes, you must have a drill with conventional drills or a screwdriver. The styling technology itself is very simple. It is necessary to follow certain rules and sequence of actions. | |
| Nice appearance. Gone are the gray slate sheets. Today supermarkets offer a wide range of colors for such roofing material. Both bright hues and muted colors are present. | |
| Low cost. Unlike other roofing materials, slate has an affordable price. Only an uncut board covered with roofing felt is cheaper. But this is unreliable and impractical. |
Muffler tips
Car service "Mister Silencer" will quickly and efficiently carry out the installation of muffler nozzles on your car. Split exhaust system (without nozzles) 2 year warranty
.
With us you will receive not only good service, but you will also be able to observe the performance of work, and get advice from the master.
Our services are located in different parts of the city of Moscow, you can choose a convenient one! Car service addresses are here!
| Job title | Price, rub.) |
| Installing a nozzle (price without cutting the bumper) | 1000 |
| Installation of two nozzles (price without cutting the bumper) | 3000 |
| Assorted nozzles | 1000-4000 |
Choose a muffler attachment !!!
Today, on store shelves, we see a pleasant variety of all kinds of tuning devices.Especially often, the views of motorists are attracted by all kinds of shapes and configurations of muffler attachments: different diameters, stainless steel or chrome-plated.
Is it worth installing a muffler nozzle
In fact, first it is important to understand the "usefulness" of a particular nozzle for your car, in that it, by its design, will certainly not cause the common problem of overheating of metal parts due to the aggressiveness of the exhaust. There are also frequent moments when, when installing a massive muffler nozzle on a car with a low fit, dirt on a country road stains its bottom, disabling the exhaust system.
Competent and thoughtful replacement of the muffler nozzle will give your car significant advantages regarding both its operation and appearance. The stylish nozzle will create the effect of an impressive engine roar, as well as the ability to visually color the exhaust with the help of LED backlighting attached to the nozzle itself. But, of course, we are even more interested in internal changes.
As you know, the aerodynamic forces during the movement of the car are distributed in such a way that its rear part is a stretch zone. If the size of the muffler opening becomes larger, then the difference in pressure between the inner and outer sides of the pipe increases. This actual pulling of the exhaust gases creates better ventilation for the cylinders. And then the fuel burns better, and the carbon deposits on the candles become much less. Accordingly, the engine power also increases. At the same time, the volume of fuel consumption can be reduced very significantly - even by 20%.
Installation of muffler nozzles
The installation of the muffler nozzle on the exhaust pipe is carried out in different ways.

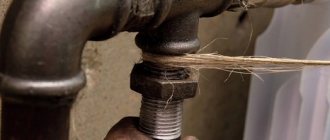
So it is convenient to attach the nozzle with a tie in the form of a clamp, or using a bolt screwed into the hole made in the pipe by means of a loop.
But in any case, in the place of attachment it is necessary to apply a refractory sealant - usually this is a thread of asbestos. Then the structure will be better protected from overheating. In this case, the mount should leave you the opportunity to dismantle the nozzle, because you will periodically need to remove it to remove carbon deposits.
In general, the muffler nozzle is a very useful invention that structurally and externally improves the characteristics of a car. But you just need to approach the selection of this albeit simple element very carefully.
We offer our customers a wide selection of high-quality and durable muffler tips, as well as their instant installation with a subsequent guarantee. Installation of nozzles on the muffler is carried out by welding the nozzles with exhaust pipes; we do not practice using flimsy clamps.
Posted in