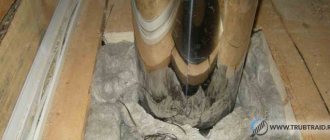
Passage of a pipe through a chimney without a factory pass-through unit
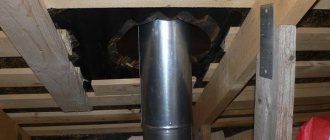
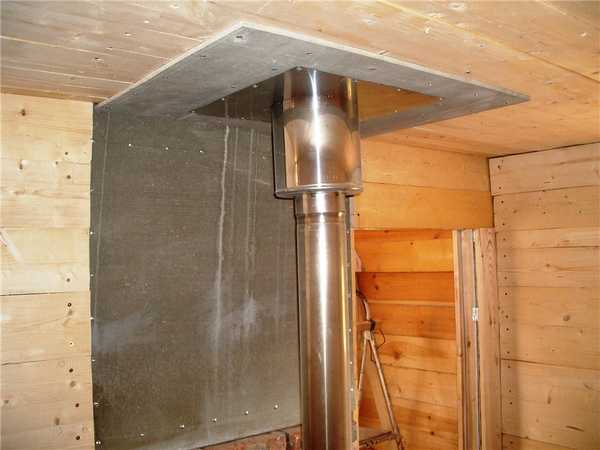
It is possible to remove the chimney without the passage device. In this case, the edges of the hole in the ceiling are also sealed with a fire-resistant heat insulator, and metal strips are stuffed over it. A protective plate made of non-combustible material is put on the sandwich coming from the furnace, in which a hole of a suitable diameter is cut out, and holes are drilled along the edges for fasteners. Traditionally, this is a sheet of metal. Next, the sandwich is passed into a hole in the ceiling, fixed there with the help of any non-combustible guides. For example, you can use drywall profiles or something similar. The main thing is to securely fix the pipe and observe the basic rule of fire safety: there must be a distance of at least 36 cm from the edge of the pipe to the combustible material.
You can make a node of passage through the ceiling with your own hands
Important! When installing and fixing the chimney, keep in mind that the pipe changes its dimensions due to thermal expansion. It must be fixed so that it can move relative to the roof
Then from below (from the ceiling) the pipe is sewn with a non-combustible material. From the side of the attic or the second floor, the voids formed in the cutting are filled with a heat insulator. The requirements for it are the same: high temperature tolerance. Expanded clay can be the most budgetary. Actually, this completes the output of the chimney through the ceiling.
You can make a node of passage through the ceiling with your own hands
Principles of arrangement of roof passages
The space between the chimney and the wall of the box turned towards it is also filled with basalt wool, and an air gap is left between this wall and the insulation outside to improve insulation. Below, from the side of the bath rooms, the penetration is closed with a box-shaped casing made of galvanized or stainless steel. For the final design, a steel sheet is first mounted from the attic side, then a casing.
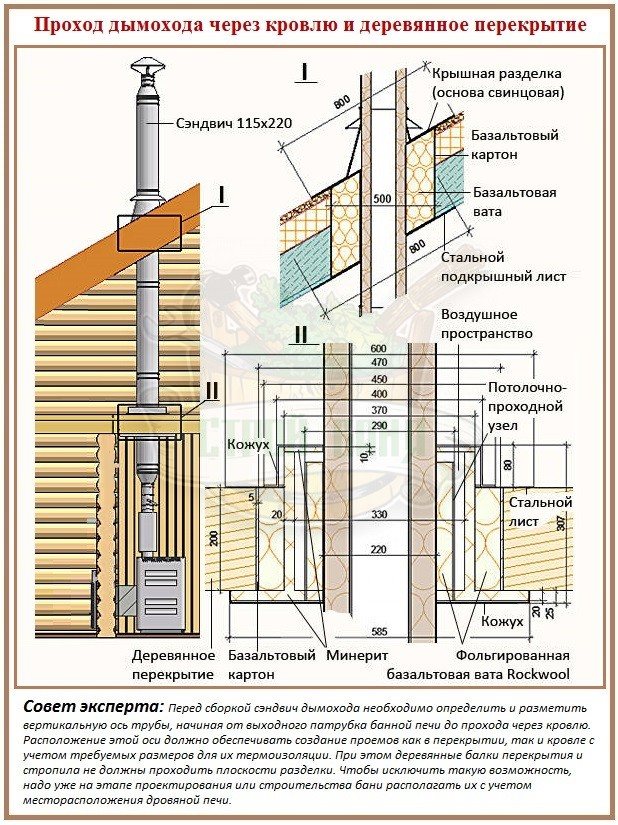
Arrangement of the passage through the slope from the side of the bath is carried out using a metal under-roof sheet with an oval hole. It is fastened with self-tapping screws to the elements of the rafter system. Before installing the sheets, basalt cardboard and cotton wool are laid in the cut-out opening. The free space is filled with non-combustible thermal insulation. A lead roof cut is installed on top. It is adjusted to the roof surface by tapping with a mallet.
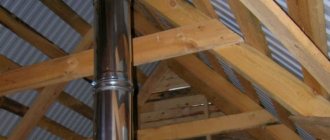
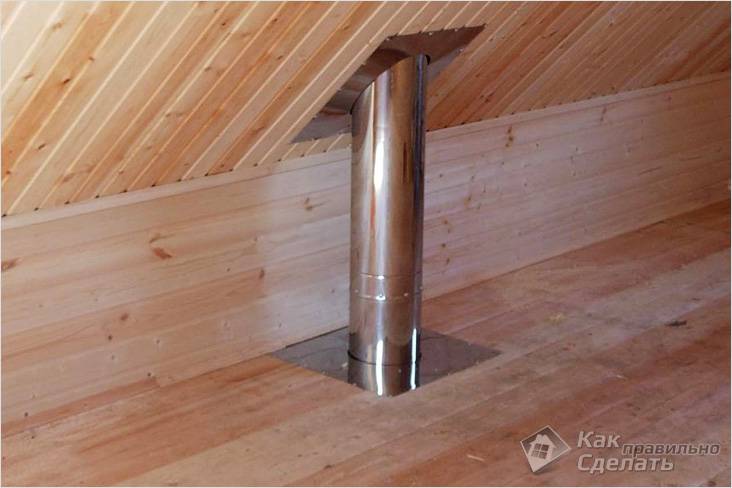
How to bring the pipe through the ceiling
Having determined the place for installing the chimney, a number of works are carried out to directly bring the pipe outside.
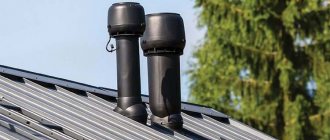
Installation of a stove chimney on the roof of a bath
- Cut a hole in the flooring at the ridge area. Since the chimney has a low height, no braces are required to strengthen the chimney.
- If the roof deck is single-pitched, then the chimney outlet is formed near the top of the roof.
- The box is mounted, taking into account the minimum distance to exclude a fire.
- The gaps are sealed and insulated with heat-resistant materials.
- The pipe is fixed by means of a penetration or a steel apron.
- Install a groove to drain the condensate.
- The gaps are sealed with adhesive tapes and sealant.
- Overlappings (lower and upper) are covered with metal or decorative sheets.
To drain the condensate, it is necessary to mine the drainage groove:
- located in the waterproofing layer;
- product material - stainless steel;
- installation is carried out directly around the pipe;
- the ends of the groove are diverted to the side (so that condensation can drain into it) and brought to the roof slope.
The resulting gap between the pipe and the "box" of additional rafters and beams is filled with basalt (stone) wool:
- Cut the material into an "envelope".
- The ends of the "layer" are wrapped up to the "box".
- The fixation is carried out by means of staples or nails.
- In places where the "envelope" touches the wood, insulation is required (with the help of sealants, adhesive tapes).
If the temperature of the chimney will fluctuate within 50-600, in this case, measures are taken:
- By means of adhesive tapes or sealant, the roofing films are connected to the pipe.
- This temperature should be calculated in the area of the chimney passage through the roof.
- The method is acceptable if there is an additional heater or heated water tank in the area where the sandwich pipe exits the firebox.
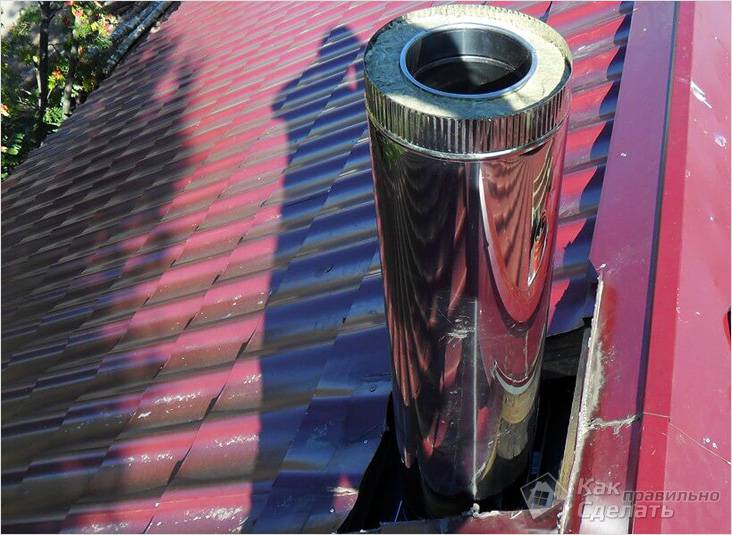
How to cut a hole in a roofing pie
Initially, the chimney outlet section is separated from the roof deck. To erect this box, you must:
- mark the distance (leave a gap between the chimney and the walls);
- if the flooring is made of soft materials, then bend it outward (leave 1.5-2 cm along the edge);
- fix additional rafters (for brick chimney) or profiles (for metal pipes) on the left and right sides;
- on the upper and lower sides, install cross beams (for brick chimney) or profiles (for metal pipes).
How to put a pipe on a garage roof
The installation of a chimney on the roof of the garage is associated with a passage through a reinforced concrete floor and a layer of roofing material. The recommendations of specialists for correct installation are as follows:
- the use of special metal sleeves to pass the chimney inside;
- the joints of the sleeves are caulked from above and below with basalt wool and cemented;
- an asbestos cord is wound directly onto the pipe (in the area where the chimney is in contact with the sleeve).
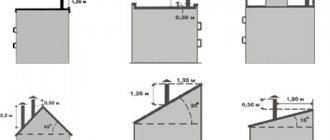
Choosing a location for output
The choice of a convenient place for making a hole in the roof from corrugated board under the chimney pipe is half the success. Naturally, the decisive factor in this matter is the location of the oven. Professional stove-makers recommend placing the chimney strictly vertically, however, there are more subtle nuances:
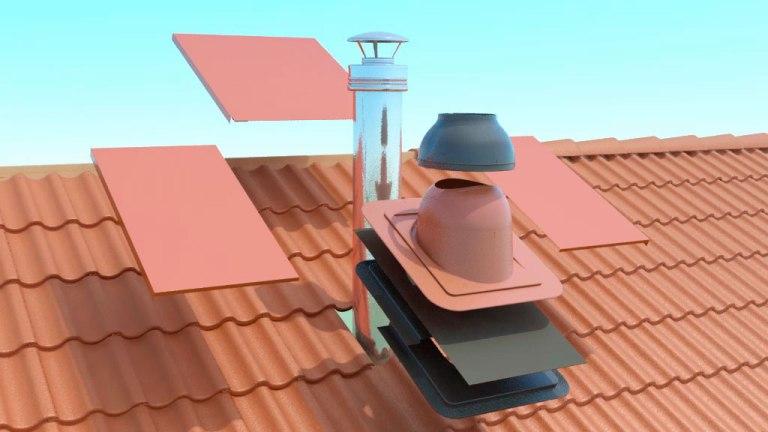
Chimney outlet scheme through the roof from corrugated board
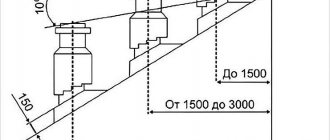
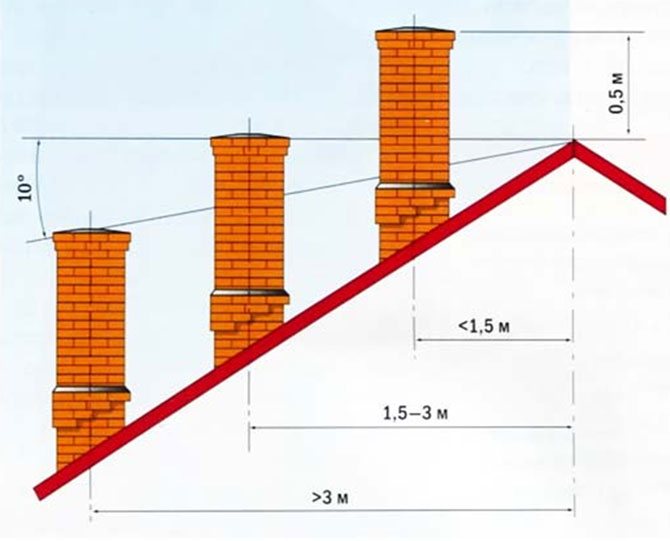
- It is best to place the chimney hole at the highest point of the roof, that is, closer to the ridge. The optimal distance from the ridge to the pipe is 50-80 cm.
- It is advisable that the hole in the roof made of corrugated board for the pipe does not fall on the elements of the rafter system. To get around them, use taps, corner sections of the chimney. They can be used to set the rotation to 90 or 45 degrees.
- The length of the chimney segments is calculated in such a way that the joints are above or below the places where the floors and roofing from corrugated board pass. Otherwise, it will be problematic to make a high-quality connection.
- To ensure good traction, the system should be 1-1.5 more than the roof ridge. If the chimney is too high, the smoke stream will have time to cool as it passes through it, which leads to the appearance of condensation.
To check if you have correctly identified the exit point of the future chimney, draw a mark on the roof made of corrugated board with a marker and check its temperature at the end of the day - the chimney should be located in the "cold zone", that is, stay in the shade for almost the whole day.
Preparatory stage of work
So that during the installation of the pipe there are no difficulties, you need to prepare the place of work and tools in advance. The hole from the corrugated board is cut according to the following technology:
After determining the configuration of the chimney, they outline where the exit to the roof will be located. As a reminder, it is best to place the pipe vertically. The size of the chimney section is selected based on the recommendations of the heater manufacturer. The thicker and higher the chimney, the better the smoke is removed from the stove.
It is important that all segments are of the same section and fit together, inserted without creating a gap. On the roof of the corrugated board, the contour of the pipe is outlined using a permanent marker. A grinder with a thin metal cut out a hole, stepping back from the marked line a couple of centimeters inward. It is necessary to work with the corrugated board carefully and slowly so that the cut edge is even, without chipping, which can be injured during the pipe withdrawal process. In the corners of the hole, you need to make short cuts to bend the edges of the corrugated board up. Saw out the same in the ceiling
A metal box is mounted that will connect the pipe to the rafters. The chimney will pass through a hole inside the box, the distance between their walls must be at least 15 cm.
Insulation, waterproofing film, vapor barrier membrane are removed from the hole made in the roof. It is necessary that the hole comes out through.
How to close the gap between the pipe and the roof
When installing a chimney, the target moment is to drain the flowing sediments. To prevent moisture from entering the floors, protective materials are used:
How to make a metal apron
Sheet aluminum is used in the manufacture of the apron. The material is divided into 4 parts:
Apron collection process:
- The elements are bent so that some of the strips sit on the pipe, and the rest is connected to the crate.
- An edge is made in a brick pipe, where a strobe is inserted. For this, a grinder is used. Everything is lubricated with a sealant.
- To exclude leaks, a "tie" is laid. This construction is in the form of a metal sheet with concave sides, which is mounted under the front area of the apron.
- When using metal roof tiles, it is recommended to install an apron, the upper end of which sits above the roof row to prevent leaks. Moreover, if the pipe is located near the ridge, then the structure is filled directly under it, or bent to the other side.
How to seal seams and joints
Sealing of joints and seams is performed taking into account the materials of the roof, chimney:
- self-adhesive tape on bitumen and silicone is applied to the seams and the area of connection of the cap with the pipe. The material adheres perfectly to all types of surfaces: metal, wood, plastics, etc .;
- wide slots are filled with ropes / linen. Materials are impregnated with oil paint;
- coat the gaps with a solution of cement and sand, but keep in mind that over time, the surface will crack;
- small cracks are covered with sealant.
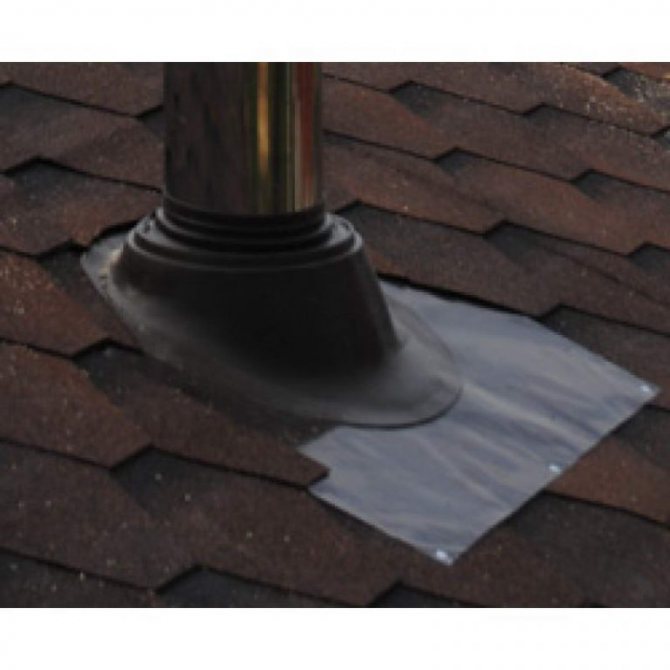
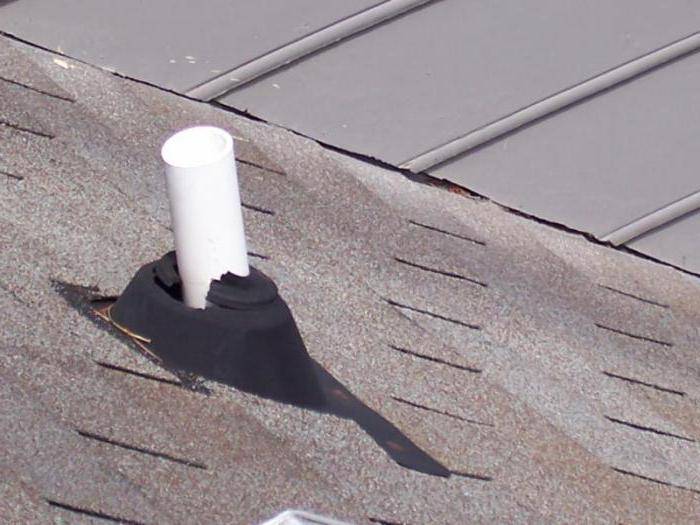
The use of penetration on the roof of different materials
Manufacturers often produce chimneys with penetration. The finished product is made of a material identical to the chimney and is connected with a special cap. The chimney passes through such a bell. And the junction of the chimney and the apron is combined with a steel clamp.
Yulia Petrichenko, expert
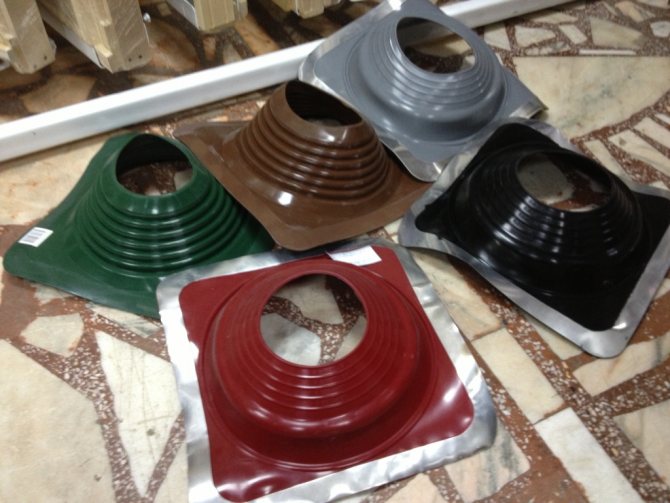
Also, the penetration can be made in the form of an aluminum flange (factory):
- A flexible part is attached to the structure, which is made of rubber or silicone.
- Components similar to the corrugated area are applied to the flange. The edges of the penetration have grooves where the gaps are filled with sealant.
- Determine various parameters (diameter, thickness, etc.) and angles of inclination of the factory penetration.
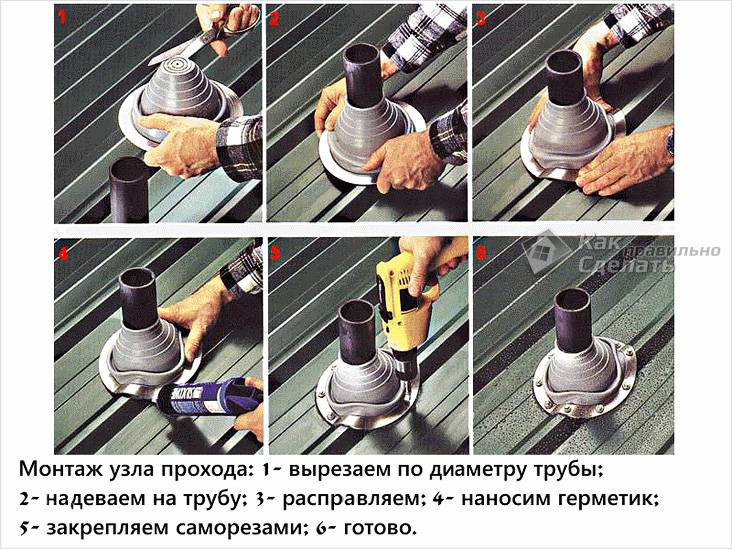
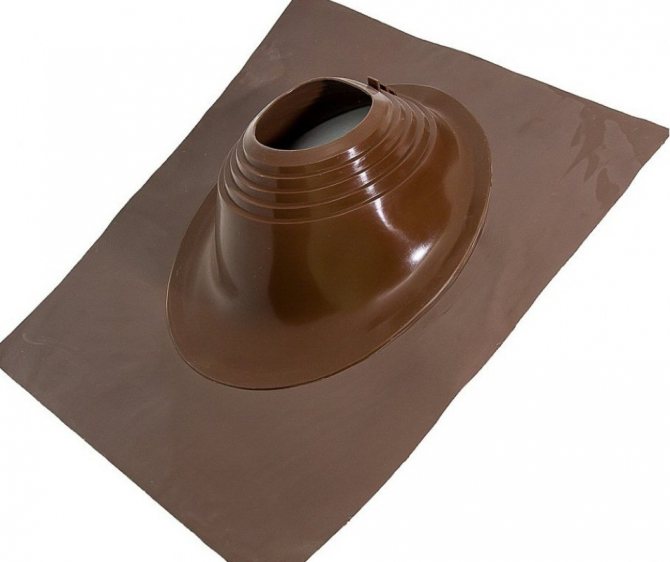
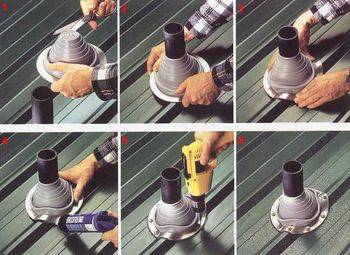
Installation of the penetration is simple:
- The corrugation is cut with scissors in accordance with the pipe diameter.
- After that, the product is put on the chimney (the penetration should be dressed tightly, tightly in contact with the chimney; for convenience, it is possible to apply soap to the surface).
- Then a flange is formed, the grooves of which are treated with a sealant.
- The product is fastened by means of self-tapping screws. When installing the penetration on a non-metallic roof, it is recommended to use longer screws or dowels, so that the parts reach the lathing area.
Installing the chimney umbrella
Installation of an umbrella is not required if the chimney is made of bricks. The raw material absorbs moisture by itself.
If the chimney is made of metal or asbestos-cement materials, then it is necessary to make an umbrella as follows:
- Make a drawing on cardboard and cut out a "pattern" in accordance with the dimensions.
- Cut metal parts based on the pattern.
- Mount the umbrella on the pipe, connecting it with clamps.
- Cover the gap between the parts (pipe / umbrella) with sealant.
Yulia Petrichenko
Chimney - passage to the roof: how to bring it out through the roof (corrugated board, metal tile, slate, ondulin, overlap), how to seal the gap correctly - print version
What materials are resistant to high temperatures?
During the heating of the stove, the temperature reaches a critical point, so the wood can ignite from direct contact with a hot pipe, which will lead to sad consequences.
To avoid fire, you need to create an insulating layer of any non-combustible material. Perfect for this:
- Mineral wool.
Fibrous insulation made from inorganic filaments. Confidently tolerates temperatures up to 300 degrees Celsius. Choose the grade ПЖ-175 or ППЖ-200 to ensure maximum thermal insulation properties. Such mineral wool products are manufactured in accordance with GOST 9573-96 Mineral wool plates of increased rigidity and in accordance with GOST 22950-95, as well as in accordance with GOST 21880-94 - stitched mats. - Minerite.
The heat-insulating material consisting of cellulose and limestone on a cement basis is a dense slab that can effectively withstand temperatures up to 150o C. The maximum heating temperature that minerite can withstand reaches 400 degrees. - Basalt cardboard.
A dense, environmentally friendly material with a thickness of 5 mm, which confidently withstands temperatures up to 900o C. - Asbestos board.
Also allows you to create excellent fire protection. Has a thickness of up to 10 mm. Does not lose its properties over the years. The only drawback is the generation of toxic fumes when heated, which is a critical factor for sauna use.
If you want to carry out the initial facing of the ends of the ceiling and have already accurately carried out all the measurements and made indents, then you can also use low-combustible materials, including:
- Glass-magnesium sheet
- the standard version is not suitable for wood protection, so choose premium products. - Fireproof drywall
- in terms of characteristics, it differs from the standard gypsum board in that it has enhanced adhesion of layers and reinforcement on the inside. Therefore, fireproof drywall is protected from critical temperatures and does not ignite even if it is thrown into a fire for 15 minutes.
Note!
Saving on materials can lead to fire and accidents, so never use standard rock wool.
If you want to create an additional layer of thermal insulation for the chimney, then give preference to basalt wool. It does not deform and does not lose quality even at a temperature of 1000 degrees Celsius.
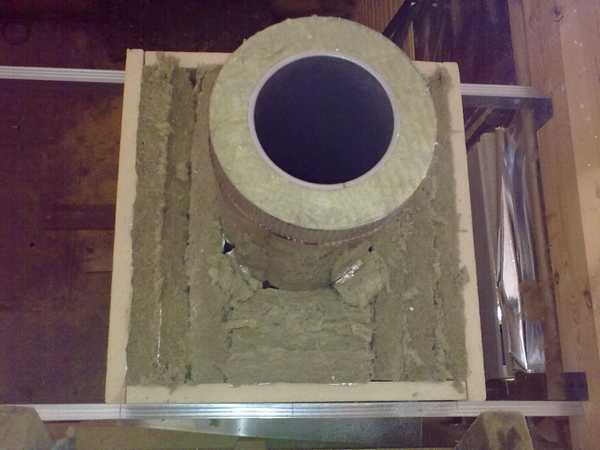
To protect the box when the pipe passes through the ceiling, basalt cardboard should be laid. To save money, but not to lose in quality, you can fill the passage box with clay.
A metal sheet with sides with a clay content (even distribution with a thickness of up to 2.5 cm) will help protect the ceiling from the increased temperature in the area where the box is attached.
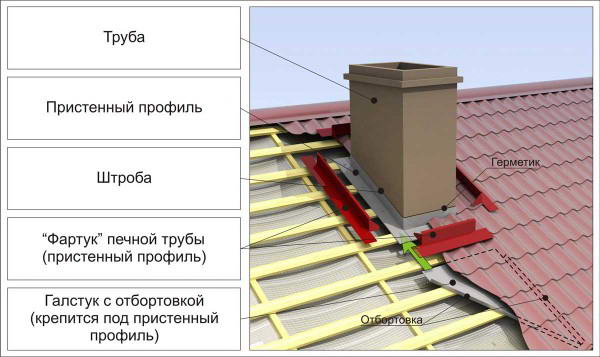
Fighting leaking joints
To create the maximum possible tightness of the abutment of the roofing material to the pipe at the points of contact, using the lower strips, an inner apron is made.
Arrangement of the chimney passage through the roof.
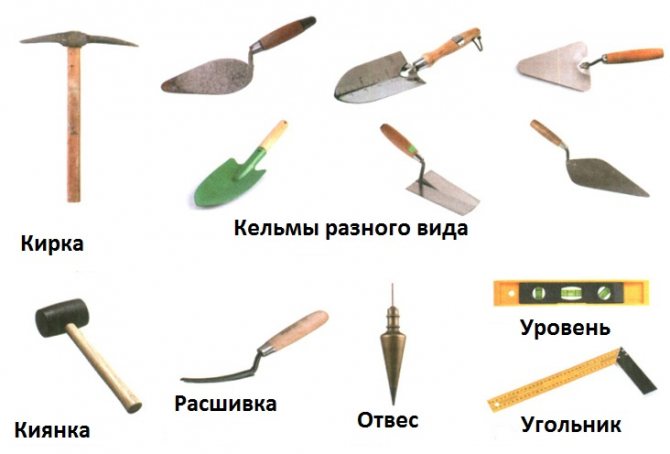
To make an inner apron, you need the following tools:
- marker;
- long metal ruler;
- grinder with a disc 2 mm thick;
- pliers;
- a hammer.
In order to do this, the plank is applied to the walls of the chimney pipe, making marks on the upper part of the plank. The next step along the previously marked line is punched through the strobe.
The installation of the inner apron should start from the bottom wall. The edge of the apron is inserted into the groove, after which it is installed on the remaining walls. The overlap should be 15 cm. Then the edge of the film is sealed, inserted into the strobe. Having cut the lower planks, they are installed, and then fastened with self-tapping screws.
After installing the lower apron, you can start installing the tie, which is a sheet of waterproofing material, wound under the elements of the inner apron from below. The main function of the tie is to drain the water.
After finishing work on the arrangement of the tie and apron, which protect the joints, the roofing material is laid. Then the outer apron is mounted. To do this, use the upper abutment strips.
The installation of the apron from the outside is carried out in the same way as the device of the apron from the inside. The difference is the absence of a groove and the upper edge is fixed directly to the chimney wall.
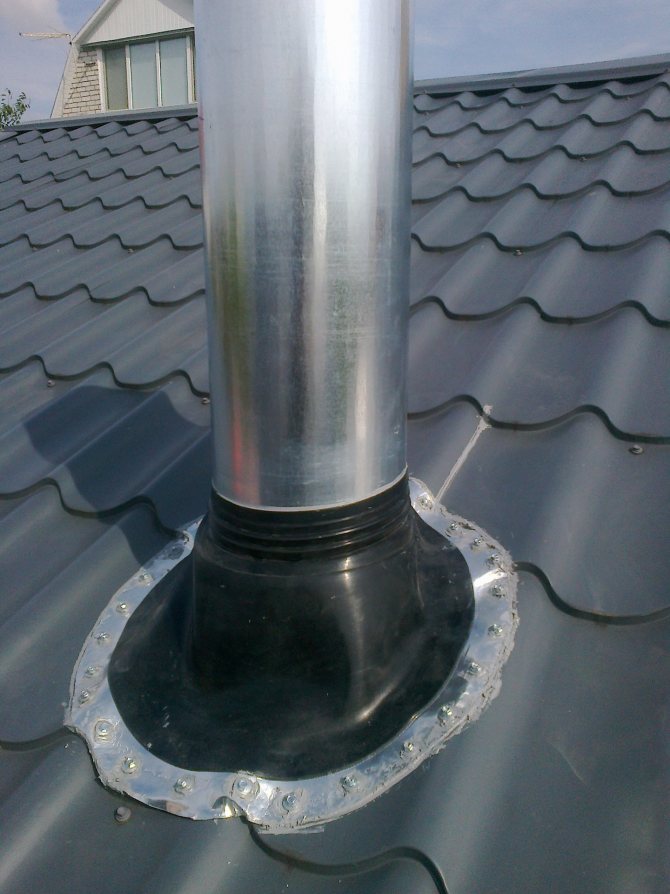
Important: today the building materials market offers products that are designed specifically for chimneys with a circular cross section. They are roof passages that consist of a base (flat steel sheet) and an apron cover
A round chimney is drawn inside the passage.
If the wall is made of brick
How to make an opening in a brick wall to avoid catastrophic consequences? According to the technology, you must first remove a couple of bricks from the masonry. Before starting to disassemble a large area, a jumper is first installed, which will hold the wall. The thickness of such a reinforcing structure is 12 cm.
If you need to cut a hole above the passage to install a lintel, grooves are made above the ceiling of the future opening with a depth equal to the width of the corner. The length of the groove is greater than the width of the opening. The calculation is based on the length of one brick.
In order to obtain a secure fit, the inserted corners must be well secured. Gaps are made in the corner and the wall, where fastening bolts are inserted to tie the corner.
Strengthening the opening in a brick wall
Chimney finishing choice of materials
The negative factors affecting the chimney include
:
- atmospheric influences (wind, precipitation, ultraviolet radiation);
- difference in ambient temperatures;
- high temperature workloads.
Due to the difference between the temperature of the working pipe and the air temperature in the chimney, condensate forms, which provokes the destruction of the pipe during the combustion of heating oil
... To avoid the formation of condensation and to protect the pipe from external influences, it is required to provide for reliable insulation of the chimney due to the lining.
Various materials are used to cover the protruding part of the pipe. When choosing, you should consider
:
- resistance to external factors, wear resistance;
- appearance and color scheme (matching the roofing or wall decoration of the building).
Roof chimney trim is most often done using
:
- clinker bricks or tiles;
- plaster;
- fiber cement boards;
- roofing material (corrugated board, slate).
Characteristics of finishing materials
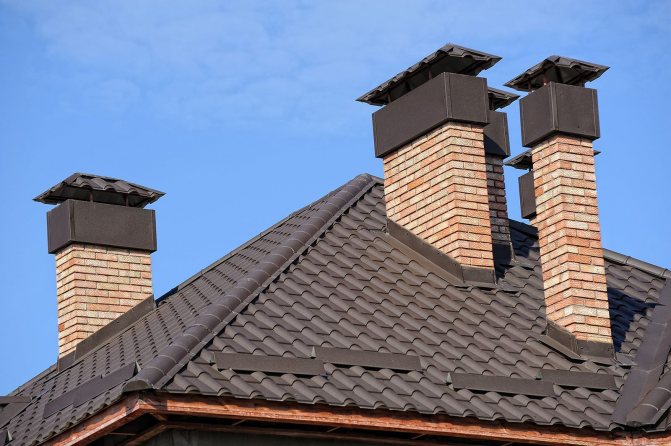
Clinker bricks or tiles are a practical option for finishing the chimney, since dirt is not noticeable on such material. The advantages of clinker materials also include the aesthetics of the masonry; such a chimney is perfectly combined with any type of roofing. It is worth noting the resistance of tiles and bricks to weather conditions, temperature extremes, as well as the strength of the material.For lining the chimney, exclusively solid clinker bricks are used, laid on a mortar for clinker, special compounds are used for grouting. Thin, lightweight clinker tiles are commonly used for cladding tall pipes.
Finishing the chimney on the roof with plaster is characterized by
:
- affordable cost;
- simple installation;
- versatility (suitable for any roofing);
- the ability to implement any color solutions (plaster can be painted with silicone paint).
Plastering of pipes is carried out using the same technology as for finishing the facade walls. Traditional cement or lime-cement mortar can be used, but a more durable option is to use mineral, silicone, silicate or acrylic plaster. Painting the dried surface increases the wear resistance and durability of the finish.
Small-format cement-fiber boards are durable, resistant to ultraviolet radiation, moisture, temperature fluctuations, and have a low weight. It is an environmentally friendly, non-flammable material. Smooth or structured boards can be used for lining the chimney; the material is available in a wide range of colors.
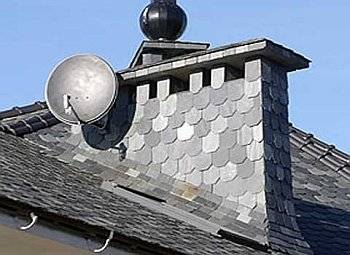
If slate is used to cover the roof, the lining of the chimney on the roof is usually made of the same material. Slate slabs can be in the form of an arc, scale, rectangle or octagon. The color of this natural material depends on the deposit. This is usually a graphite, green, or magenta color.
A fairly simple and budgetary option for finishing the pipe is the use of corrugated board. It is used if the roof covering is made of the same material. A chimney finished in the color of the roof is aesthetically pleasing.

Manufactured at the factory, the elements of the chimney for the roof passage have an aesthetic appearance and are quite simple to install. They are equipped with a steel chimney duct and can have a ready-made external cladding made of any material, or be prepared for independent finishing so that the chimney is outwardly in harmony with the roof. The modular steel structure is not additionally finished, it is enough to mount it in the place of passage through the roofing pie.
How to install a finished feedthrough?
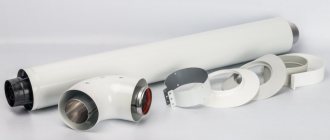
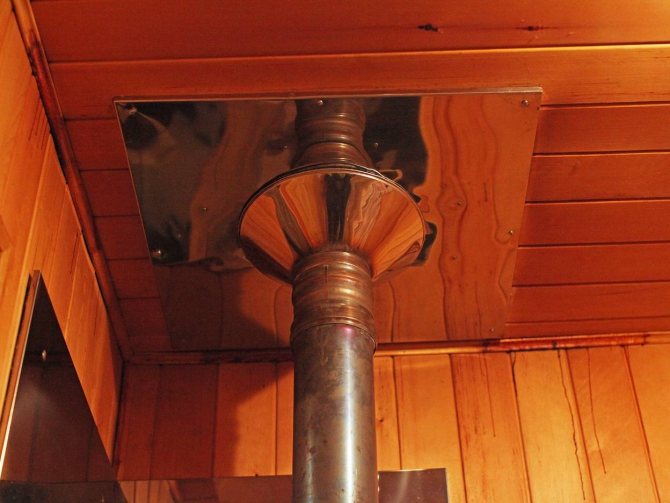
Today on sale you can buy a ready-made passage assembly, which is a metal structure installed in the ceiling of the bath.
In terms of design and fastening strength, a factory build is much better than a homemade one. In stores, you will find any configurations of nodes for the passage of a pipe through the ceiling, which are a rectangular or circular box, securely fastened to a metal sheet that performs a protective and decorating function.
A cutout for the pipe is already provided in the design of the factory ceiling pass-through unit (PPU), so the unit must be selected taking into account the diameter of the pipe.
To carry out the installation, follow the following sequence of steps: 1. An opening is made at the installation site of the passage unit and the frame of the ceiling unit is assembled from the galvanized profile:
2. Sheet heat-insulating material (asbestos-cement sheet or basalt cardboard) is carefully sealed over the end of the floor in the place of passage:
3. In places where the metal sheets of the passage unit are in contact with combustible materials, sheet thermal insulation is also laid.
4. The structure is installed into the opening in the ceiling and one knee of the sandwich is inserted into it, fixing it in the metal structure, wrapping it with an asbestos cord.
5. In the upper part from the attic side, the box is filled with refractory mineral wool, expanded clay or other material recommended by the manufacturer.
6. After that, the attic part of the aisle unit can be closed with decorative metal elements.
Chimney box
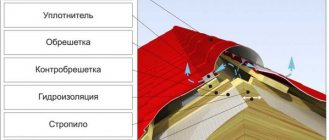
In order to correctly lead the chimney through the roofing pie, you should equip your own rafter system around the pipe. It must be spaced from the chimney at the distance specified in SNiP. The structure consists of side rafter legs and horizontal cross-beams from the bottom and top, which are made of a bar of the same section as the rafters.
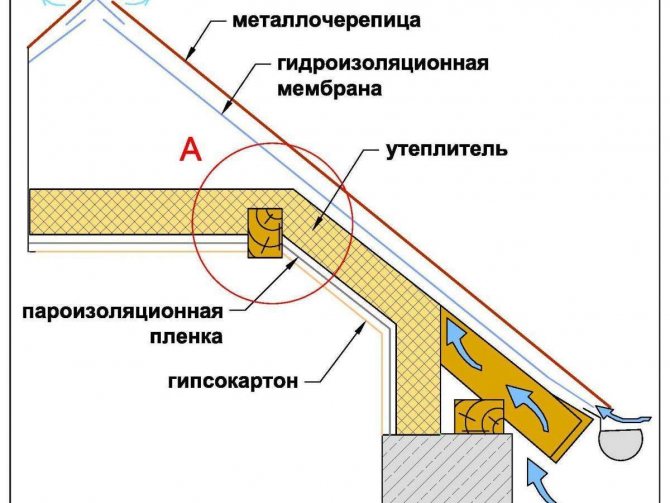
To insulate the structure, it is necessary to use non-combustible heat-insulating materials, such as glass wool or stone wool - it is stuffed between the pipe and wooden structural elements.
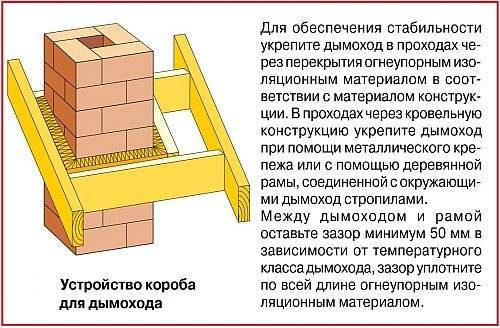
When passing the chimney through the roofing pie of the operated roof, the steam and waterproofing is cut crosswise, like an envelope, the edges should be tucked up and fastened with nails or staples to the rafter system.
Roof chimney waterproofing requires special attention. When installing a chimney box for a pitched roof, the vapor barrier and waterproofing membrane are fastened as follows: the edges of the films are tucked in and tightly fixed with brackets to the box, in addition, the attachment points should be additionally sealed with a sealing tape or some other adhesive material. On the outside, on top of the roofing, protective elements are mounted that do not allow moisture to pass into the joints of the box with the roofing pie.
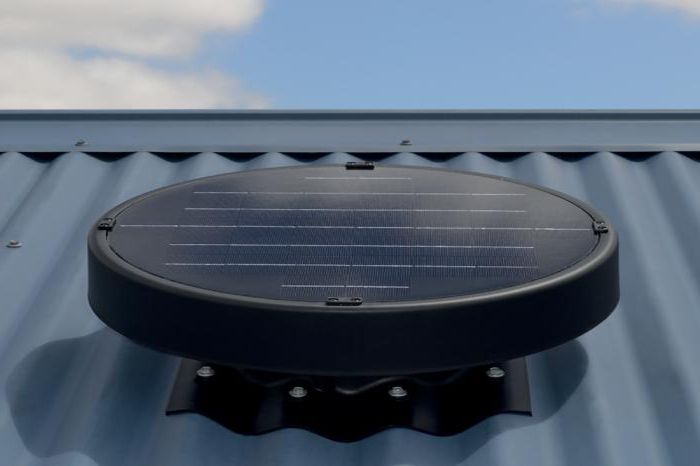
It is important to take into account that the installation of the box can negatively affect the air exchange in the under-roof space. To avoid deterioration of moisture removal, additional ventilation systems can be installed, for example, ventilation tiles, roof aeration grilles, etc.
If the width of the chimney exceeds 800 mm (perpendicular to the rafters, along the outer dimensions), then a slope is required higher along the slope.
The slope is a small roof of its own, which diverts water and snow from the pipe. Its installation is rather complicated, since all layers of insulation are part of the slope, in addition, it should be qualitatively combined with the main roof using curly elements. To avoid the installation of the slope, it is worth making the pipe smaller.
Using ready-made kits
Standard modular chimneys ("sandwich") greatly simplify the process of passing the pipe through the roof. A wide range of materials are used for the manufacture of structures, including
:
The choice of a modular chimney depends on the fuel used, since they differ significantly in their technical characteristics. The advantage of such systems is the ability to install the pipe at a non-right angle. This is especially true when installing a chimney in an operating building and allows you to choose almost any place for installing a fireplace, stove or automatic boiler.

A modular chimney passes directly through the roof, consisting of parts such as
:
- deflector (a device that enhances the draft in the chimney by using a stream of hot air);
- a clamp for stretching (allows you to additionally fix a high pipe on the roof);
- skirt (an element that protects the place where the pipe exits through the roof);
- roof passage (element with a fixed apron, which is directly mounted in the roofing cake).
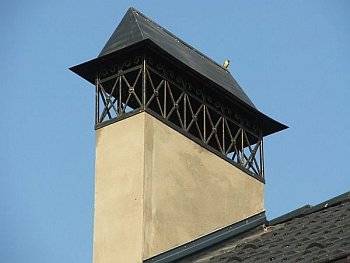
Modular chimneys have an attractive appearance.
Steel chimneys can be installed if the flue gas temperature is not more than 500 ° C. Forbidden for installation on coal-fired stoves. For asbestos-cement pipes, this parameter is 300 degrees; for coal stoves, such chimneys are also unsuitable.
If the chimney is made of concrete or brick, or a ready-made factory passage is installed, the structure should not be rigidly attached to the roofing system.Under the influence of external factors, the roof can deform, and these forces will be transferred to the chimney, which can lead to its destruction. When the chimney exits through the roof, all connections between the chimney and the roof are made using flexible elements.


How to work with a concrete wall?
When the brick is removed, the corners are fastened together with steel strips welded to the shelves. After that, the fasteners are removed. Reinforcement of the vertical is done using channels welded to the lintel, which creates one structure.
You can move a doorway in a brick wall by following the above technology. The sequence of operations must be followed and reinforcement jumpers must be installed in advance.
This kind of work is time consuming. Doing everything quickly will not work. Unlike a brick wall, a doorway is cut here without installing lintels. The concrete panel is made in one piece, so it does not require additional support.
When the passage is dismantled, reinforcement is made. A channel is selected according to the thickness of the opening, which serves as a frame for the upper crossbar. It will support the vertical walls of the opening.
Concrete cutting
How to pass a square or rectangular pipe
If you want to lead the pipe through a metal roof, you will need to make an internal apron to ensure tightness:
- In a specialized store, you need to purchase the upper and lower abutment strips. The lower structural element is applied to the surface of the chimney. Then the top edge is marked;
- The strobe is selected according to the mark. The depth of this element should not be less than 1.5 cm. The strobe should also have a slight upper slope;
- All the resulting litter is removed. The strobe itself is cleaned of impurities by means of water;
- The installation of an internal apron is carried out starting from the bottom of the chimney and following on;
- The installation of the strips is carried out with an overlap, which should be equal to 15 cm. This is necessary to ensure sealing;
- The edges of the additional parts, which are fixed in the strobe, are filled with a special sealant. The sealant must be heat resistant;
- Under the bottom of the made apron, a flat sheet of metal is fixed, directed downward. It is required to ensure the drainage of water. Then we start organizing the side. It is performed with a hammer and pliers;
- On top of the apron, metal tiles are laid along the perimeter of the pipe. After that, the arrangement of the external apron is carried out. It is carried out using the upper abutment strips. Its main function is decorative. Its installation is carried out in the same way as the installation of the internal apron. But there is one difference: the upper edges of the slats are attached to the surface of the chimney. That is, there is no need to organize a groove.
Rectangular chimney on a metal roof
How to make a round pipe pass
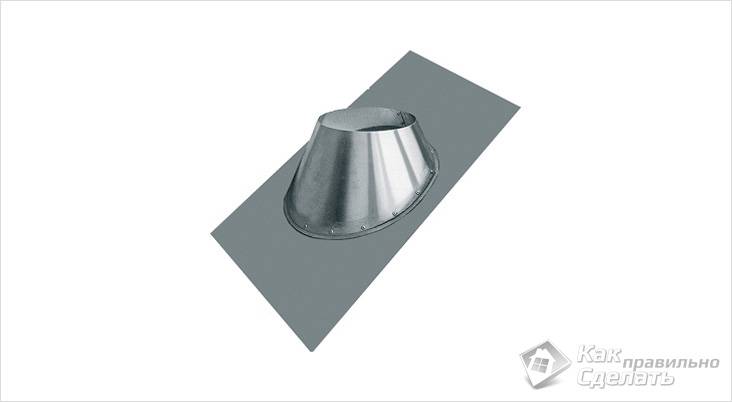
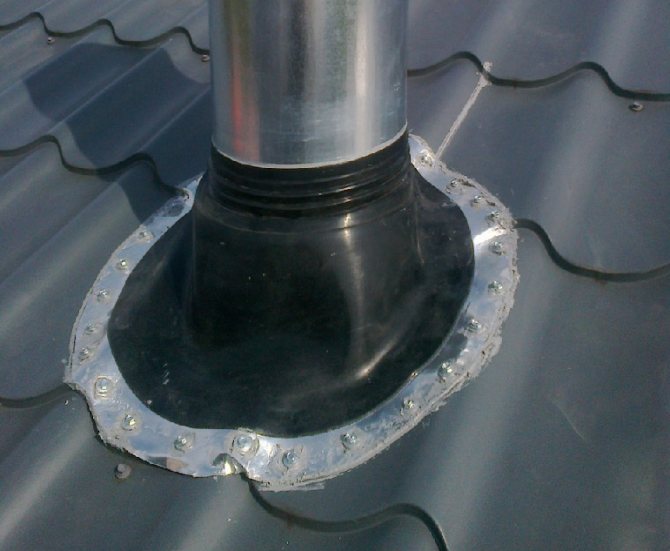
In the range of modern roofing products, you can find a special chimney passage. You can purchase this product at any hardware store. The roof walkway will greatly assist you in pulling the structure through the ceiling. Then an apron is performed. It is fixed on the roof.
Installation of roof penetration
Round pipe apron
In which zone of the roof is it better to organize the passage of the structure
Taking into account the peculiarities of the installation of the abutment unit, the best working area is the ridge of the roof. In this case, there is no risk of snow pockets forming. This ensures the optimum level of tightness. Would you like to make an installation in this area?

The passage of the pipe through the metal tile
You can also design a pipe outlet close to the roof ridge, on a ramp. In this case, it is quite simple to equip the junction, since there is no risk of the formation of snow pockets.Would you like to run the pipe on the roof, in the area where the slopes intersect? It is better to choose other options, because in this case, the organization of a high-quality junction will be fraught with countless difficulties.
Pipe installation
If you need to bring the pipe through the ceiling, it is important to take your time and follow all safety precautions. Be sure to purchase all the materials and tools you need. In the opposite case, there is a high risk of not just poor-quality work, but damage to the chimney and the ceiling or roof made of metal tiles.
In the opposite case, there is a high risk of not just poor-quality work, but damage to the chimney and the ceiling or roof made of metal tiles.
Pipe passage through the roof
However, if you follow the instructions, the risk of additional complications is minimal. Removing the chimney is not as difficult as it seems at the beginning of work.
Video on the arrangement of roof penetrations
Standard tube cutting:
Ondulin passage device:
Homemade knot for the passage of the pipe through the corrugated board:
Information on the rules for arranging chimneys will be useful both for independent craftsmen and for customers of the services of a team of builders. Compliance with technological requirements will save you from many negative consequences. Competently executed nodes of the passages will provide excellent insulation and extend the service life of the sauna chimneys and the sauna itself.
To achieve a visual expansion of the area of an apartment, designers use a popular technique by creating an additional passage. Any person familiar with the technical rules and having construction skills can independently make such an opening in the wall.
Installation of penetration
The installation technique largely depends on the specific type of penetration. But in most cases, installation involves three stages. First of all, a base is arranged on which the knot will stand. It can be a concrete or metal glass that will support the structure like a foundation. The second stage provides for the direct passage of the communication pipe through the assembly, as well as the performance of crimping actions. The installation of the roof penetration is completed with mechanical fixation on the roof surface. For this, self-tapping screws, fastening corners, screws and nails are used. The specific fastening method depends on the roof finishing material.
Working with a reinforced concrete wall
Concrete walls are made load-bearing. Therefore, how to make an opening in such a reinforced concrete wall so as not to destroy the building is indicated in the regulatory documents. It is important to make the correct calculation of the reinforcing frame. It is better not to do such work yourself in order to avoid unpleasant consequences.
Such changes in the supporting structure require special permission. It is necessary to submit a work plan and drawings for the future redevelopment of the premises. Even the slightest nuances are taken into account in the documents. Only in this case can one count on the approval of the work by the architectural organization. After obtaining permission, you can start work.
First, the marking of the future passage is made. Moreover, it must be done on both sides of the wall. To make the lines coincide, grooves are drilled in the corners of the wall, and marking lines are drawn, starting from them. Then holes are drilled along the perimeter of the opening, with a step of 30 mm.
For processing concrete walls, it is advisable to have diamond saws. They easily handle concrete surfaces. Without them, such work will be time consuming and laborious.
In the punched wall, the opening is strapped. For this, a metal channel is used. You can install corners that are pre-welded to each other.
Channel reinforcement of the opening
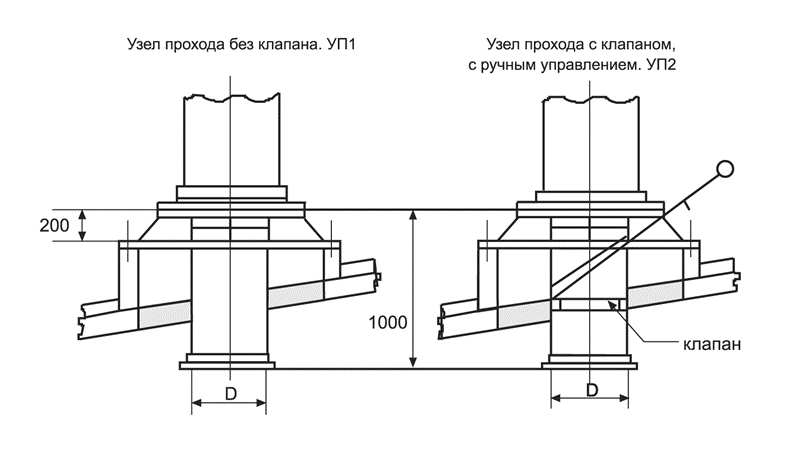
UE marking
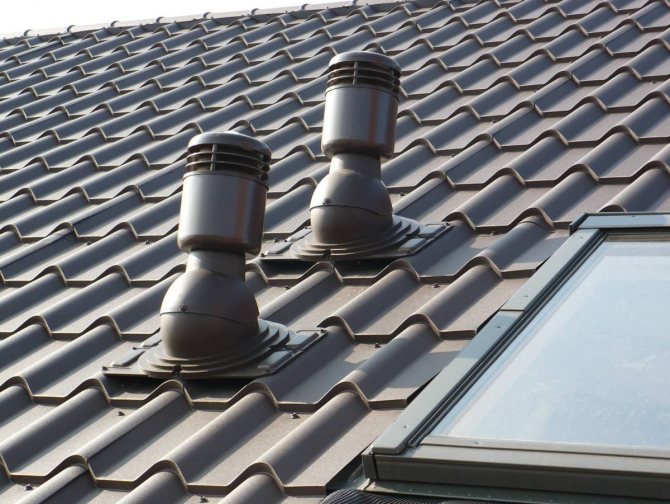
Today, the industry produces eleven standard-sized types of ventilation units, including for ventilation of folded roofs and corrugated board.For original designs of ventilation systems and aerators, non-standard UP options are made.
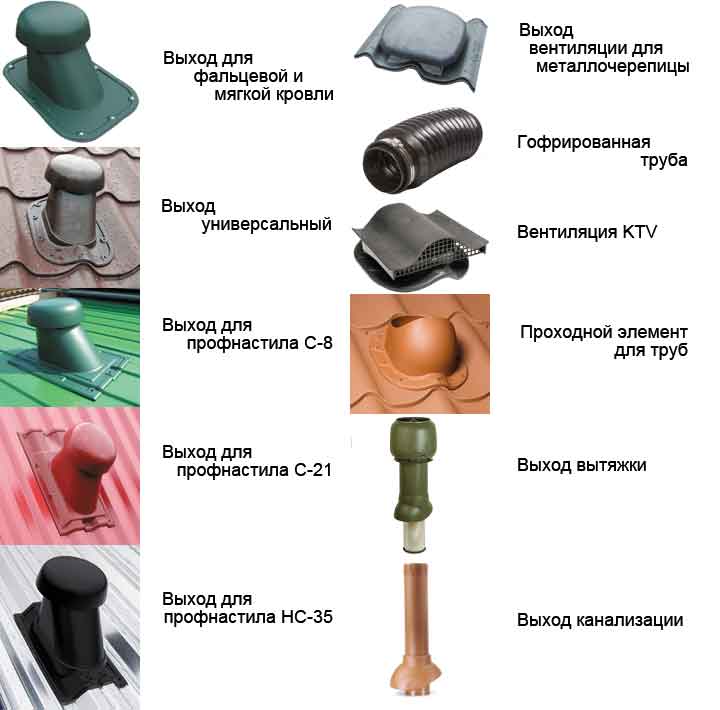
Types of ventilation outlet elements
Typical node designs are marked with alphabetic and numeric designations that determine their characteristics and elements:
- The letter combination УП designates a passage node.
- Numbers 1 and further 01-10 indicate typical sizes of units without a condensate ring and a valve (for example, УП1-01).
- Numbers 2 and further 01-10 indicate the typical dimensions of assemblies with a valve, but without a condensate ring (for example, УП2-01).
- Figures 3 and further 11-20 indicate the typical dimensions of units equipped with a valve and a condensate ring (for example, UP3-22).
The UP type is directly related to the climate of the environment, the need to install an aerator, the design of the folded roof and corrugated board.
Nodal passages on the roof of the house
Chimney outlet through metal roofing
In conditions of an insulated roof, materials for thermal insulation, waterproofing and vapor barrier are possible sources of fire. The wood sheathing can also catch on fire. In this regard, all these elements must be at a distance of at least 130 mm from brick, ceramic and concrete pipes. If a ceramic pipe without thermal insulation is used, then the distance is increased to 250 mm.
In the place where the chimney passes through the metal tile and the roofing cake, an opening is formed in which heat loss and condensation occurs in the insulation. To prevent this from happening, the chimney is equipped with its own rafter system, and the gap between the pipe and the roof is insulated with non-combustible mineral basalt wool. If the output of the pipe through the metal tile is carried out in an operated house, then the hydro and vapor barrier materials are cut out like an envelope and, turning the edges, they are fixed to the rafter system. For pipes of rectangular and square cross-section, an inner and outer aprons are equipped, which ensure the abutment of the pipe to the metal tile without the possibility of leakage.
The use of pipes made of stainless steel and asbestos cement is unacceptable for furnaces fired by coal or peat!
(no votes yet)
What to look for
The cost of creating a passage depends on the contractor. If you do this work yourself, you can seriously save money, but you will have to be responsible for the wrong actions yourself. You must consider your choice so that you do not regret it later.
Collect complete information before starting work. Check out how to make an opening in the wall. Several factors must be taken into account:
- wall material;
- opening width;
- number of storeys of the building;
- cracks;
- bends;
- potholes.
It is necessary to find out how the floors are located and what type they are. Such information will be needed to calculate the strengthening of the passage, if for this it was necessary to disassemble the load-bearing wall. The opening made must have reliable lintels so that the building does not collapse. A suitable material for this is a steel channel.
Dismantling the wall under the doorway