Before carrying out the installation, remember one important nuance. There are certain installation standards, rules for constructing a box in the ceiling. They need to be followed clearly and flawlessly.
An incorrectly positioned pipe in the bath through the ceiling and roof is a serious violation of fire safety rules. The consequences can be different, up to a severe fire. But if you provide good thermal insulation, a visit to the bath will become an absolutely safe activity. Due to numerous requests from readers, we decided to write an article on how to make a chimney, what standards must be observed. We'll start with helpful tips.

What does a novice stove maker need to know?
Especially for you, we have made a selection of relevant recommendations that give you an idea of do-it-yourself installation. So let's get started!
- When you install the pipeline in the bath, the installation of the stove ceiling box is a must. It contributes to an even distribution of heat that comes from the pipe, eliminating the possibility of fire.
- What material is suitable for insulation? The use of mineral wool, foam glass, expanded clay is allowed. Earth and sand are unlikely to work. Due to the high coefficient of heat capacity, the materials will keep heat, which is not necessary in our situation.
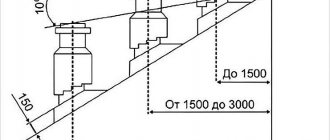
- It is desirable that the chimney in the bath has a complete height of 4-5 meters. Usually it is placed closer to the wall of the room. Since the wood trim is very close, you should take care of the screen protector.
- The GOST rules are as follows. The distance from the pipe to the beam is at least 13 centimeters. The diameter of the pipe with additional insulation is 32-33 centimeters. The distance between the beams is from 60 cm. If you lead the ceramic pipe in the bath through the ceiling, the distance should be at least 25 cm on each side.
- From the stove, we always make a metal lead from a thick, refractory material. Even stainless steel will not work - it will not be able to withstand such a prolonged exposure to high temperatures. Height - at least one meter.
- Removing the chimney excludes the use of more than three bends (bends).
- Where the structure passes through the ceiling, we recommend using a sandwich pipe. The assortment of such products in stores is quite diverse. You can find products with a thickness of insulation from 3 to 10 centimeters and more. Take the "top ten" - it is safe and reliable.
Useful information: "What and how should you insulate the ceiling in a Russian bath?"
Chimney types
Smoke exhaust structures, both external and internal, can be made of various materials and their combinations:
- Single-circuit chimney. Use steel galvanized or stainless steel pipes, less often - asbestos-cement. This type of chimney is mounted only inside the bath, since the chimney without insulation and an external casing on the street quickly cools down, becomes overgrown with soot deposits and cannot maintain good draft. Especially a lot of soot is deposited on asbestos-cement pipes. At the same time, an additional foundation is not needed for a single-circuit chimney, and its construction will not require high costs either for consumables or for installation.

- Brick smoke mine. A cheap and very popular type of chimney. The brick heats up and gives off heat to the room for a long time, while its surface is more reliable in terms of fire safety. However, the construction of a brick structure is a full-fledged construction work that requires certain skills and significant time and labor costs.The structure turns out to be cumbersome and heavy, therefore, a foundation is required for it. In addition, condensate settles on the rough inner surface of the shaft, destroying the masonry, and soot forms, which is why the chimney has to be frequently cleaned.
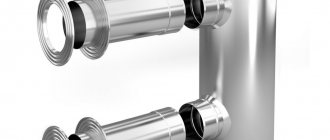
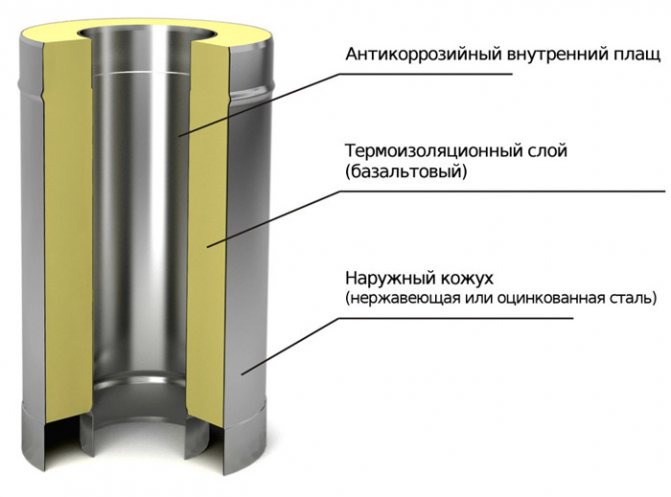
- Chimney sandwich. You can buy a set of ready-made sections for assembling a chimney, each section consists of two pipes and a non-combustible thermal insulation layer. The pipes can be made of galvanized steel, stainless steel or heat-resistant ceramics. Installation resembles the assembly of a designer and does not take much time, and the finished chimney is less dangerous than a single-circuit one, although it can also be used as a heat source. Due to the insulation, the smoke inside the chimney cools down more slowly, soot and condensate settle less on the walls, so the chimney provides good draft and needs less cleaning.


Note! Steel sandwich pipes are lightweight and do not need foundation equipment. However, a sandwich that combines an outer steel casing with an inner ceramic pipe is much heavier and the chimney from such sections cannot be erected without a foundation.
- Combined chimney. Such a smoke exhaust system requires financial and time costs, but combines all the advantages of other types of chimneys. A smooth steel or ceramic pipe is used as a smoke channel, and the outer shaft is built of brick, foam or expanded clay concrete. A non-combustible insulation is placed between the shaft and the smoke channel. Such a chimney is efficient, safe, unpretentious in operation and durable.
We recommend that you familiarize yourself with: Is it possible to use metal-plastic pipes of the system for heating
Choosing a reliable material for thermal insulation
High-quality overlap is impossible without the use of such materials:
- Mineral or basalt wool. Withstands heating up to 600 degrees. The main disadvantages are that it contains formaldehyde and loses its protective properties after getting wet.
- Expanded clay. It retains its beneficial properties even when wet. Arrangement of effective thermal insulation is impossible without the installation of additional tanks.
- Minerite. Like basalt wool, it can heat up to 600 degrees, but it does not emit harmful substances, does not lose its properties in a humid environment. The composition of minerite includes cellulose, cement, mineral fillers.
- Asbestos. It is considered a good insulating material, although it can also release hazardous substances when heated.
- Clay and sand. Used until more modern heaters appeared. It can be concluded that among the insulation materials listed above, minerite is considered the most optimal.
Chimney device diagram in detail
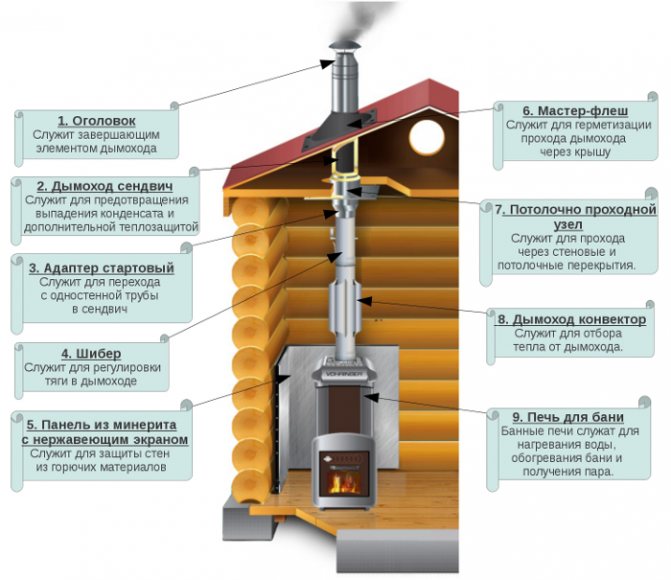
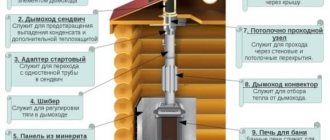
Diagram of a typical chimney
Installation will become clearer when you know what elements the chimney consists of. There are usually nine of them:
- Bake. Water heats up in it, the room is heated, steam is formed.
- Minerite panel with stainless steel screen. Located behind the stove, it protects the walls from fire.
- A convector chimney is located directly above the stove. It serves to extract heat.
- Shiber. Regulates traction.
- Starter adapter. Located at the top, it provides a transition from a single-wall pipe to a sandwich.
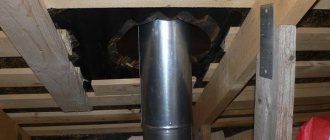
- So we got to the ceiling. It is here that the ceiling-throughput assembly is placed with your own hands. It is a kind of passage through wall and ceiling coverings.
- Chimney sandwich, which was already mentioned above. Protects the structure from condensation, serves as additional thermal protection.
- Master flush. You can also build it yourself. Seals tightly the passage of the pipe through the ceiling in the rooftop bath.
- The final element of the chimney is the head.
How to avoid burning out?
Even with correct cutting, it is not always possible to avoid overheating. The pipe heats up to extreme temperatures, the likelihood of burning out increases.
Useful information: "What is the best ceiling to make in the bath?"
There are several ways to protect the structure and minimize damage:
- "Water jacket". It is done right on the chimney. The heated water can be used for showering. Effective but not easy to build. You will need to install a remote tank, water supply. But the temperature over the water jacket will be low, any burns out are excluded.
- Samovar type tank. A simplified version, thanks to which the water will also be heated. It is important to drain it in time or add cold, not allowing it to boil.
- Grid for stones. The advantage of this method is that the stones dry the air perfectly. Difficulties can arise only with the search for reliable support, since the stones weigh a lot.
Using any of the above methods will significantly reduce the pipe temperature. However, you can try air cooling as well. On a thermally insulated pipe, you will need to put on the same, but larger diameter. A lattice is erected above and below, providing free inflow and outflow of air.
Insulation of the chimney in the bath
This event has a twofold goal: to ensure safety and improve the heat transfer of the furnace. The insulated chimney heats up much faster, so condensate practically does not have time to accumulate in it. This is why pipe insulation in a bath is needed.
Chimney insulation scheme in the bath.
The chimney in the bath must be made detachable, that is, from two parts: lower and upper. Not only because it will be easier to install it this way, but also in order to achieve the best efficiency.
Firstly, the steel pipe inside the bath will give off heat, warming up the space in the steam room faster.
Secondly, it can be replaced without disturbing the thermal insulation layer.
The lower pipe, extending directly from the source of fire - the stove, heats up more and burns out, which is why it needs periodic replacement.
The connection of the parts of the riser must be done in the middle of the attic of the bath. This will allow for proper thermal insulation of the upper part of the chimney. Both pipes tend to have the same cross-section because they are lengths of one.
The upper part of the riser should be insulated according to the following instructions. First of all, it is necessary to wrap it with insulation, then the diameter of the resulting structure should be measured. This dimension will be needed in order to determine the width of the galvanized steel sheet from which the casing for the outer pipe will be made.
To calculate the upper part of the riser, you must use the formula: dx3.14 + 30 mm. 30mm is the additional width of the flange connection.
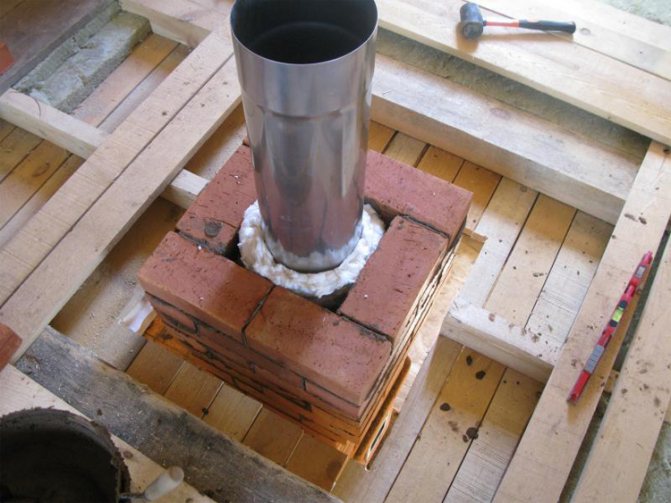
Installation diagram of the furnace on the foundation for additional insulation.
Having received the initial data, we proceed to isolation:
- cut out two rectangles from a sheet of galvanized steel and roll them up in a circle, connecting the edges with a rolling;
- we cut off a strip of 20 cm from the same sheet and the length of the corresponding circumference of the riser, adding 30 mm, - we get a clamp with which we connect the lower and upper parts of the chimney;
- we make four more rings using the same dimensions in order to close the insulation in the upper and lower ends;
- to the end of the upper part of the chimney from below, we weld a metal strip 4 cm wide and 2 mm thick around the circumference to form a branch pipe on which the upper pipe will be held.
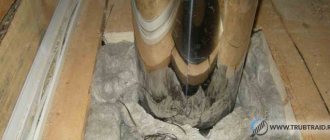
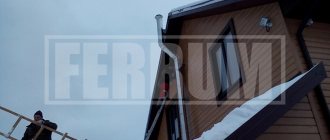
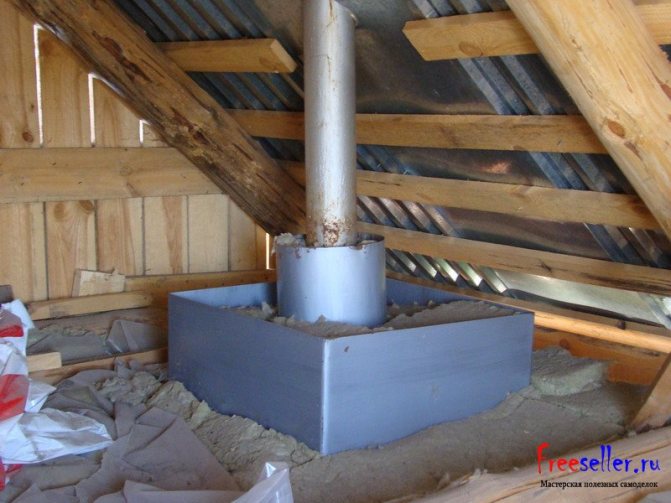
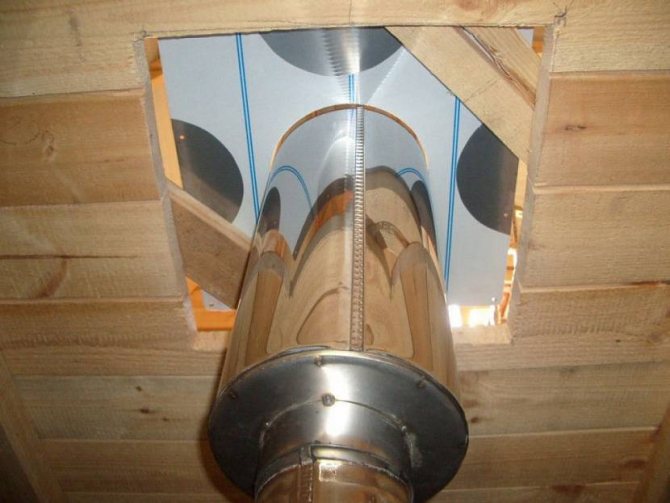
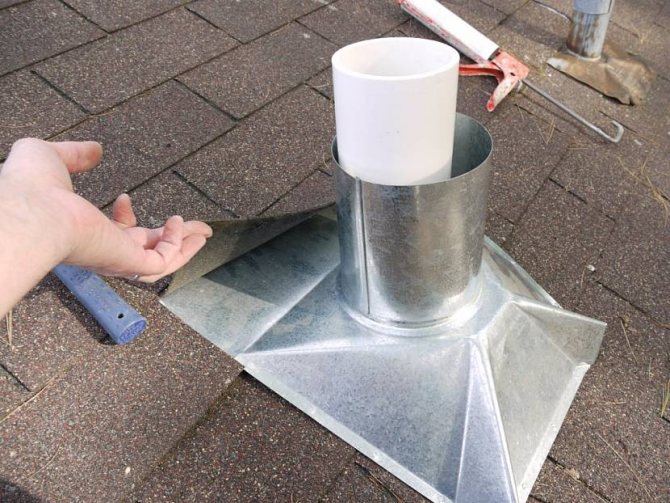
A 40 cm square hole should be cut in the ceiling above the passing riser so that the chimney is located exactly in its center. A similar hole is made in the outer roof of the bath. Then two squares should be cut out of a thick sheet of metal with dimensions of 50x50 cm. They must be fixed on the ceiling and on the roof. In the corners of the workpieces, holes must be drilled for subsequent fastening. In the center of the metal squares, holes should be made equal to the diameter of the riser.On the blank that will be mounted on the roof, the hole must be made not round, but oval, because it will need to be hemmed to the roof slope.
Making a sandwich chimney
Further steps for the installation of a sandwich chimney are carried out in the following order:
- we put on a casing made of galvanized steel on the riser, insulated with mineral wool, the ends of the segments of which should first be muffled with rings, bending the edges of the outer pipes to fix them;
- the upper, insulated end of the lower riser is pushed into a round hole in the ceiling, the lower single-circuit chimney piece is put on the furnace pipe;
- making sure that the chimney runs exactly in the center of the hole in the ceiling, you should screw the sheet of metal to the ceiling;
- we push the upper part of the chimney through the hole in the roof, then in the same way we put it on the lower part of the riser, very close to the pipes welded in advance. We connect both parts with a clamp;
- we fasten the top sheet of metal to the inside of the roof;
- on a sheet of metal located around the riser, we pour expanded clay or fill it with clay or asbestos.
Diagram of a sandwich pipe with insulation.
However, insulation is possible in a different way - by putting ready-made pieces of thermal insulation on the upper pipe, which is able to withstand temperatures up to 1500 ° C. Thermal insulation is a layer of foamed polyethylene covered with aluminum foil. Rectangular sections are also cut out of it, with which the chimney is wrapped to insulate it.
A similar property is possessed by the material - folgoizol, the outer shell of which is made of food grade aluminum.
The upper part of the chimney is wrapped with any of these materials: starting from the joint from the bottom to the exit from the roof opening. For fastening the insulation, metal clamps are used.
Before you start wrapping the pipe with mineral wool, thermal insulation or foil insulation, the outer surface of the chimney should be treated with a special heat-resistant sealant that can withstand temperatures up to 1000 ° C. This is necessary so that the outer layer of the sandwich chimney does not slide over the surface of the metal pipe.
After the chimney has been insulated, care should be taken to provide sufficient waterproofing. In the place where the pipe passes in the roof of the bath, you need to install a seal using factory sealant. A tin cap should be welded to the top to protect the chimney opening from atmospheric precipitation.
Share a useful article:
Similar articles:
experttrub.ru
Ceiling cutting yourself: how to do it?
How to remove a pipe in a bath with your own hands, without resorting to the help of specialists, without using factory units?
Let's look at the workflow in stages:
- Prepare a sheet of stainless steel to cover the hole. To do this, you need to measure and cut the desired size. Please note that the metal circle should be about 0.2 cm larger than the pipe diameter. If you plan to install a sandwich type chimney, the diameter of the circle is slightly larger than the outer diameter of the sandwich.
- A hole is cut under the pipe in the ceiling area.
- Along the perimeter, its edges are sealed with cotton wool, and metal is stuffed on top of the insulator in the form of strips.
- Now we need to make a chimney for the bath through the ceiling. The first step is to put a single-wall pipe on the stove. It is necessary to put on a stainless steel square with a hole already cut out, and then install the sandwich.
- The removed pipe piece is always set vertically. To fix it from the attic side, we recommend using metal strips. Fixing them in the desired position is a snap. Please note that the slats play the role of guides, while the chimney itself does not need fastening. It is necessary that it move freely, because when it cools, the metal will change its size.
- The insulating layer is laid from the side of the room.The required amount of material is placed between the plate and the ceiling. Use self-tapping screws to secure the plate. We drill holes in advance: 4 along the edges, as well as 1-2 on each side.
- We must insulate the resulting passage - and the cutting is ready.
A do-it-yourself version of the pipe in the ceiling of the bath is not a fantasy and not a daunting task. This procedure is available to everyone and will not cause difficulties. The main thing is to comply with all norms and strictly follow the guidelines.
Safety regulations
In order for the bath to be comfortable and safe, and the heating device to work without interruption and not cause a fire or injury, the following safety rules should be followed when installing and operating the chimney:
- Sagging and warping of the elements of the flue system are not allowed.
- Pipe turns are allowed, but no more than three.
- The distance from the chimney to the walls must be at least 50 cm.
- All connections must be made in such a way that none is inside the wall, ceiling or in the place where the roof passes.
- The margin for thermal insulation in the ceiling and roof made of combustible materials is made at least 100 cm when installing a single-wall pipe, at least 20 cm when installing sandwich sections and 6 cm for a chimney or a combined chimney. For the passage of a non-combustible roof, a margin of 13 cm is enough.
- If the chimney is more than 1.2 m above the roof, it must be additionally secured with guy ropes.
- All connections must be reliable and tight. If a depressurization of the unit is detected, it should be repaired immediately. If smoke appears at the junction of pipes or shaft elements, the operation of the heater is stopped, and the joint is repaired.
- During operation, it is necessary to carry out preventive measures: cleaning the pipe from soot deposits, discharging condensate from the dropper. This will extend the service life of the chimney and the heater.
- When the draft decreases or overturns, as evidenced by the smoke of the steam room or boiler room, as well as sparks and hum in the firebox, it is necessary to clean the chimney.
- After a long break in using the bath, the chimney and the heating device may become clogged or airy. In this case, it will not be possible to heat the bath. It is better to inspect, repair and clean the chimney before starting the heat generator.
We recommend that you familiarize yourself: Choosing the best pipes for the heating system