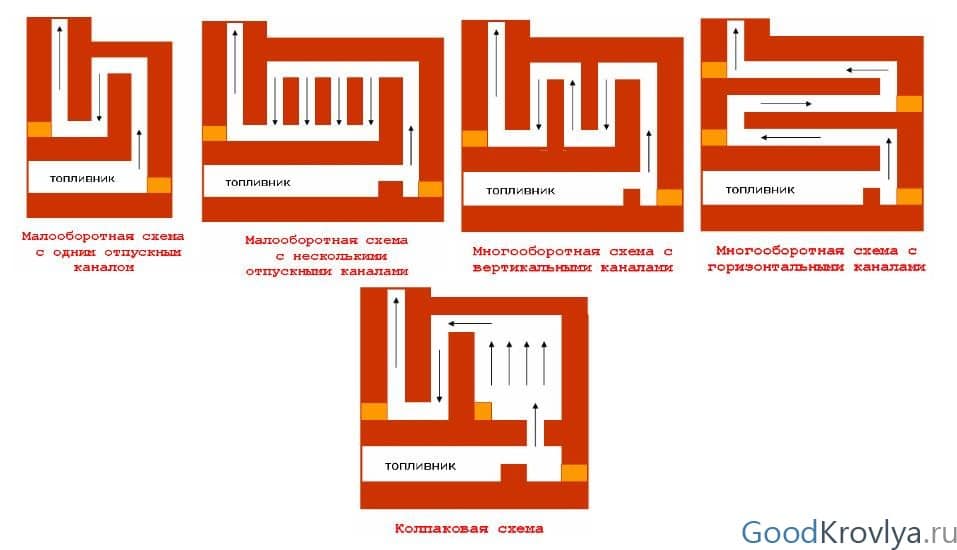
The legislative framework
To begin with, the chimney from the sauna stove heats up quite strongly. Especially if the stove is wood-burning. And since the ceiling in this structure is most often made of wood, there is a correspondingly high probability of its ignition on contact with the chimney. Of course, if the chimney is a brick structure, then the likelihood of a fire is reduced. But today, in the age of modern technologies and materials, sauna stoves are metal structures with metal chimneys. This means that the temperature of the metal shell is exactly the same as that of carbon monoxide gases passing through the chimney.
Therefore, there are several legislative acts, namely SNiPs, which clearly indicate what you need to pay attention to, and what points in the process of installing a chimney from a sauna stove must be taken into account in order to guarantee high fire safety of the facility.

SNiP 2.04.05-91: "Heating, ventilation and air conditioning" Source en.decorexpro.com
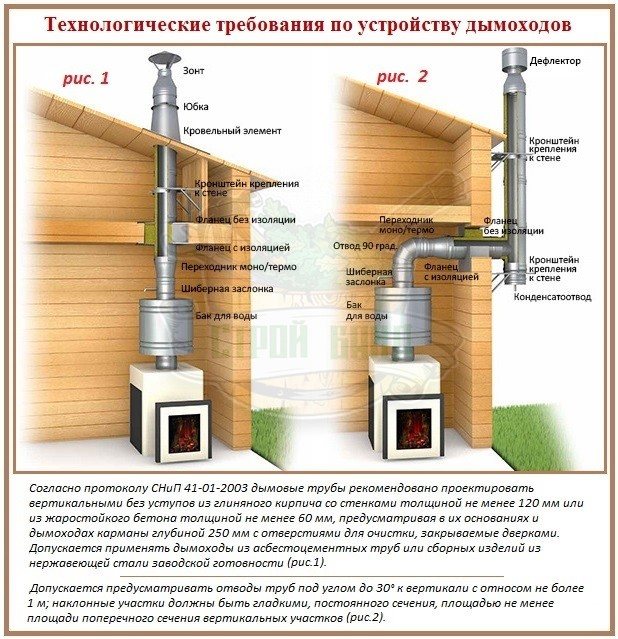
So, the main set of rules and regulations that are used in the process of installing a chimney in a bath is SNiP 2.04.05-91 called "Heating, Ventilation and Air Conditioning". In this code, namely in the section "Stove heating", which starts from position 3.62, it is clearly described what requirements are imposed on stove chimneys. We will not go deep into each paragraph of the document, we will simply designate those of them that relate to the topic of our article.
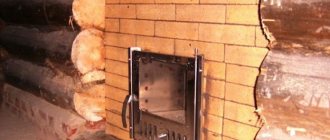
First of all, a few words about the stove itself. First, the temperature of its walls should not exceed + 120C. Secondly, if a fan is installed on the chimney, which provides the necessary indicator for removing carbon monoxide gases, in other words, an exhaust hood, then it will accordingly be necessary to provide an artificial flow of air from outside the room. Thirdly, the stoves must be installed only at the inner walls of the bath, which are erected from non-combustible materials, or the walls must be sheathed with non-combustible materials.
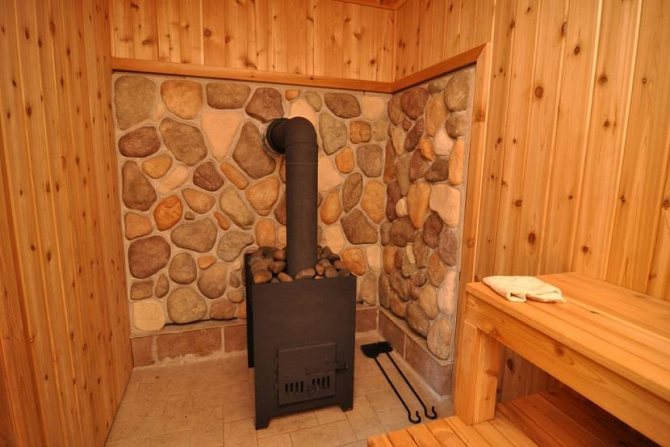
The stove in the bathhouse near the wall, which is sheathed with stone Source stroisovet.com
Now about the chimney.
- Her take out at least half a meter above the ridge
, or the same parameter is used above the plane of the flat roof of the bath. Special attention
pitched roofs
where the pipe can exit
anywherestingray
, not necessarily next to the skate. But the height of the outer part of the chimney is determined by the same parameter. - If a bath
- a structure that
attached to the mainhome
, or is
part
this house, then
chimney out
necessarily
above the ridge
the roof of the house by the same half a meter. - The brick chimney must be vertical
.
- Metal pipes can be partially laid at an angle
, but with the condition that the angle of inclination does not exceed 30 °, and the length of the inclined section does not exceed 1 m. In this case
inclined part
in the plan of the section should be exactly
same
like
vertical
... Plus, her
inner surfaces
must be
smooth
. - If a bath roof
covered
combustible
roofing materials, then the chimney must be installed
spark arrester
in the form of a metal lattice with cells no larger than 5x5 mm.

Spark arrester for chimney Source banyaprofi.ru
Our site presents the best 684 bath projects at a price of 66,000 rubles. And also you can get acquainted with the most popular models of other buildings - gazebos, garages - from construction companies presented at the exhibition of houses "Low-rise Country".
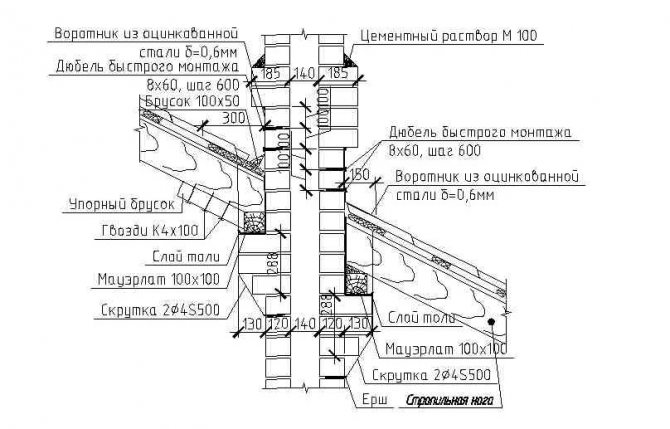
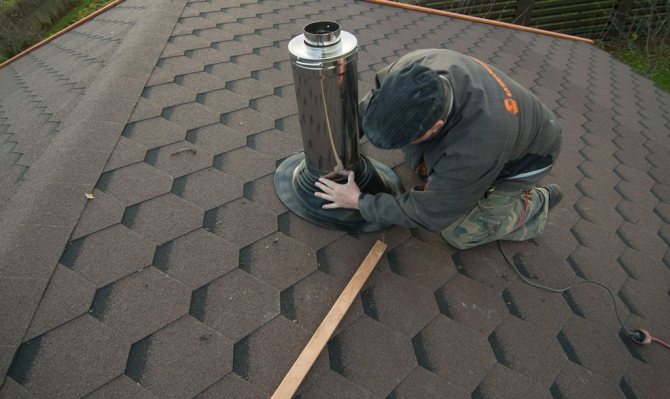
Now, what does SNiP say about the exit of the pipe from the bath to the roof.To begin with, a passage through a ceiling structure is called an opening. And the part of the pipe structure passing through the opening is cut. So the latter should be at least 70 mm more than the thickness of the opening along the length of the chimney on each side. That is, it turns out that the protective element that protects the opening from the pipe should protrude into the room and towards the attic at a minimum distance of 7 cm. This is done in order to ensure fire safety.
Further, with regard to the width of the opening relative to the section of the chimney. It should be noted here that in SNiP there is a reservation that this parameter should be sought in the recommendations from the manufacturer of the furnace equipment. And take it as a basis for installation work. But there is an appendix in the document numbered "16", which is designated as "mandatory". It indicates these ratios, which are often taken as a basis by many builders and installers.
The opening for the chimney must be wide in accordance with SNiP standards.
So in this appendix it is indicated that the distance from the chimney to the edge of the opening, not protected from fire, should be 0.5 m, and when protected from fire - 0.38 m.And this distance must be filled with non-combustible material. And one more important point. It is impossible to join parts of the chimney inside the opening. That is, the passage must be solid in order to avoid depressurization of the chimney during its operation.
So, everything is with SNiP. As you can see, in this legislative document everything is, in principle, laid out on the shelves. If you strictly follow these standards and requirements, you can guarantee the high quality of the final result. Now let's look at how to properly pass the chimney through the ceiling in the bath.
The most popular manufacturers and construction companies are gathered at the exhibition and presented on our website. Here you can find contacts, choose and order any service, including the installation of metal structures (sheds, greenhouses, etc.), roof repair, construction of fences and barriers. You can communicate directly with representatives by visiting the Low-Rise Country exhibition of houses.
Safety regulations
In order for the bath to be comfortable and safe, and the heating device to work without interruption and not cause a fire or injury, the following safety rules should be followed when installing and operating the chimney:
- Sagging and warping of the elements of the flue system are not allowed.
- Pipe turns are allowed, but no more than three.
- The distance from the chimney to the walls must be at least 50 cm.
- All connections must be made in such a way that none is inside the wall, ceiling or in the place where the roof passes.
- The margin for thermal insulation in the ceiling and roof made of combustible materials is made at least 100 cm when installing a single-wall pipe, at least 20 cm when installing sandwich sections and 6 cm for a chimney or a combined chimney. For the passage of a non-combustible roof, a margin of 13 cm is enough.
- If the chimney is more than 1.2 m above the roof, it must be additionally secured with guy ropes.
- All connections must be reliable and tight. If a depressurization of the unit is detected, it should be repaired immediately. If smoke appears at the junction of pipes or shaft elements, the operation of the heater is stopped, and the joint is repaired.
- During operation, it is necessary to carry out preventive measures: cleaning the pipe from soot deposits, discharging condensate from the dropper. This will extend the service life of the chimney and the heater.
- When the draft decreases or overturns, as evidenced by the smoke of the steam room or boiler room, as well as sparks and hum in the firebox, it is necessary to clean the chimney.
- After a long break in using the bath, the chimney and the heating device may become clogged or airy. In this case, it will not be possible to heat the bath. It is better to inspect, repair and clean the chimney before starting the heat generator.
We recommend that you familiarize yourself with: How to determine the required chimney height relative to the roof ridge?
Chimney laying through the ceiling
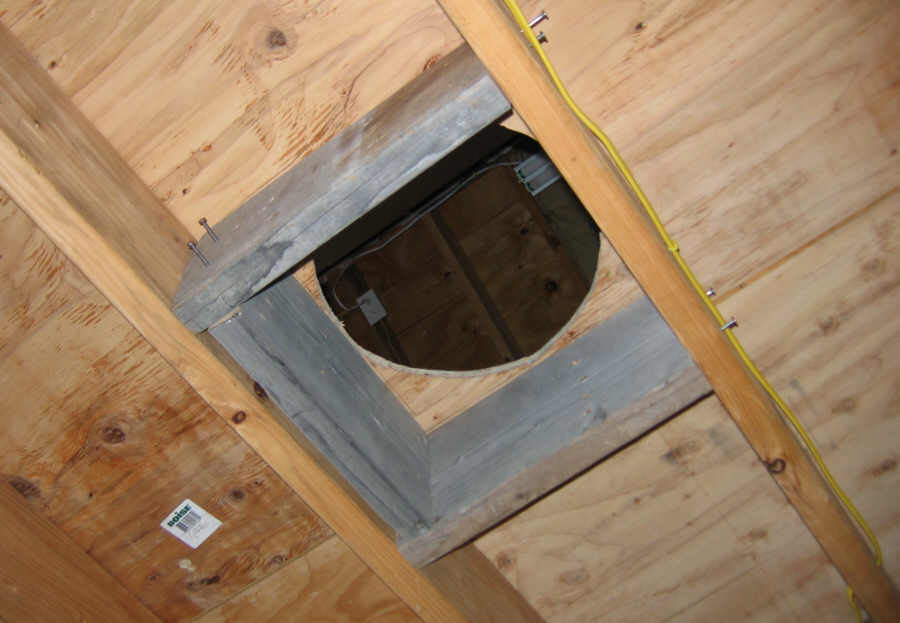
Usually, the opening in the ceiling is planned at the stage of drawing up the project. Therefore, a hole is left immediately in the ceiling: square or round. But sometimes you have to make a hole in an already constructed floor. How it can be done simply:
- Install the stove over
the place of its installation
. - Applied to the ceiling plumb line
so that
the tip of the load exactly matchedwith the center of the chimney of the sauna stove
. - A cross mark is made on the ceiling
.

To determine the location of the opening in the ceiling, use a conventional plumb line Source samibm.ru
- They make a small through hole
drill and drill.
- Then they move to attic
and hang the plumb line so that it
cargo
exactly
coincided
from
drilled hole
in the overlap. Put a mark on the roofing material. - Then you need to decide on size and shape
opening
... And apply them to the floor and roof using a pencil or marker. - Usually the floor material and the roof covering are cut jigsaw or hacksaw
.
So, the opening is ready, now it remains to do the cutting. There are many options, we suggest considering one of the simplest.
It could beinteresting!
In the article at the following link, read about the technology of building a flat roof bath, the nuances of the process and the materials used.
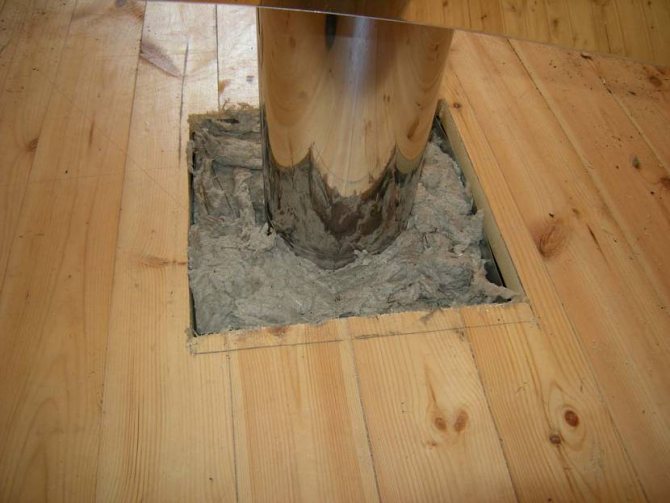
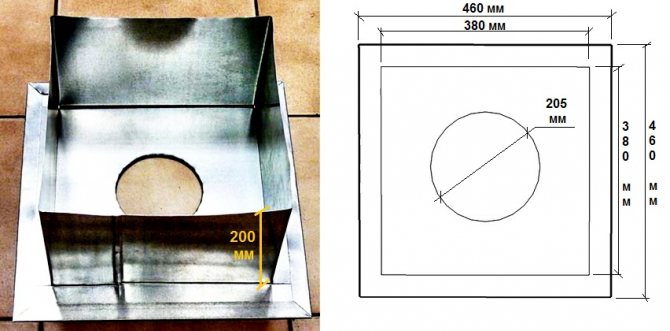
How to cut
To do this, you need a steel sheet, preferably galvanized. It is cut into two equal parts. The size of the parts should be 5 cm larger on each side in relation to the dimensions of the opening. The shape must match the shape of the opening. In each part, in the middle, a hole is made with a diameter equal to the diameter of the chimney. It should be added that the place where the chimney is installed does not always coincide with the center of the opening in the ceiling. Therefore, this must be taken into account when cutting a hole in the metal sheet. Pay attention to the photo below, where this situation is shown. This usually happens if the stove in the bath is installed in the corner of the room.
Chimney passage not through the center of the opening in the ceiling Source tulaxyq.qogilen.ru.net
One part of the steel sheet is put on the chimney, which is then installed on the sauna stove so that it passes through the opening. This part is attached to the ceiling in the bath with self-tapping screws. The main task is to close the free space of the opening.
Then, from the side of the attic, a non-combustible heat-insulating material is laid in the opening. It can be expanded clay, mineral wool slabs, asbestos and others. The main task of the contractor is to fill the entire space of the opening and cutting up to the upper plane of the bath overlap.
After that, a second part, cut from a steel sheet, is put on the pipe, and also installed on the ceiling, screwing to it with self-tapping screws. It is necessary to take into account the fact that the hole in the metal sections for the pipe must be at least 5 mm larger than the outer diameter of the chimney. This is also indicated in SNiP. The thing is that during the heating process, the metal pipe will expand, which means that a tight junction can lead to deformation of the entire structure.
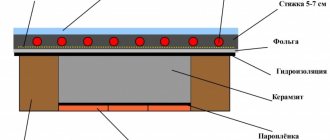
Principles of arrangement of roof passages
You should think about the method of removing the chimney from the bath during the design of the roof. A thorough study of the project and calculations are needed to exclude the emergence of impressive complications during the implementation of construction.The structures and functional units of the sauna building will have to work "in one team", therefore it is necessary to take into account their mutually directed influence. We must not forget that the truss system is built from sawn timber, and the wood is extremely negatively affected by the temperature inherent in chimneys during operation, and moisture that can penetrate through the gaps in the roof.
The chimney from the sauna stove can be led out through the load-bearing wall at an angle or installed inside the load-bearing interior partition. In the first case, the gas outflow rate will significantly decrease, which is undesirable for normal operation. In the second case, the budget for the construction of a foam concrete or brick building will noticeably increase, and for a structure made of timber or logs, it is simply unacceptable.
Passing through one of the slopes with the intersection of the roofing pie is the most common and technically sound option for a bath building, dictated by a number of convincing circumstances:
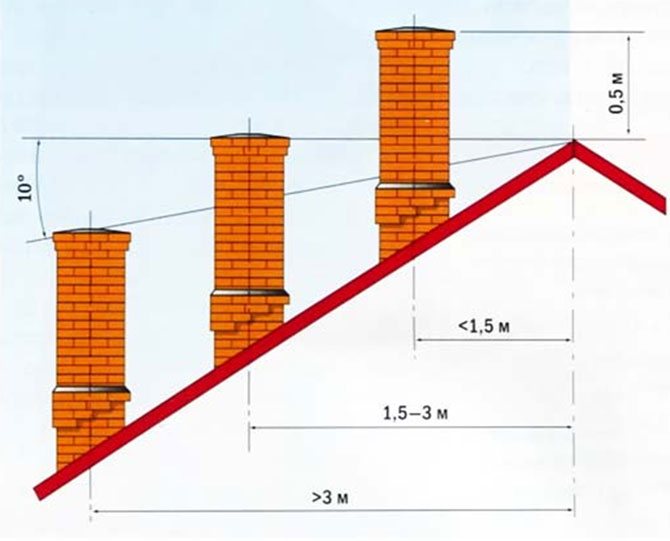
- According to the SNiP 41-01-2003 protocol, the priority is given to the strictly vertical direction of the chimney installation, which is necessary for quick and unimpeded removal of flue gases. It is allowed to connect pipes to the furnace at an angle of 30º if the length of the inclined section of the chimney duct does not exceed 1m.
- It is advisable to install the stove together with the chimney belonging to it in the center of the building so that one heating unit can handle several adjacent rooms. When the stove is located in the central part of the building, the vertically installed pipe will exit through the roof near the ridge.
- The height of the chimney, calculated from the level of the grate, must be more than 5m. If you bring it out to the side through the wall, then the pipe will turn out to be too high. A detached object of such a configuration will feel the beauty of the wind load with quite predictable consequences.
A pipe crossing the slope approximately in the area of the ridge is least affected by winds. Most of it is fenced off from atmospheric misfortunes, including rain and low temperatures. True, with a close approach to the ridge, the chimney will be the highest, which means it will be the most costly. After all, a pipe located at a distance of up to 1.5 m from the ridge will need to be brought out above the top of the roof by at least another 0.5 m.

But if we have not forgotten about the five-meter technical regulations for the length of the chimney, then the sum of the distance from the grate to the ceiling, the height of the attic space and the size of the segment taken out above the roof of the bath will roundly give just these same 5m.
The second weighty minus is that the passage through the roof for the chimney violates the integrity of the ceiling along with the roofing cake. In case of improper arrangement, the formed hole will freely pass water inside and remove heat from the bath outside. In addition, penetration complicates the installation of both piece and large-sheet coatings, although special shaped elements are now produced for almost all of their types, designed for the design and sealing of chimneys.
Chimneys for baths, as well as for other operated buildings, are constructed of non-combustible materials. Traditionally, they are erected from bricks with an inner liner of a single-wall metal pipe or assembled from prefabricated sandwich-type modules. The sandwich chimney module consists of two pipes of different diameters, the smaller of which is embedded in the larger. A layer of non-combustible thermal insulation is laid between the pipe walls, which excludes overheating of the chimney and prevents heat loss.
Despite the relatively low temperature of the gases in the exhaust pipe and the use of non-combustible materials in the device of chimneys, their direct contact with flammable elements is strictly prohibited.Between the surface of structures and the walls of the chimneys, an indent must be observed - the distance, the value of which depends on the flammability and non-flammability of the material.
The amount of deviation from the outer surface of the brick chimney is regulated by SNiP 41-01-2003. He also stipulated a limit: the distance between the outer wall of the pipe and the element located opposite should be at least 7 cm more than the thickness of the structure to be crossed. How much you need to retreat when installing a sandwich pipe is specified in the manufacturer's instructions.
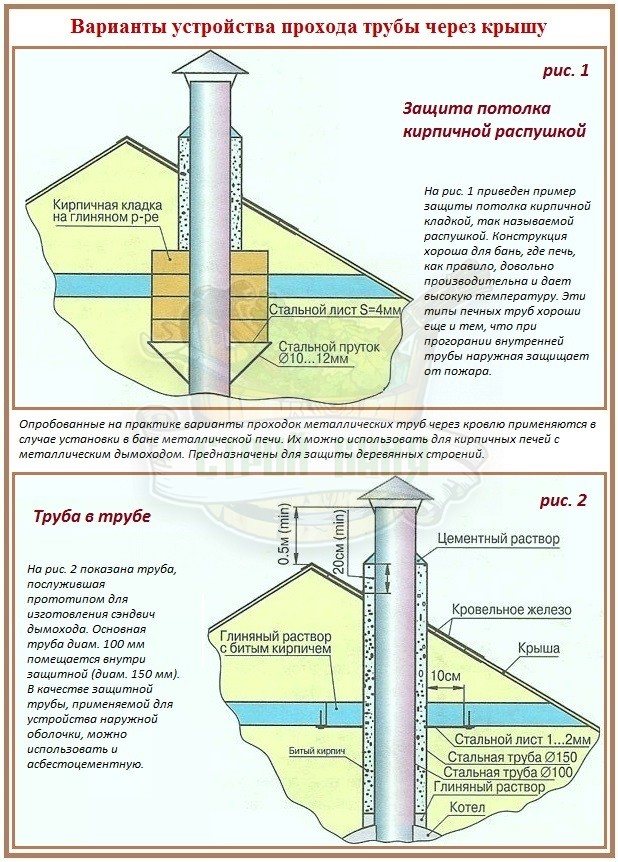
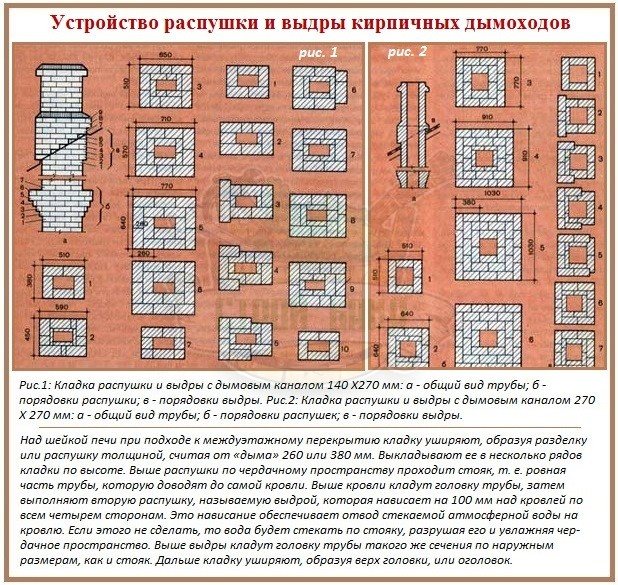
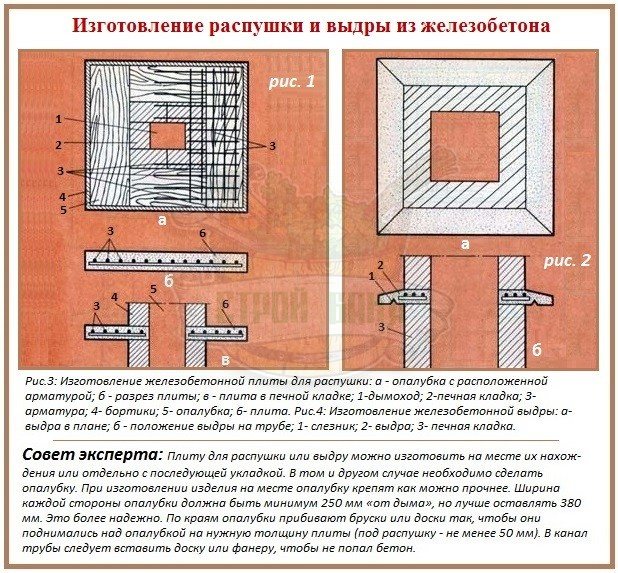
The space between the pipe crossed by insulated ceilings and roofs is filled with non-combustible thermal insulation: mineral wool or glass wool. The area adjacent to the sandwich pipe is made out with home-made or factory boxes made of non-combustible materials. A thickening is constructed around the brick pipe - the so-called fluff. It is laid out of brick or arranged from a small reinforced concrete slab, poured into a specially made formwork according to the dimensions of a particular penetration.
If the chimney is installed in a bathhouse under construction, it is necessary to take into account the difference in the shrinkage of the materials of the walls and pipes. There should be no rigid connection between pipes and crossed structures. The gap for the possibility of independent movement must remain between the sandwich-type pipe and the box, fixed to the ceiling. In the brick version, the fluff is part of the chimney. Therefore, a gap is left between it and the ends of the penetration.
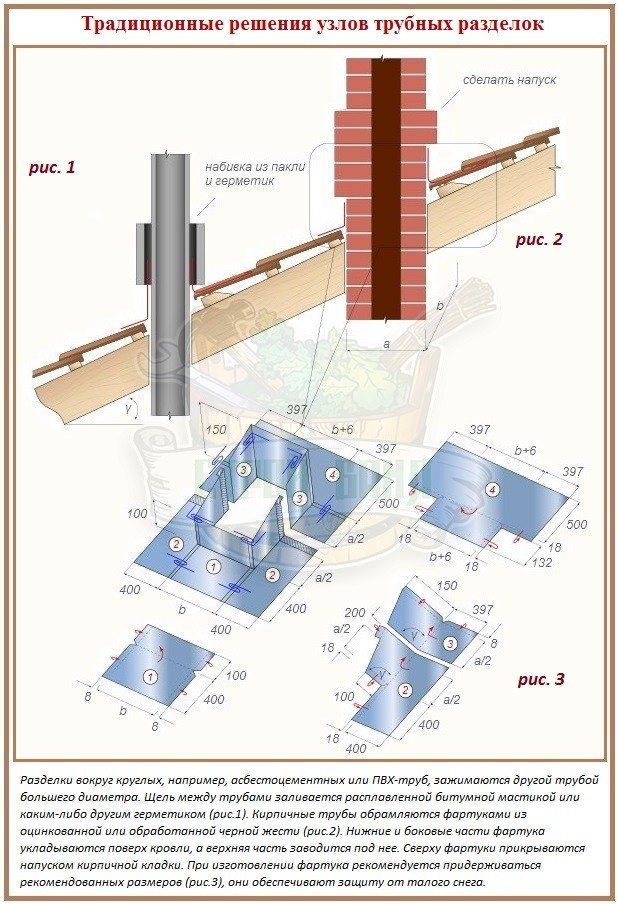
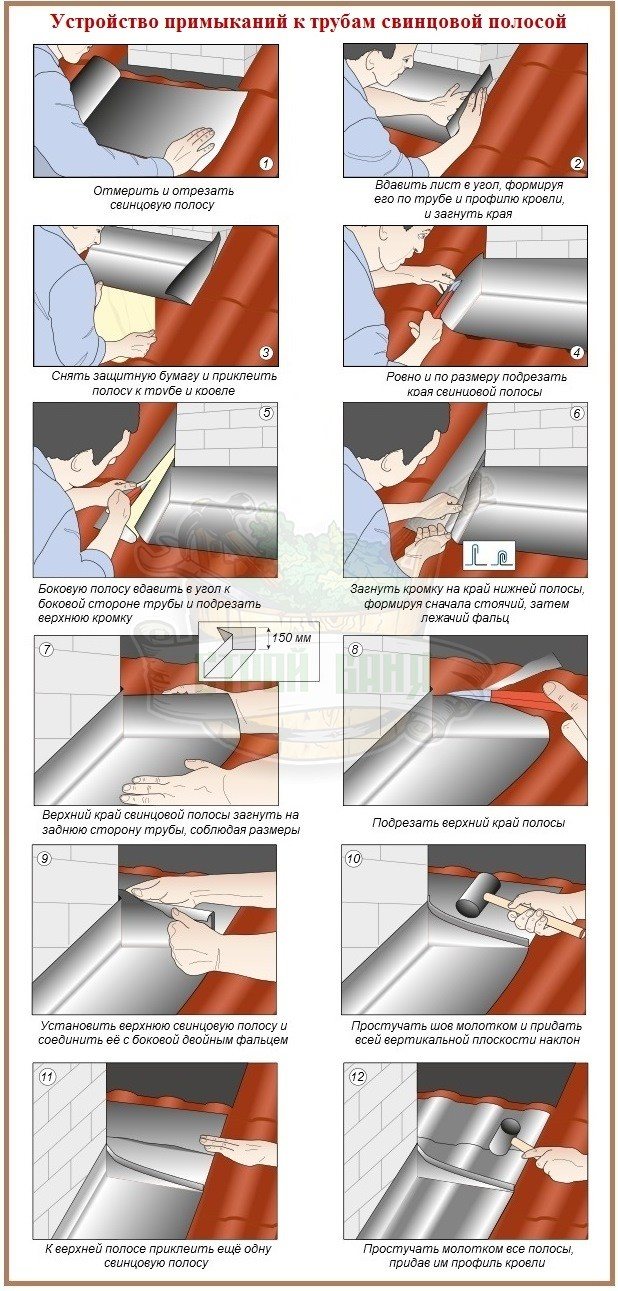
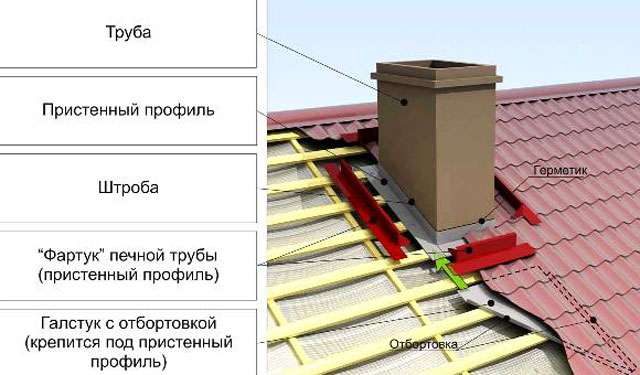
The method of arranging the passage of the pipe from the side of the street is determined by the type of chimney:
- For framing brick pipes, metal aprons are used, parts of which are connected with a recumbent fold. The apron components are cut from black or galvanized sheet metal. The upper part of the tin frame fits over the vertical walls of the pipe, the lower one rests on the roof slope. The back part of the apron is wound under the cover. The side pieces and the front element are placed on top to prevent dripping rain and melt water from entering the roofing cake and into the rooms. The upper edge of the apron is wound into a stripe selected in the brickwork, then filled with a sealing agent.
- For framing round pipes, for example, ceramic or asbestos-cement, a pipe of a larger diameter is installed in the cutting area. The gap between it and the chimney is filled with an elastic sealant or molten bitumen mastic. Before pouring the sealing compound into the gap of impressive size, it is necessary to mint with linen tow, rope or similar material, previously impregnated with bitumen or oil paint. A sealant or cement-sand mixture is poured over the gap filled with tow.
Note that when arranging a brick chimney for attaching the apron, you cannot lay wooden plugs. And it is also forbidden to grind in the seams of the masonry - only in the brick.
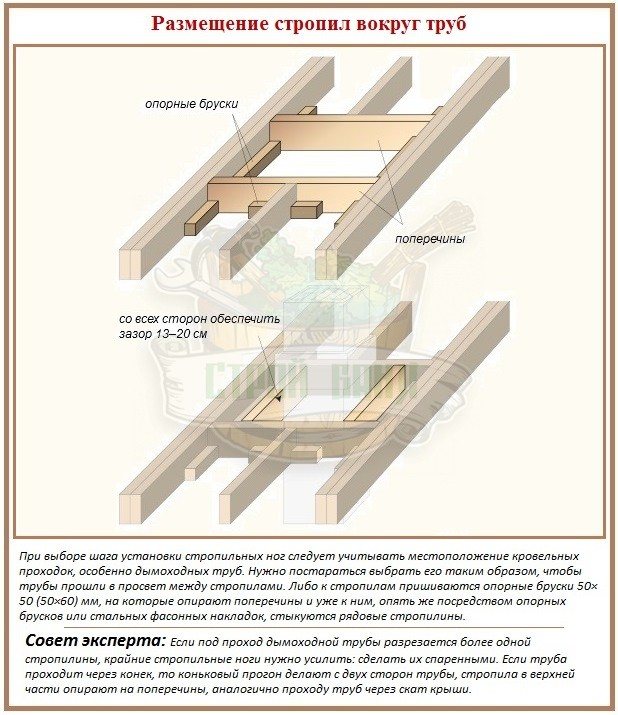
The need to retreat from the intersected structures is taken into account when designing a combustible floor and rafter system. The step of their installation should be calculated so that the pipe passes into the gap between the beams and the rafters.
If this is not achieved, the wooden elements in the driving zone are cut. To do this, first, support bars 50 × 60 or 50 × 50mm are sewn to the adjacent rafters. With their help, the crossbars are fixed, to which parts of the cut rafter leg are attached with corners or similar support bars.
It is recommended to strengthen the neighboring rafters by sewing on an additional board, which should be done especially if more than one rafter leg has to be cut.
Adjoining a brick pipe
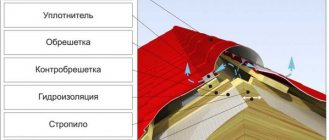
The tightness of the chimney penetration depends on the quality of the roofing joints. It is necessary to reliably protect both insulated and cold structures from atmospheric water, dust, heat loss.In a well-prepared node of the chimney passage through the roof, there should be no flammable materials such as polyethylene film. It is undesirable to find slowly fading and melting materials there.
Standard ways of organizing the passage
The vapor barrier must be cut in advance with an envelope over the penetration. Its edges must be attached with a stapler to the nearby elements of the rafter system. A continuous lathing is arranged around the roof passages and an additional waterproofing carpet is laid. A water-repellent carpet is similarly cut by an envelope. Then about 10 cm are laid around the perimeter of the holes to put them on the vertical walls of the pipe. The excess is cut off.
When laying almost all types of roofing, pipe cuts are performed according to similar patterns. Around the chimney, a gap of 2-3 cm must be left for free movement of structures during shrinkage. In addition to the aforementioned classics with a galvanized metal apron, the following can now be used in the arrangement of adjacencies:
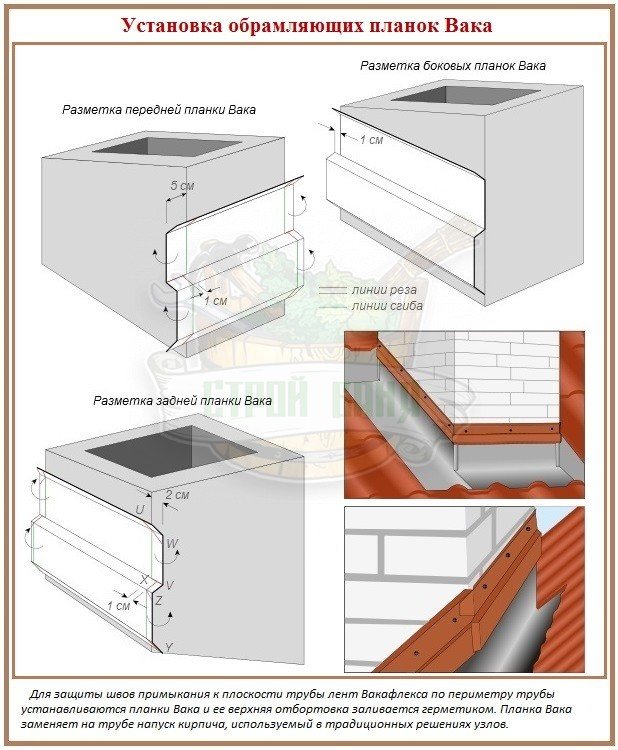
- Self-adhesive tapes with the Wacaflex trademark paired with Vaka strips.
- Self-adhesive lead strips.
- Complementary parts produced specifically for a specific brand of roofing.
An exception is bituminous shingles, when using which it is allowed to make an apron not from roofing steel, but from a waterproofing carpet. It can be banally glued to the walls of the chimney with mastic. Before laying the flexible piece coating, a plinth or a triangular strip in the cut is installed around the pipe to ensure water drainage. Then the components of the apron are mounted or glued.
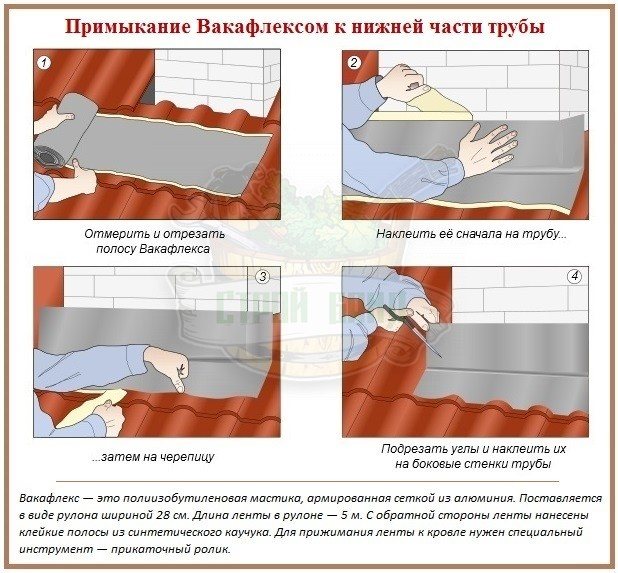
Self-adhesive tape with strips
The Wacaflex waterproofing agent is a polymer mastic reinforced with an aluminum mesh. Supplied as a 28cm wide tape with adhesive stripes on the back. To prevent the material from sticking together ahead of time, its rear is covered with a protective film. The tape is glued to the coating by rolling it with a roller.
The procedure for gluing the waterproofing tape is carried out in the following order:
- We cut the strip to the size of the pipe with 5 cm overlaps on both sides.
- Bend the cut piece along the long side so that you get something like a metal corner with the top shelf width 15-16 cm.
- We apply our "corner" to the bottom wall of the pipe with a wide part.
- Carefully remove the protective film and roll the tape with a roller to the adjacent surfaces of the pipe and coating, without gluing the gaps.
- By stretching the material, we achieve a snug fit to the profile surfaces, if any.
- We cut the gaps at 45º, not reaching the intersection of the pipe line and the slope approximately 1 cm.
- The remaining pieces of material on the sides are brought onto the adjacent walls of the pipe and rolled in.
- For actual fitting, we will attach a roll of tape to the bottom edge of the already glued strip.
- The part of the “corner” glued to the ramp is about 10-12cm. The lateral part of the junction should be lengthened by that much cm. The resulting size is identical parts.
- We make a "corner" from both parts. Empirically, we select the size of the shelves. It is desirable that the edges of the lower and side parts of the framing at the docking points are practically at the same level.
- A rectangle was cut from the bottom side for gluing over the existing strip.
- For attachment to the upper wall, the pipes were cut in the same way as in the case of fixing the edges of the first strip.
- They tried it on, adjusted it, stretched it out, rolled it on, glued it on.
- We try on the back strip in place, glue it and put it under the cover.
On top of the glued waterproofing, strips are installed, the upper side of which, after installation, is filled with a sealing compound. It is mounted according to an equivalent scheme.First, the lower part is cut out and fastened with overlaps of 5 cm on each side, then the side ones, and finally the upper one. Only for letting the upper and side elements leave 1-2 cm. The slats are cut out according to the results of the actual fitting, fastened with screws to the walls of the chimney.
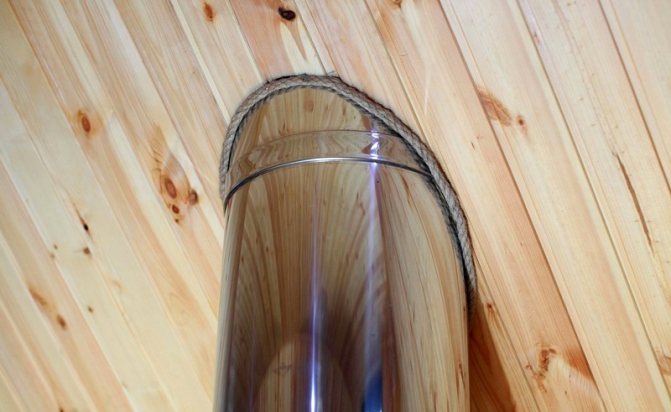
Lead strip framing
After installing the chimney through the roof, the lead strip should be glued onto a dry surface, free from dust and technical contaminants. In wet weather, primer should be applied to the substrate before working to optimize adhesion. When the thermometer reads below + 8 ° C, lead strips are not used. Lead framing is not an elastic material. Therefore, it only needs to be attached to one of the adjacent surfaces in case of shrinkage.
Algorithm for pasting with a lead strip:
- We cut out the lower part of the lead frame with a minimum overlap of 10 cm from both edges.
- Without removing the protective film from the rear, we apply the cut strip to the pipe so that about 10 cm falls on the vertical wall.
- We profile the strip, trying to completely repeat the surface located under it. We perform profiling, moving from the central part to the periphery.
- We remove the film from the back side, put the apron piece in place and, gently pressing, glue the lead strip to the area where the roof meets the pipe.
- We draw a line for trimming the excess of the glued sheet. We retreat 3cm from the upper edge and draw a line to the point of intersection with the pipe.
- We cut along the drawn line and glue it.
- We cut out the side sheets. We apply the strip to the pipe from the side so that the end cut line of the material coincides with the lower edge of the glued part. On the opposite edge, the strip to be cut should be 15 cm longer than the pipe.
- According to the marked fitting results, we cut out two symmetrical side parts. We apply them one by one to the installation site, taking into account that it is advisable to arrange the upper edges of the parts at the corners of the pipe at the same level. We profile, remove the film from the rear, glue.
- We bend the protruding parts of the side strips, forming recumbent folds from them.
- We fold the upper edge of each side piece with a fold and put it behind the upper wall of the pipe.
- Trim the top edge of the side piece at an angle. Let's retreat from the edge of the upper edge 3-5 cm, draw a line from them until it intersects with the pipe.
- We cut out the back strip, taking into account the fact that its edges must overlap the side parts. On the vertical wall of the pipe, the upper part should go 15 cm. And another 2 cm must be left to form a seam seam. We profile the part by separating the film and glue it.
- We go around the protruding parts of the side stripes with the upper edge of the back part according to the principle of creating a recumbent fold. Let's knock on the seam with a mallet for beauty and reliability.
- We will strengthen the upper part of the lead apron by gluing another strip on it, from each edge of which we add a 5 cm overlap for a strong attachment to the roof.
The fastening of the protective apron made of lead strip, if necessary, can be reinforced with galvanized self-tapping screws.
Video description
The video shows how to make the passage of the chimney in the bath through the ceiling:
It could beinteresting!
In the article at the following link, read about how to choose the right bathhouse: the main assessment criteria when building a building on a suburban area.
Ready cuts
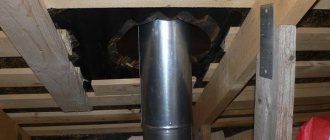
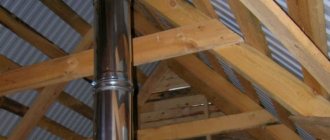
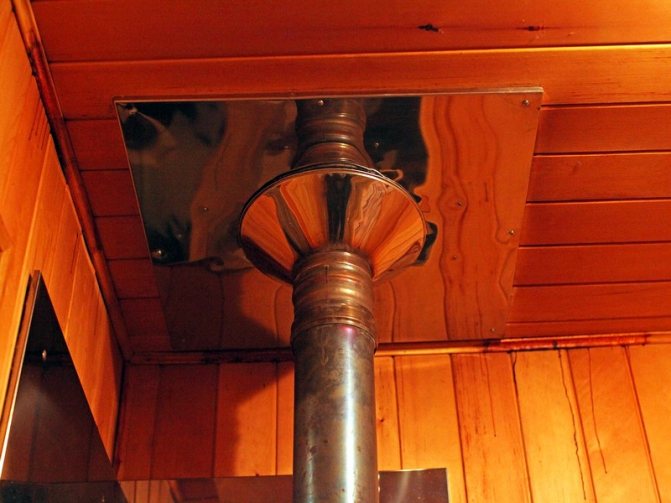
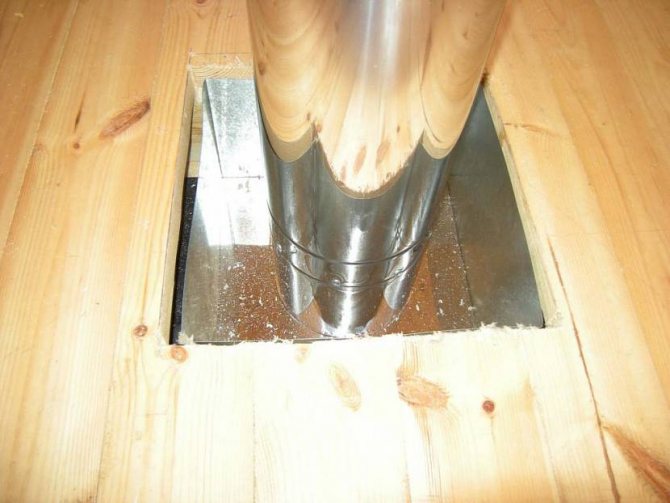
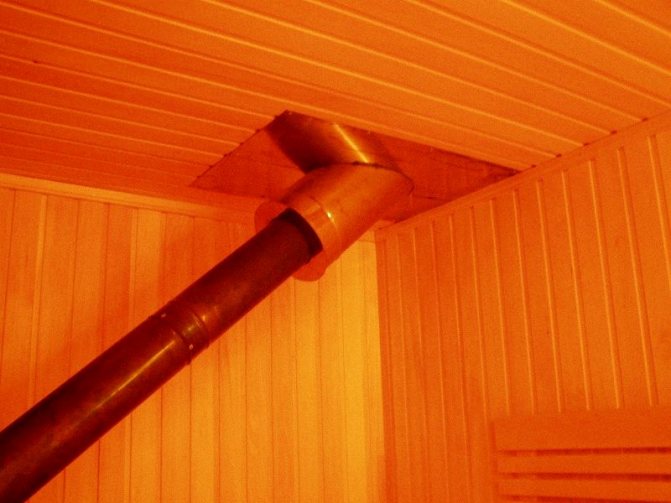
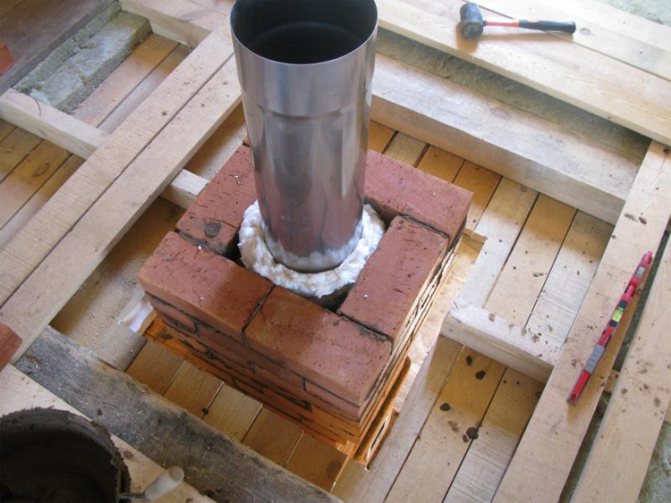
We must pay tribute to the manufacturers who offer sauna stoves and chimneys for them today, in which safe operation measures have already been taken into account. These are the so-called sandwich pipes. That is, this is a structure that is a pipe in a pipe, and a heat-insulating material is laid between them. Usually mineral wool or polyurethane.
That is, the stove chimney itself is of two types of pipes: single and sandwich.The first is installed in the bathhouse, the second is laid through the ceiling opening, a cold attic room with access to the street, that is, through the roofing material. In this way, two tasks are solved at once:
- Overlap protection against
heating
. - Protection from condensation
inside the chimney, which negatively affects the metal due to the formation of foci of corrosion.
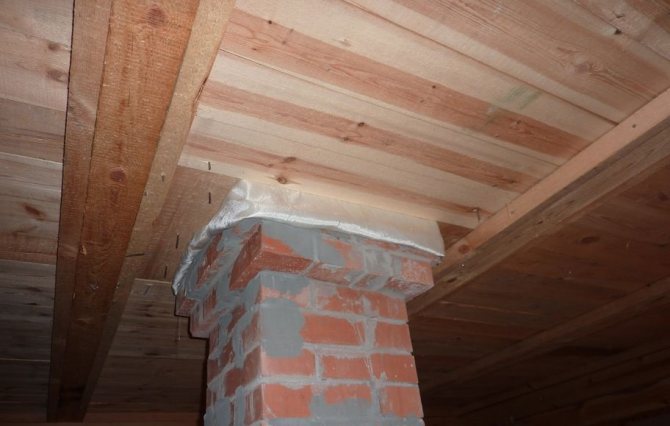
The photo below shows just this type of chimney, which is laid through the floor structure in the bath.
Sandwich chimney passing through the ceiling Source stroyfora.ru
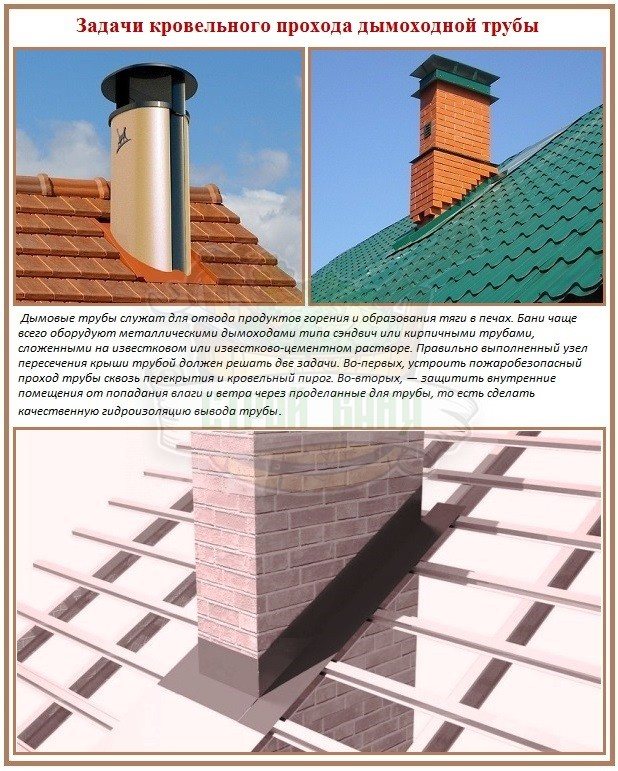
Now about the exit of the chimney in the bath through the roof.
It could beinteresting!
In the article at the following link, read about when you need a 2-storey house, the pros and cons of the second floor, purpose and operation.
How to pass a pipe through roofing material
More recently, this was associated with the use of concrete mortars, which filled the free space between the chimney and the roofing. Thus, an airtight layer was created, and the issue of fixing the pipe was solved. Today no one uses these methods anymore.
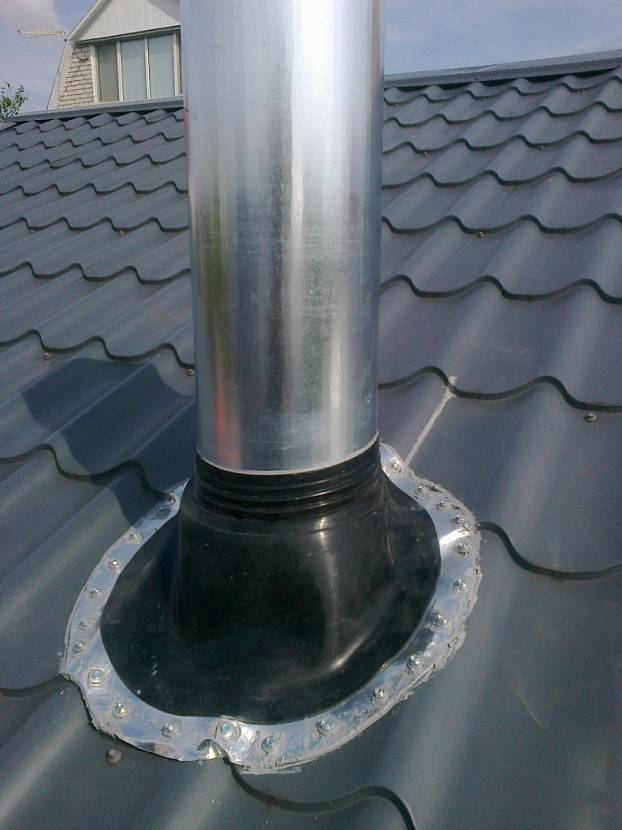
The best option is to install special hoods on the roof, made of heat-resistant flexible and resilient plastic. This device is put on a chimney sticking out of the roof structure and fixed to the roof with self-tapping screws. In the construction of the hood there are fields with which it is pressed against the roofing material, creating an airtight abutment. It is in the fields that fasteners are screwed, for which mounting holes are made in the factory.
Passage under the chimney through the roof in the form of a plastic cap Source snd-line.kiev.ua
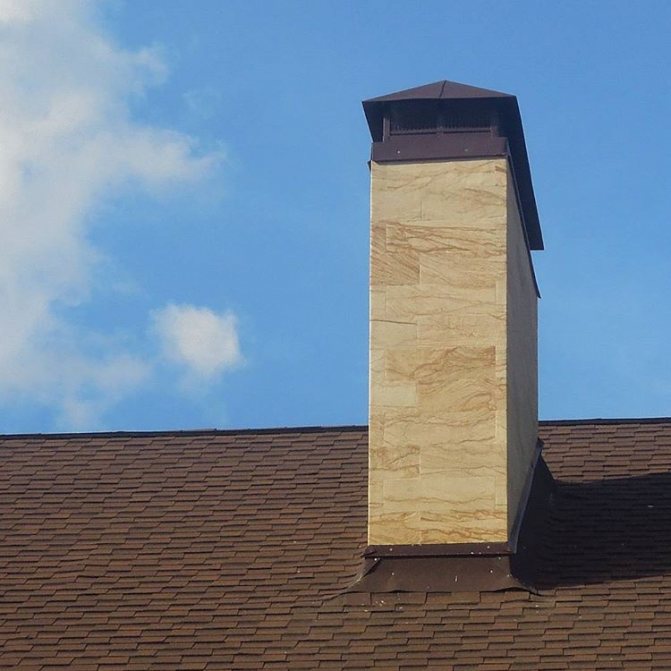
If the roof is covered with a flat roofing material, for example, bituminous shingles, then a passage through its structure can be made, as in the formation of an opening through the ceiling. Only the upper part of the metal protection should be a hood, so that atmospheric precipitation does not cause leaks through the roof. In the photo below, this variant of the formation of the passage is very clearly visible.
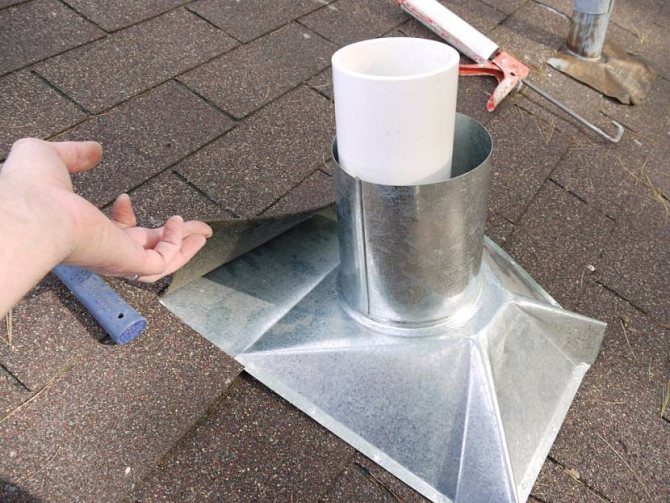
Closing the chimney passage through the roof with a metal cap Source plotnikov-pub.ru
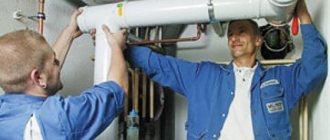
In fact, the process of installing a chimney through the roof of a bath is not an easy process. Don't try to deal with it yourself. This will not lead to anything good. It is better to pay a foreman who has been doing this type of work for a long time to ensure the guaranteed high quality.
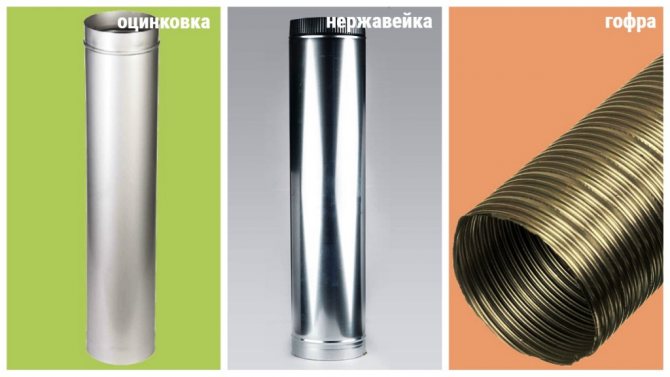
Chimney types
Smoke exhaust structures, both external and internal, can be made of various materials and their combinations:
- Single-circuit chimney. Use steel galvanized or stainless steel pipes, less often - asbestos-cement. This type of chimney is mounted only inside the bath, since the chimney without insulation and an external casing on the street quickly cools down, becomes overgrown with soot deposits and cannot maintain good draft. Especially a lot of soot is deposited on asbestos-cement pipes. At the same time, an additional foundation is not needed for a single-circuit chimney, and its construction will not require high costs either for consumables or for installation.

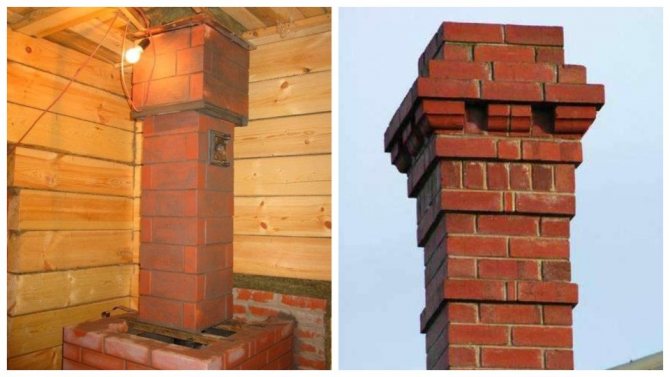
- Brick smoke mine. A cheap and very popular type of chimney. The brick heats up and gives off heat to the room for a long time, while its surface is more reliable in terms of fire safety. However, the construction of a brick structure is a full-fledged construction work that requires certain skills and significant time and labor costs. The structure turns out to be cumbersome and heavy, therefore, a foundation is required for it. In addition, condensate settles on the rough inner surface of the shaft, destroying the masonry, and soot forms, which is why the chimney has to be frequently cleaned.
- Chimney sandwich. You can buy a set of ready-made sections for assembling a chimney, each section consists of two pipes and a non-combustible thermal insulation layer. The pipes can be made of galvanized steel, stainless steel or heat-resistant ceramics. Installation resembles the assembly of a designer and does not take much time, and the finished chimney is less dangerous than a single-circuit one, although it can also be used as a heat source. Due to the insulation, the smoke inside the chimney cools down more slowly, soot and condensate settle less on the walls, so the chimney provides good draft and needs less cleaning.
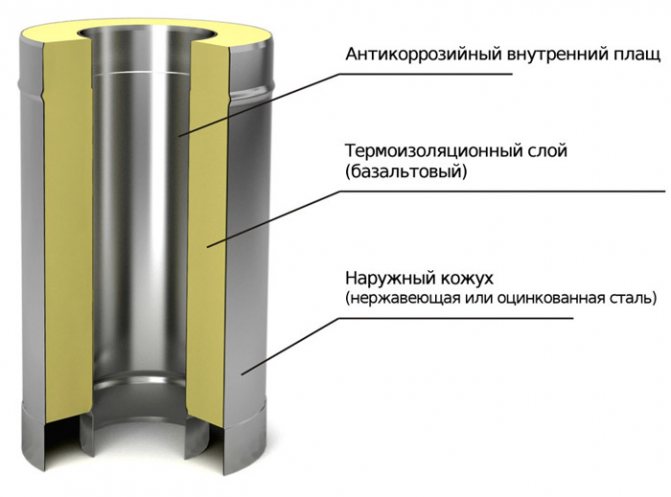
Note! Steel sandwich pipes are lightweight and do not need foundation equipment. However, a sandwich that combines an outer steel casing with an inner ceramic pipe is much heavier and the chimney from such sections cannot be erected without a foundation.
- Combined chimney. Such a smoke exhaust system requires financial and time costs, but combines all the advantages of other types of chimneys. A smooth steel or ceramic pipe is used as a smoke channel, and the outer shaft is built of brick, foam or expanded clay concrete. A non-combustible insulation is placed between the shaft and the smoke channel. Such a chimney is efficient, safe, unpretentious in operation and durable.
We recommend that you familiarize yourself with: Fasteners for fixing the underfloor heating pipe
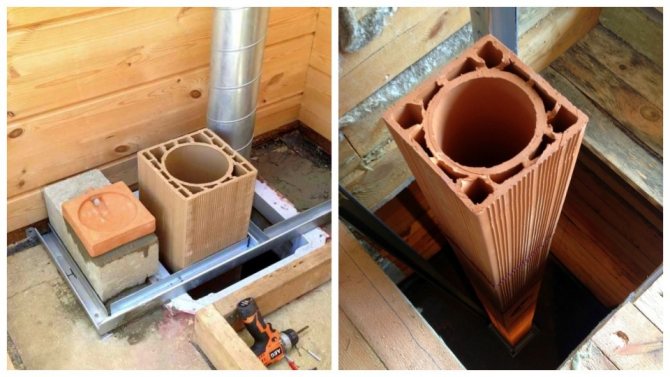
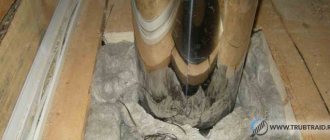
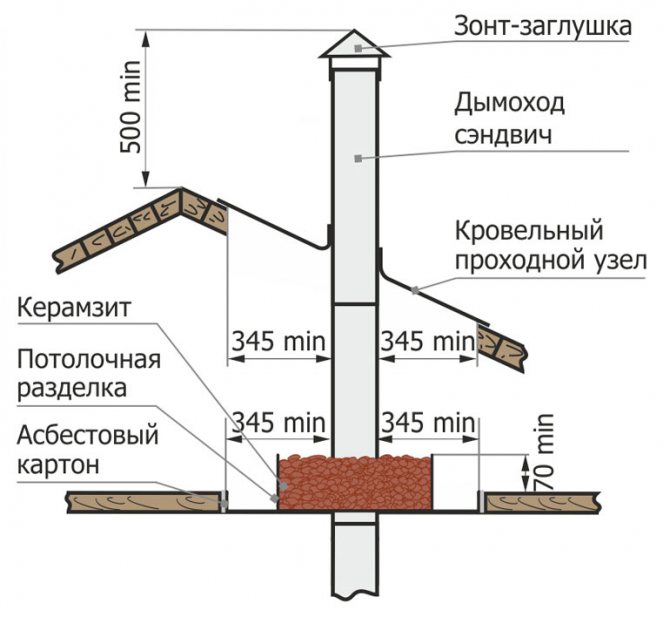
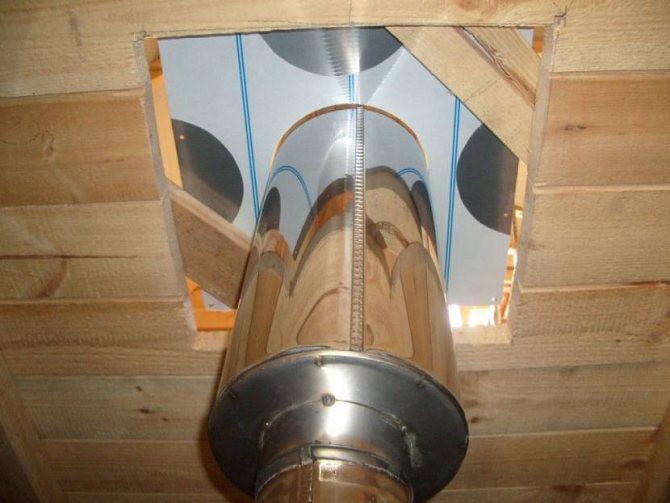
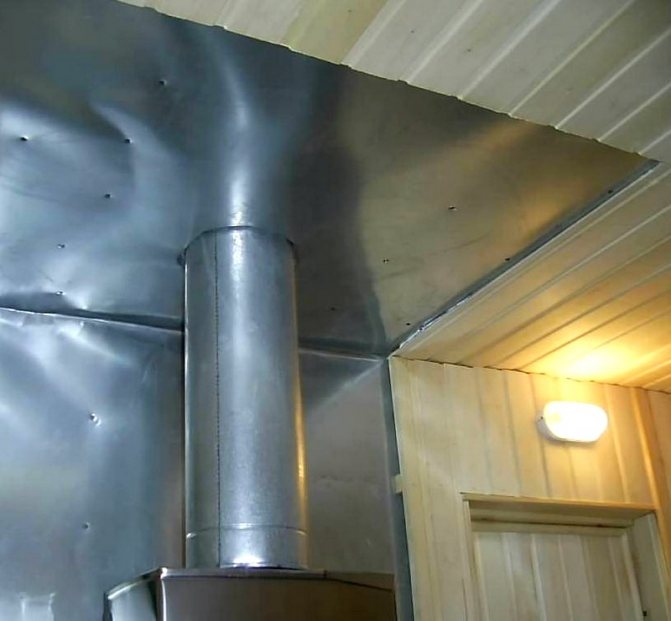
Roof penetration sandwich chimney
In principle, the diagram of the arrangement of the roof penetration of a sandwich-type pipe is not much different from the cases described above. When making indents and adjacencies, the requirements of SNiP 41-01-2003 should also be observed. Let us analyze the case, standard for a bath, with the intersection of the attic floor and the slope by the chimney.
The penetration of a sandwich pipe through the thickness of the attic floor is most reasonable and easiest to accomplish with the help of PPU - a prefabricated ceiling-walk-through unit. The walls and surfaces of the finished product are made of minerite or galvanized steel. In order to save money and, if you wish, to show your own abilities, you can make a similar metal box yourself. The task of the PU foam is to fill the space around the pipe, which must not only be filled, but also ensure proper thermal insulation.
The finished factory assembly is attached to the end cuts of the penetration. Before fastening, the surfaces to be in contact with the box are first bordered with basalt cardboard. Then basalt wool or a similar non-combustible insulation is laid along the contour.
The space between the chimney and the wall of the box turned towards it is also filled with basalt wool, and an air gap is left between this wall and the insulation outside to improve insulation. Below, from the side of the bath rooms, the penetration is closed with a box-shaped casing made of galvanized or stainless steel. For the final design, a steel sheet is first mounted from the attic side, then a casing.
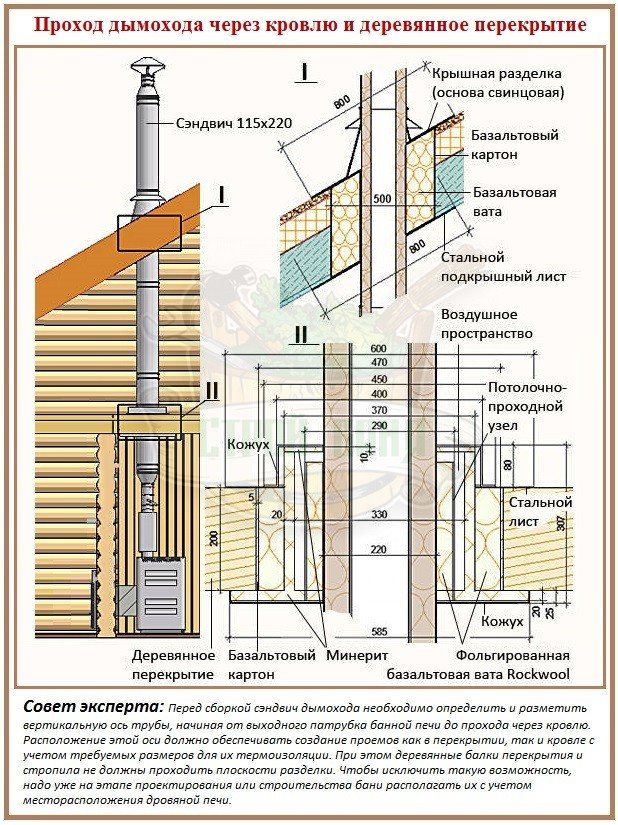
Arrangement of the passage through the slope from the side of the bath is carried out using a metal under-roof sheet with an oval hole. It is fastened with self-tapping screws to the elements of the rafter system. Before installing the sheets, basalt cardboard and cotton wool are laid in the cut-out opening. The free space is filled with non-combustible thermal insulation. A lead roof cut is installed on top. It is adjusted to the roof surface by tapping with a mallet.
Features of the passage for a brick chimney
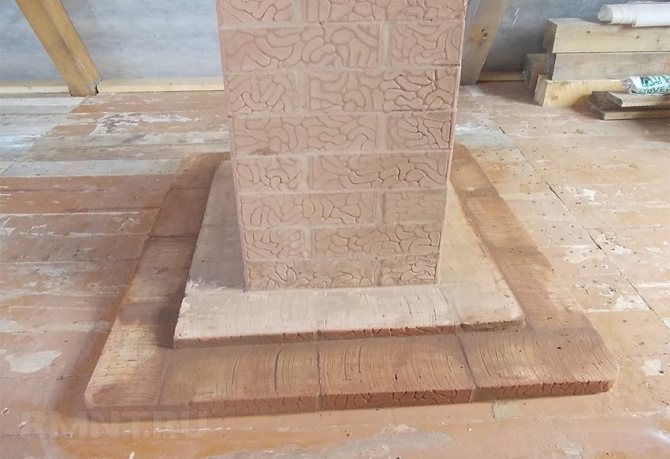
Among the materials that can keep the temperature for a long time, maintaining a comfortable microclimate in the room, brick rightly occupies one of the leading positions. When it is necessary to properly equip a pipe passage for a brick oven, the main thing to focus on is the device of a special penetration for thickening the chimney wall in the zone of contact with the ceiling.
If it is not possible to make a penetration, then a hole with a diameter slightly larger than the diameter of the chimney is prepared in the surface of the ceiling base, then following the previously described algorithm for installing a round furnace through the ceiling:
- arrange protection for the edge of metal strips or minerite;
- sheathe the entrance from the side of the dwelling with a metal sheet;
- fill the voids in the attic or second floor area with heat-insulating material that is resistant to high temperatures;
- mask the cutting from the attic or second floor with a metal sheet.
With such a scheme of the passage device, you can be sure that the brick pipe is reliably insulated and retained the aesthetic component.
Installation of a finished chimney for a bath
Naturally, there are also ready-made chimneys. They are easier to install and take much less time. In this case, it is also important to do everything as correctly and efficiently as possible, especially you should be careful if you do all the work without anyone's help.
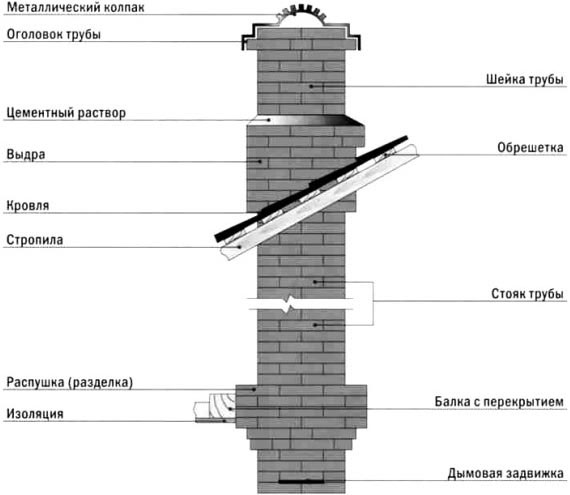
Whatever the chimney, its installation is carried out so that it protrudes beyond the building by exactly half a meter.
At the junction of the roof and the pipe, you will need to make an "otter", thanks to which precipitation will not get inside.
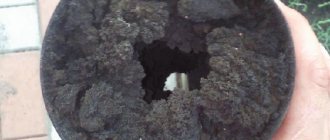
It is worth noting that the appearance of soot on the walls after a while indicates a poor installation of the chimney.