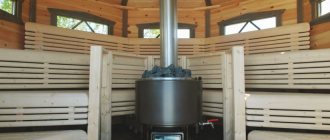
Correct chimney operation
All chimneys for stoves in saunas operate on natural draft. It is created by the difference in temperature and pressure inside and outside the chimney. A well-functioning chimney with a correctly calculated flow capacity effectively removes products of complete and incomplete combustion. In addition, it creates a vacuum in the combustion chamber of the furnace, due to which the air necessary for combustion is supplied to it.
A correct chimney in a bath with a stable draft must meet the following conditions:
- The temperature in the chimney is always higher than the outside temperature. The walls must be sealed, and the material must prevent heat exchange with the outside air. Thermal insulation is required for the part of the chimney that runs down the street.
- The head does not fall into the wind support zone. The total height of the chimney should be at least 5 m. At a distance of up to 1.5 m from the ridge of the roof, the chimney should be 500 mm higher, from 1.5 to 3 m - be level. If the distance is more than 3 m, the head is raised to a straight line drawn at an angle of 10 ° from the ridge. When determining the height of the pipe, other obstacles must also be taken into account: trees and high-rise buildings that are within sight. Backwater does not always arise, but only at certain speeds and directions of the wind. If you are installing a chimney in a bathhouse with your own hands, study this issue in more detail or entrust the calculation of the pipe height to specialists.
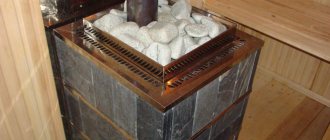
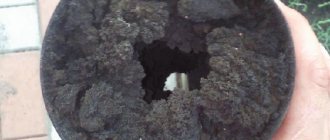
- There are no deposits on the inner walls. The chimney design should be as simple as possible. Any turn or bend is a place where soot will be deposited. It is necessary to provide for the possibility of cleaning the chimney. Usually, corner pipe fittings are made in the form of a tee with a plug, which is removed to gain access to the interior of the chimney. To prevent street debris and precipitation from entering the chimney, its head is protected with a metal cap. The inner surface of the pipe should be as smooth as possible.
The amount and composition of deposits inside the chimney depends not only on its design, but also on the quality of the fuel and the operating modes of the furnace.
Determining the cross section of the chimney is much easier than the height. The ideal shape of the section from the point of view of aerodynamics is round, it is easier for gases to escape through it.
Internal or external - which is better?
Everyone knows that the chimney is one of the most important parts of the heating system. This means that the choice of it should be approached especially carefully. After all, it will ensure the reliable operation of the equipment, without endangering people.
The classification of chimneys is carried out according to various criteria. We will consider one - by the way the system is installed, there are:
- Internal
- External
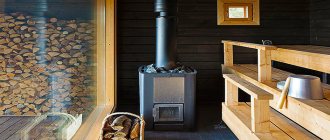
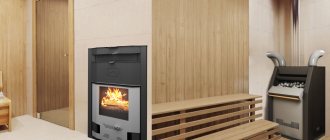
Let's consider in detail the advantages of each type. Internal - considered a classic model.
Its advantage is additional heating of the steam room, which allows to reduce fuel consumption and the time of warming up to a comfortable temperature. But at the same time, the internal structure is considered more difficult to maintain and laborious in terms of installation. Also, the disadvantages include the possibility of smoke in the event of cracks in the pipe.
The external model is equally popular. It differs from the internal one in that the chimney for the bath is brought out through the wall to the outside of the building, and directly in the plane of connection with the stove. It turns out that almost the entire structure is located outside, which significantly reduces the risk of fire.
Watching the video, outdoor chimney:
But it also has a drawback - the need for high-quality insulation, which will prevent the rapid cooling of exhaust gases and help reduce the number of regular cleanings. Another disadvantage is that such a design will not be able to give off excessive heat to the steam room, which means that fuel consumption will increase.
Types of chimneys and requirements for them
A chimney for a sauna stove must meet a number of requirements. The slightest discrepancy can cause poor traction. Therefore, when performing a chimney device in a bath, you should pay attention to the following factors:
- The face of the pipe must not be damaged. This can result in excessive condensation.
- The inner surface should be smooth. Various irregularities will contribute to the rapid accumulation of soot and burning.
- The chimney in the bathhouse with your own hands or with the involvement of specialists is equipped not only in a vertical, but also in a horizontal plane. Due to this, the heat literally does not fly out into the chimney, while each horizontal component of the chimney duct should not have a length of more than 1000 mm. Otherwise, the traction will be weak.
- Chimneys for sauna stoves, mounted through ceilings, must be equipped with fire-fighting structures. For example, steel and ceramic chimneys are placed in special boxes.
- When deciding how to install the pipe in the bath - through the ceiling or wall, last but not least, you should think about the diameter of the pipe. It directly depends on the power of the furnace and, as a rule, varies from 100 to 350 mm.
- The part of the chimney located outside the building must be made of strong durable materials that can withstand aggressive environmental influences (rain, wind, snow, etc.). To a greater extent, this applies to pipes installed outdoors. In such a situation, the pipe in the bath through the ceiling and roof has more advantages, because only a small part of it is outside the room.
Do not forget about the size of the chimney. For people who have bought a stove made at the plant, this question is not so acute. After all, it already has an entrance for connecting the chimney. Thus, pipes of a smaller diameter cannot be used, and more does not make sense, because this is an additional cost for the gearbox.
If the stove is homemade, then an arbitrary pipe diameter can be used, varying within the values indicated above. High accuracy is not important here, as well as complex mathematical calculations. Leave them to the specialists involved in the design of flue gas ducts in huge buildings.

This also applies to the height of the pipe. The main rule for its installation is that its outer part must exceed the highest point of the roof by at least one meter. Thus, having decided to make a chimney on your own, you do not need to delve into the calculations.
Having familiarized yourself with the basic requirements, you should think about how to remove the pipe in the bath. There are three ways to install a chimney:
- On the foundation of a building or floor. The first method is ideal for people building a bath from scratch, the second for those who decide to convert any room into a steam room.
- Over the oven. Such a chimney is suitable for owners of metal stoves.
- On the facade of the building, that is, through the wall.
What is the best chimney for a bath? Everyone should give the answer to this question independently, comparing goals and means. The information presented in this article will surely help you make the right choice.
Removing the pipe through the roof of the bath is a rather laborious process, so the first step is to consider the option of installing a chimney through the wall. Any person can easily cope with such a task, even without the appropriate experience. To carry out the work you will need:
- three elbows of different sizes, which directly depend on the location of the stove (if the stove is near the wall, then elbows of the following sizes are suitable: 200 × 1200 mm, 160 × 1200 mm and 160 × 100 mm);
- tee with plug;
- fungus to be protected from water and debris entering the chimney.
Having stocked up with all the necessary materials, you should start installing the chimney in the bath with your own hands, the step-by-step guide is as follows:
- The first step is to carry out preparatory work. The passage of pipes through the ceiling in the bath is not necessary, so preparation is reduced to drilling the wall. Taking into account the parameters of the pipes taken, the hole diameter should be 160 mm.
- Next, you need to connect all the knees. Usually self-tapping screws are used for these purposes.
- A fungus is installed in the upper part of the structure.
Such installation of a chimney in a bath is usually resorted to if the structure is temporary. Therefore, most people are interested in how to make a chimney through the ceiling in baths.
This is the right approach to solving the problem, because pipes laid along the street do not contribute to the early warming up of the room. An alternative can be chimneys in the bath through the wall, containing materials in their structure that help to retain heat.
The most popular is a pipe for a sauna stove, which contributes to the preservation of heat, having a cavity in its structure filled with heat-insulating materials. Such chimneys for a bath to a greater extent exclude the possibility of burns and fires, rather than saving heat.
Thus, the installation of pipes in the bath eliminates the need to use additional fire-fighting materials when laying through wooden walls.
If the main task is to keep heat, then you can use a chimney for a water-cooled bath. The use of such systems has many advantages:
- Firstly, chimneys for stoves in a bath become completely safe in terms of the possibility of ignition when in contact with combustible materials. In other words, there is no need to use fire-fighting materials at the point of contact between the pipe and the wall.
- Secondly, the possibility of getting a burn is excluded.
- Thirdly, the pipe for the stove in the bath serves as a heating element, which eliminates the need to install a boiler.
Bath chimneys made of stainless steel are a cheaper option. Their installation does not require special experience and additional knowledge, therefore, installation can be carried out by anyone who knows how to hold construction tools in their hands. The main thing is to observe all precautions.
When it comes to ceramic chimney ducts, the first to be mentioned is ceramic pipes. Their installation requires much less effort than the installation of brick structures, while cutting the roof is greatly simplified.
We invite you to familiarize yourself with: Heat-resistant materials for wall decoration near the stove
Ceramic pipes as a chimney have many advantages:
- they are able to withstand exposure to high temperatures;
- ceramic pipes are not afraid of corrosion;
- Smooth inner surface significantly reduces the possibility of soot and burning build-up, so cleaning is not often required;
- ceramic pipes are highly non-conductive. Thanks to this, the heat does not go out into the street, and the possibility of getting burned is completely excluded.
Do not forget that the installation of a ceramic pipe does not require a large amount of dismantling of the ceiling and roof. You just need to drill a hole for the pipe.
A corrugated pipe is often an integral part of sauna chimneys. In most cases, they replace the elbows connecting the horizontal and vertical pipes of the chimney. This approach can save a lot of space.
Sauna stoves equipped with an entirely corrugated chimney are a rarity. Despite the ease of installation, such chimneys have many disadvantages:
- Lack of the required thermal insulation characteristics. Leaning against a corrugated pipe can cause burns. With prolonged exposure to temperatures above 900 degrees, the material begins to collapse.
- Corrugated pipes are easily susceptible to corrosion, which, together with high humidity in the steam room, leads to their rapid failure.
Only a temporary chimney can be made from a corrugated pipe. In this case, it is necessary to properly protect the ceiling-throughput unit from ignition, otherwise the occurrence of a fire will become only a matter of time. This also applies to other places where the chimney comes into contact with combustible materials.
Features of the
Planning a chimney in a bath is always associated with the choice of design. It is necessary to understand all types, to know how to correctly calculate the size, display and install. Before drafting a project, it is necessary to briefly study these aspects.
The chimney in the bath can have two devices: external and internal. Anyone has its positive and negative sides:
- External arrangement is less fire hazardous, do-it-yourself installation and fastening are also easier. The disadvantages are that the pipe goes outside and the heat loss increases.
- The internal arrangement is complicated, but all the heat goes into the bath. The main disadvantage is a high degree of fire hazard.
The sandwich pipe can be easily assembled by hand.
Design flaws can be prevented by applying good insulation. We advise you not to save on time and effort and conduct an internal chimney, although it is more difficult to install, but the cost of heating the steam room of the structure will be reduced. For a small bath in a summer cottage, it is easier to remove the external chimney. In any case, the choice is up to the user.
Materials for the chimney are different: red brick, ceramics or metal. They tolerate temperatures above 100 ° C well and are durable.
We offer you to familiarize yourself with: The choice of material for the construction of a bath
You can read reviews about the use of a chimney made of aluminum or asbestos, but for a bath, where temperatures are above 120 ° C, they are not suitable.
It is easier to buy a ready-made version of a chimney sandwich. It is easy to assemble and install, and the internal asbestos gasket makes the device safe.
Work on the arrangement of the chimney cannot be started without knowledge of the design features. For example, each sauna stove manufacturer recommends its own chimney diameter and height. Technical indicators require maximum compliance with certain requirements. The performance of the device will not be better if the thrust is higher than the required standards.
With a strong draft, the hot gases will not have time to heat the stove, they will escape into the chimney. With insufficient draft, little oxygen will be present in the furnace. The room will be smoky, which will lead to an uncomfortable person in the bath and the possibility of carbon monoxide poisoning.
The air in the chimney moves from bottom to top. To check the correct direction of movement, a candle or a lighted sheet of paper is used, which must be brought to the furnace. The fire must be drawn inward. With an incorrect chimney arrangement, reverse draft often occurs. The main consequence of this phenomenon is the unpleasant smell of smoke and burning inside the premises. Smoke and fumes are bad for the health of people, wall coverings, ceilings and furniture in the room.
The ideal chimney should be strictly horizontal. However, the construction of such a structure is not always possible. If the chimney requires a change in direction, so-called elbows are used. Modern manufacturers offer a huge selection of devices that differ in the ratio of angles and turns. Elbows in the chimney make it difficult to clean.Therefore, it is recommended to use this option if possible to equip a horizontal structure.
Another feature of the sauna chimney is the ability to install a structure inside and outside the building. Each option has its own merits and demerits. It is believed that the external chimney is less fire hazardous in comparison with the internal structure. It is easier to install, fix and carry out subsequent cleaning. The main disadvantage of an external chimney is large heat losses.
If the chimney is internal, the concept of heat loss is automatically excluded. However, the installation of this structure is more complicated. In addition, this design is not entirely fireproof. The external and internal chimney will have fewer drawbacks if modern materials are used in the work. The characteristics of the raw materials and elements used must correspond to the characteristics of the bath. It is necessary to take into account the temperature in the room, sanitary standards, the structure of the bath itself (preferably the presence of wooden materials).
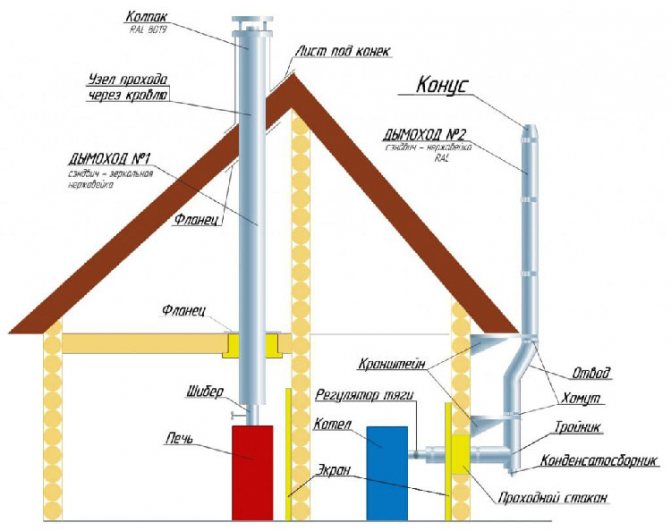
Installation of chimneys for "Teplodar" sauna stoves
The places where the pipe passes through the ceiling and other building structures should be considered taking into account the fact that they are sheathed with wood from the inside, that is, with a combustible material. In this case, it does not matter what material the wall itself or the floor is built of, it is enough that there is a combustible lining. In general, the postulates of laying chimney ducts sound like this:
- before installing a metal or masonry brick oven, you need to successfully choose a place so that the future chimney of the bath does not fall on the supporting structures of the roof. It makes no sense to make unnecessary turns of the pipe later, and it is impossible to turn the brick channel. The total number of pipe turns should not exceed 3;
- the horizontal section from the stove to the tie-in into the vertical channel along the length should not exceed 1 m. The exception is a gas duct inclined at an angle of 45 °, sometimes used instead of a horizontal one. But here, too, you should not get carried away, make this segment as short as possible;
- a single-walled metal chimney should be separated from unprotected combustible materials of the ceiling at a distance of 0.5 m.If the combustible surfaces are covered with a non-combustible screen, then the gap can be reduced to 38 cm.All requirements of fire regulations are shown in detail in the figure below;
- the same figure shows how to correctly install the chimney in height so that its cut does not fall into the leeward zone. Then the force of natural traction will decrease significantly;
- the vertical flue duct must be equipped with a system for cleaning and draining condensate.
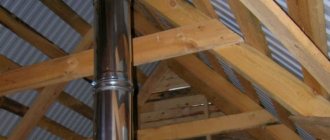
Starting from the attic floor, it is strongly recommended to protect the single-wall pipe with a heat-insulating layer of non-combustible insulation, the best option is basalt fiber. The outside of the insulation is wrapped in a galvanized steel casing. Then condensation will not appear outside the pipe, and the attic space will be protected from fire. When the chimney is installed through the wall, the same indents are observed as for passing through the ceiling.
The choice of material for installing a chimney depends on many criteria. In this process, everything should be taken into account: from what kind of ceiling duct you want to make, and ending with the type of oven. Ideally, a sauna chimney should meet the following requirements:
- Promote fuel combustion in full.
- Provide high-quality heating of the furnace walls. In other words, the heat should not escape into the pipe.
- Good traction must be present. It is ensured by a competent selection of the pipe diameter and the absence of horizontal parts of the chimney more than a meter long.
In addition, the chimney must be easy to maintain. Any chimney requires cleaning over time, therefore, during installation, a structure should be assembled that will not complicate this process.
Installing a pipe without connecting to a furnace is a fairly simple process that anyone can handle. It is much more difficult to make sure that the chimney is properly connected to the stove. Correct installation looks like this:
- First you need to install supports that have gaps, because the chimney expands when heated. An excellent support for the chimney will be a construction with asbestos. This material is resistant to high temperatures.
- If the chimney opening of the stove is in the immediate vicinity of the wall or the channel will not come out through the wall, then the use of support structures is not required.
- The joint between the pipe and the stove must be perfectly finished. This eliminates the possibility of cracks and, as a result, the ingress of smoke into the room.
Further, the installation of the pipe in the bath involves the installation of the remaining components. How to properly install the rest of the components is described above.
Thinking about how to make a chimney, some bathhouse owners do not know if a chimney valve is needed. If you decide to assemble and install a chimney in the bath with your own hands, then installing the valve will greatly complicate the process. If you buy a ready-made chimney, then you can choose a model with a valve.
As a rule, this element of the smoke removal system is designed to retain heat after the fuel burns out; there is no such need in a bath. If the valve plays an important aesthetic role for you, then you can make a passage in the pipe or use an additional elbow.
As a rule, the installation of a chimney in various buildings requires the preparation of drawings in advance, indicating all the main components. Using the drawing, you can make the installation step by step.
When installing a chimney in a bath, such difficulties are useless. Everything is much easier. The required data and instructions are given above. Using them, you can easily make a chimney for a bath with your own hands.
When all the nodes from the optimal materials are installed, you need to check the functionality of the chimney.
The tests are best done in the evening or at night. It is important that the ambient temperature is lower than that of the room.
Otherwise, the smoke will enter the room during kindling even with a working chimney. A desirable but optional condition is the presence of wind - the traction will be better.
The oven should be fired up carefully. A competent stove-maker uses a minimum of fuel when carrying out such a procedure. This allows appropriate measures to be taken if the operation of the flue duct is unsatisfactory.
We offer you to familiarize yourself with: Shelves in the bath with your own hands drawings
If the ignition was successful, there is no smell of smoke in the room, then you should add fuel, choosing damp wood, which gives more smoke. Smoke does not enter the room from well-insulated chimneys. The opposite situation is a direct indication for a thorough check of the channels for installation inaccuracies and damage.
https://www.youtube.com/watch?v=MMSAuqSRwcc
When firing up for the first time, it is necessary to follow the roof as well. Smoke should not come from the groove that we install at the last stage of installation.
At the last stage of the check, you need to properly warm up the system. If you have an iron stove, then you need to properly heat it up in order to check the stability of the chimney in advance. This also applies to a brick firebox.
If the smoke is removed successfully, sparks do not fly anywhere, then you have managed to build an excellent chimney. It is necessary to maintain it in working order, that is, to clean it in a timely manner. The procedures for cleaning the chimneys of stoves that use solid fuels are done 2 times a year.
The efficiency, durability and cost of a chimney depends on the material from which it is made.
Brickwork is a classic option with good thermal insulation and durability. However, its use is currently limited for the following reasons:
- The large mass of the structure requires a separate foundation.
- For the construction of such a structure, you need to involve an experienced stove-maker, who is extremely difficult to find.
- The cost of work and materials will be cosmic in comparison with other types of chimneys.
- Due to the rectangular section and the seam between the bricks, vortices are formed in the gas flow, due to which a large amount of soot is retained in the channel. The brick chimney must be cleaned at least twice a year.
- The sauna stove is operated intermittently, and the brick accumulates moisture in the intervals between the fireboxes. Kiln acceleration requires a lot of fuel.
One of the solutions, partially compensating for the disadvantages of the masonry, is to sleeve. If you got a bath with a ready-made brick chimney, you can insert a stainless steel sleeve into it, which will significantly improve the aerodynamics of the channel and reduce the amount of deposits. They also use flexible pipes of the FuranFlex® type, designed specifically for the repair of such structures.
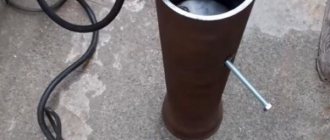
A metal pipe is the simplest and most affordable material, suitable for self-assembly of a chimney in a bath. The sectional structure is assembled from individual elements. Socket joints are treated with a heat-resistant sealant. The part of the chimney located in the room is assembled from a single-wall chimney.
The advantages of such designs include:
- small dead weight;
- smooth inner surface, resistant to soot accumulation;
- stable draft and low condensation.
Stainless steel sandwich pipes are very popular. They are non-corrosive and durable.
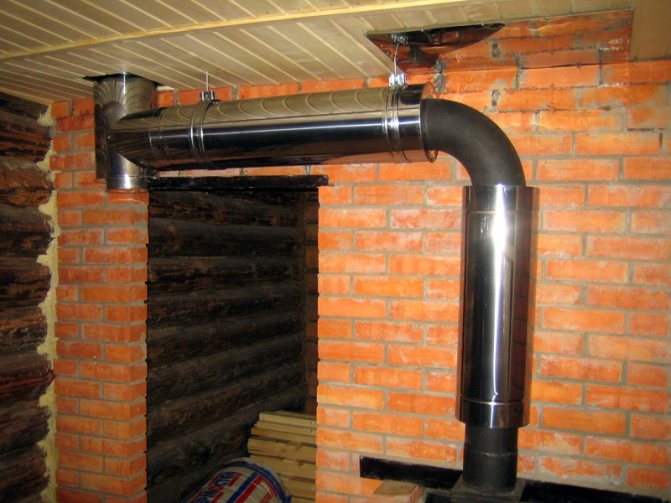
- The furnace is installed in the design position, the corner element is pre-mounted on the outlet pipe and the exit point through the wall is marked. The knee does not need to have a right angle. The pipe can exit horizontally or at an angle.
- Remove excess wall material. If it is made of wood, there is usually no problem. With a brick or concrete structure, you will have to tinker a little longer. When calculating the height and width of the opening, fire safety requirements are taken into account.
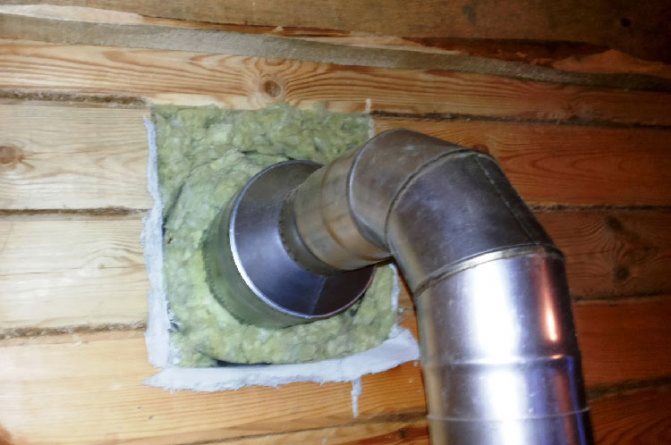
- A wall cut is installed - a metal insulating flange through which a horizontal or inclined section of the pipe will pass. It can be a ready-made or homemade design. The space between combustible materials and the flange is filled with thermal insulation. Basalt wool mats are usually used in wall openings.
- The final installation of the internal section of the chimney is carried out: the starting section, the gate, the angle, the adapter from the monotube to the sandwich and the horizontal branch pipe.
- The support and brackets are marked and installed along the facade.
- Collect all external sections of the chimney, including the head with an umbrella or deflector.
It will be a little more difficult to make a chimney in a bath through the ceiling with your own hands than through a wall.
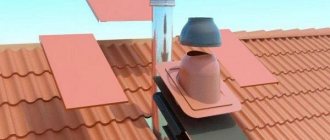
You will need to organize two fire cuttings: ceiling and roof. The arrangement of the passage through the roof practically does not differ from the wall cut. The exit point through the roof requires careful sealing, otherwise rainwater will enter the room. For this, two types of prefabricated flanges are used:
- Made of metal. When choosing, you need to pay attention to the compliance with the outer diameter of the pipe and the angle of inclination of the roof. It is desirable that the edge of the flange goes under the ridge of the roof.
- Made of EPDM rubber. These seals are more versatile.
Construction options
Arrangement options require calculations that take into account the amount of air supplied to ensure fuel combustion. There are complex and simplified calculation methods.
For the first calculation, you need the optimal characteristic features of the bath chimney:
- the temperature of the gases at the outlet of the pipe 120;
- the minimum movement speed is about 2m / s;
- the recommended length is 5 meters;
- combustible fuel with one filling in the furnace - 10 kg / h.
To calculate the diameter of the chimney, there is a formula: D = √ (2 {amp} amp; 4xVr / 3.14x2)
Here D is the pipe diameter and Vr is the amount of air.
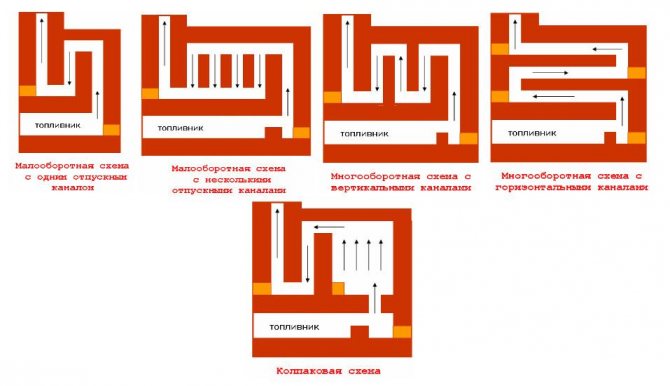
The geometry of the section may be involved in calculating the height of the chimney. A graph is drawn up for this calculation. The graphical calculation involves the area of the furnace and the area of the pipe. Divide the first value by the second and determine the percentage.
With a section equal to 10%, the minimum chimney height will be:
- 7 m - with a round pipe;
- 9 m - with a square pipe;
- 11 m - with a rectangular pipe.
All values are valid for the construction of a direct chimney. In most cases, chimneys require pivoting structures that reduce the pulling force. To prevent this, when calculating a chimney with curvatures, the resulting diameter can be slightly increased. If the stove for the bath is purchased, the stage with calculating the diameter of the chimney can be skipped altogether. All the necessary parameters for chimneys are usually indicated by the manufacturer in the instructions for a particular model.
The internal values of the pipe are calculated taking into account the power of the stove. The standard bath pipe is 150-200 mm. It is worth considering that with an increased size of the structure, the heat in the furnace will not linger. With a small cross-section, there will be no required thrust. When constructing a prefabricated structure, it should be borne in mind that the diameter of the pipe sections should not be less than that of the outlet part of the stove.
The exact value of the pipe height is interrelated with the location of the structure on the roof. If the pipe is in the middle of the slope, the structure must be raised above the ridge to a half-meter height. This parameter is closely related to the location of the oven inside. If there is more than one stove in the bath, each of them must be equipped with its own chimney system. Otherwise, it will not be possible to achieve normal traction force.
We offer you to familiarize yourself with: Do-it-yourself block bath step-by-step instructions
To maintain heat in the steam room, the chimney must be placed closer to the inner wall. This is where traction will be most effective. In the absence of such a possibility, the walls must be solid and solid. With thin walls of the bath, you can never wait for heat inside.
Smoke and condensate installation
In practice, two options are used for the passage of the pipe from the premises to the street: through the wall and through the ceiling. The choice always remains with the owner of the stove, and we will tell you about the features of both schemes.
The advantages of the through-the-wall construction include:
- Saving useful space. If the bath is located on the basement of the house, it is not necessary for the pipe to pass through the living quarters located above. It will not only "eat up" the usable area, but also require compliance with a whole range of fire safety measures. Also, if you accidentally touch the pipe, you can get serious burns.
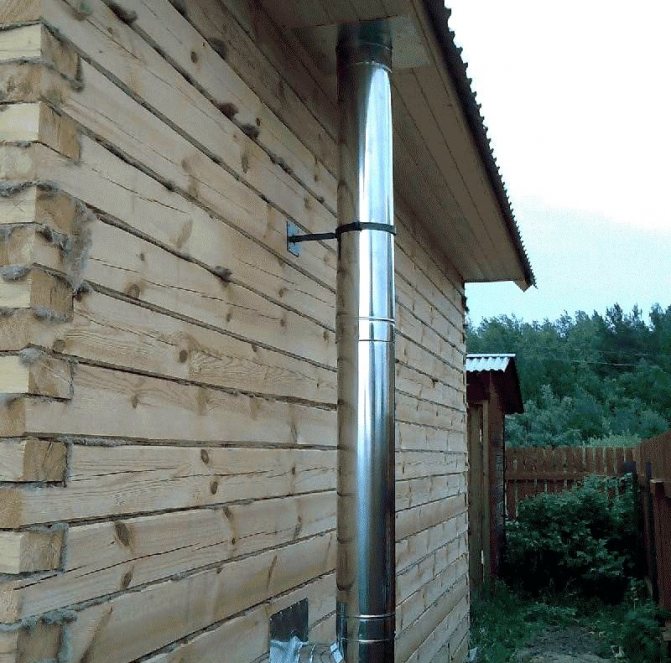
- Easy to install. Most of the work is done outdoors. The weight of the vertical structure is practically unlimited, and it is protected from wind loads: the pipe rests on a bracket, "tied" with clamps to the wall. Installation through the wall means the arrangement of only one fire section.
- Maintainability. If necessary, you can always extend the pipe with additional sections. Replacing the elements of the external chimney does not require any work in the room.
Obvious design flaw - low
Efficiency
... Part of the flue gas energy that could be used to heat the room is released into the atmosphere. Outdoor chimneys often disrupt the design of buildings, and soot accumulates in their horizontal sections and at bends. Such structures need to be cleaned much more often than vertical internal smoke extraction systems.
The advantages of leaving the chimney of the bath through the roof are:
- high efficiency, since more heat remains in the room;
- less deposits and condensation;
- stable traction.
The disadvantages of this scheme include the increased complexity of installation work. All internal flammable structures must be shielded from heat radiation by specialized materials. It is also necessary to check the weight of the structure with the bearing capacity of the furnace and, if necessary, unload the roof using brackets. The relative position of the chimney and rafters must be taken into account even when designing a building, so as not to weaken the ceiling or roof.
There are two schemes for assembling a chimney system from sandwich pipes:
- Through smoke, or flare down. Such a scheme excludes the exit of flue gases in case of violation of the tightness of the joint, but may be accompanied by the release of condensate to the outside. This scheme is used for indoor installation. This eliminates the danger of carbon monoxide poisoning, and the appearance of a small amount of moisture is not critical.
- On condensate, or flare up. This scheme is used when assembling street chimneys, where gas release is not dangerous. At the bottom of the chimney, a condensate collector is made, into which all the moisture enters.
Sandwich pipes from different manufacturers may differ in the design of the socket joint. When choosing an assembly scheme, read the instructions. Manufacturers provide detailed step-by-step installation guides.
The installation method depends on what material is planned to be used for the production of the chimney. There are some rules that must be taken into account when making a chimney yourself:
- The device must not be docked with other pipes.
- The smoke evacuation structure should not have horizontal sections longer than 1 m.
- During the heating season, the chimney of the bathhouse must be cleaned at least 2 times.
- The structure must extend at least 0.5 m beyond the roof.
The first thing to consider is a sandwich chimney. Manufacturers supply products along with a set of additional parts, which include:
- knee;
- tees;
- clamps;
- stubs;
- ceiling-walk-through units;
- headbands;
- protective screens.
We suggest that you familiarize yourself with: Wall vapor barrier from the inside of a wooden house: functions, photos, video which side to glue, tools, vapor barrier outside
The diagram will allow you to understand the technology of installing a stainless steel chimney
A step-by-step guide to assembling a steel chimney:
- First of all, using a plumb line, you need to mark the points of exit of the branch pipe through the roof and ceiling structure. Next, you need to prepare a recess according to the dimensions of the pipe. It is worth remembering that a distance of about 10 cm should be left between the sandwich pipe and the wooden ceiling parts along the perimeter of the recess. The dimensions of the opening should be approximately 10 cm larger than the dimensions of the chimney
- Thermal insulation can be done with mineral wool. It will be necessary to close the place where the pipe passes through the ceiling. Do not worry about cotton wool becoming damp, as the high temperature dries it out quickly.
- It will be necessary to remove all dimensions and determine the place of installation of the unloading unit. It is recommended to do it in the attic. It will take on the loads of the pipe that comes out of the ceiling. In addition, the unloading unit is able to eliminate lateral vibrations. The unloading unit takes the load of the pipe coming out of the ceiling
- If the distance between the floor base and the attic is large, then an unloading unit should be installed. If the distance is less than 1.5 m, then auxiliary props are not required. The unloading unit can be constructed from steel corners and fasteners. The corners must be fixed to the rafters. The fixation should be as reliable as possible.
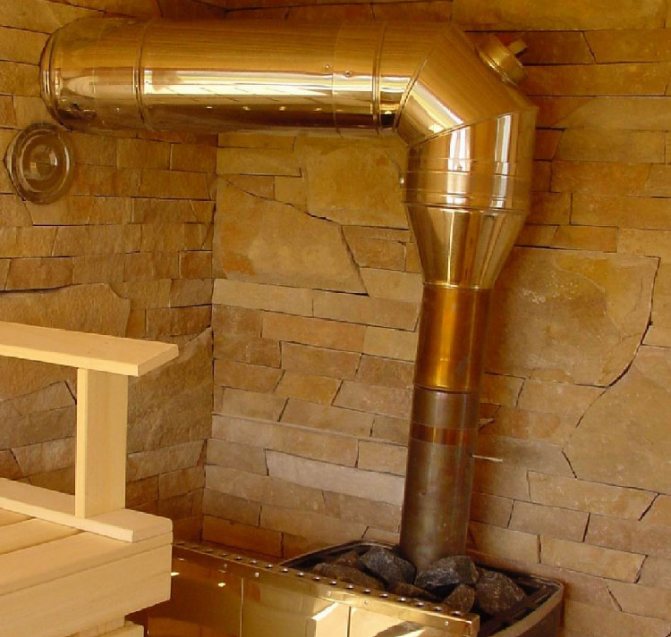
- You will need to mount an initial pipe on the outlet of the stove. It should fit into a large pipe with an interference fit; during the purchase process, you need to choose the right dimensions. An initial sandwich tube must be installed on the furnace outlet.
- The narrow pipe should enter the outlet at the furnace outlet without covering it. Pipe sections must be inserted into each other. Places of transition and bending should be additionally secured with clamps. Places of passages and bends of pipes must be fixed with clamps
- In the place where the branch pipe passes through the ceiling structure, it is necessary to put a groove to cover the outlet recess. This will also make the chimney more stable. A larger diameter pipe must be welded to the cutting, which will be used as an adapter. This will increase the area of the stop and eliminate deformation in the event of heavy loads in the lateral part. The adapter will allow the chimney to move freely up and down. To avoid heat loss due to loose parts, it is recommended to use mineral wool. It must be placed under the cutting piece and carefully tightened to the ceiling with nails or self-tapping screws. To close the outlet in the ceiling, you need to install a cut
- Holes must be prepared in the lathing and roofing. Next, seal the exit point of the smoke exhaust device. This requires an adapter. The joints must be coated with sealant. It is recommended to put another sheet on the coating and fix it with self-tapping screws with rubber washers. The remaining gaps are sealed with a sealant. The pipe outlet must be 55 cm above the roof level. The vertical position must be controlled by the building level
- A fungus should be mounted on the top of the chimney.
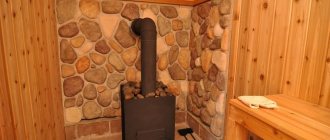
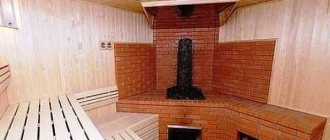
Traditional chimney
The classic chimney is a brick exhaust system.
It means the passage of the pipe through the ceiling of the bath. It is called classic due to the fact that such chimney ducts were built in the past. If you are interested in a brick chimney diagram, then you can easily find it on the Internet, on numerous resources dedicated to construction. The circuit can also be found in specialized literature.
The advantages of installing such a chimney are as follows: low cost, strength and improved performance. Bricks tolerate both high and low temperatures very well. The rules for installing a brick chimney are quite complicated:
- The first rule is fire protection. It is provided with a high level of fire safety. Having asked the question: "How to make a brick chimney correctly and take into account the fire safety rule?", It should be remembered that the minimum distance between the chimney duct and the wall must be at least 380 mm. In the areas where the chimney passes through the ceilings, special extensions are created.
- The draft directly depends not only on what diameter of the chimney is chosen. This indicator also depends on the height of the structure. Achieve maximum thrust and, as a result, heat transfer is possible if the height of the pipe is five meters.
- Fire safety directly depends on the thickness of the chimney walls. The thinner the wall, the more reliable and safe. The minimum thickness must be 100 mm. Thus, if the pipe diameter is large, then, together with a thick wall, you can get a rather voluminous structure.
Based on the above, it becomes clear: before choosing a brick chimney, you should think carefully. Its installation may be overwhelming for you.
Think it might make sense to make a chimney through a wall or ceiling using the above methods.
How to install?
For arranging a chimney with your own hands, metal pipes are the ideal material option.They reduce construction costs as well as labor costs. The installation of the chimney begins towards the oven already installed in the bath. An ordinary iron pipe is installed up to the first knee. Correct fastening will be ensured by special structures with fireproof characteristics.
The initial part is connected to the oven nozzle. They immediately install a gate - a gate valve that will allow you to add or subtract traction force. Then a hole is made in the roof, which can be square. Next, a metal box is assembled with a through hole corresponding to the size of the structure. Through it, the chimney will be led to the attic. The height of the box should be greater than the materials for finishing the ceiling.
The box is securely fixed in the ceiling. The free space of the box is filled with mineral wool or expanded clay. In the attic, the structure is closed with a lid with a hole for the pipe. At the point of passage of the chimney, a sheet of heat-resistant material is fixed. The upper pipe is protected with sheets of mineral wool or asbestos. A special waterproof cuff is used as thermal insulation. Gaps can be sealed with sealant.
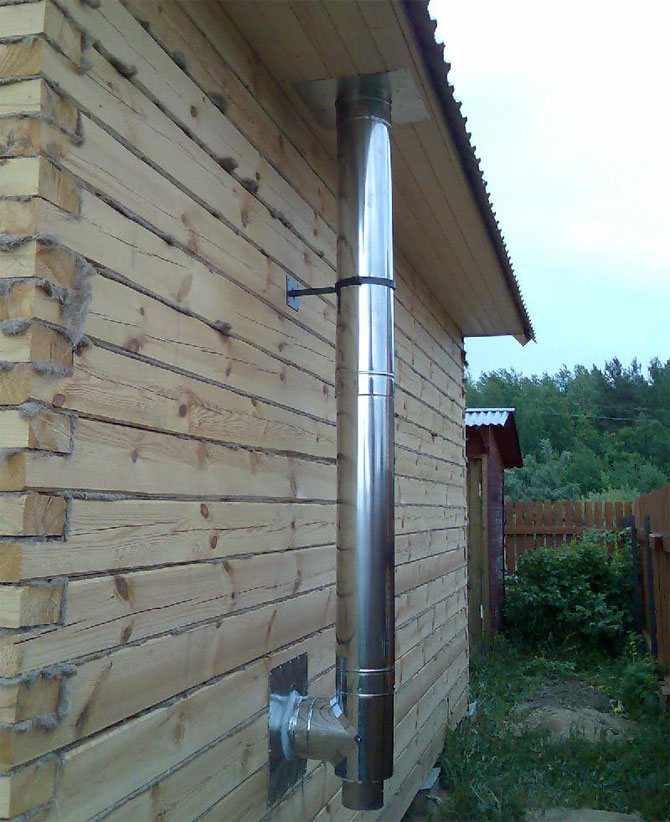
The installation of an external metal chimney will require even less labor. The device assumes a suitable hole in the wall (not in the roof). To turn the pipe from the furnace, they acquire a special elbow. Bends are different, choose the option you need.
The branch is installed on the stove branch pipe. Then a tee is placed on the outside. From it, the chimney is laid up along the wall, if necessary, down. It is correct to use a similar metal box filled with non-combustible bulk material as wall insulation.
When arranging an outdoor structure, it is important that it rises 50-60 cm above the ridge: such an installation will guarantee good traction. To protect the chimney from small debris and rain, a special umbrella is put on top.
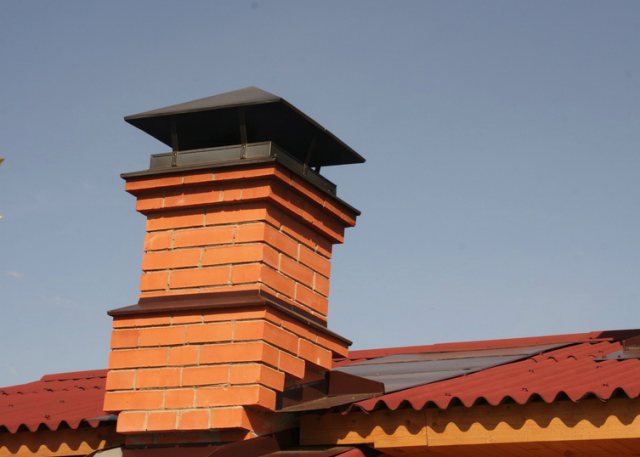
Brick chimneys can be indigenous or mounted. The best option for sauna stoves is indigenous. If the stove is made of brick, then a structure from the same material is attached. If the stove is made of metal, the brick chimney is connected to the branch pipe with a special pipe.
A brick chimney is arranged in the form of a square pillar, which is equipped with a well-shaped section. The size of the section is related to the power of the sauna stove; it can be half a brick, a brick or two bricks. The basis for a brick structure is a foundation of the same thickness with a sauna stove, making up a single whole with it. The pipe is raised to the desired height, where the valve is installed.
Immediately mark the space for the structure on the ceiling and in the roof. Use a level to maintain strict verticals. Start the work with the laying of the overhead part, for which there is already a point on the stove. Make the passes of the brick rows evenly: any unevenness will impair the quality of the traction force. Control the position of each row. For control, a stretched thread is suitable between the angle of the initial row and the angle of the hole in the roof.
To protect the ceiling from fire, a fluff is laid. The fluff is the expansion of the outer walls of the pipe, which also ensures the stability of the structure. The widest point of the fluff should be at the level of the ceiling material. After completing the laying of the fluff, the chimney is fixed with edged boards. Further, the fluff is narrowed, the pipe is aligned to the initial value.
The outer perimeter of the chimney is laid out until the roofing material appears. A structure is being built upstairs, which will serve to drain rainwater. It has increased dimensions by about a quarter of a brick. Lay out the structure in a similar way with fluff. Its height is related to the angle of inclination of the roof.
Next, lay out the neck of the chimney. It is allowed to install a metal cap on top of the structure.It is important to carefully seal the joints between the brick chimney and the roof structure. Choose methods of work and additional elements depending on the type of roofing material. The methods of this work are different, decisions on the application of one method or another are made at the place of installation of the pipe.
It is difficult to correctly install a brick chimney with your own hands. In addition, the design is expensive. Therefore, you should not start masonry if you have seen a brick and a trowel only in the video. Modern materials make it possible to construct simpler and more efficient designs of pipes for a bath.
Installation of a chimney for a metal and brick oven
The laying should start from the top of the stove. A packing tube is pre-installed on the furnace. Brick laying is carried out as when erecting walls, but there are a number of nuances:
- In order for the stove to regularly give heat, and the smoke to leave through the channels, you need to carefully monitor the level of the structure. You need to use a measuring device after each laid out row.
- When building a chimney from a brick, however, like a stove, it is necessary to use not a standard solution, which includes cement and sand, but to add clay to the mixture. The proportions of the solution are as follows: 2: 5: 1.
- The thickness of the mortar layer should vary from 5 to 10 mm. An indicator equal to a centimeter is critical. If you exceed it, then the masonry will collapse rather quickly;
- The joints between the bricks must be carefully sealed. If this procedure is neglected, sparks can enter the room.
- Installation must be carried out exclusively from whole bricks. The use of quarters and halves may lead to the need to increase the consumption of the solution, which is unacceptable.
From the foregoing, the following conclusion should be drawn: a brick chimney has a lot of undoubted advantages, but its installation is complicated by many factors. Therefore, it is unlikely that it will work to install it with your own hands, without having the appropriate experience.