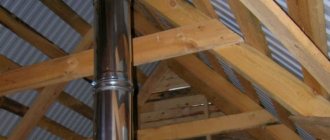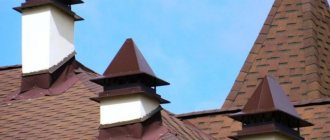
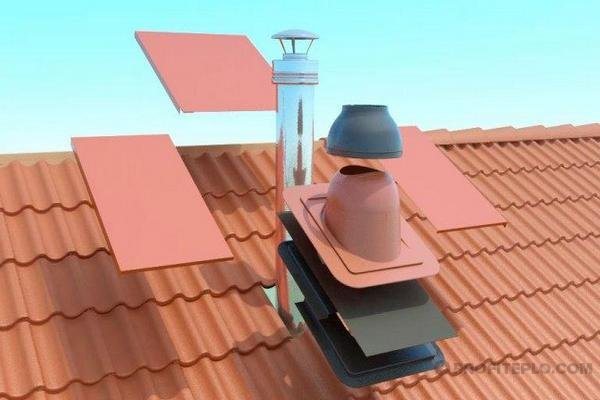
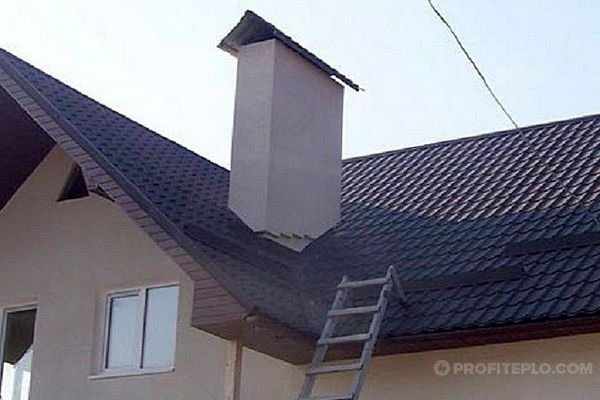
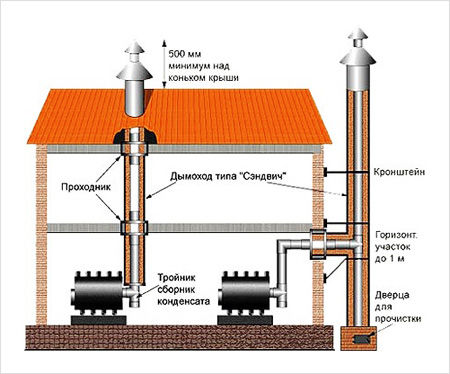
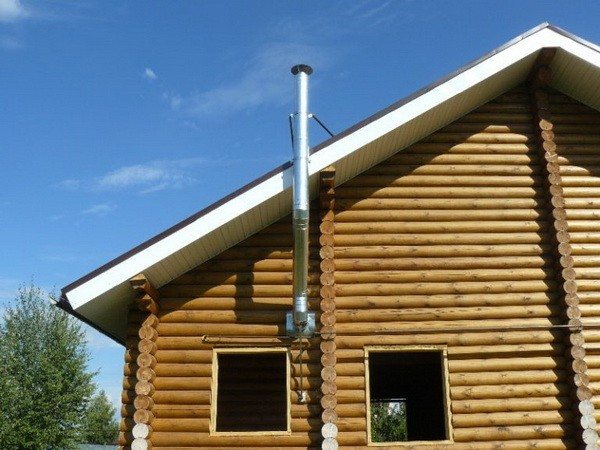
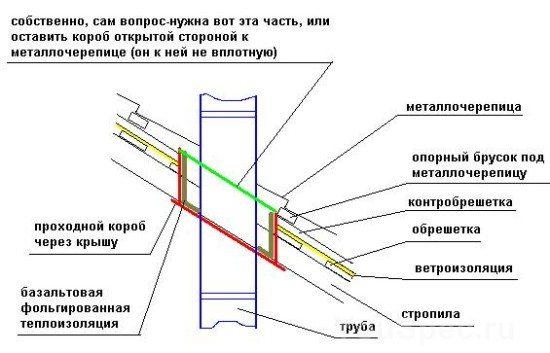
Chimney passage through the roof
Heating units operating on solid, gas or liquid fuels are equipped with a flue duct for the removal of combustion products. Increased requirements are imposed on the functionality and safety of chimneys, because due to the use of low-quality materials for their installation or violation of technology and SNiP norms, the structure itself may collapse, and a fire may occur. Particular care should be taken to equip the passage through the roof for the chimney to ensure waterproofing and fire safety of the unit. Let's consider how to properly carry out the passage of the smoke channel through the roofing system.
Smoke channel passage
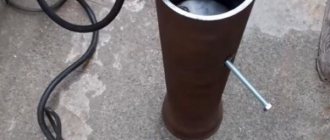
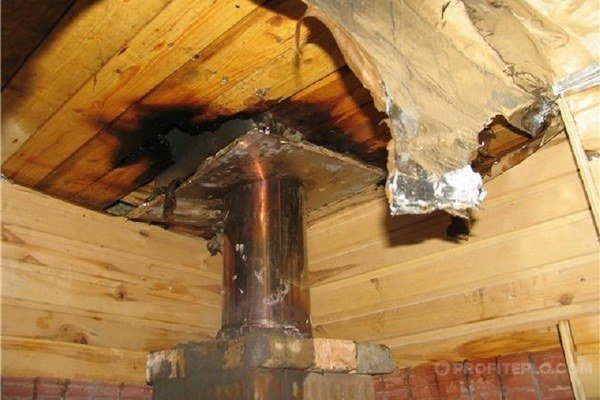
Consequences of poor-quality installation
The passage unit must be reliably protected from moisture penetration, therefore, it is of great importance to comply with the installation technology, the use of reliable and durable materials. Poor waterproofing of roof pipes
:
- Leads to the destruction of the brickwork of the chimney due to the weakening of the solution, as a result of which the flue gases can penetrate into the attic. The fire hazard also increases.
- It provokes the penetration of moisture into the brick chimney and the appearance of fungus in the warm season.
- Promotes waterlogging and damage to waterproofing carpet and vapor barrier membrane.
- Increases the heat loss of the building (correspondingly, fuel costs increase).
- It disrupts the air circulation in the room under the roof, this leads to an increase in the level of humidity and provokes decay of wooden structures. In difficult cases, this leads to the need for overhaul of the roof system of the house.
- It causes the formation of ice deposits, which provoke the expansion of cracks and the destruction of the roofing next to the chimney.
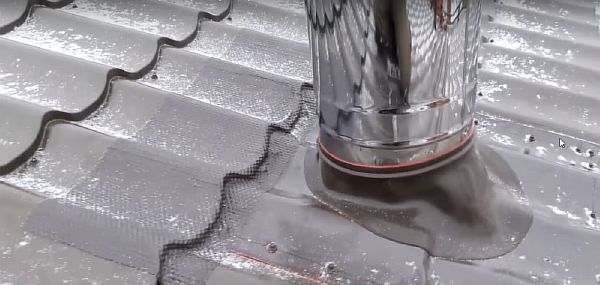
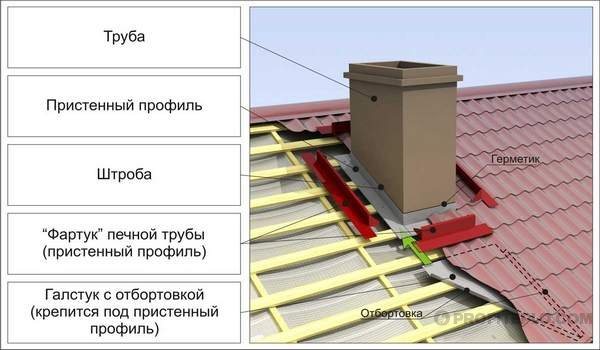
Bypassing the chimney from a brick pipe, installing an apron
There are two problems that need to be resolved to equip the junction. The first is to transfer the water that flows from the slope, redirect it to both sides of the structure being erected. After that, she is released onto the ramp under the building. The second is to prevent water from entering the housing, and direct the liquid that comes off the walls of the flue to the roof.
To solve all this, an apron should be built from metal. He must stand on the surface of the roof and on the pipe (at a distance of 15 - 20 cm, rising above the plane).
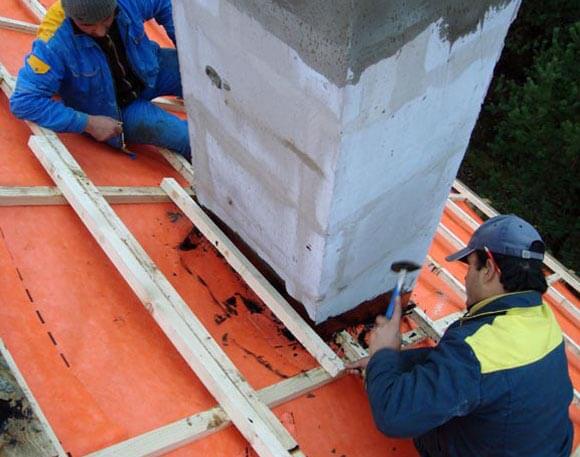
Before starting work, the chimney is plastered. After that, waterproofing protection is put on its sides. From the back side of the edge, no more than 80 cm, a gutter is built into the waterproofing for water outlet.
Before removing the asbestos or other chimney pipes through the covered with metal tiles, the crate is equipped, and a lower apron is installed on it. For this task, the left and right sheets are cut along the contour and then cut to the width. At the same time, the length is maintained 5 cm from the place where the first wave begins, which will pass from above over the chimney on the house or on the bath.
Watch the video: brick chimney - how to go through a metal roof
Lines are applied to the sides, which are located 15 cm above the surface part of the roof. Then they are connected along the entire length of the contour. On this outline, grooves are made, having a width of 2 mm.
You need to withdraw the grooves by brick, and not by masonry. After processing, the place is cleaned of contamination and thoroughly rinsed with water. When it dries, the grooves are filled with a silicone-based sealant.
After that, prepare the abutment bar and the necessary elements of the apron.Next, the extreme part of the strip is introduced into the sealant and attached to the metal tile by means of self-tapping screws.
Round and square chimney passage
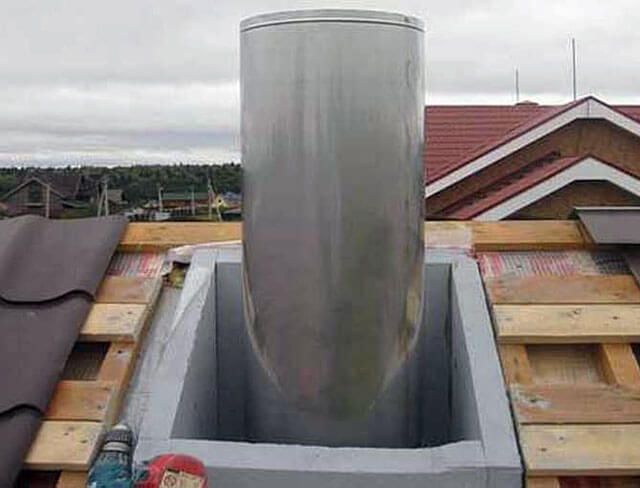
The problem of how to correctly output the passage of a round pipe through a metal tile is becoming quite relevant. If the round tubular billet is already equipped with insulation, then the roofing cake must be protected from fire.
If, when installing through the ceiling, materials that are easily flammable are used, then they should be at a distance of at least 20 cm from the chimney. At the same time, a passageway is made in the form of a box of wood. And the empty space is filled with thermal insulation material.
When equipping a passage channel for a round pipe billet, the following technological sequence is used:
- the waterproofing is cut in the form of an envelope;
- the extreme parts of the canvas are brought to the rafters and fixed to the building, which plays a supporting role, with brackets;
- then the waterproofing film is pressed by the bars included in the crate, and the vapor barrier layer is pressed into the base for installing the material - finishing;
- in order to protect the insulating material as much as possible, the junction zones are glued with a special tape;
- at the end, the surface where the work was done is covered with metal tiles.
How to make the passage of a steel pipe billet through the roof
Actions with such a building do not like haste. The master who took up this business must clearly understand the features of each ceiling. For example, the passage of a brick structure through a wooden floor, as well as through any other, must be carried out without losing the integrity of the roof.
Otherwise, after the first rains, the overlap will leak. It is also important to take into account that the waterproofing of a steel chimney on a slate floor will not be the same as on a wooden floor and metal tiles.
Watch the video
The single layer steel pipe gets very hot. Therefore, the ceiling opening, where a tree was used for construction, must be equipped with a thermal insulation barrier or a special box. Thus, they act not only on wooden floors, but also on any other.
Making a pass without fluffing
The brick chimney is designed with the provided protection of combustible materials from overheating. The part of the structure, which is carried out through the ceiling, becomes cutting, and has the name "fluff". This element plays the role of the necessary thickening of the pipe walls, which protects against overheating.
Recently, expanded clay or vermiculite has been used to pass a brick flue structure through the ceiling without fluff. These materials have good thermal insulation properties.
Simple sand is rarely used for this task. The whole problem lies in the fact that the sand has too small fraction and a large mass. The thermal conductivity of this material is too high for such a "fluffing" function.
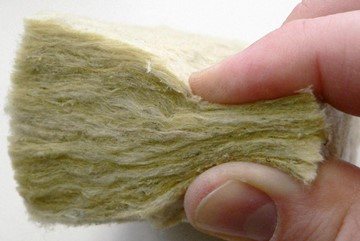
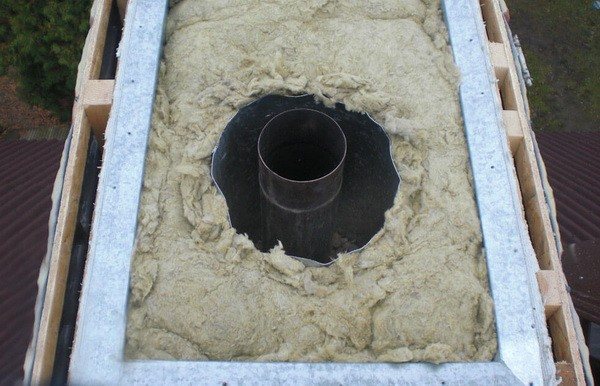
An easier and simpler solution to this issue is to use a box filled with heat-resistant basalt wool. When installing mineral wool, the building from the attic side is equipped with free access to it.
In cases where the building is taken to the second floor, then the opening in the floor with insulation is closed with a sheet of metal.
Ventilation passage
The outlet of ventilation to the roof is a prerequisite for construction. A fully equipped roof ventilation system is a guarantee of the use of housing for a long time. Circulated warm air from inside the room causes condensation to form on cold surfaces.
The conclusion from this is simple. Under such influence, the erected structures quickly lose their integrity. For this reason, forced ventilation is installed.
It is not difficult to purchase ventilation of any type in hardware stores. It does not take much time and effort to draw her conclusion. This installation is carried out in this way.
- The passage element is laid on a tile base and outlined with its contour. This is how the place where it will pass is determined.
- The metal tile is cut according to the marked markings.
- The rubber seal is fixed with self-tapping screws to the metal profile. Then it is carefully treated with silicone.
- The passage part of the ventilation duct is fastened with a rubber seal and fastened with screws to the roof.
How to carry out asbestos and sandwich chimneys
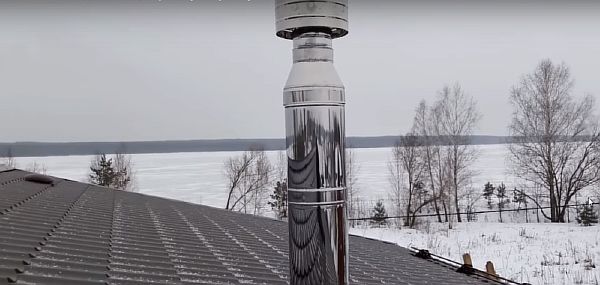
In many situations, the output of a sandwich pipe to the roof through metal tiles becomes an excellent alternative to a brick chimney for a stove. Such a building is easy to install. Since the main elements are two pipes of different diameters, between which there is a heat-insulating layer of basalt wool.
The conclusion of the passage for a sandwich structure on a roof from metal tiles can be performed even by a person who does not have much construction experience.
And the ease of installation in this case is complemented by excellent performance and a long service life.
Experts say that for the removal of combustible substances, it is better than a sandwich - a pipe is difficult to find. After all, such a material is excellently protected from strong overheating of the walls from outside. Likewise, from the formation of condensation.
To these advantages, it must be added that this structure looks very presentable.
To summarize briefly, you can come to a conclusion. The whole process does not contain actions of high complexity. The main thing when working in steps is to comply with the requirements established by the SNIP, maintain all dimensions and follow the recommendations.
If everything is done according to the rules, then the operation of the heating device will become absolutely safe, and there will be no problems with the inspection authorities.
Chimney location and height
In order to ensure optimal draft force for efficient combustion of fuel, the total length of the flue duct should be between 5 and 10 meters. The height of the location of the upper edge of the chimney relative to the ridge of the roof or the wall of a higher building located in the immediate vicinity is also important.

Rules for the location of pipes on the roof
When designing the passage of the chimney through the roof, one should be guided by the current rules and regulations, fire safety requirements. Consider the following:
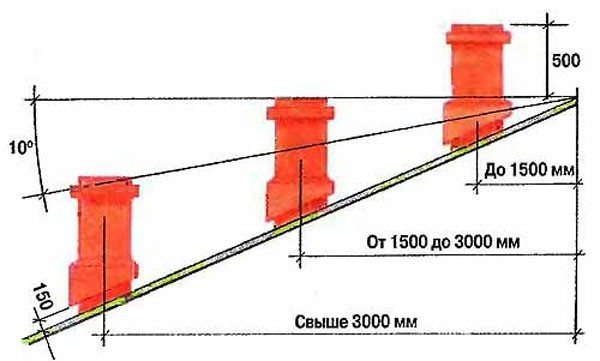
- The recommended place for arranging the chimney is at a distance of no more than one and a half meters from the highest point of the roof (ridge). In this case, the upper cut of the pipe must be at least 50 cm above the ridge.
- If the pipe is 1.5–3 meters from the ridge, its upper part may be at the level of the ridge. When the chimney is removed by more than three meters, its height above the roof is calculated depending on the height of the ridge. The top edge of the ridge should fall on an imaginary line drawn from the ridge at an angle of 10 ° relative to the horizontal line passing through the same point.
- The place where the chimney passes through the roof should be located between the rafters at a distance of at least 25–30 cm from the wooden elements of the roofing system. In the case of removing a part of the rafter, a special structure is mounted so that the roof frame can withstand operational loads.
- A gap of 13–25 cm should be left between the chimney pipe and the edges of the roofing, which is not resistant to fire (soft roof, roofing felt); if the roof is made of sheet metal, natural or cement-sand tiles, slate, this distance can be reduced to a minimum.
Pipe in the valley
It is not recommended to install the chimney in the place where the complex roof valley is located.Precipitation flows down it, which flows here from two slopes, in addition, the snow masses will accumulate near the chimney and melt. The increased load inevitably leads to depressurization of the penetration and roof joints, they will have to be regularly checked and repaired.
Ondulin roof
It is not easy to make a chimney passage through the roof of ondulin, but you can still do the work yourself. The fact is that the ondulin coating is flammable. Therefore, in order to organize the outlet of the chimney, you need to make a large hole in the cover of the ondulin.
To prevent the hole in the ondulin coating from becoming a place of leaks, they carry out the installation of pass-through roofing parts, that is, the exit is organized through a metal roof cut with an apron. The angle of inclination of the cutting is selected depending on the steepness of the roof slopes from ondulin. When installing the cutting, its ends are introduced under the located sheets of ondulin
Fire safety
The wooden truss system and some layers of the roofing cake (waterproofing, vapor barrier) do not withstand heating and can ignite or melt. The safety of system elements that do not differ in fire resistance is ensured by installing a special box around the perimeter of the hole in the roof.
Violation of safety rules
The box is mounted from a wooden block, it should be located flush with the crate, on the outside of the roof. Along the perimeter of the box from the outside, the edges of the vapor barrier are fixed - a carpet made of roofing material or other waterproofing material, as well as the edges of the vapor barrier membrane from the side of the room, if we are talking about an insulated roof. In both cases, a cross-shaped incision is made in the panel and triangular fragments of material are tucked inward. For fastening, nails with wide heads or staples are used, and a sealant or adhesive tape allows you to achieve the tightness of the abutment of the materials along the perimeter of the wooden box.
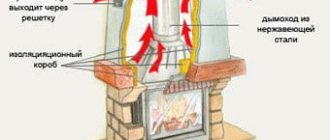
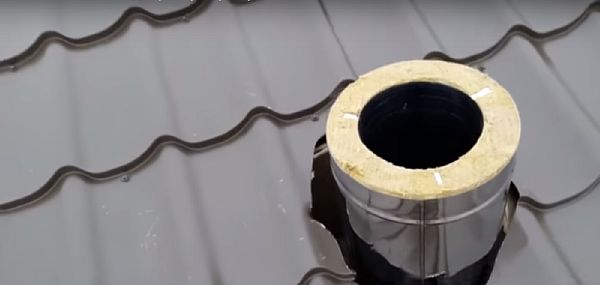
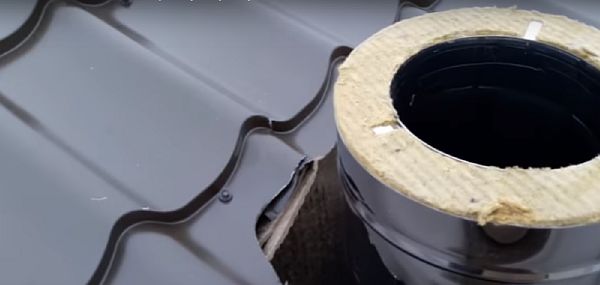
The passage through the roof of the chimney provides for thermal insulation of the chimney with basalt wool or other non-combustible materials. If possible, an air gap of 5-7 cm wide is left between the layer of insulation and the chimney itself.
Box insulation with basalt wool
If the installation of the chimney involves the use of a special element - penetration, when choosing it, first of all, make sure that the element is made of a material that is resistant to temperature extremes.
Please note: Do not use materials that are not designed for high temperatures, such as pipes and roof penetrations for ventilation ducts.
Rectangular or square tube
The brick chimney of a classic stove usually has a rectangular or square section, since this is the simplest form for installation. The outer casing of the ceramic stove chimney looks similar.
In the standard version, the chimney is located strictly vertically, but on the ceiling of the attic, a horizontal section of a small length can be arranged in order to adjust the place where the chimney exits to the roof.
A hole is cut in the roofing pie and the wooden structure mentioned above is mounted. After the laying of the pipeline passing through the roof is completed, it is necessary to ensure reliable protection of the passage unit from atmospheric precipitation. From the inside, from the side of the attic, a steel sheet is attached to decorate the penetration site (a hole in it is cut to fit the size of the pipe, the sheet is put on the chimney in advance). The protective and decorative plate is attached to the edges of the support box with self-tapping screws, the joint along the pipe perimeter is filled with a fire-resistant sealant. The box is lined with asbestos sheets from the inside, or the gap between it and the pipe is filled with basalt wool.
Rectangular pipe
From the outside, the edges of the waterproofing are brought onto the brick pipe, in which a cruciform incision was previously made. Each of the resulting triangles is cut so that the overlap on the chimney wall is 10–12 cm. Waterproofing is glued to the brick using a special material - an elastic metallized tape with an adhesive layer.
Then the inner apron is mounted. The structure consists of four galvanized steel strips. The upper folded edge of each plank is inserted into a brickwork, and not into a masonry seam. In the corners, the strips are joined with a 15 mm overlap. All joints are treated with a heat-resistant sealant. The side strips should be provided with bumpers that direct the flow of water downward. A metal sheet with sides is put under the lower bar - a tie, which provides water drainage to the lower edge of the roof or to the nearest valley.
To decorate the chimney through the roof, an external apron made of galvanized sheet metal is installed. The material can be painted in the color of the roof. The method of fastening is the same as for the internal structure, but you can do without the punishment by treating the joint with a heat-resistant sealant for external work. The edges of the apron, laid on top of the roofing, are fastened with galvanized self-tapping screws.
The basis of safety is the right choice of materials
Installation of the chimney through the roof can be carried out using various technologies using ready-made structures or special elements. The choice of technology is primarily dictated by: 1. type of roof (flat or pitched); 2. the features of the roofing; 3. the shape of the chimney; 4. the presence and type of chimney lining.
Structural elements and materials such as a duct, a chimney cover, insulation, sealant, abutment strips, etc. must correspond to the type of chimney to be installed. A properly assembled roof entry unit must be fireproof and airtight. Moisture trapped inside the roofing cake provokes rotting of wooden elements of load-bearing structures, the development of harmful fungal mold, and reduces the thermal insulation properties of cotton wool insulation. Passage elements, sealing parts and consumables suitable for one type of chimney cannot be used to install another type of chimney. basic elements for sandwich pipes When purchasing components and materials for installing a chimney on the roof, you must familiarize yourself with the quality certificates for each type of purchased product. It is recommended to go to specialized stores.
Installing a sandwich pipe through a finished roof
In the last few years, chimneys have been made using a sandwich pipe. People are attracted by its appearance, low cost and long service life.
An important condition is the ability to install a sandwich chimney with your own hands.
Installation of a vertical channel requires certain skills in the field of construction and knowledge of some of the nuances. However, with great diligence, such work can be done independently. The main thing is to figure out how to do it correctly, as well as observe safety precautions and fire safety standards.
How to lead a chimney through the roof
Such an operation requires a preliminary study of the location of the rafters and installed floor beams. The pipe should be between these parts. It is important that the outer wall of the flue duct does not touch the fuel element. In this case, it is necessary to maintain a minimum distance of 13 cm. Moreover, this part must necessarily have insulation. To fulfill this requirement, the pipe is often displaced in two places at an angle of 45 degrees.
A special hole is made in the ceiling, taking into account the fire safety requirements. The distance from the chimney should be more than 250 mm, and it is necessary to provide for the installation of thermal insulation on the ceiling.
To protect the edges of the hole, a fireproof material is used - minerite, which is fixed with ordinary nails or self-tapping screws.
Next, the sandwich construction is inserted vertically into the made box. The pipe does not need to be firmly fixed: it is enough to simply create a direction. 2-3 planks will keep it from falling, while the vertical movement will be completely free. This design is necessary so that the cylindrical product can move up or down. As the pipe heats up, it lengthens, which requires additional space and freedom of movement.
The remaining space is covered with basalt wool. You can cover everything with expanded clay or foamed glass granules.
Several years ago, ordinary sand was used for this purpose. However, over time, he began to get enough sleep through the available cracks. Today this option has been completely abandoned.
The front side is wrapped in stainless steel. A non-combustible gasket is made under the sheet. Previously, asbestos was used for this purpose. Today, it is considered a carcinogen, because this material has been replaced with mineral wool.
But you can also use another method: close the edges of the hole with mineral wool and only then install the assembled pass-through unit made of stainless steel sheet.
After the pipe is brought into the attic, a hole is made through the roofing cake. Next, the waterproofing is cut crosswise. The resulting triangles are carefully wrapped, then fixed with a construction stapler. The opened crate must be cut, keeping a distance of more than 13 cm to the smoke channel.
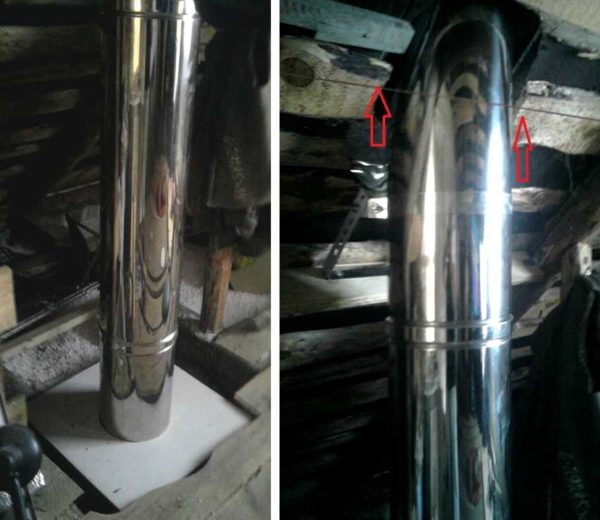
The photograph, which shows the red arrows, shows an incorrect pipe passage through the roof. The segment separating the cylindrical part from the planks is insufficient in size. If made correctly, the edges are trimmed with minerite, taking into account the requirements of fire safety. The next photo shows the correct passage.
Elastic penetration sealing
Sealing of the chimney on the roof is carried out taking into account the shape of the pipe and the relief of the roofing:
- For rectangular and square designs, a metal apron is suitable;
- For round exits, flexible rubber or polymer penetrations are often used;
- Sandwich pipes are equipped with a metal cone fixed at an angle on a steel apron;
- The slate or metal tile is equipped with lead abutment strips or the Master Flash system.
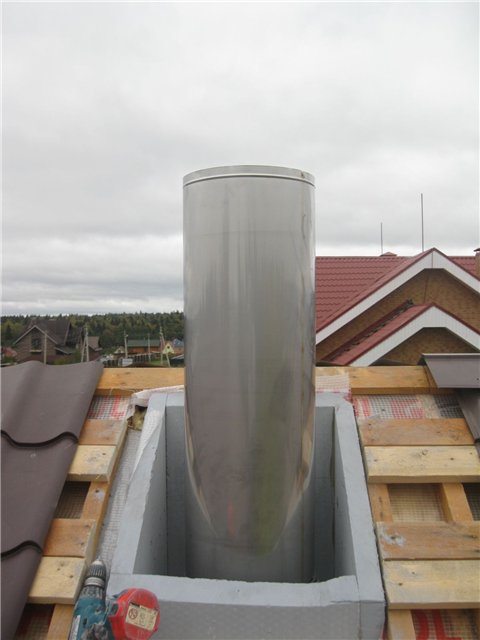
Installation of a pipe on a metal roof
There is a pattern - the lower the pipe is placed along the roof slope, the more effort will be required to waterproof the joint between the chimney and the roof.
Roofs made of profiled sheet are equipped with pipes in the following areas:
- Near the skate. According to SNiP 41-01-2003, the withdrawal of the device near the ridge will reduce the likelihood of the formation of snow pockets and the appearance of condensation.
- Chimney insulation on the slope. Chimney passage at a distance of 500-700 mm. from the ridge of the roof reduces the risk of leakage and preserves the rafter structure. Elastic penetrations or additional elements of the apron will help to protect the joint.
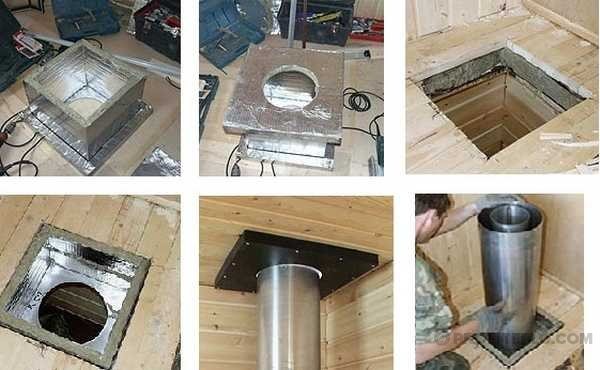
When planning to make a chimney passage through the roof with your own hands, start with a wooden box.
- Select the bars corresponding to the thickness of the floor beams (at least 5-10 cm) and measure the length that increases the pipe size by 15-25 cm.
- Connect the boards to form a square or rectangular structure (corresponding to the shape of the chimney), attach to the horizontal and vertical floor beams.
- Prepare additional materials: top and bottom apron, tie (long smooth sheet with a flange to drain rainwater), sealant.
- The abutment strips that form the apron are installed on the sides, top and bottom. The inner apron is placed under the roofing material to drain water. A tie is laid under it with a length equal to the distance of the lower apron to the cornice. External abutment strips perform decorative functions, and prevent moisture from entering the area where the chimney passes through the roof.
- Basalt wool will help to close the hole around the pipe and floor beams. The distance between the concrete and brick chimney, relative to the elements of the rafter system, is 13 cm, a clearance of 25 cm is left from the ceramic uninsulated pipe, in the presence of a heat-insulating layer - 13 cm.
- The gap between the pipe and the combustible material is covered with sheet metal. The tightness of the roof is ensured by a special film, which is cut with an envelope, and the edges are fixed on the outer part of the pipe, a wooden box.
When organizing the outlet of a round pipe, it is enough to choose an elastic seal, which eliminates the need for additional waterproofing protection around the penetration.
Waterproofing a chimney on a roof made of metal tiles requires the preparation of the following tools and materials:
- construction pencil or marker;
- drill and drill set;
- grinder with a 2 mm disc;
- silicone sealant;
- riveter;
- aluminum strips and clamps;
- metal corners;
- roofing screws;
- long ruler or tape measure;
- pliers and hammer.
Tools and materials necessary for work
Bypassing the chimney on a roof made of metal tiles provides for the creation of two protective layers, which are done as follows:
- An internal apron is assembled on the crate, covering the roof and chimney.
- Prepare external decorative strips covering the roofing material and the bottom apron.
If the smoke system is located near the ridge, then the edge of the upper strip is introduced under the ridge element.
The arrangement of the inner apron begins from the bottom wall of the riser.
- Each element covers the slope by 200 mm and rises vertically of the ventilation structure to a height of 150 mm.
- The side strips go under the ridge of the metal tile, cover the lower element of the apron along the entire length, extend beyond the pipe by 20 cm.
- All parts are firmly connected with self-tapping screws.
- Measure 15 cm on the pipe, make a 15 mm deep groove with a grinder.
- Next, the ditch is filled with silicone sealant, after which the lower abutment bar is fixed.
When pouring silicone, it does not need to be spared, it must fill all the voids between the pipe and the apron
Important! The upper part of the apron should fit snugly into the groove filled with sealant.
It remains to lay the roofing material and attach the upper strips to the chimney with self-tapping screws, fill the sealing line with waterproofing mastic.
So that the screws do not stand out against the background of the roof, the color of their caps should be matched to the tone of the roofing
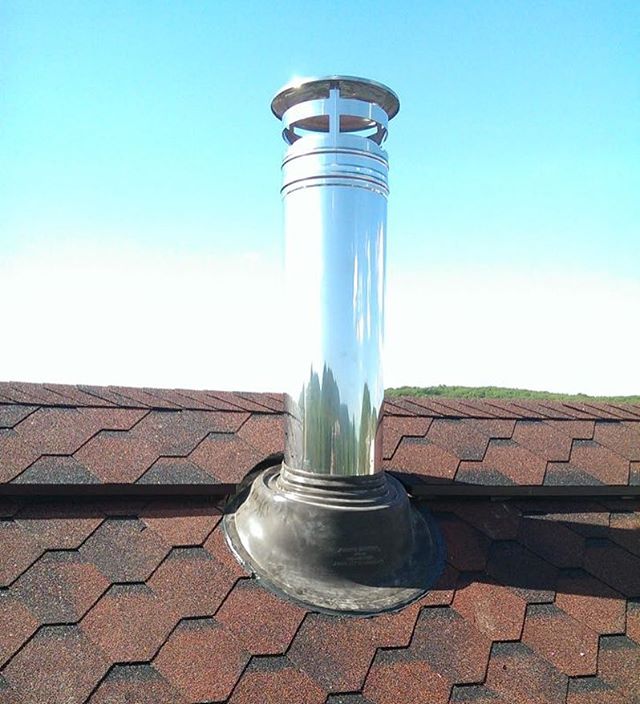
A finished apron-cap, represented by a metal sheet with a hole, closed with an inclined truncated cone, will help to seal the round chimney.
- The sheet is attached to the crate, the pipe is passed through the cap, the upper part of which is pressed against the chimney with a steel clamp with a heat-resistant gasket.
- Wanting to direct the flow of water downward, a side is made along the edge of the sheet with pliers and a hammer.
Interesting to know! An apron for a round chimney is made of black steel with a thickness of 1-3 mm. They cover the metal with heat-resistant enamel that can withstand heating up to 600 degrees. It is also possible to manufacture stainless steel parts with a maximum thickness of 2 mm.
Sealing the joint using a ready-made apron-cap made of stainless steel
To ensure the reliability of the roof in the places of valleys and abutments, a tie made of metal parts (abutment strips), which are brought under the covering by 150-200 mm, will help.
The joints of the apron with the profiled sheet around the chimney are sealed with roofing sealant. Cornice bends are installed below and on the sides, directing the flow of precipitation to the roof slope.
Before applying the corrugated board, it is necessary to seal the riser passage with a membrane.
- A cruciform cut is made in the material, and glued to the walls of the chimney at a height of more than 5 cm.
- Self-adhesive tape "Wacaflex" is attached under the upper abutment bar: from the bottom, from the side, then from the top.
- Sometimes the chimney is arranged in the finished roof, cutting out a hole in the corrugated board with a margin of 1.5-2 cm.To do this, the metal sheet at the junction of the rectangular pipe is folded back, a waterproofing membrane is glued and the lower, then the upper crate is installed, tightly pressed against the roofing cake and chimney.
Safety measures when installing the chimney must be strictly observed
In order to avoid the formation of a thick layer of plaster, you should know how to properly insulate pipes:
- To begin with, seal up all existing irregularities on the pipe with cement mortar;
- Then cover the walls with a reinforcing mesh;
- The final stage is the application of plaster.
Important! Before covering the first layer, bring the solution of lime, cement and slag crumbs (or sand) to the thickness of sour cream, sprinkle without leveling. The second coating is more dense, it is applied with a trowel, rubbing until a smooth surface is obtained.
Reinforcing mesh will allow the plaster to adhere well to the pipe and will not crack when it dries
Plating a chimney with asbestos cement requires the use of a cement-lime mixture applied to the surface of the slabs.
- The chimney is reinforced with a mesh and the first layer of solution is sprayed.
- A new layer of the mixture is applied to the insulation sections and fixed to the surface of the chimney.
Asbestos contains carcinogens that are dangerous to humans, so experts do not recommend using it in residential premises.
When insulating a metal pipe, the distance of the chimney from combustible materials should be observed - 60 cm.
- The structure is wrapped with 5 cm thick mineral wool with an overlap, clamped with steel wire. Wrap it on top with a metal sheet.
- Rivets are inserted into the previously prepared gaps, the heads of the retainers are closed with a special tool.
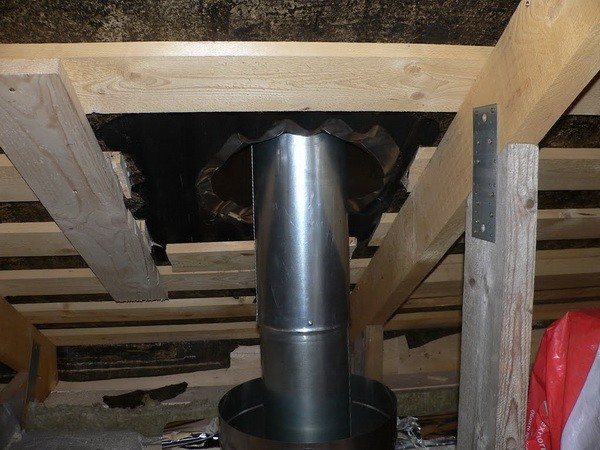
When removing the chimney from the sandwich pipes through the roof, it is necessary to take into account the location of the floor beams and rafter legs on the roof. It is necessary to guess so that the pipe passes between these elements. The minimum distance from the outer wall of the pipe to the fuel element must be at least 13 cm, and this is provided that the fuel element is protected by a heater. To fulfill this requirement, the pipe often has to be displaced. This is done using two 45 ° angles.
Offset of the pipe to pass through the ceiling slab
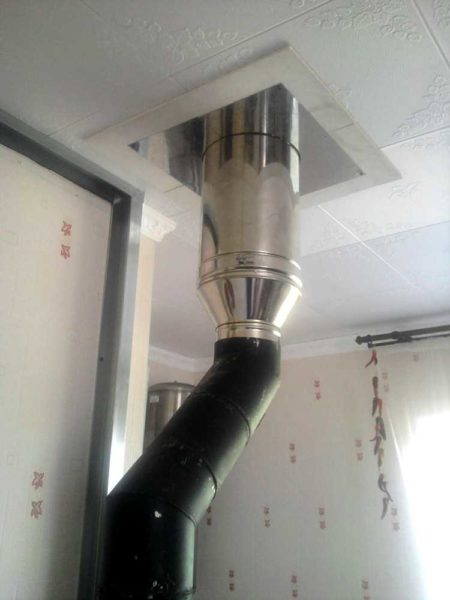
Please note that the installation of a sandwich chimney from a solid fuel boiler begins with a metal pipe without insulation. In the photo above, it is black. After it, an adapter is placed on a sandwich, and a chimney with insulation enters the passage unit.
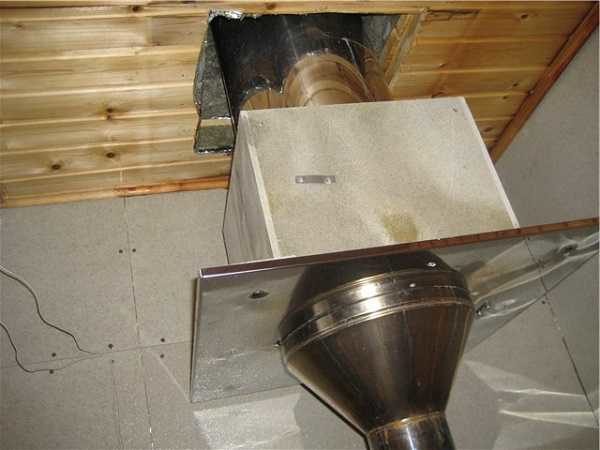
A hole is cut in the ceiling, which meets fire standards - 250 mm from the edge of the pipe, if the ceiling is protected by thermal insulation material. Having cut out the hole, its edges are closed with non-combustible heat-insulating material. Minerite is best suited for this (nailed or fastened with self-tapping screws on wood).

Gray material around the perimeter of the hole - minerite
A chimney sandwich pipe is inserted into the resulting box. It should be directed strictly vertically, without the slightest deviation.It cannot be rigidly fixed, you can only give direction by installing several planks that will hold it, but it can move up / down without difficulty. This is necessary, since when heated, its length increases significantly.
The remaining space is filled with basalt wool (check the temperature range). Another option is to pour expanded clay, granulated foamed glass. Previously, sand was still poured, but sooner or later, it all woke up through the cracks, so now this option is unpopular. On the front side, all this "beauty" is covered with a sheet of stainless steel, under which (between it and the ceiling) non-combustible material is placed. Previously, it was an asbestos sheet, but since asbestos is recognized as a carcinogen, they began to use mineral wool cardboard.
There is another option. Trim the edges of the hole with mineral wool, and then insert the finished stainless steel ceiling-walk-through assembly. It immediately contains both a box and a decorative stainless steel screen.
Ready-made ceiling duct assembly (one of the options)
Having brought the pipe to the attic, they make a hole in the roofing cake. All films in the place of passage (vapor barrier and waterproofing) are cut crosswise. The resulting triangles are wrapped and secured with staples from a stapler. So the damage is minimal. The exposed crate is cut so that the pipe is at least 13 cm.
How to bring the chimney through the roof - the passage of the ceiling and roof
Completion of installation
At the end of the assembly of the structure, the protective film must be removed from the pipe. The chimney length is considered ideal, starting from the grate and ending with the head within 5-6 m. Special attention should be paid to these values. Then all gaps and existing seams are sealed.
The operation is performed using a heat-resistant polymer compound that can withstand temperatures of over 1000 degrees. Sealant treatment is as follows:
- Inner pipes - the outer wall of the top is covered.
- External products - one external surface is processed.
The junction of double-walled products with other parts is covered with a polymer composition only on the outside of the circle.
The joints of the modules and the single-wall pipe are sealed according to the last option.
After completion of all work, it is imperative to check the hazardous areas for their ability to withstand high temperatures.
To facilitate the maintenance of the chimney, the installation of a special revision is provided. This part has a removable part or is equipped with an opening with an opening door.
Typical errors
When installing a vertical channel in a wooden house, fire safety requirements must be strictly observed. In this case, it is important to correctly make and process the passage of the sandwich pipe through the ceilings made of wood. These places must be well protected. Usually sheet steel is used for this, in which holes are made. The free space is closed with non-flammable thermal insulation materials.
To facilitate the work, a special ceiling-throughput unit (PPU) is often installed. In its appearance, it is very similar to a box. Its installation is necessary to perform certain actions:
- If the house shrinks or deforms, the chimney must retain its original position.
- PPU protects wooden floors and prevents them from burning.
The best option for laying a vertical channel is to install a special sandwich system. Usually, problems arise only if low quality thermal insulation was used during installation, for example, general construction insulation instead of a special non-combustible material.
Basalt wool is considered one of the options for such protection.
It is sometimes misused.This material is known to be capable of storing heat. If you just wrap a chimney with it, then after 4 hours of operation, the insulation will begin to give the accumulated heat back, thereby provoking overheating of the chimney. To prevent this from happening, it is required to install a special steel sleeve that would cover the cutting insulation layer. Superisole can be used as the latter.
This steel element should be in the form of a cylinder. It is important that the height of the part is equal to the thickness of the groove. The sleeve will help to avoid temperature rise and will help to remove heat from the thermal insulation.
Around the steel part, it is necessary to organize a micro-ventilation system, which is an air gap with a thickness of 3 mm. The air moving around the liner will cool it, thereby lowering the temperature.
Installing a steel product allows you to use the heater for a long time, eliminating the risk of overheating.
Possible installation errors and how to avoid them
The presence of errors during the installation of the chimney can lead to a fire in the ceiling, roof or wall. It is important to keep the minimum distance between flammable objects and the chimney.
Errors and remedies:
- A common mistake is saving space. Sandwich pipes should not heat up as long as they are in good working order. But over time, it is possible for warm air to pass through the thermal insulation layer. In this case, nearby flammable materials may ignite. The presence of sufficient space between the chimney and building materials excludes this possibility.
- Another mistake is neglecting the tightness of the compared parts. It is recommended to cover all joints between the constituent parts of the chimney with a layer of sealant, otherwise the passage of combustion products from the chimney into the environment is possible. The joints between the pipes can be additionally tightened with special clamps.
- The third common mistake is matching pipes only by smoke or condensate type. Smoke matching means that the bell of the overlying pipe is pushed onto the underlying pipe. In this case, smoke will not accumulate in the pocket formed between the pipes, but condensation can drain there. Condensate matching means that the funnel of the underlying pipe is pushed onto the overlying pipe. Condensation cannot drain into the resulting pocket, but smoke will accumulate there. In the first case, there will be a lot of condensation in the chimney, in the second - soot. In order to take advantage of both options in a sandwich pipe, it is sufficient to match the inner cylinders “by condensate” and the outer ones “by smoke”. Matching both cylinders in the same way can quickly clog the chimney.
- A gross mistake is the use of general construction insulation instead of thermal insulation. Many insulating materials are used in construction, but when arranging a chimney, it is necessary to choose materials with the best thermal insulation. This material is mineral wool. When installing external insulation, the use of basalt wool is allowed, but if the pipe heats up significantly from the outside, after a few hours the basalt wool will begin to heat up.
Related article: Lightweight roof structure
Features of this design
A sandwich is a good option for a chimney with insulation. Warming provides you with the following advantages:
- the possibility of the functionality of the chimney while being in the zone of low temperature conditions;
- endows the pipe with the necessary fireproof properties (inside the building).
Standard versions of such chimneys have an external galvanized coating. There are also options made of stainless steel, as well as painted in any color that suits you.
Existing versions of sandwiches made of stainless steel are covered with a special protective film from the outside. The main thing - do not forget to remove it before using the chimney for its intended purpose. There are also special adapters on sale that you will need when connecting the boiler and pipe. Be careful when choosing elements for a sandwich chimney.
Sandwich pipe device diagram.
The necessary tools for work are:
- jigsaw;
- pencil or marker;
- roulette;
- level;
- Bulgarian;
- screwdriver.
Installation of a sandwich chimney
The chimney can be connected both directly to the stove and to the heat exchanger (tank) through which the chimney passage is made.
The first thing to do is to install a single-wall stainless steel pipe of the required length. Installing a single-wall pipe will help dissipate a large amount of heat at the first stage.
When installing an insulated version of the chimney (sandwich), a high degree of heating will contribute to overheating of the outer circuit of the chimney.
Layout of the passage of a sandwich pipe through the roof.
With the first option with a single-wall chimney, you will significantly reduce the heat loads on the chimney and at the same time ensure rapid heating of the steam room. At the next stage, the insert-gate valve (gate) is installed in the absence of it in the oven for the bath. With a low bath ceiling, the gate is fixed directly to the stove (tank, heat exchanger), while single-wall pipes are not used.
Now it is necessary to perform the device of the lower nozzle. It will carry out the transition between two types of pipes - single-walled and insulated (sandwich). The time has come to install the insulated bath pipe. It should be of the length you need and be placed up to the highest point of the chimney. It would be impractical to install a single-wall pipe in the upper part of the chimney after the sandwich. With this option, the flue gases will cool down rather quickly, which contributes to the deterioration of draft and the formation of condensate.
To make a passage through the floors of the bath (combustible), you can use the so-called telescope. This design provides for the presence of adjustment for the desired thickness of the existing overlap.
The installation technology is as follows:
- A hole is cut in the ceiling of wood, 15 cm larger than the diameter (outer) of the sandwich pipe. This hole will accommodate a telescopic sleeve.
- The space between the overlap of the bath (house) and the installed sleeve is filled with heat-resistant insulation, as an option, expanded clay can be used.
- Square-shaped sheets, fixed at the bottom and top, will mask the gap (where the passage through the roof) and help maintain an attractive appearance.
Another nuance: in order to efficiently carry out a sealed passage through the roof of the bath, it is necessary to use a special silicone penetration made on an aluminum base, which easily takes the shape of the roof.
In the upper part of the chimney, there is an insulated nozzle that covers the insulating material from the sandwich. This means that protection from moisture and destruction is provided to you. An umbrella is installed in this nozzle, designed to protect the chimney from various types of precipitation. All joints of elements and thermal insulation (nozzles, pipes, etc.) are reinforced with tightening clamps that prevent separation.
Types of location of sandwich chimneys.
Chimney device
Sealing issues
An important point when leading the pipe to the roof is the sealing of the joints. The ban on the output of the chimney at the junction of two slopes is connected with this. In this case, gaps are likely to appear through which water will seep into the roof. In addition, this location will invariably be associated with the accumulation of snow and rainwater. It is much easier to seal a pipe located on one slope.
Chimney sealing is associated with another important point - ensuring fire safety.
A roofing cake is made of flammable materials, which will cause a fire if they come into contact with a hot metal pipe. The basic rules boil down to the following points:
- When removing the chimney, it is necessary to take into account the removal of hot elements from the rafters by at least 20 cm. The rest of the elements of the roofing cake are sealed by covering the outlet with a continuous layer of insulation, which does not allow heat to be transmitted to the roofing elements.
- It is possible to separate the pipe from the rest of the roof by an installed box of wooden elements with a distance of up to 15 cm. It is this space that will be filled with a non-combustible insulation (for example, stone wool).
- In the case when in the place where the chimney passes through the roof its temperature is not more than 60 °, and it itself is insulated, then there is no fire hazard for the elements of the roofing pie. In this case, at the point of output, the film materials are cut according to the type of an envelope and fastened with nails tucked into the base. They can be brought directly to the insulated pipe and mounted to it using adhesive tapes. In this case, the installation of gutters for water drainage will be required.
Arrangement of various types of pipes
The issue of sealing is solved differently for different types of chimneys:
- The brick pipe is insulated against possible moisture seepage by means of a plate.
- On the slate roof, a special platform is made around the chimney.
- If the roof is a multi-layer cake, then the above example of creating a box is applied.
- A special insulating apron can be used for waterproofing. It fits snugly around the pipe and roofing material and prevents moisture from entering the roof. A similar element is made of rubber, resistant to temperature fluctuations and precipitation. Pulling on such an apron is done with a soapy solution.
- A good solution would be not to exit the pipe through the roof, but to lay the roof around the erected pipe. This minimizes the hole that needs to be repaired to avoid roof leaks.
It is convenient in terms of ensuring the sealing of the pipe, the use of ready-made sets, the so-called sandwich pipes. Let's consider an example of their installation in more detail.
Use of sandwich pipes
Installation of a sandwich pipe with a passage through the roof does not fundamentally differ from the arrangement of other types of chimneys. Ease of use lies in the use of a ready-made insulated chimney. Let us give an example of the output of a pipe in a bath from a finished sandwich chimney.

It is necessary to lead the chimney in the bath through the roof and through the attic. It would be wise to make a passage through the attic using a walk-through assembly. This is a metal box that contains the pipe. It is filled with non-combustible insulation. The main purpose of this unit is to fill the space around the chimney and prevent it from losing heat.
It is advisable to close the places of contact of this box with the surfaces of the attic with non-combustible basalt cardboard and also cover the box on all sides with basalt wool. This will help improve the efficiency of the stove and minimize its heat losses for heating the attic.
Direct passage through the roof is made using an under-roof element with an opening for the outlet of the sandwich chimney. It must be installed on self-tapping screws to the elements of the rafter system. Before this, the hole in the roof is filled with non-combustible insulation. Outside, the outlet is closed with a lead element, which must fit snugly against the pipe. This is achieved by tapping it with a hammer.
The passage of the pipe through the wooden roof. Typical errors and execution technology
When installing a chimney in a wooden house, in order to ensure fire safety requirements, particular importance is attached to how the pipe passes through wooden floors. Protection of these places is mandatory and is carried out using sheet steel equipped with holes and using non-combustible heat-insulating materials.
Often for these purposes, a special ceiling pass-through unit (PPU) is used. Its appearance resembles a box or a sleeve. It is mounted to perform the following functions:
- to prevent deformation of the chimney in case of shrinkage or deformation of the structure;
- to protect wood floors from fire.
The device for the passage of the pipe through the roofing pie
Providing a competent abutment of the roof to the chimney pipe is not an easy task, since the complex design of a modern roofing cake requires continuity throughout its entire area..
In addition, according to the requirements of SNiP, combustible materials must be located at a distance, depending on the type of chimney pipes, at least 13-25 cm, and steam and waterproofing films for the roofing cake are just combustible.
How to get the pipe through the roof in such conditions?
There is an optimal solution to the problem - separation of the zone adjacent to the pipe from the main coating:
- rafter legs from the sides of the pipe;
- transverse beams attached to the thickness of the rafters, top and bottom.
Chimney pipe in a box
In other words, you will need to create a wooden box that separates the pipe from the roofing cake, and install a chimney pipe in it. In this case, the distance from the walls of the box to the pipe itself should be arranged in accordance with the rules of SNiP, and the space between the walls and the pipe will need to be filled with non-combustible heat-insulating material, for example, basalt wool, which is most often used for these purposes.
Adjoining the roof pipe, or rather hydro and vapor barrier films to the mounted box, can be done using the standard method:
- The canvases need to be cut with an "envelope".
- Bring their edges to the crossbeams or rafters and fix them with staples or nails.
- The waterproofing film will then be pressed by the beams of the counter-lattice and the lathing, the vapor barrier film will be the basis for laying the finishing material of the attic or attic.
- To ensure maximum protection of the insulation in the roofing cake from moisture, it is necessary to arrange an airtight seal at the junction of the films to the walls of the box using a special tape or adhesive.
How to equip roof passages
The installation of a chimney is necessary so that a draft is formed in the furnace, and the products of combustion come out of it. If we are talking about arranging a bath, then most often they use metal or brick pipes.
Even during the design of the building, it is necessary to decide how the chimney will be removed from the roof. Otherwise, difficulties may arise already during the period of direct construction. The passageway between the roof and the chimney must be fire resistant, and also provide reliable protection of the room from external environmental conditions. That is, you should pay special attention to high-quality waterproofing.
There are several ways to install a chimney:
- Exiting the pipe through the load-bearing wall at an angle,
- Through a load-bearing interior partition.
The best option is to have the pipe passage closest to the highest point of the roof. This location will be able to protect the structure from leaks to the maximum. In any case, the pipe head must be raised above the coating by at least 50 cm.
The node of the passage will be equipped for each separate type of pipe in an individual way. In addition, the material from which the roof is made is also important.Modern construction markets present a large number of materials that are suitable for waterproofing a chimney under one or another type of roof.
The most important point in arranging the passage of the pipe through the roof will be the choice of the correct slope. The pipe should be positioned so that there is a distance of about 7 cm between it, the roof and the rafters. Subsequently, these holes must be filled with non-combustible insulation.
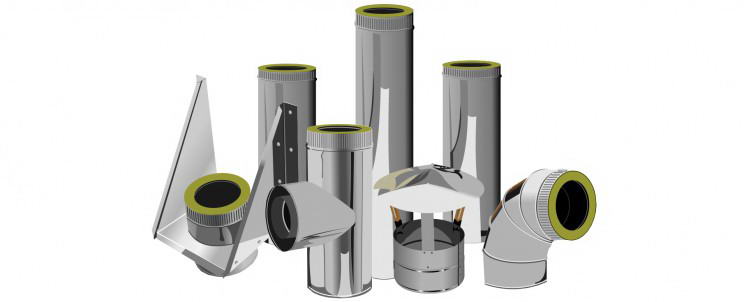
What is a sandwich pipe
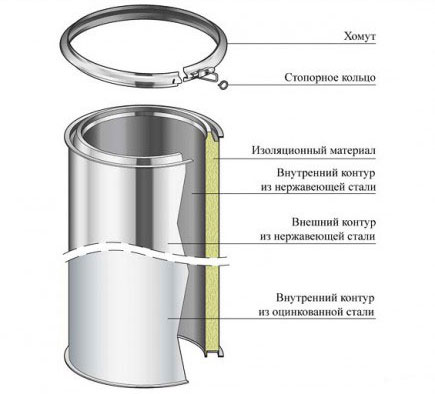
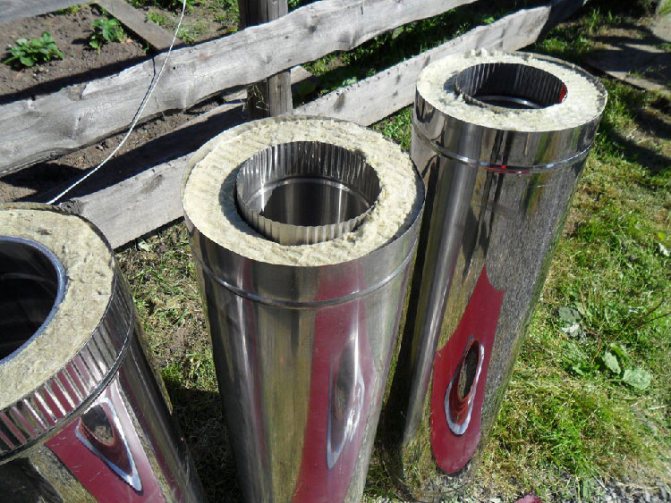
Sandwich - this type of pipe received this name for its layering by analogy with the named product. The inner and outer layers of such pipes are represented by metal cylinders, and the middle layer is a layer of thermal insulation.
Chimney metal has been used for a long time. A simple example is the pipe of an ordinary potbelly stove. However, soon after commissioning, it became clear that metal pipes have a number of disadvantages. The problem was that metals, with good thermal conductivity, quickly heat up and give off heat to the environment, and there is always a danger of ignition.
Related article: Cross-section of gable roof rafters
The solution turned out to be simple - the metal pipe was wrapped in a layer of thermal protective material. However, such material does not tolerate environmental conditions well and is not very attractive from an aesthetic point of view.
Sandwich pipes are the next solution in the evolution of metal chimneys. Another metal pipe is placed on top of the thermal insulation layer, which protects the inner two layers from external influences and does not spoil the appearance of the building.
It is important! Sandwich pipes can be purchased ready-made, but you can do it yourself by choosing the materials of the required parameters. It is worth remembering that the inner pipe should be more expensive and of better quality than the outer one, but smaller in diameter, and the thicker the thermal insulation layer, the higher the combustion temperature of the fuel in the heater.
The inner cylinder is made of stainless steel. This material is less corroded by combustion products. The steel must be of high quality and high-tech. They give preference to those options, the seams of which are welded using the TIG method - the most reliable and wear-resistant, but also the most expensive.
The middle layer provides thermal insulation and protects the surrounding surfaces from heat. For these purposes, mineral wool is used, the density of which is not less than 120 kg / m3. The thickness of this layer depends on the temperature inside the chimney. This parameter should be selected individually.
The outer cylinder is also made of steel. It is worth giving preference to stainless material, but to save money, you can choose galvanized steel. The durability of the chimney will depend on its quality to a lesser extent than on the quality of the inner cylinder. In addition, there are sandwich pipes with decorative outer cylinders on sale.
What you need to know about the removal of chimneys
The total size of the chimney should be at least 5 meters, and the part of the chimney above the flat roof should be about half a meter. And the distance from it to the rafters should be about 250 mm.
- Experts recommend moving the chimney to either side of the ridge. And the pipe must rise above it by at least 50 cm, if the distance between them is up to one and a half meters.
- When it is at a distance of up to three meters from the ridge, then you can make it flush with the ridge.
This transfer will be easy when using sandwich structures. If this is not done, then the constant accumulation of water at the junction will soon lead to a leak.
Types of arrangement of the passage
In order for the tightness of the passage assembly to be the best, high-quality execution of roof junctions is necessary. When arranging the passage, no flammable materials should be used.
How to properly organize the passage
The vapor barrier layer must be cut with an envelope and laid over the penetration. Its edges are fixed with a construction stapler to the rafter structure. It is necessary to create a crate near the passage and fill it with waterproofing material. Further, by analogy, a water-repellent carpet is made by cutting it with an envelope. Leaving about 10 cm on it, to insert the material onto the pipe wall.
It is imperative to leave a small gap around the perimeter of the chimney. This is done to ensure proper shrinkage of the structure. In addition to the described method, the following can also be applied:
- self-adhesive tapes with strips,
- special self-adhesive strips,
- special parts that are produced for a specific type of roof.
In the case when we are talking about a non-newly built building, and the arrangement of the chimney is not taken into account in the original design, then when the pipe is removed through the roofing, its integrity is always violated. In this case, it will be necessary to determine the territory where the chimney will pass through the roof.
A so-called separate box is created, in which the passage node will be located, separating it with transverse beams. This is necessary so as not to violate the integral insulation layer of the entire floor. This will reduce the thermal protection of the entire room.
The distance that forms between the pipe and the truss structure is filled with basalt wool, which tolerates high temperatures well, and does not triple its properties under the influence of humidity.
Chimney passage through flat roof
Reading now
How to properly cover the roof with corrugated board with your own hands
When installing the chimney on a flat roof, it is important to remember that its height above the roof surface must be 500 mm in accordance with SNiP standards. A round pipe, a rectangular chimney box or a brick chimney can be led out through the concrete slab. The round pipe passage assembly will be considered separately, but for other cases, two basic principles of installation are used. To lead the rectangular chimney box to the roof, it is necessary to make a corresponding hole at the installation site. Previously, a roofing cake is removed on the selected area - a finishing soft coating and underlying layers. In this case, the roll cover should go 150 mm along the perimeter into the prepared cell. The cover is scored and folded back - these free edges will then be attached to the vertical walls of the penetration. A rectangular hole of the required size is made in the concrete. A formwork is installed along its edge and a vertical rectangular side with a height of 150 mm above the roof carpet is poured along the perimeter. After the concrete gains strength, the formwork is removed, and a pre-bent roll covering is attached to the outer sides of the side. To prevent peeling of the roofing material from the sides of the side, a metal strip is mounted along its edge using dowels. After installing the chimney box, it is important to waterproof the joint between the box and the concrete side. For this, an outflow with a drip made of roofing sheet is mounted on the abutment of the end of the side with the walls of the chimney. It is easier to mount a brick chimney on the roof. In this case, the pouring of a special side is not required: the brick structure passes through a prepared hole in the concrete floor, and the flaps of the soft roof are mounted directly to it, after which a galvanized apron is installed on top. brick-built chimney on the roof At the required height along the perimeter of the chimney, a horizontal groove with a depth of 15 mm is made. It should be done in the brick, not in the assembly seam. The upper edge of the metal apron, bent inward, is inserted into the strobe. Then the strobe must be filled with construction sealant.
Roofing metal requires the use of an acetic acid-free sealant. Features of the arrangement of the passage through the pitched roof How to fix the chimney on the roof? On the chimney from the inner side of the roof, it is required to mount a flange that is rigid enough to take the loads from the crate - the chimney outlet forces part of the girders to be dismantled, and without installing the flange, the structure will remain in a suspended state.
The flange is usually a steel sheet with stiffeners welded to it. The sheet thickness should be at least 2-3 mm. A non-combustible heat insulator - basalt cardboard should be laid on the flange. This will prevent heat transfer from the chimney to the battens. If the chimney structure is not reliable enough to take on some of the loads on the roof, a rafter structure or additional posts are mounted around the perimeter of the hole so that the load is transferred to the attic floor.
It is recommended that the lathing around the chimney be made solid or thickened in order to be able to fix the elements with which the passage assembly will be sealed. Around the pipe, all layers of the roof must be cut to a gap corresponding to the standards specified in SNiP (depending on the type of pipe and the degree of its heating). The resulting gap must be filled with a non-combustible heat insulator - basalt or glass wool, basalt cardboard. The principle of sealing the abutment of the roofing material to the chimney depends on such factors as: 1.material of manufacture and coating of the chimney; 2. location of the pipe outlet on the roof. To ensure that the chimney led out through the pitched roof is not damaged by snow melting, it is recommended to install snow holders higher up the slope. If the chimney width (across the slope) is over 800 mm, a special structure should be mounted on the slope above it, which diverts the water flow. It is very difficult to waterproof the junction of the roof to a circular pipe without using special roof penetrations. The construction market offers a wide selection of pipe assemblies that differ in diameter and material of manufacture.
A universal option is an aluminum flange fitted with a silicone or rubber bellows. Several standard sizes of these elements are available, so you can choose a penetration for a chimney of any popular diameter. The flange face is covered with a material similar to that of the corrugation and provided with grooves for filling with a sealant. The top of the corrugation cone is cut to the required diameter, after which the penetration must be pulled over the chimney. The flange must be coated with sealant and attached to the roof with self-tapping screws that are included in the kit. If the roof covering is not made of metal, the flange is attached with dowels or long self-tapping screws directly to the batten. For roofs with different slopes, penetrations are offered in which the corrugation is located at different angles to the flange. You can purchase a split design, which is used if it is not possible to pull the corrugation onto the pipe due to the presence of protruding parts or the high height of the mounted chimney. Such a penetration is equipped with clamps, due to which the corrugation is tightly squeezed around the pipe. Fastening the chimney to the roof can be done using penetrations, in which a hinge segment is used instead of a corrugation. This is a universal option for roofs with any slope of the slope: the surfaces of the docking elements are spherical and can be fixed relative to each other at any angle. It is not uncommon for roofing material manufacturers to offer prefabricated chimney penetrations with a pre-formed flange for the appropriate roof covering. Such a penetration is attached to the roof lathing with the necessary overlap.To achieve the same diameters, the apron cone is cut off. Passages from roofing manufacturers have several standard slope angles. To seal the joint, a second conical apron is mounted overlapping the first. To compensate for thermal expansion, such joints are made without fasteners. This allows the pipe to "breathe" and also not to experience additional destructive loads from the roofing structure.