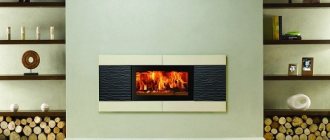
Preparatory work
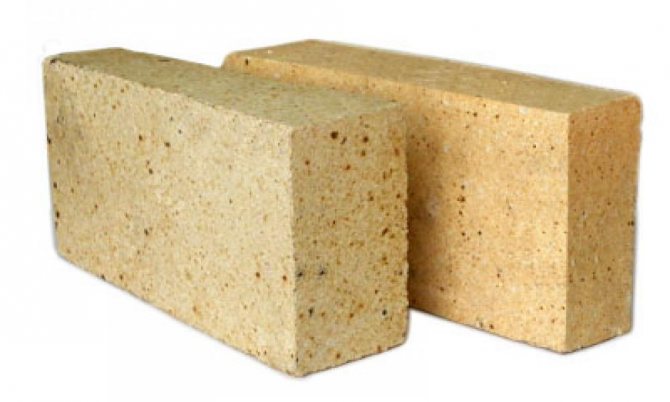
Cladding bricks must be refractory.
- brick;
- cement;
- sand;
- reinforcing mesh;
- Master OK;
- shovel;
- grinder;
- container for solution preparation.
Silicate bricks are not suitable for cladding fireplace surfaces that reach high temperatures. It is necessary to buy refractory bricks. It is not subject to destruction at significant temperature changes, it is able to accumulate and gradually release heat. Masonry mortar can be prepared by hand.
This will require cement, sand and clay added for plasticity. It is recommended to pre-soak the clay, pour it with warm water and leave it for two days, only after that it can be added to the solution. Prepare in advance the decorative elements provided by the project. How to overlay a fireplace insert with your own hands?
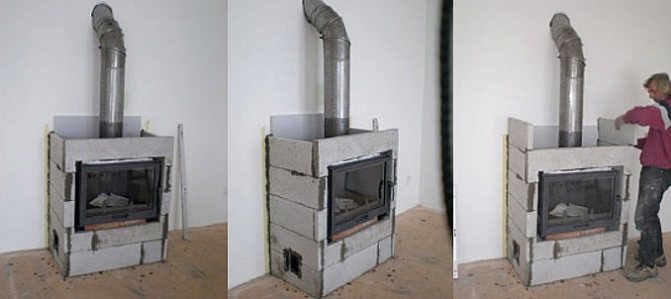
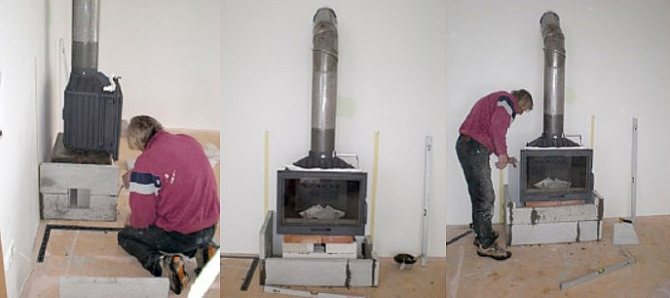
Metal fireboxes have a fairly large mass. However, the main danger arises from the strong heating of the structure. In order to make such a firebox safe, it is installed on a pre-assembled and fixed pedestal made of metal or concrete. Cladding also plays an important role.
Cast iron furnaces have a certain sequence of work, which you can familiarize yourself with below:
- In order for the design of the heating unit to warm up well, but at the same time not overheat or deform, a small gap must be left between the combustion chamber and the portal, a little free space, about 5-8 centimeters;
- The combustion chamber is pre-installed on a sheet of metal or a loaf base. Bricks are also laid only on a protected floor surface;
- Pre-soak the brick in cold water. The first rows are laid as tightly as possible. You also need to keep the same thickness of the seams, which ideally will be 3-6 millimeters;
- In the same way, we lay the remaining rows, dressing is periodically performed. When laying the second or third row, several holes or so-called ventilation ducts are left;
- We use a plumb line and a building level to check the evenness of the structure and masonry of the rows;
- A brick structure should have a well-thought-out and convenient functionality. All compartments and elements are installed in such a way that, if necessary, free access to each area is provided.
After the brick fireplace portal is completely assembled, it is necessary to eliminate all excess mortar. After that, the fireplace needs time to dry completely and get a natural shrinkage. This can take from 7 to 20 days, depending on the size of the structure.
It is important to remember that if the dimensions of the brick base are very large, and the mass exceeds the weight of 600 kilograms, before building the portal and installing the firebox, you will need to make a foundation.
For an additional foundation, you will need to dig a hole, at the bottom of which rubble is compacted, reinforcing bars are inserted, and a special composition is poured.

Fireplace insert
If you are not able to build a fireplace, but you really want to have a brick lined fireplace, there is a way out - this is a brick lining of the fireplace insert that you bought earlier. Moreover, all the advantages of such a fireplace are preserved. True, the weight will increase by 1-2 tons. When lining the firebox with a brick, ordering is not needed, because there is nothing complicated.
Let's consider the important features:
- The firebox must be free.
- We leave thermal gaps of about 5 mm between the masonry and the front of the firebox.
- It is impossible to support the chimney and the ceiling masonry on the firebox.
- The firebox must not be closed tightly.
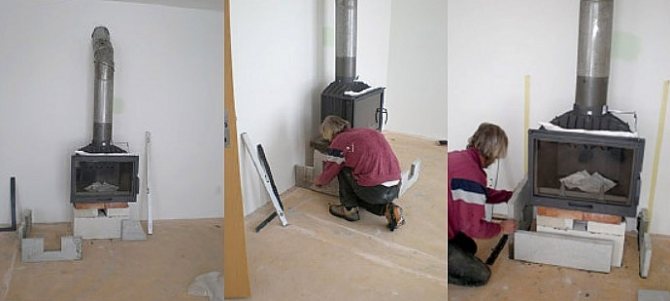
- The firebox must be installed on a brick base raised above the floor.
- The firebox is installed from below, into which the channels are built.
- A steel pipe is installed on the firebox, which is needed to connect the brick-mounted brick to the firebox.
- Leaving four centimeters per row, the masonry converges to the pipe.
- The void between the brick and steel pipe is filled with basalt carton.
The above recommendations are only the basis, but knowing at least a small fraction of the masonry rules, you can make the lining yourself. In principle, there is nothing complicated, having familiarized yourself with the literature on this topic, you will stock up on all the necessary knowledge. (See also: Fireplace cladding)
Cladding
So, the lining of the fireplace insert with your own hands is over, you can proceed to the lining with decorative material. This will give your fireplace more grace and beauty.
They all differ in color, texture and have different subspecies. Following your taste and desires, you are sure to find a good model. With a small budget, you can use inexpensive claddings, a wide selection of which will allow you to find the right material and the lining of the fireplace will not only be cheap for you, but also beautiful in appearance. Your friends and family will definitely appreciate the beauty of the cladding. (See also: How to assemble a fireplace with a firebox)
DIY fireplace masonry
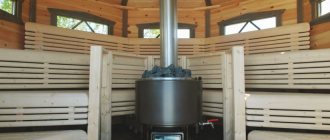
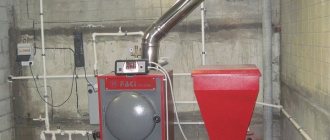
Stoves - fireplaces combine ease of use and installation. In addition, unlike a conventional oven, the fire can be observed through a glass door. Stoves - fireplaces have a high level of functionality and quality. The advantage of this structure is that it not only serves as a room heater, but also a stove for cooking. As a matter of fact, due to the compatibility of the fireplace and the hob, the name originated.
It will be quite problematic to establish such pleasure in a city apartment. At the dacha, laying stoves and fireplaces is still much easier and more appropriate.
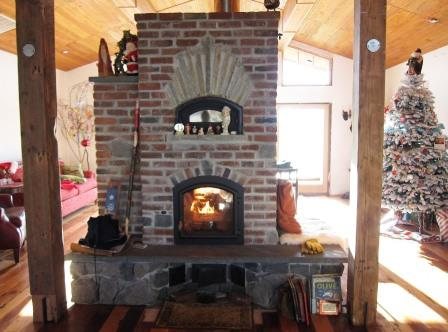
Brick ovens
A brick fireplace looks like a stove combined with a fireplace. This is, so to speak, a monoblock that joins one pipe channel and foundation. Such an oven combines heating and savings on additional gas ovens or electric ovens. Operational problems also do not arise. Before entering the chimney, the chimney of the stove is connected to the chimney flue ducts. The firebox is produced separately, although from time to time it can work simultaneously. (See also: How to choose the right fireplace)
Having decided on the type of stove, you can start work, although of course you can buy a ready-made nordika stove-fireplace, the installation of which is much easier, but much more interesting to do everything yourself and is proud of its unique design.
To build a fireplace stove, you need to have at least the slightest knowledge of construction, or at least superficially familiarize yourself with the literature on this topic.
The first step is to draw up diagrams, drawings, calculate the amount of material and prepare everything for work. (See also: Fireplace inserts)
08/23/2017 9708 Pechnik (Moscow)
Brick is one of the strongest, most reliable and durable materials. It is he who is most often used in furnace construction, and despite all the difficulties of installation, professionals prefer to choose this particular coating.
However, before imposing a fireplace insert, it is necessary to calculate and purchase the necessary fittings and coatings. Not knowing how to impose a brick on a fireplace insert, it is important to familiarize yourself with the advantages and disadvantages of this method.
Such a framing takes a long time to warm up, but at the same time it is also capable of retaining and distributing the accumulated heat for a long time.The surfaces practically do not heat up, they always remain warm, and the coating itself is easy to maintain and, subject to the order, the correct selection of each building component does not subsequently crack, crumble or deform.
In this article, you can view photos of ready-made options for assembling framing for combustion chambers, get acquainted with various technologies, procedures and the stage of preparatory work, which plays a key role in the construction and construction of such a fireplace.

We stock up on everything you need
The process of finishing a cast iron fireplace is a complex process that requires the use of special tools. For such purposes, specialists use a set of certain products and mechanisms:
- level;
- roulette;
- hammer pickaxe;
- plumb line;
- Master OK.
You also need to stock up on small containers for mixing the mortar and transporting it to the place of masonry (buckets, pallets, etc.). To cover a metal fireplace with bricks, you should also stock up on materials:
- Brick. This product must be designed for high temperature service. Building bricks should not be used, but refractory materials should be preferred. Many experts recommend buying decorative materials right away, which will exclude additional finishing on the outside of the masonry.
- Solution. You can make such a mixture yourself from clay, cement and sand, but this procedure requires adherence to a certain technology. It is much easier to buy ready-made masonry products that only need to be diluted with water to a certain consistency.
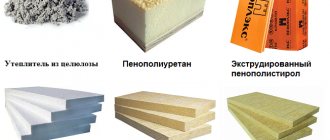
- Asbestos cardboard, metal corners, etc. All these attributes are auxiliary and are used to optimize the design (insulation, reinforcement, arches formation, etc.).
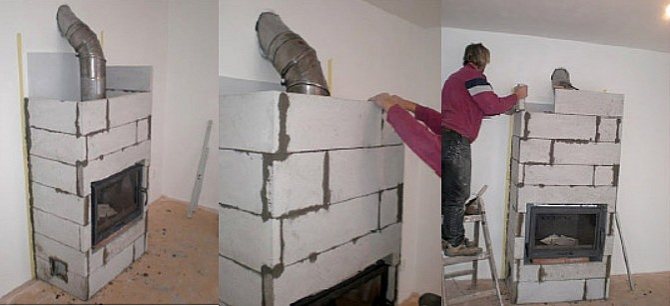
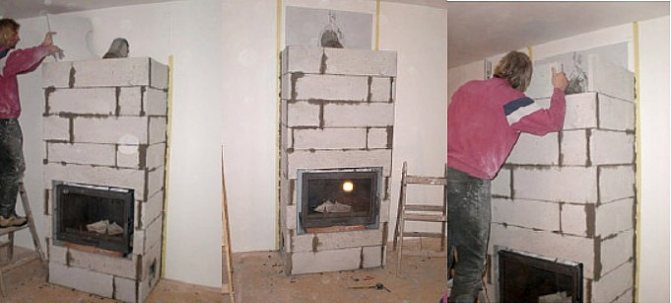
DIY cladding
The best instruction, of course, will be a video where you can see all the little things of editing with your own eyes. We will try to convey this to you now in a textual version. The list of materials is small, and, most importantly, it does not require huge injections of money from you. These materials are sold in any hardware store. Before starting work, you should stock up on: self-tapping screws, a fireplace grate, a metal profile, galvanized sheets, as well as drywall (preferably moisture-resistant) and heat-resistant wool. The latter must withstand temperature not less than 700 degrees... Preferred thickness - about 3 cm.
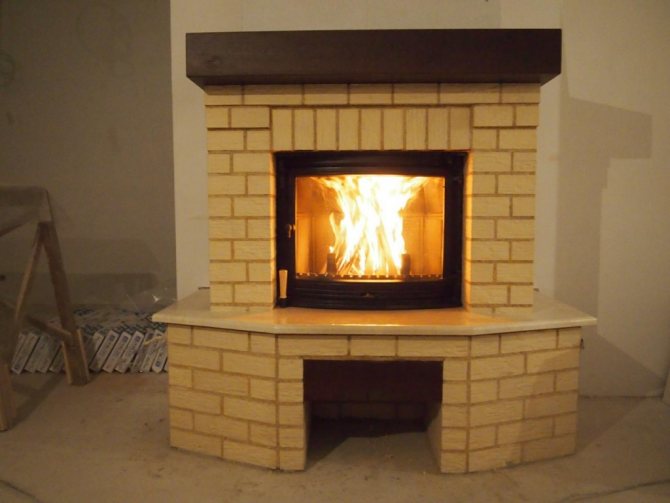
Making brickwork
Corner brickwork scheme.
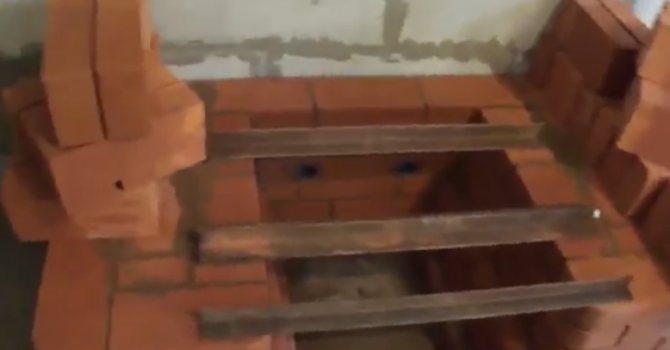
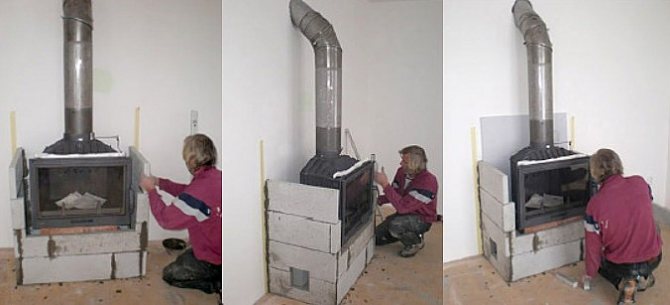
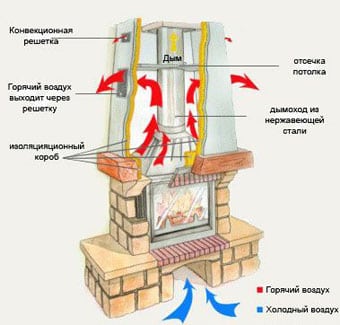
Cast iron furnaces begin to be lined from below. The lower part for any fireplaces is built according to a single scheme, according to which it is made in the form of an M-shaped structure with right angles. Particular attention should be paid to the calculation of the initial row, since the whole structure will rely on it. Incorrect placement of the first row of bricks can lead to cracks and breaks in the upper rows.
When forming the wall of the firebox, it is necessary to leave small distances between the bricks. They should be sized so that air can easily penetrate and not slowly leak out. It is from these holes that cold air will flow into the fireplace. Do not cover these gaps with mortar.
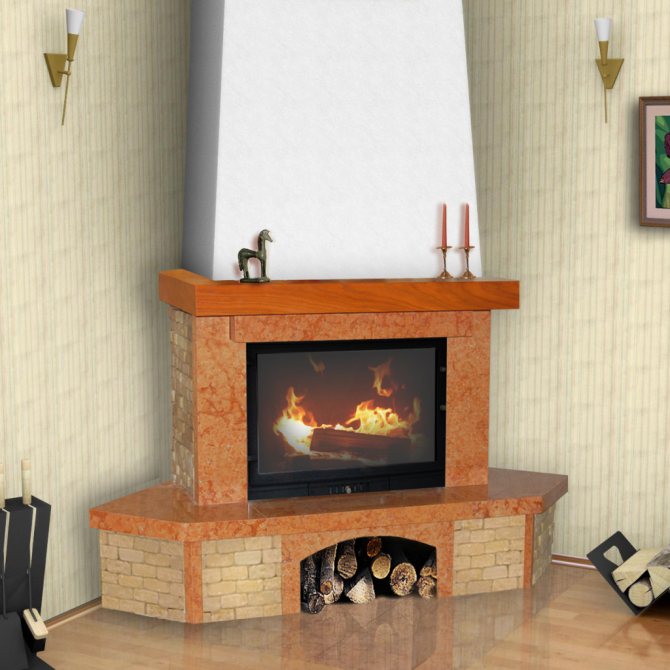
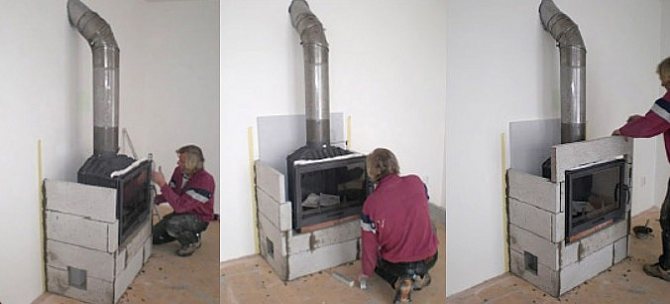
The top of the firebox is called the worktop. It is possible to cover the fireplace insert with bricks without forming a countertop, but it is this that gives the structure the greatest aesthetic appeal. You can build two such parts. One will be placed in the lower part of the firebox, the other in the upper. For the construction of the countertop, it is necessary to make a wooden formwork, the brick is cut to fit its dimensions.
The fireplace insert is laid evenly, the distance from the walls of the furnace to the cladding, according to building codes, should be 3-7 cm. This ensures the required air circulation. This technique allows you to provide the most efficient heating of the room without overheating the oven.Leaving a shorter distance can significantly reduce the lifespan of the fireplace.
It is worth remembering that the cladding should not touch the walls of the cast-iron firebox.
Pre-prepared countertops are laid in the lower and upper parts of the structure. In this case, take into account the weight of the resulting slab, it may be necessary to install a counterweight - the upper masonry.
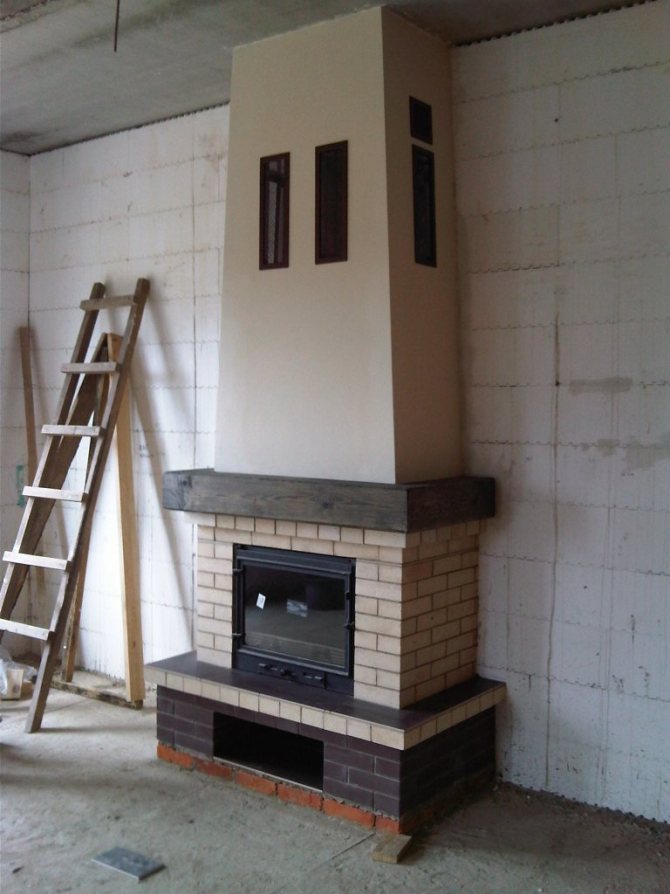
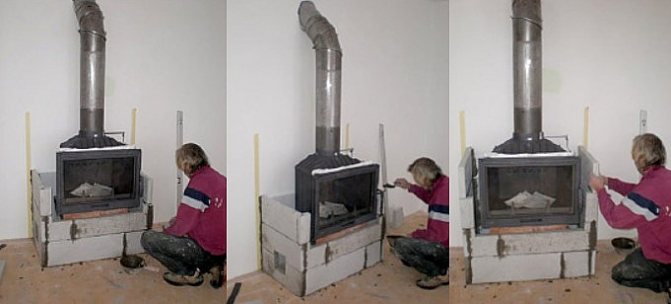
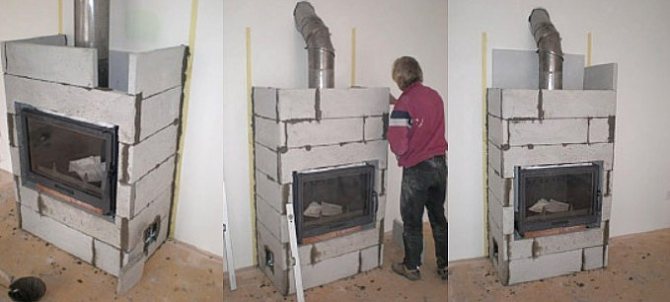
The final stage is the formation of the chimney. It can be either straight or tapered. The second type is considered more complex in execution, therefore, it is necessary to describe the construction process using his example. First of all, it is necessary to determine the value of the required slope, it should not exceed 4 cm per row. The bricks are laid with a uniform slope. Holes are made at a distance of 30-40 cm from the ceiling to remove the overheated air.
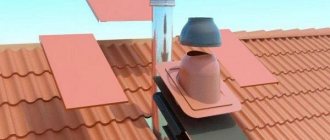
The chimney should not be located near flammable structures, this can lead to their deformation or fire. At a distance of up to 20 cm above the holes, the chimney passes into a metal pipe. If there is no pipe, this distance can be bricked. Thermal insulation of the chimney avoids heat loss.
Finishing and checking the operation of the furnace
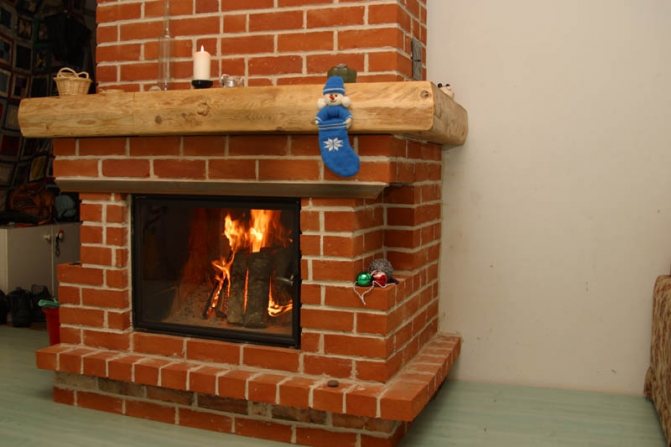
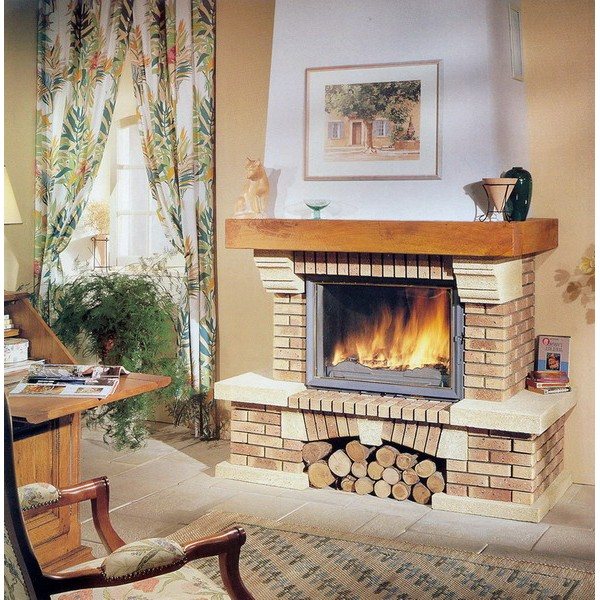
When the chimney is installed, you can do the final finishing of the base of the fireplace. The surface at the foot of the firebox is tiled with tiles or decorative stone. It is impossible to install a wooden floor or laminate at a distance of 50 cm from the fireplace, as the covering may catch fire from the falling coal or sparks from the firebox.
It is also recommended to put an openwork metal grate in front of the fireplace for safety. The decor is completed with chimney tongs, a poker, a beautiful wood stand and other accessories. Forged elements painted in black look the most exquisite.
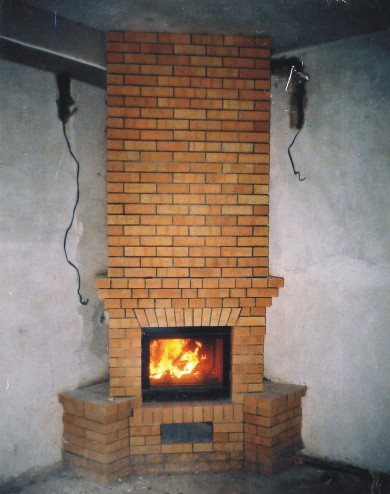
Fireplace
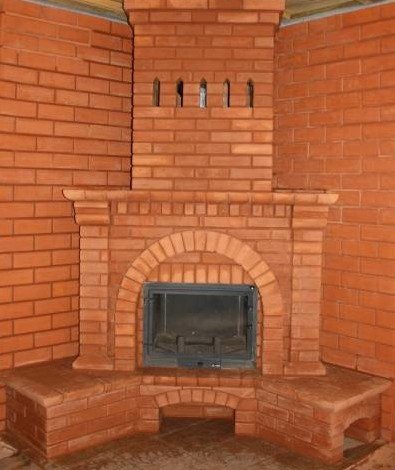
Corner fireplace
After finishing the finishing, you need to check how the fireplace works. For the first time, it is advisable to open the windows, as the paint on the firebox will burn and emit an unpleasant odor. If, during the combustion of fuel, smoke enters the room, this means that the installation technology has been violated. To eliminate the causes, check the air supply to the furnace and the tightness of the chimney joints.
Fireplace
It is very important not to build a strong fire when checking, it is better to start with a low temperature load.
Preparing masonry mortar
A stove, for which only a refractory brick is selected, will be much stronger if you prepare a high-quality mortar at home with your own hands. It is important to remember that since the oven gets very hot, the composition must also be heat resistant. That is why it is recommended to use clay among the components. To knead, you need to use the following step-by-step guide:
- In the prepared container, we need to mix two parts of sand and one part of clay. Keep the sand clean and free of lumps, dirt and plants. Pre-sift it through a special sieve and only then start mixing with other components;
- Next, water is poured into the two components in a ratio of 1: 4, mixing is performed, and the composition is left under a lid for 40-60 minutes, after which it is mixed well again. For these purposes, it is most convenient to use a construction mixer;
- In order to check the quality of the prepared mixture, a small piece needs to be rolled up and shaped into a rope, the thickness of which will be 10-12 millimeters. After that, it is formed in the shape of a circle. If no cracks appear on the surface and the consistency is similar to plasticine, then there is a lot of clay in the composition. To improve, it is necessary to add sand to the solution and after mixing, wait again for about an hour. If, on the contrary, the solution cracks strongly and a tourniquet does not form from it, add clay and let it brew.
The basis of almost any masonry mixture is a substance that is similar in composition to the material used for walls. Therefore, in the case of a brick fireplace, it is advisable to use clay solutions. The algorithm for their preparation is relatively simple and consists of several steps:
- Initially, sand and clay are mixed in a special container (2: 1). Please note that the sand mixture should be as pure as possible and consist only of this substance. Therefore, it is pre-sifted through special feed, which allows you to remove all organic components (plants, etc.) and large stones that cannot be kneaded to a uniform consistency.
- When the mixture is ready, it is poured with water in a ratio of 1 to 4 and the solution is allowed to acquire the desired plasticity. To do this, it is initially left for about 3 hours, then mixed thoroughly and then again allowed to stand for about an hour. To minimize evaporation of water, the container is closed with a lid or similar structure.
- At the end of the time, the mixture is checked. To do this, a small tourniquet is rolled out of it, about 1 cm thick.Then it rolls up into a ring with a diameter of about 5 cm.If during this process the solution looks like soft plasticine and there are no cracks, then there is a lot of clay in it. This is eliminated by adding sand and additional infusion. When it is difficult to form a ring with the help of a substance or it has large cracks, then this indicates a lack of clay, which must be added to it and left to infuse for some time.
Progress
The construction of such heavy structures, as a rule, begins with the foundation. The guca lava fireplace stove is less heavy and functional; it can be purchased online. Lovers of comfort will appreciate this facility. The fireplace stoves are practical and easy to use. The taste of food cooked on a live fire is much healthier and tastier.
The chimney foundation should not be associated with the foundation of the house, because they give a different fit. Further, at the level of the basement, we draw up a plan for the fireplace device. Then we combine it with the plan at the level of the firebox and chimney. The width of the foundation should be 6 cm larger than the basement row. (See also: Fireplace room)
Before pouring the foundation, you need to prepare a pit, which should be 12-15 cm larger than the foundation and about 60 cm deep. The foundation can be made both concrete and brick. We focus on the price of the material and its availability.
Pouring the foundation:
- We fill in the crushed stone into a pit 10-15 cm, which is immediately compacted and horizontal is checked.
- We knock down the formwork and coat it with resin or cover it with roofing material.
- We install the formwork and pour stones or broken brick on top.
- Fill with concrete. Solution: sand - 3 parts; cement - 1 part. Mix the whole mixture (dry) and fill it with water, stirring thoroughly, bringing it to the consistency of thick sour cream.
- We level the top of the foundation and smooth out irregularities. Then we check with a level and cover with polyethylene. We are waiting for a week.
Important: The foundation is made 6 cm below the floor level.
Furnace finishing
An iron fireplace is not only heavy, but also a relatively dangerous structure. Therefore, it must be operated in accordance with all safety standards, according to which it must be installed on a metal or concrete base. The process of finishing the fireplace insert is carried out in compliance with some sequential rules:
- To ensure the optimal level of heating and movement of warm air, a gap of about 5 cm must be left between the walls of the stove and the masonry.This parameter is taken into account when marking the base of the structure.
- The brick is placed on a flat surface, often using the same metal sheet that the oven is placed on. Therefore, when buying it, you need to take into account this small nuance.
- The first row should be solid without any holes or crevices. Before construction is carried out, the brick should be slightly wetted. The mortar is applied with a trowel in such a quantity as to form seams with a thickness of 3 to 5 mm.
- All subsequent rows are laid according to the same principle, observing the binding of bricks. In the second row, experts recommend leaving 2 small holes that act as ventilation.
- After placing several rows, it is imperative to control the level of the masonry and the verticality of each of the corners. To do this, use plumb lines or a flat rail.
- In the places where the doors are located, special openings are formed, which make it easy to access the firebox and perform the necessary operations with it. In the same way, the entire brick structure is built, observing the previously considered rules.
Upon completion of construction, the fireplace can be decorated with special clinker tiles that can withstand high temperatures. is selected individually and depends on the wishes of the owner.
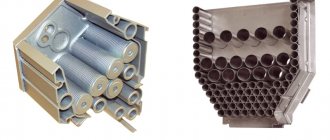
Advantages of a cassette insert
It has many advantages:
- Extensive lineup.
- Security.
- There is no need to calculate the cross-section, lay out the order according to obscure schemes.
- It can be replaced in the future with a new one when it becomes unusable, as well as repaired.
- It is very convenient to clean such a portal.
- You can cover it with a brick, and it will not differ in any way in an aesthetic sense from a classic fireplace.

Advantages of brick cladding for a fireplace cassette:
- It is not required to carry out regular repairs to the cladding or somehow especially take care of it.
- The cost will come out less than the services of a stove-maker, while the cladding can be done by hand, even without having special skills.
- A solid stove brick, has a heat-accumulating effect, which means its efficiency is higher than that of most other materials, therefore it is necessary to sheathe the box from all sides with them.
- Powerful carrying box for the portal.
Material
In fact, it doesn't matter at all what kind of cladding material you choose. It can be like ordinary brick, drywall, or even installation with aerated concrete blocks or porcelain stoneware.
By the way, cladding is necessary not only to create a beautiful look, but also to make the processes in the furnace more efficient. The fact is that in the presence of the same drywall, much less heat will be uselessly dissipated in space. Moreover, its cost is quite low.
Almost everyone can also afford to buy bricks. For those people who have private plots, they often remain after construction.