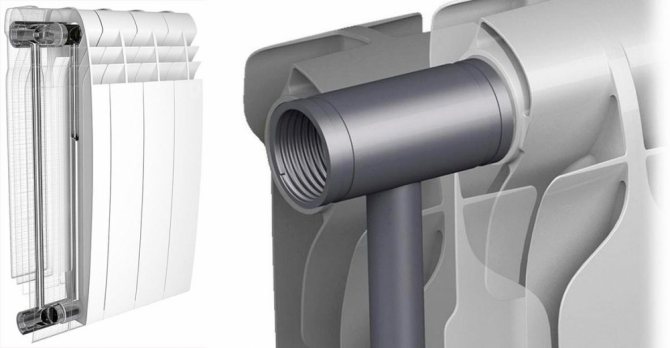
Heating system type
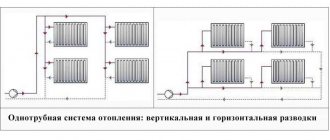
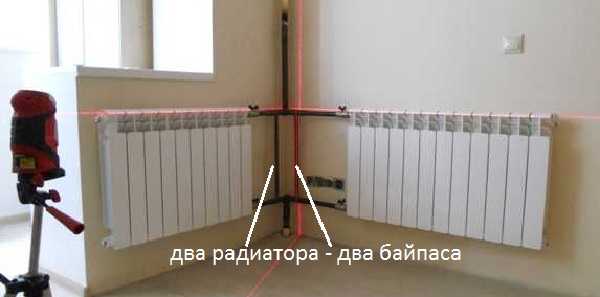
Single pipe systems can be routed vertically or horizontally. The latter option is most suitable for low-rise dwellings: usually we are talking about one- or two-story houses. Three-story buildings are rarely equipped with horizontal wiring. Vertical wiring is usually used in high-rise buildings. Such a scheme consists of a pipe coming out of the flow, next to the radiator, and then to the floor. This picture can be observed in all (or almost all) rooms. Sometimes there are cases when two radiators are powered from one riser at once. In this case, it is not at all necessary that they be in the same room.
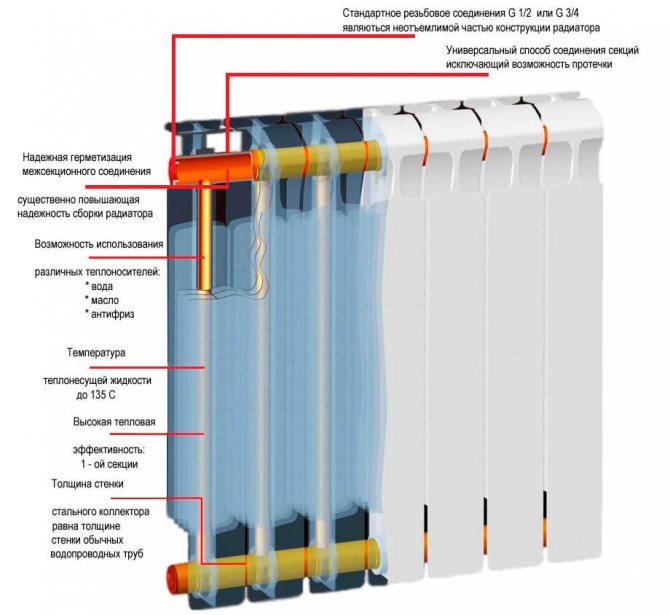
The strong point of this scheme is the low cost of installation work and stability of operation (it is rather difficult to unbalance it). However, if there are significant changes in the parameters of the batteries and pipes, this can significantly affect the hydraulic resistance. As a result, only the first two sections are warm, while the rest of the device remains cold.
For one-pipe wiring, a gradual decrease in the temperature of the coolant is characteristic as it moves away from the boiler. The efficiency of heating the battery from the neighbor on top (with the upper supply) is inversely proportional to the heating of the radiator on the floor below. To avoid such situations, a law was passed on the common ownership of the heating system. Now, in order to replace a pipe or a heating device, you need to obtain the appropriate permits. High-rise buildings are equipped with two-pipe wiring not so often. This is explained by the high consumption of pipes for its organization. In addition, the large dimensions make it difficult to balance the circuit.
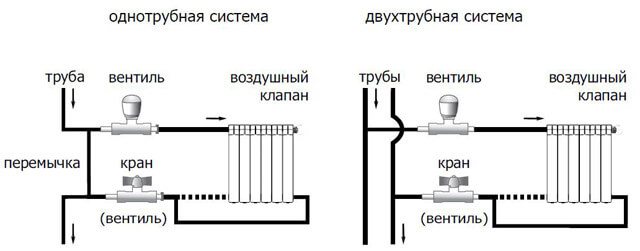
A two-pipe system in a multi-storey building has the following scheme:
- Two pipes are brought into the room.
- The hotter part serves to supply the coolant to the battery.
- The second removes the coolant that has cooled down after the radiator further.
Thanks to this scheme, the identity of the temperature of the heating medium supplied to all heating devices is achieved. It is important to remember that if there is a change in hydraulic resistance in just one radiator, the entire system can be completely unbalanced. A very small resistance will provoke the passage of almost the entire volume of the coolant through this section. Therefore, in the presence of such a wiring, the installation of control valves is mandatory. Most often these are manual control valves or thermostats.
Coolant circulation direction
Bottom saddle connection of batteries with the use of a lower vertical collector makes it possible not to depend on the direction of the coolant supply. The same cannot be said about the lateral and diagonal leash, as well as when radiators with a lower connection point are used: here the supply must be clearly adjusted. Otherwise, the device may stop heating completely, or it will heat up very weakly. Lateral or diagonal connection provides for the use of the top feed (in this case, the return pipe goes from the bottom).
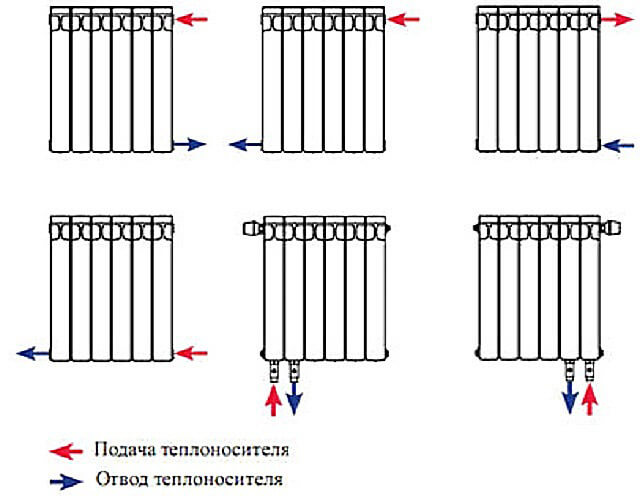
When mounting a bimetallic radiator with a bottom connection, it is important to clarify in advance which of the inputs will be connected to the supply. Usually this information is indicated in the passport. It is important not to confuse the directions, because the supply in such heaters is equipped with a tube going up from the inlet assembly. With its help, the coolant is adjusted to the upper collector.After that, it spreads over the radiator.
The place of collection of the coolant is the lower collector, from where it is fed into the return pipeline. The connection unit is located on the left or right side of the radiator (it is recommended to choose the point closest to the riser). This makes it possible to save on pipes for bimetallic radiators and achieve a more aesthetic appearance.
What you need to pay attention to during installation
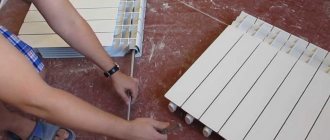
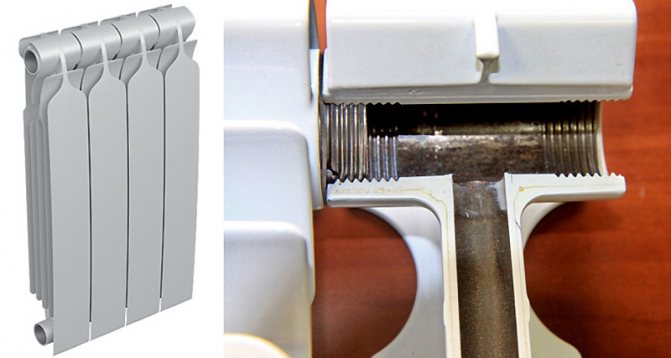
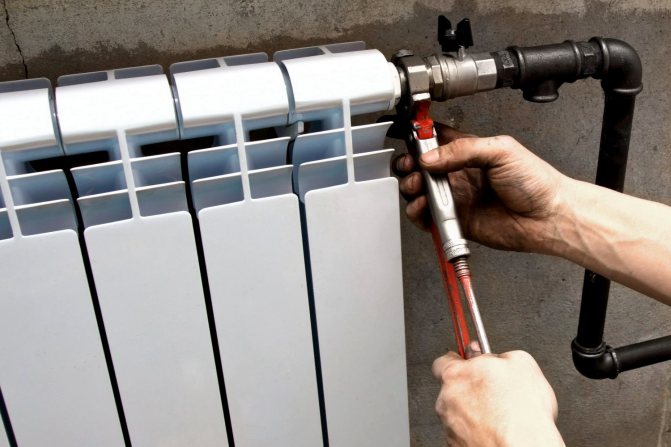
Bimetallic radiators are of two types: partial bimetal, or full. Partial vertical collectors (to which fittings or pipes are connected) are made of aluminum, therefore, you need to be very careful when connecting and installing. When installing bimetallic radiators, observe the following requirements:
- Do not use excessive force when connecting the valve to the manifolds. Many manufacturers in the passport for radiators give detailed instructions for installation. In this case, most recommend using a torque wrench, with which you can control the applied force. For aluminum collectors (partial bimetal), this effort is not more than 100 N * m, when assembling a complete bimetal with steel collectors 170 ... 180 N * m.

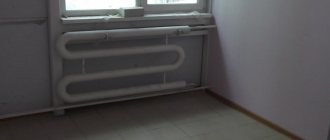
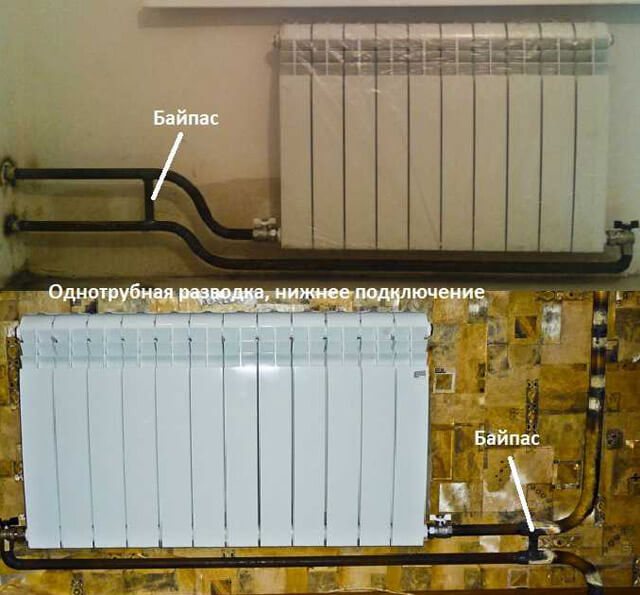
Side connection, one pipe routing, bottom delivery
- If you use a linen reel, do not wind it a lot: it may take some of the effort on itself, but microcracks will subsequently form in this place. Then the coolant will get into them, the paint will begin to peel off and a leak will appear. Better to use a sealant. A little flax that has been coated with sealant is the best solution. You can do without flax at all. Only on the sealant. But paint in networks with a coolant other than water cannot be used for sealing. Any other coolant will quickly corrode it, and the radiator will begin to "drip".
- You need to be very careful about the paintwork. Especially at the junctions. If a coolant gets under the paint, the corrosion process will begin. Therefore, repair all damage immediately (with an appropriate paint or sealant).
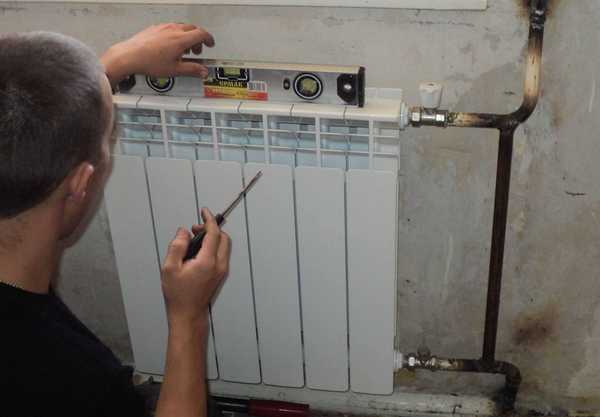
- The heater must be located strictly horizontally. A slight increase in the angle where the air vent is installed is permissible - this way the gases are released more efficiently. The reverse slope disturbs the circulation, therefore it cannot be installed.
The radiator should be located strictly horizontally
- The radiator is hung on three brackets: two at the top and one at the bottom. The upper ones account for all the weight: they fit the radiator with the upper manifold. The bottom one only serves to give direction.
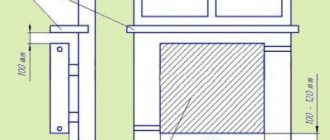
- When installing a bimetallic radiator, to create effective air exchange, it is necessary to maintain the following distances: to the floor must be at least 6 cm, to the windowsill - at least 10 cm.But many manufacturers give their recommendations that are related to the design features. They can differ by several centimeters. What remains unchanged is the distance from the back wall of the battery to the wall behind it - 3-5 cm.
Number of sections of bimetallic radiators
How many sections there will be on a bimetallic radiator has a direct impact on the choice of connection method. The battery up to 8 sections can be switched by side, bottom saddle or diagonal connection. If there are more than 8 sections, it is better to use a diagonal connection.
When using side switching, a flow extension will be required. This refers to the tube inserted into the supply manifold. It helps out in situations where the lateral connection provides heating of only the first sections. Thanks to the tube inserted inside, the coolant flows beyond the inlet, more evenly heating the surface of the device.
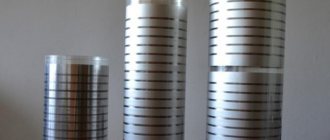
Flow extension length options:
- 2/3 batteries.
- To the center of the last section.
Various cases show the effectiveness of both the first and second options.The main thing is that a noticeable optimization of the heating of the radiator is achieved. Sometimes it happens that the installation to the middle of the last section provokes a decrease in the heating level of the first sections. In this case, it is recommended to shorten the tube. But such situations rarely occur, which is affected by the pressure in the riser and the cross-section of the liner.
As practical experience dictates, it is better to mount a long tube, because it can always be shortened (but it cannot be increased). Another way to distribute the coolant more evenly is to fit the flow extension tube with a series of holes. Thanks to this, the coolant enters the vertical collectors located nearby. However, in general, a solid tube is sufficient.
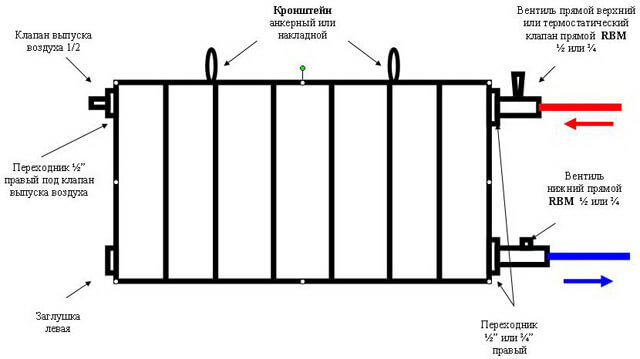
What kind of fittings are needed
To connect a sectional bimetallic radiator, you will need a standard connection kit.
These are the following elements:
- Plugs.
- Manual air vent ("Mayevsky" valve) and a key to it.
- Pair of adapters (with right-hand and left-hand threads).
The right and left sides of the radiator are supplied with adapters. They can be connected to fittings or pipes. Their diameter (½ or ¾ inch) directly affects the diameter of the fittings and connections.
Required fittings
To install any sectional bimetallic radiator, you need a standard connection kit. It consists:
- stubs,
- manual air vent (valve "Mayevsky") and a key to it,
- two adapters (one with a right-hand thread, the other with a left-hand thread).
Adapters are installed on the right and left of the radiator. Fittings or pipes will be connected to them. Their diameter - ½ or ¾ inch - will depend on the diameter of the fittings and liners.

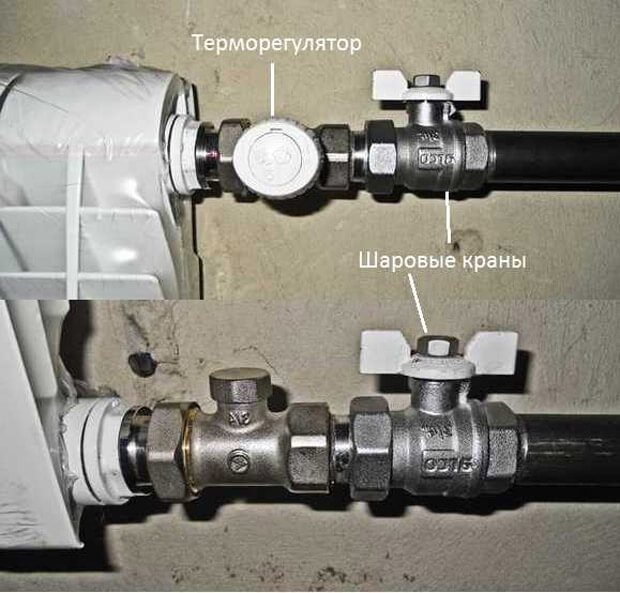
These are radiator fittings. Ball valves are required, and thermostats in one-pipe systems are optional, in two-pipe systems are obligatory
What pipes and what diameter
If you are changing radiators in a high-rise building, you must use the same pipes and the same diameters. This is not just a whim, but reasonable demands. Systems in multi-storey buildings are designed for certain parameters, the key of which are hydraulic resistance and working pressure. It is under them that a test (pressure) pressure is created when the system is started, which is much higher than the operating pressure.
Polypropylene and metal-plastic pipes, with all their advantages, are unsuitable for such pressures. Although they are more attractive in appearance, they do not live long in centralized systems. As a result: the flood with all the ensuing consequences.
Diagonal connection is the most efficient
The same applies to pipe diameters. Changing the diameter of the supply line greatly changes the hydraulic resistance of the entire system. And it's not a fact that you will be any plus from this. Therefore, if the previous pipes were half-inch, then put the same ones, and choose the appropriate fittings and adapters for radiators. Also with respect to three-quarter.
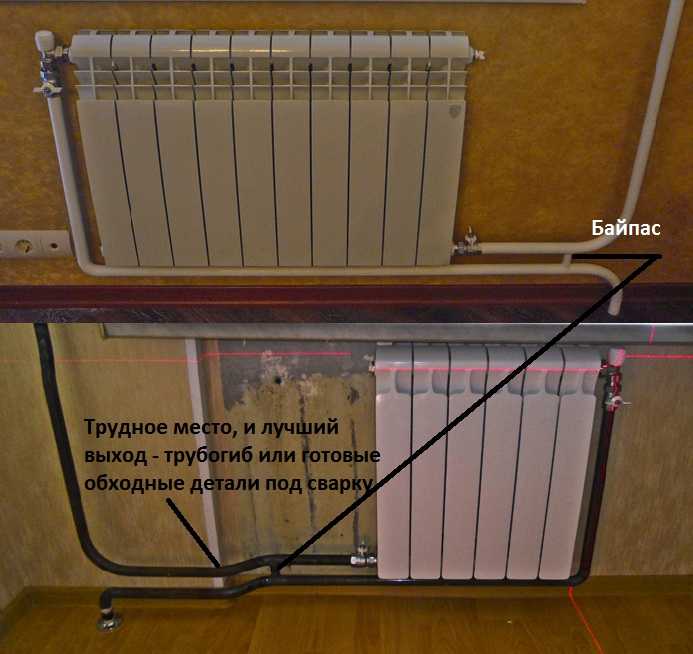
Bypass: what and for what
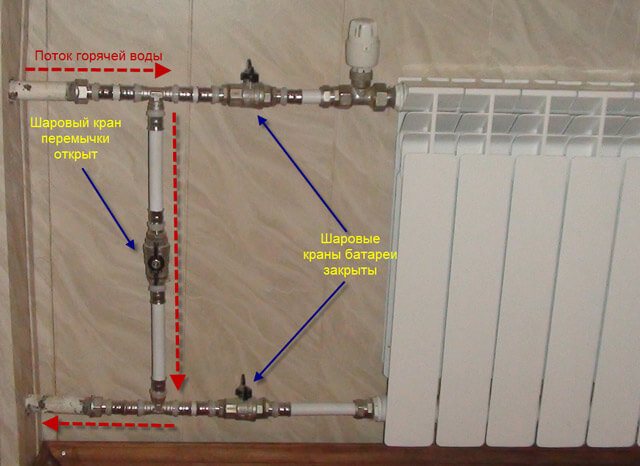
A little about the radiator piping schemes. When installing bimetallic radiators in one-pipe systems, a bypass is required. This is a jumper between the supply and return pipes. The "extra" coolant will flow through this jumper, which will not go into your radiator. With such a scheme, you will never "ban" the stock, and, therefore, you will avoid "showdowns" with the control campaign.
In most cases, they try to make the bypass offset - it is located between the radiator and the riser. Sometimes it is advised to put a tap on it and thus regulate the temperature of the radiator. But the method is more harmful than useful: there remains the threat of "blocking the riser". It even becomes more real.
Bypass for a one-pipe system is mandatory: this way you can regulate the temperature of the radiator, or completely turn it off
It is much more effective to leave the bypass unregulated, and put control valves on your radiator. But this is necessary if your room is very hot. In other cases, there is no need to reduce the efficiency of the radiators (and this is exactly what the regulators do). And one more nuance: automatic regulators are designed for a pressure of 10 atm. That is, if your pressure (test) pressure is below 15 atm (the boundary pressure that they will withstand), you can safely use them. But if higher, they will fail when the system is started.
If a thermostat is needed, and the test pressure is higher, you have only one way out: before starting the system, remove it, install a squeeze, and after starting, reinstall it (at the same time, clean the valve).
Shut-off valves
When installing bimetallic radiators, it is very desirable (according to the recommendation of some manufacturers, it is generally necessary) to install shut-off valves at the inlet and outlet. Ball valves are usually used as shut-off valves. But to ensure the normal permeability of the coolant, full bore models (and not standard ones) are needed.
What is a shut-off valve for? It allows the battery to be removed for repair and maintenance without shutting down the system. Just close the taps, wait for the coolant to cool down, and remove the heater. This is where the bypass comes in handy: the coolant will flow through it, bypassing the disconnected radiator. Otherwise, you will have to cover the entire riser. To do this, you need to negotiate with the management company and pay for the shutdown and drain of the system.
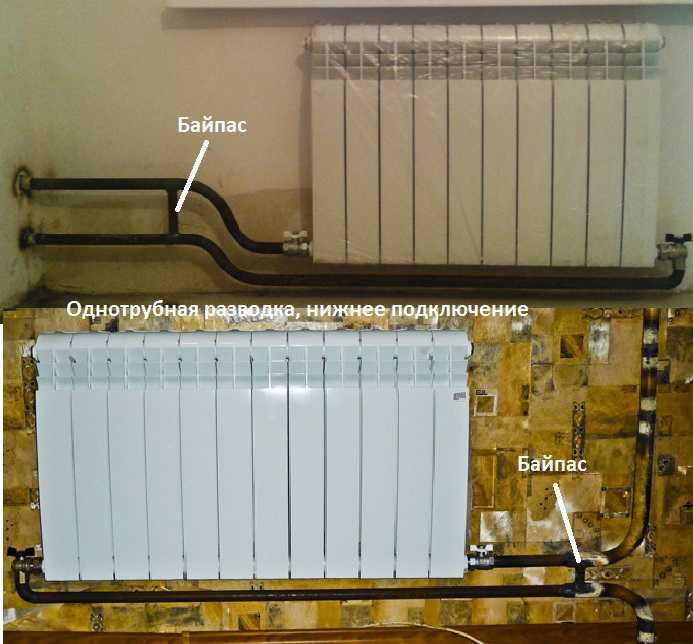
Bottom (saddle) connection for one pipe system
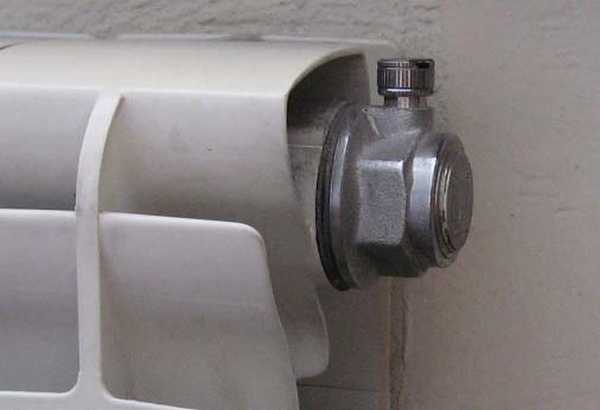
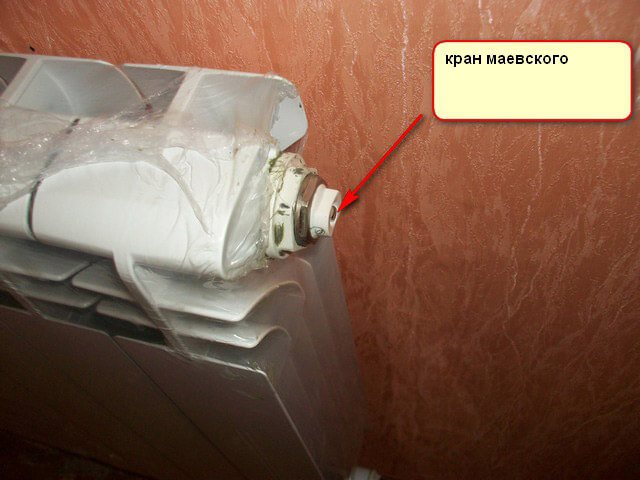
Air Vents
The standard installation kit includes a manual air vent, which is also called the "Mayevsky" valve. It is installed in the free top manifold.
This element is required when connecting a bimetallic radiator. When the coolant contacts the collector materials, chemical reactions occur, which are accompanied by gas formation. This small device allows the removal of air and gases that have accumulated in the radiator. If this is not done, an excess pressure is created inside, which during the heating season leads to the fact that circulation is disturbed and some part of the battery stops heating (usually the top becomes cold). From time to time, gases need to be released by opening and then closing the valve with a key.
Automatic radiator air vent can be small
If you do not want to manually bleed gases, you can install an automatic air vent. The installation location is the same: free top collector. But the device itself looks like a cylinder 6-8 cm in height, and is installed strictly vertically. Only in this position does he work. If this "beauty" does not scare you, or you still plan to install a decorative screen on the radiator, then this is the best way out.
How air vents work and how to use them read here.
Pipes
When replacing radiators in a high-rise building, it is necessary to use the same pipes and with the same diameter. This is not just a whim. The fact is that in multi-storey buildings, systems with certain parameters are used. The main ones are hydraulic resistance and working pressure. A test (pressure test) pressure is specially organized for them, which is used during the start-up of the system. As a rule, it is an order of magnitude higher than the worker.
The use of polypropylene and metal-plastic pipes for connecting bimetallic radiators, despite all their advantages, is not recommended in such conditions. Their visual appeal in no way contributes to an increase in service life in conditions of centralized systems, which is fraught with the appearance of leaks with all the ensuing consequences.
The same applies to the diameter of the pipes. When changing the diameter of the line, the hydraulic resistance of the entire circuit changes greatly.And no one can guarantee that this will have favorable consequences. Therefore, when using half-inch pipes in the system, you do not need to experiment with other diameters. The same goes for battery fittings and adapters.
Bypass assignment and selection
When installing a bimetallic radiator in a one-pipe system, it is imperative to use a bypass. This is the name of the jumper between the supply and return pipes. It makes it possible for the excess coolant to bypass the battery. This scheme allows you to avoid blocking the drain and subsequent troubles with the control campaign. Most often, the bypass is made offset: the most optimal place for its location is between the radiator and the riser. If a tap is cut into the jumper, this will make it possible to adjust the temperature of the radiator. However, in this case, there is a possibility of blocking the riser.
A more effective solution is to use an unregulated bypass, equipping the radiator directly with control valves. This is mainly done in cases where the room is very hot. If there is no such problem, then it is better not to reduce the efficiency of the radiators, which inevitably happens when installing regulators.
The automatic fittings are designed for a pressure of 10 atm. Therefore, when the pressure drops below 15 atmospheres, the operation does not encounter any difficulties. Exceeding this limit is likely to lead to failure of the devices. If a thermostat cannot be dispensed with, and the test pressure is very high, it is better to dismantle the device before starting the circuit, replacing it with a squeegee. Upon completion of the pressure test, the device is mounted back, which makes it possible to clean the valve at the same time.
Choice of valves
As some manufacturers recommend, the installation of bimetallic heating radiators with your own hands should be accompanied by the installation of shut-off valves at the inlet and outlet. These are ball valves. In order for the permeability of the coolant to be normal, it is better to use full bore products.
Thanks to the shut-off valves, the radiator can be dismantled at any time for repair and maintenance, without stopping the entire system. To do this, it is enough to turn off the taps and wait for the coolant to cool. Then the device can be removed. In such cases, the presence of a bypass helps out, through which the coolant will bypass the serviced battery. Otherwise, you will have to turn off the entire riser, which can only be done with the permission of the management campaign.
Section calculation
All information on the calculation can be obtained during the purchase of batteries. However, there is an old rule that should be followed when installing heating radiators in an apartment with your own hands: with a standard room height of 2.7 m, one section heats 2m2 of area. The result should be rounded up. If the apartment is located on the corner of a panel house, it is better to make an individual calculation taking into account all the conditions and technical parameters of heating devices.
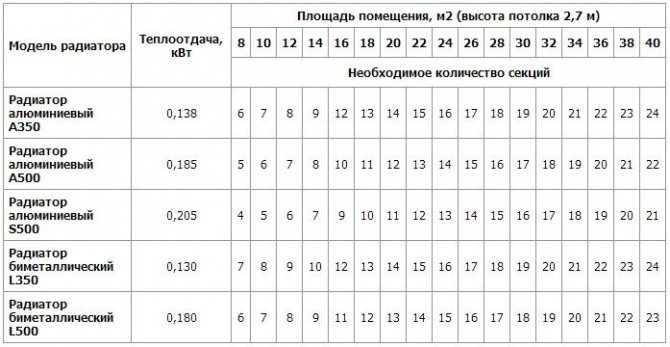
Calculation of heating radiator sections by area
Air Vents
The standard mounting kit includes a manual air vent ("Mayevsky" valve). The place of its installation is the free upper collector. The presence of an air vent is mandatory when connecting a bimetallic radiator. The fact is that the contact of the coolant with the collector materials provokes chemical reactions, as a result of which gases are formed.
Thanks to this small device, it becomes possible to remove air and gases that have accumulated inside the radiator. If this is neglected, overpressure will appear in the system, provoking a violation of circulation and uneven heating of the batteries. To release gases, you need to open and close the valve with a key.
If there is no desire to manually vent the gases, there is an option with the installation of an automatic air vent. It is mounted in the same place as the Mayevsky crane. The device has a cylindrical shape and a height of 6-8 cm: during installation, strict verticality must be observed. To hide the automatic air vent from the eyes, a decorative screen for the radiator is usually used.
How to install correctly
Now how to hang a radiator. It is highly desirable that the wall behind the radiator is level - it is easier to work this way. The middle of the opening is marked on the wall, a horizontal line is drawn 10-12 cm below the window sill line. This is the line along which the upper edge of the heater is aligned. The brackets must be installed so that the top edge coincides with the drawn line, that is, it is horizontal.
Correct installation of heating radiators
Wall mount
This must be taken into account when installing hooks or brackets for heating radiators. Hooks are installed like dowels - a hole of a suitable diameter is drilled in the wall, a plastic dowel is installed in it, and the hook is screwed into it. The distance from the wall to the heater can be easily adjusted by twisting and unscrewing the hook body.
https://www.youtube.com/watch?v=sfkFcArxvXk
Cast iron battery hooks are thicker. This is a fastener for aluminum and bimetallic
When installing hooks under heating radiators, keep in mind that the main load falls on the upper fasteners. The lower one serves only for fixing in a given position relative to the wall and is installed 1-1.5 cm lower than the lower collector. Otherwise, you simply cannot hang the radiator.
One of the types of brackets
When installing the brackets, they are applied to the wall in the place where they will be mounted. To do this, first attach the battery to the installation site, see where the bracket will "fit", mark the place on the wall. With the battery down, you can attach the bracket to the wall and mark the location of the fasteners on it. In these places, holes are drilled, dowels are inserted, the bracket is screwed onto the screws. Having installed all the fasteners, the heater is hung on them.
Fixing to the floor
Not all walls can support even lightweight aluminum batteries. If the walls are made of lightweight concrete or covered with plasterboard, floor installation is required. Some types of cast iron and steel radiators come immediately on legs, but they do not suit everyone in appearance or characteristics.
Feet for installing aluminum and bimetallic radiators on the floor
Possible floor installation of aluminum and bimetallic radiators. There are special brackets for them. They are fixed to the floor, then the heating device is installed, the lower collector is fixed with an arc on the installed legs. There are similar legs with adjustable height, there are fixed ones. The method of fastening to the floor is standard - on nails or dowels, depending on the material.
The installation of each type of battery has its own nuances.
Cast iron
The difference from the standard scheme is that for batteries of this type, sections are initially formed using a radiator key.
The nipples are impregnated with linseed oil and manually fixed on 2 threads. In this case, a gasket must be used. Then the radiator keys are inserted into the nipple holes and tightened.
Important! The assembly of the sections must be carried out with an assistant, since the simultaneous rotation of the nipples can lead to skewing.
After crimping the battery, a layer of primer is applied to it and painted.
Aluminum
Passes according to the standard scheme of one of three connection options.
The only caveat is that aluminum batteries are fixed both on the wall and on the floor. For the latter option, special clamping rings on the legs are used.
By adjusting the indentation of the radiator from the wall, floor and window sill, you can increase or decrease the level of heat transfer from the battery.
When installing aluminum heating sources, they are guided by the attached instructions. If the recommendations indicate the use of a coolant, then you need to use it exclusively.
Installing the shield in front of the radiator will increase the efficiency.
Such batteries are suitable for installation in private houses with autonomous heating.
Steel
An important point in connection is to check the horizontal position of the battery. Any deviation will reduce work efficiency.
Read more: How to connect a heated towel rail do-it-yourself connection to a riser
In addition to wall brackets, floor stands are used for additional fixation.
Otherwise, standard connection schemes are used.
Bimetallic
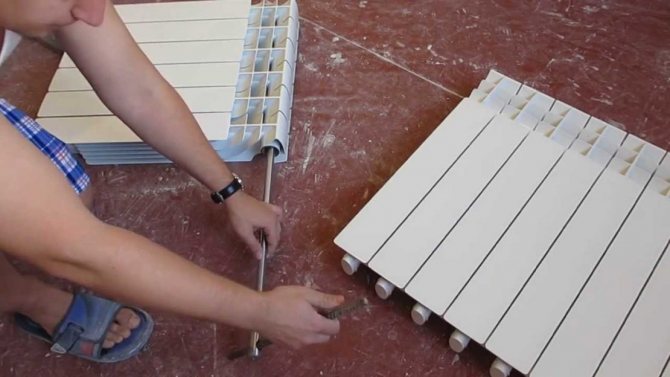
In such batteries, it is allowed to build up or remove unnecessary sections. They are already painted. The sections are pulled together in stages from the bottom and from the top, without distortions.
Attention! In the place where the sealing gasket for the nipple is located, do not sandpaper or file.
As with the standard scheme, pre-treatment of the wall is required.
Installation nuances
There are two types of bimetallic radiators: partially or completely bimetallic. In the first case, aluminum is used for the manufacture of vertical collectors, which requires special care during installation.
There are the following requirements on how to properly connect a bimetallic battery:
- When connecting fittings and manifolds, it is necessary to keep from excessive forces. Typically, the accompanying documentation contains detailed installation instructions. A torque wrench is very convenient in this regard, allowing you to control the applied force.
- When using linen roll, it is important not to overdo it with the amount. Otherwise, part of the effort will go to it, which ultimately will lead to the appearance of microcracks. After the coolant enters them, the process of paint peeling will start. As a result, sooner or later, a leak will appear. It is best to apply a sealant and some flax. It is better to refuse the use of paint in systems where antifreeze acts as a coolant. This will quickly erode the seal and cause leakage.
- The battery must be installed in a strictly horizontal position. The exception is the cases of using an air vent, when, for greater efficiency of the gas release, some deviation of the angle forward along the circulation is allowed. It is forbidden to make a slope in the opposite direction, because this disrupts circulation.
- When hanging the radiator, three brackets must be used: two at the top and one at the bottom. The upper elements take all the load. Due to the lower fasteners, the desired direction is set.
- To ensure effective air exchange, the following parameters should be adhered to: the distance to the floor - from 60 mm, to the window sill - from 100 mm.
In some cases, the manufacturer may recommend other distances, depending on the design features (the differences usually concern a few centimeters). However, the gap between the rear surface of the battery and the wall remains unchanged - 30-50 mm.
Rules for connecting heating radiators
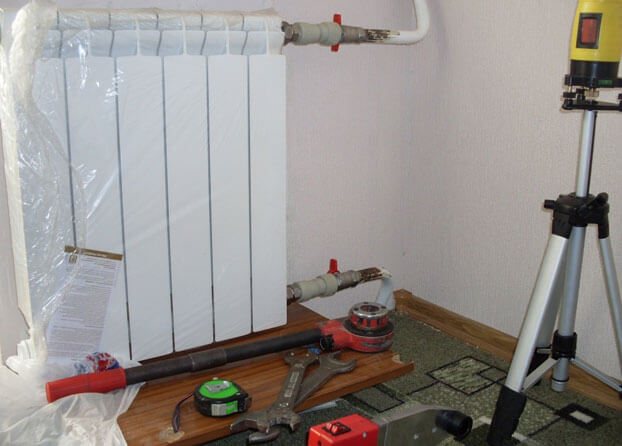
In the old days, it was problematic to install heating radiators on your own because of the welding work, which was an integral part of the installation. Modern materials make it possible to do without special devices, which makes it possible to carry out the installation of heating radiators in the house with your own hands.
To carry out similar events in the apartment, it is recommended to involve the plumbers of the service company, since it will be necessary to completely disconnect the system from the mains and drain the water.Not everyone knows how to do it correctly, and a poor-quality connection can turn into a flood of hot water.
https://www.youtube.com/watch?v=3BaaUUG4JZE
If we are talking about replacing old structures with new ones, then the question of location disappears by itself. In the case of planning a circuit diagram, it is necessary to take into account important factors, according to which the batteries must create reliable thermal protection. No matter how high-quality modern double-glazed windows are, they are still sources of a cold air stream.
• the diagonal method involves connecting the supply pipe to the upper part of the heater, and the return pipe from the bottom, but with the location on the other side;
• bottom connection is carried out at the bottom of the battery on different sides;
• lateral or one-sided method is more often used with a vertical wiring diagram with connection to the right or left side of the radiator.
1. Preparatory work includes the dismantling of old structures, if necessary. The water must be completely drained from the disconnected system beforehand. On the wall, you will need to install special fasteners for batteries or check the strength and correct installation of existing hooks. You should also do a study of the wall surface for integrity.
Often, cracks and gaps form under the windowsill over time. They must be sealed with cement mortar, and foil insulation should be fixed on a dry surface. Among other options for wall decoration: plaster with a special insulating compound, plasterboard cladding with an insulating layer, etc.
• To increase heat transfer and save heat resources, it is worth fixing a sheet of foil insulation on the wall on the back of the radiator. Penny costs will save up to 10% on heating.
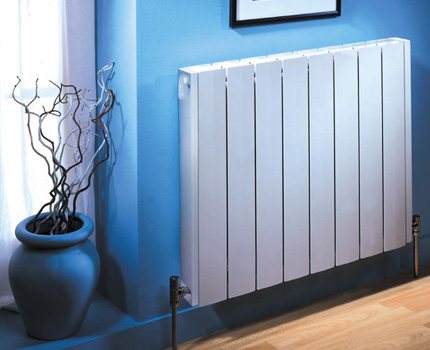
High-quality heating is a guarantee of a favorable climate in the house and the absence of cold weather even in the most severe frosts. Therefore, if you have an old and already ineffective radiator in your apartment or cottage, then it should be replaced. At first glance, this seems like a very difficult job, available only to specialized professionals with significant experience. But with due regard to the matter and the presence of some tools, installing heating batteries with your own hands does not pose a serious problem.
In addition to the characteristics of the radiator itself and the literacy of its connection, one of the most important factors affecting the efficiency of the heating system is the choice of the right place for the location of the product. True, in most cases it is predetermined in advance - the new battery, most likely, will stand in the place of the old cast-iron one, which has existed since the construction of the building. But still, here are some recommendations for the correct placement of the radiator.
How to install a radiator with your own hands
https://www.youtube.com/watch?v=olrD9qxCAhM
First, it is advisable to place the battery under a window. The fact is that it is a "bridge" through which the cold from the street gets into an apartment or a cottage. The presence of a radiator under the window forms a kind of "thermal curtain" that interferes with the process described above. In this case, the battery should be placed strictly in the middle of the window, and, preferably, occupy up to 70-80% of its width.
Secondly, the distance from the floor to the radiator must be at least 80-120 mm. If it is less, then it will be inconvenient to clean under the battery, a huge amount of dust and debris will accumulate there. And if the radiator is located higher, a certain amount of cold air will collect under it, which requires heating and, as a result, impairs the operation of the heating system. In addition, too small a distance to the sill has a negative effect on the efficiency of the battery.
Thirdly, a distance of 2.5-3 cm is allowed between the back of the radiator and the wall.If it is less, the processes of convection and movement of warm air flows are disrupted, and, as a result, the battery works less efficiently and spends some of the heat in vain.
All the above principles of placing a heating battery are presented in the diagram above.
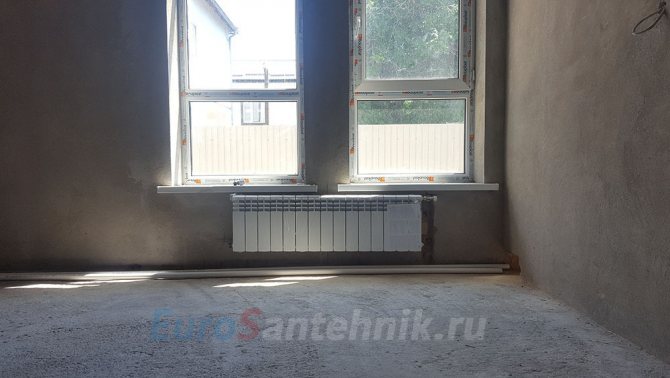
Table. Standard diagrams for connecting heating batteries.
Liquid fuel boilers - an overview of models and the choice of the best For comfortable living in a private house in a temperate or northern climate, it is necessary to equip.
Which boiler is better for a private house A heating boiler will provide housing with heat without the need to connect to central communications, due to which.
The Leningradka heating system Leningradka, that is, the most economical of the existing heating systems, appeared for several decades.
Water heating convectors: selection, operating principle, installation Water heating convectors are increasingly being installed in modern houses and apartments. High heating efficiency.
Home »Heating» DIY installation and connection of heating radiators
The device or reconstruction of the heating system implies the installation or replacement of heating devices. The good news is that if you want, you can do it yourself without involving specialists. How the installation of heating radiators should take place, where and how to place them, what is needed to carry out the work - all this is in the article.
Do-it-yourself installation of heating radiators is possible
If you install radiators with the bottom connection, you have no choice. Each manufacturer rigidly binds the supply and return, and its recommendations must be strictly followed, since otherwise you simply will not get heat. There are more options with side connection (more details about them are written here).
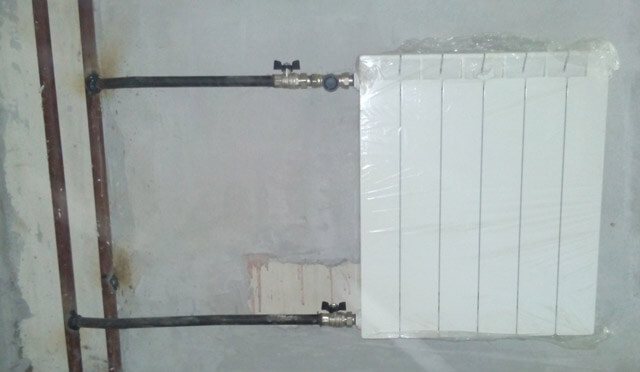
One-way connection is most often used in apartments. It can be two-pipe or one-pipe (the most common option). In apartments, metal pipes are still used, therefore, we will consider the option of tying the radiator with steel pipes on squeegees. In addition to pipes of a suitable diameter, two ball valves, two tees and two squeegees are needed - parts with external threads at both ends.
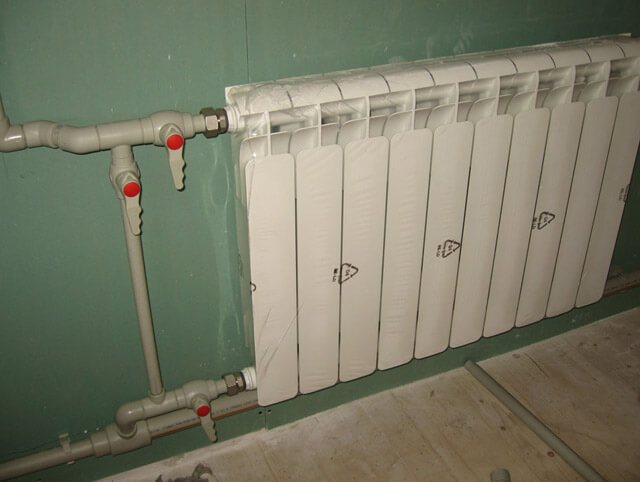
Lateral connection with bypass (one pipe system)
All this connects as shown in the photo. With a one-pipe system, a bypass is mandatory - it allows you to turn off the radiator without stopping or lowering the system. You cannot put a crane on the bypass - with it you will block the movement of the coolant along the riser, which is unlikely to please your neighbors and, most likely, you will be fined.
Read next: How to choose and install a dishwasher siphon
All threaded connections are sealed with fum tape or linen tape, on top of which packing paste is applied. When screwing the tap into the radiator manifold, a lot of winding is not required. Too much of it can lead to the appearance of microcracks and subsequent destruction. This is true for almost all types of heating devices, except for cast iron. When installing all the others, please, no fanaticism.
Welded option
If you have the skills / ability to use welding, you can weld the bypass. This is how the piping of radiators in apartments usually looks.
With a two-pipe system, a bypass is not required. The supply is connected to the upper input, the return is connected to the lower one, taps, of course, are needed.
One-sided piping with two-pipe system
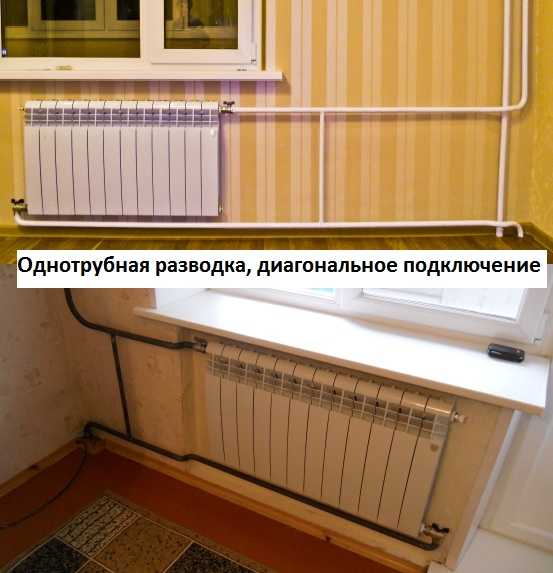
With lower wiring (pipes are laid on the floor), this type of connection is done very rarely - it turns out to be inconvenient and ugly, it is much better in this case to use a diagonal connection.
Installation of heating radiators with diagonal connection is the best option in terms of heat transfer. She is the highest in this case. With the lower wiring, this type of connection is easy to implement (example in the photo) - supply from this side at the top, return from the other at the bottom.
With two-pipe bottom wiring
In a one-pipe system with vertical risers (in apartments), things do not look so good, but people put up with them because of the higher efficiency.
Coolant supply from above
Note that with a one-pipe system, a bypass is again required.
Coolant supply from below
With lower wiring or hidden piping, the installation of heating radiators in this way is the most convenient and most inconspicuous.
With a two-pipe system
With saddle connection and bottom one-pipe wiring, there are two options - with and without bypass. Without a bypass, the taps are still installed, if necessary, you can remove the radiator, and install a temporary jumper between the taps - a squeeze (a piece of pipe of the required length with threads at the ends).
Saddle connection for one pipe system
With vertical wiring (risers in high-rise buildings), this type of connection can be seen infrequently - heat losses are too large (12-15%).
Applicable to all batteries, regardless of type:
- it is imperative to calculate the amount of coolant that the battery can accommodate;
- the water in the heating system is shut off, then the pipes are blown out with the help of a pump;
- torque wrenches are required;
Attention! Tightening and securing parts at your own discretion is unacceptable! The circulating fluid is under pressure, so improper fastening of parts leads to unpleasant consequences.
- a suitable option for connecting batteries is initially thought out and selected;
- radiators are mounted at a certain angle to prevent the accumulation of air masses in them, otherwise they will have to be removed through the air vent;
- in private houses, pipes made of metal-plastic are recommended for use, in apartments - made of metal;
- the protective film from new heating devices is removed only after the installation is completed.
- one-way connection;
- diagonal;
- bottom.