
Replacing cast iron sewer pipes, time to dismantle
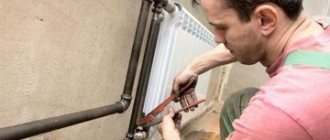
First step. Using a pipe cutter, a vertical pipe is cut, if such a tool is not available, you can use a grinder. The cuts are made at a slight slope in relation to each other and at a distance of 10-15 cm. The cuts should converge closer to the wall, but the pipe itself should remain ¾ uncut. This is necessary so that the upper part of the riser does not bend. Then a wedge is hammered on both sides, after which it is necessary to break out the piece, as accurately as possible, cut out. Be careful not to end up in the drain.
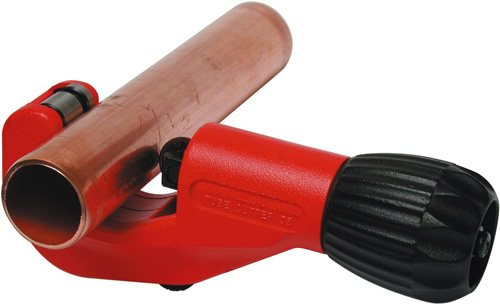
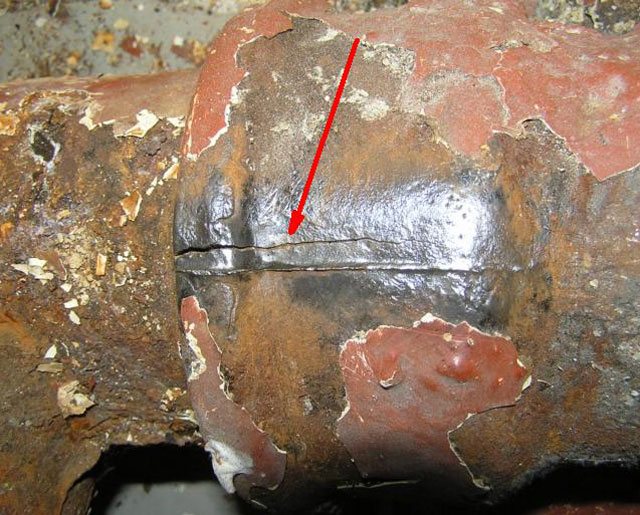
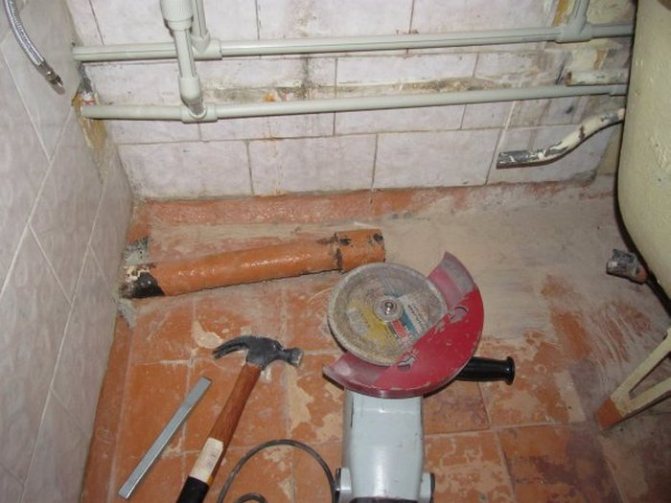
We cut the pipe with a pipe cutter
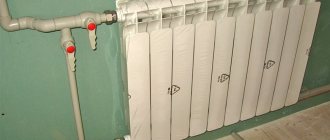
Replacing cast-iron sewer pipes with plastic ones is the second stage. The top edge of the pipe is cut at a predetermined height. To connect the plastic to the rest of the cast iron, it was easier to leave a piece of pipe. Its height should be equal to the size of the connector. It is recommended to mark the cutting line before cutting so that the edge is straight. After the pipe has been cut, a blow must be made towards the wall, which will provoke cracking.
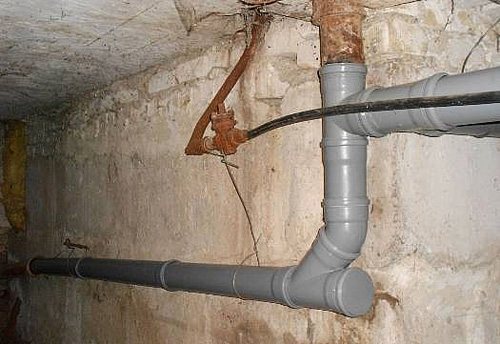
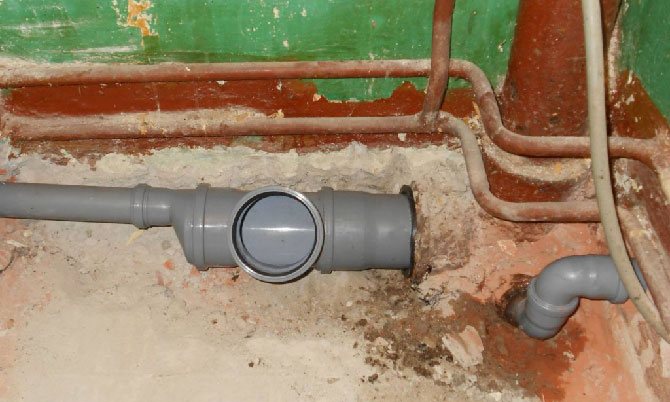
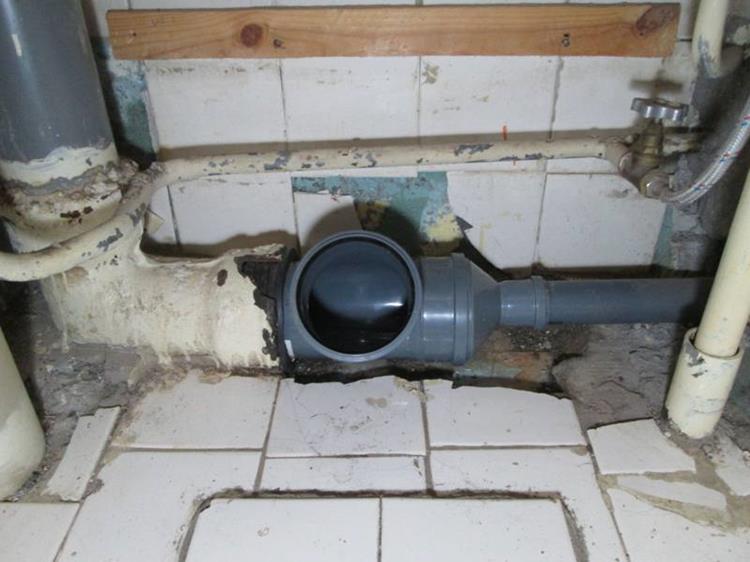
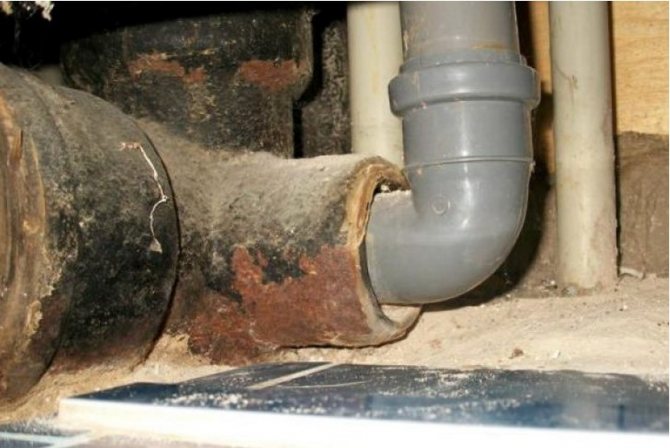
This is how a plastic pipe is connected to a cast iron
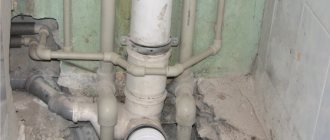
The third stage of dismantling consists in gently rocking the lower part of the remaining pipe, it is very important not to damage the lower bell. If it lends itself to rolling, then you can proceed to the extraction of such components as couplings, revisions, compensating pipes
Dismantling the sewer pipe
Before starting work, cold and hot water is turned off in order to exclude the discharge of wastewater from the upper floors on your head. It will not be superfluous to ask neighbors during this period to minimize the use of the sewage system. Wear protective goggles and gloves.
1. First of all, replacing a cast-iron riser with a plastic one begins with dismantling the old cast-iron riser. This pipe is heavy and its removal is carried out in parts. To do this, create cuts at the top of the riser and below. It is not necessary to completely cut the pipe. It is enough to cut it in half with a grinder 8-10 cm from the ceiling and below 80-100 cm from the tee.
2. Insert a chisel into the slots and gently strike with a hammer. First they work with the upper cut, then with the lower one. From such manipulations, the cast-iron sewer riser must be split, after which it is removed. With the help of polyethylene, the pipe hole under the ceiling is insulated.
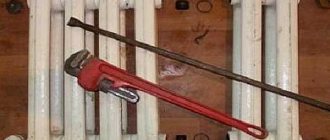
3. Using a grinder, cut out the rest of the sewer pipe and start loosening and removing the tee. This will require a nailer or crowbar. You have to work hard here. In the old days, joints were usually sealed with cement, which only got stronger over the years. It is carefully removed with a screwdriver, or even a puncher is sometimes used.
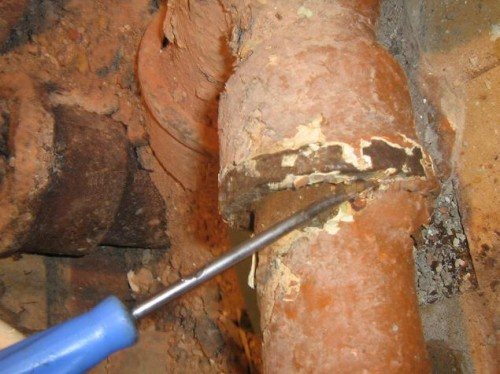
Dismantling the cross when the joint is sealed with gray
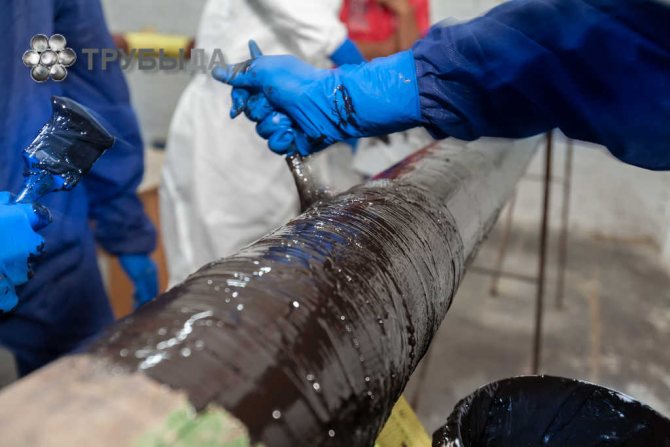
The connecting piece itself is not sheared, but its 100 mm diameter extension must be removed. Now you can work with a blowtorch in the pipe, providing the necessary heating of the structure. On top of the product, an asbestos or metal shield is required to adjust the draft in the riser.
In the case when there are holes at the bottom near the socket, for example, obtained during the installation of water pipes, through them hot sulfur can penetrate into the plumbing unit of the neighbor from below. To prevent this from happening, the holes must be covered with plaster or cement. Mineral wool can be used to repair small crevices. The riser itself is sealed with a lump of fire-resistant materials to avoid the ingress of molten sulfur.
Warming up is carried out evenly, only the angle of inclination and the direction of movement of the fire change. This process must be controlled, otherwise the bell may crack, as evidenced by the powerful cotton. However, this rarely happens. Poor quality cast iron pipes usually burst.
One way or another, if the groove clearance allows, before starting work, it is recommended to clean out as much sulfur as possible using a drill with an extended drill or a hammer drill, but without a victorious tip. It should be borne in mind that heated liquid sulfur can flow inward or splash out. However, when it cools, it quickly takes on a solid state. It is better to put the frozen pieces some distance away from the burner flame.
It is not required to use a gas mask or special masks before the sulfur starts to burn. However, do not forget that from a strong fire, a liquid substance can boil and start splashing out. To protect your face and eyes, it is recommended to wear special goggles when working with heating elements.
Periodically, you need to check the mobility of the cross by swinging or hitting with a hammer from different sides. As soon as you notice that a play appears, you must stop heating and start extracting the part using two adjustable wrenches. It is required to gently swing the element in different directions, then lift it up.
You need to be extremely careful, because the edges of the cross are quite fragile and can crumble when gripped with keys.
If there are droplets of burning sulfur on the surface of the pipeline connection, it can be dipped into a metal bucket filled with cold liquid. Next, you need to clean the inside of the socket the remnants of sulfur and soot using an old chisel or a sharp penknife. Only after the funnel-shaped expansion has completely cooled down can you start installing the plastic riser.
When water pipes need to be replaced
After a certain period, all property owners have to replace the water supply and sewerage system. Over the years, plaque forms inside the cast-iron pipes, which not only significantly impairs the permeability of the system, but also has an unpleasant odor. It will be simply impossible to do with simple cleaning. In addition, cast iron itself is a brittle metal, therefore, if the system is used incorrectly, cracks can form. Replacing the sewerage system in Moscow and other regions with a plastic service, which is quite expensive in terms of cost, while the process takes place in one sequence. The only thing that may differ is the prices for plumbing services and the quality of the work done. If you have any problems with the operation of the old system, it is better to immediately contact the professionals and change the long-worn water pipes. At the same time, the prices for replacing sewer pipes in an apartment can be radically different.
Replacing the old sewer riser
Second in order, but not in importance, make two cuts on the pipe with a grinder. Approximately in the middle, and the distance between them is 10 - 15 cm, more is simply not needed. After all, this does not cut the pipe, but simply divide it. But you do not make cuts to the end, there is a high probability that the cutting wheel will jam, and it is far from always possible to crawl over the entire diameter. Fortunately, cast iron, although very strong, is at the same time a very brittle metal. Therefore, one sharp blow to a chisel inserted into the cut, or a blow from a good and powerful hammer drill, and the pipe will burst. The same blow to the second cut and that's it, the fragment can be removed.
At a distance of 6 - 8 centimeters from the ceiling, cut the pipe perpendicularly, and clean the remainder of the pipe from paint and rust with a grinder's cleaning disc, simultaneously removing the chamfer, so that later it will be easier to put on the plastic flange.
Now - the most important lower part with a tee. It is highly probable that the sulfur fill used by builders during installation as glue for metal and sealant "sits" very tightly, and two parts (the tee itself and the coupling, concreted into the floor and going to the lower neighbors) seem to be a single whole. Therefore, in order not to damage the remaining pipe (remember the fragility of cast iron), you will have to anneal the sulfurous putty for 3 - 5 minutes with a blowtorch to remove the softened putty. You can then remove the flange without noticeable force. Replacing the sewer riser, or rather dismantling the old one, is over.
Chasing
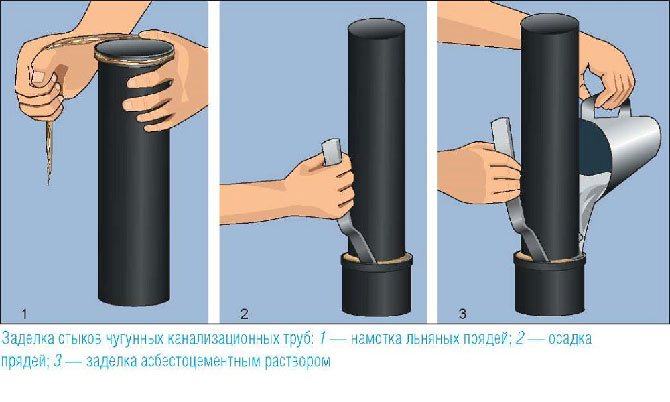
This method has been used for a long time. It is used when installing a cast iron pipeline. In this case, rubber seals are not used. The joints of the communication sections are sealed with tow (linen winding). For hardening, cement mortar is used. This method is used when the leakage between the walls of cast iron and plastic pipes is 3-5 mm. Instructions for the installation of communications using the stamping method:
- Plumbing paste is applied to the plastic pipe, tow is wound on top. The caulking depth is 2/3 of the socket length.
- The product is brought into the cast-iron pipeline until it stops.
- Tamp the tow using a narrow spatula, screwdriver.
- The remaining 1/3 of the socket is filled with polymer cement mortar. At home, it is prepared from cement, water and PVA glue.
The advantage of this method is a high degree of reliability. If the rubber adapter has been in operation for 8-10 years, then thanks to the stamping method, the pipe joint will last much longer. It also has disadvantages. So, they note the need to wait 1-2 days until the cement slurry hardens. The pipeline must not be used during this period. This will lead to deformation of the seam joint, which in the future will cause the destruction of the polymer-cement layer, and the appearance of a leak.
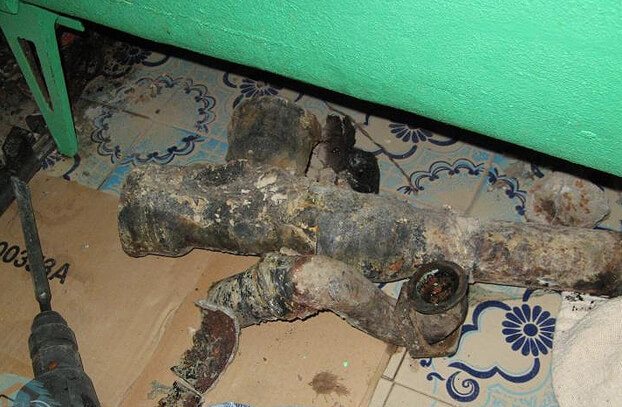
How to remove the undersides of an old pipe when it is anchored with concrete in the floor and the joint is not brushed
The lower sections of the risers are usually made from component parts. They can include a coupling, an expansion pipe, and more. The first thing to do is check all joints for strength. Why, shake the pipe in the upper part, only very carefully so as not to harm the lower bell
Luckily, if it loosens a little, carefully remove all swinging parts. When the cross is even slightly loose at the joint, remove it using a nail pull
In the case when the cross is firmly fixed, you will first need to clean the joint deeper. If its clearance allows, then you can use a hammer drill with a narrow drill. Do not use a victorious drill. The mortar filling the joint is crumbled around the perimeter and removed with a chisel.
It is bad when there is practically no seam, and the cross is fixed firmly. Here you can try to clean the seam with a metal file. But, if these manipulations do not help, and you confidently wish to replace the crosspiece, then you will have to cut it 2-3 centimeters higher than the socket. The opening of the riser must be covered with a rag and fixed with a rope, this is done so that the scraps of cast iron do not fall into it. Then, using a grinder without protection, carefully cut the remainder of the pipe from the socket. At the same time, do not spoil the socket itself, which remains in the overlap. Use a special wedge to remove the remaining pipe fragments from the socket.
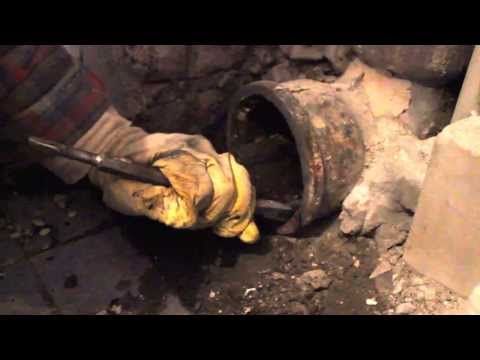
Dismantling the old pipe
Dismantle the cast iron pipeline very carefully to avoid the appearance of chips or cracks.
We recommend that you familiarize yourself with: What is fire protection for air ducts for and how to choose it correctly
Joints have often been sealed with cement and tow, so it can take a lot of effort to loosen the joints.
It is necessary to disconnect the pipes by scrolling, and in no case by swinging. If you are not sure that the bell of the cast-iron pipe can be released without damage, it is better to carefully cut it off with a grinder.
It is important! Do not try to break off a notched cast iron pipe. Most likely, the break will turn out to be uneven and you will have to cut it again. It is better to work with the grinder a little longer, and cut the cast-iron product completely.
What tools and materials will be required
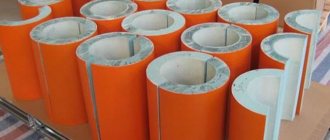
Replacing a cast-iron sewage system begins with the fact that you decide on which pipes you are replacing. The most practical and affordable material is plastic. It not only looks good, but is a completely reliable alternative to cast iron products. The material has such advantages as low resistance to flow and thus a low risk of clogging. Also, the small weight of the elements is noted, which facilitates the installation process.
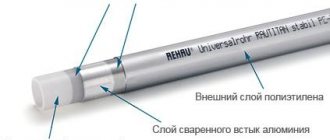
Plastic pipes for replacing the sewer
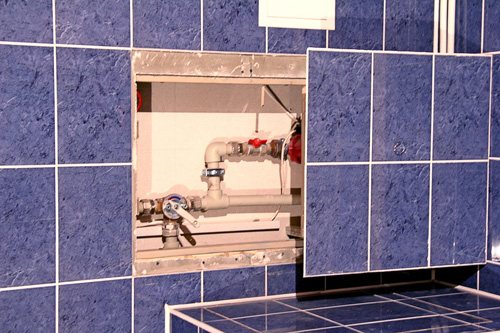
This is what an inspection hatch looks like
Required tool:
- the most important is the Bulgarian;
- gas-burner;
- hammer and chisel;
- level and tape measure;
- brand, plumb line, goggles, respirator.
Don't forget about sealants, grout and liquid soap on hand.
Dismantling
Work will start from the riser. The tube is cut at a distance of about 0.6 meters from the floor and 0.1 meters from the ceiling. The cut is not made continuous, but it is divided into two, with a narrow jumper. Later, it is broken with a hammer, and the cut pipe is removed. It is very difficult to accomplish this task alone. It is necessary for one worker to break the lintel and the other to hold the pipe
These manipulations are performed carefully. Otherwise, you can harm the riser section hidden in the ceiling.
This is not a problem when replacing the structure along the entire line. Disassembling the riser is the most time consuming part of the case. All other components of the sewage system are removed much easier and faster.
Piping selection and tools required
In old houses, all pipes were installed from cast iron, including sewer pipes. Of course, this is a very durable and reliable material, but it also has its own shelf life. Therefore, sooner or later, the time comes when it needs to be replaced.
Modern risers are made of an even more durable material, which is also lightweight and outwardly more aesthetic. Masters recommend switching to this more practical material. Steel or galvanized pipes will need to be replaced again after ten to twenty years. But if you make a replacement for polypropylene or polyvinyl chloride, then their operation is guaranteed for up to thirty to fifty years. And often it stretches for an even longer period.
And if, along with the replacement, you also take care of good ventilation, which can be purchased complete with pipes, then you can simply forget about sewer odors.
Since it is necessary to replace the cast-iron sewage system with a plastic one in a multi-storey building, the water is preliminarily shut off. Therefore, the work is done as quickly as possible.
Also, neighbors from above are warned not to use the restroom and water, otherwise everything will go to your apartment, and the neighbors below will be flooded.
To dismantle a sewer riser, the following tools are required:
- Bulgarian;
- nail puller;
- a large screwdriver to remove small items from the system;
- chisel;
- puncher;
- a hammer;
- grinder;
- film to cover the pipe hole;
- an apron, gloves and glasses for personal protection.
Dismantling the old sewage system
Having decided on an independent replacement of the riser, it is best to agree with the neighbors so that, if necessary, they can provide access to the apartments.However, in most cases, the replacement takes place exclusively in your apartment between the floor and the ceiling.
The step-by-step instructions for removing the riser are as follows:
- A distance of ten centimeters from the ceiling surface and eighty from the tee is calculated. Two cuts are made with a grinder. The depth should be half the pipe diameter.
- A chisel is applied to the upper cut and beaten with a hammer. Then the same manipulation is repeated below. The blows must be applied with enough force to split the pipe so that the middle section is removed.
- The pipe from the ceiling is covered with polyethylene foil.
- When disassembling the lower part, which consists of a tee and other fittings, arm yourself with a nailer or crowbar to loosen the fasteners. Then remove the fitting. But, in general, this requires additional work with a hammer drill. With it, the cement on the fasteners is removed.
- With a chisel or a screwdriver, chip off the cement, and then remove the tee. If it does not work out, the fitting is cut off with a grinder, retreating up to three centimeters from the socket.
- In the remaining places, remove all dirt and clean the cast iron with a grinder.
Installation of pipes
After removing the old pipeline, you need to immediately install a new one so as not to cause unnecessary inconvenience to neighbors. But they start the process, like the previous one, with checking all the tools necessary for this.

Installation requires the following equipment:
- pipes with a diameter of one hundred and ten centimeters;
- outlet tee made of the same material as the riser;
- rubber grommets to secure fittings between protruding cast iron stubs and plastic pipe;
- branch pipe for transition from cast iron to plastic and vice versa;
- pipe mountings;
- soap used to facilitate entry into the mounts, that is, a kind of lubricant;
- vertical building level.
Installation takes place in the reverse order compared to dismantling:
- The rubber sleeves are inserted into the pipe cut.
- Attach the adapter at the top and the tee at the bottom. All parts must be fastened as tightly as possible to ensure maximum tightness. With the free movement of the tee, the connection is sealed using silicone sealant or linen winding.
- The plastic riser is secured with clamps. If the ceiling height is standard, then they usually manage with three pieces: for the top, bottom and middle. If it is high, then you need to purchase additional connections.
- The system is pre-assembled.
- A branch pipe must be lowered into the tee to connect the plastic and cast iron.
- Each fastener is lubricated with a silicone sealant and wait for it to solidify.
- Then turn on the water and check the pipe connections for leaks. If everything is in order, then this part of the work can be considered completed.
Where to start installation work
Pipes made of cast iron become faulty over time. It all starts with corrosion, then the pipes become cracked and overgrown with internal deposits, thereby reducing the drainage space for household waste. Old sewer communications can no longer fully fulfill their functions.
In order to maximize the time spent on replacing the sewage system, it is necessary to adhere to a certain algorithm and sequence of actions. Each stage is a very important link in the entire chain of events, and a violation committed during the performance of any type of work can fatally affect the functioning of the entire sewer system. First of all, it is necessary to dismantle communications, the state of which, as a rule, leaves much to be desired. After all, they are the main burden of transporting waste from the house to the tee and then to the riser.
Work order:
- Drawing up a list of the necessary materials and tools that will be useful in the process of work, with their subsequent purchase;
- Drawing up that part of the sewer communications plan, which includes the placement of a bath, sink, tee, shower and other plumbing devices;
- Dismantling an unusable sewerage system;
- Installation of new pipes, connection of all necessary plumbing devices to the sewer system;
- Sealing of seams and joints;
- Fine finishing for a specious appearance.
Did you know: if work on replacing sewer lines is carried out in a private house, you may have to change pipes for a riser. In an apartment building, this is not possible.
The advantages of plastic sewage
A sewage system with a cast-iron pipe becomes completely unusable after 40-50 years of use. It is optimal to replace it with practical polypropylene or PVC pipes. These materials have enough advantages:
- light weight compared to metal;
- smooth inner surface (reduces the risk of blockages, simplifies the cleaning process);
- plastic is not afraid of corrosion;
- no special equipment is required for installation.
The only drawback of plastic is a high level of noise when water is drained or wind noise (in a private house). A soundproof box made of soundproof materials will help to solve this problem.
The advantages and disadvantages of such a connection
The advantages of the transitional connection of PVC products to cast iron include:
- high technical characteristics of plastic products, the absence of rust in them, ease and simplicity of installation in comparison with cast iron pipes;
- less laborious process of joining in comparison with joining cast iron products;
- the ability to make a connection with your own hands;
- a variety of methods for installing polymer pipes with cast iron, each of which brings a reliable result;
- no need to purchase expensive equipment, use welding, etc .;
- a large selection of standard sizes of polymer pipes and connecting elements.
The disadvantage is the difference in heating temperatures of these materials. Plastic products heat up faster, while they begin to deform, which leads to loosening of some types of joints and loss of their strength.
For this reason, over time, detachable joints of cast iron and plastic lose their reliability.
Preparing to replace the cast-iron sewer with a plastic one
Dismantling a cast-iron sewer with your own hands begins with the preparation of tools.
The work is done using:
- chisels;
- a hammer with a nozzle (rubber or wooden);
- puncher;
- chisels;
- 2 adjustable wrenches, knives, screwdrivers, crowbar, steel wedge for disassembling pipe parts;
- grinder, grinding disc and 3-4 pieces of 125 mm discs.
Before dismantling, it is determined how cast iron parts (in particular crosses and tees) were connected to the shaped section, for which it is necessary to find the connection point - usually it is located higher than the level of the floor covering. If tiles are laid on the floor or there is a screed, then a perforator or chisel is required to search
You need to work with them carefully - you cannot damage the bell that remains in the overlap.
The connection between tees, crosses and pipes can be done in three ways:
- filled with gray;
- polymer-cement mixture;
- caulking with a solution. You can use cement-sand or cement.
Dismantling the old cast iron sewage system
As for how to dismantle a cast-iron sewer, this work takes place in stages:
- The vertical pipe is cut with a pipe cutter. If it is not there, then this work can be done with a grinder by making two cuts with an interval of 10-15 centimeters from one another.They need to be placed at a slight angle relative to each other, and converge near the wall, where the pipe is not cut, so that its top does not sink. The product is cut 3/4 in relation to the perimeter. Using a wedge driven in on both sides, the cut out area is broken off with a chisel, and the remainder is knocked out with a hammer. Pieces are removed carefully so that they do not fall into the drain and thus clog the system.
- Subsequently, the upper edge is cut off at a specific height. In order to easily connect the cast-iron sewer with the plastic one in the future, a section of the pipe coming from the ceiling is left at the top. Its height must correspond to the parameters of the molded product, pressed during the installation of plastic products. The cut is performed relative to a horizontal line, therefore, the place of the cut is pre-marked with masking tape. Applying a sharp blow directed towards the wall, the pipe is destroyed in the place where the cut was made. Cast iron products are fragile, and problems with this cannot arise.
- Usually, the lower part of the riser has several components. They can be revisions, couplings and other elements. To check the strength of the connection, you need to carefully, trying not to damage the lower socket, swing the rest of the pipe. If possible, they begin to pull it out in parts, helping with a crowbar.
Replacing a cast-iron sewage system with a plastic one with your own hands cannot be called particularly difficult. If the connection of the pipe with the fittings is rigid, then to disassemble the structure, you need to clear the joint by loosening the product. When the junction of the connecting elements expands significantly, you can use a perforator with a thin drill that does not have a victorious tip. They carefully try to hammer the solution connecting the elements, and remove the remains with a chisel.
Dismantling can be difficult if the seam is practically absent, and the solution glued the elements together too tightly. In this case, an old metal sheet is used to expand the joint. If in the end it was not possible to disassemble the connection, then the fittings should be cut off 2-3 centimeters above the joint.
The piece of pipe that remains in the socket is cut with a grinder, while the protection is removed, at different angles of inclination of the disc. Fragments of fittings remaining inside the pipes are removed using a special wedge.
There is nothing difficult in how to disassemble an old cast iron sewer. You just need to be patient.
Press fitting connection
In this case, a special adapter made of metal (steel) is used. On the one hand, there is a thread for connecting to a cast iron pipe, on the other, a socket for connecting a plastic pipeline. For work, you will need an angle grinder, a thread cutter. Installation instructions:
- It is necessary to prepare a cast iron pipe. A cut is made with a grinder. If a clutch is installed in this area, unscrew it. The threaded connection is now complete. Otherwise, the thread must be done independently, for which a thread cutter is used.
- A sealing tape is applied to the prepared cut. As an alternative, tow can be used.
- To strengthen the threaded connection, a sealant is applied from above.
- Install the press fitting. However, it should be screwed onto the pipe manually. In this case, you cannot use an adjustable wrench, because the fitting may burst.
- On the other side, a plastic pipe with a crimp collar is connected.
In order for this section of the pipeline to be operated without interruptions, it must be remembered that a fitting made of polyvinyl chloride cannot be installed on a metal base.
Pipe replacement materials
The number and diameter of plastic pipes, fasteners, connection parts depends on the wiring diagram. If the products will simply be put in place of the old ones, it is easy to count them. On a plastic riser, it is imperative to make an inspection hatch.For work, you will need some shaped elements to connect different diameters of products. These are tees, crosses, rubber cuffs, plastic adapters, seals. Of the tools you need:
- grinder with discs;
- nail puller;
- blowtorch (not always needed);
- a hammer;
- roulette;
- respirator and goggles;
- chisel;
- marker;
- puncher;
- building level;
- plumb line;
- ladder;
- pipe with a diameter of 110 mm.
The plastic product must be checked against the markings applied to it. It must be designed for sewer works
This is important because sewage is highly aggressive. In addition to improvised tools, you will need a silicone sealant
It will come in handy when sealing riser joints. Liquid soap and cement may be required.
Correct embossing of the fan tee. Dismantling of the cast iron sewage system. Switching from cast iron to plastic.
Watch this video on YouTube
Noise isolation and causes
Of course, PVC and polypropylene pipes are much better than cast iron pipes. They will last longer, have an aesthetic appearance and are much cheaper. However, they have one significant drawback. This is noise. At first, even experienced specialists did not know how to deal with this. But today, as soon as the pipes are installed, they begin to deal with noise and sound insulation. Doing this is not at all difficult on your own. Therefore, do not be afraid! Having done this work, you will forget what the noise from the pipe is.
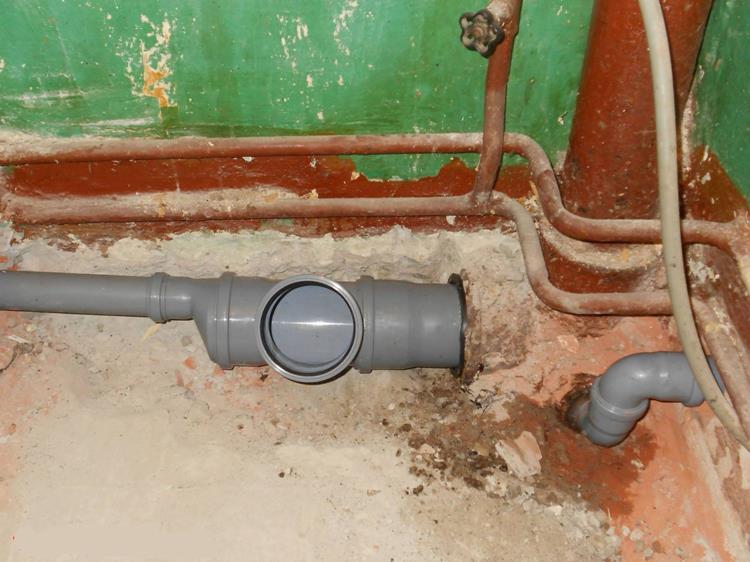
installation of a plastic pipe with a non-return valve and connection to a cast-iron pipe of a riser
There is no one way to achieve soundproofing effect yet. Therefore, they are used different, depending on the design, acoustic features and the availability of certain materials.
Why do cast iron pipes make no sound, while modern plastic pipes are so noisy? After conducting special studies, several reasons for extraneous sounds from the riser were revealed. Among them are:
- percussive sounds occur when the contents beat against the pipe walls, making noise;
- atmospheric phenomena occur with the howling of the wind, the sound of rain, or even more hail;
- resonant manifestations appear when extraneous noise is transmitted;
- vibrational sounds are transmitted from the entire structure, underground traffic, and so on.
The pipe itself, due to its shape, suggests the possibility of perception and transmission of the different nature of sounds. But the material from which it is made is also important. Those cast iron risers that still stand in old buildings do not make noise for this very reason. After all, it is not completely metal. It is an alloy that consists of different grains that differ in composition and properties. Thanks to this, sound absorption is ensured, since the grains rub against each other and reduce vibration.
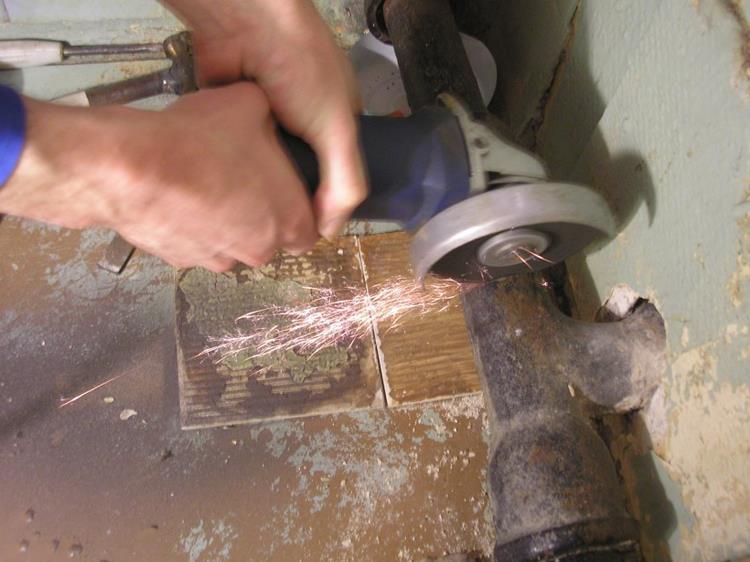
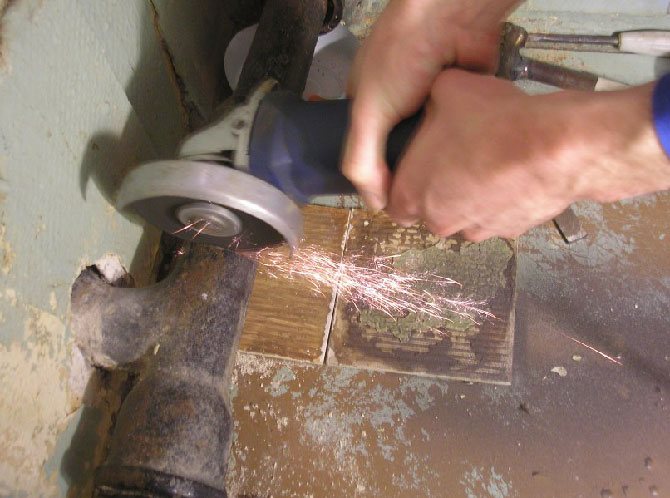
trimming old cast iron pipe
In addition, such pipes are covered with plaque from the inside, which in itself plays the role of an excellent sound insulator, despite the fact that the movement of wastewater slows down.
Methods for connecting plastic and cast iron pipelines
The choice of one or another method of connection is due, first of all, to the fact whether it was possible to keep the bell of the cast-iron pipe intact, or it was cut off. The further choice of the installation method is determined based on personal preferences and the availability of the necessary materials and tools.
Rubber pad application
This method of connection is justified in situations where the socket of the cast-iron pipe was released and kept in good condition. The approximate course of action can be described as follows:
- The socket is thoroughly cleaned of dirt and rust, after which it is dried, and on the inside it is coated with a layer of sealant.
- The outer surface of the adapter, in turn, is also coated with a sealing compound and inserted into the socket.
- Further, the end of the plastic pipe is inserted into the free end of the cuff until it stops.
- All joints are once again treated with a sealant.

It turns out a completely reliable connection, which, if necessary, can be easily disassembled.
Using a plastic adapter with a rubber seal
This method is suitable in cases where the socket of the cast-iron pipe had to be cut off:
- The edge of the cut pipe should be as straight as possible.
- A rubber ring treated with a sealing compound is put on the edge of the cast-iron pipe, as well as a rubber cuff.
- A plastic adapter is put on top, which in turn is also treated with a sealant.
- A piece of plastic pipe of the corresponding diameter is connected to the adapter.
We recommend that you familiarize yourself with: Flange adapter for connecting PE pipes
Using a pressfitting
A press fitting in this case can be described as a special adapter equipped with a thread for attaching to the cast-iron part of the pipeline at one end, as well as a socket for mounting the plastic part of the pipeline at the other. The reliability of this type of connection is very high, but the installation method is also the most laborious:
- The end of the cast iron pipe is cut neatly. At the same time, the chamfer is removed.
- Further, the place of the cut is lubricated with grease (any machine oil), after which the thread is cut. The thread depth should not be more than 50 mm.
- Thread sealing is done by winding plumbing tape or tow. An additional layer of silicone can be applied to enhance the tightness.
- The press fitting is carefully screwed onto the thread. Tightening wrenches are not recommended as they can easily damage the threads and inevitably lead to leaks. It is possible to tighten the element more tightly after the water has been supplied, if leaks are detected in this area.
- A plastic pipe with a ferrule is pushed onto the other end of the fitting. Using a special hand press, crimping is performed, which ensures excellent tightness.
Note! The use of a press fitting will additionally require taking into account a certain difference between the coefficients of thermal expansion for metal and plastic products. It is for this reason that experts do not advise winding PVC fittings onto cast iron.
Flax embossing
This method was almost the only one before the advent of modern silicone sealants, although many craftsmen still prefer it to everyone else:
- In the place of the supposed joint, a linen winding is wound in several layers at the end of the plastic pipe.
- The plastic is inserted all the way into the socket of the cast-iron pipe.
- Using a wide flat screwdriver or a narrow spatula, the reel is pushed as tightly as possible into the gap between the pipes to be connected. This stage of work is precisely called chasing.
- Further, the junction of cast iron with plastic is thoroughly coated several times with a special mixture, which contains cement, PVA glue and water.
- After 24 hours, the mixture solidifies completely and the ready-made pipeline can be used.
We recommend that you familiarize yourself with: Methods of interconnecting plastic sewer pipes
Silicone sealing
Least time consuming method. If the dimensions of the gap between the cast-iron socket and the plastic pipe inserted into it do not exceed 2 mm, simple sealing of the joint with sanitary silicone is allowed.
- The cast-iron socket is thoroughly cleaned and dried (it is better to do this with a construction hair dryer).
- The end of the plastic pipe is wrapped with plumbing thread and placed into the socket to a depth of 8-10 mm.
- Silicone is fed into the slots in an amount sufficient to fill all the voids.
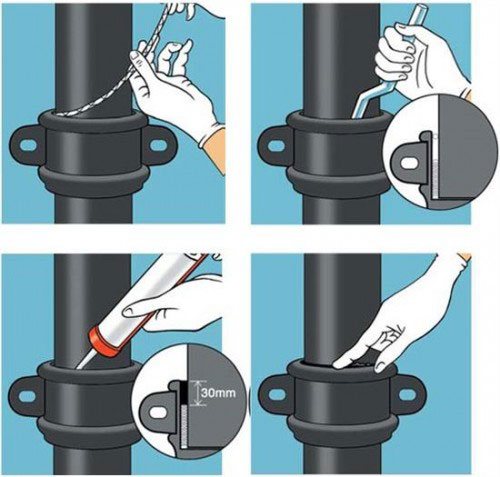
Special attention should be paid to the joint area at the bottom, trying to place the silicone as far as possible into the gap (it is convenient to use a special tool for this purpose, for example, a construction gun).
The procedure for complete drying of silicone, as a rule, takes 3-5 hours.
Flange connection
Perhaps one of the most difficult connection methods. For installation, you will need to purchase special connecting parts.
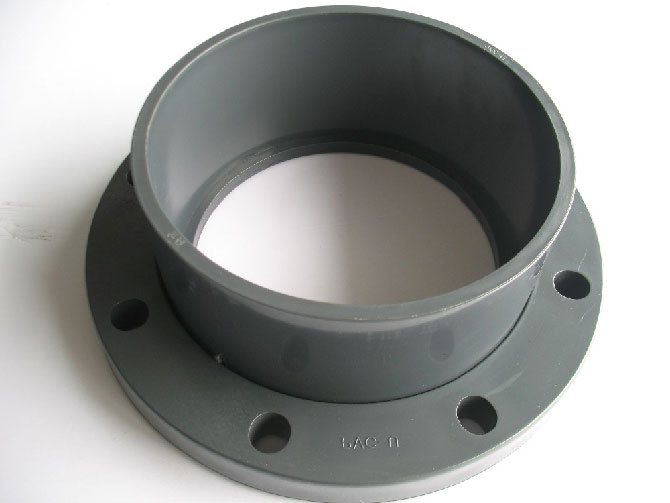
In addition, the use of welding equipment will be required, which will allow not every owner of a house or apartment to carry out the entire volume of work on their own.
The recommended sequence of actions is as follows:
- The cast iron pipe is cut and cleaned.
- A metal flange is welded to it.
- A special crimp sleeve is applied to the resulting structure.
- Further, a seal is placed between the flange parts, after which they are tightened with bolts.
It should be noted that flange connections are most often used for large (200 mm or more) pipe diameters.