To this day, a substantial share of the housing stock is occupied by the Khrushchevs - houses that were built as a temporary solution to the problem of populating cities. The quality of life in Khrushchev, taking into account the natural wear and tear of the building over the period of many years of operation, does not differ in comfort and coziness. At the same time, residents are forced to put up with other problems, including poor-quality heating in the cold season.
Most of the Khrushchevs are heated by old heating devices that do not have the proper heat transfer and do not cope well with their functions in the heating system. Therefore, residents of such houses resort to various methods to improve the quality of heating their apartments.
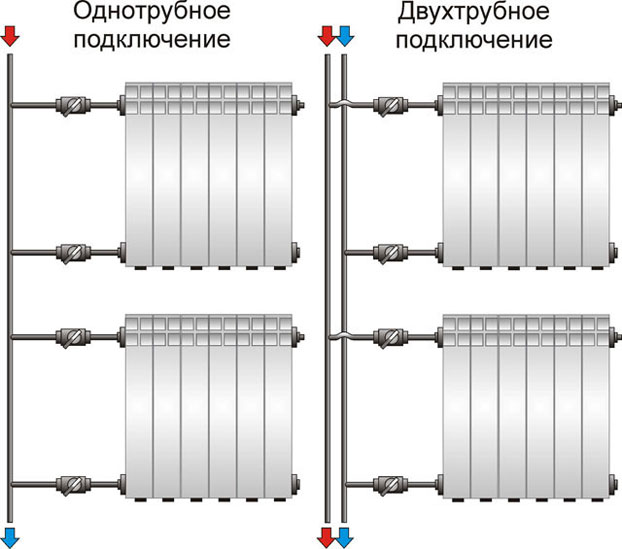
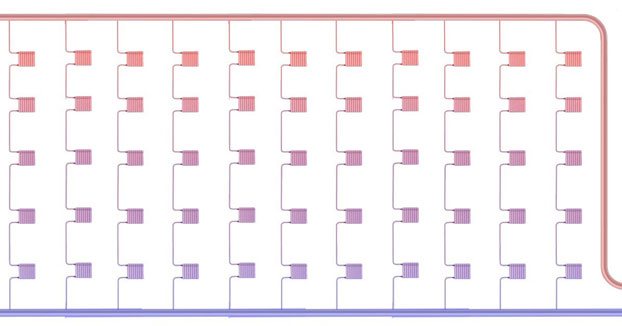
The centralized heating system in Khrushchev is implemented using a single-pipe piping of radiators. According to the scheme, the coolant spreads along the contour, starting from the fifth floor. As it passes through the system, the cooled coolant enters the basement (basement). At the same time, room heating batteries located on different floors of the Khrushchev will differ greatly in terms of temperature and heat transfer.
In addition to uneven heating, the Khrushchev heating scheme has other critical flaws:
Residents of Khrushchev can solve the problem of inefficient heating by installing modern radiators and pipelines in the apartment. To understand how to choose the right heating batteries for an apartment, it is important to study the performance characteristics of heating devices made of different metals. In recent years, polymer pipelines and are in demand. But the owner can choose any other type of heating devices that meets his financial capabilities and requirements.
It is most rational to replace heating devices in all apartments connected to the same riser.
The installation of new heating devices on all floors will result in a round sum, but such measures will give tangible results instantly.
Additional measures
Even after new radiators have been installed for an apartment, prices for which depend on their type, residents of Khrushchev may note the insufficient efficiency of central heating.
Autonomous heating in Khrushchev
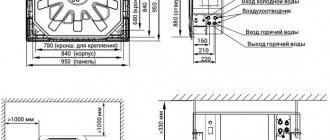
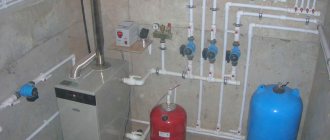
In order to radically solve the problem of cold batteries and low air temperatures in Khrushchev, the apartment owner can implement an autonomous heating project. The project provides for the installation of a separate boiler in the apartment and the presence of a well-developed project that regulates the technical conditions according to which the autonomous heating system will operate.
The boiler for Khrushchev is selected in accordance with the area of the apartment.
Often, a 7-8 kW device is enough to heat a two-room apartment with an area of sixty square meters. According to the regulations, the boiler must have a closed combustion chamber, be equipped with a coaxial chimney and be installed in accordance with the recommendations specified by the manufacturer.
Re-equipment of the circuit
In addition to the boiler, the existing circuit will have to be re-equipped. Heating batteries used and new radiators can be connected to it, which are tied with a pipeline in accordance with the heating scheme. Depending on the required heat output, low radiators installed under the windowsill, as well as standard radiators, can be used in the heating circuit.
Types of heating panels
First of all, it should be said that different types of systems are called panel heating. Their main common feature is the absence of radiators and heating of the surfaces of the room.
In other words - when installing panel heating, the heating element is located in building structures:
- In partitions;
- Attached window sill panels;
- Floor screed;
- Monoliths in the ceiling, etc.
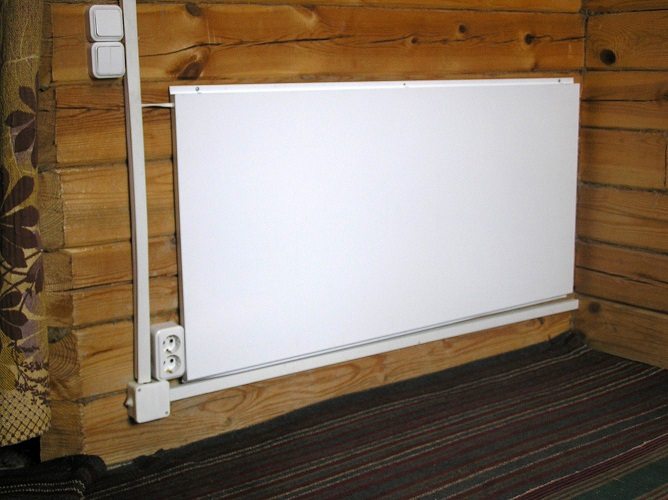
In addition, heating devices can be in the form of ready-made hinged panels that are mounted to walls or ceilings.
Depending on the heating method, there are two types of systems:
| Electric (radiant panel heating) | They work by emitting infrared rays. |
| Aquatic | They are systems of pipes through which the coolant passes. |
Below we will take a closer look at the features of these systems.
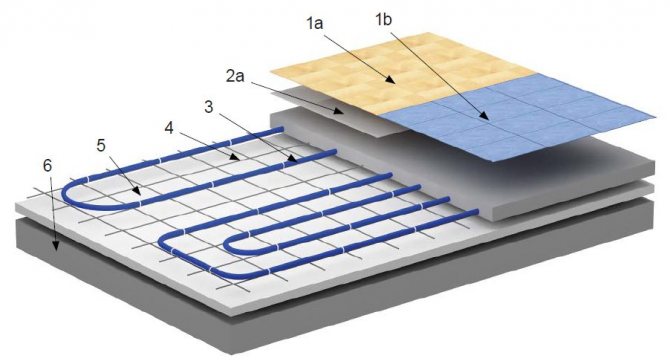
Underfloor heating construction
Water system
The water system is most often used for underfloor heating and is better known as "water underfloor heating". This solution provides comfortable living conditions even in the most severe winter. It is pleasant to walk on a warm one, and, thanks to its installation over the entire area, it prevents the occurrence of cold zones.
However, it should be noted that the floor temperature cannot rise above 30 degrees, otherwise it will be uncomfortable to walk on it. Therefore, as a rule, such a system is not enough to fully heat the room, therefore it is used in conjunction with batteries or other heat sources.
The disadvantages of this design include the complexity of DIY installation, which involves removing the old screed, laying heat-insulating material and pipes of the heating system. In addition, in the event of a breakdown, it is necessary to dismantle the floor covering and screed.
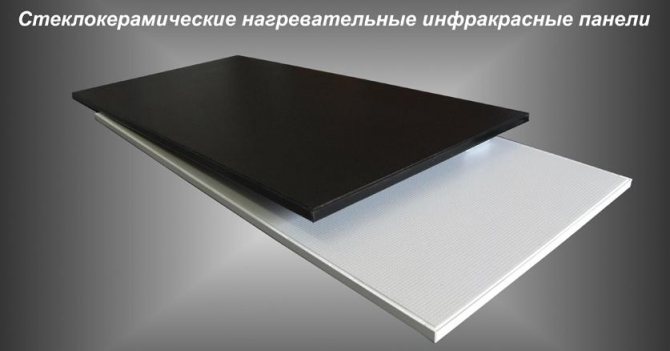
In the photo - ceramic infrared heaters
Electrical panels
Panel - radiant heating, which is a fundamentally new distribution of thermal energy, has recently gained particular popularity. Unlike traditional radiators, which heat the air, infrared radiation first gives off heat to the surfaces in the room, which in turn heats the room.
Most often, the following types of devices are used to heat rooms:
- Ceramic heating panels are a device whose front side is made of ceramic... The heating element of such a device has a high heat transfer coefficient with low power consumption. In addition, the efficiency of the device is increased due to the design of the rear side, which has a heat storage coating and provides natural convection.
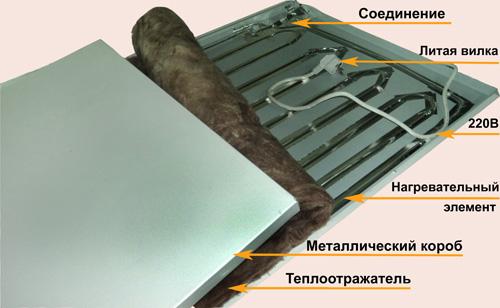
Construction of STEP panels
- Heating panels STEP - today are one of the most economical heaters... The body of the device is made of galvanized steel, and inside there is a high-power heating element.
- Heating panels EINT - are long-wave infrared heaters... They are available in the form of ceiling, wall and floor heating panels. They are reliable, safe and do not dry the air.
Heating panel STEP
Advice! When installing panel heaters, for safety reasons, it is recommended to hide the wires in a box. In this case, the description of the installation process itself has instructions that are attached to each device.
Alternative heating methods in Khrushchev
It should be borne in mind that it is not so easy to make autonomous heating. The owner of an apartment in Khrushchev needs to obtain many permits and this option for optimizing the heating system is not always realistic.Residents of Khrushchevs are denied permits for individual heating due to low main pressure in the circuit, inconsistency of chimney ducts with required standards, violation of fire safety standards, etc.
When choosing to use additional heating devices powered by electricity in Khrushchev, you should make sure that the wiring will withstand high loads.
Using the recommendations given in the review, the owner of an apartment in a five-story Khrushchev will be able to optimize the heating system and achieve comfortable temperature conditions in his home. Do not forget about the periodic maintenance of the heating system, which must be carried out from time to time. It will help prolong the life of the heating devices installed in the apartment and maintain the achieved heat transfer rates.
Each owner does everything to ensure that there is enough comfort, warmth and coziness in his house. Especially if it is a country house, cottage or just a small summer cottage. The fact is that this is not a comfortable apartment located in city blocks, one can also recall the Khrushchev apartments and where all the utilities do everything.
In the case of a private house, questions arise related to thinking over communications, how to come up with a scheme for installing a heating system, as well as water supply and sewerage. All this is the responsibility of the owner and should be done at the stage when the house is still being designed.
In the case of an already built house, the installation of communications is associated with serious problems, both financial and organizational plan. Heating, of course, can be installed, but not all schemes of heating systems can be implemented.
Secondly, as a result, the interior of the house can ultimately change significantly. When engineering communications are thought out when designing a house, aesthetics are not disturbed and, if necessary, access to all systems will be free for their maintenance.
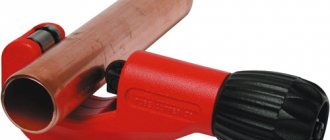
Material for connecting pipes
When creating heating, pipes are used, which are made of various materials.
Pipes can be simply steel, galvanized, stainless steel, copper, polymer, including metal-plastic, polyethylene, polypropylene reinforced with aluminum.
- Iron has a significant drawback - poor corrosion resistance
... Pipes made of stainless steel or galvanized on the contrary, do not corrode, they are installed using threaded connections. The installation of such a pipeline requires certain qualifications and work experience. Nowadays, when there are metal-plastic and polypropylene on the market, steel is practically not used.
- Copper pipes - their advantage is the ability to withstand high temperatures and high pressure, durability and reliability. The connection of copper pipes is carried out using high-temperature brazing, a solder that contains silver. Highways are masked in the walls during finishing work. Working with them requires a very high level of professionalism. Copper pipes are most often used in construction of an exclusive nature, because they have a very high price.
- Polymer pipes - the material for them is polyethylene or polypropylene
... Very comfortable and easy to install. Such pipes are durable, corrosion-resistant, they have a smooth inner surface that excludes the deposition of mineral salts.
- Metal-plastic - consists of two layers of plastic, separated by a layer of aluminum
.
Installation of metal-plastic is carried out using threaded connections, while welding is not used. Press connections can also be used, as a result of which the cost of installation is significantly reduced.
Such a scheme has no restrictions on its use, but the performance is determined by the circulation pump, its power and power supply.
Heating circuits defined by piping
The difference between these heating systems lies in the principles of connecting heating devices to the boiler. It can be a serial or one-pipe connection, parallel or two-pipe and beam, it is also a collector.
Sequential heating system
In a heating system with one pipe, the hot coolant enters all the heating devices in order, in each it gives off part of the heat. Such wiring diagrams of heating systems are the simplest, and the least components and materials are spent on its implementation.
The main disadvantage of such a system is that the amount of heat emitted decreases depending on the increase in the distance from the boiler.
Heating circuit with two pipes
In this heating system, two pipes are suitable for each heating device - with a hot coolant, direct, and already with a cold one, reverse. The system has undoubted advantages, but they are "paid" for with a double set of pipes laid in the house.
Radiant heating system
This system differs from the others in that a separate pair of pipes is laid to each heating device - both forward and reverse flow. They then converge near the boiler on special combs. The total pipe length is longer than in a two pipe system.
No connections are made in these pipes and balancing is carried out before putting it into operation. That is, the adjustment of the coolant flow rate is performed for each loop separately.
Such a system solves the issues related to the regulation of heat transfer for each heater in a system with one pipe. Each battery has shut-off valves and with its help the flow rate of the coolant through it is regulated.
In addition, a shunt is made in the form of a bypass pipe having a smaller diameter. This shunt allows fluid to circulate even if the battery taps are completely closed.
If you are already registered, enter your login information!
Previous article Next article
Heating scheme of a multi-storey building - how is the supply in the heating system of high-rise buildings
Content:
1. Features of the heating system of apartment buildings 2. Purpose and principle of operation of the elevator unit 3. Design features of the heating circuit 4. Layout of the pipeline in a multi-storey building 5. Types of radiators for heating apartment buildings
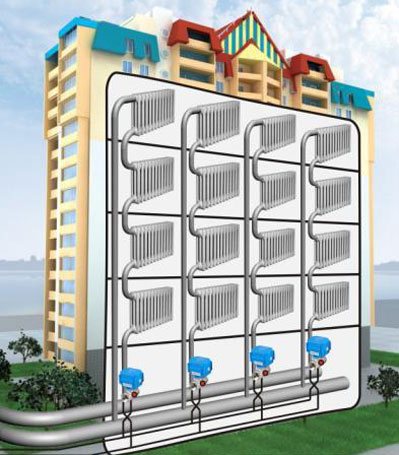
An apartment in a multi-storey building is an urban alternative to private houses, and a very large number of people live in apartments. The popularity of city apartments is not strange, because they have everything that a person needs for a comfortable stay: heating, sewerage and hot water supply. And if the last two points do not need special introduction, then the heating scheme of a multi-storey building requires detailed consideration. From the point of view of design features, the centralized heating system in an apartment building has a number of differences from autonomous structures, which allows it to provide the house with thermal energy in the cold season.
Features of the heating system of apartment buildings
When equipping heating in multi-storey buildings, it is imperative to comply with the requirements established by regulatory documents, which include SNiP and GOST. These documents indicate that the heating structure should provide a constant temperature in apartments within the range of 20-22 degrees, and the humidity should vary from 30 to 45 percent.
Despite the existence of norms, many houses, especially among the old ones, do not meet these indicators. If this is the case, then first of all you need to start installing thermal insulation and change heating devices, and only then contact the heat supply company.Heating a three-story house, the diagram of which is shown in the photo, can be cited as an example of a good heating scheme.
To achieve the required parameters, a complex design is used that requires high-quality equipment. When creating a project for a heating system for an apartment building, specialists use all their knowledge to achieve an even distribution of heat in all sections of the heating main and create a comparable pressure on each tier of the building. One of the integral elements of the work of such a structure is work on an overheated coolant, which provides for a heating scheme for a three-story building or other high-rise buildings.
How it works? The water comes directly from the CHP and is heated up to 130-150 degrees. In addition, the pressure is increased to 6-10 atmospheres, so the formation of steam is impossible - high pressure will drive water through all floors of the house without loss. In this case, the temperature of the liquid in the return pipe can reach 60-70 degrees. Of course, at different times of the year, the temperature regime can change, since it is directly tied to the ambient temperature.
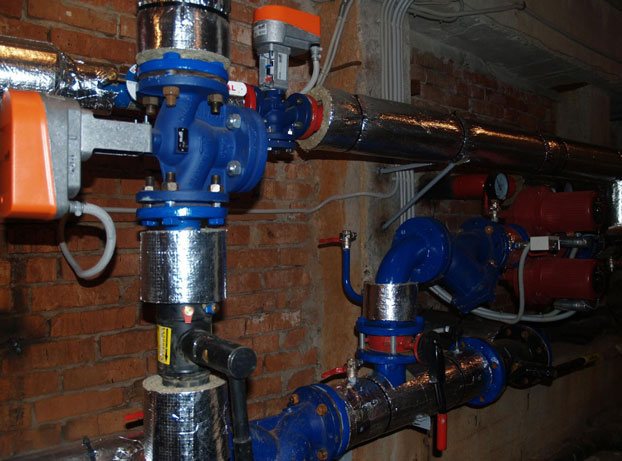
Purpose and principle of operation of the elevator unit
It was said above that the water in the heating system of a multi-storey building heats up to 130 degrees. But consumers do not need such a temperature, and it is absolutely pointless to heat the batteries to such a value, regardless of the number of storeys: the heating system of a nine-story building in this case will not differ from any other. Everything is explained quite simply: the supply of heating in multi-storey buildings is completed by a device that goes into the return circuit, which is called an elevator unit. What is the meaning of this node, and what functions are assigned to it?
The coolant heated to a high temperature enters the elevator unit, which, in its principle of operation, is similar to a metering injector. It is after this process that the liquid carries out heat exchange. Leaving through the elevator nozzle, the high pressure coolant exits through the return line.
In addition, through the same channel, the liquid enters the heating system for recirculation. All these processes together make it possible to mix the coolant, bringing it to the optimal temperature, which is enough to heat all apartments. The use of an elevator unit in the scheme allows you to provide the highest quality heating in high-rise buildings, regardless of the number of storeys.
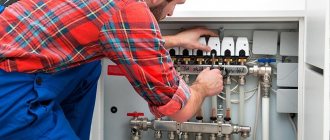
Design features of the heating circuit
There are different valves in the heating circuit behind the elevator unit. Their role should not be underestimated, since they make it possible to regulate heating in individual entrances or in the whole house. Most often, the adjustment of the valves is carried out manually by employees of the heat supply company, if such a need arises.
In modern buildings, additional elements are often used, such as collectors, heat meters for batteries and other equipment. In recent years, almost every heating system in high-rise buildings has been equipped with automation in order to minimize human intervention in the work of the structure (read: "Weather-dependent automation of heating systems - about automation and controllers for boilers by examples"). All the details described allow you to achieve better performance, increase efficiency and make it possible to more evenly distribute heat energy across all apartments.
Layout of the pipeline in a multi-storey building
As a rule, in multi-storey buildings, a one-pipe wiring diagram with an upper or lower filling is used. The location of the straight and return pipe can vary depending on many factors, including even the region where the building is located. For example, a heating scheme in a five-story building will be structurally different from heating in a three-story building.
When designing a heating system, all these factors are taken into account, and the most successful scheme is created that allows you to bring all the parameters to the maximum. The project may involve various options for filling the coolant: from bottom to top or vice versa. In individual houses, universal risers are installed, which provide alternating movement of the coolant.
Types of radiators for heating apartment buildings
In multi-storey buildings there is no single rule that allows you to use a specific type of radiator, so the choice is not particularly limited. The heating scheme of a multi-storey building is quite versatile and has a good balance between temperature and pressure.
The main models of radiators used in apartments include the following devices:
- Cast iron batteries. They are often used even in the most modern buildings. They are cheap and very easy to install: as a rule, apartment owners install this type of radiator on their own.
- Steel heaters... This option is a logical continuation of the development of new heating devices. Being more modern, steel heating panels show good aesthetic qualities, are quite reliable and practical. They are very well combined with the regulating elements of the heating system. Experts agree that it is steel batteries that can be called optimal when used in apartments.
- Aluminum and bimetallic batteries. Products made of aluminum are highly valued by owners of private houses and apartments. Aluminum batteries have the best performance when compared with previous versions: excellent external data, light weight and compactness are perfectly combined with high performance. The only drawback of these devices, which often scares off buyers, is the high cost. Nevertheless, experts do not recommend saving on heating and believe that such an investment will pay off pretty quickly.
Conclusion
The correct choice of batteries for a centralized heating system depends on the performance indicators that are inherent in the coolant in the area. Knowing the cooling rate of the coolant and the themes of its movement, it is possible to calculate the required number of radiator sections, its dimensions and material. Do not forget that when replacing heating devices, it is necessary to ensure compliance with all the rules, since their violation can lead to defects in the system, and then the heating in the wall of a panel house will not perform its functions.
It is also not recommended to carry out repair work in the heating system of an apartment building on your own, especially if it is heating within the walls of a panel house: practice shows that residents of houses, without the appropriate knowledge, are able to throw away an important element of the system, considering it unnecessary.
Centralized heating systems demonstrate good qualities, but they need to be constantly maintained in working order, and for this you need to monitor many indicators, including thermal insulation, wear and tear of equipment and regular replacement of used elements.
https://youtu.be/01vZcb1f8qw
Previous article Next article
Heating system installation
Currently, the market presents various materials, and therefore, various schemes for installing a heating system with your own hands can be implemented.It is possible that you do not need any professional skills and abilities. Enough patience and consistency in performing certain operations.
Attention: The connection of the heating boiler to the gas main must be carried out by specialists who have a special permit and the appropriate qualifications for this. The fact is that the very fact of such a connection is registered by the relevant services and an independent insertion is unacceptable.
Below is an instruction according to which you can mount heating in a private house:
- Heating installation begins with the choice of the scheme to be implemented. And in turn, the scheme is determined both by financial capabilities and by the characteristics of the house in which the heating is installed.
Advice: When choosing a scheme, consult with specialists who will tell you the most practical option that is right for your case.
- After the scheme is selected, make a list of the necessary equipment and materials for which a certain stock is needed and go to a specialized store.
- First of all, the heating boiler is installed according to the rules described in the operating instructions.
- Heating devices of appropriate power and size are installed in the necessary places.
- A pipeline is drawn to each device, according to the selected scheme.
Attention: Be sure to include a circulation pump in the circuit, then the coolant will always move through the system. Do not forget about devices that control the pressure and temperature of the coolant.
Tip: Choose pipes of this material to avoid welding when joining them. Because these jobs require professional skills or the hiring of an appropriate specialist.
- Perform a test run and check the system for leaks.
Installation of panel heating
It is recommended to entrust the installation of heating panels to an experienced craftsman, especially when it comes to a hot water field. In any case, the installation of panel drowning, with your own hands or by specialists, consists of several successive stages:
- Choosing a place for installation. As it can be used cold walls under the windows, as well as the floor. The inner walls of the premises and the ceiling for this purpose are rarely selected.
- Fastening. It is carried out using the supplied mounting hardware, while tools such as a drill and screwdriver may be needed. During the fastening process, it is very important not to accidentally damage the elements of the heating system, so the work must be carried out very carefully.
- Connection to a heat source - electrical network or hot water supply.
- Masking panels under trim elements.
Advice! When choosing a decorative finish for heating panels, it is advisable to focus on the color of curtains and flooring, so as not to disturb the harmony of the surrounding interior.
Output
Heating a private house is a serious task that can be solved independently, but nevertheless, one cannot do without consultations with specialists. In the video presented in this article, you will find additional information on this topic.
Starting repairs in September, and realizing that there is about one month left before the start of the heating season, a decision is made “first of all, the heating batteries in the apartment should be replaced” and at the same time begin preparations for the repair of the Khrushchev. We will replace cast-iron heating radiators, which have been completely clogged up over 50 years of use and, as a result, we have cold batteries for bimetallic heating radiators. As always, we plan to install heating with our own hands. Replacing heating radiators in an apartment requires a certain tool:
- Grinder with cutting disc for metal.
- Perforator and drill for concrete for making holes for fastening the heating radiator to the wall.
- Adjustable wrench.
- Building level.
- A scraper or die, in order to cut the threads on the riser pipes, which will remain after dismantling the cast-iron radiator.
Now let's try to do radiator heating at home with our own hands.
One-pipe heating systems in Khrushchev. Heating circuit - bypass.
The one-pipe heating scheme used in Khrushchev has a significant drawback that I had to face.A single-pipe heating system with hot water supply is carried out through one riser on which the radiator battery of the room is installed, and returns in another way with a much lower coolant temperature through the heating battery in the kitchen.
Having a one-pipe heating circuit available, in my opinion, the only correct option for connecting radiator batteries would be a circuit using a bypass. In order not to make a bypass of a smaller diameter, which ensures the passage of the coolant through the battery itself, it is necessary to install an additional ball valve on it. Thus, a water heating circuit using a bypass will look like this:
On the heating circuit using a bypass, it can be seen that we have not reduced the diameter of the main riser. By opening American women 2 and 3 and then closing the ball valve 1, we get the entire flow of the coolant with the maximum pressure (for pushing more than 8 sections of the heating radiator) passing through the heating battery. The weak point of this scheme is the need for increased reliability of the ball valve 1 (product quality), since if it fails, it will be necessary to turn off the entire riser. Ball valves 2 and 3 are made in the form of American women and allow at any time to perform quick installation, dismantling or replacement of batteries by disconnecting from the central one-pipe heating system.
Electric panel heating
The most modern and convenient option in every sense, which is becoming more and more popular. As a rule, it is carried out using teplomodern.ru infrared panels that generate powerful heat rays that evenly warm the air in the room. Other solutions can be used as well. When creating, such electrical appliances are used as:
- Ceramic panels combining a heater and a convector, the front part of which is made of glass ceramics, and the heat generating element is characterized by a high efficiency and economical energy consumption. Convection is provided naturally by covering the back of the panel with an accumulation material.
- STEP panels with a metal casing in the form of a galvanized box, the walls of which have a reflective coating, and a powerful electric heating element is located inside.
- EINT panels are ceiling, wall and floor type, the principle of operation of which is based on the operation of an infrared heater with a long wavelength.
Electric panel heating is absolutely safe and has a high degree of reliability, so it can be operated anywhere.
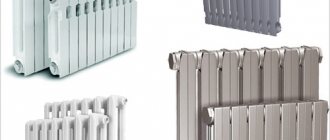
The choice of heating radiators. Cast iron, steel, bimetallic or aluminum radiators.
After deciding to replace old batteries, the question arose, how to choose heating radiators? The primary factor influencing the choice was the ratio of the cost of a heating radiator to its quality and heat transfer. In principle, as with the choice of any thing, I weigh the pros and cons for myself, correlate it with the price and make my choice. At the moment, there are cast iron, steel, bimetallic and aluminum radiators on sale. Let's consider each of them separately.
Cast iron heating radiators.
Benefits:
- Large thickness of the walls of the cast-iron radiator, which contributes to the durability of the product, in the presence of a large number of abrasive particles in the coolant.
- High resistance to corrosion, which is due to the physical properties of cast iron and is associated with the formation of a protective layer of "dry rust" on the walls.
- High thermal inertness and heat storage properties.
- Has the longest service life.
Disadvantages:
- Significant weight complicates installation and requires a more serious fastening system.
- There is a twofold situation with the cost - in the middle price category but very nondescript in appearance or made in exquisite patterns like forging but having a significant cost.
Steel radiators for heating.
Benefits:
- Low weight, and as a result, ease of installation.
Disadvantages:
- Average heat dissipation compared to aluminum and bimetallic radiators.
- A constant presence of the carrier in the radiator is necessary, since its absence causes rapid oxidation and, as a consequence, the formation of rust and rapid destruction.
- Low working pressure, 6 to 10 bar.
- Low resistance to pneumatic shock and water hammer.
Aluminum radiator for heating.
Benefits:
- For me personally - the most aesthetic appearance.
- Low weight and easy installation.
- Rapid heating when the media feeds.
- The highest rate of heat transfer (even in the ratio of heat transfer to cost).
- Sufficiently high working pressure 16-20 bar.
- The ability to set the required number of sections, depending on the size of the room.
Disadvantages:
- The main disadvantage is weak corrosion resistance, which imposes increased requirements on the quality of the coolant.
- When connected to other types of metals (most of all to copper), a galvanic pair is formed and, as a result, the destruction of the junction.
Bimetallic heating radiators.
Benefits:
- Bimetallic heating radiators, in principle, have all the advantages of aluminum radiators, perhaps slightly lower heat transfer, but at the same time eliminating its main disadvantages. The steel on the inside of the radiator is less susceptible to corrosion and, additionally, no galvanic vapor is generated when connected. Additionally, it has higher working pressure characteristics.
Disadvantages:
- The only drawback in my opinion is a slightly higher cost compared to aluminum, but this did not stop me and the choice fell on bimetal.
In the end, without brands, Italian manufacturers won according to the reviews of users who had already installed them, and over time I did not regret my decision.
Do-it-yourself installation of bimetallic heating radiators.
Even before installing heating radiators in an apartment with your own hands, you need to decide on the installation parameters. To install a radiator operating only on the convection principle, the following technological distances are required:
- from the floor to the radiator 10-15 cm. - providing a gap for air flow.
- similarly, from the radiator to the window sill 10-15 cm. - Providing a gap for air outflow.
- the distance from the rear side to the wall is 3-5 cm, excluding the thermal insulation installed on the wall prior to installation.
As mentioned earlier, bimetallic radiators will be installed (Italy). Before we are going to connect the heating radiators to the general network, it is necessary to drain the coolant from the central heating system. This operation in my case was closed by drawing up an agreement with the housing office for a certain date and paying a receipt.
An employee of the housing office who appeared in the morning said that everything was ready and that you could start.
First of all, we carry out the installation of the battery body kit. For this we need 3 pass-through plugs to connect two input American women and one for installation on the upper left side of the Mayevsky crane, which will help bleed air when the system is started. In the lower left part, we will simply install a plug. A very important point, as for me, to use only tow and paste for threaded connections and not in any case fum tape, which I consider to be the weakest link when using. After the body kit of the heating battery (bimetallic) is assembled, we begin the actual work on the riser. As you can see in the photo below, we start with the grinder cutting off the cast-iron battery itself (cuts 1 and 3), remove it and start cutting the riser at point 2.Now we take two pipe wrenches, with one of which we hold the pipe going to the neighbor from the top, and with the second we unscrew the part of the pipe we do not need, on which the old (not working crane) is located. Then it's all a matter of technology, we cut the threads at the cuts 2,3 points with the help of a scraper and assemble a structure from a tee, extension cords and ball valves, two of which are with an American (seen on the right side of the photo below). After we have everything assembled, we attach a bimetallic heating radiator and lightly bait the American women by installing it, for example, on books or any other support when using a building level. Now we can mark the mounting points of the radiator on the wall. We remove the radiator and, at the designated points, make holes for the dowels with a puncher, where we then screw in a standard 170 mm bracket. The distance from the wall can be adjusted by twisting / unscrewing the bracket. Additionally, you can use screens for heating radiators that are mounted on the wall before installing the battery and reflect the heat back into the room, preventing the wall from heating.
Yes, until I forgot, the entrances to the heating battery have their own distance between the axes, which in my case is 50 cm.So, when assembling a heating system with a bypass and outgoing taps, this parameter must be taken into account, and the distance between the axes of American women will likewise be equal to 50 cm.
This completes the installation of heating batteries in the apartment and requires only cleaning the heating pipes and subsequent painting. What happened in the end can be seen in the photo below.
Calculation of radiator sections. Heat dissipation of radiators.
Before performing calculations, you must be sure that the other factors affecting heat conservation, such as external insulation, replacement with new windows and slopes, are fulfilled.
To calculate the heating radiator sections, we need the initial data:
- power of one radiator section (heat transfer from radiators).
- area of the heated room.
- the required heat output per square meter of the room.
For my case (sectional radiators), the power of one radiator section (heat transfer of radiators) is 180 W and the area of the heated room is 15 square meters. According to SNiP, 100 W of thermal power is required for one square meter of the room. We get the formula:
Number of radiator sections = 15 (room area) x 100/180 (section heat transfer)
We get the value of the number of radiator sections equal to 8.3. We round this value up and get the value 9, and given the fact that manufacturers actually slightly overestimate the power of the section, I decided to add another one. Thus, for my rooms, the value of the number of heating radiator sections came out equal to 10. When calculating the radiator sections, I did not take into account the fact that a warm floor would be made in the kitchen, since it was not made for heating, but for a comfortable temperature.
After the poured floors had dried and the radiators had been replaced, I was able to start laying the laminate in the rooms.
Greetings, comrades. I have repeatedly covered the renovation of an apartment in Khrushchev's with relatives (bathroom and toilet), which has been successfully completed. But with the onset of the heating season, my help was needed again, and at once for the tenants of 5 floors. We are talking about de-airing the heating riser, with which we managed to cope, although not without difficulty.
Benefits of panel heating
The heat generated by the heating panel will be quite enough to create a comfortable microclimate inside the room, so this type of heating can easily replace obsolete radiators. Not at all inferior to them in terms of efficiency, panel heating has a number of other advantages, including:
- Even distribution of heat.Unlike batteries, the use of which often leads to a situation where it is hot only in the immediate vicinity next to them, while at a distance it is cold, the panel system heats the surrounding space evenly. Due to this, the same temperature is maintained in all parts of the dwelling.
- Energy saving is one of the most important aspects today, which allows you to significantly save on monthly utility bills
- No cold wall effect
- Aesthetic appearance of the room - unlike radiators, heating panels are not striking, moreover, they can generally be hidden behind the surface of a wall, ceiling or floor covering
- Saving usable space - panel heating takes up a minimum of space
This type of heating is of two types - electric and water. These can be systems of various types, with the main similarity, which is the complete rejection of the use of pipes visible to an outsider's eye.
Problem
The main problem that my relatives told me about was absolutely cold radiators in two adjacent rooms, while in other rooms the radiators got noticeably warmer with the beginning of the heating season.
For comparison:
- In rooms with warm batteries, the average daily temperature was + 17C;
- In rooms with inoperative heating + 13C.
As they say, feel the difference ...
For several days, calls from neighbors and relatives in the heating network ended in approximately the same way - nothing, because the house is cooperative, and its maintenance is not within their competence, except in emergencies.
And it was expensive for a cooperative of 60 apartments (4 entrances), where more than half of the residents are people of deep retirement age, to support their permanent plumbing from their own pockets. The part-time specialist only made sure that there were no leaks during system startup, and nothing more.
Searching of decisions
Arriving at the place, the first thing I do is check the taps on the radiators and bypasses - everything is open in both rooms. I open Mayevsky's taps on each radiator - a thin stream of water informs that there is pressure in the system, and the radiator is not air-conditioned. But you need to find out if there is a coolant in the system at all.
To this end, I go to the basement of the house. From the elevator unit I determine the direction and find "my" supply and return pipes.
Having reached the location of the apartments in our entrance, I see two - supply and return. To the touch, both pipes differ quite noticeably, so it was not difficult to determine that the colder one is the return.
Again I use my hands - both risers are cold, although literally a meter before this area the temperature was more than comfortable. The reason is the airing of the system on the upper fifth floor, which is why the coolant does not circulate.
I leave the basement and go to get acquainted with the neighbors of the upper floor, along the way asking other residents about the presence of stopcocks and their condition. As you'd expect, everyone has cast iron radiators installed 30 years ago.
In Khrushchev houses there is no technical floor, so the coolant is supplied from below from the basement. For clarity of the heating system, I propose to consider the diagram below.

We return to the apartment on the fifth floor. Cast iron radiators with 12 and 7 sections were installed in two rooms of the family of pensioners. It was them who were to be de-aerated.
The only method available for this is with the help of a nipple (a prototype of the Mayevsky crane) embedded in the radiator cap.
Armed with tools:
- Old galvanized bucket for 12 liters;
- Pliers;
- Two flat-blade screwdrivers;
- A few doormats - splashes are inevitable.
Since a lot of splashing is expected, I provide a place around the radiator to work - I clean and move the furniture away.Then I take a screwdriver and carefully, so as not to lick off the edges, unscrew the screw counterclockwise.
- The old system did not give in on the first attempt, I had to use the pliers - with their help I turned the screwdriver until the screw was removed from the stuck place;
- A hiss of air marked the beginning of an airlock. Within 3-4 minutes the air left the radiator, after which cold water flowed in a thin stream;
- By adjusting the screw so that water flowed into the bucket that was placed, I gave time - in about half an hour, when the bucket was half full, the temperature of the water changed from ice to warm, after which I tightened the screw back.
I did the same operation with a cast-iron battery in another room. A few hours later, it became noticeably warmer in the apartments - the thermometer showed a rise of a couple of degrees. Of course, there is no need to talk about a complete solution to the problem of cold in the apartment, because the temperature of the coolant is far from 75C, but outside the window is not yet a fierce winter.