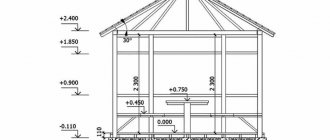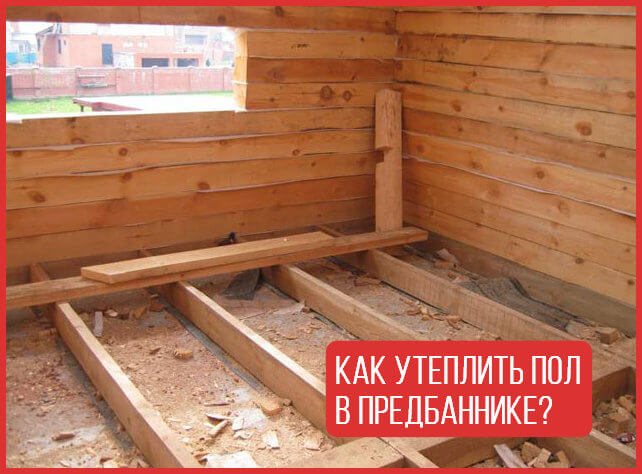
How to insulate the floor in the dressing room with your own hands? In the Russian bath, without fail, there is another room where you can relax after the steam room. Such a room protects the bath itself from cold air from the outside, entering through the doors. The warm floor also affects the comfort in it.
In such a room, the base does not heat up very much. Typically, the temperature on the coating does not exceed 30 degrees. To insulate the dressing room with your own hands, you can use different materials:
- The flooring is made of wood.
- Concrete screed.
- Ceramics.
It is also important to create a slope at the base along which water will flow.
Experts say that for arranging the floor in the dressing room, it is worth abandoning the use of materials that can melt, for example, linoleum. When heated, it can also release toxic substances into the air that are harmful to humans.
How to insulate the dressing room?
Before doing any work, it is worthwhile to initially lay down a plan. It must be created even before construction begins. This is necessary in order to navigate when choosing a heater, since the installation of each of them requires adherence to a certain technology.
There are many different options for insulating such a room. But when using any type of thermal insulator, you will have to remove about 15 centimeters of the base. If the floor is supposed to be made higher than the foundation, then the space can be backfilled with bulk materials, such as:
- Land.
- Expanded clay.
- Slag.
After filling, these mixtures will need to be tamped.
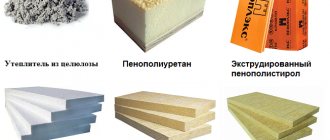
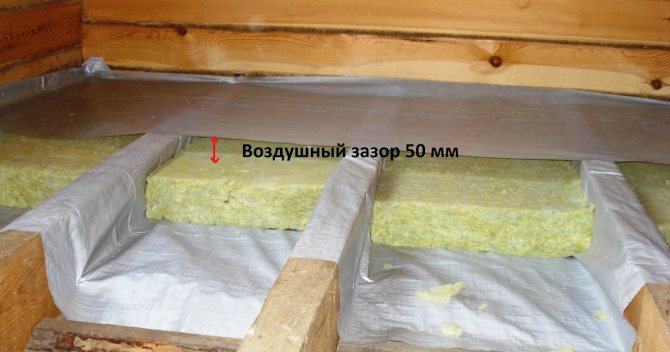
The ideal insulation for the floor will be a material that is durable and fire resistant. It must be inorganic, so it can be:
- Minvata.
- Perlite.
- Glass wool.
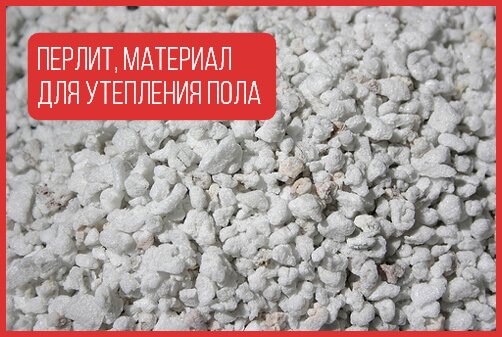
Such elements are not susceptible to decay and microbes and / or fungi cannot spread there.
Concrete
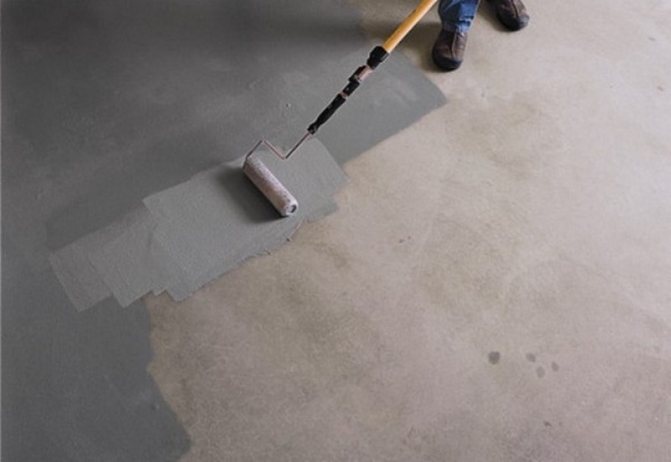
Painting the concrete floors in some rooms, including the dressing room, can be a quite decent and affordable alternative to laying ceramic tiles or porcelain stoneware. Even the highest grades of this material are capable of gradually deteriorating under the constant influence of high humidity, high temperature and water. Therefore, the protection of such coverage must be carefully considered.
Modern paints for concrete coatings presented on the market of finishing materials today have many specific characteristics. The consumer has a choice between epoxy, acrylic and polyurethane. The optimal material for painting is characterized by increased wear resistance and the absence of toxic effects during operation.
Dressing room functions
This room in the bath can perform different functions, but the main ones are:
- Water treatments after the steam room. Everyone knows that after the steam room you need to plunge into cold water or douse yourself with it, as this has a positive effect on human health. If there is no pool in the bath, you can pour water from the barrel in the dressing room.
- Shower room. There you can wash off the dust in a day and you don't have to go to the bathhouse.
- Storage of utensils. You can store chuyki, gangs, brooms and more.
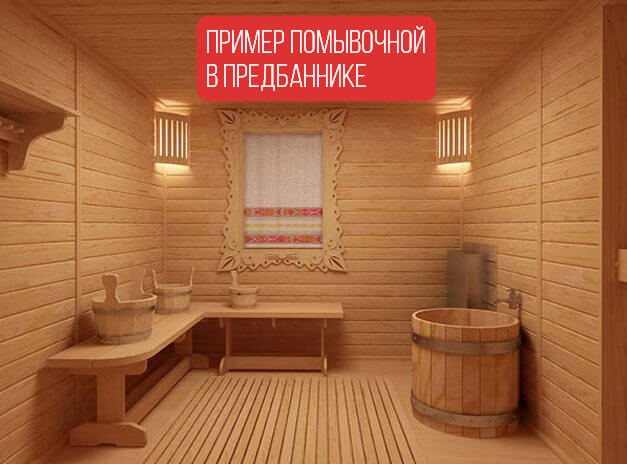
Therefore, this room must be built as comfortable and warm as possible, so that you can relax there after the steam room, drink tea or pour yourself over with ice water.

Finish coating
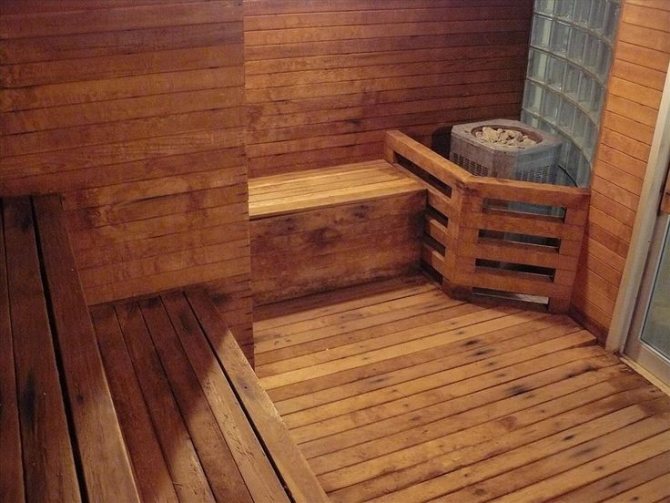
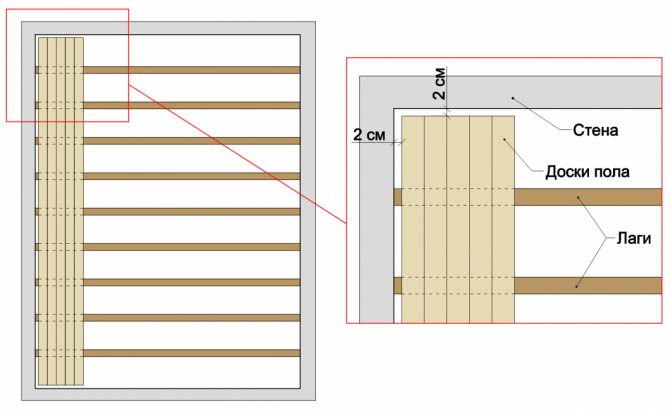
But what is the floor in the dressing room covered with? This issue should be resolved after the formation of the subfloor, which is the basis. The most common coating is in the form of boards.For these purposes, coniferous wood is most often used, it is better to use larch. The thickness of the board is about 3 cm and the width is about 25 cm. The surface of the board must be well cut. After that, the boards are stacked very tightly to each other.
It should be noted that at this stage it is imperative to impregnate the wood with an antiseptic composition. As such a composition, a water-soluble impregnation, a combined antiseptic, an oil composition, an antiseptic made on the basis of an organic solvent can be used. These impregnations are applied with a paint brush in 2-3 passes.
Floor insulation
How to insulate the dressing room? The simplest and cheapest option is an earthen floor. But when water gets on it, the appearance of dirt cannot be avoided. A clay floor will not allow moisture to pass at all, and therefore it will constantly accumulate on its surface, which is also not good.
When arranging the base, you should pay attention to the following points:
- Water should be freely drained from the room, since when it accumulates, after a while it will begin to stagnate and emit unpleasant odors.
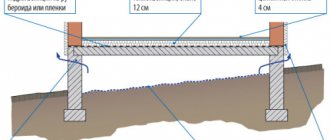
- You can build a pillow under the floor. To do this, you need to remove about 30 centimeters of earth and fill the hole with slag and sand. Such a mixture will allow moisture to pass through well and will not allow it to accumulate on the floor.
- Floors can be made of concrete. The top is finished with tiles, on which wood shields are placed. Here, too, it is important to build a high-quality water drain.
- Laying boards on logs is one of the acceptable options. The distance between the boards and the pillow should be at least 10 centimeters. It is important to remember that when moisture gets in, the boards will expand, and therefore the gap between them must be left at least one centimeter.
- A rough floor covering that does not absorb moisture.
- The gutters and wood must be soaked in mixtures that will prevent bacteria from multiplying there.
Features of floors in the steam room
High temperatures, high humidity and direct contact with water require special care during flooring. Otherwise, washing will be uncomfortable and the floors will have to be changed frequently. So, we have a ready-made log house, what to start with the construction of floors and what they are.
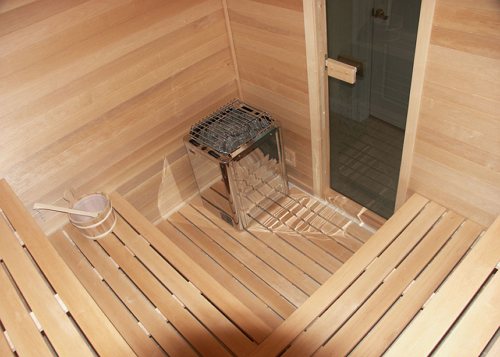
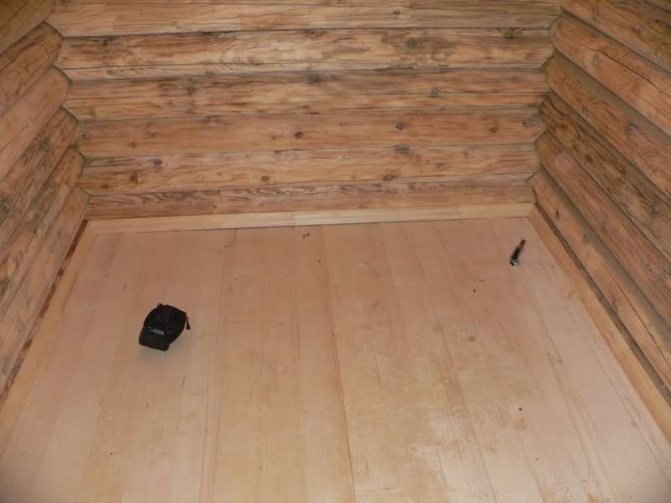
Photo of the floor in the steam room, already finished and laid
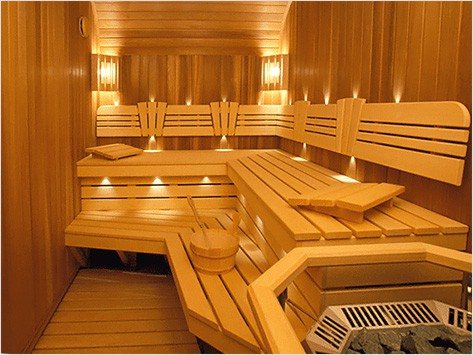
Wooden floor in the steam room
Spilled floors
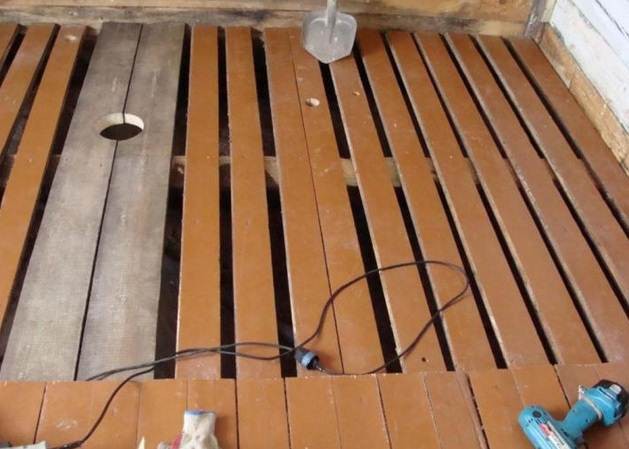
Spilled floors
Spilled floors - photo
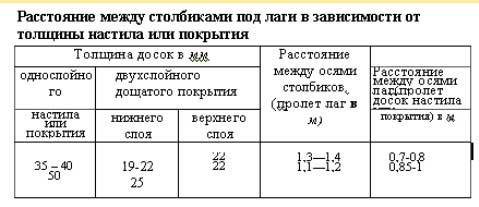
The simplest option, they are laid only with natural (glued will not work!) Boards of coniferous species, the thickness of the boards is at least 25 mm, the distance between the logs is not more than 80 cm, the distance between the beams is 1.0 ÷ 1.3, The thicker the board, the greater the distance maybe between lags. For lags, you can take bars of 50 × 100 mm, the dimensions of the beams are about 100 × 100 mm. There is a desire - make the impregnation with antiseptics, there is no desire - and without impregnation the floors will last for many years. The main difference between pouring floors is that water flows over the entire area in a slot with a width of ≈5 mm.
Pouring floor
Pouring bath floor
Do-it-yourself pouring floor. Instructions
Step 1. We examine the earthen base.
Examining the earthen base
The point is that the water must go into the ground. If the soil is sandy, no problem. If your soil is clay or loamy, there will be problems. Baths are built on columnar or shallow strip foundations, they dig to a depth of about 50 cm, rarely anyone makes a sand pillow (but in vain!). Clay soils with an excess of moisture swell, the bath begins to "play" with all the negative consequences. This means that on clayey soils, it is imperative to make a drainage if the foundations are closed (tape shallow).You should not be especially upset if the builders are responsible, then they must have left ventilation holes in the foundation, they can be used to drain water. There are no such holes - you have to do it yourself.
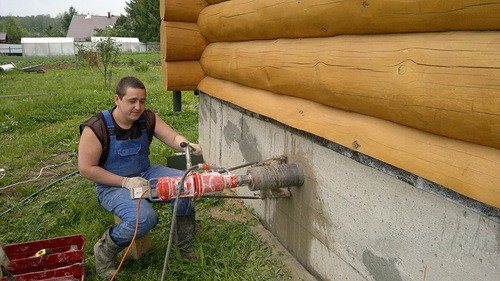
Drilling an air vent in the foundation
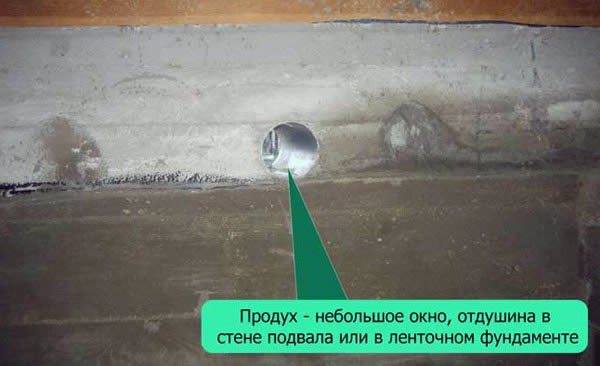
Air in the strip foundation
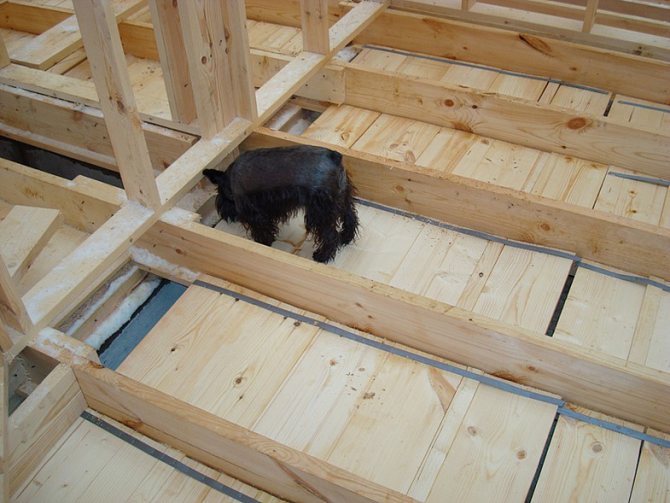
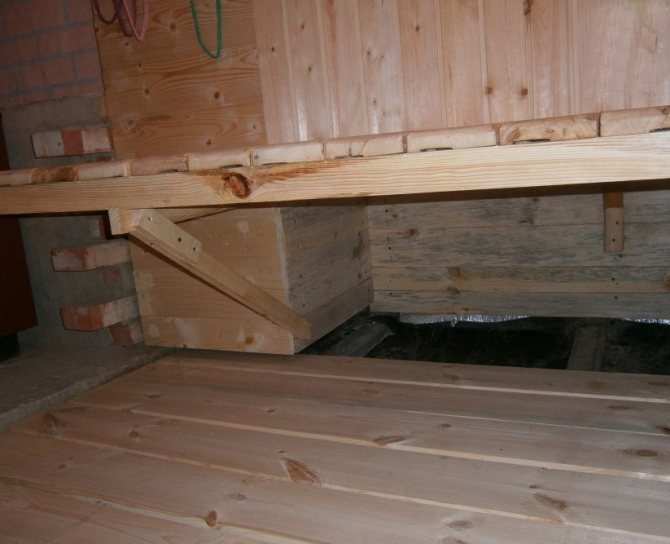
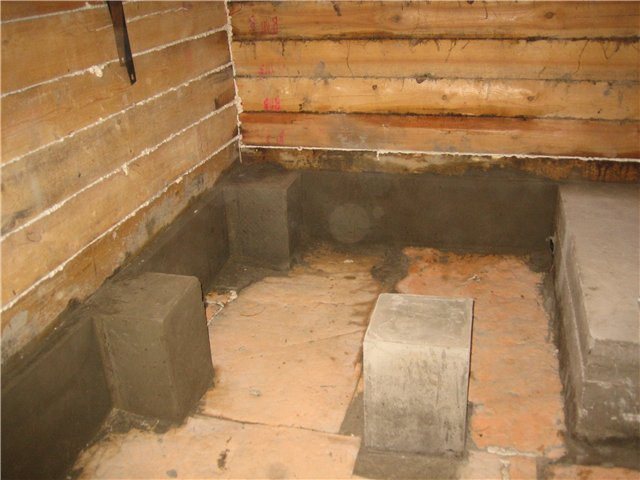
Step 2. The floors are laid on logs, logs - on beams. And here a lot of things depend on the conscientiousness of the builders. They had to lay the beams during the laying of the timber. Didn't you get it? The problem is, you need to make columns for them.
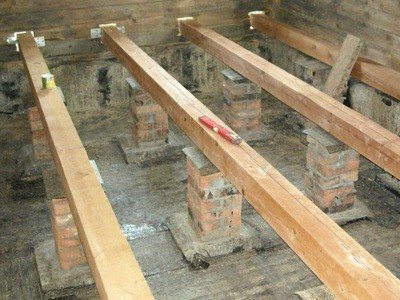
An example of the correct installation of the lag on the posts
Use post pads to level the level
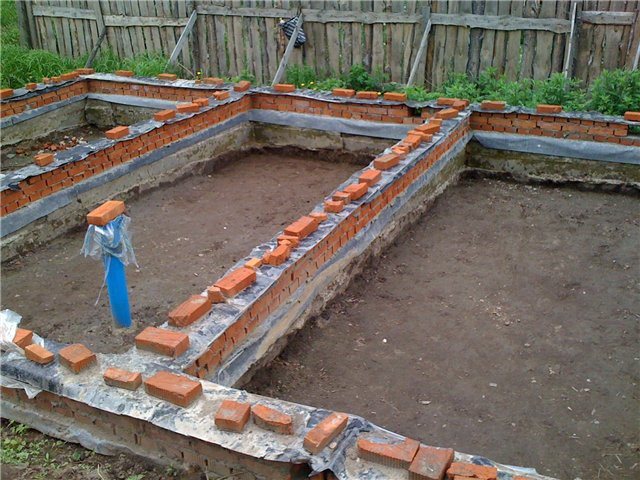
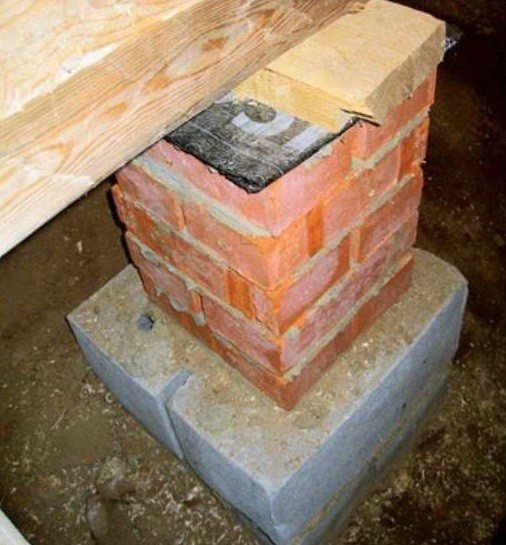
The pillars should be poured only with concrete, the brick is afraid of moisture and crumbles after a few years.
The distance between the posts for the lags
| Stage | Description |
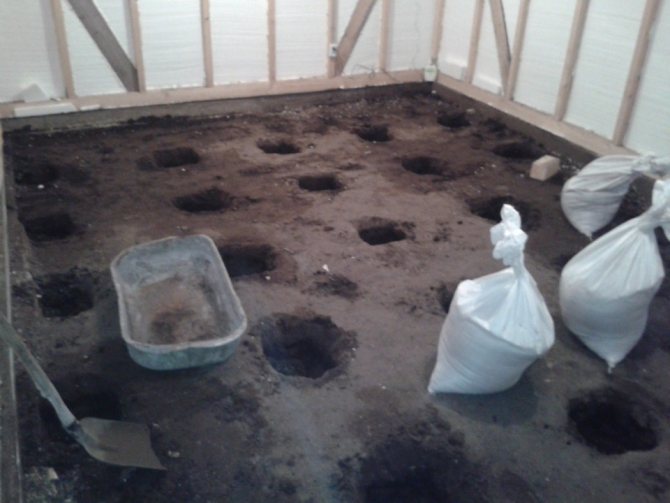
Marking and digging holes for supports | Make markings, the distance between the posts is the same as the distance between the beams. In most cases, 1.0 ÷ 1.3 m is sufficient (for beams 100 × 100 mm). Dig square holes 50 centimeters deep, pour 15 ÷ 20 cm thick sand on the bottom and tamp it down, this will be a pillow that prevents swelling. |
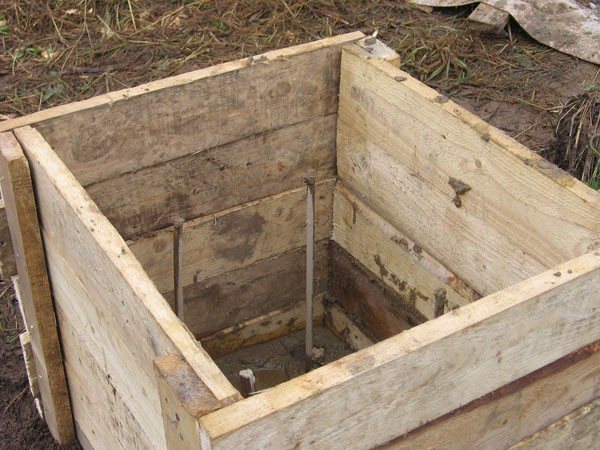
Formwork | In clayey soils, the formwork does not need to be done, the earth will hold its shape anyway, the formwork needs to be done only for the protruding part of the posts. For sandy soils, formwork will have to be made along the entire height of the posts. For formwork, you can use various waste boards, trimming OSB board or plywood. The height of the posts should be below the floor level (in construction, this level is considered to be the zero mark) to the height of the beams, the log and the thickness of the boards. First, you need to set the formwork of the extreme posts, pull the rope between them and put all the rest at this level. |
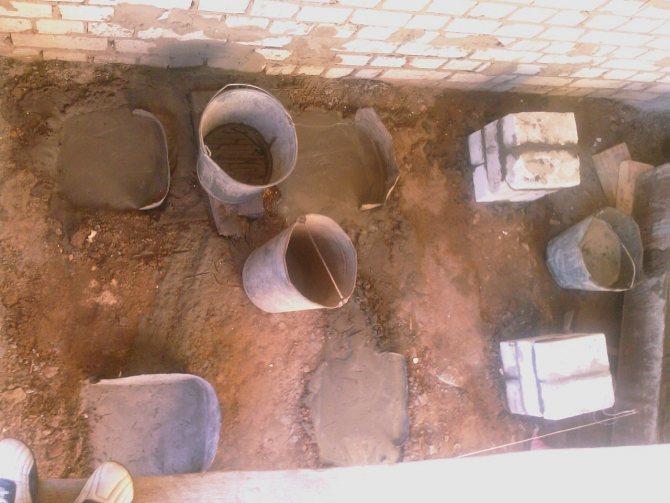
Pouring concrete into the formwork | Pour concrete, making it elementary, no advice is needed. |
Dismantling of the formwork. Completion of work | After pouring, you need to wait at least two weeks, during this period of time the concrete gains 50% of its final strength, you can already work with such material. Remove the formwork and check the position of the posts again. If necessary, adjust the posts with a cement-sand mortar, make them as equal in height as possible. |
Video - An example of arranging a columnar base for logs
It is advisable to lay the beams on a waterproofing material, it is not necessary to use expensive modern cushioning materials, you can use ordinary roofing material or several layers of plastic film.
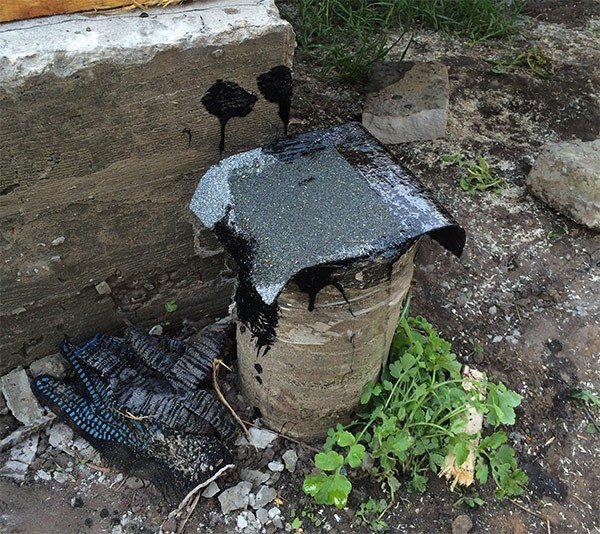
An example of waterproofing a support with roofing felt
The beams are fixed to the posts with corners - a dowel in concrete, to a tree with a self-tapping screw or a nail. Lay the beams and logs according to the level, constantly check the spatial position, fix the logs to the beams with metal corners. The same height is also checked with a rope stretched between the outer eiders. If necessary, pieces of boards should be placed under the logs for leveling. Just do not use wedges, they fall out over time, the emphasis of the gaskets should be over the entire area of the beam.

Fixing beams
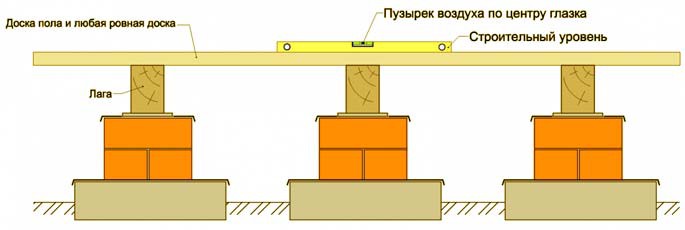
Installing the log and checking the levelness before laying the floor
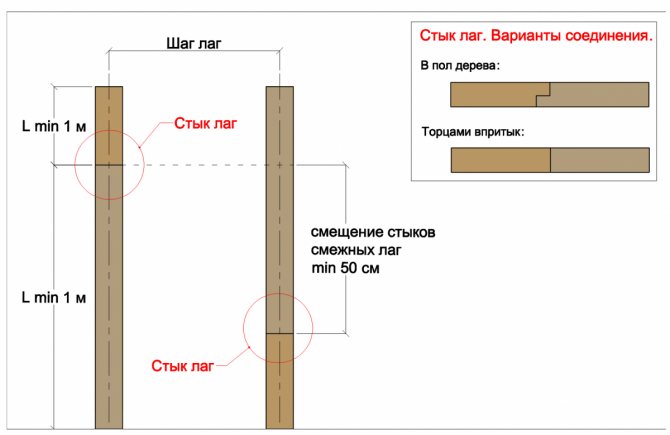
Length joining options

Lags installed on ready-made posts
Roofing material prices
roofing felt
Step 3. Laying boards.
The boards lie across the log, do not forget to leave gaps between them for water to drain. In order for the slots to have the same width, a thin river of suitable thickness can be used as a template. After laying the board, it is removed.
Installation of floor boards
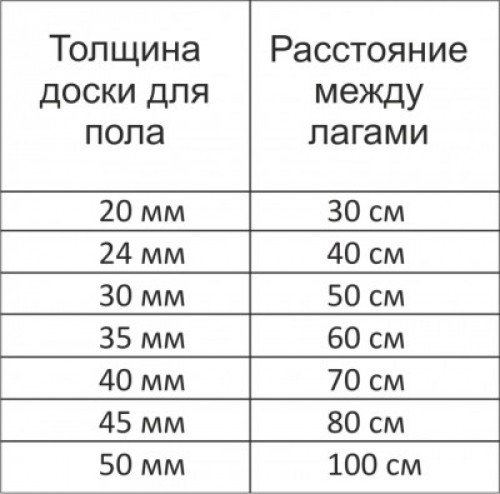
Dependence of the thickness of the board and the step of the lag
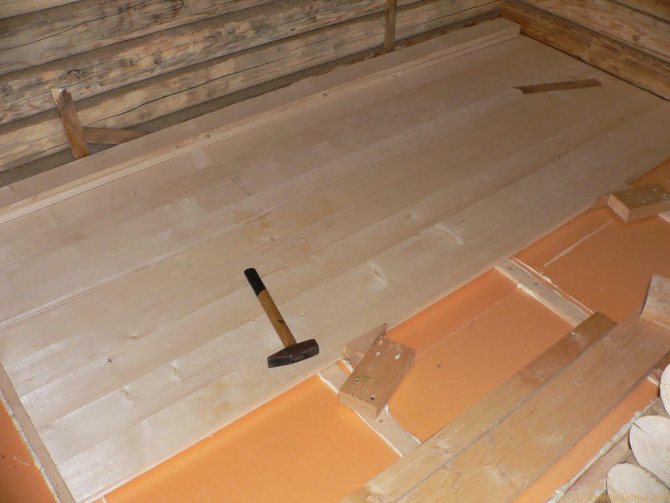
You can nail it down (quickly and cheaply), or you can use self-tapping screws. The main thing is that the hats must be flush. Why are nails better? The fact is that the relative humidity of the floors in the steam room varies considerably, the boards swell and dry out.The nails compensate for these changes in the floor thickness, they pull out a little from the log, the length of the nails in our case is approximately 70 mm. In general, there is a rule - the length of the nails should be three times longer than the thickness of the board to be nailed. Self-tapping screws hold "tightly", the boards break a little, which is not very desirable.
Video - Preparing boards for laying
Video - Installing beams, laying floorboards, floor insulation
Step 4. Finishing work - nailing the skirting boards, leveling and, if necessary, sanding the boards. The skirting boards are nailed in the usual way with small nails approximately 30 mm long. The specific values depend on the thickness of the skirting boards. The cuts in the corners must be done at an angle of 45 °, there are special devices for cuts. If a factory device is at hand, then it will not be difficult to make it yourself. That's all, the drain floor is ready for "use".
Installation of wooden skirting boards Wooden skirting boards
Do not be afraid that the drain floors are cold and in the steam room you will catch a runny nose. The temperature in the steam room is about + 80 ° C, the floor heats up from this heat, and large drafts from small cracks will not appear.
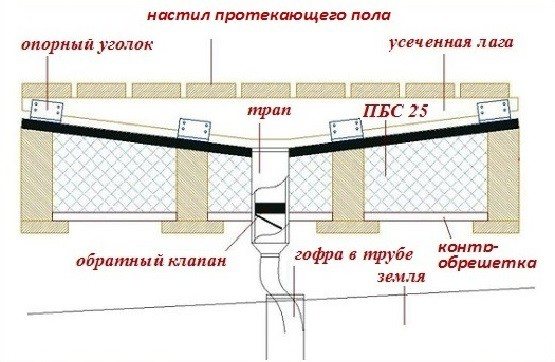
Leakproof floors
It is a little more difficult to make them, but the comfort of being in the steam room increases. They differ from the flowing ones in that there are no gaps between the boards, but there is a slight slope for draining the water.
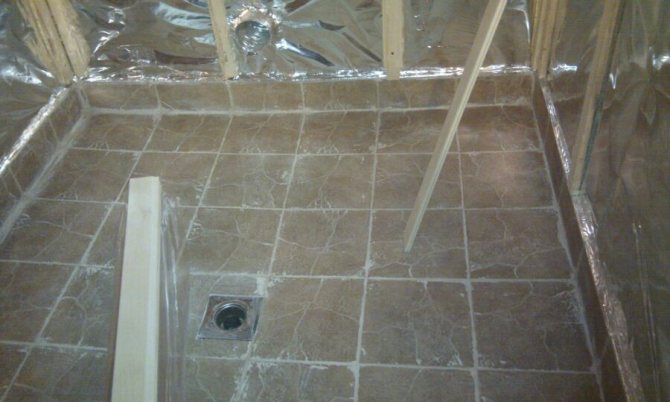
Example of a bath floor with a drain
You need to make a slope to one of the walls of the steam room, it should be borne in mind that periodically the mesh will have to be cleaned. This means that access to the drain must be free. At the point of discharge, it is advisable to make a water receiver and immediately remove it outside the perimeter of the foundation, it is not difficult to do this, the water flows down in one place (unlike leaking floors).
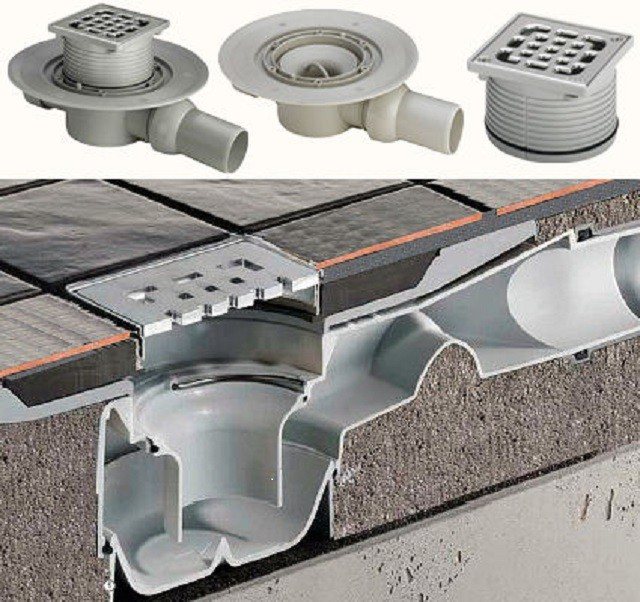
Bath drain with siphon
As for the preparatory work for the arrangement of ventilation holes in the foundation and the arrangement of stacks, these works are the same as we described above, but in the future there are differences.
Step 1. Preparing the posts. The markings for the distance between the posts, the depth, the preparation of the cushion and the preparation of the concrete mixture are the same. Further differences. The point is that the posts must be at different heights. The floor is slightly higher near one side than near the other. The slope should not be made large, two to three millimeters per meter of floor is enough. For example, if you have a steam room 4 meters long, then the difference in the height of the extreme posts should be within 8 ÷ 12 millimeters. It will not be possible to immediately pour concrete with such accuracy; after removing the formwork, it will have to be adjusted with mortar. For the initial marking, you will need a simple hydraulic level, make marks on the formwork of the extreme posts. Then everything is already familiar - pull the thread between them and level the surfaces.

Schematic diagrams of bath floors

Schematic diagrams of bath floors
Step 2. And there is a lot in common, only the beams and logs will be at an angle, you also need to check their position using a stretched thread. After installing the last log, do not be too lazy to check the correctness of their position again.
Step 3. Plank flooring. Immediately you need to prepare the drain grate and come up with a drain method. Use hoses or pipe lengths of appropriate diameters. Before laying, check the boards for parallelism of the edges, if the curvatures exceed 5 mm - trim them on a thickness gauge. For laying the boards, you need to have special devices for their tight attraction. There are two options. The first is to buy ready-made in the store, it is inexpensive and works quite efficiently. The second option is to prepare ordinary metal staples and wooden wedges of various sizes.
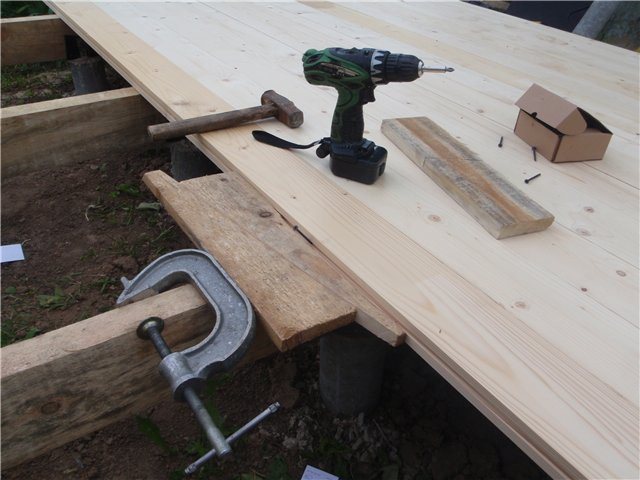
Flooring planks
Nail the first board against the wall, fix the stops on two logs. We have already said that these can be staples or factory fixtures. The distance between the stops and the first board should be several centimeters greater than the width of the second board.You can fix the stops further, and adjust the distance with dummy boards - it's faster, but more difficult. Install the second board and use the wedges to pull it tightly against the first, the slight bend will even out. Secure the second board with any hardware. Everything, you have mastered the "main operation", continue to mount the entire floor in the same way.
Do not forget to put a drain grate in the place where the water flows. It can be homemade from galvanized sheet iron or purchased, there is not much difference, both do an excellent job with their functions.
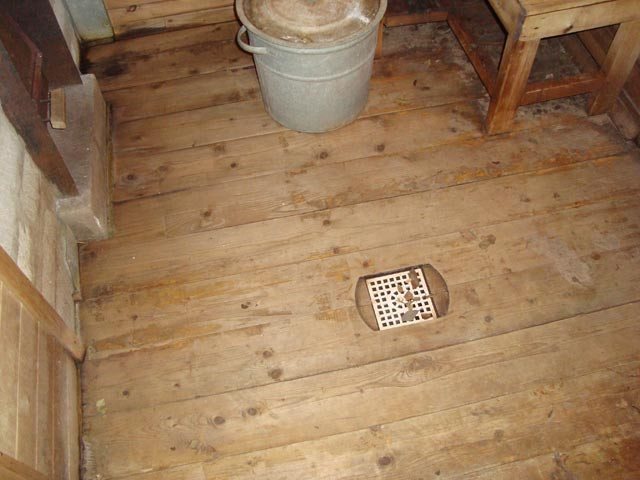
Drain grate on a wooden floor
Floorboards prices
floor boards
Warming of the dressing room outside
These procedures are worth performing in order to reduce the amount of heat loss. It will also make it possible to keep the same temperature in the steam room itself. You can insulate the dressing room with your own hands both from the inside and outside.
Walls
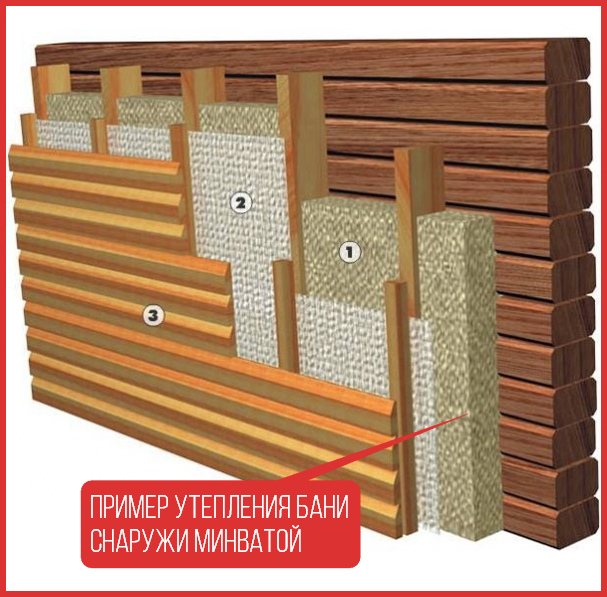
They do not need to be treated with any impregnation on the inside, since in most cases it contains substances that can evaporate when heated. It is possible to insulate the walls from the outside with foam or other thermal insulation, which is used for arranging ordinary buildings, since the high temperature will not affect the insulation material from the outside.
It is important to lay vapor barrier on the walls. It will not allow moisture to penetrate the walls and form condensation. This will also prevent fungi from growing there. The vapor barrier is pressed against the base using a wooden bar.
Ceiling
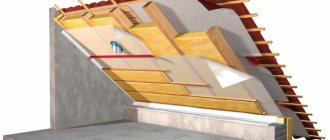
Some of the warm air can escape through the roof. It is possible to reduce the amount of lost heat by building thermal insulation in the attic. To do this, in the attic, you need to create a frame made of wood for laying insulation. It is recommended to make two layers, sprinkling them with expanded clay. A waterproofer is also placed under the thermal insulator, which will not allow moisture to flow from the steam room. At the end of such work, the attic floor is covered with boards.
A video on how to do such work is below:
Underfloor heating options
Nowadays, there are many ways to get warm floors in a bath:
- Electric floor.
- Water floor.
- Infrared floor.
- The floor is insulated with various heat-insulating materials.
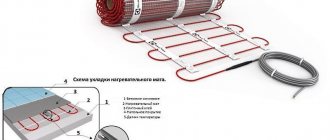
How to make an electric heated floor in a bath? This type of floor looks like a tape, cable or heating film, converting the current flowing through them into heat emitted by them. As a rule, this is a heating element made from a cable.
The technology of such work provides for several main stages:
- First, a pillow of gravel or crushed stone, having a thickness of up to 15 cm, is poured onto the prepared soil, and it is carefully tamped.
- Then, forming the base, concrete mortar is poured to a thickness of 5-7 cm.
- Next, the screed is reinforced and poured with a solution, after which the underfloor heating system is installed.
- At the end of the work, finishing pouring and cladding are made.
The process of preparing the base and pouring the screed under the warm floor is not too complicated, but it is still better to entrust the installation of the underfloor heating system directly to specialists in order to avoid mistakes, because after filling and installing the facing layer, it will no longer be possible to get to the system. Ceramic tiles serve as an excellent facing coating for such a warm floor - they are beautiful, practical, great for wet rooms, and the heating system will not allow it to be cold.
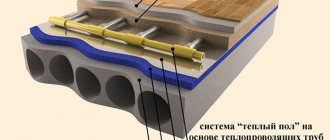
The water floor, according to the type of installation, is flat and concrete. The heating element of such a floor is a pipe filled with hot water. Nowadays, elastic and rather practical plastic or metal-plastic pipes are used for these systems.A feature of their installation is the ability to create an absolutely sealed system that works perfectly even in a wooden house, since the material is non-toxic, hygienic, and also inert to water. The service life of such pipes is more than 50 years.
Another type of warm floors - infrared - is performed in the form of a heating system, which works on the basis of the properties of natural heat - the infrared spectrum of radiation. Such a floor is usually performed using a film with different heating elements soldered into it, depending on the manufacturer.
The next option for organizing a warm floor in a bath is a more traditional method using materials that can increase the thermal insulation of the floor. This option is quite suitable for making a warm floor with your own hands, which must be carried out following a certain technology. Let us consider in more detail the arrangement of insulation of the two main types of bath floors - wood and concrete.
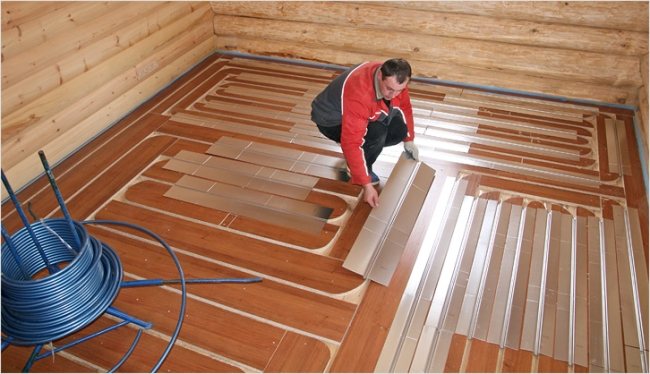
We lay a water floor with our own hands
A water heated floor is considered one of the most convenient and profitable for installation in a bath. The system is a closed pipeline through which, thanks to the pump, a liquid circulates - it can be either ordinary water, or ethylene glycol or antifreeze (or its aqueous solution). The source of heat for heating water in the pipes is the boiler, the pipes themselves can be plastic or copper. You will also need a pump and fittings.
Water floor is perhaps the most popular type of heating for a bath.
Advantages of water heating:
- the ability to heat a large area with moderate energy consumption;
- the system is less susceptible to mechanical damage and deformation due to the fact that it is entirely under the floor surface;
- even distribution of heat over the entire area;
- does not require large investments.
Disadvantages of water heating:
- requires significant efforts, the presence of an analytical mindset from the master;
- due to the fact that the basis of the underfloor heating system is a pump, which must circulate warm water around the clock, a rather significant consumption of energy resources is possible;
- regulating the temperature regime can be quite difficult (a lot depends on the heat source);
- if a leak appears in the system, it is extremely difficult to locate the place of its origin.
Installation instructions
Insulate the floor surface using a matte material (mineral wool or polystyrene). The main challenge is to provide a good level of protection against heat loss. The walls of the bath are insulated with the same material. To increase the efficiency of the system, it is advisable to lay a mirror film over the heat-insulating layer (the film should look with the shiny side up).
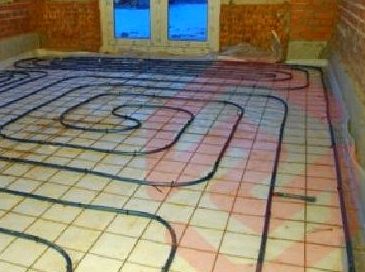
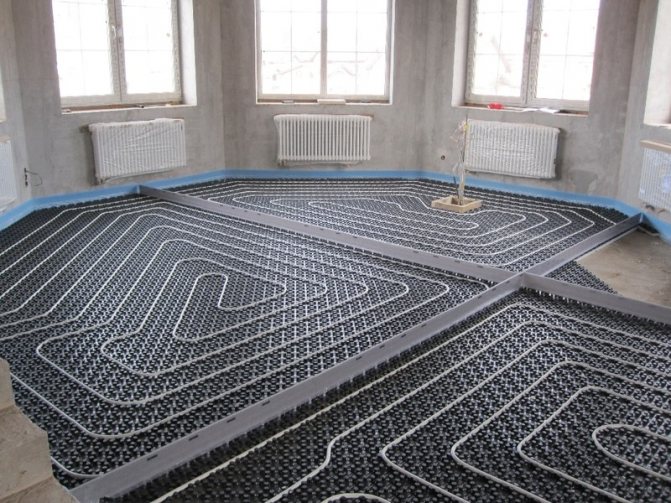
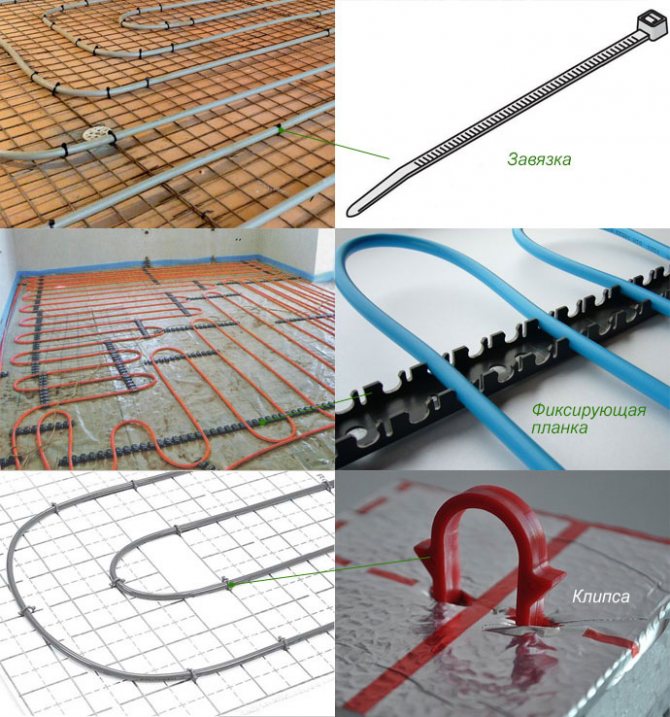
On top of the insulation, it is necessary to lay a reinforcing mesh, to which the pipes will be attached using plastic clamps or clips. However, neither fittings nor additional plastic fasteners are needed if you have selected polystyrene plates for thermal insulation with special strips for flexible pipes, with which you can immediately fix your pipeline.
It is very important to immediately determine the areas of the floor on which the furniture will be located. There should be no pipes under the furniture! Pay special attention to the areas near the outer walls and the doorway - we advise you to shorten the installation step so that the room warms up better. The main types of pipe laying, which are used not only for a bath, but also for any other premises:
- snake - the system is simple and reliable, but does not provide uniform floor heating;
- a snail - it will be able to provide uniform heating of the surface, but it is more difficult to install.
It is easier and faster to lay pipes with a "snake" than with a "snail"
It is not at all necessary to place or "snails" in the center of the bath. You can choose the laying step yourself, but you should not place the pipes too far from each other - with a distance between them of 40 cm or more, it will be quite difficult to provide efficient heating in the room. But laying pipes too close is also not worth it: the liquid in a pipeline that is too long cools down quickly.
Lay pipes at a distance of 40 cm or less, but not too close to each other.
An important element of the water floor heating system is a manifold cabinet, to which the ends of the pipeline are connected and in which shut-off valves and adjusting devices are located. Before leveling the floor and fixing it with a screed, pressurize the system to eliminate the possibility of leakage.
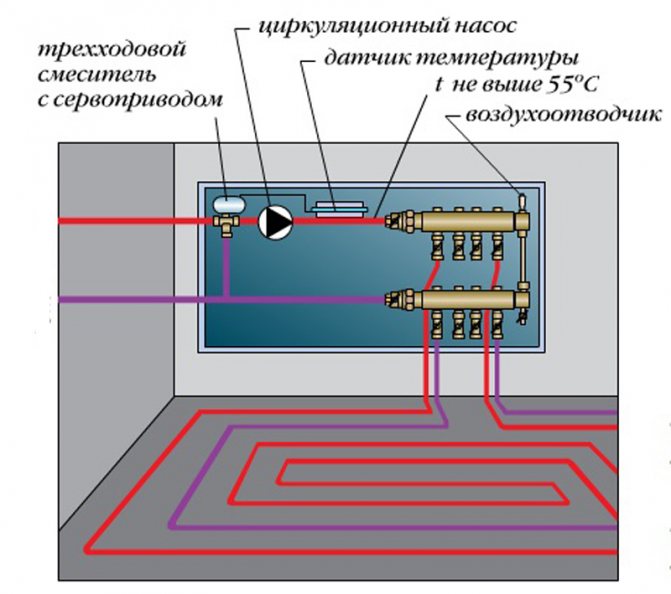
The main elements of a complex water floor heating system, in addition to pipes, are a boiler and a collector
After checking the performance of the system, it is necessary to fill the surface with a cement-sand or dry screed, after which has hardened (about 28 days), the floor covering can be laid.