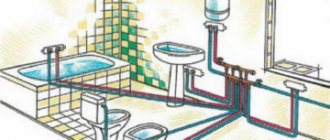
The most comfortable and most economical way to heat your home is to install a warm floor. This method retains a significant amount of heat - up to 20-30% at a ceiling height of about 2.5 m and up to 50% at higher ceilings (3.5 m and higher). But a water heat-insulated floor is a rather complex engineering system, its device requires certain knowledge.
I welcome my regular reader and bring to his attention an article on what is the optimal distance between the pipes of a warm floor and what factors it depends on.
The advantages of heating a house with a warm floor are many:
- The entire room is heated, and in the most physiologically comfortable way - it is warmer below, cooler at head level.
- There is no strong convection, heat does not rise to the ceiling and is not wasted, therefore such heating is more economical.
- Dust and dirt do not collect on the heaters.
- Devices and communications do not take up space, curtains and furniture do not obstruct the structure of the warm floor and do not interfere with its work.
But comfortable heating is obtained only with proper installation and adjustment of the heating system. One of the main factors that determine the power of a warm floor is the distance between the heating pipes.
Common installation steps
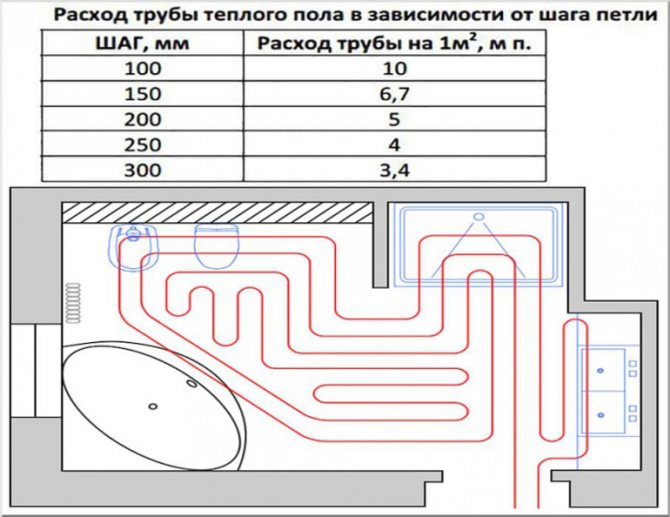
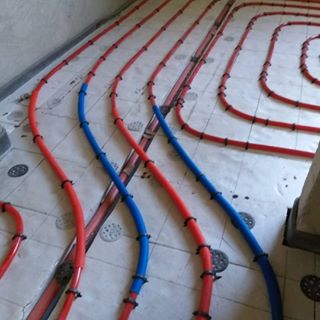
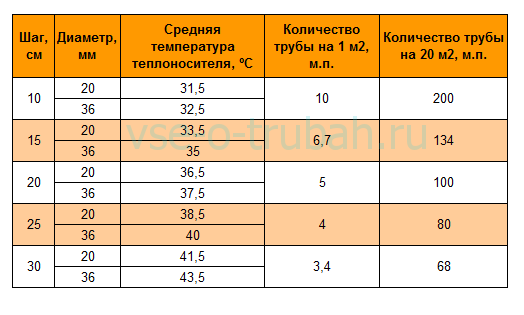
Usually the pipes are laid so that the distance between them is 100-300 mm. More precisely, the step is determined only after calculating the total length of the pipeline and determining the heating area (room area minus the area of bulky furniture). In practice, the distance is calculated approximately (see below), and then a scheme for laying a warm floor is drawn and the step is specified.
The approximate distance in bathrooms is 100-150 mm, in living quarters - 250 mm, 300-350 mm in corridors, lobbies, kitchens, utility rooms, closets, etc. more in the rest of the room. Any method of arranging warm pipelines can have a different pitch in different parts of the room.
How to properly position heating pipes
The distance between heating pipes with parallel laying should not be less than 200 mm, as indicated in paragraph 3.22. The rule applies to both smooth and finned pipes, provided they are connected to an adjacent radiator.
At the same time, the main lengths of indents from the elements of the room change:
- the pipes leave the plaster by 25 mm; the distance from the floor is at least 200 mm.
Parallel piping requires extra care. Moreover, this is the most convenient way of positioning a particle in the system. In order to correctly carry out the parallel laying of pipes, it is better to navigate by the instructions and the photo.
A special arrangement also applies to the fasteners (clips, clamp, etc.) that support the heating.

For example, the distance between clips of polypropylene heating pipes is determined depending on their diameter and the temperature of the water inside. With a diameter of 40 and a degree index of 40, the clips are spaced with a distance of 900 mm. The table of how the clips are located can be found in the construction documentation, but not in the SNiP.
How the pipe length is calculated
Traditionally, calculations assume that 5 m of pipe is sufficient to heat 1 m² of floor (see table above). The nominal distance will be 200 mm. Based on this ratio, you can calculate the nominal length of the entire pipeline: multiply the total area of the room by 5 and round up.
For corner rooms with one window, it is better to increase this length by 20% (by 1.2), with two windows - by 30% (by 1.3).For the northern regions of the Russian Federation, it is necessary to multiply the resulting length by another 20% (by 1.2).
For example, for a corner room with an area of 20 m² with two windows and in a cold region of Russia, the length of the pipeline will be:
This calculation uses the full area of the room without deducting the area of large pieces of furniture. This is done because the air above the sofas (and even cabinets) also needs to be heated, part of the heat is spent on heating the furniture itself. Calculated by the reduced area, the room will be cool, and in a small room cluttered with furniture it may be simply cold.
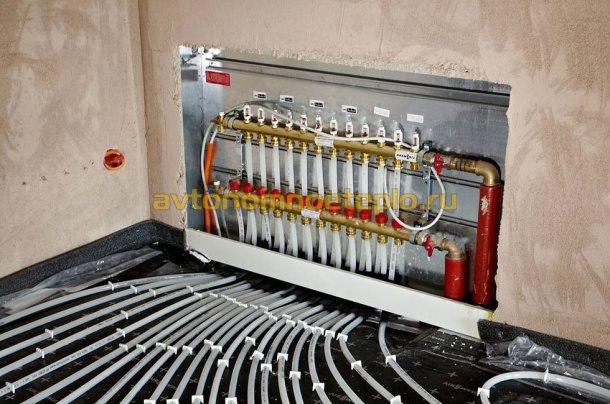
When buying, you need to add a small margin for turns and inaccuracies (6%, or a factor of 1.06) and double the distance from the collector to the room.
Determination of the maximum length of one contour
The maximum length of one circuit should under no circumstances exceed 100 m - otherwise the pump simply will not push the coolant into the circuit. And it is better to divide the one-hundred-meter circuit into two - the heating will improve, and with excessive heating, you can always adjust the heating of each circuit using a three-way valve in the manifold assembly.
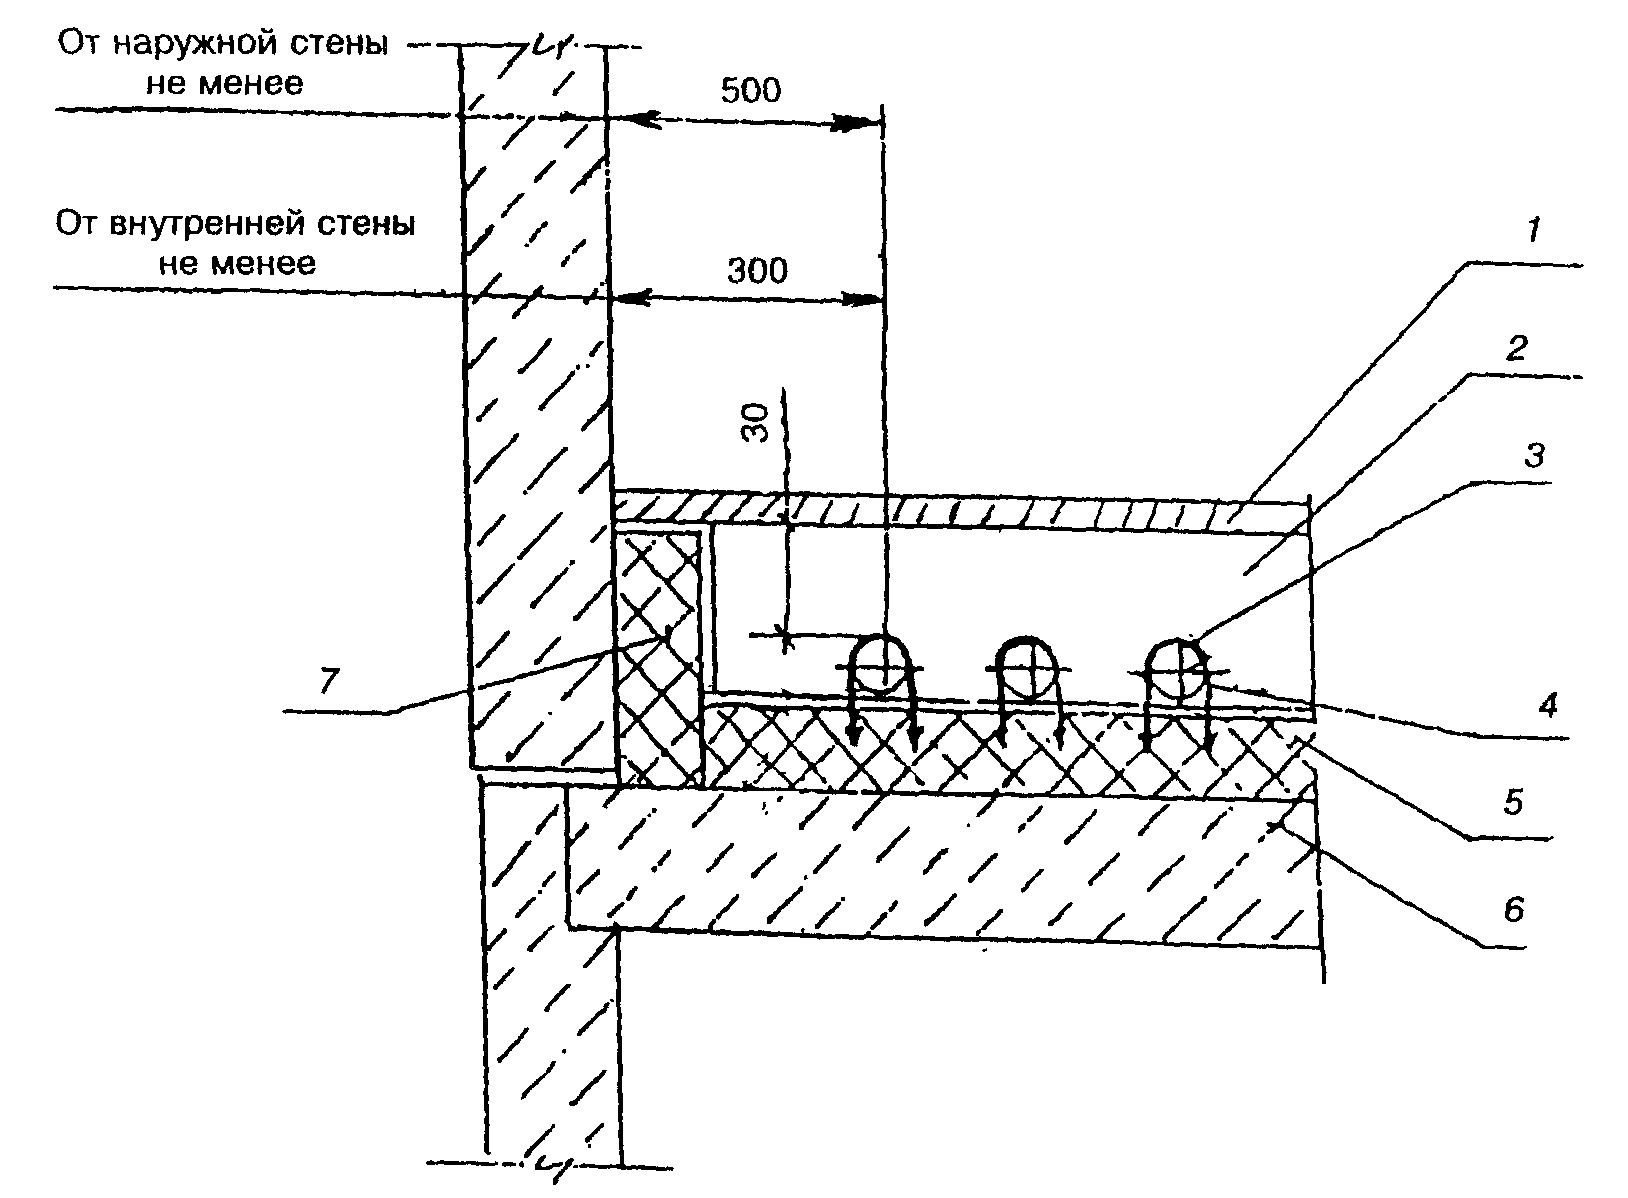
Distance between pipes and floor
The most important thing is to calculate the correct position of the radiator grilles and pipes in relation to the floor. It is depending on the distance to it that the heating efficiency is determined, as well as the safety level of the heating system and a separate pipe.
Distance between pipes and floor
At the moment, SNIP defines the following norms:
- distance to the floor at least 60 mm;
- from 50 mm, counting from the lower edge of the windowsill boards;
- at least 25 mm from the plaster of the vertical surface (walls).
These figures are calculated based on the fact that the adjacent materials that surround the heating are non-combustible. If one or more of them can catch fire, the basic rule should be observed: at least 10 mm from the combustible surface to the radiator or pipes. Then heating through the water supply will not lead to a fire.
Medical institutions, educational institutions differ in their specificity of laying communications. In them, at least 100 mm must remain from the radiator to the floor, and the product must be 60 mm from the wall. This approach increases the safety of a weakened or child's body, even if the heating water supply is interrupted.
SNiP 3.20 implies that the distance to the window is calculated according to the window sill. But he, in the line below, indicates that in the absence of window-sill boards, attention should be paid to the lower edge of the window. 50 mm are set aside from it if the system is being laid.
The specified values are valid for all types of radiators, the only exception is made for units in hospitals. The distance between the heating pipes in the floor is at least 150 mm - this is the only heating option different from others in terms of parameters.
Important! Paragraph 3.20 also implies that the pipe supply network, when open, allows the supply of additional communications. This is a very important requirement when installing heating, because often polypropylene and metal pipes are placed too tightly and incorrectly, leading to overheating.

Styling forms
There are various ways of laying pipelines in a screed.
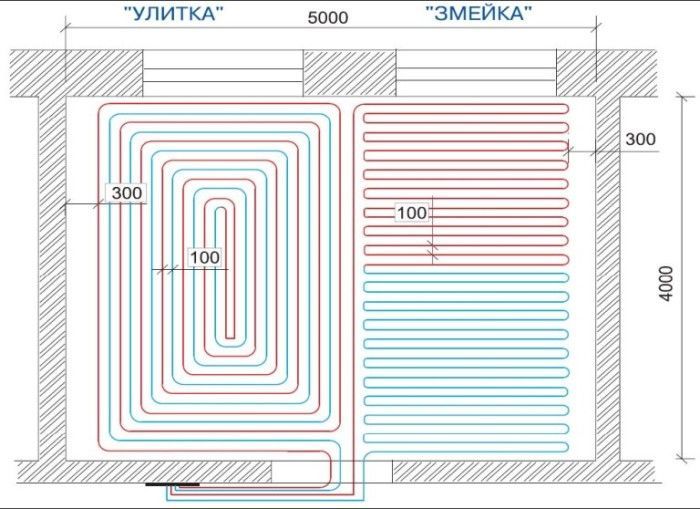
Snake
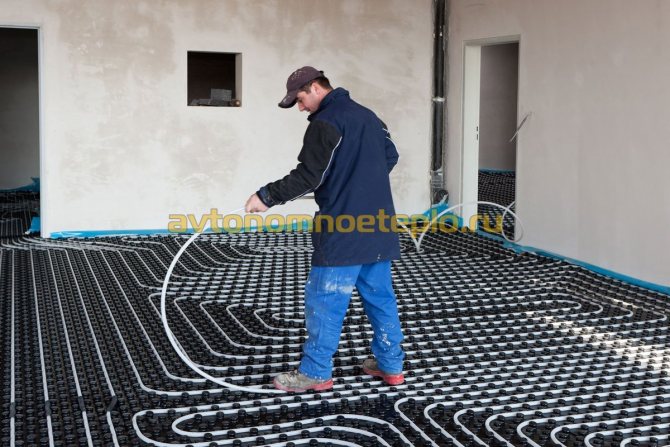
When laying in a snake, or meander, pipelines are placed in parallel. At the same time, the room heats up unevenly. The method is suitable for small rooms. The snake is used for a combined installation method - communications are laid along the outer wall and cut off cold air.
When laying with a snake, a short distance or additional heating (radiators) is required.
Corner snake
The pipe is laid along the outer corner, the next turns are laid in parallel so that the pipeline occupies a square. Suitable for heating corners. The double corner snake is used for rooms with three outer walls.
Double snake
The beginning and end of one heating circuit are laid in parallel. Of all the options for snakes, it provides the most uniform heating of the room.
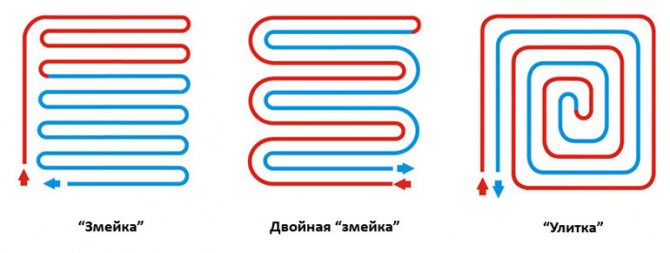
Snail
Otherwise, this method is called a snail, shell, spiral. The pipelines are laid in a spiral, ensuring the most uniform heating of the entire area. It is so convenient to place pipes in large rooms.
Which way is better
The combination of two installation options allows you to optimally arrange communications in the room. In large rooms, it is better to use a snail or combine it with a snake - lay several pipes with a snake near the outer wall, and arrange the pipes in a spiral over the rest of the area.
A snake against the outer wall will cut off the cold from the walls and windows. You can adjust this circuit to a higher temperature of the heating medium.
In small rooms, for example, a bathroom, a corridor, a snake is optimal. In medium-sized rooms, there is a double snake. When laying pipes using the corner snake method, the room will warm up unevenly, the use of a corner snake is appropriate only when warming up the corners with combined laying.
Often, combined options or a change in distance are used deliberately - to compensate for unheated areas (under upholstered furniture) or to heat a workplace, a play corner for children, etc. For example, it is better to heat a little more:
- The area near the desk, sewing machine or piano - there a person sits motionless and can freeze.
- Part of the room where children play often and a lot.
- Warm areas around the bed, sitting area with upholstered furniture in the living room.
In any case, before installing with your own hands, you need to draw a pipeline laying diagram by calculating the length of the pipeline and the distance between the turns. Then arm yourself with a pencil and graph paper and draw a diagram, taking into account the arrangement of furniture and the method of laying out the warm floor. At the same time, take into account the increase in the frequency of laying near upholstered furniture, beds and other places requiring heat.
The subtleties of laying and connecting pipelines can be seen in our video.
Warm floor: what is taken into account when calculating
To organize the efficient operation of heating, it is necessary to correctly calculate the distance between the pipes of the underfloor heating - the step of laying the pipe. This indicator depends on the coefficient of thermal conductivity of the material from which it is made, and its diameter, as well as the place of laying and possible heat loss. An incorrect calculation will lead either to overheating of the surface or to discomfort associated with temperature changes.
Calculation of water floor heating, materials
Coefficient of thermal conductivity
Determining the distance between the loops of the contour must begin with the selection of the main consumable. To do this, you need to determine which pipes conduct heat best and are traditionally used to organize a warm water floor, arranging them in descending order.
- Copper.
- Steel.
- Metal-plastic.
- Crosslinked polyethylene.
- Polypropylene.

Distance between supports for pipeline
The step between pipes made of materials with a high thermal conductivity is always larger. Copper and steel corrugated pipes conduct heat best. However, they are used very rarely in the arrangement of a water-heated floor due to their high cost. And worst of all, polypropylene conducts heat, which is rarely used due to its poor elasticity.
The most popular materials are cross-linked polyethylene and metal-reinforced plastic.
Pipe diameter
The smaller the diameter of the main element of the system, the less you need to make the distance between the loops in the contour.When using a pipe with a larger diameter, the laying step in the contour increases accordingly.
- A pipe with a diameter of 16 mm is laid with a minimum distance of 10-15 cm.
- With an increase in diameter to 20 mm, the laying step also increases. In this case, it can be 15-20 cm.
- When using a pipe with a diameter of 25 mm, the distance between the hinges should be between 20 cm and 30 cm.
SANEXT pipes for underfloor heating
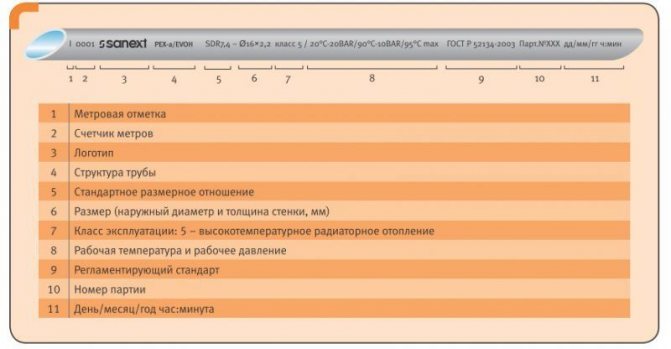
Experts do not recommend using pipes of a smaller or larger diameter when laying the contours of a warm water floor, since when they are used, heating will lose its effectiveness.
Underfloor heating pipes
Heat loss and location
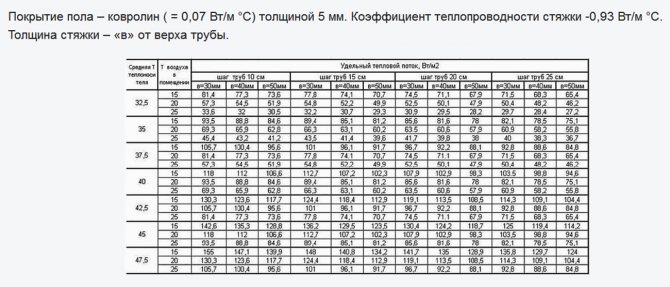
The step between the loops in the water floor heating circuit can be constant or variable. A constant step is usually observed in industrial premises and in rooms that have strict air temperature requirements, for example, in bathrooms.
Calculation of the length of the contour of a water-heated floor
- In large industrial premises, as well as swimming pools and water parks, the distance between the hinges should be 20 cm (provided that a consumable with a diameter of 20 mm is used).
- In bathrooms, the laying step should be 15 cm.
- In all other cases, a variable step is used. The minimum distance between the turns is observed along the walls in contact with the street, since it is in these places that the greatest heat loss is observed. As the distance from the outer walls increases, the laying step increases.
- In general, the optimal laying step size is determined based on the calculated heat loss power.
- If the heat loss is less than 50 W / m², the installation spacing in the contour can be 30 cm.
- If the heat load exceeds 80 W / m², then the minimum step is observed.
Is it possible to join a pipe for a warm floor
When laying a copper system in a screed, pipes will most likely have to be docked together. Such a connection is reliable and durable. Soldered connection of polypropylene pipes and welding of polyethylene using a thermistor coupling are also reliable. The issue is more complicated with the use of fittings for HDPE, PE-X and thermostable polyethylene (PE RT).
Press fittings can be used, although not desirable (anything can happen, any connection can leak). But when connecting pipelines to the manifold, press fittings are indispensable. It is not allowed to connect the pipes to each other using push and compression fittings. The same goes for HDPE collet connectors.
It is advisable to use flexible pipes in one whole piece - this is more reliable. Drying the floor, repairing the lower room and breaking the screed in the event of a leak are more expensive.
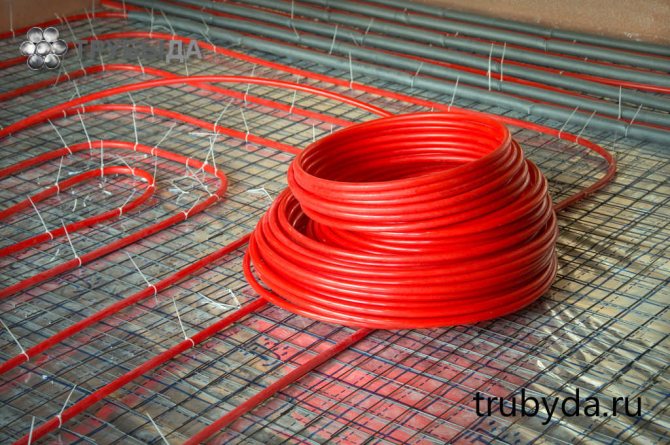
Underfloor heating pipes
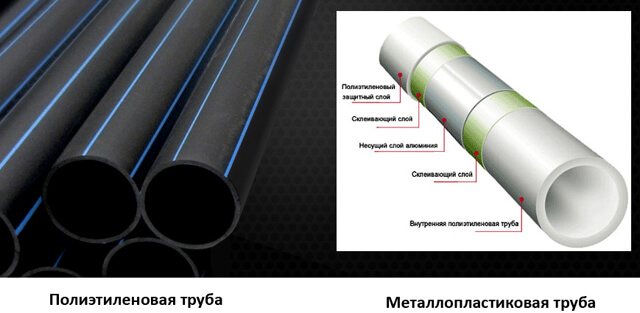
For installation of the "warm floor" structure, polyethylene or metal-plastic products are used. Each type of product has both advantages and disadvantages that should be considered before starting work.
In modern construction, both industrial and civil, pipes with an outer diameter of 16 or 20 millimeters are used for such systems.
Polyethylene products have the following advantages:
- the material of manufacture is so soft that it allows you to freely lay pipes in a spiral or a snake, choosing any angle of rotation for the circuit elements; resistance to corrosion processes; simple laying; durability; low thermal conductivity; environmental friendliness; low cost; the pipeline through which the coolant moves is able to withstand the working temperature is within 40-50⁰C, and the critical temperature is 90⁰-95⁰C.
The softness of polyethylene is not only an advantage of this material, but also its disadvantage, since when the upper concrete screed is laid, the system must be filled with water to prevent deformation.
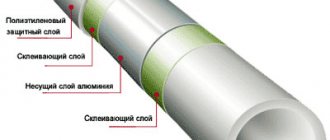
Reinforced-plastic products behave differently during installation, since they are afraid of sharp turns - they can form a hall, as a result of which the pipe will begin to leak. The critical temperature for metal-plastic is 90⁰C, and in standard operation mode it is about 60⁰C (for more details: “Which metal-plastic pipe is better for a warm floor”).
Of the advantages of metal-plastic pipes, their reinforcement should be noted, due to which, when pouring the upper part of the screed, there is no need to fill the circuit with water. Such an indicator as heat transfer from metal-plastic and from polyethylene under similar installation conditions is identical. Of the other advantages of metal-plastic products (see.
photo) it can be noted: good thermal conductivity, due to the presence of an aluminum layer; corrosion and chemical resistance; lack of tendency to form deposits on the inner walls. Experts advise when buying metal-plastic pipes to give preference to seamless products. To independently verify the quality of these products, you should cut off about 5 -millimeter piece. It is necessary to remove the polyethylene protection along with the glue from it and check if the bearing aluminum layer has a seam. In the case when the insulation cannot be removed, then this moment indicates the high quality of the product, and there are no traces of soldering in it.
Material consumption
The amount of material required directly depends on the choice of the method of arrangement and the pitch of the pipes within one circuit.
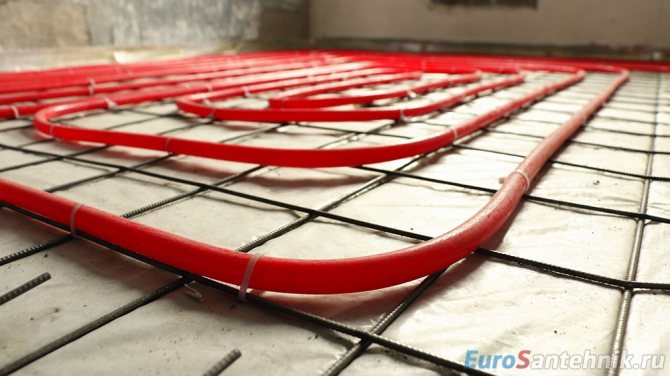
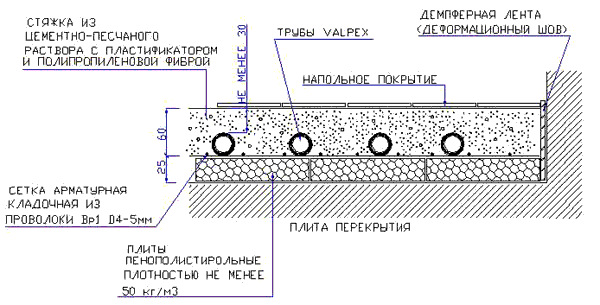
The design of the installation scheme for materials is carried out so that the heating circuit captures the maximum area, taking into account the indentation from the walls of 25-30 cm.At the same time, the floor areas on which heavy furniture and bulky items, a fireplace, a bath, large household appliances, kitchen and living rooms are supposed to be headsets, built-in wardrobes, etc. are not heated.
Calculation of the underfloor heating system
Surfaces over 40 m² are equipped with at least two working circuits, often using the "double snake" pipe arrangement method.
To calculate the approximate length of the material, you need to use the formula:
D = S / M ˟ k
- D is the length of the pipe;
- S - heated floor surface;
- M - step;
- k - stock indicator, which is in the range of 1.1-1.4.
Pipe Laying Options
The consumption of materials and the amount of heat in the room depend on the method of installation. There are three basic techniques for placing pipes on the floor:
Pipe Laying Options
Laying "snake" is characterized by simplicity of design and installation, which determines its widespread use. The serpentine pipe arrangement is ideal for rooms with low heat loss, industrial facilities that require year-round heating.
Laying the pipe with a snake
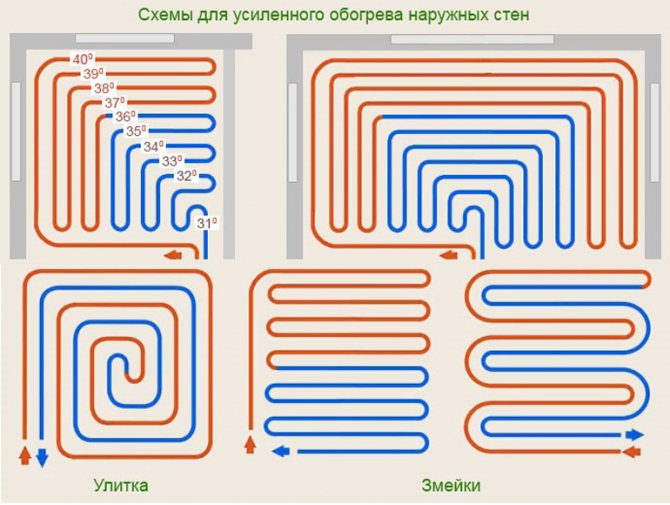
But such a layout of heat sources can lead to temperature differences in different parts of the floor, which will affect the degree of comfort and the possibility of exceeding the permissible SNiP values by certain zones, according to which the temperature maximum for heated floor coverings in places of constant presence of people is + 25 ° С, periodically + 32 ° C. To reduce the effect of uneven heating during design, a number of restrictions are imposed on the inputs and outputs of heating circuits of heat carriers:
- the maximum temperature difference is no more than 5 ° С, the method cannot level large values;
- the maximum power of the heating system is 80 W / m².
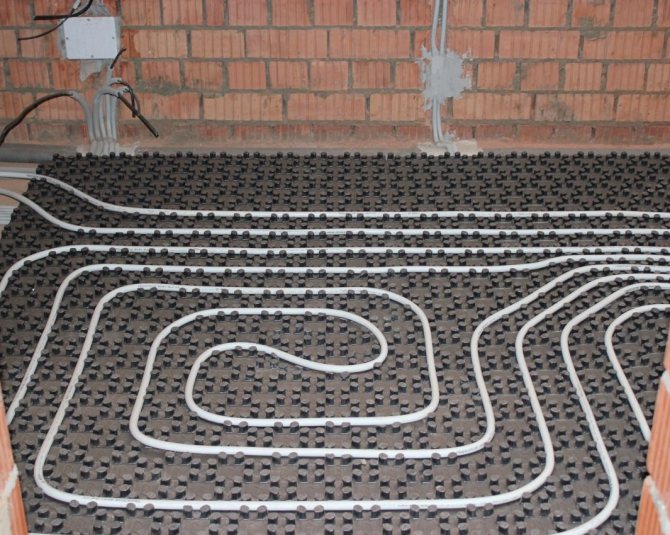
Laying pipes underfloor heating "snail"
More complex in the arrangement of the coolants is the "snail" method, sometimes called a spiral or "shell". Despite the more laborious execution and the required accuracy of design calculations, this method is distinguished by a uniform distribution of the temperature field over the entire floor surface. This is achieved by alternately placing the straight and return pipes.Temperature equalization is carried out by means of a surface construction concrete screed, the recommended thickness of which is 3-5 cm, or aluminum plates placed on the heat carriers from above. Installation "shell" helps to remove the temperature gap from 10 to 25 ° C and uniform temperature distribution over the entire area.
Pipe-laying option
The combined method is a combination of different laying methods over large areas. Significant surfaces of the coating are divided into zones in which the installation of insulation materials is carried out according to the location of the site - at windows, entrance doors and outer walls, pipes are placed with a snake, and along.
Features of fixing pipes in the contour
Underfloor heating pipes can be laid in one of the following ways:

- using plastic strips in the form of a cantilever tape; using special rugs with laying grooves; using a metal mounting tape; using separate brackets - they are attached to the base at a distance from one another.
As an example, consider the use of a plastic fastener strip that has grooves for 16 and 20 mm pipes. At the same time, opposite clamps on the fastener are spaced 50 millimeters apart, and pipe clips are spaced 20 centimeters apart.
A convenient way of installation is to fix the contour using strip (or tape) clamps - they provide a 200 mm pipe pitch when laying a warm floor and therefore do not need to markup.
A similar distance of 20-25 centimeters should be adhered to when installing the heating structure using point brackets. They are designed so that the screed warms up evenly, regardless of the method of installation - a spiral or a snake.
It is also possible to provide a fixed gap between the pipes by using aluminum heat distribution plates. They are placed on plates of extruded polystyrene foam, which have special grooves on their surface. The result is a kind of assembly system that has much in common with children's designers, since they already have all the necessary dimensions in advance.
To avoid deformation of the metal-plastic during a sharp turn of the heating circuit, a steel spring is put on the pipe before carrying out installation work, having a length of 20-25 centimeters and a width of 18-20 millimeters. It should be pulled over the intended place of bending, as a result of which it will squeeze the walls and the plastic will begin to stretch evenly, so that the hall will not happen. In the process of laying, the spring is pushed further to the end of the contour and then removed. You need to know how to properly lay the pipe for the underfloor heating on the screed so that the coating warms up evenly.
The fact is that warm air on concrete rises not strictly vertically to the top, but at an angle of 45 degrees, resembling a cone in shape. In the case when the edges of the flows intersect on the surface of the concrete layer, then the floor covering will warm up evenly and when moving along its surface, the temperature drop is not felt.Thus, it turns out: if the distance between the pipes of the underfloor heating is 20 centimeters, the thickness of the concrete should also equal to 20 centimeters. Theoretically, heat flows will intersect exactly at this height. In reality, it is enough for the thickness of the screed to be less, namely about 10-12 centimeters, and there are several explanations for this: A finishing floor covering will still be laid on top of the concrete layer, which will increase the height of the floor. pipes located in the screed do not create clear heating limits, and the concrete heats up nearby, resulting in the same temperature at the surface. Installation and selection of pipes for a warm floor is a completely solvable task.
But it must be remembered that the heating system is equipped once for a long time and repairs as a result of a breakdown will cost a significant amount.As a full-fledged heating, floor heating began to be used in ancient Rome. Considering that in those days there were no radiators yet, the Romans placed stoves in the basements, heated with wood, which heated the room with warm air. Such heating systems have come to the modern market since the introduction of the technology for the production of plastic pipes, which not only reduced the cost of the heating system itself, but also extended its service life.
Installation nuances
In order for the flooring to turn out to be of high quality, the masters advise you to adhere to a number of rules.
- It is not recommended to correct the approved pipe layout directly during the installation process.
- Heat transfer fluids must not be subjected to mechanical stretching, deformation or heating.
- Trim the pipes before connecting them to the hydraulic pump.
- Careful placement and connection of all components ensures the tightness of the heating system as a whole.
- It is not recommended to step on it while laying the coolant.
For the convenience of laying pipes, you can use a lined foil underlay
It is not so difficult to select pipes and determine the optimal step for laying the flooring on your own. The main thing is to remember that all manipulations are aimed at creating a comfortable and cozy home environment.
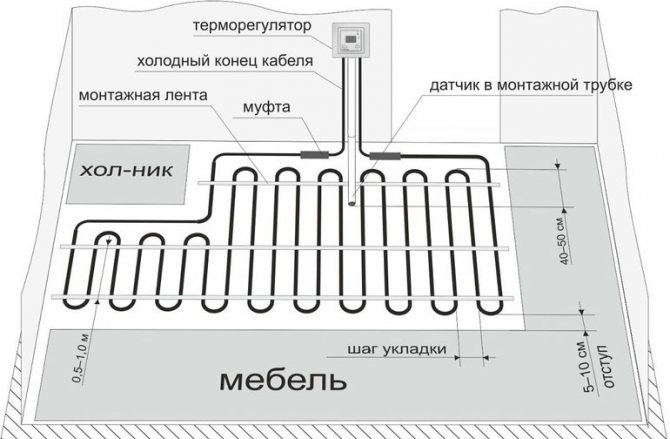
How to fix the pipes of the water floor
The choice of what to attach the pipes to is influenced by the chosen method of installation of the heating system and the size of the total heated area. For large rooms it is recommended to use installation panels and ready-made clips. In small rooms, you can get by with clamps.
Choice of pipes
An important point in the installation of underfloor heating is the choice of pipes. Therefore, it is best to give preference to the products of the manufacturer who gives a guarantee for their goods for more than 30 years and undertakes to pay compensation or fully reimburse the cost of the material in the event of defects, malfunctions or other malfunctions.
| Name | The size. Standard size numbers - outer diameter, wall thickness of a metal-plastic pipe | price, rub. The price is given for a running meter |
| METAL-PLASTIC (METAL-POLYMER) PIPE VALTEC PEX-AL-PEX | 16 X 2.0 mm, 100 m 16 X 2.0 mm, 200 m | 55 |
| METAL-PLASTIC (METAL-POLYMER) PIPE VALTEC PEX-AL-PEX | 20 x 2.0 mm, 100 m | 83 |
| METAL-PLASTIC (METAL-POLYMER) PIPE VALTEC PEX-AL-PEX | 26 x 3.0 mm, 50 m | 145 |
| METAL-PLASTIC (METAL-POLYMER) PIPE VALTEC PEX-AL-PEX | 32 x 3.0 mm, 50 m | 215 |
| METAL-PLASTIC (METAL-POLYMER) PIPE VALTEC PEX-AL-PEX | 40 x 3.5 mm, 25 m | 575 |
| PEX-EVOH PIPE OF CROSS-LINKED POLYETHYLENE | 16 x 2.0 mm, 200 m 16 x 2.0 mm, 100 m | 50 |
| PEX-EVOH PIPE OF CROSS-LINKED POLYETHYLENE | 20 x 2.0 mm, 100 m | 69 |
Underfloor heating pipe UPONOR
During installation, the bending of pipes can vary from 45 to 90 ° C, which can complicate the process of laying the material. The following requirements are imposed on the heating main:
- strength;
- wear resistance;
- durability;
- sufficient heat transfer;
- low rate of thermal expansion;
- water neutrality;
- ability to withstand temperatures up to 120 ° C.
Laying a metal-plastic pipe
The most popular materials for heat transfer fluids:
An important point! An “ideal” pipe is not prone to cracking and can be installed at ambient temperatures of + 5 ° C and above, it combines a small outer diameter, which can be from 9 to 22 mm, and a sufficient inner section, providing good flow capacity, since the large cross-section relieves some of the load on the hydraulic pump.
Polyethylene underfloor heating pipes
Sequence of pipe laying
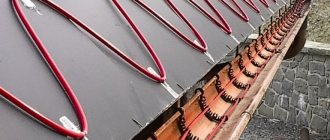
Another effective installation method is "polystyrene". In this case, the installation is carried out on heat-reflecting plates.Special mats with grooves and latches serve as the basis for laying the pipe.
The polystyrene system has several main advantages:
- The pipe-laying principle is simple. Self-assembly of the water circuit is possible in any way. On the mats there is a special bracket for fastening the pipe with a latch-lock, which provides the necessary secure fixation.
- There is no need for additional concrete work. The mats have metal heat-reflecting plates. A red pipe is placed in the plates for the supply and blue for the return. From above, they are filled with a special solution. It takes 1-2 days for the surface to dry. The floors can be immediately laid with laminate or linoleum, or any other type of flooring, which reduces the time for installation work.
- Installation speed. The polystyrene method is the most effective technology for attaching pipes for a water-heated floor. There is no need to tie and fix the contour with mounting tape or harpoons. The mounting brackets are positioned in such a way as to fully meet the necessary technical requirements. Thus, it is impossible to violate the minimum pipe bend diameter, which is a common mistake when laying without mats.
- Maximum heat dissipation. Aluminum heat distribution plates are laid on top of the water circuit, inserted into the mats. Such a device allows you to evenly distribute the received heat throughout the room. Alternatively, metal or galvanized heat distribution plates can be used.
Pipe diameter
The smaller the diameter of the main element of the system, the less you need to make the distance between the loops in the contour. When using a pipe with a larger diameter, the laying step in the contour increases accordingly.
- A pipe with a diameter of 16 mm is laid with a minimum distance of 10-15 cm. With an increase in diameter to 20 mm, the laying step also increases. In this case, it can be 15-20 cm. When using a pipe with a diameter of 25 mm, the distance between the loops should be from 20 cm to 30 cm. SANEXT pipes for underfloor heating
Experts do not recommend using pipes of a smaller or larger diameter when laying the contours of a warm water floor, since when they are used, heating will lose its effectiveness.
Underfloor heating pipes