The drainage system is equipped to protect the supporting structures of the house: roofs, walls, foundations - from the destructive effects of rain and melt water. But the gutter itself needs protection, because in the cold season it has to go through serious tests associated with the formation of ice, as a result of which there is a decrease in throughput up to complete inefficiency and breakdown due to too much weight of the frozen ice.
The gutter heating system, the main element of which is the heating cable, helps to cope with these problems, facilitates drainage.
What is it and why is it needed
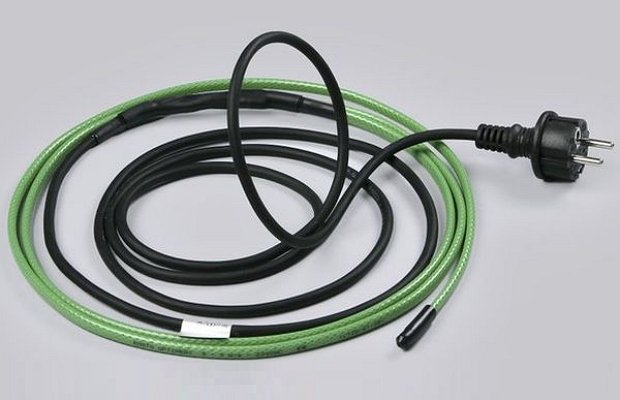
A heating cable is a wire that carries an electric current. The energy of the electric current is converted into heat, the amount of which directly depends on the resistance of the cable material and on the strength of the current.
Designed to prevent ice formation on drainage systems.
When heating is needed
Gutter heating must be carried out in the off-season - when the first snow falls and in spring, at the beginning of thawing. The temperature outside at this time ranges from -5 to 3˚С. It is at this time that ice and icicles form.
In addition, in country estates, it is often necessary to warm up external water and sewer pipes.
Why does ice accumulate
Ice on the roof and in the gutters accumulates for several reasons:
- Temperature jumps. The snow on the roof first melts and then freezes in the form of icicles;
- Incorrectly calculated roof slope angle;
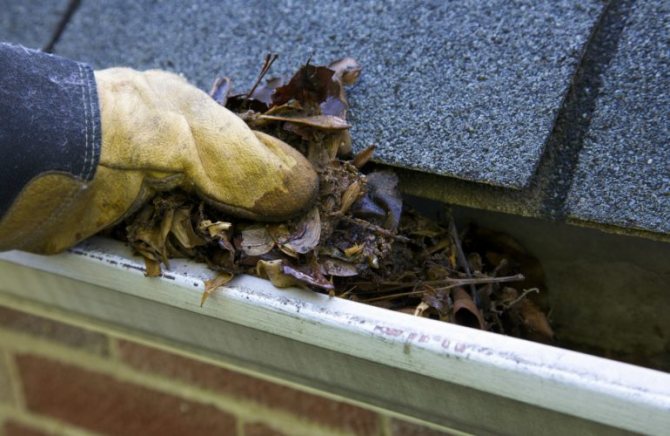
- Untreated gutters. Foliage and dirt clog the drain holes, which prevents the normal flow of water;
- Warm roof attic. The difference in temperature inside and outside the room leads to the formation of condensation, which freezes and forms ice.
A roof and drain heating system will help prevent the formation of icicles. With its help, the following tasks are solved:
- Removing ice;
- Prevention of roof damage due to water accumulation;
- Prevention of sudden temperature jumps;
- Reduction of snow load;
- Roof cleaning;
- Extending the service life of the entire roofing cake.
Installation of a roof heating system
Installing a roof de-icing system requires certain knowledge and skills in working with power equipment. If you have no experience with voltage, it is better to consult a specialist, or at least invite a practicing electrician as your partner.
Tools and materials required to work with the roof de-icing system
For installation, you need the following tools:
- drill;
- rivet pliers;
- screwdriver;
- a hammer;
- roulette;
- multimeter;
- megohmmeter.
For work at height you need a ladder.
Special glue may be required from the materials, for example, GE Gray RTV 167. It is used on soft roofs, to which the heating cable retainer cannot be screwed with screws or nails.
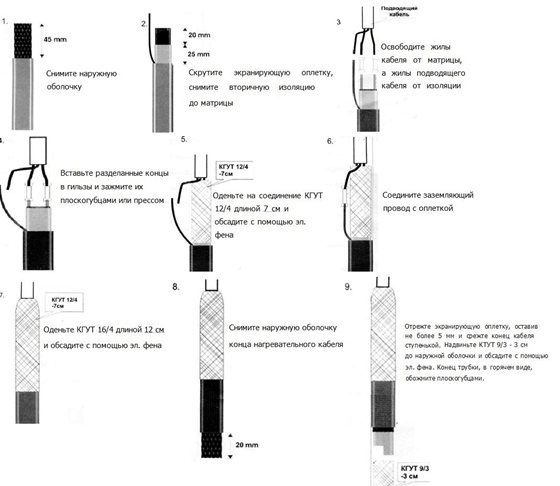
Preparing the cable for installation and connection
Work on the installation of the anti-icing system is carried out in the following order:
- The cable is inspected for damage, and if none are found, proceed to the assembly of the sections.

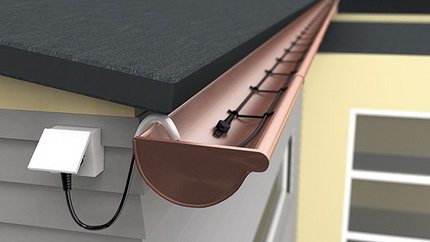
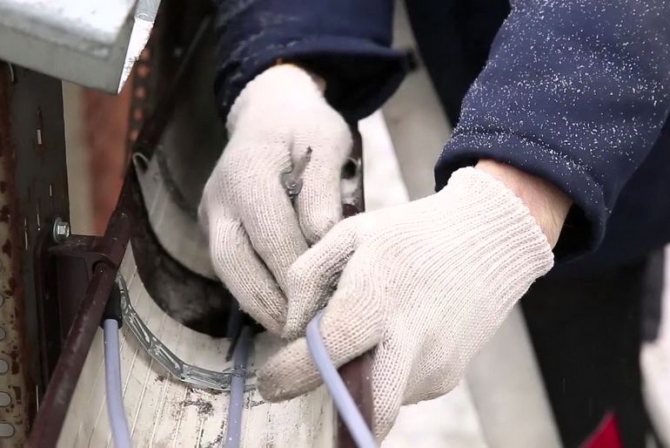
The conductive cores of the heating cable must be crimped before connection. - Start laying the cable. You can start with the gutters of the gutter system. The manufacturer prescribes some types of cable to be laid directly in the gutter, in which case the fastening is not required.If it is necessary, nevertheless, to fix the cable, clamps installed on the glue should be used. If, according to the instructions, the cable must be laid outside the gutter, then it is fastened with mounting tape, which in turn is fixed on the gutter with rivets. When installing the rivet, the rivet itself and the hole must be sealed with a sealant.
The installation pitch of the mounting tape depends on the cable material:
- for resistive (unregulated) - 25 cm;
- for self-adjusting - 50 cm.
If several cable lines are laid nearby, dividers should be installed between them in increments of 25–30 cm to prevent cable tangling when snow melts or in strong winds.
To avoid damage to the cable, do not:
- lay it on sharp edges;
- pull with effort;
- walk on the cable;
- squeeze or twist it;
- lay rough materials on top of it.
Fastening the heating cable to the gutters
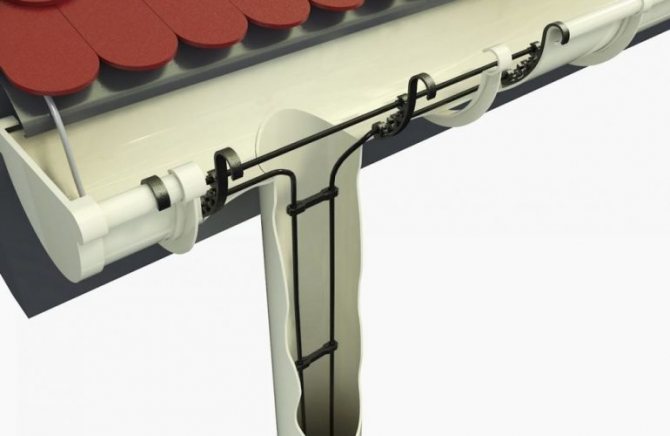
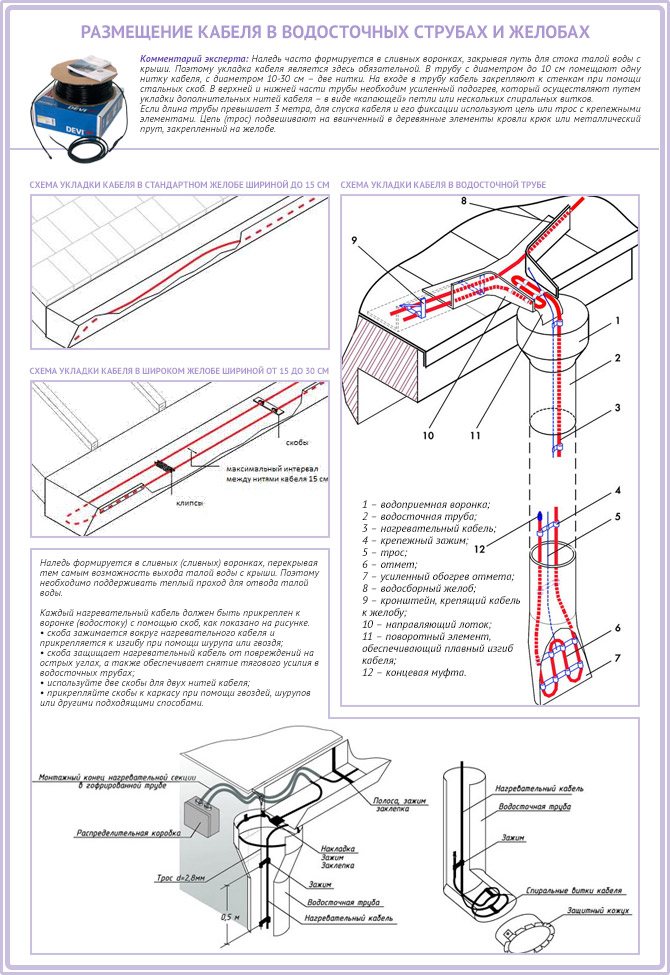
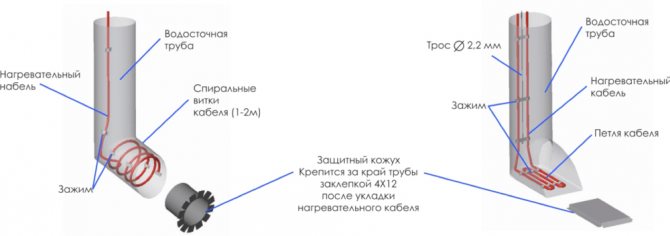
On downpipes, the heating cable is installed in the same way: either it is simply wound inward, or it is attached from the outside with mounting tape. Heat-shrinkable tubes can be used as fasteners. If the pipe has a length of more than 6 m, the cable must be fixed on a metal cable with a polymer sheath in order to avoid bursting due to its own weight.
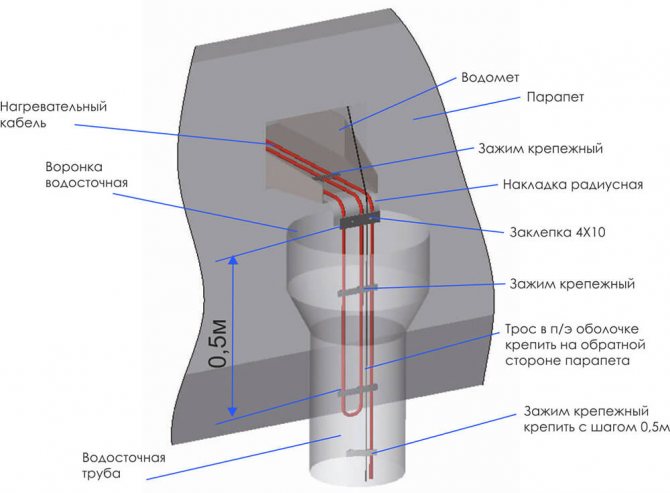
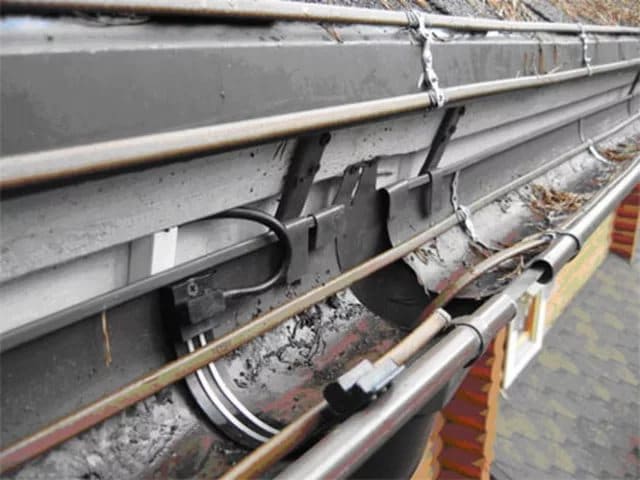
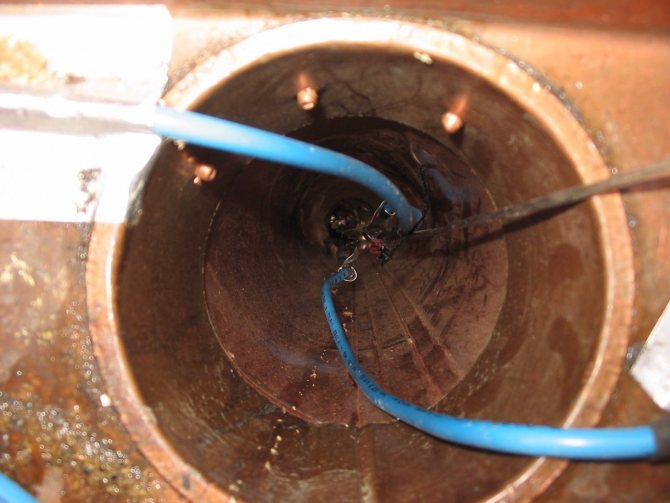
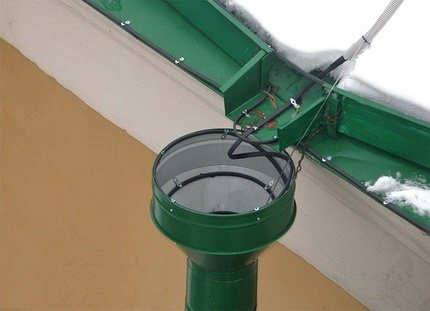
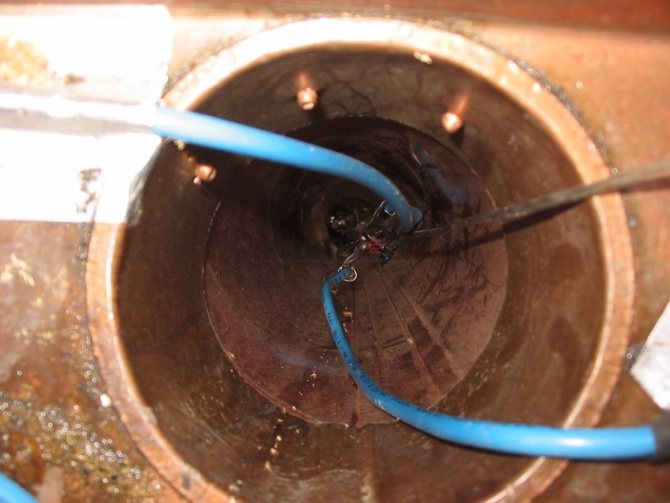
Inside the downpipe and at the entrance to it, the cable is reinforced with special clamps or ties
When laying the cable in one thread, after forming a "dripping loop" in the funnel, the end of the cable must be fixed with a tie. The cable can be fixed in the funnel with a clip.
When laying several lines, each of them is fastened with a separate bracket.
Video: installation of a drainage heating system
Roof cable installation
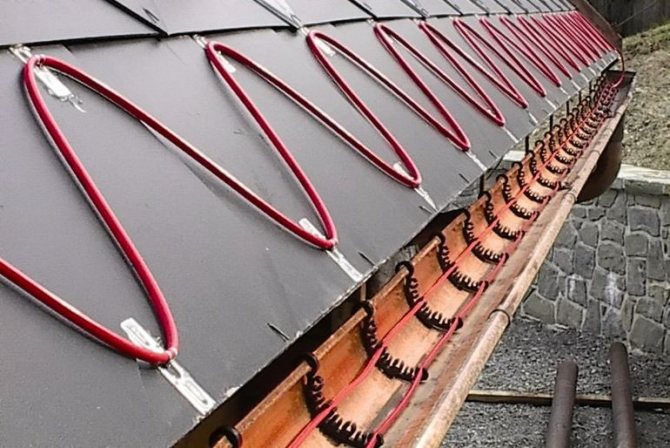
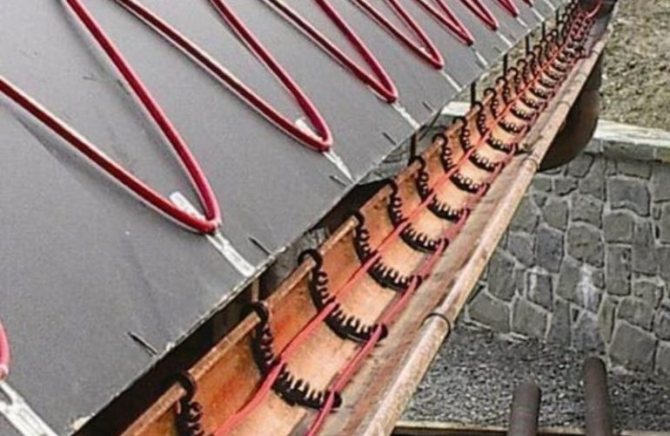
On the roof, the cable is fixed with perforated tape, which can be screwed on with self-tapping screws or glued with special glue (on soft roofs). When installing a self-tapping screw, he himself and the hole in the roof covering are treated with a sealant. Excess sealant should not be removed, but coated with a head of hardware.
On the finished tiled roof, the cable fixing tape must be wound 7.5 cm under the tiles and glued there. If the tiles have not yet been installed, this tape is nailed to the solid sheathing.
When using glue, you do not need to remove excess glue either. Having protruded through the holes of the perforated tape and dried out, it strengthens the fastening, working like a nail or self-tapping screw.
The installation step of the mounting tape is indicated in the instructions for the heating cable. Usually it is 15 - 25 cm.
Many manufacturers today supply clip-on clamps with heating cables, in which the cable is held in place with pliers. Before this, the clamps must be screwed to the roof with self-tapping screws, nailed or glued.
Some types of cable are attached to the roof covering using special clips that are included
Another method is also used: the cable is fastened with clamps to the pre-laid mesh.
Further:
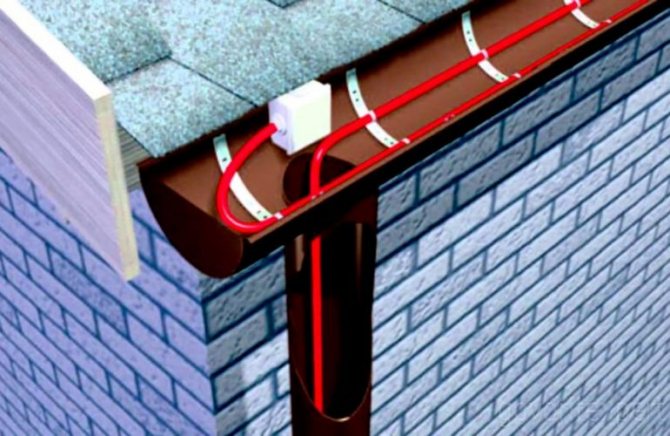
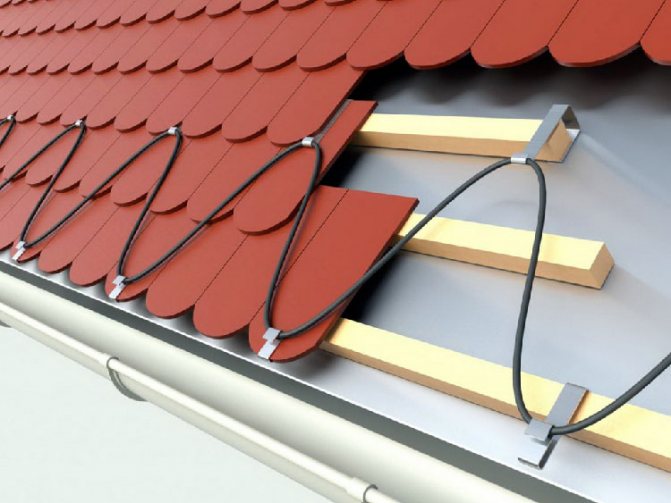
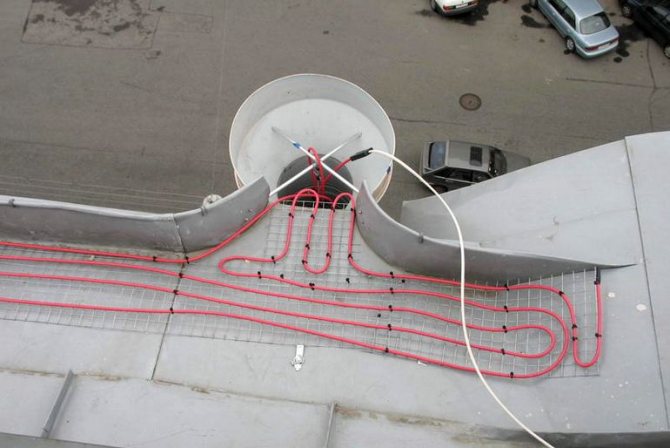
- They lead the cable into the valleys, using cables for additional fixation (in addition to the mounting tape). It is necessary to ensure the contact of the cables on the roof and in the gutter so that there are no cold zones between them. Otherwise, water can freeze at the edge of the roof. For this, the cables are pulled together with cable ties.
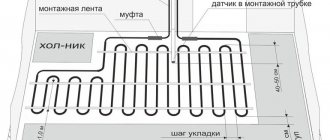
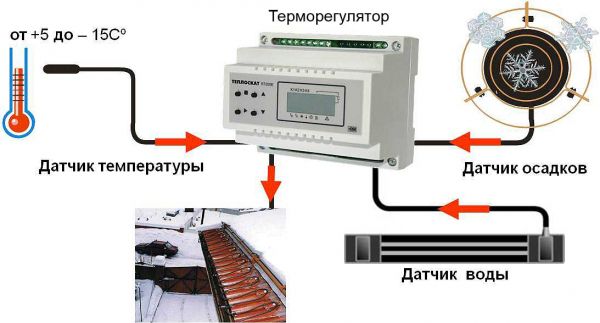
- After laying the heating cable, the weather station sensors are installed. The temperature sensor is best positioned in a trough, the humidity sensor in funnels and troughs or other places where icing is most likely.
Temperature and humidity sensors are installed in gutters - Next, the mounting boxes are attached. To prevent water from getting into them, drainage systems should be fixed.
- At the last stage, the readiness of the heating cable for operation is checked.To do this, call it, then determine the insulation resistance.
Video: laying the cable for the snow melting system on a multi-pitched roof
Heating cable dialing
A megohmmeter is used to measure the insulation resistance of the cable.
For a full check, measurements must be performed at a voltage not only of 500 and 1000 V, but also at 2500 V, otherwise some defects may remain undetected.
The first step is to measure the amount of resistance between the conductors and the shielding metal braid. In the event that the cable is installed on a metal surface, then you must also measure the resistance between the metal braid and this surface.
Verification is carried out in the following order:
- The system is disconnected from the power supply.
- The voltage on the megohmmeter is set to zero.
- A positive electrode is alternately connected to both conductive conductors, and a negative electrode is connected to the metal braid.
The positive electrode of the megohmmeter (red wire) is connected to the conductive core, the negative (black wire) to the braid - Turning on the megohmmeter, set the voltage to 500 V and hold it for a minute. After that, the resistance is measured.
- Similarly, resistance measurements are made at voltages of 1 and 2.5 kV.
- Turn off the megger and discharge it through the grounded conductor (if the model is not self-discharging).
- If the cable lies on a metal surface, measure the resistance between that surface and the metal braid. The same steps are performed, only the positive electrode is connected to the metal surface.
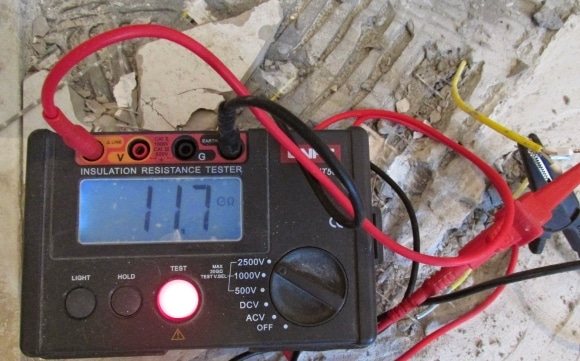
Normally, all three resistances should have a value of at least 1000 MΩ, regardless of the circuit length and voltage. In this case, the value of one resistance, for example, between one of the cores and the screen, should be constant at all three voltages, and all three resistances within one circuit should not differ by more than 25%.
In the case of using a self-regulating cable, it is necessary to measure the resistance between the conductors at both ends. It should be 3 ohms. A value of more than 100 ohms indicates a damaged core or a broken connection between sections of the circuit. After such a check, all elements with heat-shrinkable materials, for example, the end sleeve, must be replaced.
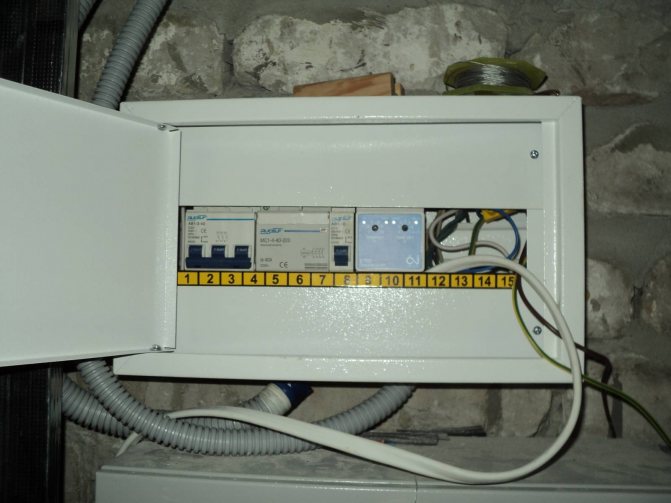
Roof anti-icing system connection and commissioning
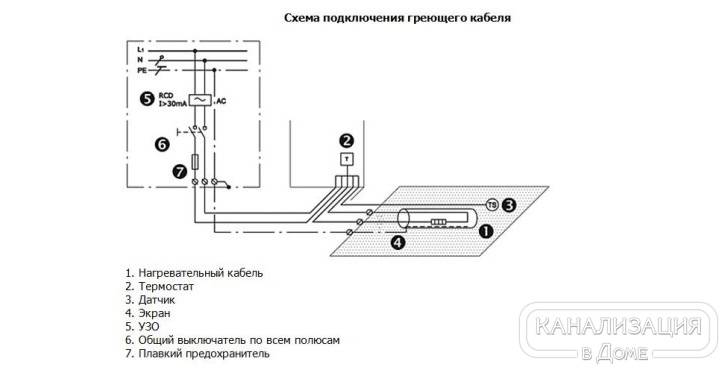
After checking the insulation resistance, make the necessary connections:
- Lay and connect the power cable, as well as the control system cables (signal).
- The control cabinet is assembled and installed in the designated place.
All electrical connections of the roof de-icing system are made in the control cabinet. - They check the power and signal cables by dialing and measuring the insulation resistance.
- Check the performance of the RCD. For this, a controlled leakage current must be produced, which is only allowed to be carried out by specialists.
- Set up a thermostat.
- They begin to perform commissioning: they check how the heating cable works, if necessary, adjust the thermostat.
Pressing the "TEST" button on the RCD case cannot be considered a full-fledged test: it is possible to determine how quickly and at what differential current the breaker is triggered is possible only with the help of a controlled leak.
Fine tuning of the thermostat is possible only in the cold season.
Upon completion of the installation, the owner should have the following documents on hand:
- anti-icing system, thermostat and control cabinet passports;
- certificates for all components of the system;
- protocol with data on the value of insulation resistance.
Advantages and disadvantages
Like any engineering solution, a heating cable has a number of pros and cons.
Advantages:
- Fast uniform heating;
- Long service life - at least 10 years;
- Safety and environmental friendliness;
- The system configuration can be easily changed;
- Sufficiently low power consumption.
- Resistance to external influences.
Disadvantages:
- The need for accurate and competent calculation;
- The cost of a good cable is quite high.
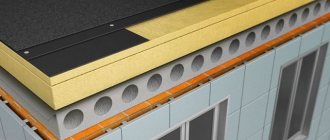
Heating of gutters and gutters
The main reason for the inoperability of the building drainage system in the cold season is the accumulation of ice in the gutters and downpipes.
If the roof is cold, that is, it does not have large heat losses, and the snow does not melt on the roof itself, then laying the heating cable in gutters and downpipes is enough to solve the problem of icing.


If the roof is warm, then a complex solution will be required - see: roof heating, drip heating.
Cable selection
The linear power is selected based on the diameter of the downspouts and the width of the gutters. The material of the drainage system is of less importance - plastic heats up a little worse than metal - more power is needed. Table 1 shows averaged values. For difficult conditions - altitude, wind load - the power should be increased, if there is little ice, then the power can be reduced.
Table 1: Selection of a heating cable for heating gutters and gutters
| Pipe diameter / Gutter width | less than 100 mm | 120-150 mm | 150-160 mm | 200 mm |
| Required linear power per site | 30-40 W / m | 50-60 W / m | 60-100 W / m | 80-120 W / m |
| Heating cables X number of threads | Raychem GM2-X x 1 HeatTrace GT-2 x 1 Nelson SLT2 x 1 Nexans DeFrost Pipe 20 x 1 | Raychem GM2-X-C x 1 Nelson LT-28-jt x 1 Nelson CLTR-28-JT x 1 Nexans DeFrost Pipe 30 x 1 FreezStop 25K x 1 | GM2-X-C x 1 LT-210-jt x 1 DeFrost Pipe 30 x 1 FreezStop 25K x 2 | GM2-X-C x 2 LT-28-jt x 2 LT-210-jt x 2 DeFrost Pipe 30 x 2 FreezStop 25K x 2 |
Resistive cable
in these areas should be used with caution, as it, in contrast to the self-regulating one, is not resistant to local overheating. And gutters and gutters are just those areas where foliage and dirt accumulate. It is more profitable to use a self-regulating cable also because during installation
inside the downpipe
it significantly saves energy when dry.
Now let's take a closer look at the installation of a heating cable in various sections of the building drainage system:
Downpipes
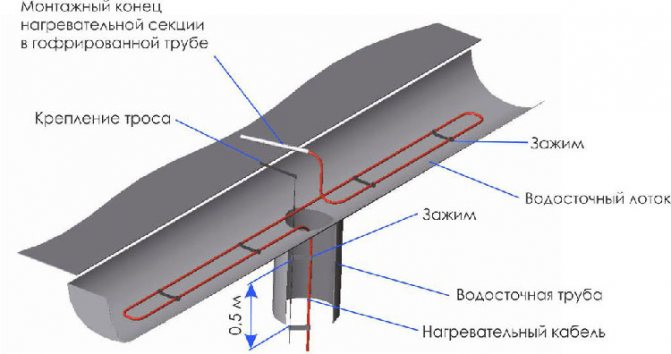
There is always an upward flow of air in any downpipe. In fact, the downpipe works like a blower. When installing a heating cable inside the gutter, the air flow even increases slightly. Therefore, it is necessary to perform reinforcement, namely to lay additional loops at the mark and around the water intake funnel. Thus, it turns out that an additional 1.5-2 m of heating cable is required for each downpipe.
If you study the methodological recommendations of the manufacturers, they state that if the height of the drain is less than 4 m, then the cable can be lowered inside it without additional devices. However, our experience shows that in order to increase the service life of the heating cable, it is necessary to fix it on the cable so that the mechanical load is carried not by the cable itself, but by the cable. It is also advisable to protect the cable at the point of exit from the pipe with a metal cover.
Internal gutters
In the case of internal downpipes, it turns out that most of the downpipe is located in a warm room. Therefore, in most cases it is sufficient to heat the upper part of the pipe, i.e. lower the heating cable from above to the overlap, to a depth of 0.8-1.5 m, and additionally heat a small area around the funnel. It is convenient to do this by securing the cable to a metal mesh. The weak point is also the exit from the pipe (it works like a blower). In this case, the power supply is supplied from below: the heating cable is introduced into the pipe through a clamp with a gland. It is true that it is quite laborious to supply power supply from below and from above to the same pipe, which in some cases (height less than 8 m) can negate the savings in heating cable footage.
Hanging gutters
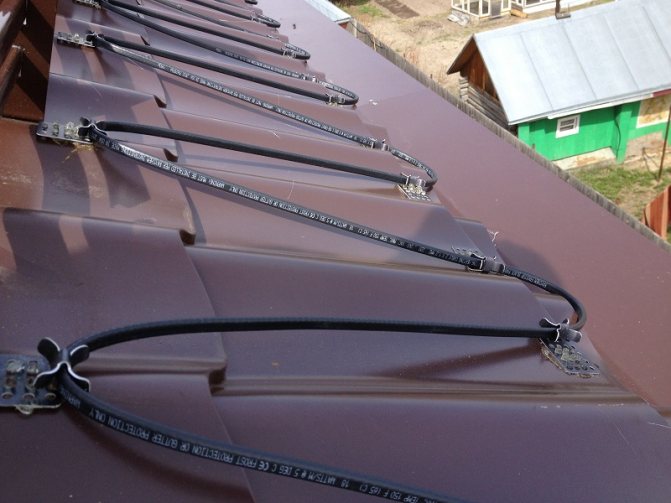
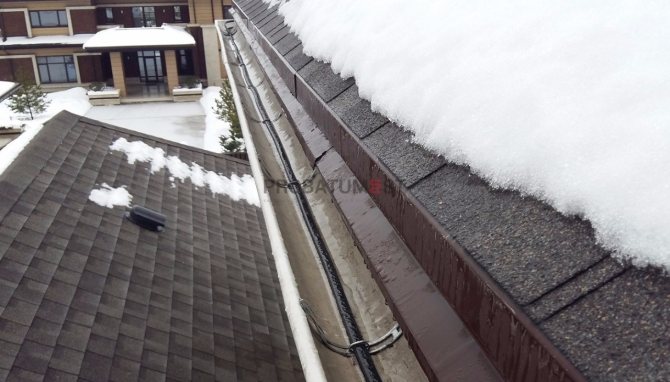
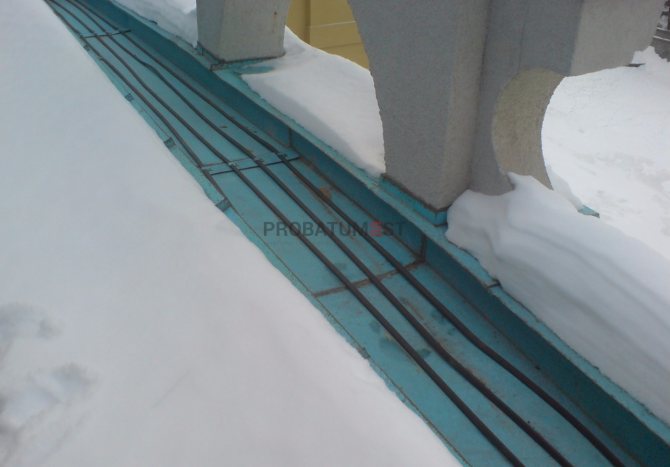
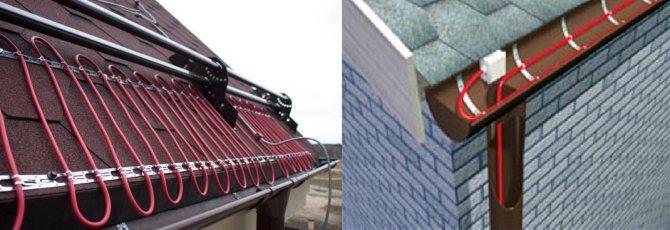
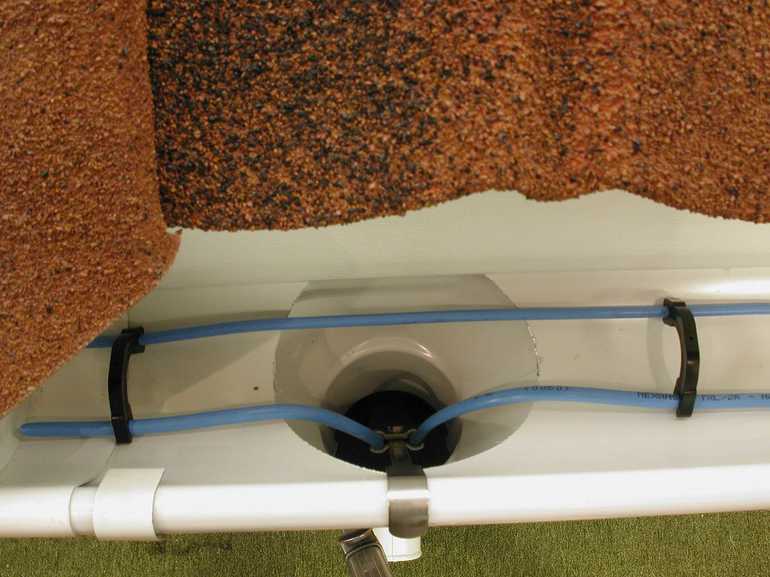
On the horizontal sections of the building drainage system, the heating cable is fixed every 0.3-0.5 m using pieces of mounting tape. The tape itself is attached to the gutter using rivets (on a metal gutter) or self-tapping screws (plastic gutter). The power of the cable is selected according to table №1.If there is a weather station, the moisture sensor is also installed in the gutter.
Sloping gutters
Since the term "width" is not applicable to the slope, then when selecting a heating cable, they are guided by the amount of ice formed. If a lot of ice is formed, a 30-watt cable is used, if not very much - 25- or even 18-watt cables are used.
Branching
In order to simplify the power supply subsystem with a large number of gutters and downspouts, branching nodes are used:
- T-junction box: a universal solution, which however requires the creation of three couplings;
- KSR3 / 20: this is an industrial splice-branching unit, but the terminals are not the most convenient;
- RayClick PT-02, RayClick T-02: elegant solutions for Raychem heating cables.
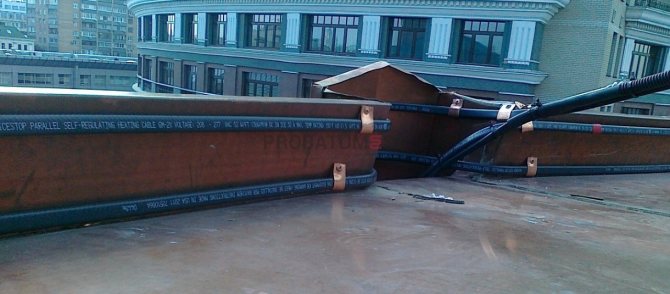
Heating cables for heating gutters and gutters
Sales leaders
- Self-regulating heating cable TSD-30P 325 rubles
- Self-regulating heating cable Freezstop-25K 476.04 rub
- Self-regulating heating cable Nexans Defrost Pipe 20 672 rubles
- Nelson SLT-2-JT self-regulating heating cable for heating a roof 879.06 rub
- self-regulating heating cable Raychem ICESTOP GM-2X 1471.33 rub
Temperature controllers and weather stations
Sales leaders
- Electronic temperature controller RT-330 (with a DT sensor) 3855.72 rubles
- Thermostat for heating a roof OJ electronics ETR / F 1447A 7790.69 rub
- Weather station Probatum IS22 27000 rubles
- Weather station Raychem EMDR-10 49972.72 rub
Fasteners
Sales leaders
- Galvanized mounting tape type PVA 12x0.75 10m 498 rubles
- Galvanized mounting tape type 2.11 144 rub
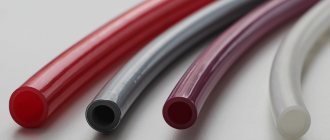
Types of heating cables
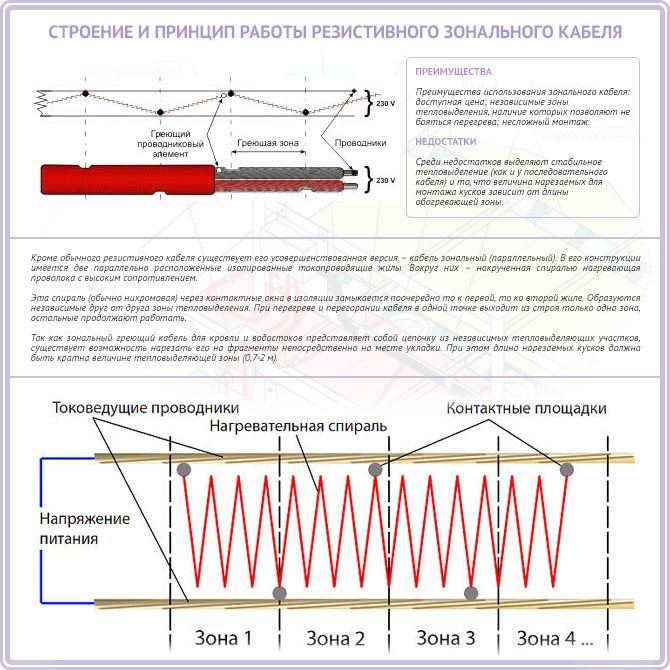
There are 2 types of heating cable.
Resistive
Traditional, simple and inexpensive. It is a high resistance copper wire covered with an insulating layer. The entire length of the product is heated evenly. Ideally, protect the wire with a layer of thermal insulation.
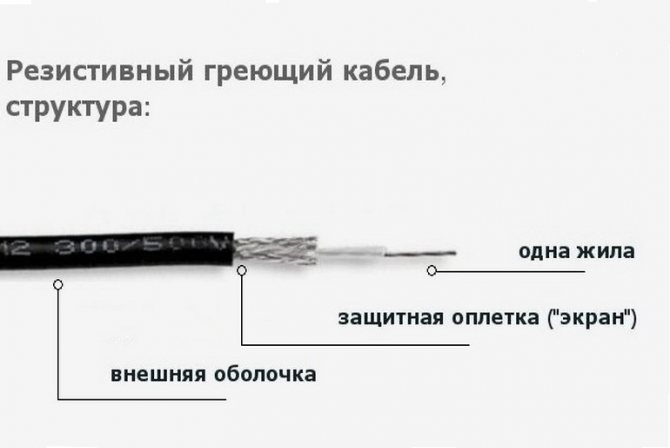
The resistive cable is available in two versions - serial and zone. Zonal is an improved version of sequential. There are 2 cores in its structure, connected at regular intervals with a special wire. These gaps form independent zones, and if one burns out, the others continue to work normally. If the serial cable burns out, it will not be possible to restore it.
The main advantages of a resistive cable are low, ease of installation and operation, fast heating.
An important nuance is that the heating of the cable is distributed evenly along the entire length, but its temperature in different parts of the roof is different. For example, in severe frost, the part of the wire located under the open sky will be colder, and the part inside the pipe will be warmer.
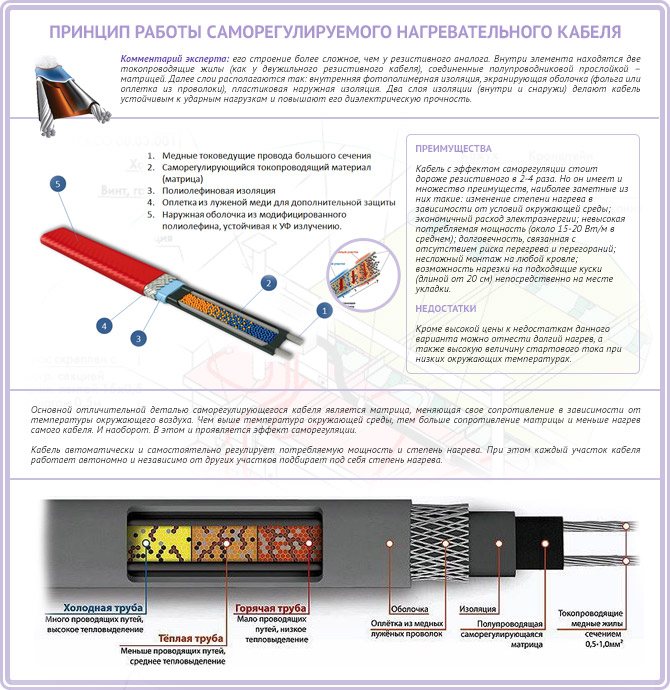
Self-adjusting
Differs in a more complex device. Inside - 2 wires, placed in a special matrix.
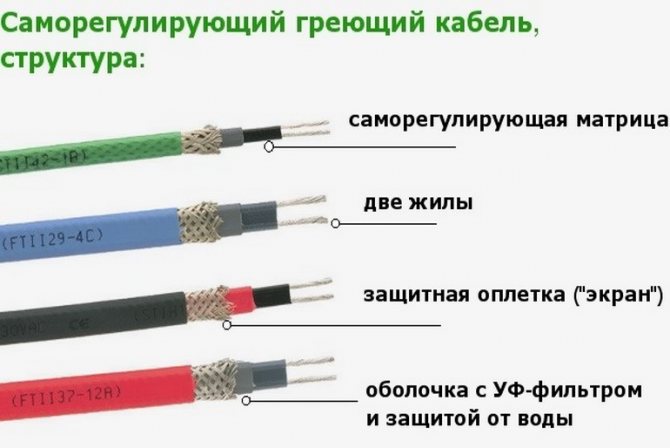
The matrix adjusts the resistance of the conductors depending on the air temperature. The entire structure is wrapped in several layers of insulation and covered with a sheath that protects against external influences. The warmer it is outside, the less the wire heats up, and vice versa.
This option, although more expensive, is more reliable than the resistive one, it does not burn out, does not overheat, it can be divided into sections of the required length.
Heating cable - which one to choose?
You will have to choose from an inexpensive resistive and expensive self-regulating cable. Resistive cable is completely ordinary, based on a metal core and insulation. Unless, when choosing a product, you should ask about a certificate confirming its fire safety. By connecting a cable for heating metal gutters to a closed circuit, you will create a constant resistance. The cable will absorb the same amount of power throughout its operation, delivering a stable temperature.
Do not rejoice in saving money when buying the cable itself - over time, you will start to overpay for the electricity consumed by the system.
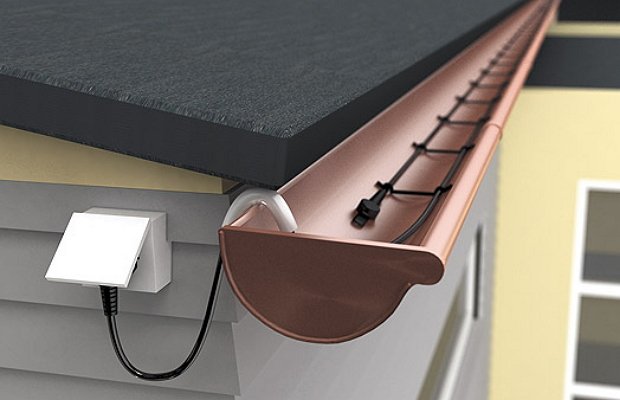
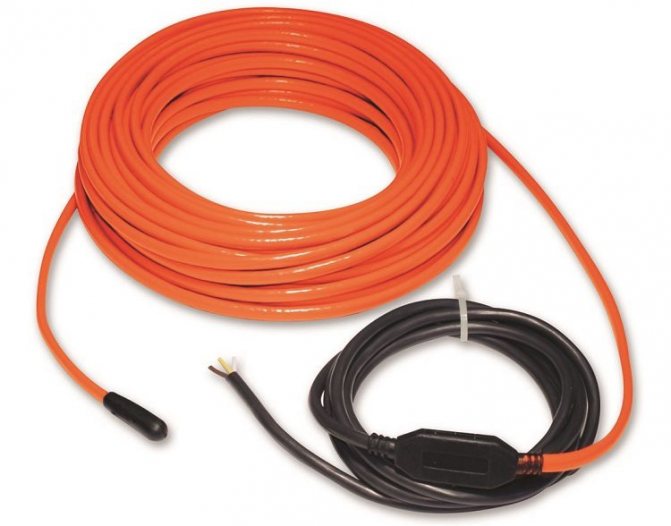
Photo of a cable for heating metal gutters
In addition, such a cable has a serious drawback - it often burns out in overlapping places. Another disadvantage is the inability to freely cut pieces of the required length.Already prepared sections and blocks are on sale, which are mounted without changes. The only way out is to select blocks in such a way that their total length overlaps the required roof segment.
Self-regulating cable is a more technological solution for heating roof eaves and gutters. Its structure is a matrix that “knows how” to react to the ambient temperature and change the level of resistance. Consequently, the heating temperature of the entire cable also changes. Thanks to this, electricity is significantly saved. Of course, a self-regulating cable is more expensive, but its service life is much longer, primarily due to its resistance to burnout. The cable can be cut into pieces of any length on site. In addition, there is no need to use a temperature sensor that regulates the operation of the resistive cable.
So which heating cable should you buy - resistive or self-regulating? In fact, their combination is considered the best option - a self-regulating cable is responsible for heating gutters and gutters, and a resistive cable is used in the roofing part to eliminate icing. This allows you to save on the purchase of building materials, and get a high-quality heating system for roofs and drains.
Pictured is a self-regulating heating cable for a drain
The power of a resistive cable for a roof heating system is from 18 W to 22 per linear meter. In the case of self-regulating products, the permissible power is up to 30 W per meter. This is if both the roofing material and the gutters are made of metal - the plastic may not withstand too high a heating temperature. The maximum power of the cable for plastic gutters is 15-17 watts.
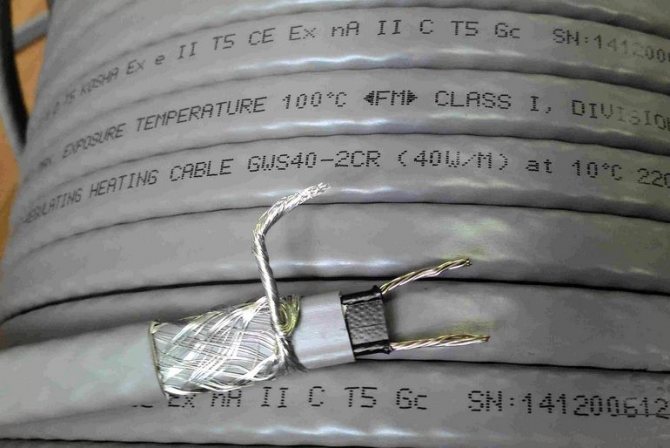
Shielding
Screen - protective shell made of aluminum or copper foil. Serves as an additional source of heat distribution, but its main function is to prevent electric shock of a person carrying out repair work.
The construction of a shielded conductor is more complicated, and therefore the price is higher.
Most often, there is a cheap unshielded version on the market. For its safe operation, a residual current device (RCD) is required.
The procedure for calculating the power of the heating system
If the owner of a private house is tired of manually cleaning the ice from the roof and gutters, and he decided to install a heating system, then the first step towards this goal will be the development of a heating project. In fact, the selection of the cable and the calculation of the required power are carried out by specialists that every reputable trading organization has. Unfortunately, occasionally there are not too conscientious suppliers who are interested in selling an expensive de-icing system and therefore you should not rely entirely on the seller's honesty. For this reason, it is recommended that you familiarize yourself with the general rules for calculation and design:
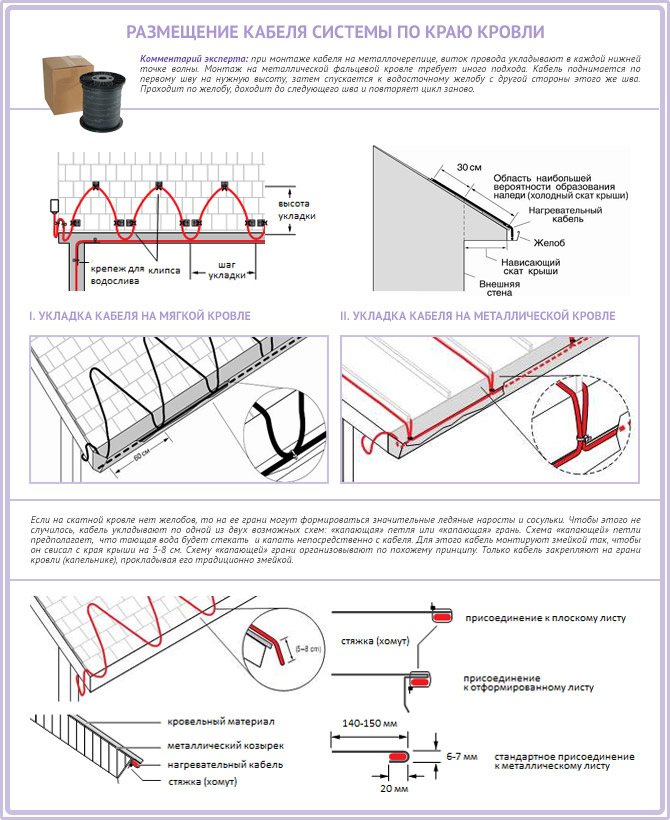
- Drawing up a plan for laying the heating cable. With an insulated roof with a slight pitched slope, the wire is placed around the perimeter and in the water intake funnels.
- On flat roofs, the cable is laid in the areas adjacent to the gutters.
- Roofs with a large slope require a slightly different installation pattern. The cable is laid in a zigzag manner between the edge of the roof and the structure of the snow holder.
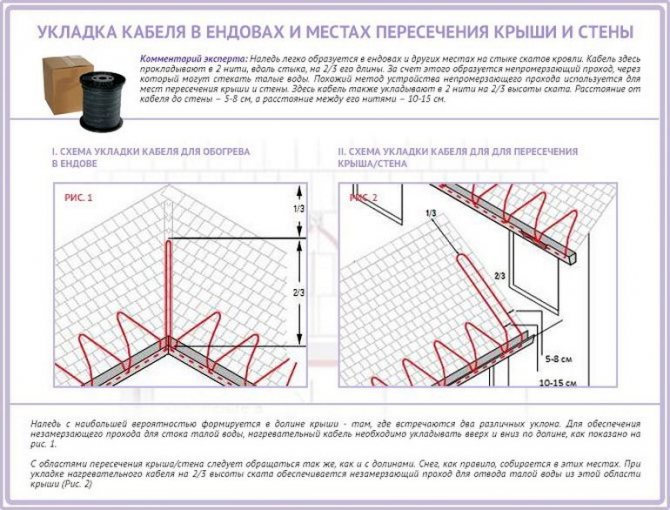
- In the places where the roof adjoins the wall and on the valleys of gable roofs, a kind of pocket is formed, in which ice constantly forms. In these places, the heating cable is laid in height at a distance equal to 2/3 of the long side of the valley. In places of contact between the roof and the wall, the heating wire is laid in an elongated loop of 10-15 cm at a distance of 5 to 8 cm, without bringing it to the wall to the structure.
- If it is necessary to heat a roof with a steep slope and without an organized drain, the heating cable is placed in a "dripping" loop.In this case, it is planned to install the cable in a loop so that the melt water drops directly from it to the ground in drops. The dripping loop element increases the consumption of cable products by 50 - 80 mm.
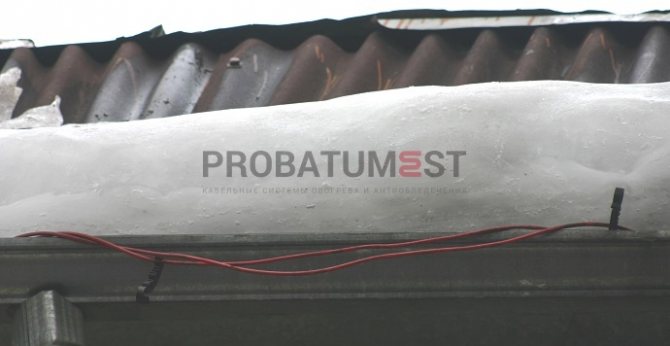
- In a gutter up to 150 mm wide, a heating cable is laid in one thread and a dripping loop of 300 - 400 mm is inserted into the drain funnel.
As mentioned above, a self-regulating cable is considered the best option for a heating cable. Since this type of cable product is more expensive and its price ranges from 240 to 660 rubles per 1 meter, it can only be used to heat gutters, and the roof structure can be equipped with a cheaper type of heating wire.
Type of drainage system with electric heating
At the next stage, the owner needs to decide on the places of maintenance where it will be necessary to install the mounting boxes. Most often they are installed on the roof next to the heating cable or somewhere under a hinged canopy or on a parapet fence.
Calculation of the power of the electrical heating system
The next step in calculating the "system without icicles" will be to determine the linear and total power consumption. There is a table of values of approximate values of the power of various types of roofs:
| Chute up to 150 mm | Cold roof | 30 - 60 W / m |
| Warm roof | 100 W / m | |
| Chute over 150 mm | Regardless of the type of roof | 200 W / m |
| Eaves overhangs | Cold roof | Up to 150 W / m |
| Warm roof | 200 to 250 W / m | |
| Endows | 250 - 300 W / m | |
| Flat roofs at the point of abutment to the parapet | 40 - 80 W / m |
Plastic gutters are equipped with a heating cable with a total power of no more than 17 W / m, and for a roof with a soft coating, the maximum permissible power is considered to be 20 W / m.
After determining the calculated power of the heating wire, calculate the required length and the number of cable threads, knowing that the maximum length of one circuit should not exceed 120 - 150 meters. Each circuit is connected to its own UZ0.
At the final stage, the control panel of the entire heating complex is selected.
Laying the self-regulating wire - the ideal “no icicle” roof solution
Maintenance
For normal operation of the laid self-regulating heating cable, the following preventive measures must be taken in a timely manner:
- Once a year, before the winter season, visually inspect the cable surface for mechanical damage.
- Before starting operation in the cold season, it is necessary to clean the water intake gutters and funnels from leaves, branches and other debris.
- Check the resistance value of the insulating layer.
- Before the onset of cold weather, set the operation of the automatic thermostat.
- Check the RCD.
Preparing for winter operation of the heated gutter
The use of the technology of heating gutters with a heating cable can significantly save the owner's time for cleaning from ice, eliminates the possibility of injury due to falling ice icicles. Therefore, the cost of purchasing and installing this entire complex in winter will be quite justified. Of course, equipping gutters with heating is a serious project and for a better result of operation, it is advisable to participate in the installation by experienced specialists.
Power and duration
The power of the cable depends on its temperature class.
- Low temperature. Heating up to 65C, power up to 15 W / m;
- Medium temperature conductor. Heats up to 120C, power 10-33W / m;
- High temperature. The most powerful - up to 95W / m, heats up to 190C without problems. Designed for industrial plants and pipes of large diameters.
It is rational for different communications to select a wire of suitable power, its underestimation will lead to poor heating, and overestimation will lead to increased power consumption.
The choice of cable power depending on the diameter of the drain pipes:
- Outside pipe diameter (D) from 15 to 25 mm - power 10W / m:
- D25-40mm - 16W / m;
- D40-60mm - 24W / m;
- D60-80mm -30W / m;
- D 80-300mm - 40W / m;
Heating cable for roofs and gutters: types and features
Any anti-icing system assumes the presence of a heating cable for heating gutters and downspouts, which provides heat to the drain and does not allow water to crystallize into ice.
There are two types of electrical cable:
- resistive;
- self-regulatory.
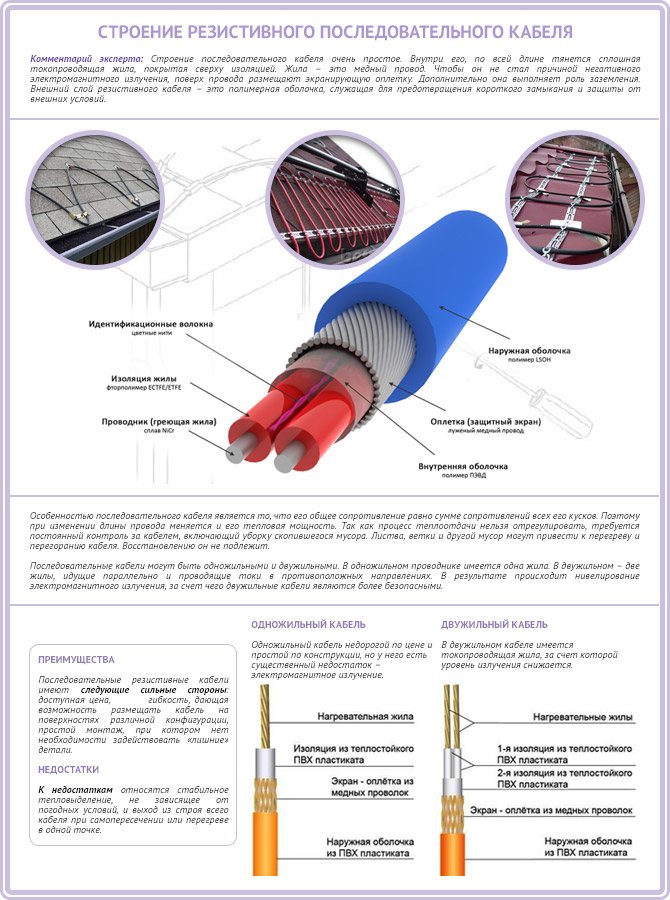
Resistive type
Self-heating cable consists of multi-layer insulating material. There are two heating cores in the cable cavity, which are connected to an electrical source.
NOTE!
Current resistance and power are constant. It heats up to a certain fixed temperature that cannot be adjusted.
This type is a conventional cable in a multi-layer winding, which consists of:
- outer polymeric shell;
- under it is a protective shield made of tinned copper wire;
- then the inner polymeric shell;
- conductor or heating conductor inserted into fluoropolymer insulating conductors.
By the principle of operation, it resembles an ordinary household heating element.
Such a wire for heating has a constant resistance and power, unregulated by the heating temperature.
It is in demand, having the following positive qualities:
- low price;
- easy to mount on the roof.
This type of cable heats up evenly along its entire length, which reduces its efficiency. It takes a lot of power to defrost strong ice-covered conditions. The cable may overheat and break.
Resistive type
Using a self-heating cable with increased power is irrational from the point of view of energy consumption. If the power is reduced, then ice areas remain not thawed in the gutters and on the roof.
The flexibility of the cable allows it to be placed in any configuration. If bending waves are made more often and placed one to another at a short distance, you can increase the heating force... But if the core overheats, the damaged cable cannot be restored.
To prevent this, it is required to often clean the roof from dirt and fallen leaves. Its short lifespan and high power consumption make it unpopular. And it is used more often on roofs with a large area.
Self-regulating heating cable for gutter
The technology for manufacturing a self-regulating cable is more complex.
The heating capacity depends on the matrix, the action of which is to spontaneously regulate the heating depending on the air temperature.
The matrix is located between two conductors.
With a large amount of snow and severe glaciation of the roof, the power increases, with warming, the heating weakens.
This functional feature allows you to save on energy consumption.... When an ice crust forms, the heating element installed in the gutters is automatically switched on.
It retains its linear power when not needed. It always works in optimal mode. Self-regulation of heating, leading to savings is the main plus of the heating wire.
Especially if the weather is unstable in winter and the temperature regime often changes. If part of the cable burns out, it is cut out, and the working parts are reconnected.... There is no need to install a temperature sensor or an on / off system.
Self-regulating heating cable
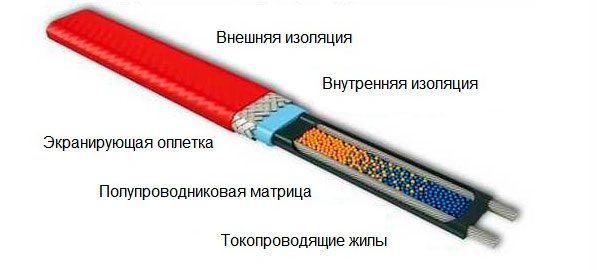
The thermal cable consists of an outer protective sheath, inner thermoplastic insulation. At the end is the semiconducting matrix itself and the conductive cores. This is a special technology for self-regulation of heating power.
Life time
The service life of the cable depends on the operating conditions and the materials from which it is made.
We can bring the service life of products from different manufacturers to a common denominator:
- Resistive - in a screed it serves up to 50 years, in other conditions - an average of 15;
- Self-regulating - "lives" up to 20 years.
Particular attention should be paid to the choice of the manufacturer.
Heating system arrangement technology
We offer you to study the detailed instructions for installing a roof and gutter heating system with your own hands. The process of installing a heating system for gutters includes a number of standard steps:
Image gallery
Photo from
Step 1: Installation of the heating cable according to the project
Step 2: Laying vertical heating lines
Step 3: Install icing sensors
Step 4: Installation of junction boxes and automation in the panel
First, we outline the places where the cable will be laid. It is important to consider all the turns and their difficulty. If the angle of rotation is too steep, it is recommended to cut the cable into parts of the required length and then connect them using couplings.
When marking, we carefully examine the base. There should be no sharp protrusions or corners here, otherwise the integrity of the cable will be at risk.
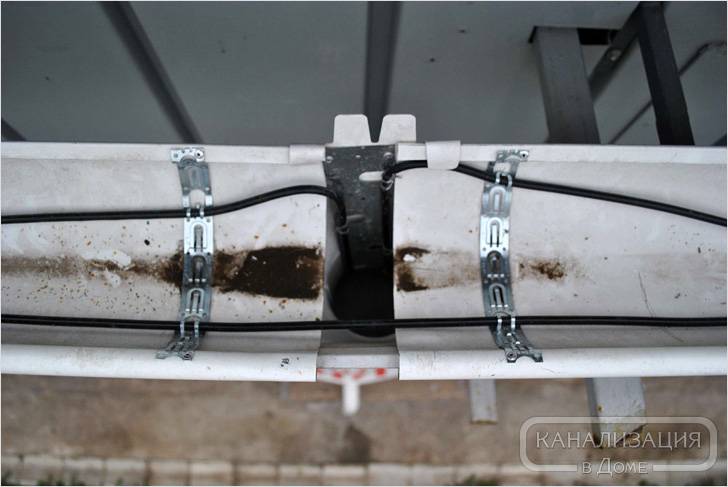
Inside the gutters, the cable is fixed with a special mounting tape. It is fixed across the wire. It is advisable to choose the most durable tape.
The resistive cable is fixed with a tape every 0.25 m, self-adjusting - every 0.5 m. Each strip of tape is additionally fixed with rivets. The places of their installation are treated with a sealant.
For cable installation, use a special mounting tape. It is not recommended to use any other fasteners. Rivets, sealant or polyurethane foam are used to fix the tape.
Inside the gutters, the same mounting tape or heat shrink tubing is used to secure the cable. For parts longer than 6 m, a metal cable is additionally used. A cable is attached to it to remove the bearing load from the latter.
Inside the roof outlets, the heating cable is fixed with tape and rivets. On the roof - on the mounting tape glued to the sealant, or on the mounting foam.
An important note from experts. It may seem that the adhesion of the roofing material to the sealant or foam is not sufficient for a secure connection. However, it is absolutely impossible to make holes for rivets on the roofing material. Over time, this will inevitably lead to leaks, and the roof will become unusable.
We choose a place for the junction boxes and install them. Then we call and accurately measure the insulation resistance of all the resulting sections. We put the thermostat sensors in place, put the power and signal wires. Each sensor is a small device with a wire, the length of the latter can be adjusted. The detectors are placed in strictly defined places.
In some areas of the system, increased heating is required. More cables are installed here. These areas include a drain funnel where ice can accumulate.
For example, a place on the roof of a house is selected for a snow sensor, and a water detector is selected at the lowest point of the gutter. All work is carried out according to the manufacturer's instructions. We connect the detectors to the controller. If the building is large, the sensors can be combined into groups, which are subsequently connected one by one to a common controller.
Next, we are preparing the place where the automatic control system will be installed. Most often this is a distribution board located inside the building. The controller and protection group are installed here.
Depending on the type of controller, the nuances of its installation may differ slightly. However, in any case, it will have terminals for connecting detectors, heating cables and for supplying power.
The picture shows that the cable is suspended in a suspended state. Over time, a violation of the installation will inevitably lead to its breakage and breakdown of the heating system
We install the protective group, after which we measure the resistance of the previously installed cables. Now we need to test the automatic safety shutdown to find out how well it does its job.
If everything is in order, we program the thermostat and put the system into operation.
Do it yourself or buy
The range of heating cables in stores is very large. But there are several ways to make a wire with your own hands. I will give an example of a home-made cable device:
- We take a double-insulated two-core copper wire and a 300W power supply (a computer is suitable), in addition, a temperature sensor is needed to measure the parameters.
- We close the wire to the 5V output of the power supply.
- After 10 minutes, the temperature of the cable will reach about 50 C-, this is quite enough to heat the drain.
Operating mode of the gutter heating system
The purpose of the gutter heating system is to prevent water from freezing and ice accumulation in gutters and downpipes. The operating mode is adjusted so that the snow melts as it falls. This can be schematically depicted as follows:
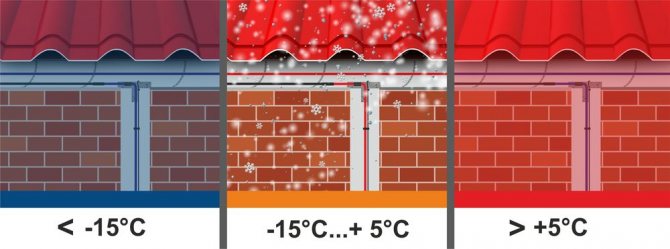
The control system is adjusted in such a way as to ensure the operation of the heating cable in the range of -15 ° С ... + 5 ° С. In this temperature range, precipitation is most likely to occur and melting occurs more efficiently.
- At temperatures less than -15 ° C, the operation of the system is not advisable, since, firstly, snowfalls are unlikely in frost, and secondly, at low temperatures, the power of the cable will be insufficient to drain melt water. In this case, the melted snow will freeze up, blocking the drainpipes.
- In the range of -15 ° C ... + 5 ° C, the system turns on and the snow melts. Temperature sensors are installed on the north side of the building.
- At temperatures above + 5 ° C, the system turns off.


Selection Tips
The advantage of a home-made system is the cheapness of the components (on average, all equipment is no more than 1000 rubles), and besides, the cable is easy to repair, it will not burn out, it will not melt. The power supply is very easy to replace if necessary.
Cons - lack of automation of the process, it is necessary to adjust the temperature manually and periodically check the power supply.
Therefore, the industrial version is still easier. Professionals recommend installing a combined heating system. In it, a resistive cable is located in areas with the same temperature (roof slope, etc.), and a self-regulating cable is located in gutters, valleys, pipes.
You can manually turn on the resistive part of the system for convenience.
Installation nuances and possible difficulties
Installation of a roof and gutter heating system presupposes compliance with a number of rules. All work is done according to the following scheme:
- First you need to check the health of the power supply, temperature controller, moisture sensor and temperature indicators.
- After that, you need to prepare the wire, guided by the diagrams and dimensions indicated in the instructions. Experts recommend laying such heating systems before finishing and installing the topcoat.
- The wires are held together in bundles with special clamps. After that, they should be placed in pipes and sections. From the edge of the roof, it is better to mount the cords in a zigzag, securely fixing them with clamps.
- Products are fixed in pipes and gutters using polyurethane foam. For this, the composition is applied across. If the drain pipe has a length of more than 6 m, the cord is first fixed to a metal cable in a sealed sheath, after which the assembled structure is placed inside the pipe.
- It is recommended to lay 2 wires in the drainpipes at once. In this case, the installation must be carried out from below and from above.
- It is necessary to carefully inspect the integrity and tightness of the fasteners.
- The next step is to install temperature sensors.
- After that, the installation of the control panel and commissioning are carried out.
You can handle the installation of the anti-icing system yourself. However, it is necessary to take into account the following rules:
- It is forbidden to fix the wires with wire, steel strips, self-tapping screws, adhesive tape and electrical tape. In any case, you need to use polyurethane foam and sealant.
- If the power is incorrectly selected, this is fraught with significant costs in the future or insufficiently efficient operation of the entire system.
- Do not twist the wires, otherwise a short circuit will occur.
- Each of the connections must be protected from moisture.
By observing these rules, you can avoid unnecessary costs when installing the anti-icing system and reducing its effectiveness.
DIY cable making and installation
Drawing and diagrams
Regardless of whether the heating wire was made by hand or purchased from a store, it is quite possible to install it yourself.
As an example, I will give several ready-made schemes for different sections of the roof (just below in the text: Fig. 1, Fig. 2, Fig. 3).
Sizing calculation
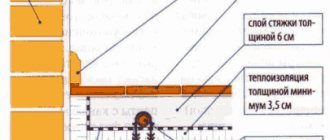
Initially, we measure the diameter of the pipes and select the power of the wire. It should be noted that if the roof is reliably insulated, a cable with a capacity of 25-40 W / m will be sufficient. If the roof is cold, choose a product of at least 40-50 watts.
There is another formula for an accurate calculation, in it the cable length is added to the length of the heated space and multiplied by 2. The resulting number is the required power.
The resulting power value should be compared with the value recommended based on the physical and technical indicators of the material used:
- for plastic gutters - at least 20 W per linear meter;
- for metal gutters - at least 25 W;
- for wooden gutters - at least 18 W.
If the cable in the anti-icing system is laid using the spiral piping method, its length must be calculated using the following formula:
Total length = pipe length x spiral factor.
The pitch of the spiral is determined depending on the diameter of the pipe according to special tables.
Next, you should draw an accurate diagram of all elements of the system. All stages of work will be carried out according to this drawing.
Fig. 1. Laying the cable along the edge of the roof:
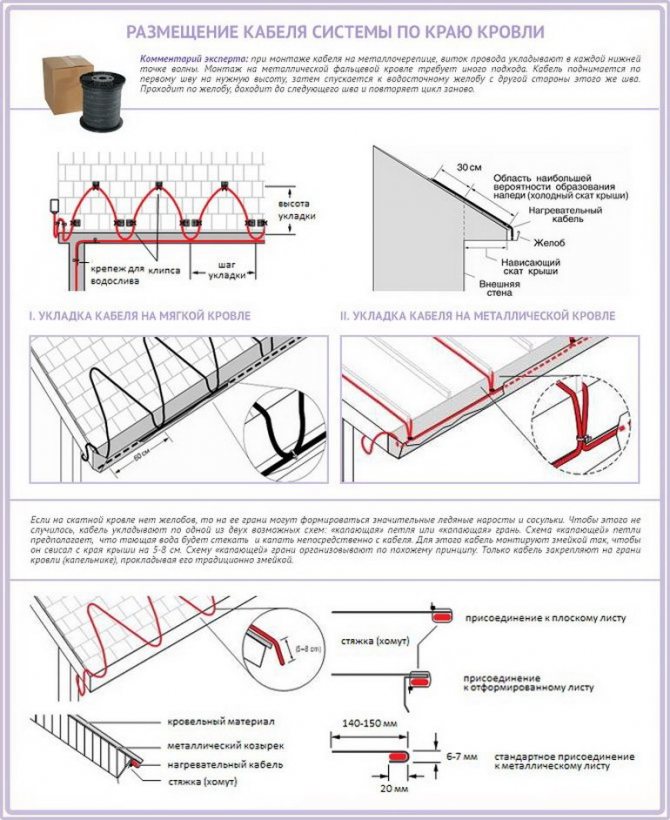
Fig. 2. Installation in gutters and pipes:

Fig. 3. Accommodation in valleys:
Calculation of the length of the heating cable for gutters
The calculations take into account the length of all heated downpipes and gutters, as well as the presence of additional elements (funnels, drippers, water cannons, and so on). Based on the principles given above, the total cable length required for the heating system is calculated.
For example, there is:
total length of plastic gutters with a diameter of 150mm - 54m, total length of 4 plastic drainpipes 6m high with a diameter of 150 - 36m. We lay the cable in the gutters in 2 threads, and in 1 thread in the drainpipes - we get 108m + 36m = 144m of a heating cable with a capacity of 30W / m.
In addition, we lay an additional length to strengthen the lower part of the drainpipe, adding 1-1.5m of heating cable to each drain.
The maximum length of the heating cable section must be taken into account when sizing the system.
For a heating cable 30 W / m with a screen - the maximum section length is 75 m. For a heating cable 40 W / m with a screen - the maximum section length is 55 m.
Based on the maximum length, the number of cable sections is calculated, and then accessories are selected (junction boxes, coupling kits, fasteners and controls).
Installation features
The installation of a heating system for roofing communications should be carried out taking into account the following rules and in the following sequence:
- It is necessary to take care of the presence of a temperature change controller, a power supply unit with a temperature sensor, a precipitation control sensor;
- A wire of the required length is prepared, according to measurements and diagrams. Ideally, install the cable before installing the top layer of the roof and finishing;
- The cable is tied into bundles with the help of special clamps, then it is laid in trays and pipes. The cable at the edge of the roof is mounted in a zigzag, fixed with special clamps;
- In the gutters and pipes, the heating cable is attached using mounting tape, in strips across. If the heated drain or sewer pipe is longer than 6 m, the wire is first attached to a metal cable in a sheath, and then the whole structure is lowered into the pipe;
- To heat the drainpipes, 2 pieces of the required power are laid at the same time. Installation is carried out from above and below.
- The place where the wire is attached must be inspected for sharp edges and unnecessary items;
- Thermostat sensors are fixed;
- The control panel is installed;
- Commissioning works are in progress.
Why do you need a heating cable?
Due to the formation of ice jams, the throughput of gutters and pipes decreases, the load on the structure increases, which can lead to breakage of the drain, destruction of the façade sections adjacent to the roof. During daylight hours, water will penetrate walls and ceilings, and at night it will freeze, causing more and more harm.
Leaks can cause damage to the interior decoration of the premises, the formation of fungi in the house, the development of harmful microorganisms. But this is not the worst thing. Icicles and ice blocks sliding from the roof into a thaw are deadly for people passing near the walls and are fraught with serious damage to the equipment standing near the house.
It is not always possible to correct the consequences of ice freezing on the roof and in the gutter that have already arisen, therefore it is better to deal with this problem by means of prevention. And while regular cleaning of the roof and gutter requires a lot of effort, this work is necessary.
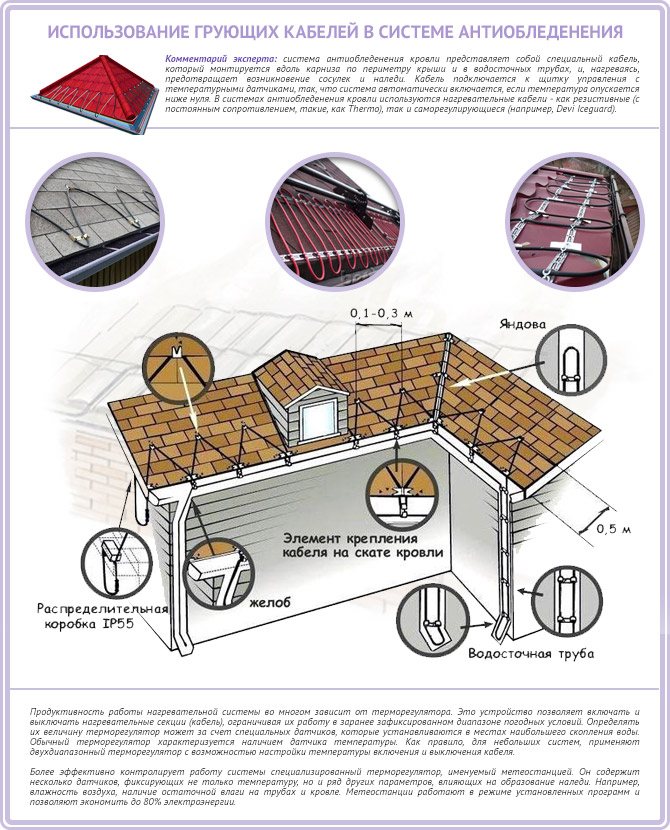
The equipment of the anti-icing system, consisting of a heating cable and auxiliary elements: a power supply unit, a conductive cable, a residual current device (RCD), a thermostat, as well as connecting and fastening elements, makes it possible to simplify the maintenance of the drain.
The installation of an anti-icing system is especially relevant for:
- multi-storey buildings, where the maintenance of the drain is more difficult and the height of the icicles falling is greater;
- houses with a mansard roof: as the roof over the heated room warms up, the snow on the roof melts and the volume of melt water entering the drain increases.
The task of the heating cable is to prevent water from freezing in gutters and drain pipes, as well as in problem areas where water can penetrate into the supporting structures of the house. The cable temperature can be controlled manually or automatically.
Note! The anti-icing system is not always in operation - the need to turn it on appears during periods of fluctuations in the daily temperature of about 0 degrees Celsius. Usually, such fluctuations occur in autumn and spring, when it can be quite warm during the day, and frosts are observed at night.
Frequent errors and problems during installation
It is not difficult to install a heating system, but during assembly there are common mistakes:
- The cable must not be fastened with self-tapping screws, steel strips, wire, vinyl tape, tape. You always need a sealant and mounting tape;
- Incorrectly selected power is fraught with either high costs or inefficiency of the system;
- The wires cannot be twisted, a short circuit will occur;
- Any connection should be carefully insulated from moisture;
Common problems:
- Circuit breaker malfunction;
- Malfunction of the residual current device;
- Poor braided cable termination;
- Low voltage, hence a decrease in heating power;
- Mechanical damage;
- Overheating (resistive version);
Preparing for installation - purchasing parts
In addition to the cable itself, for the installation of the heating system, you will need fasteners, an input three-phase circuit breaker, automatic shutdown devices for 30 mA, a four-pole contactor, single-pole circuit breakers for each phase, a signal lamp, a thermostat control circuit breaker. Also, power cables will be needed to power the heating elements, to connect the thermostat sensors to the control unit - signal cables, couplings to ensure complete tightness of the connections.
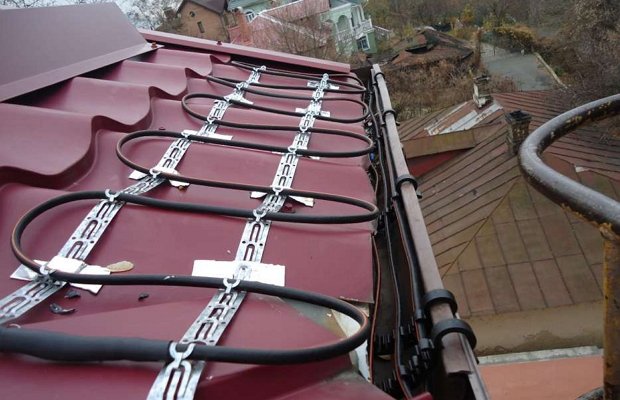
Photo of the gutter heating system
Devices such as a thermostat and a weather station are responsible for regulating the operation of the heating system. The thermostat turns on the heating system if the ambient temperature reaches a pre-set minus temperature - usually -8 ° С, and turns it off at +3 ° С. In most cases, you can adjust the frames up or down.
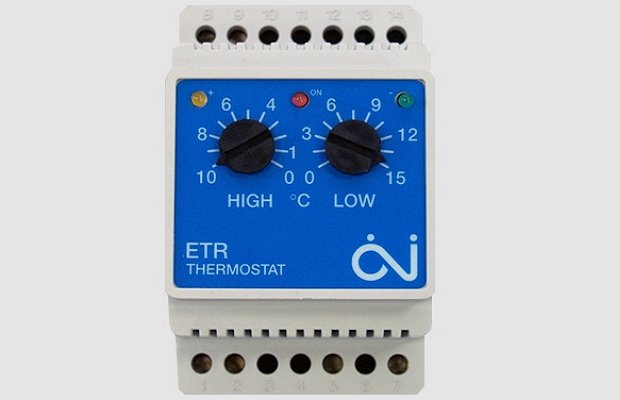
In the photo - the thermostat of the gutter heating system
Meteorological stations are more complex devices. A humidity sensor and a temperature sensor are the main components of a weather station, less often in more expensive models there are precipitation and humidity sensors that allow you to react to snowfall and turn on the system when there is snow on the roof. As a result, the process of operating the heating system turns out to be completely automated, while when using a conventional thermostat, the inhabitants of the house will have to turn on and off the system on their own, focusing on the weather. However, both options have the right to life - thermostats are much cheaper than even the most inexpensive weather stations.
Service
Maintenance of the system is reduced to monitoring its operation, periodically checking all sensors and visual inspection of the integrity.
Modern gutter heaters are equipped with special thermostats with LED bulbs. If the light is on, it means heating is in progress, turned off - the required temperature has been reached. If heating does not occur, look for the cause of the malfunction. The main reasons are listed in the previous paragraph.
Features and places of installation
Heating systems of this type do not function constantly, but only when thaws come, that is, in the autumn-winter, as well as winter-spring, if the outside temperature ranges from -5 to + 3˚С. This time is just the most favorable for the formation of ice and the appearance of icicles.
The delivery set of the heating system, in addition to the heating cable for the gutters itself, includes air temperature sensors and special thermostats that control its operation in automatic mode.
The cable is equipped with additional equipment that controls its operation
In general, the following sections of engineering systems are exposed to cable heating:
- gutters;
- storm sewer pipes;
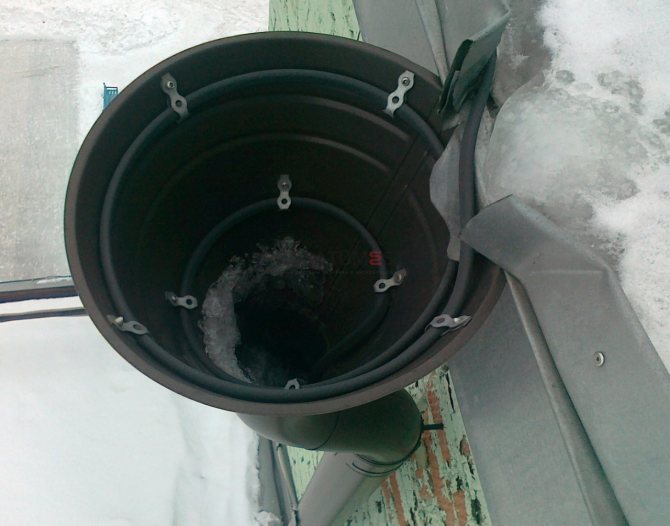
- funnels of gutters, including the area around them;
- drainage and drainage trays;
- eaves of roofs;
- roof slope joints - valleys.
Expert advice
Some helpful tips:
- The cable can be laid both inside and outside the pipe. Usually pipes with a diameter of more than 40mm are tied with a self-regulating cable from the outside. If the pipe diameter is smaller, the use of an internal resistive is suitable;
- It will not be superfluous to ask the manufacturer for a hygiene certificate (especially important when heating pipes with drinking water);
- A new food-grade cable may emit a pungent odor at the beginning of use - that's okay;
- Before buying - check your energy consumption
- If an open gasket is planned, it is desirable to have UV / protection. For indoor installation, a waterproof casing is required.
Self-regulating cable concept
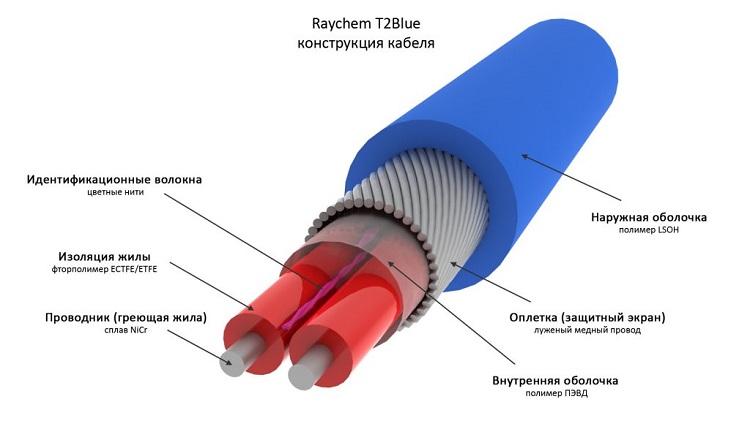
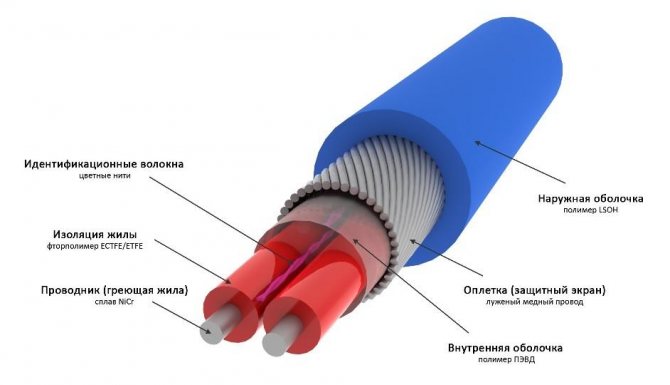
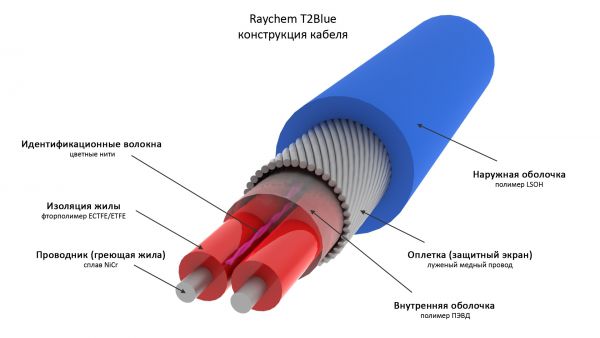
Of all the specialty cable products used for heating roof drainage pipes and wall gutters, the most effective protection against icing is provided by an electrical self-regulating wire. In terms of its structural structure, it consists of two conductive cores connected to a special semiconductor matrix, with photopolymer inner insulation, wire or foil braid, and outer plastic insulation. Two insulating layers provide maximum resistance to mechanical shock loads and increase dielectric strength. The main elements of a self-regulating wire is a semiconductor matrix, which can convert its electrical energy into thermal energy. Depending on the decrease or increase in the winter temperature regime, the electrical resistance of the wire changes, the thermal heating of the wire begins, sufficient to defrost the gutter and the drain pipe. It is this use of the self-regulation effect that underlies the principle of operation of the heating cable.
The self-regulating wire automatically changes the power consumption of electrical energy and regulates the heating temperature.
Self-regulating cable structural structure