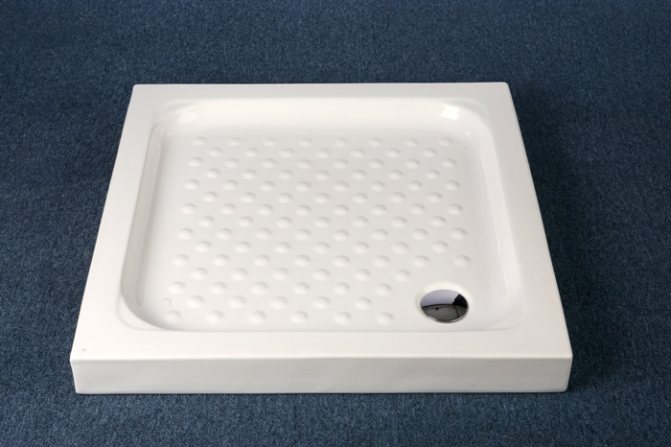
You can install a shower tray with your own hands. A comfortable, convenient, beautiful shower corner in their apartment is the dream of many residents of our country. Today, for its arrangement, the plumbing fixture market offers a huge selection of shower stalls and trays. Among them, you can choose the ideal option that suits the size, texture, design solution. Sometimes the selected model and its installation can be “prohibitively expensive” in the price range. Then the owner has a completely acceptable choice. Mount the shower tray yourself or make it entirely yourself.
Making a dream come true for people who can work with tools, have elementary experience in construction work and the desire to bring ideas to life with their own hands is not difficult at all. To do this, they can be helped by detailed installation instructions from the manufacturer, informational articles on the Internet, the experience of friends.
What are pallets
In the network of large construction supermarkets, specialized stores and warehouses, pallet models are presented for different tastes and capabilities of the buyer's wallet. These are samples of both domestic and leading foreign brands:
- Ravak;
- Kolo;
- Timo;
- Cersanit;
- Apollo.
Shower trays are classified according to shape, height and materials of manufacture. Structurally, they are divided into:
- Super flat with a height of 6 to 10 centimeters;
- Flat from 10 to 18 centimeters;
- Deep from 25 to 35 centimeters.
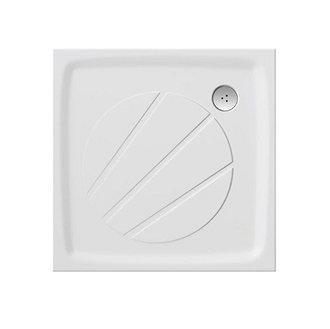
Among them you can find models of round, rectangular or free form. The most popular in the assortment are round and quarter-circle models. The latter option is very convenient for installing a shower enclosure.
For the manufacture of these plumbing fixtures are used:
- Marble;
- Cast iron;
- Steel;
- Ceramics;
- Acrylic;
- Kvaril.
The most expensive and durable are, of course, marble pallets. After them, on the next step are cast iron and steel. Since they also have a fairly high strength reserve. Ceramic products are more vulnerable to mechanical stress, although they are highly decorative.
The most common, convenient and budget option is acrylic. Such pallets have an impressive weight, are equipped with special brackets, adjustable legs and a fastening system. However, with all its positive advantages, the installation of an acrylic shower tray has its own characteristics.
Pallet constructions
Shower cabins are currently equipped with four types of pallets:
- The deep ones are so called for the reason that some of them are only slightly inferior to the bath in terms of the height of their sides. A strong frame supports their bottom from below, supported by six height-adjustable legs.
- Small pallets are often called low. They are perfectly flat with a few exceptions. In the modern version, they are placed on 5 legs, but you can still get a completely bare "shell", for which you definitely need a foundation.
- Trays made of artificial stone and ceramics stand on a completely separate line. In all previous cases, there is free space under the bottom for mounting a siphon, and in this case we have a plate with a drain hole in the center.
- Cast iron are much less common than steel, and are often confused, but have won recognition for their durability at an affordable price. They are both deep and shallow, but complete cabins are rarely sold. Cast iron pallets have to be purchased separately.
Cast iron shower tray
It is clear that thin-walled pallets do not suffer from durability. This is due to the fact that they constantly endure mechanical deformations: from temperature changes, from the feet of bathers and from other reasons. Thin-walled pallets are made of fiberglass reinforced plastic, ABS and steel. Each of these materials is deformed and has its own disadvantages:
- The steel is painted and the coating peels off easily. A metal pallet must have a properly equipped frame. For example, in the form of a solid brick foundation.
- The acrylic pallet has not been able to get around the same drawbacks. But over time, he not only bends, but also begins to break. There are plenty of videos on YouTube about this.
In addition to these features, it should be noted that the steel rusts. As soon as the protective coating of the enamel peels off, the metal will immediately begin to oxidize. This is all the worse because the process can go completely unnoticed by the owner. So one day there will be a hole through the steel. Acrylic is not afraid of moisture, sunlight, mold, but over time, like any plastic, it loses its strength. When buying, the consumer participates in a lottery: lucky or not (high-quality polymer or the first one that comes along).
As for a cabin with a pallet made of artificial stone or ceramic, this is the most profitable option. Both materials have proven themselves excellent throughout human history. An additional plus is that the slabs are completely flat, they stand well on any suitable pedestal foundation. And IDO cabins have an advantage in that they roll on rollers instead of legs. Due to this, the structure can be moved around the room within certain limits (in the presence of flexible connections and a siphon). But you don't need to put it on the bricks - no matter how it falls.
Durable shower tray
Cast iron is good because it does not rust. The walls of the pallet are noticeably thicker (by an order of magnitude), so the pallet is very durable. Among all varieties, cast iron is the most durable.
Materials and tools for installation work
After choosing a shower tray and determining the place of its installation, it is necessary to clearly indicate the method of separating the shower area. It can be a shower stall or a curtain with a bar. To solve the question of how to install a shower tray and further work with your own hands, you must definitely have a certain set of consumables in the form:
- Sewer pipes;
- Plastic dowels;
- Plugs;
- Self-tapping screws;
- Penoplex;
- Cement;
- Silicone sealant;
- Sand.
Of the tools you will need:
- Screwdriver Set;
- Marker;
- Perforator;
- Building level;
- Screwdriver;
- Construction trowel.
Do-it-yourself metal shower tray installation
Choosing the desired modification of the shower cubicle, consumers pay attention to functionality, aesthetic appearance and dimensions.
You can build a box from any convenient materials - from bricks to glass blocks. However, when choosing the right model, it is also important to have a pallet where water will drain. Such an element can be bought in a store or made on your own, using a minimum of time and money.
The most common material that customers love for its high performance, affordable price and variety of shapes. Another indisputable advantage is the fact that even beginners can install such a shower tray with their own hands:
- Acrylic models have adjustable feet, which greatly facilitates installation. The legs may be already attached or included in the kit and should then be secured according to the manufacturer's instructions.
- Turn the pallet upside down and twist the legs so that they are high enough to accommodate the siphon. Try to keep them all roughly the same length.
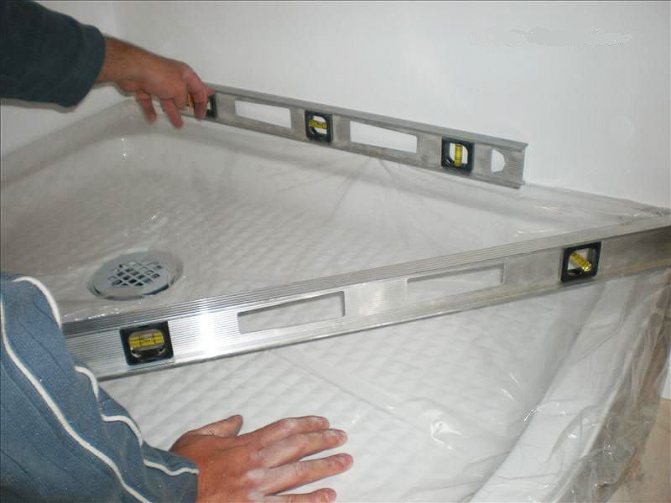
- Place the pallet in the space provided for it, and place it absolutely level. It's great if you have a long bubble level that you can put from side to side. Otherwise, you will have to control each side separately.
- If the manufacturer has not reinforced the bottom with a reinforcing frame, in the central part it is worth making an additional support from the scraps of brick or foam block laid on the mortar.
- Connect the siphon and check its tightness by draining some water. It is better to fix the shortcomings now than to wield in a confined space when the structure is already fixed.
- Now you have to mount it to the wall, preventing it from moving. Installing a shower tray on a wooden floor requires a loose fixation, as the tree may move slightly. In this case, you will need a fastening bar, on which the bottom edge of the pallet clings like a hook. The level of fastening of the plank must also be accurately measured.
- To simplify the process, craftsmen prefer to glue the pallet to the wall with ordinary mounting glue.
- Fill the joint along the wall with silicone sealant. You can stop the process at this point, but if you are not satisfied with the appearance of the seam between the pallet and the wall, fix a standard corner for bathtubs there.
- Secure the decoration panel. It is attached to standard latches, the design of which depends on the specific model,
To properly install the shower tray, it is necessary to strictly maintain horizontal position. Failure to comply with this condition will lead to the fact that it will be impossible to install doors on it, and if the slope comes from the drain hole, the water will not drain.
If the building bubble level is not at hand, place a wide bowl on the side and gradually draw water into it. When the plane is correctly set, the edge of the water will reach all the edges of the pan at the same time. If water spills out on one side earlier, this edge of the pan should be raised.
We suggest that you familiarize yourself with How to get rid of an old washing machine
Models made of this material do not have legs, since they are made by stamping. Therefore, the manufacturer offers special stands made of a metal profile or pipe, which can be included in the kit, or they can be sold separately. Geometrically, the stand is fully consistent with the model to which it is attached, and it will not be difficult to install the metal shower tray correctly:
- Place the pallet in the frame, and turn the resulting structure upside down. Use the foam to walk along the bottom, carefully bypassing the place where the siphon enters. This will save you from ringing noise throughout the apartment during hygiene procedures.
- Let the foam set well. If the foam has expanded to the wrong place, cut it off with a construction knife.
- Move the frame together with the pallet to the place of the forthcoming installation and twist the legs to obtain the correct plane. Don't forget to test yourself with the level.
- Connect the siphon and check the tightness of all connections.
- Fix the pallet to the wall with mounting glue, support it with something heavy and wait until it fully sets.
- Manufacturers do not offer ready-made front decorative panels, so decorate it with the selected material. Plastic or drywall is perfect, followed by tiling. Just don't forget to make a revision window.
- Seal the joints with silicone, if desired, close them with a decorative corner.
Do-it-yourself steel shower tray installation is not limited to this option. It can also be mounted on a brick parapet, as described below. Although, given the lightness of the design, there is not much point in this. Unless, if you want to perform tiling and do not like drywall.
Made of ceramics, natural or artificial stone, they make the interior interesting and sophisticated.But these products have a feature that must be taken into account when installing - a lot of weight. Therefore, they have to erect a parapet of bricks or other masonry material. The video posted at the end of the article will clearly demonstrate this method of installing a shower tray with your own hands, but for now, let's pay attention to the description.
Models of well-known brands can have cavities prepared at the factory in the thickness of the material, in which the siphon is located. In this case, it is enough to lay the pallet on the tile adhesive, after leveling the base.
- If such a cavity is not provided in your pallet, you will have to erect a parapet in order to raise the bottom and place a siphon under it.
- Place the pallet on the floor at the installation site and trace its outline with a pencil or marker.
- Turn it over and inspect where it is still possible to make supports. Proceed with caution as pottery or stone can be easily broken.
- Measure the height of the siphon and mark the walls to determine the height of the parapet.
- Lay brick or foam block scraps, exactly following the contour marked on the floor. Do not forget that support is needed along the entire perimeter, so also build a parapet along the walls.
- Think about where it is convenient to leave the inspection window so that access to the siphon is as convenient as possible.
- Connect the drain and check its tightness, then everything will have to be done through the inspection window.
- Apply a thick layer of tile adhesive to the surface of the resulting retaining wall. This is necessary in order to properly align the top edge.
- Place the pallet on top evenly and neatly. If it didn't work the first time, correct it, tile adhesive gives 10 to 20 minutes to correct it. Controlling yourself with a level, gently tap with a mallet on the protruding places, leveling the edge.
- Do not touch the result of work until the glue is completely dry. Considering that the layer was thick, take the maximum drying time indicated by the manufacturer.
- Cover the dashboard to your liking, making sure to design the inspection window hatch as well.
- Seal the joints with silicone sealant. If you want to make them invisible, choose a colored sealant, in the color of the bowl or tile.
In the same way, you can install any steel shower tray without feet if other materials are not at hand.
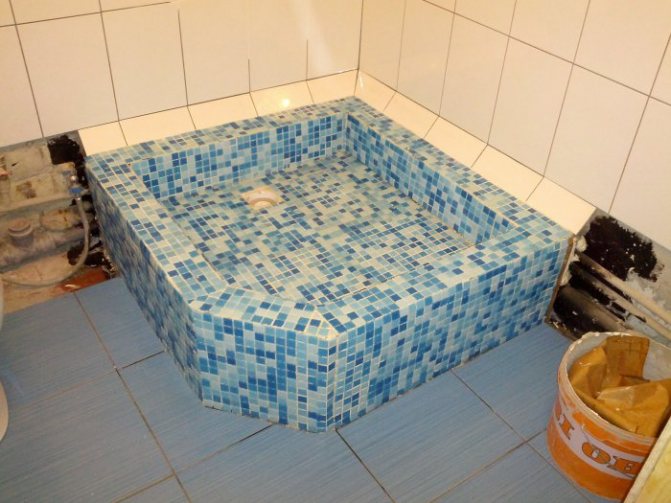
This is not at all a way to save money, but rather a spectacular interior solution in which you yourself form the bowl and do not think how to install a shower tray with your own hands. To do this, proceed as follows:
- Buy and install a shower drain - a special siphon that fits into a monolithic base.
- Erect a shower parapet of the chosen height. Inside the pedestal obtained, it is necessary to make a screed, the height of which will be slightly lower than the ladder. Lower by the thickness of the facing tiles and a layer of tile adhesive.
- Do not use quick-setting adhesive when lining, as you will have to create a slope towards the drain hole.
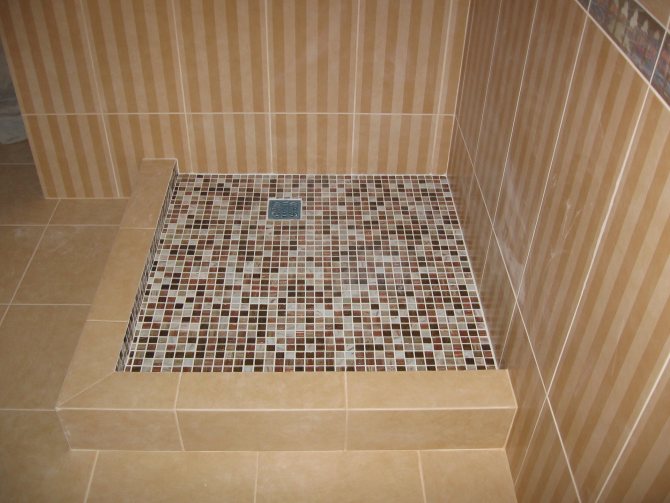
- Lay the tiles and gently tap with a mallet to form a slight slope towards the drain. The easiest way to do this is if a mosaic is used for facing.
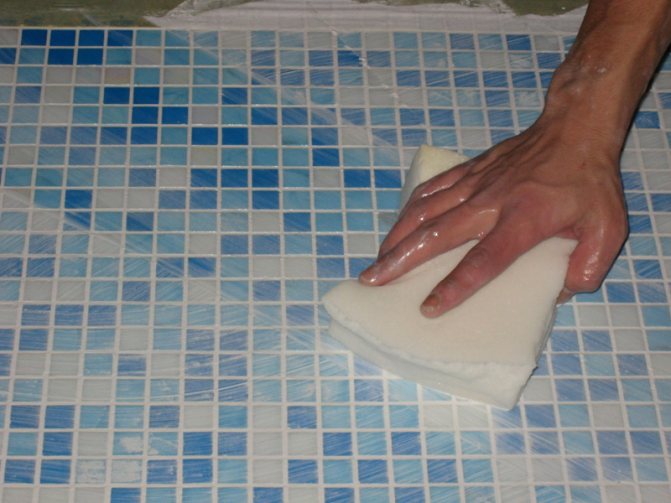
- Make sure that no one steps on the tile until the adhesive cures completely. Rub the joints with hydrophobic grout.
Now you can be proud of yourself, because such a shower tray looks really great, especially when combined with glass walls.
For readers who prefer visual demonstrations to detailed descriptions, we have prepared a short and clear video tutorial. Despite the short duration, it shows all the stages of building a retaining wall, installing a do-it-yourself shower tray, and also gives recommendations on the necessary materials and tools.
We offer you to familiarize yourself with Acrylic shower tray - types and features of choice
Share your experience in self-assembly with users in the comments to the article, because a lively discussion is the best way to give birth to truth. If you have not yet chosen a shower tray, be sure to take a look at this publication, where all possible sizes, shapes and materials of these sanitary products are analyzed.
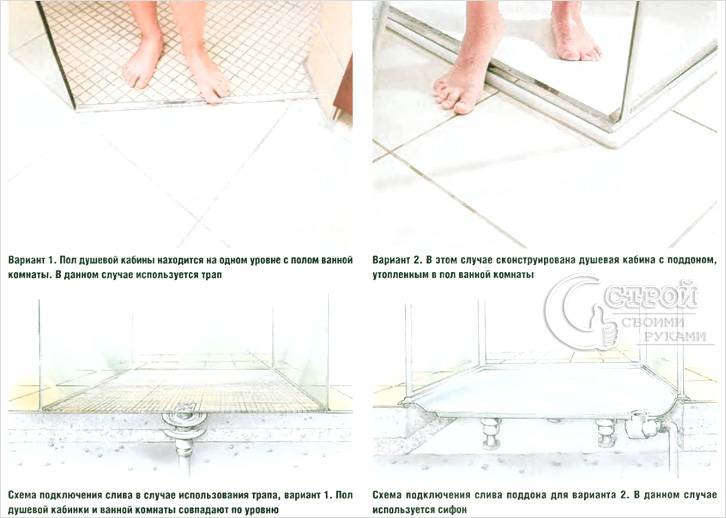
There are two principles for installing shower trays: embedding on a foundation and installation on a frame frame.
On the foundation
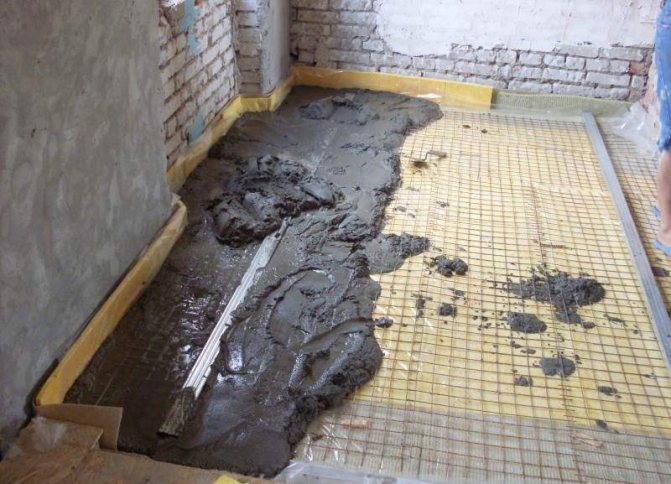
For the most correct arrangement of shower rooms of this type, the horizon of the floor surface, as well as its waterproofing, is of great importance. Therefore, the first step will be to perform a screed on the floor along the beacons if the level is not met. Careful waterproofing of the joints between the floor and walls will help to avoid possible troubles in the event of a leak through the drain system.
Before installing the pallet, you need to study its characteristics (strength, wall thickness, the design of the drain used). If the product can deform under the weight of a person, then the foundation must be laid out over the entire space of its bottom so that the pallet stands on it with its entire bottom. To eliminate noise when choosing steel pallets, it is recommended to isolate it from the foundation with a small layer of polyurethane foam or fill the frame made of bricks or blocks with fine sand.
When making the foundation, it is important that the sides of the pallet rest on a rigid structure around the entire perimeter. Therefore, gas silicate blocks have more advantages over bricks, they are easier to adjust in place using an ordinary small hacksaw. To eliminate possible leaks and better fix the pallet around the entire perimeter, you need to put it on silicone with antifungal additives. After that, you can start decorating the shower enclosure with mosaics or ceramic tiles.
In addition to steel pallets, this type of installation includes ceramic pallets. The accuracy required for its installation is dictated by its fragility, like any morocco product. The difference in installing ceramics on the foundation lies in the fact that it is imperative to provide an inspection hole for access to the drainage communication. At the landing site, along the entire perimeter and under the bottom, the pallet should be fixed with a solution of tile glue or sand concrete.
On the frame-frame
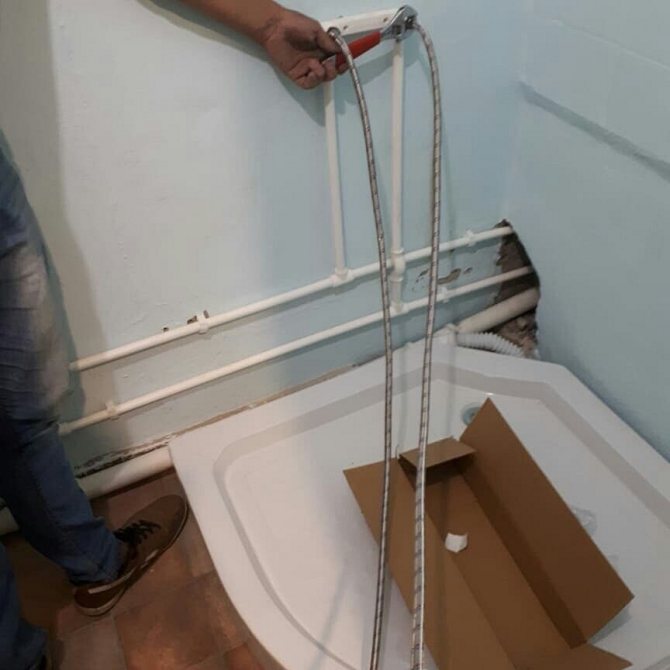
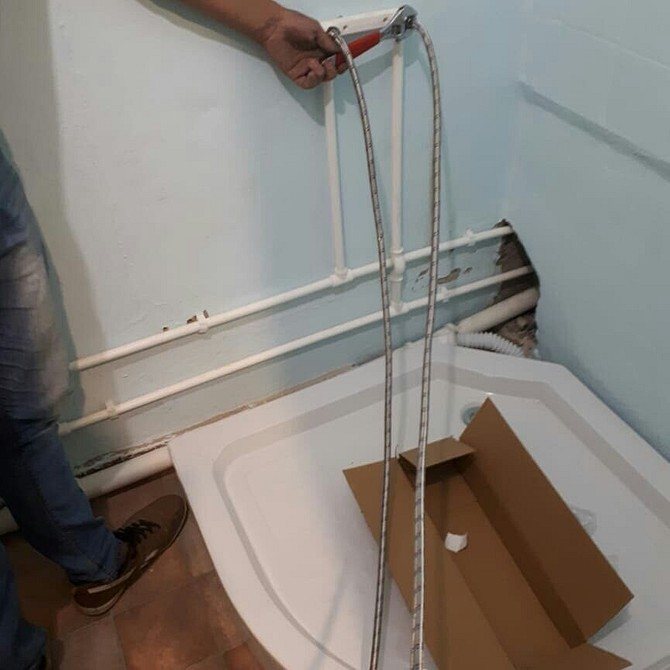
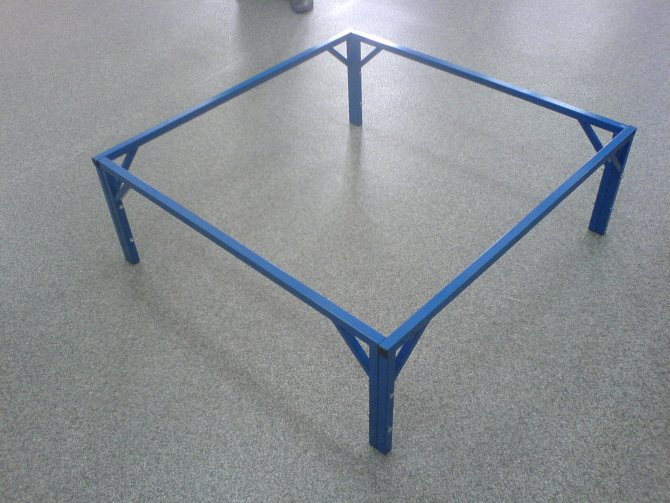
These pallets stand on legs fixed in a frame that can be adjusted in height. Sometimes manufacturers supply their products already assembled for installation, but more often the frame comes in a separate kit. In the latter case, before installing the pallet, you need to assemble it according to the diagram attached in the instructions, then fix it on the pallet. Before installing the product in the marked place, you need to mount the drain.
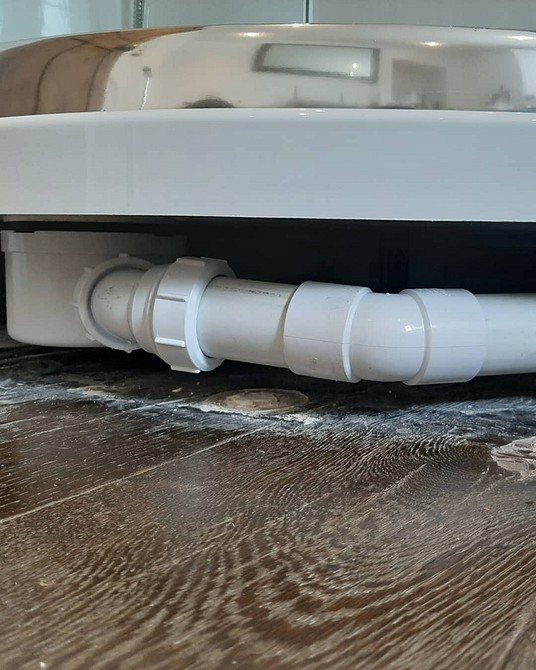
The siphon is connected to the sewer pipe, the hole is sealed with a collar and insulated with silicone sealant. The drain funnel is mounted after the pallet is installed in its original place. Despite the presence of a frame, acrylic pallets can sag under the weight of a person, which can subsequently lead to cracks and product replacement. In this case, it is necessary to measure the distance from the floor to the bottom of the bottom, as well as to make reinforcement from metal pipes or bricks, gas silicate blocks, then cover with a rubber mat of a suitable size.


Preparatory stage before installation
Before installing the shower tray, the bathroom needs to be completely renovated. The scope of work performed should relate to:
- Wall decoration;
- Installation of water pipes;
- Electrical wiring gaskets;
- Sewer pipe system installations.
It is important here that the hidden electrical wiring, which is needed to equip the shower stall, does not have twists, and is protected from dampness. Couplings, water pipes, sewer pipes, adapters must be reliable and have high quality characteristics. Before starting installation work, all outlets of water and sewer pipes must be closed or plugged so that construction debris does not get into them.
Installation procedure
There are many ways how to quickly and efficiently install a metal tray in a shower room (chamber). Consider one of the simplest and most common options for installing a drainage channel.
Before you start the process of installing this structure with your own hands, it is imperative to study the technical instructions that are usually attached to it during the sale. It is worth noting that experts recommend doing this, regardless of what material the shower tray is made of.
First of all, the shower cubicle must have such dimensions that generally correspond to the dimensions of the metal base. In this case, the dimensions and finishes should be adjusted in such a way that the facing ceramic tiles, if not the entire wall of the room is laid out with it, their lower edge descends slightly below the level of the pallet attached to the wall. If there is a gap between the wall and the base of the cabin, it must be sealed with a waterproofing compound (sealant).
Starting to set up a pallet according to all the rules, it is recommended to immediately track the clear horizontalness of its upper plane with a building level.
This situation should not prevent effective water removal in the future, since modern drainage products are manufactured with ready-made cone-shaped funnels.
The legs supplied with the pallet are used to fix the structure in a certain position and to ensure its horizontal position. They are usually adjustable so that they can be used to quickly and easily position the base. At the end of the adjustment, the legs are rigidly fixed with locking mounting bolts.
In some cases, instead of legs, special plastic supports are used, which are supplied with the pallet. At the same time, builders very often mount these products, resting them not on legs, but on specially constructed supports made of bricks or assembly cinder blocks.
The specified support (or, as it is also called, the well) is built in accordance with such dimensions that the future bottom of the shower stall fits freely on it, resting with its sides on the edge of the brick (cinder block) masonry. To fix the pallet, its sides are either glued to the masonry with a special adhesive mixture, or planted on a cement mortar.
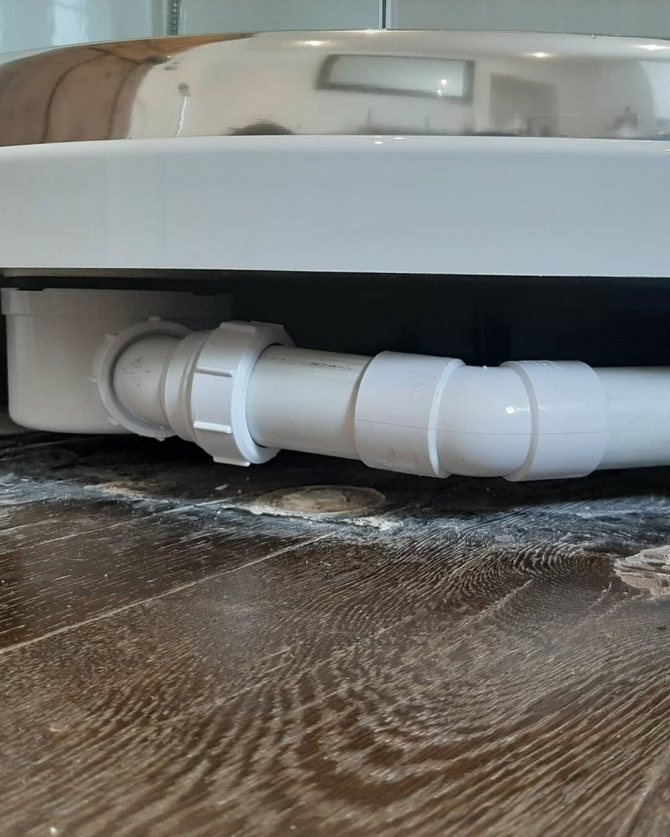
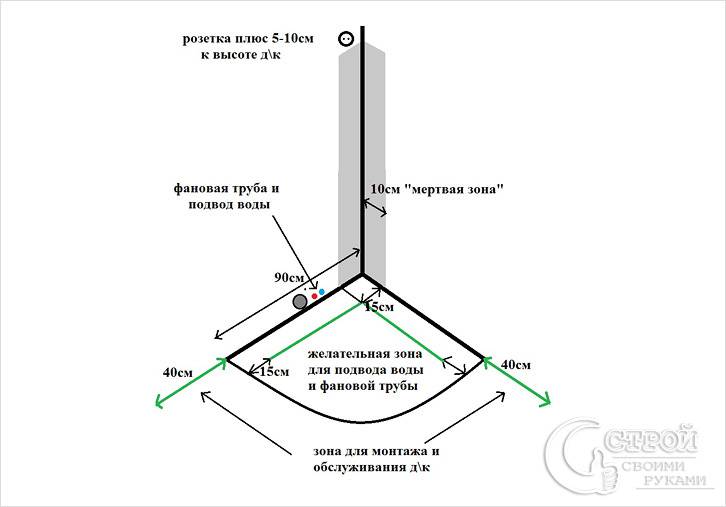
When installing the base of the shower chamber on a stone support well, one cannot ignore the fact that a siphon must be connected to the bottom of the drain neck of the pallet. It is necessary to take care in advance that the height of the well is sufficient for it (the sewer outlet must be above the floor level at a height of 12-15 cm), when designing a bathroom. By the time of the final fixing of the entire structure on the brick support, the mixer must be assembled, and its component parts must be tightly screwed to each other according to the diagram.
For better stability of the pallet, the space between it and the floor can be filled with ordinary sand. This will create additional support for him. If there is no sand at hand, polyurethane foam can partly replace it.
It should be borne in mind that a shower stall is a place where, by definition, there must be a lot of water. Therefore, all the smallest seams, cracks and mating points - between the sides and the brick on which they rest, between the edges of the pallet and the tiles on the walls, between the tightly twisting elements of the mixer and the pallet - should be carefully coated with silicone sealant and laid with FUM tape.
Each time, after completing one or another stage of the installation procedure, it is recommended to immediately check the quality of what has been done. In particular, after the support well (but without its final fixation) it is proposed to make sure that it is stable. To do this, it is enough, with the utmost care, just to stand on the pallet, and, most likely, the deficiencies in balancing will immediately manifest themselves.
It is also necessary to make sure that the junction of the pipe with the neck of the pallet and the siphon with the sewer pipe is well-sealed. For this purpose, water is supplied to the pallet with a small pressure. If there is no fluid leakage, the shower can be used as directed. If water seepage is detected, additional sealing of the connected components will have to be done.
The effectiveness of showers is achieved by a well-balanced combination of heat and the beneficial effects of water. The design of shower cubicles is not an end in itself, but is designed to ensure water circulation. Everything should be in harmony, and especially a comfortable shower tray, on the correct installation of which a lot depends.
Features of installing acrylic appliances
All pallets for installation are equipped with adjustable feet. Particular attention must be paid to strengthening the foundation of any such product. Most acrylic shower structures have a weak point in the center, as there is very little external support. Therefore, if improperly arranged, this part can crack and cause a lot of trouble.
There are times when the frame mount is based on the two outer legs. Then additional supports must be made independently. They can be made with your own hands from a rectangular steel pipe or brick. For the direct installation of the trough of this plumbing product, such a foundation must be covered on top with a thick rubber gasket to ensure soft contact between acrylic and brick.
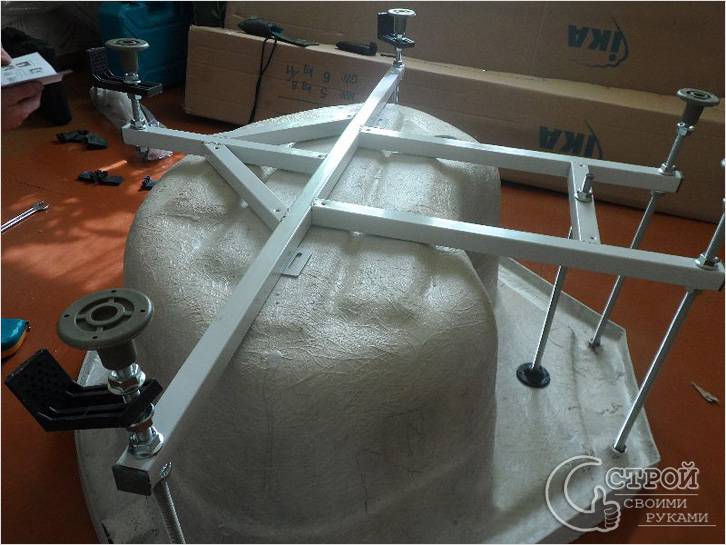
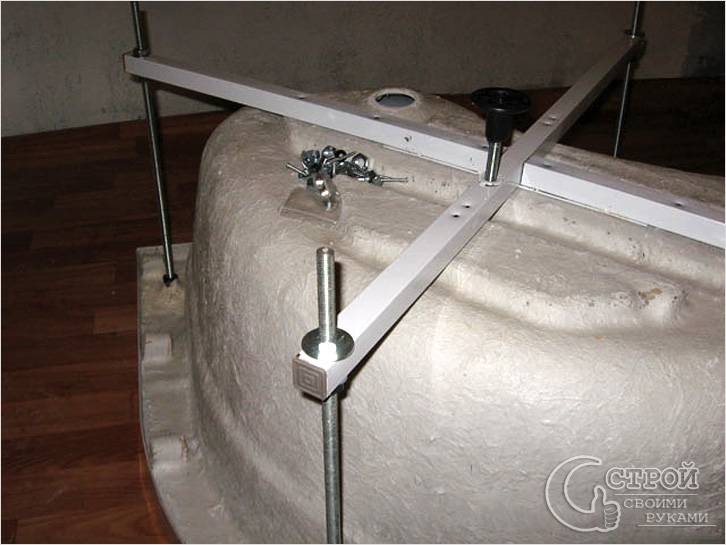
Assembly
The pallet itself must be assembled upside down. At the same time, observing the following sequence:
- Studs are screwed into the trough seats, onto which nuts and washers are screwed;
- A cruciform support is put on the studs;
- A foam cushion is placed between the base and the support for cushioning;
- The central leg is fixed in a short support;
- The entire support system is attached with self-tapping screws screwed into wooden blocks.
The assembly technique, connection of the drain and the wastewater drainage system is detailed in the instructions from the manufacturer.
Installation
The main thing in the installation of the entire system is to provide additional structural strength, which will be given by brickwork on cement mortar. It is necessary to install acrylic sanitary ware with your own hands on a flat horizontal surface. To provide access to the sewerage system, it is necessary to leave an assembly gap between the floor and the "ceiling" of the pallet.
It is necessary to set the pallet with your own hands strictly according to the level. Since only perfect installation will provide a reliable drain, and water will not accumulate in the corners of the pallet.
Sequence of installation of different pallets
To get it right, use the tips in this section. Some materials will deteriorate quickly if their characteristics are not taken into account. For example, this often happens with acrylic.
Acrylic
If the bottom of the product is not reinforced, it can be reinforced with expanded polystyrene. A sheet of material is laid on the foundation. Another option is a support frame made of steel strips, welded together or connected by brackets.
- Place the tray on the floor, mark the drain on the floor with a pencil.
- Pour or glue the foundation.
- Remove the bowl and connect the siphon to the drain pipe. Its edge should not touch the floor.
- Fill the siphon with water to check for leaks.Seal the identified defects.
- Seal the joints of the sleeve and the siphon branch pipe with epoxy sealant. If they have paronite or polymer gaskets, no sealant is needed.
- Apply glue to the foundation and carefully glue the tray onto it.
- If the set includes legs, attach them to the pallet at the same level. Make sure that their length is not less than the length of the siphon.
- Place the product on a foundation, podium or legs.
- Check the flatness of the tray with a spirit level.
- Degrease and seal the wall joints with silicone sealant.
You can use the shower after ten hours - after the sealant and glue have dried. Watch a video on how to install your own shower tray. It clearly contains a similar instruction.
Cast iron
The foundations for cast iron bowls are almost never made. An exception is cases when the distance from the bottom to the floor is less than the height of the siphon. To raise the tray, it is enough to lay bricks or foam blocks around the perimeter. In this case, use the usual masonry mortar. In other cases, the structure is installed directly on the floor, on the legs that are already attached to the bowl.
- Using a level, determine the differences and, where necessary, place steel plates or other objects under the legs.
- Connect the siphon and coat the joints with epoxy glue.
- Fill with water a little later and check for leaks. If there are, eliminate them.
- Fix the legs with cement mortar, diluted 1: 3. The formwork can be made from matchboxes.
Instagram @ lm.plumbing.services
The cast iron pallet is not glued to the wall. The cab can be used after ten hours - when the epoxy sealant has dried.
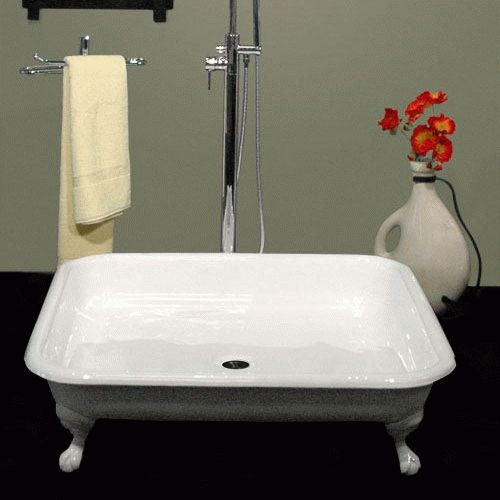
Shower tray RAVAK Perseus Pro
Steel
You can also reinforce the bottom of the steel tray with a sheet of expanded polystyrene foam on the podium or a homemade frame. Usually there are no legs included with the steel stand.
- Make a frame: a concrete or brick foundation.
- If the podium was filled with a cement-sand mixture, wait until it dries and waterproof.
- Connect the siphon and check the drain function. Repair leaks, if any.
- Install the tray and level it with a spirit level.
- Attach it to the foundation with mortar or glue.
- Degrease and seal all joints with epoxy sealant.
The video contains a visual instruction.

Installation of other types of shower trays
Marble, ceramic and cast iron shower trays are used much less often and are mainly made according to individual orders. However, the steel plumbing fixture is quite popular. Since its final installation is limited to the protective shutter and the installation of the rod for it.
Steel products are also laid on bricks or plastic supports. Sometimes, to deepen them, additional work is required to equip the pit. To insulate the trough, sometimes polyurethane foam is blown into the space under it.
How to strengthen the shower tray
For many buyers of shower cabins, the strength of acrylic trays, even reinforced ones, seems insufficient. Steel pallets also need strengthening.
General rules for how to strengthen acrylic or steel shower tray, no. Typically, strengthening the structure is reduced to laying bricks under the bottom of the pallet or installing supporting pillars. In this case, one thing is important: the surface of the supporting element should correspond as much as possible to the surface of the bottom of the pallet, and all the supports should be of the same height. Otherwise, it will be even worse: the support element will simply push the bottom of the pallet.
We make the shower area ourselves
To equip a shower corner, you do not need to purchase a branded pallet, but make it yourself. Of course, it will take a little more time and labor, but the result will satisfy all the desired ideas.Such work can be performed not only in a private house, but also in the bathroom of an ordinary apartment.
Consider the main stages of self-arrangement of a shower tray:
- First you need to decide on the installation location.
- Next, carefully prepare its base, which must be treated with a waterproofing layer.
- To keep the floor warm, an electric underfloor heating can be laid under the final screed.
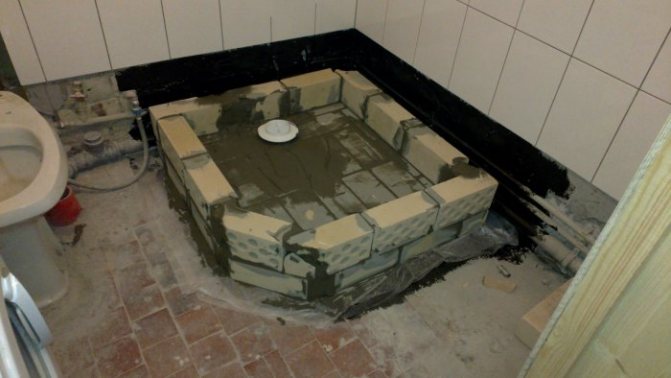
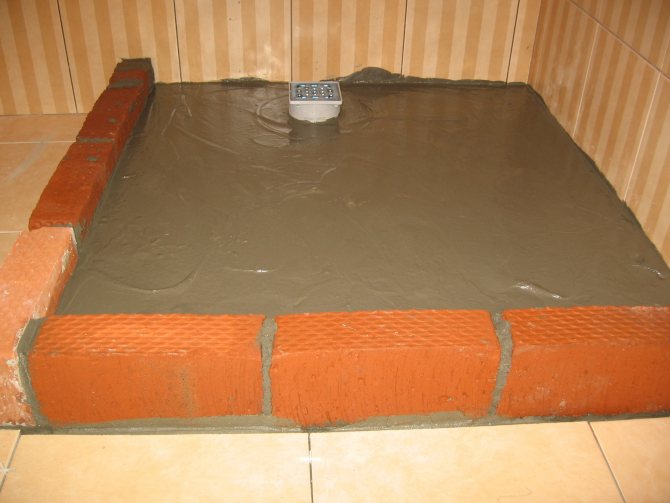
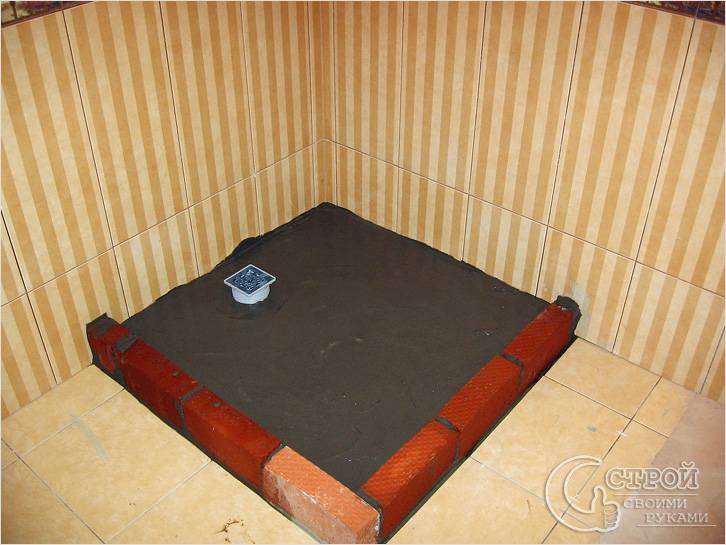
- After the waterproofing layer has dried, the contour of the brick pallet is formed, which is attached using special mixtures or cement-sand mortar.
- Then the place of discharge is determined, a water drainage system is installed.
- Subsequently, a rough screed is poured, which, at the end of drying, is again covered with a layer of waterproofing.
- Next, a self-leveling mixture is applied to a dry surface, and a smooth depression is made around the drain.
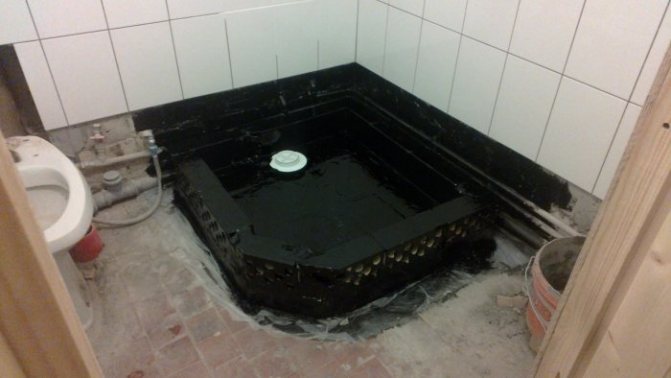
- After the self-leveling mixture has dried, a layer of waterproofing is again applied to it.
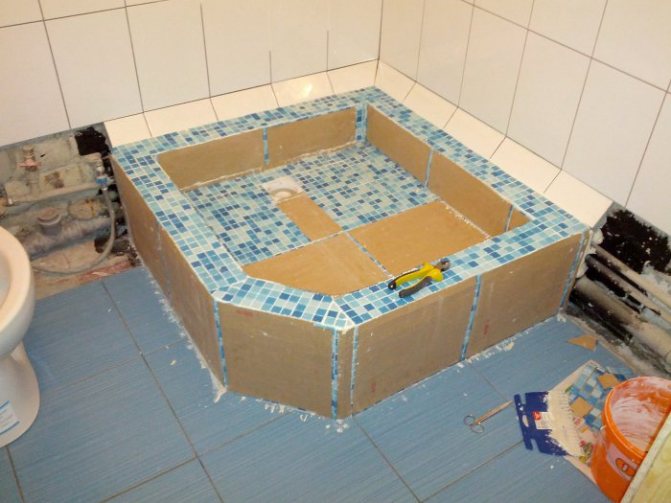
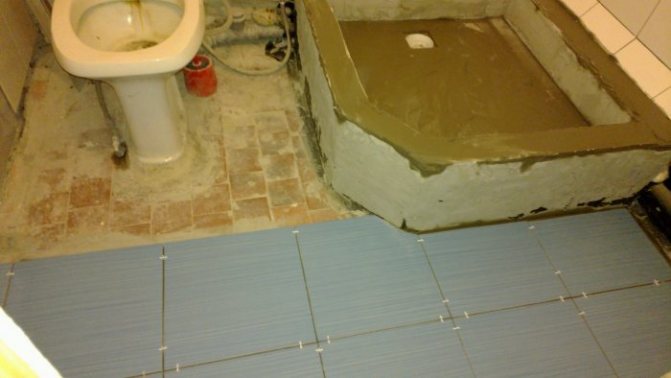
- The final stage will be the facing of this area of the corner with ceramic tiles or mosaics.
After grouting the tile shower tray, it will be finally ready for use.
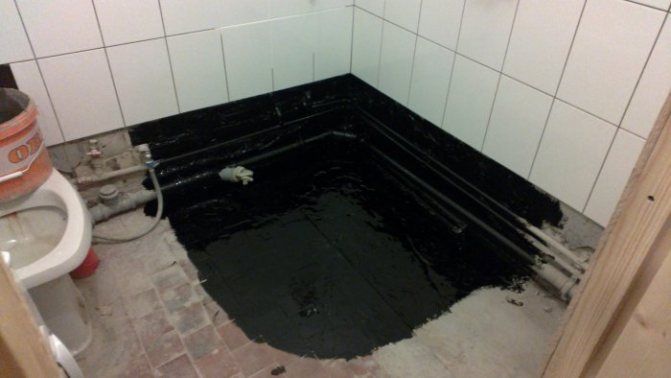
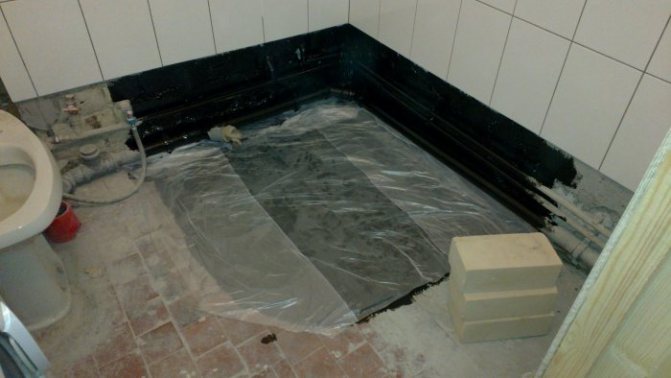
Site preparation - We process with waterproofing

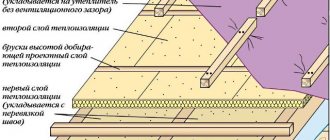
The second step of installation - we put additional insulation

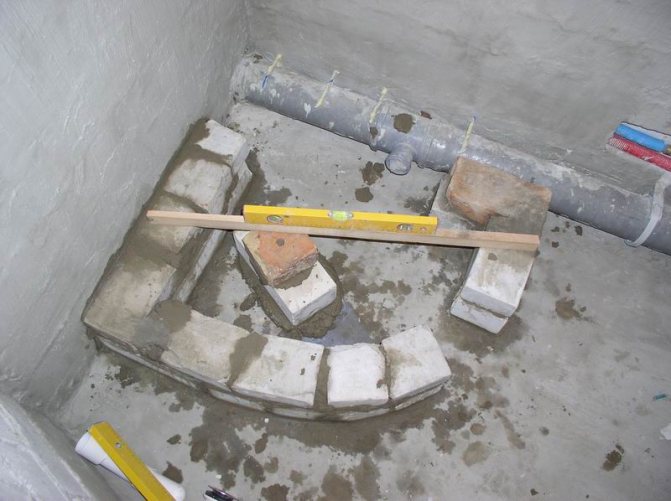
Third step - start laying the edges of the pallet using bricks or similar materials

The fourth step - we process the masonry with waterproofing
The final stage, when we plaster the pallet and finish it with tiles
Features of the
Modern plumbing stores offer a great variety of showers, corners, separate pallets and curtain doors.
They differ in:
- depth;
- form;
- material of manufacture;
- frame.
availability:
- additional attachments;
- devices;
- built-in ventilation;
- lighting;
- radio systems.
Depending on the height and shape, these plumbing products can be overhead (mounted in a foundation stand made for them) or frame (installed on a prefabricated metal frame). For frame models, you can almost always find suitable curtains. They are usually straight or semicircular. For a flat shower tray, you must also select the appropriate shower.