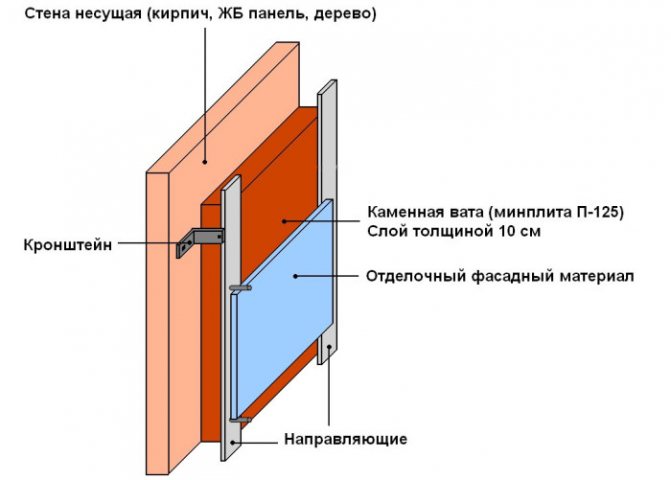
Ventilated facade layout
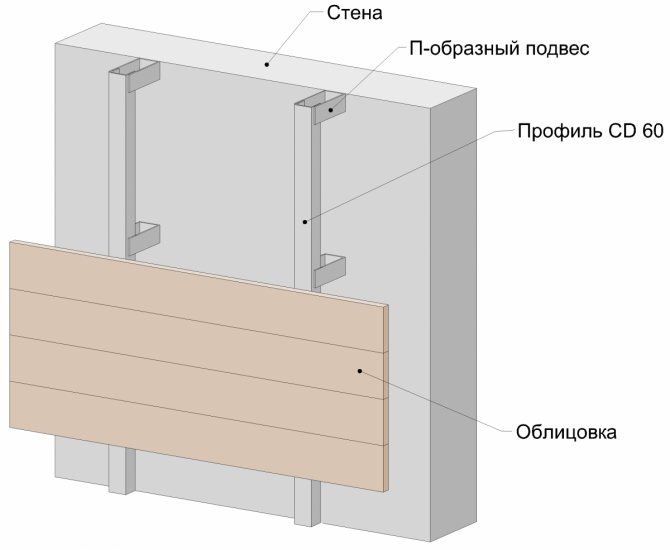
I will give a general diagram of a ventilated facade, Figure 1 (using the example of a ventilated facade with a wooden lathing).
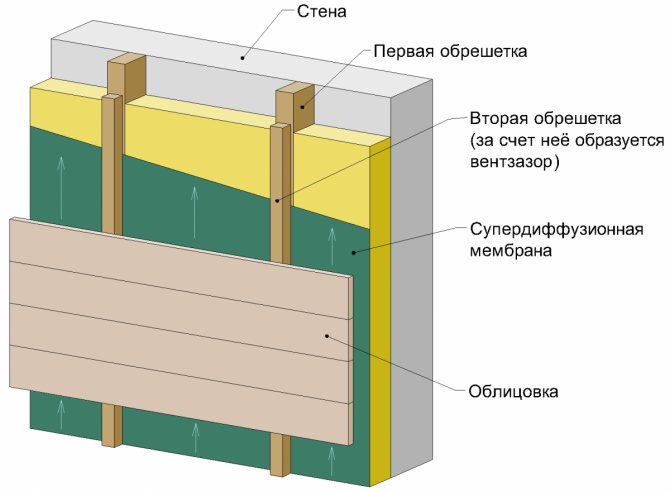
The figure shows the first and second crate. This is a conventional name adopted in this article. This name does not depend on the material of the lathing. The first lathing is the one that is attached to the wall, the second lathing is attached to the first and the cladding is attached to the second lathing. The first crate can also be called "main".
I will describe what options we will consider and (briefly) when this or that option is applied.
- Arrangement of a ventilated facade with a wooden crate, for a non-insulated facade;
- Arrangement of a ventilated facade with a wooden crate, for an insulated facade with an insulation thickness of 50 mm;
- The device of a ventilated facade with a wooden lathing, for an insulated facade with an insulation thickness of 100 mm (despite the Note below, it is rare, but it is performed).
Note on the wooden lathing
Wooden lathing is mainly used for wooden sheathing, such as OSB, blockhouse, board. It is important to note this moment. Despite the fact that in Internet sources the option of a completely wooden lathing is given very often, and its device is simple, it is important to understand that the device of a completely wooden lathing is advisable for a ventilated facade without insulation and (sometimes) for a ventilated facade with insulation, if the insulation is no more 50 mm. Let me explain why.
1. If insulation is needed 100 mm, then the main (first) lathing should be with a section of 100x50 mm. And then there is also the second lathing (for fastening the membrane and organizing the ventilation gap), with a section of 30x40 mm. This means that with a lathing step of 60 cm, the wood consumption per floor will be the same as for the construction of a frame house of the same area. And, as a rule, the owners are counting on a more economical option, they use an inexpensive finish, such as PVC siding, and the purchase of timber for the crate will reduce all savings to nothing.
2. Completely dry wood is rarely taken (it is harder to find and more expensive). A beam of 100x50 mm, if taken not completely dry, will lead a lot. And at the same time, this bar is powerful enough (in its cross-section) to "twist" along with itself the cladding itself (the PVC siding, which is popular for such a design, will twist it for sure). In addition to wooden lathing, the article will consider:
- Combined (first metal, second wooden) lathing for a non-insulated ventilated facade and an uneven load-bearing wall.
- Combined (the first metal, the second wooden) lathing for the insulated ventilated facade and an uneven load-bearing wall, with an insulation thickness of 50 mm.
- Metal lathing. For an even and uneven wall, for a non-insulated ventilated facade.
- Metal lathing for a heat-insulated ventilated facade, with an insulation thickness of 50 mm.
- Combined lathing made of a self-made fastener and a wooden bar for a heat-insulated ventilated facade with an insulation thickness of 100 mm.
- Arrangement of metal lathing for the insulated ventilated facade, if the insulation is 100 mm.
For each of the nine options for the crate listed above, the following points on the device will be considered:
- from what the first and second lathing is made in each case;
- how the first lathing is fixed to the wall;
- how the second crate is fixed to the first;
- how the insulation is attached (if any);
- how the superdiffusion membrane is attached (if any);
- due to which a ventilation gap is formed in each case.
Note. In this article, I deliberately do not give the details of the cladding fasteners to the second crate. The fact is that fasteners vary greatly depending on the cladding material. And for each type (OSB, siding, etc.), you can make a separate article with installation details.
Pros and cons of various heaters
Each insulation for a ventilated facade has its own advantages and disadvantages. Consider the most popular types of insulation and their benefits.
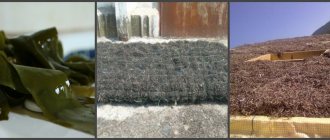
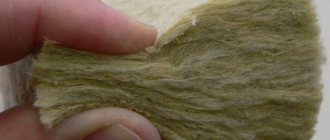
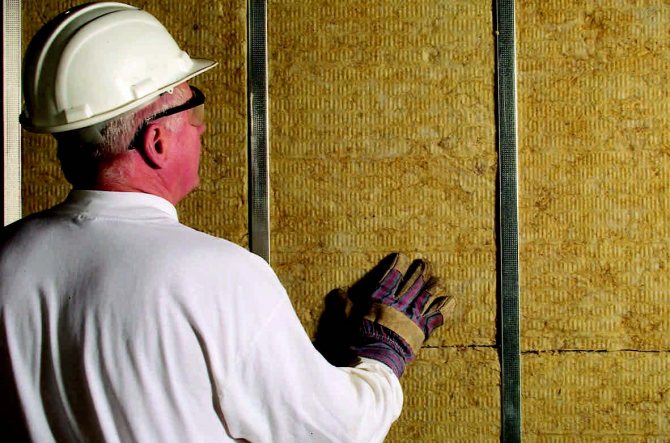
Mineral wool
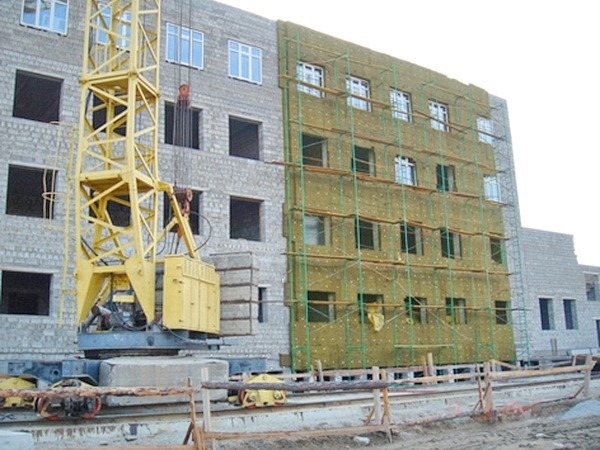
The facade of the house is sheathed with basalt mineral wool brand Isover FASAD 80 for subsequent cladding mm
Mineral wool is the most popular material as insulation for rooms, both outside and inside. This popularity is due to its merits, such as:
- Moisture resistance Mineral wool has a porous structure that perfectly permeates air and steam, but does not absorb moisture well. Thanks to this, the facade with this type of insulation is perfectly protected from dampness.
- Air exchange Due to its structure, the material carries out a moderate air exchange. Thus, the insulation for the ventilation facade breathes at the same time, providing a comfortable microclimate for a person in the room. Therefore, when using this type of thermal insulation, there is no need to install additional ventilation. Also, the possibility of condensation occurring is very small.
- Good sound insulation The porous structure of the material provides excellent sound insulation. Thanks to this, the room will be protected from extraneous noise from the street.
- Absolute incombustibility Mineral wool does not ignite, and also does not emit harmful substances during combustion. The building with mineral wool insulation has excellent fire safety.
- Long service life Mineral wool is a practical and durable material. The service life of this material ranges from 20 to 60 years. Also, longevity is added to it by the fact that rodents do not touch this material.
Disadvantages of using mineral wool under the ventilation facade:
- It was found that mineral wool contains and releases harmful resins that are bad for human health. But in recent studies, it has been found that the amount of these resins is negligible for harm to health.
Important! Over time, the moisture-resistant properties of the material are lost and mold and mildew can form from the condensation that has arisen in the cotton wool. This can significantly reduce thermal conductivity. Therefore, when installing mineral wool, it is necessary to use a waterproofing agent.
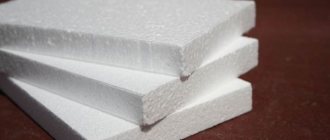
Expanded polystyrene
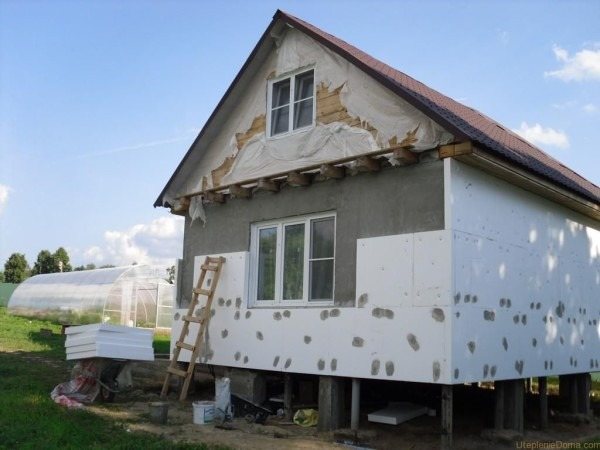
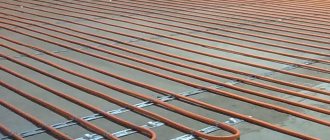
Preparing the walls before installing the ventilation facade
Expanded polystyrene (foam) has the following advantages:
- High moisture resistance and immunity to condensation.
- Excellent thermal insulation properties.
- Resistant to mold and mildew, they do not form on expanded polystyrene.
- Easy to cut and install.
- Little weight;
- Resistant to temperature extremes, heat and cold.
- Excellent soundproofing.
- Does not require additional waterproofing.
- Long lasting.
Also, foam has its drawbacks, namely:
- Low strength. Requires additional protection against damage.
- Does not allow air to pass through.
- Sensitive to paints and varnishes (degrades).
Polyurethane foam
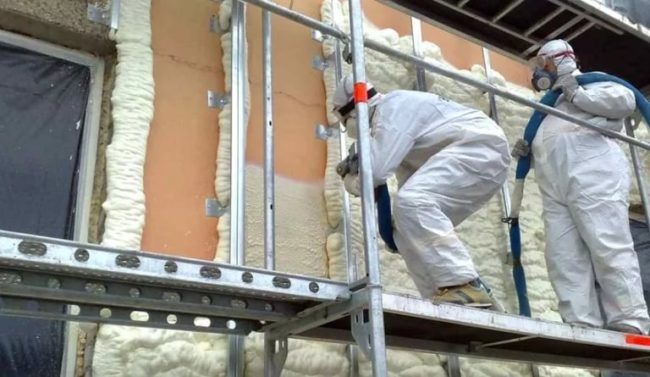
The building is insulated with polyurethane foam before facing with a ventilated facade
The use of polyurethane foam when insulating a ventilated facade greatly facilitates the process. This is due to its remarkable properties:
- This material adheres perfectly to any type of material, even to glass and metal. There is also no need to treat the wall before spraying;
- All material is produced on site;
- The material is very light and does not weigh down the surface in any way;
- Strengthens walls;
- Neutral to temperature changes;
- Lack of seams, since the material is applied in a single sheet;
- Fire resistance;
- Perfectly insulates rooms warmly.
Minuses:
- Requires protection from the sun, as ultraviolet rays are bad for the material. The material wears out quickly under the sun.
Important! Polyurethane foam is a very refractory material, but it starts to smolder when exposed to high temperatures. This process can be easily interrupted by cooling the material.
https://youtu.be/jk_ppSQLIBw
Wooden lathing (the first is not, the second is from a bar) for a non-insulated ventilated facade
So, for a non-insulated ventilated facade, a 30x40 mm bar is needed for the lathing device. In fact, only the second crate is performed, the first (since there is no insulation) is not needed. The diagram of the device is shown in Figure 2 below.
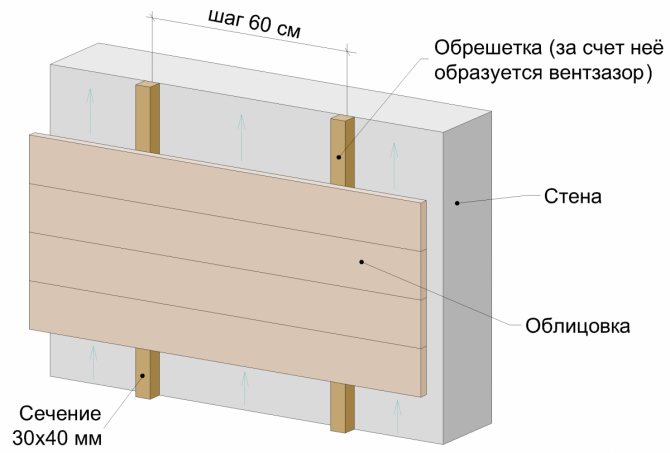
The batten is fixed to the wall with a side of 40 mm, and due to the side of 30 mm, a ventilation gap is formed. The lathing step is 60 cm.
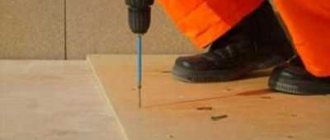
Fastening the battens to the wall. If the wall is made of bricks or similar hard materials, then the lathing is attached to the wall with dowels.
If the wall is made of blocks (foam, gas, shell, etc.), then the crate is fastened with self-tapping screws for wood. The step of the fasteners is 50 cm. The cladding is attached to the crate.
There is no insulation and superdiffusion membrane in this case.
The ventilation gap is formed by a lathing bar, the size of the gap is 30 mm, this is enough for the free release of moisture from the wall.
Insulation selection criteria
When insulating a ventilated facade, it is necessary to choose a high-quality material that meets safety standards. The main aspects for choosing thermal insulation for a ventilated facade are the following material criteria:
- Peel strength of layers;
- Non-flammability of the material;
- Density.
Also, when choosing a material, it is worth considering the purpose of the building, the climate and the material of the walls.
Since there is an air gap in the ventilated façade, which can contribute to the spread of fire, it is strictly forbidden to use flammable material due to safety regulations. Also, now during construction, the insulation is not covered with a wind and moisture protective film, because this material ignites very quickly. That is why the insulation must be resistant to moisture and wind. Thus, the minimum peel strength of the material should be 3 kPa or more.
A sufficient density of the material is 80-90 kg / m3. It is at these values that the material is sufficiently flexible and rigid at the same time, and the risk of slabs slipping under its own weight is also reduced.
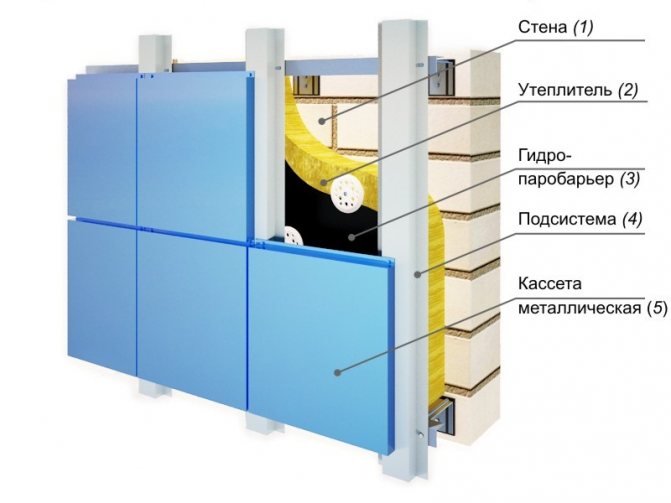
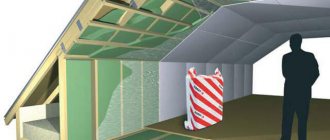
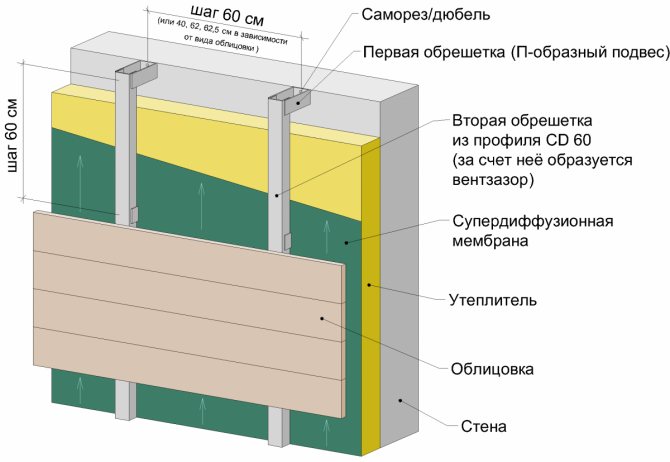
Schematic diagram of a heat-insulated ventilated facade
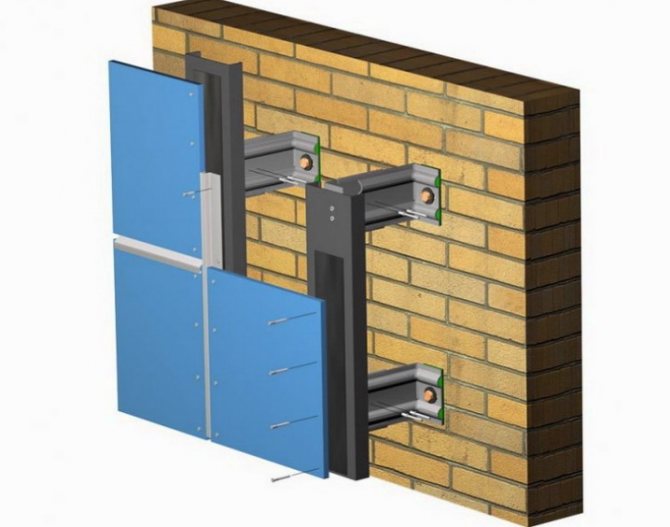
Metal lathing. For a smooth and uneven wall, for a non-insulated ventilated facade
As mentioned above, U-shaped hangers are used to level the plane without plastering the original wall (if it is uneven).
The first lathing made of U-shaped suspensions. U-shaped hangers are attached to the wall with dowels (if the wall is brick or concrete) and self-tapping screws (if the wall is a block), 2 fasteners (self-tapping screw or dowel, depending on the wall material) for each suspension. The step of the suspensions vertically is 60 cm, horizontally - depending on the type of cladding (62.5 or 62 - OSB, LSU, 60 or 40 - blockhouse and siding).
The second lathing is made from the CD 60 profile.
The second crate is attached to the U-shaped suspension as follows: for each suspension there are 2 self-tapping screws (1 self-tapping screw for one "ear" and 1 self-tapping screw for the other "ear"). Self-tapping screw with a diameter of 3.5 mm and a length of 9 mm (popularly called "nines", "fleas"). They are black and galvanized, galvanized is preferable.
Important points when fastening (namely metal to metal):
- In the U-shaped suspension itself there are ready-made holes, we fix the screws not in them, but in solid metal. No need to make your work easier, fixing to the finished hole will not work. The self-tapping screw cuts the threads in the metal and if it is fastened not in solid metal, but in a finished hole, then it will not cut the thread, accordingly, it will not hold properly. Will scroll.
- It is better to fix it with a screwdriver, not with a drill. The drill is high-speed, it does not have a stopper when pressing a self-tapping screw, in addition, it is heavier, does not sit well in the hand. But if there is no screwdriver, then you need to have a magnetic attachment on the drill, plus watch out for each self-tapping screw: if after fixing it scrolls, then attach another self-tapping screw to this "ear" of the suspension. If he scrolled, then attach another one. All in solid metal. As a result, on some "ears" of suspensions there may be 2 or even 3 self-tapping screws. But only the self-tapping screw that does not scroll will hold.
There is no insulation and superdiffusion membrane in this version. The ventilation gap is formed due to the length of the “ears of the U-shaped suspension and due to the CD 60 profile. The size of the gap is adjustable (the profile can be placed closer and further to the wall). It is optimal to make the size of the gap 30-40 mm.
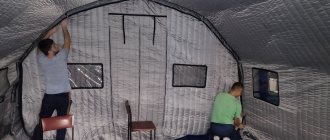
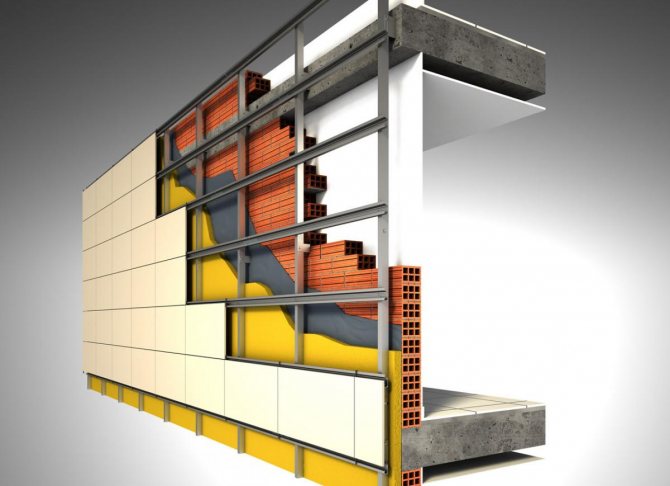
Installation of the ventilation system on a metal frame
The device of a hinged ventilated facade on a metal frame requires the creation of a project - a diagram of a hinged facade and the corresponding layouts of horizontal and vertical bearing profiles, a diagram of fixing brackets. Before starting work, the walls must be cleaned of dust, dirt, paint, and, if necessary, repaired. Dismantle parapet and window sills.
Installation procedure:
- The position of the brackets and the supporting system is marked on the wall.
- Mount a plinth strip with a shelf width equal to the thickness of the insulation.
- The brackets are fastened by leveling and plumbing the horizontal and vertical in the same plane.
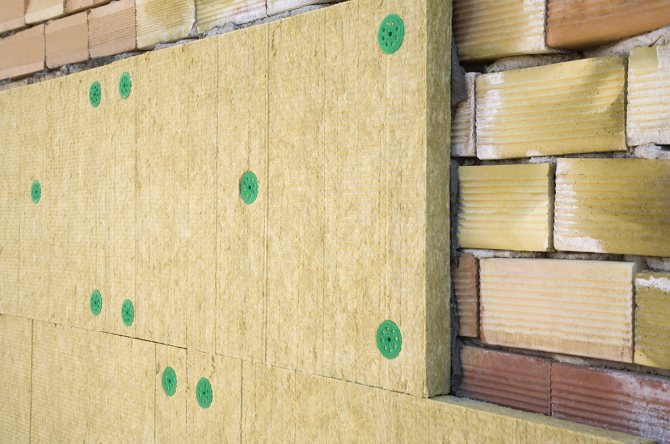
- The insulation is mounted on glue.
- Hydro-wind protection is mounted - a superdiffusion membrane, joining the canvases with an overlap of 10-15 cm on a double-sided vapor-permeable adhesive tape.
- fix the insulation and the membrane with dish-shaped plastic dowel screws with a metal core and a thermally insulated head.
- The main horizontal profiles are mounted on the brackets, then the vertical profiles.
- Installation of cladding panels.
Fatal installation errors
Violations of the work technology or unfair installation lead to the loss of individual cladding plates.
First level errors that reduce the life of the insulation system:
- installation of fasteners in the masonry seam of the mill;
- incorrect choice of material for thermal breaks - gaskets between the wall and the bracket, they must have a low
- thermal conductivity (polypropylene, polyamide), so as not to create cold bridges;
- installation of seals to dampen vibration and lateral shear of the cladding, the design of the fasteners should provide a solution to these problems without the use of seals with a short service life (10 years versus 50 years of operation of the ventilation system);
- the wrong choice of insulation material - too soft insulation (mats, rolled cotton wool) will slip over time, closing the ventilation gap;
- the wrong choice of hydro-windproof - the use of polyethylene, foil and foil insulation, which does not allow moisture to pass from the insulation to the outside, is prohibited;
- a decrease in the size of the ventilation gap (min 40 mm, max according to the calculation) leads to an increase in the speed and strength of the wind in the gap and the destruction of the insulation.
Errors of the second level, leading to a violation of the decorative qualities of the insulation system:
- violation of the geometry of the curtain wall - the installation of the supporting system should provide a single facing plane due to the sliding structure of the brackets, and not depending on the relief of the wall;
- Compliance with the standard width of the tile joints guarantees the integrity of the cladding, regardless of the linear expansion of the cladding and the required ventilation of the insulation. The absence of seams leads to destruction of the cladding and wetting of the insulation.
Metal lathing for a heat-insulated ventilated facade, with an insulation thickness of 50 mm
The first lathing made of U-shaped suspensions.U-shaped hangers are attached to the wall with dowels (if the wall is brick or concrete) and self-tapping screws (if the wall is a block), 2 fasteners (self-tapping screw or dowel, depending on the wall material) for each suspension. The step of the suspensions vertically is 60 cm, horizontally - depending on the type of cladding (62.5 or 62 - OSB, LSU, 60 or 40 - blockhouse and siding).
The second lathing is made from the CD 60 profile.
The insulation is put on the suspensions of the first sheathing. A membrane is put on top of the insulation (it is also pierced by a suspension), and then the second crate from the CD 60 profile is attached.
The second crate is attached to the U-shaped suspension as follows: for each suspension there are 2 self-tapping screws (1 self-tapping screw for one "ear" and 1 self-tapping screw for the other "ear"). Self-tapping screw with a diameter of 3.5 mm and a length of 9 mm. For the finer points of fasteners, see the item “Metal crate. For a smooth and uneven wall, for a non-insulated facade ", above.
The ventilation gap is made due to the length of the “ears of the U-shaped suspension” and due to the CD 60 profile. The size of the gap is 30-40 mm.
Advantages and disadvantages
There are many advantages, but there are also disadvantages of a porcelain stoneware facade. The benefits for each person are individual. For someone it is dear - good, but for someone it is bad.
The undoubted advantages of this ceramic tile include:
- Increased abrasion resistance and durability. Thanks to a specially developed production technology, it is practically not subject to abrasion. Even considerable physical effort does not damage the surface layer and structure.
- Not flammable. It can be applied in schools, kindergartens and hospitals.
- From facade porcelain stoneware, it is possible to make slopes on ventilated facades. In this case, fireproof cuts will remain behind the facing on the slopes.
- Aesthetics. She not only protects the task from the outside, but also serves as a decoration. A wide color palette, a variety of textures allow the implementation of any design idea.
- Ease of installation - achieved by dimensional accuracy and a specially processed surface.
- Easy maintenance.
- The relatively low price of porcelain stoneware for the facade compared to the use of other finishing building materials.
Now let's consider whether this scheme can be applied to a ventilated facade with 100 mm insulation
For a facade with insulation of 100 mm, this type of facade is difficult to perform, since the U-shaped suspension (see Figure 9) has a dimension "a" equal to 100 mm.
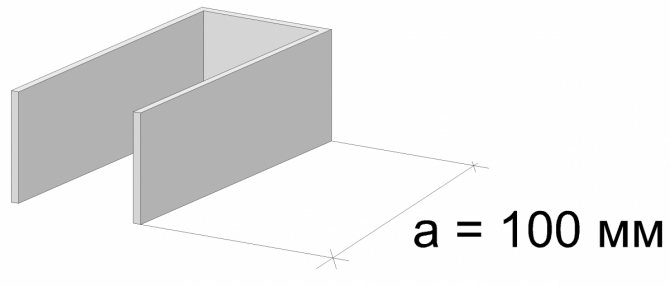
This means that if you put 100 mm cotton wool on it, it will be difficult to create an air gap. You will need either a 125 mm suspension, but it is more expensive. (A regular one costs about UAH 0.8, and 125 mm - about UAH 1.20). If the version with a suspension with a size of 125 (instead of 100 mm) is suitable, then this option can be used for a ventilated facade with 100 mm insulation.
Note. The use of a 125 mm hanger gives a 25 mm ventilation gap. This, in our opinion, is not enough. Therefore, we recommend for a ventilated facade with insulation of 100 mm, the solution with a self-made fastener, described below.
Calculation of the thickness of the insulation
When insulating a facade, the thickness of the insulation is very important. It can be calculated using an online calculator or manually. The calculation is based on factors such as:
- Thermal conductivity of the enclosing structure for the climatic zone;
- Thermal conductivity of the insulation;
- Thermal conductivity of walls;
When calculating the thickness of the insulation, it is necessary to take into account all layers of materials, even air. In a ventilated facade, the air duct, as a rule, is stationary; therefore, it is worth considering the thermal conductivity of the stationary air. It is equal to 0.022 W / m * C.
Reference: air in a stationary state is the best insulation.
When calculating, it is necessary to understand that the heat transfer resistance of the structure must be no less than the thermal conductivity of the structures for the climatic zone.This coefficient can be found in SNIP 81−05−02−2001.
Construction of a self-made fastener from a cut CD 60 profile
Such an element looks like this:
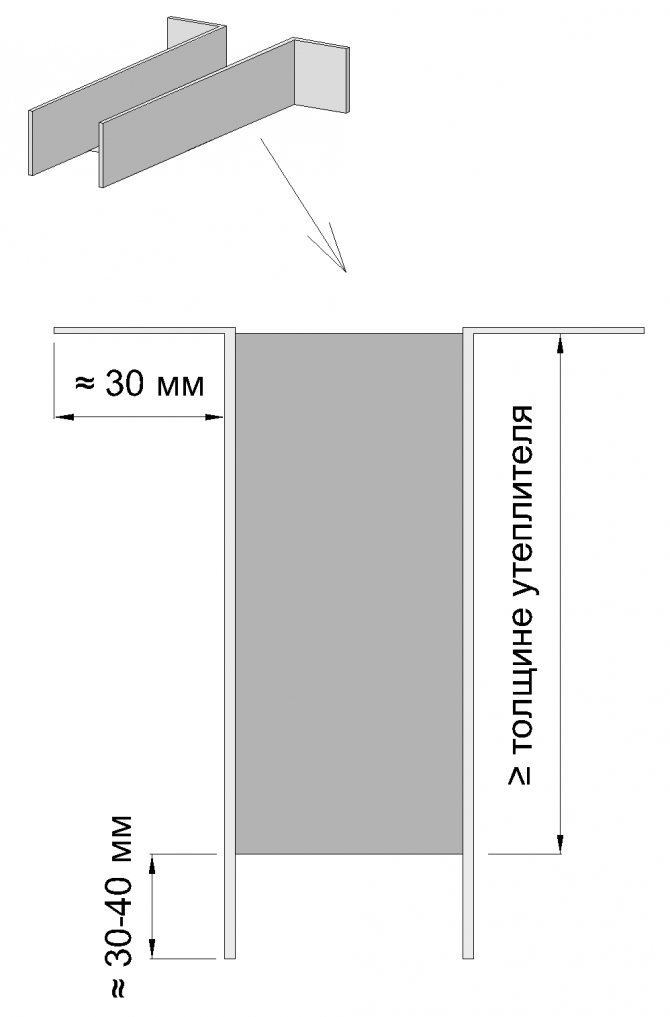
Figure 10 shows the dimensions of the “ears” of the fastener. The upper, bent "ears", approximately 30 mm long, are attached to the wall. Lower, straight "ears", 30-40 mm long, on which the second lathing is attached (or a wooden block, or a metal profile). The size of the lower "ears" is adjustable for the thickness of the bar (if the bar is 30 mm, then the size is 30 mm, if the bar is 40 mm, then 40).
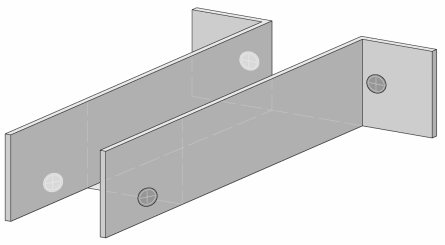
Fig 11. The location of the self-tapping screws for fastening a homemade fastener
We fasten the self-tapping screw closer to the edge (that is, at the end - closer to the place where the middle was cut, and from the side where we fasten the fastening element to the wall - closer to the place where the "ears" bend).
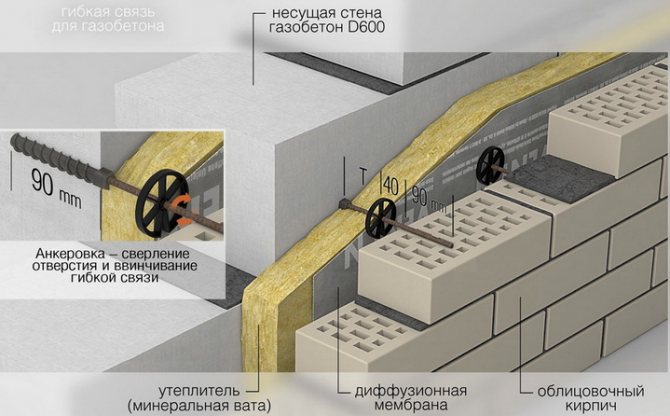
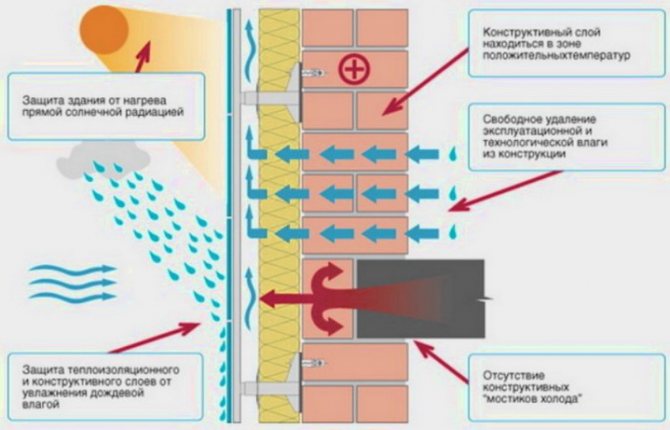
How the facade works
Another option for wall decoration is a suspended facade. For the arrangement of the ventilation facade, building insulation technologies are implemented with the creation of a small air gap between the cladding and the main surface. The purpose of this gap is to remove vapors, moisture and constant ventilation of the facade.
Schematically, the ventilation facade consists of the following "layers":
- A wooden lathing or a special galvanized profile with a corrugated surface is installed on the surface of the outer wall (irregularities in the material reduce thermal conductivity);
- Insulation is placed in the cells of the frame. If the functions of thermal insulation are not included in the design of the ventilation facade, this stage of work is excluded;
- A waterproof membrane is placed on top of the insulation (another name is a wind barrier). Its functions are not limited to repelling moisture from the heat insulator, a durable membrane reliably protects the building wall from blowing. The composition of the film is unique - on the one hand, it is permeable to steam, on the other, it is not.
An important nuance: when distributing the membrane, it must be tightly pressed against the previous layer of the ventilation facade, otherwise it will quickly rupture with strong air currents.
- The vertical control crate, which provides a ventilation gap, is the main component of the installed protection system. At this stage, it is important to observe the following restrictions - from the bottom and from the top of the casing, air must flow inside, the principle of movement of which resembles the functioning of a chimney. To prevent living creatures (frogs, mice, snakes, etc.) from entering the gap, any type of lattice or perforated profile is installed;
- The last component is the material of finishing decorative finishing, chosen by the customer of the service.
An important nuance: when arranging a ventilation facade without the function of insulation, the insulation material, wind barrier membrane and counter-lattice are excluded from the scheme described above.
Some private home owners buy a ready-made ventilation facade and assemble it themselves. But experts recommend professional installation of any cladding. After all, the craftsmen will give a guarantee for their work, and the client will be sure of compliance with all building codes. When cladding is done by an amateur, they may overlook important details and the finished structure will not last long. With an illiterate calculation of the thickness of the gap, the insulation can begin to rot, the mold will spread along all the walls and cause their destruction.
Features of the structure of the ventilation facade made of natural stone
Natural stone on the facade of the house looks very stylish and solid, reliably protecting the walls from bad weather in any climatic zone of the Russian Federation. For facade cladding, polished stone tiles are used, the thickness of which can vary from 18 to 40 mm, and the dimensions of the sides - from 300 to 1200 mm. It is easier and faster to fix square elements.
The slabs are mounted on a sub-facade made according to the traditional system, which consists of a heat insulator, a wind and vapor barrier, as well as a lathing for external finishing work.The whole system is supported by load-bearing containers, which are attached to the base wall with anchor dowels, exiting as a counterpart through a heat insulator and vapor barrier. Steel rivets are attached to the heads of the anchor counterparts. Thermo-insulating gaskets are installed under the brackets in order to exclude the formation of the so-called. "Cold bridge". The uniform load on the outer wall of the building is provided by special spherical washers.
The stone on the ventilated facade frame is fastened with clamps - metal brackets. The place of installation of these fasteners is to cut the edges at the corners of the slab, in rare cases, the installation of clamps is performed along the entire length of the stone element.
It is impossible to arrange a ventilation facade made of natural stone without the following types of clamps:
- starting - for the 1st row;
- end - complete the cladding;
- privates are the main fasteners of the installation process.
The natural stone used to install the ventilation facade can be anything: marble, travertine, sandstone, granite, onyx, etc. The surface of the tiles is sanded, treated with ultrasound or water, polished, heat treated and subjected to other operations to create a unique texture and performance parameters of the finishing material.
Stone slabs, which weigh up to 20 kilograms, must be additionally fixed with glue in addition to the main fasteners.
Installation of a porcelain stoneware ventilation facade on an already prepared frame is carried out in stages:
- The guides are marked according to the project documents in order to ensure subsequently the fastening of the clamps on them;
- Holes are drilled with an electric drill at the designated points. Important - the diameter of the holes to be drilled must exceed the diameter of the rivet by 0.15-0.20 mm;
- Clamps are installed in the design position, fastened to the frame through the drilled holes with rivets. At the same stage, porcelain stoneware facing tiles are mounted.