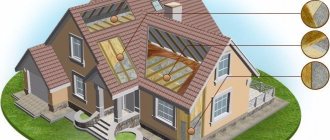
Attic and its subtleties as a building object
A little interesting story to make it easier for you to understand why attics are so problematic in terms of warmth.
For the first time, the concept of an attic was introduced into this world by the French architect François Mansart, in the 17th century, who proposed using the attic space for master's and residential purposes. And already from the beginning of the next century, the poorest people began to live under the usually uninsulated roof. And only much later - bohemia, i.e. rich youth, free artists and poets.
The joy of the Parisians can be understood: at that time the tax for the house was taken on the basis of the number of storeys, but the attic was not considered a floor. Those. it made sense to equip this nice room because of the economy, and therefore, before Russia, the fashion for a residential attic came much later. And only since the 1990s, the attic has been taken up close: the market has suddenly become overwhelmed with a variety of insulation materials and new building materials.
And today the attic as a living space is recognized by modern building codes and regulations (SNiP), which state that this term can be called the attic where the line of intersection of the facade and the roof plane is not lower than 1.5 m from the floor level. But we can tell you with confidence that the technology of insulation and waterproofing of the attic is the most complex and demanding of all.
We calculate the heat: what will be in the attic?
And now - about the important points. As you know, heat always moves upward. And therefore, if you do not want it to become too hot and stuffy in the attic, and colder in the rooms on the floors below, block the access to this heat. How? To begin with, be sure to place doors between the first and second floors, if any. Next, think carefully: will you somehow heat the attic? If not, then she will have enough warmth that will go down the floor (provided that there is no door above the stairs). If so, then the attic floor will need to be insulated in the same way as the pitched walls, thereby creating a barrier for the heat from below. The room downstairs will become warmer, and the attic will now have its own personal microclimate that can be regulated.
But why, for example, make the attic colder than living rooms? This is a completely rational solution if you are going to organize a library or a personal mini-gym in it, which do not need any extra heat or extra water vapor from below.
How to choose polystyrene for insulating a mansard roof
Not every foam can be used as insulation for the attic from the inside. Various brands differ in technical capabilities and operational parameters.
When arranging a roof, preference should be given to more durable categories. These include the brands PSB-S15 (density - 11-15 kg / cubic meters), PSB-S25 (16-26 kg / cubic meters) and PSB-S35 (25-35 kg / cubic meters).
Depending on the density, the thermal conductivity of the material is determined. For PSB-S15 it is 0.037 W / micron, PSB-S25 - 0.035 W / micron, PSB-S35 - 0.033 W / micron.
Important! When arranging flat and attic roofs, it is recommended to use the PSB-S35 brand, for mansard and pitched roofs - PSB-S15.
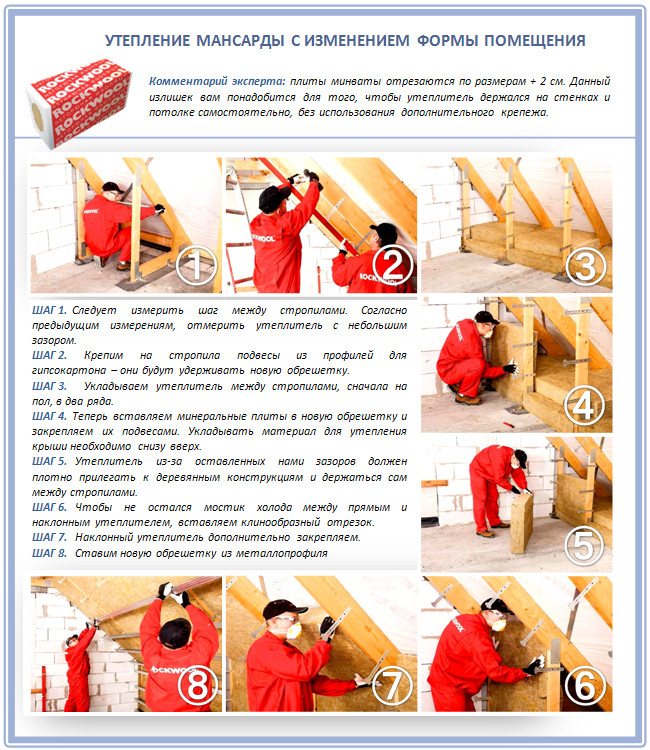
How to change the shape of the attic during insulation?
The first difficulty that is usually encountered when insulating an attic is the shape of the room itself. After all, the geometry of the attic can be any: triangular, broken or with a steep slope up to 70 ° or almost gentle from 15 °. In addition, in the process of warming, the following disadvantages will also come out:
- Sloped ceilings, which will now be slightly lower.
- Noticeable loss of usable area.
- Technically difficult process of warming, where it is important to choose the right hydro and vapor barrier.
- Health risk if the insulation was not done correctly.
Can we handle it? Of course! So what if, instead of an attic, you still only have a non-residential attic, the pitched roofs of which go all the way to the floor? And why such angles, if the useful space, from which there is still some sense, is 1.50 meters maximum? The solution to this problem is very simple: build a frame from metal-profile drywall guides, and insulate it along it. By the way, the further such a structure is from the cornice, the warmer the whole room will be.
If you do not like the shape of the attic that is now, then you can make a special frame, insulate it and sheathe it. It will be even warmer! Plasterboard profiles must be fastened in 40 cm increments to suspensions. Carry out electrical wiring at this stage of construction. And at the end of the insulation, fix the sheets of drywall on the finished frame:
Although many, we note, even like such niches - if you are smart, they can also be used to save space in an already small attic.
By the way, the simplest frame can be made of timber, the moisture content of which is not less than 12%. Additionally, before installation, treat it with antiseptics, and the structure will serve you for a long time. But even better is to make a frame from a metal profile (for example, a profile for drywall). Or combine both:
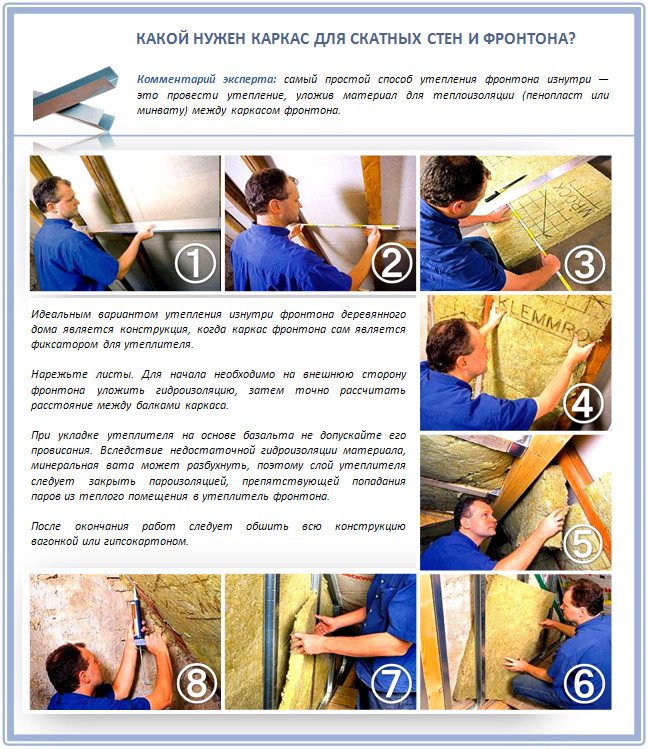
Most importantly, build the frame so that the vertical lines are perfectly vertical and the horizontal lines are perfectly horizontal. Use a good building level for this, and do not be lazy to constantly double-check everything. Otherwise, you can't even imagine how you will then suffer with the fit of the insulation.
Place vertical partitions with a profile step of up to 50 cm and no more, and horizontal partitions - as it will be convenient for you. After installing and checking with a level, take a control measurement of the diagonals - pull the thread between the extreme points of the profile, and now apply it in a different diagonal direction. If the frame is not skewed, both distances should match. You don't want to end up with a room with the wrong geometry, do you? Then you will be interested to know that in cinematography the walls of a room are specially made at different angles and with slightly distorted rectangularity in order to achieve the effect of untidiness of the room.
Installation work
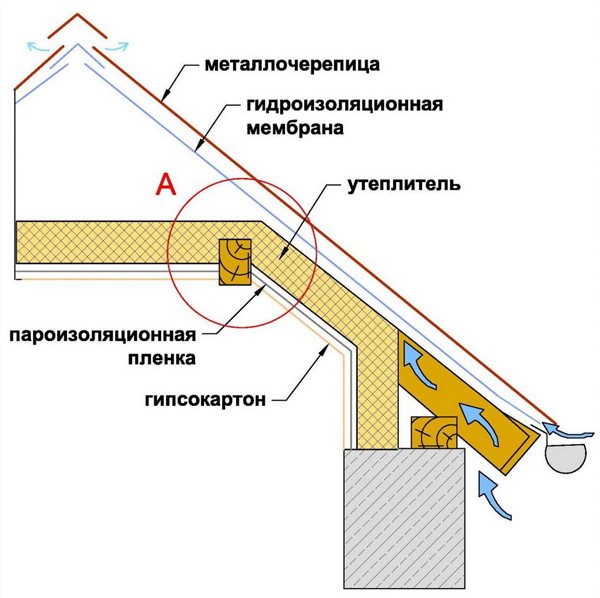
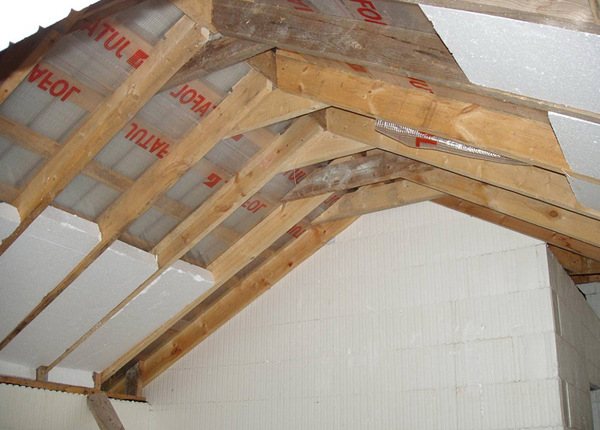
The principle of placing hydro and thermal insulation under the roof
Depending on the material used, the insulation technology also changes, and in most cases these are cardinal changes not only in technology, but also in installation technique. All methods can be classified as installation of liquid (foam), hard (panels) and soft (rolls, mat) materials.
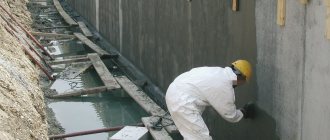
Important! If there is no waterproofing under the roofing material, then in some cases it must be pulled between the beams of the rafter system (sometimes even if a moisture-resistant insulation such as polystyrene or foam is used). The fact is that sooner or later the roof will have to be changed. But insulation is not necessary.
Thermal insulation with liquid polyurethane foam
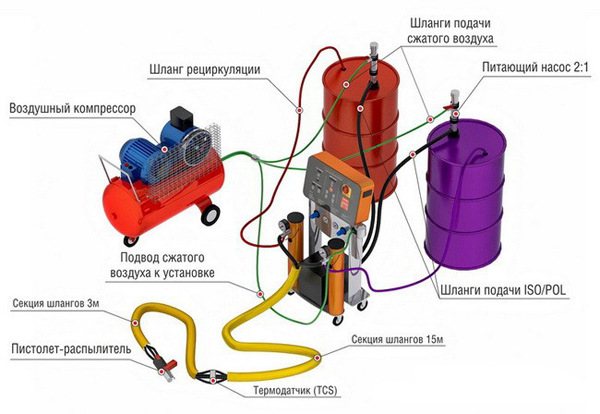
Pneumatic compressor with other items of equipment
Let's start with the fact that not everyone will be able to insulate the attic from the inside with liquid polyurethane foam, if the roof is already covered, for the most banal reason - due to the lack of the necessary equipment for applying polyurethane foam to the surface. Of course, you can buy it in a store, but it will cost more than the insulation itself and it is at least unreasonable to purchase it for one-time use. Of course, you can rent it, but such points are not available everywhere, but even if there is a point, it is very rare to find such a tool there.As a rule, it is bought by professional builders, since the cost of the compressor with the rest of the equipment is very soon paid off by earnings on repair and finishing work. Nevertheless, if you nevertheless found the necessary equipment (from friends, neighbors or just acquaintances) and nevertheless decided to apply polyurethane foam with your own hands, then you do not lose anything and, on the contrary, you even win, since the material lays down very tightly. without the slightest gaps and has a low thermal conductivity.
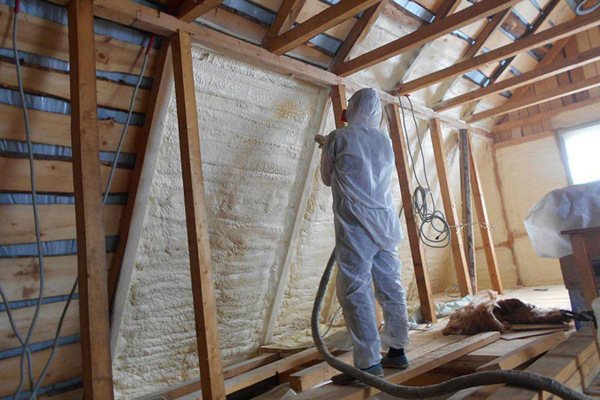
Attic insulation with liquid polyurethane foam
Quite naturally, first you need to make sure that there is waterproofing under the roof, so that in case of replacing the coating, you do not remove it together with the polyurethane foam, since the foam has good adhesion, but the PE film is far from ideal. It is best to apply the foam on a hard and clean surface, ideally between 10-15⁰C. It can be plywood, oriented strand board, or just a solid plank sheathing (this is most often done under a soft roof and metal roofing). Now it is advisable to remove all things from the attic so that foam does not get on them, but if it is some kind of heavy wardrobe or sofa, then they can be covered with a thin furniture film (it is usually sold in hardware stores and building materials, but it is inexpensive). the same film should be used to cover windows and doors, if any.
Attention! Work on the application of polyurethane foam must be carried out in a protective suit, goggles and a respirator, especially on the walls and ceiling. The sprayed mist cloud will settle down and it is highly undesirable for it to get on the skin, in the eyes, or you inhale it. You can also use clothing made of thick material or (if anyone has) an old Army Combined Arms Protective Kit (OZK).
If you have never done such work before, then consult with a specialist about the operation of the equipment or with the person from whom you rent it. It makes no sense to make any calculations on the thickness of the insulation, since such residential or non-residential attic spaces are not heated and what you are doing now is, in terms of efficiency, equivalent to insulation of ceilings, but at a positive temperature outside, it will still be possible to sleep there. As a rule, a layer of polyurethane foam is not made thicker than 15 cm, but it is not applied immediately, but in several layers, otherwise it simply will not stick.
Note. You should also pay attention to the proportions of the components - they should be 50 to 50. If the ratios are violated, the quality of the insulation decreases (thermal conductivity increases).
Insulation of the attic using PPU spraying
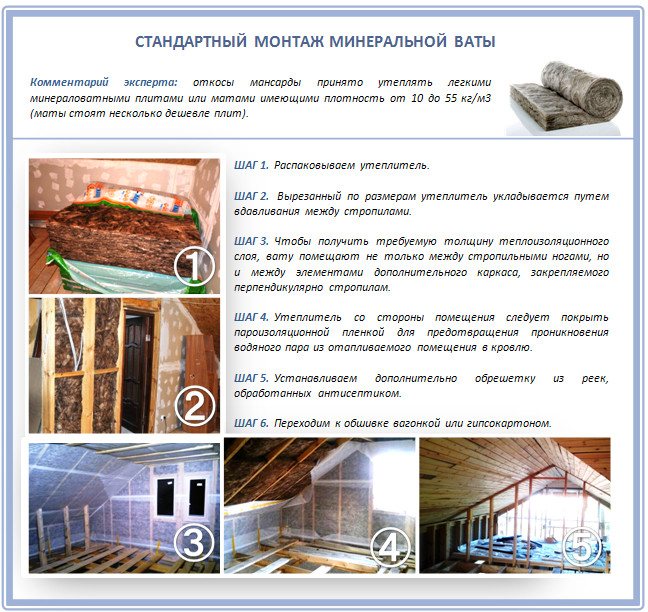
Laying mineral wool
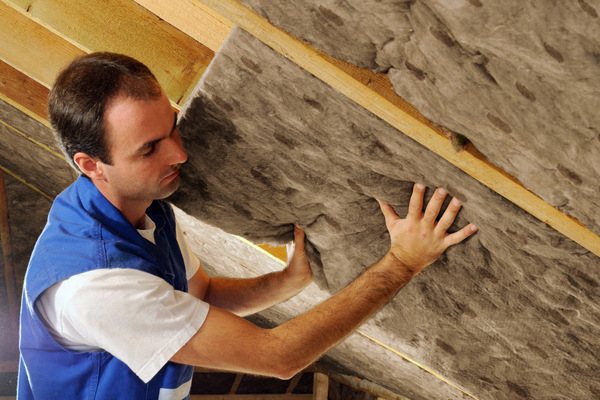
Laying stone (basalt) wool in the attic
If waterproofing was not taken care of during roofing work, then take dense polyethylene with a thickness of 50-200 microns, which is usually used for greenhouses and greenhouses, and stretch it in each opening between the rafter legs. The film can simply be nailed with a stapler, but it is better to press down with thin strips, screwing them flush with the rafter boards. But here you can also ask the question of whether waterproofing is needed for mineral wool at all? Here, as it were, the technology turns out to be correct, but when there is a reliable roofing material on the roof such as metal tiles or a soft coating on moisture-resistant plywood, then no leakage is threatened! But by closing the space between the rafter legs with PE film, you will create the effect of a thermos, which is absolutely unnecessary here, unless, of course, you foresee the supply and exhaust ventilation in advance.
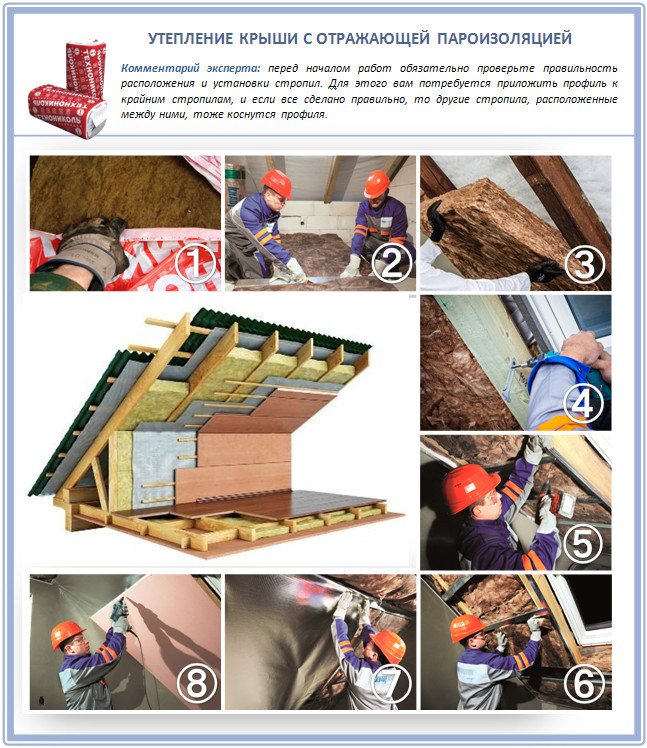
Vapor permeable membrane structure - rough side
On this basis, we can conclude that when installing basalt wool, it is not necessary to stretch the cut-off waterproofing, or to do with a vapor-permeable film, since the stone wool is vapor-permeable, that is, it has the ability to "breathe".But in the event that your choice for one reason or another fell on slag, it is better not to risk it and protect it from moisture penetration even with a reliable roof - fog, this is already a negative active factor for such a heater, which reduces its operational resource. Well, in order not to create the effect of a thermos in the attic, instead of the usual PE film, you can use vapor-permeable insulation (roofing membrane).
Attention! The vapor-permeable roofing membrane has, as it were, a one-sided "leaky" structure, that is, the film consists of conical cones that allow moisture to pass through only in one direction. Therefore, when laying it under the roof, it should be turned with the rough side to the insulation, and the smooth side outward.
Mineral wool in mats or rolls is placed under the roof in between the boards of the rafter system, but sometimes these legs are at a great distance and the width of the mat or roll is not enough. Therefore, in order to keep the material in place, it can simply be screwed to the crate with self-tapping screws with wide washers. It is easy to make such washers yourself from plastic lids for cans, cutting them into four parts, or you can buy galvanized suspensions and cut them into pieces of 40-50 mm in length. The most important thing is not to leave gaps and even small gaps - they can be easily closed with scraps left over from cutting the material. Given the softness of cotton wool, it is laid in fragments that exceed the width of the seat by 4-5 cm - this also helps to remove possible gaps.
Note. Regardless of whether a vapor barrier is installed on the inside or not, a ventilation gap of at least 20 mm, but preferably 25-30 mm, must be left under the interior decoration (plasterboard, plywood, OSB, etc.). If the thickness of the insulation is equal to the width of the rafter legs, then counter-rails of the required thickness are stuffed or screwed onto them.
Insulation of the attic with mineral wool
Thermal insulation with foam and extruded polystyrene foam
Installing foam in the niches between the rafter legs
Insulation with polystyrene and extruded polystyrene foam is perhaps the simplest from a technical point of view, the main thing is to accurately cut the fragments in width, because, unlike mineral wool, expanded polystyrene cannot be compressed - it will simply break. In addition, there is no harmful dust during installation, therefore, you can do without protective equipment - overalls, glasses and a respirator. It will not be superfluous to pay attention to the thickness of PSB-S or extrusion - sometimes you do not have the opportunity to buy suitable sheets and then you can simply mount two layers to achieve the desired result.
For example, you need a thickness of insulation of 100 mm - but at the moment neither PSB-S nor penoplex with such parameters were on sale, then you can purchase 50 mm panels. First, install the top layer over the entire roof, but do not blow out the joints with polyurethane foam yet. But when the laying of the second layer begins, then the foam is used, which not only annuls the gaps, but at the same time is glue. The principle of such an installation is quite clearly shown in the video clip, which is located below in the text.
Note. Now about waterproofing. Neither the foam nor the extruded polystyrene foam absorb moisture, therefore, the insulation itself is waterproofing. Slots and gaps blown out by polyurethane foam also do not allow moisture to pass through, so the installation of such a film is not necessary here.
Insulation of the attic with foam plastic in two layers
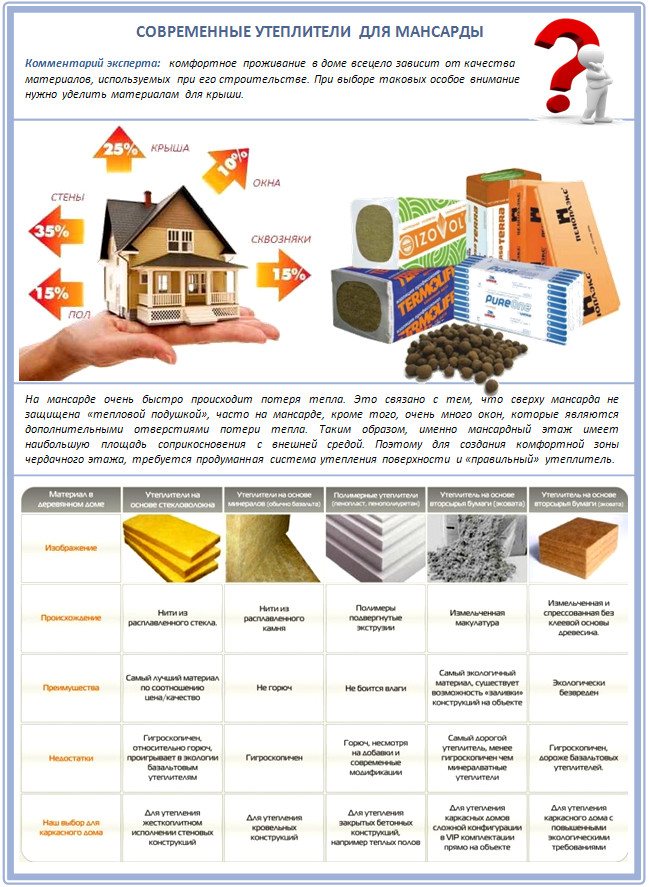
What does the modern market offer?
So, we figured out the frame for the insulation, but which brand should we give preference to? Today, manufacturers of building materials delight both with the richness of choice and the quality of the materials themselves for insulation. And the better to insulate your attic, proceed from the planned budget and the expected result.Indeed, for someone, if only cotton wool is not injected in the process of work, and someone is going to organize a personal spa-salon under the roof and he is only interested in the final thermal efficiency.
In any case, we advise you to purchase insulation only from proven brands. After all, it often happens that they buy material at half the price on the market, do not ask for a safety certificate or a license, and carry it home. And after installing such a heater, even if all the rules are followed, an unpleasant smell and harmful substances in the air can last for months! Usually, after a week, people open the walls out of despair and throw away the insulation. Again renovation, again costs. Don't risk it!
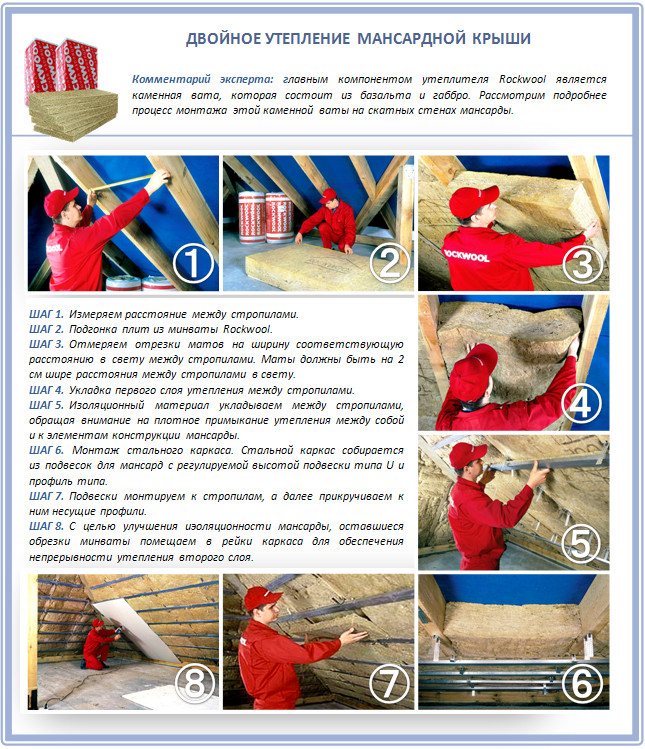
Knauf: proven German quality
Knauf products can be called one of the highest quality mineral wool heaters. You probably know this German manufacturer from the popular technology for the production of dry floors. But Knauf makes not bad heaters either: if you follow the installation rules, the heater will serve you for all 30 years. And the process of warming itself is quite simple:

This insulation is sold in special packaging under the press - to make it easier to transport. In place, as soon as you open the polyethylene, the insulation before your eyes will become twice as thick and take on its shape.
But the main disadvantage of basalt slabs is that they have considerable weight, and it is really easier to lift them together, as you can see from the step-by-step photo:
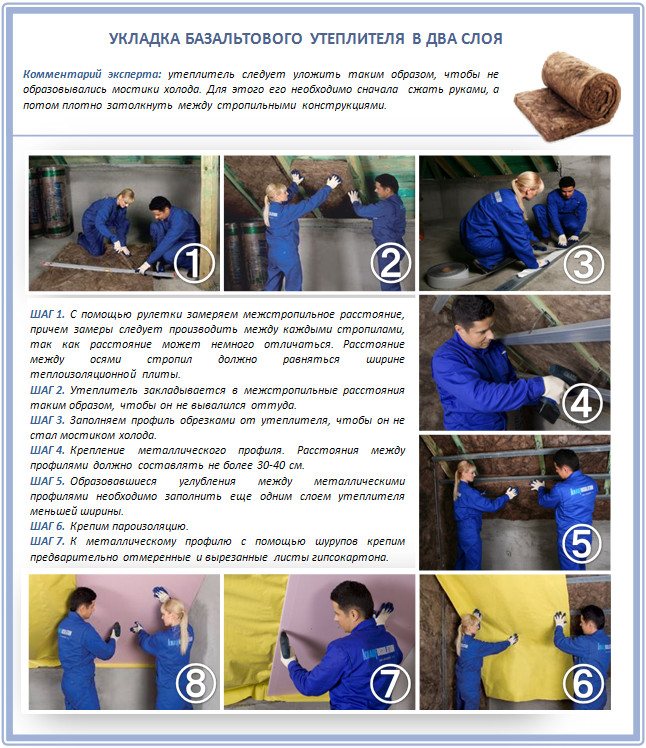
Note that the most valuable quality of such a heater is incombustibility, which costs a lot to repair the roof and under-roof space.
Izover: classics of the genre
Many people like Isover insulation primarily because of its affordable price. But the minus of Izover is that it gets wet quickly enough if moisture gets on it, and immediately worsens its thermal insulation. To prevent this from happening, it is necessary to leave a gap of two centimeters between the insulation and the roof, which will allow the cotton slabs to give off accidentally absorbed moisture:
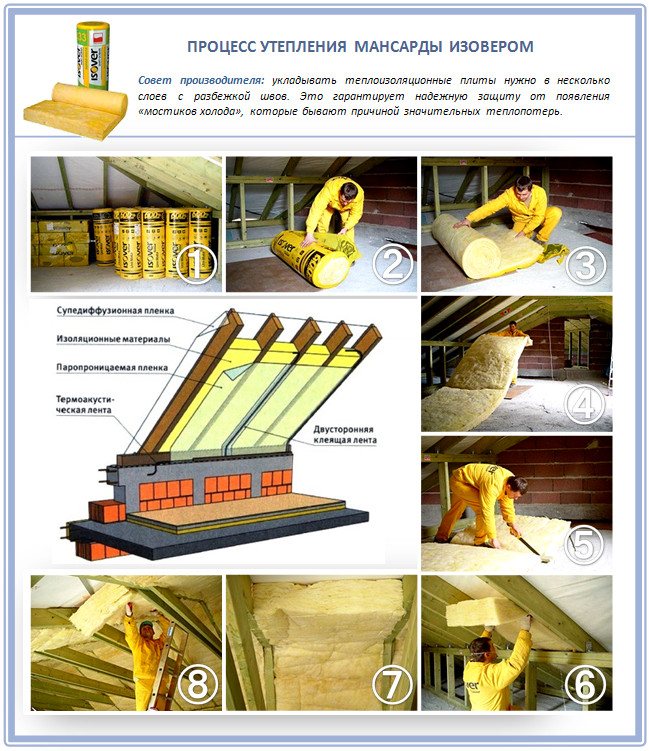
When insulating the attic, it is more convenient to use rolled Izover. It is easy to cut into separate pieces right on the spot, and nothing will fall out from under the crate. It is really convenient to work with it: it is easy to cut and does not crumble.
Ursa: light weight and compact
Ursa roofing insulation is appreciated for its lightness, ease of use and excellent quality. At its relatively inexpensive price, it is absolutely safe for health, and therefore ideal for insulating a residential attic. Plus good sound insulation!
It is not difficult to transport Ursa insulation in the car - it is enough to compress it a little if there is not enough space. In installation, Ursa mineral wool is very convenient, it fits easily even into the smallest gaps. The only thing that requires protective measures against fiberglass, which is prickly and unsafe for the lungs. Therefore, it is better to work with Ursa with gloves - for some people, contact with this material causes slight irritation.
Insulation Ursa is most valuable for its heat-insulating qualities: after the installation is completed, the temperature in the room increases significantly.
Rockwool insulation: ideal technology
Heaters of this brand are so in demand in many countries of the world that we can say that they have almost no flaws.
Ecover: at high temperatures
Insulation Ecover is good because it is easily cut with a simple clerical knife, and it is easy to make different sections from it for insulating corners and nooks. Only you need to work with this insulation in tight gloves and closed clothes, because the material pricks noticeably.
Ecover is rightfully considered a non-combustible material, because made of rock wool, which is volcanic rock. If such insulation has to be laid around the chimney or on the heating system, do not worry, the temperature of the insulated surface is calculated up to 400 ° C.
The budget version of this insulation is Ecover Light Universal. These are lightweight synthetic-based insulation boards with stone wool.
Paroc insulating materials: for difficult places
Among the heaters, Paroc is also popular, which produces two types of thermal insulation materials: in a roll, which is especially convenient for insulating the attic floor, and square slabs. Cutting this insulation is easy with a simple knife. The contours of even complex shapes are clear.
Penoplex: low hydrophobicity
One of the most valuable qualities of Penoplex is absolute moisture resistance. Whatever excess water gets on it through the roof, it will simply flow down. The plates have an L-shaped edge at the edges, which allows them to be joined as tightly as possible, without cold bridges.
TechnoNicol: for the roof of the bath
Insulation TechnoNikol does not burn, and melts only at a temperature of 1000 ° C. Thanks to this, they can perform thermal insulation as close as possible to the metal chimney - the most unsafe place in the bath.
Basalt slabs of TechnoNicol Rocklight are of high quality and environmentally friendly, and at the same time they are moisture resistant and with good sound insulation. It is so easy to work with Rocklight insulation boards that it is really possible to insulate the attic in half a day.
But in the process of cutting and installing it, the lungs and hands need to be protected, otherwise unpleasant sensations cannot be avoided. But this insulation is deformed easily, and therefore you need to work with it carefully, trying not to crush or bend anywhere.
Rocklight is produced in the following parameters: 50 or 100 mm thick, 500 or 600 mm wide and 1000 or 1200 mm long.
Thermolight: no getting wet
Another excellent budget option is Termolight PM-35. This insulation "breathes" and does not allow moisture to accumulate in the under-roof cake.
Bateplex: the easiest installation
Many people value polystyrene foam boards not only for the simplicity and ease of installation, but also for the fact that at the end of the work there is no itching or any other unpleasant sensations. At the same time, there is a lock for joints, the geometry is correct, it does not cause problems.
One of the most popular brands is the Belarusian Bateplex, whose price is 20% lower than that of more advertised competitors.
The main stages of insulation
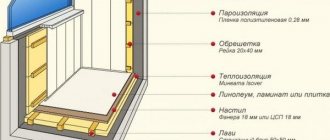
To insulate the inside of the attic, you will need the following materials: the insulation itself (it is better if it is in the slabs), a waterproofing film and a vapor barrier membrane, mounting tapes. You will also need tools: a punch, hammer, construction stapler, and a sharp knife.
Most often, manufacturers give recommendations on the use of building materials of their brand, but the general installation sequence remains unchanged:
- Install the waterproofing sheeting along the entire rafter system, moving from the bottom to the ridge. Secure the canvas with a construction stapler. This layer will protect the insulation from moisture and condensation.
- If necessary, install an additional crate. For its arrangement, bars with a width of 8-10 cm are used.
- Place insulation between the rafters. The thickness of the layer is calculated individually, usually manufacturers give recommendations for installation in various types of buildings. Ideally, the distance between the rafters should be 1-2 centimeters less than the width of the insulation. Then the edges will shrink slightly, which will ensure a reliable fixation of the plates. Otherwise, the insulation will sag or fall out, which will complicate the work and affect the quality of the insulation.
- Fix the insulation with a cord or small nails driven into the rafter.
- Cover the top layer of insulation with a vapor barrier membrane. The insulation must be airtight, so the canvases are overlapped, and the joints are closed with mounting tape.
- Make a wooden or metal frame for subsequent surface sheathing. Most often, slats of 20 * 50 mm are used for this.
Now you can start finishing the attic. For this, sheets of drywall or plywood, as well as wooden lining are best suited.It is undesirable to use plastic, since the room can get very hot during the hot season.
According to statistics from some construction companies, about a third of their orders relate to the alteration of the attic insulation. Due to improperly selected or incorrectly installed insulation, condensation appears in the insulation, which leads to the development of fungus and mold. Ondutis films and membranes will help to avoid this problem.
Combined insulation technology
In addition to the usual combined insulation of the attic, where two types of insulation are used for the sake of summing up their qualities, we also want to tell you how to insulate the attic in a more cunning way - with additional heating.
One of the most atypical ways to heat an attic is to install an infrared heater directly on pitched walls. The thin film can be easily installed under the cladding and releases valuable thermal energy. This, in turn, heats up objects in the room, and they also give off additional heat.
At the heart of infrared floor heating is the well-known principle of heating through current. The current flows through the resistive foil and emits heat up to 45C, which is emitted by invisible infrared rays 9.5 microns long. This warmth is comfortable, and the temperature difference between the floor and the ceiling is only 1-3C.
The modern film infrared heater for the ceiling works for only 15 minutes every hour. A fairly economical option, in which the air itself does not heat up, and therefore the heat does not leave through the ridge.
Installing infrared film is also simple and safe, as you can see from the step-by-step photos:
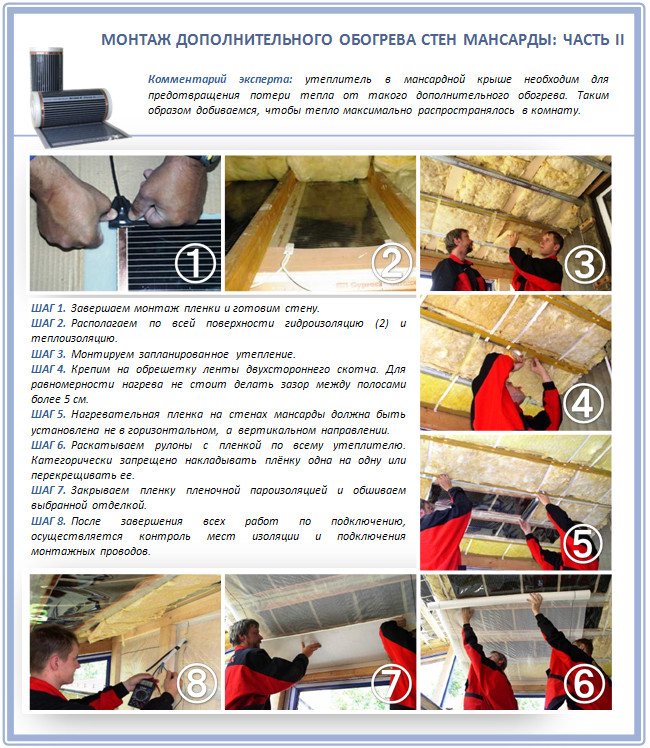
Just keep in mind that each manufacturer has its own subtleties of installing such films, for which it is imperative to read the attached instructions. But the principle is the same: we spread, fix and connect.
Insulation of the attic from the inside for living in winter
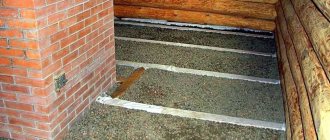
After choosing the thermal insulation material, they begin to lay it under the roof in the attic room. When performing work in any way, the thickness of the insulation is made such that it coincides with the width of the rafter legs. The width of the material to be laid is taken a little more than the interval between the rafters.
How to insulate an attic with mineral wool
The insulation is laid out on a flat surface in one layer and the width of the strip is measured. It corresponds to the distance between the rafters plus 2 cm. Thanks to this allowance of the mineral wool, the gap between the rafters will fit tightly and will reliably protect from the cold.
Then the cut strip of insulation is placed in the right place between the rafter legs. Sometimes, with a gentle slope of the roof, the mineral wool falls out of the rafters under its own weight. To prevent this, the rails are attached to the rafters in the transverse direction with temporary self-tapping screws. If there are no rails, nails are stuffed onto the rafters in a checkerboard pattern and a thread is pulled between them.
After that, the created structure is covered with a waterproofing film. It will protect the hygroscopic thermal insulation material from humid air, which will reduce its working properties. The waterproofing is laid from the bottom up, overlapping the panels and nailing them down.
Important! When one layer of mineral wool is not enough to fill the space the width of the rafter legs, a second layer of material is laid. In this case, the top sheets are stacked with an offset.
How to insulate an attic with foam
Polyfoam or polystyrene plates are one of the most affordable roof insulation options. They are recommended to be used if there is no vapor or waterproofing membrane under the roofing material. This is possible due to the very low water absorption.
The foam slabs are cut according to the distance between the rafter legs. The prepared material is laid in the rafter leg scheme so that a little free space remains between it and the roofing.It is necessary for the removal of humid air vapors and harmful vapors emitted by foam plastic to the outside.
On top of the first layer, the foam is laid again so that its sheets cover the rafters. This design will protect against the penetration of cold air, which penetrates into the gaps between the rafters and the first layer of insulation. The second layer is attached to the rafters with self-tapping screws with a wide head.
How to insulate an attic with polyurethane foam
This insulation of the latest generation has a high degree of adhesion. It does not require preliminary surface preparation, since it adheres perfectly to any building material. To work with it, you will need a special compressor unit, which is assembled right in the attic. The material is applied in layers, achieving complete filling of the space between the rafters.
Features of the application of polyurethane foam:
- Polyurethane foam is applied in a ventilated area.
- The work is performed in special clothing, shoes and mittens.
- Insulation components are mixed in equal amounts.
What to do with old insulation?
But what if you bought a house with a fairly cold attic, the renovation of which has already been completed? Do you really have to turn everything around in order to change or add insulation? It's not obligatory!
You can make additional insulation according to what you have. To do this, we define the role of the roof covering for the inner lining, again leave the ventilation gap and forcibly direct the air, put in a membrane, insulation and, finally, a new vapor barrier and new skin. Of course, all this will hide a little useful area, but it will no longer be necessary to disassemble and destroy the roofing pie. Everything is simple, as with conventional insulation:
Or we simply attach a modern warm floor in the form of a film under the cladding, and all problems are solved: the temperature in the attic will be uniform and high enough. It is only important to make sure that there are no cracks and other "cold bridges" anywhere in the roofing cake.