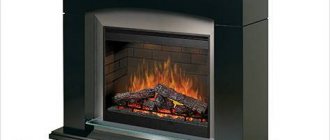
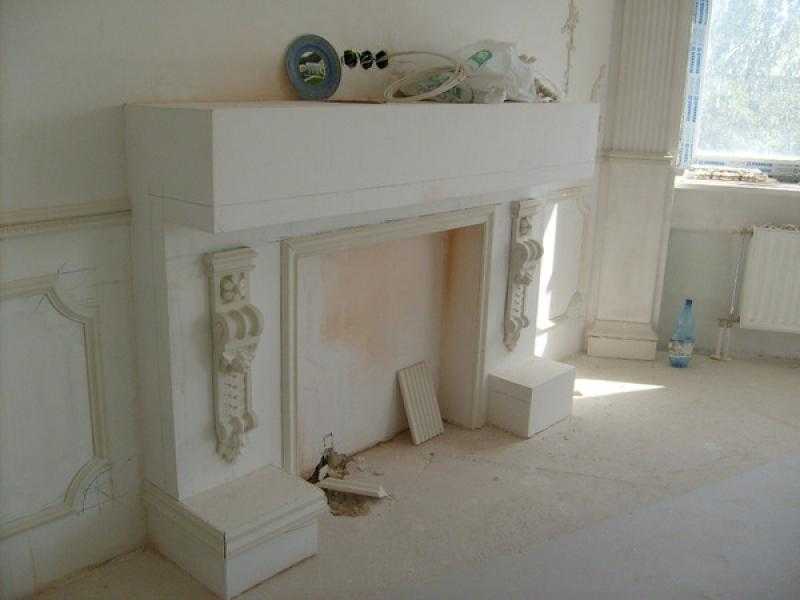
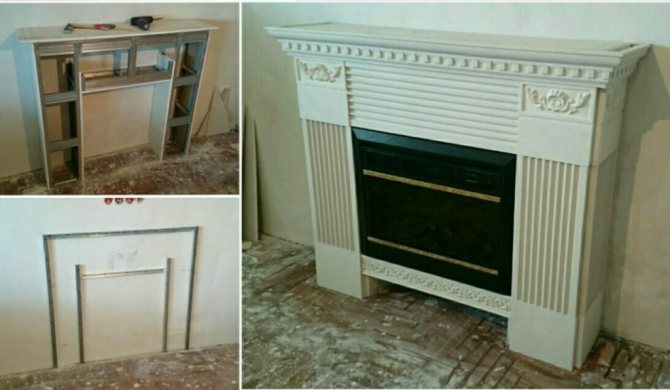
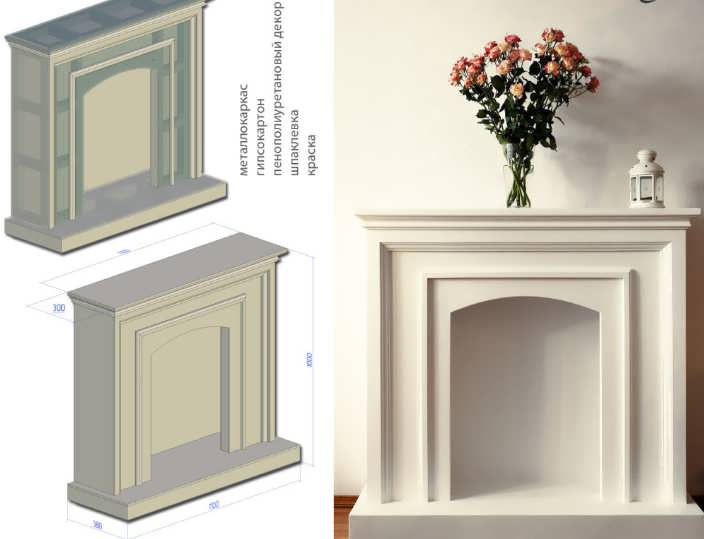
In apartments where it is impossible to install an ordinary fireplace heated with wood, it is possible to build an electric fireplace with an imitation of a flame. These devices have become very popular recently. An electrically powered fireplace built into a portal or wall can become not only a decoration for a room, but also an additional source of heat. The most popular solution in this case is to build a plasterboard fireplace portal, an inexpensive and beautiful design that can make the interior chic.
Drywall is a simply processed material that has become popular lately. FROM with gypsum plasterboard plates, you can build a straight or curly structure by building it in numerous tiers or decor. In addition, such a drywall portal weighs a little, which is a definite plus when constructing it in an apartment, where it is undesirable to create additional loads on the base, there is no need to pour the foundation under it. As for the design of this structure, you can do anything: from a pendant or classic to a corner fireplace.
Portal construction
As we wrote earlier, the portal can be of any form, and completely arbitrary in design, but for this you need to comply with certain requirements:
- The portal must correspond to the area of the room in which it is being built. It is also worth considering the area of the electric fireplace itself.
- You can build a portal only after you select a fireplace model, or after purchasing it. This must be done because the electrical device needs ventilation, which must be provided for in a drywall structure. In addition, it is worth determining where the electrical outlet will be located for connection.
- If you want to put a fireplace to the corner, then build a corner portal. This system will look proportionally in the room, and besides, it will take a corner that is useless in the interior.

- The portal should be designed in the same way as the entire interior of the apartment. If the room is decorated in a retro style, then a high-tech portal will look inorganic.
- You need to decide in advance on the facing material. If you want to decorate the fireplace with stone or ceramic granite, then the skeleton of the structure must be additionally reinforced, for example, apply two layers of drywall, or reinforce the profiles with wooden bars.
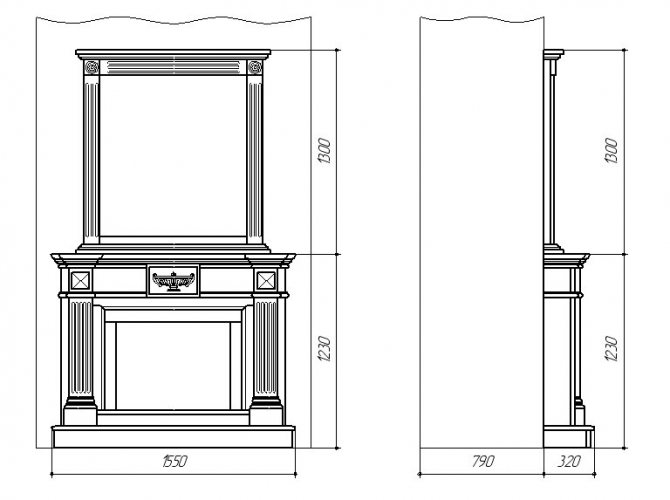
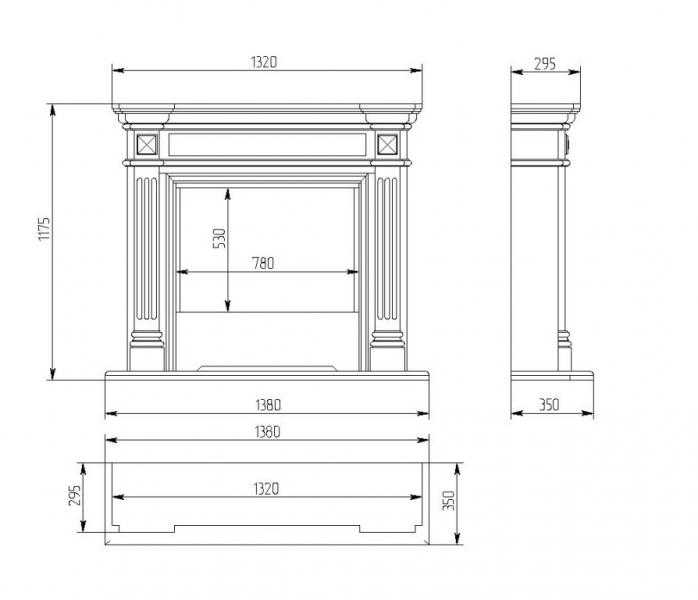
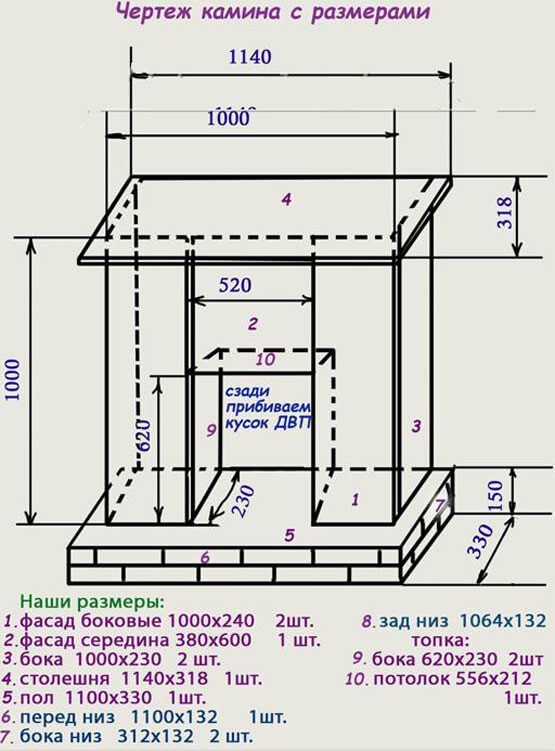
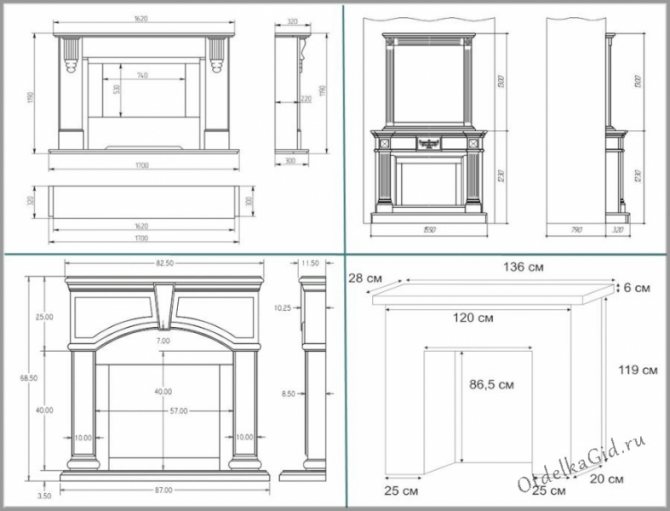
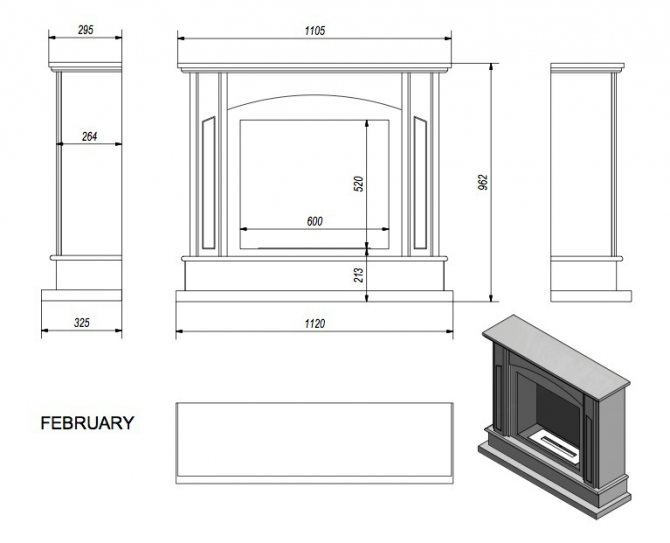
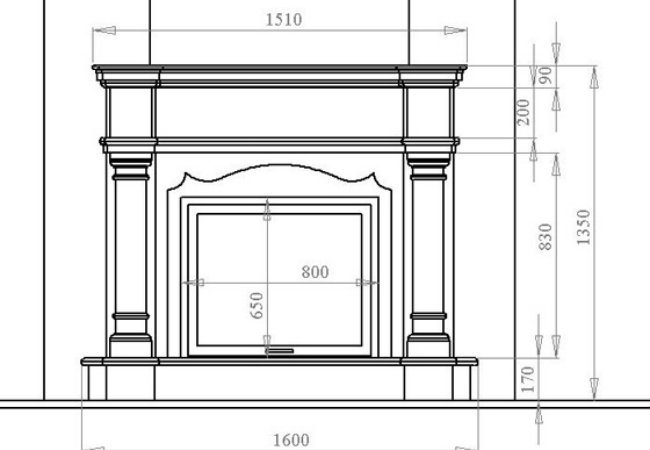
- Before starting the assembly, draw your future fireplace, then draw up a detailed drawing with all dimensions and marks. Then draw your design on the floor, this will help you avoid making mistakes with the choice of size.
After all the preparations, you can go for the material for the portal and prepare the toolkit.
Design
Portals differ in style as follows:
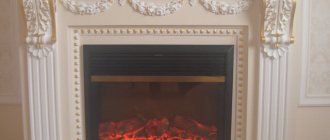
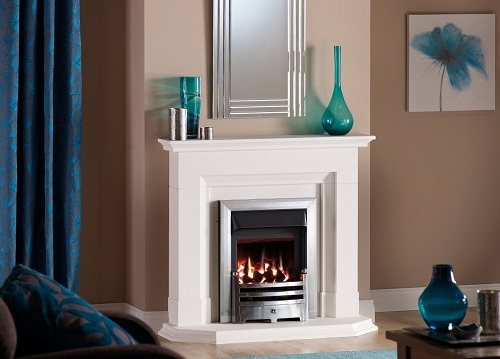
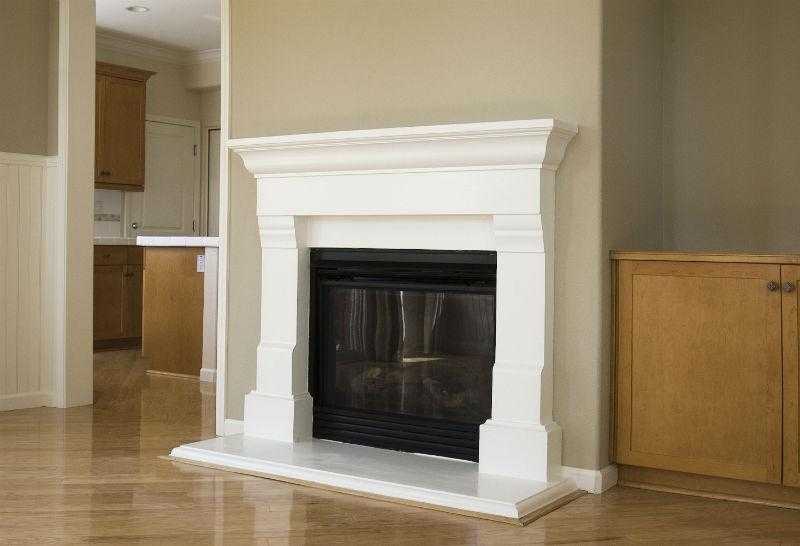
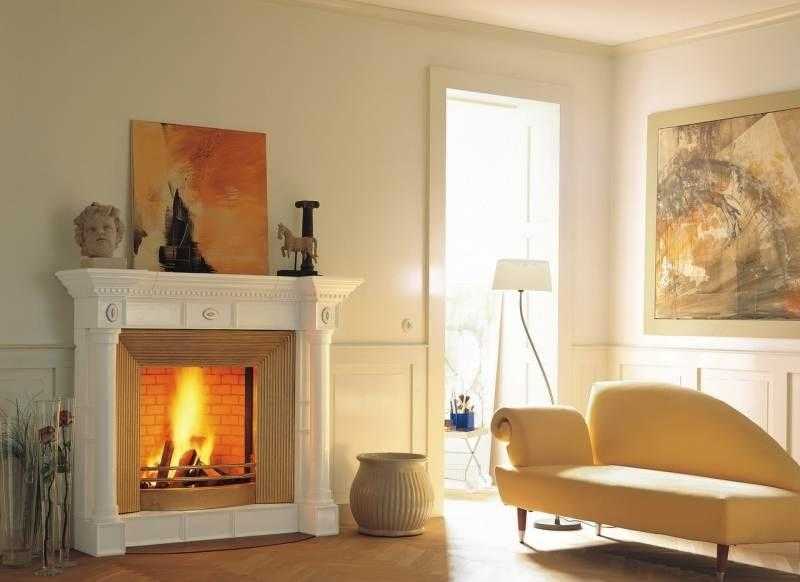
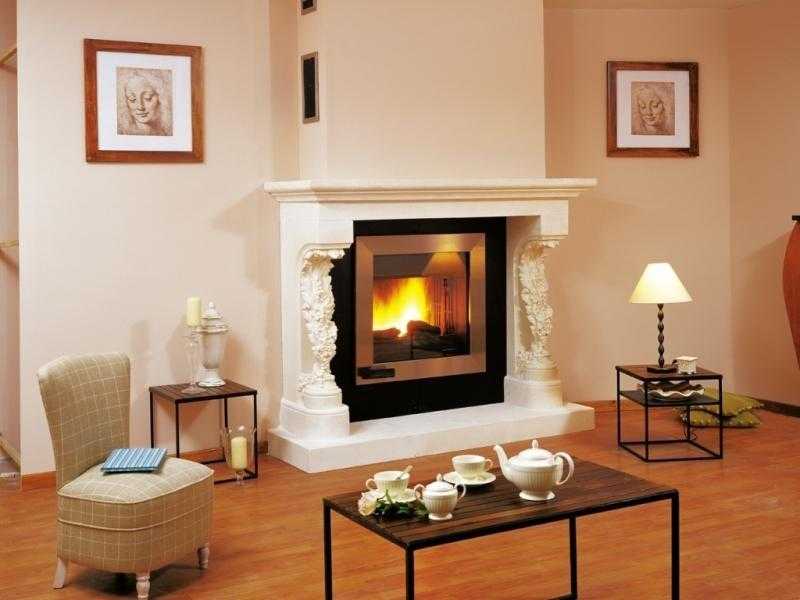
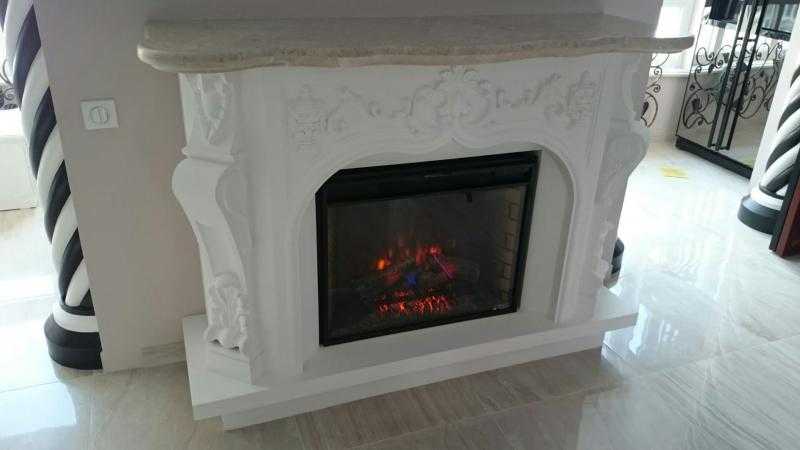
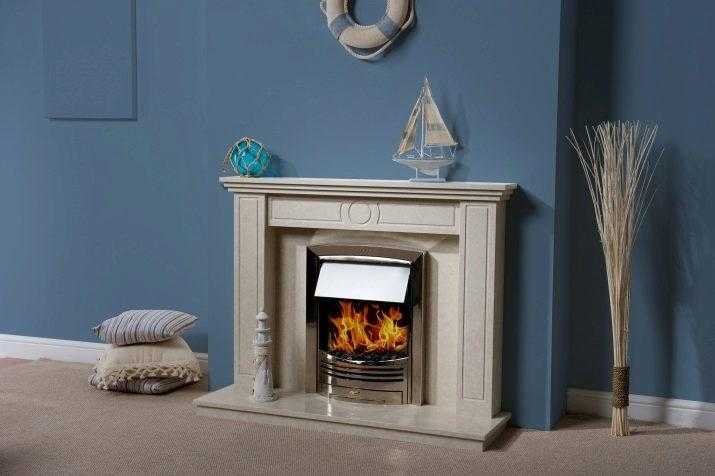
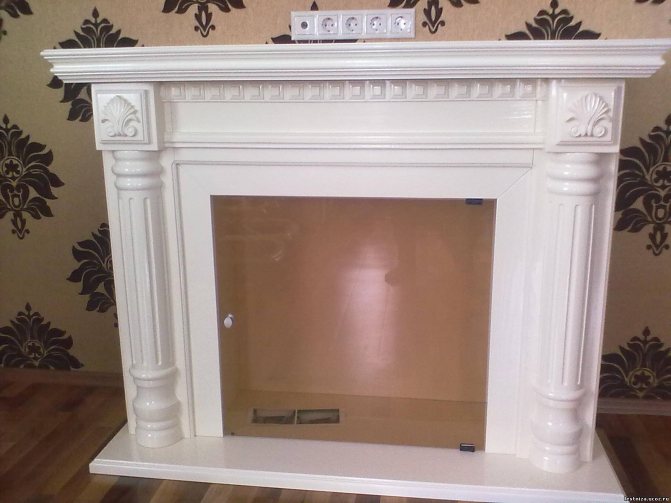
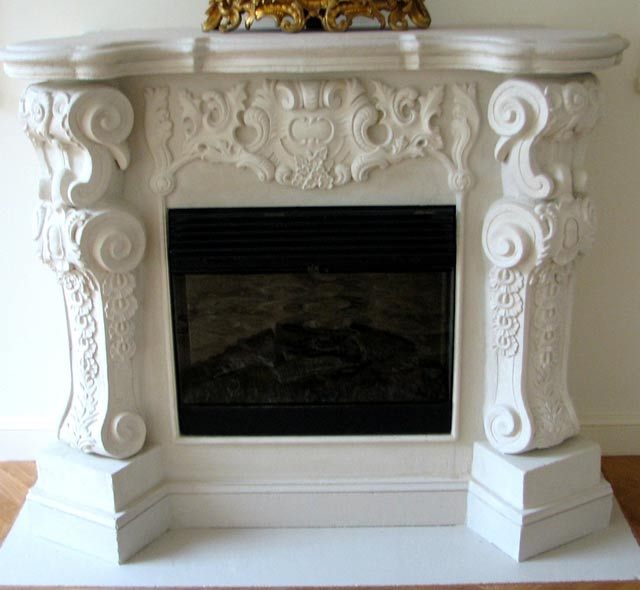
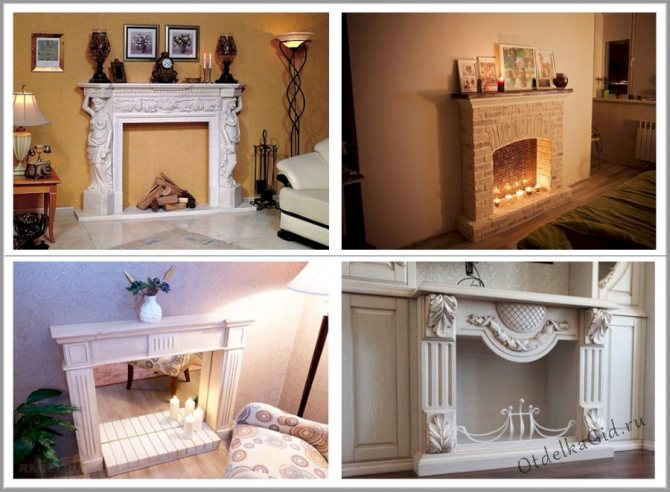
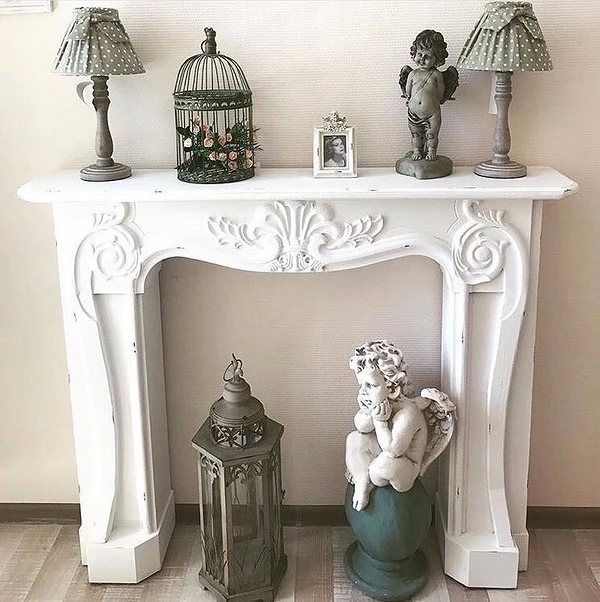
- Classic style. The most common type of portals. Their distinctive feature is the rigor of the design, the clarity of the lines. As a rule, they do not require any additional decorations. Paint the portal with white paint, you can add a little gilding;
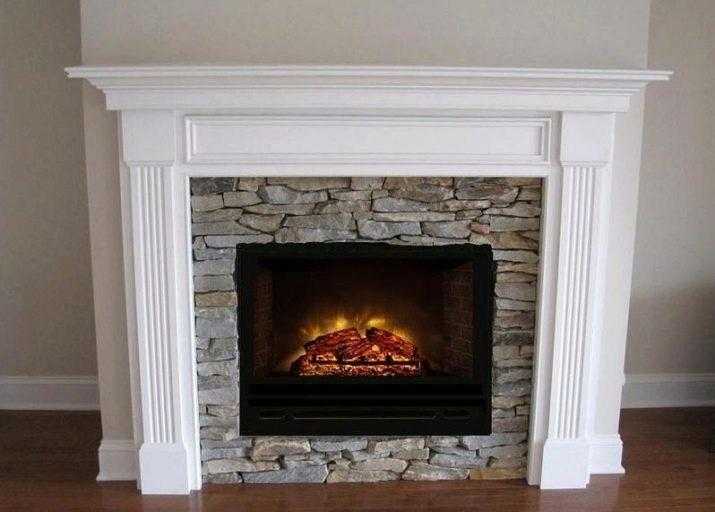
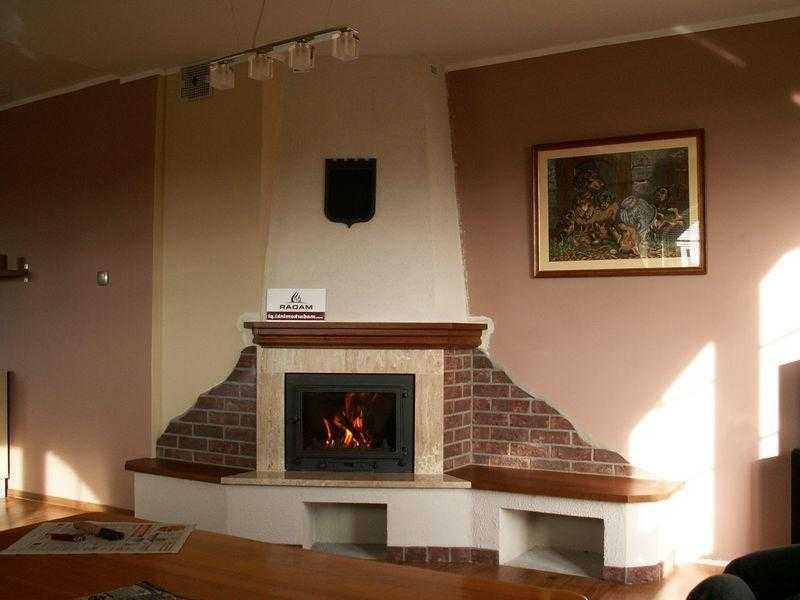
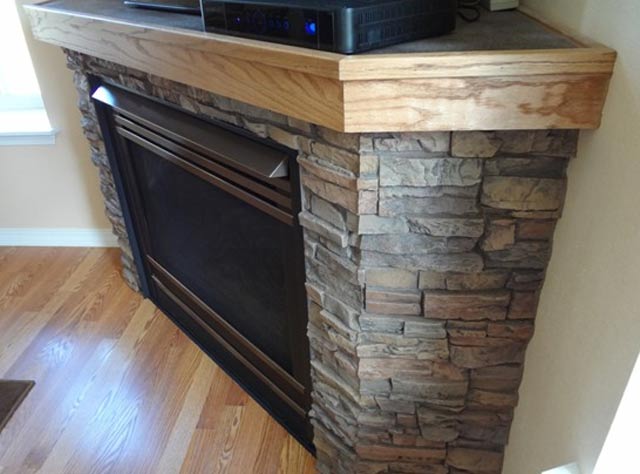
- Country style. If you want to choose such a design for your plasterboard portal, decorate it with tiles like natural stone or brick. Place bronze knick-knacks on the mantelpiece as decorations;
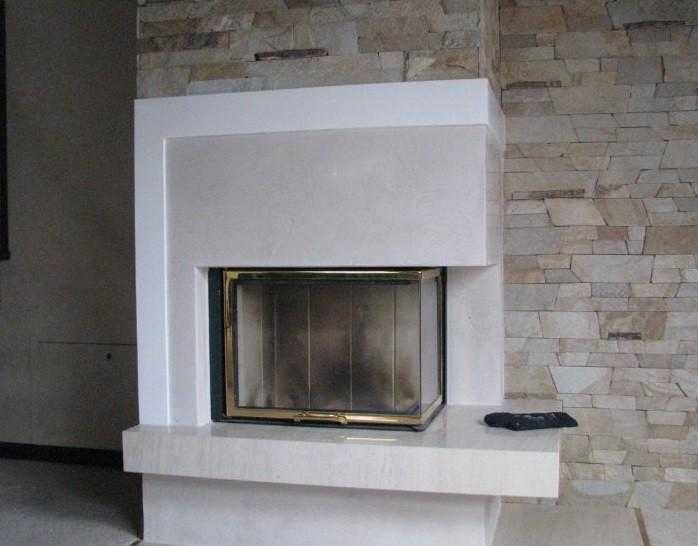
- High-tech style. In general, such portals are made of steel and glass, but if you are determined to make your portal exactly in this style, glue it with self-adhesive glossy film in black, add mirror or glass inserts, put the glass on the mantelpiece. You can hang a TV on top;
- Art Nouveau style.A distinctive feature of this type of portals is the mixture of classic and modern research. Such portals are suitable for almost any interior.
Required materials and tools
So, in order to build a structure for an electric fireplace you need:
- GKL based on the design of 8 or 12 mm;
- profile, both rack-mount and guide;
- fasteners for gypsum board and profile;
- serpyanka, putty, corners, spatulas;
- finishing material;
- electrical equipment;
- knife and scissors for iron;
- roulette;
- level;
- puncher;
- screwdriver;
- knife;
- pliers.
Once all the preparations are made, the installation can begin. Consider the most common and most complex drywall portal.
Design
- First, select the type of fireplace for which you are going to build a drywall portal. If you live in a city apartment, it is best to choose an electric or bio fireplace;
- Decide on the shape and size of the portal. The chosen fireplace must fit freely into it. It is also necessary to correlate the desired size of the portal with the parameters of the room, do not make it too large or too small;
- Next, we prepare a detailed diagram on which we indicate the sizes of all elements of the portal, we calculate the amount of materials required for the construction. Take into account all the nuances and double-check the received data several times - it is much easier than redoing something already in the design process.
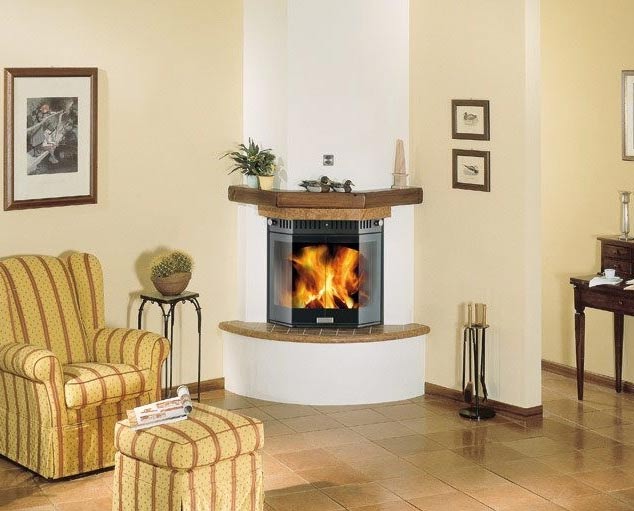
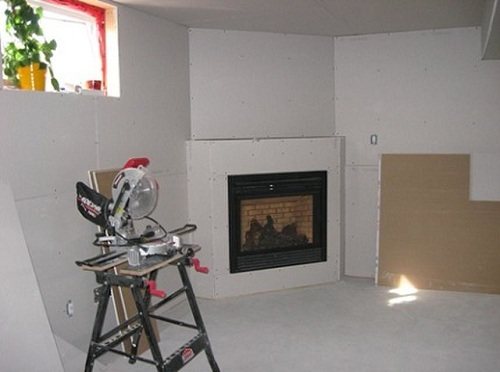
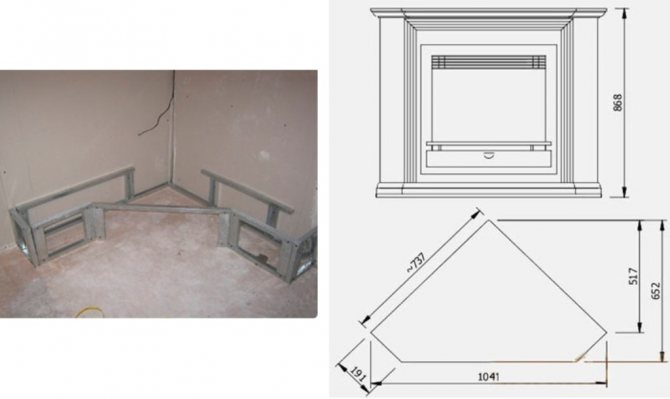
Corner portal for fireplace
This structure is irreplaceable in a room with a small area. The corner portal for a fireplace with your own hands from drywall takes up little space, in addition, it takes up a minimum of usable space, occupying a dead zone in the room. You can place it in any corner. They construct a structure according to a sketch prepared in advance, while it is necessary to strictly follow the instructions of the manufacturer of the electric fireplace, in which the parameters of the ventilation hole are written.
Corner portal made of plasterboard
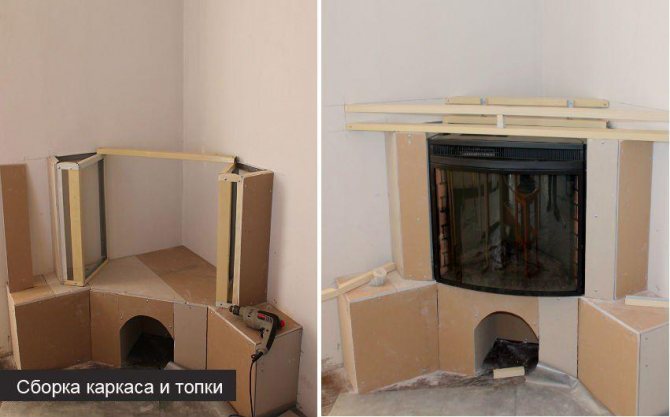
The work is carried out according to the following algorithm:
- Mark the profiles according to the sketch and cut them to the desired size, for this you can use a hacksaw for metal or scissors.
- All structural elements must be connected together with small self-tapping screws. This is easy to do, insert the wall profile into the guide and tighten the fasteners with a screwdriver.
- If you chose a heavy material as a finish, then the entire structure should be fixed to the wall or a special base should be made for it, which should be 30 cm larger than the structure itself.This approach to the structure allows you to build an imitation of a woodpile of firewood at the base.
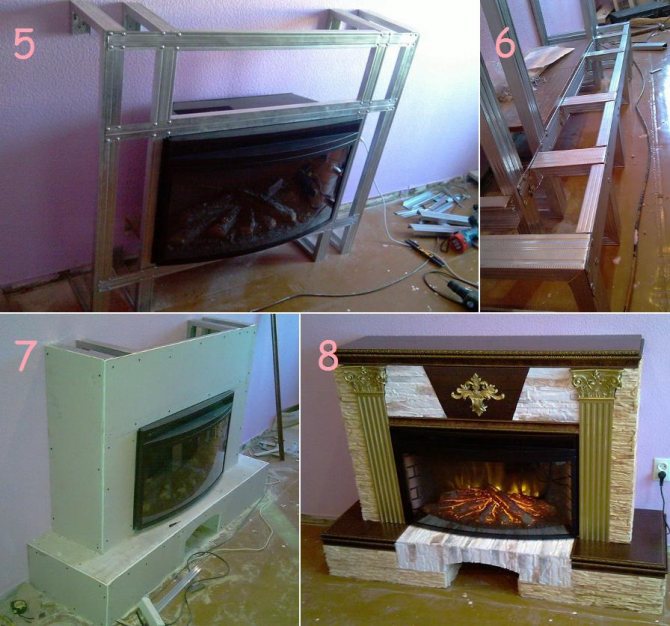
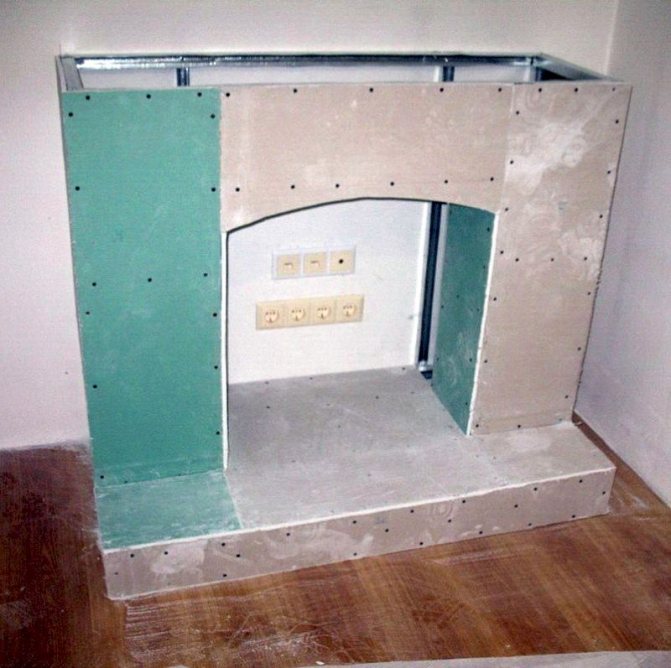
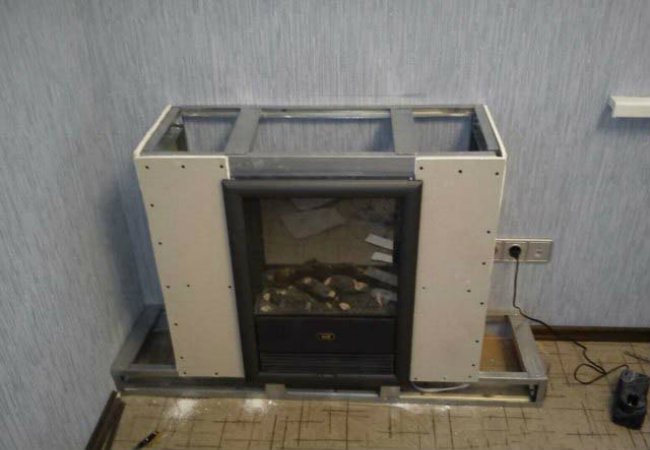
- During the assembly of the frame, it is worth constantly checking the parameters; for this, an electric fireplace is applied to a niche. This will help you not to make a mistake and make the correct electrical wiring to connect the device.
- As soon as the frame is completely ready, you should supply electricity to it so that it is convenient for you to turn on the fireplace.
- Drywall should be cut immediately according to the sketch, so it will be more convenient to work.
- The frame is sheathed with plasterboard using black self-tapping screws and a screwdriver. To make it easier to finish the structure, the screw heads are slightly sunk into the material, but make sure that the fasteners do not break through the cardboard layer.
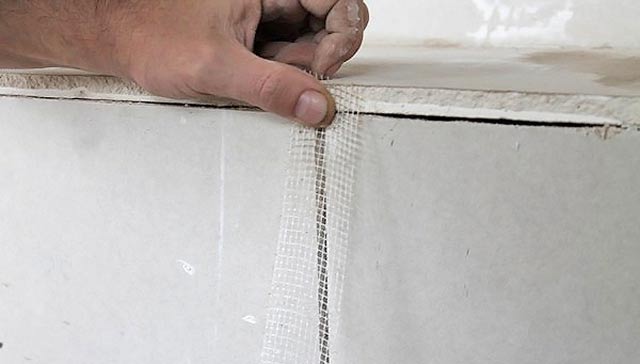
- GKL seams are embroidered and sealed, be sure to reinforce them with reinforcing tape. At the corners of the structure, a perforated corner is fixed to the plaster.
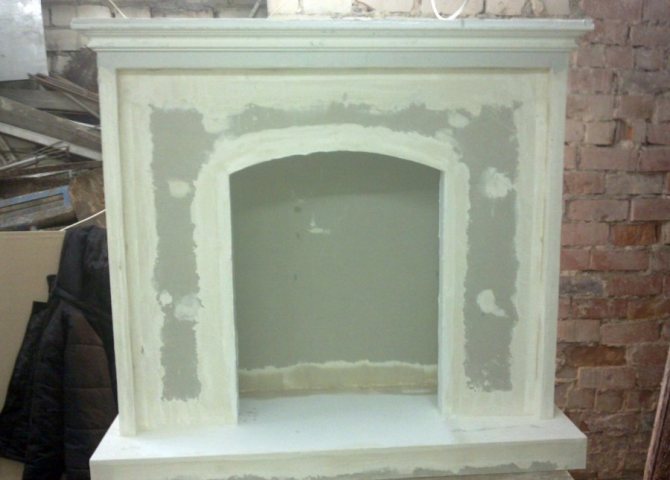
- The surface of the false fireplace must be putty with a base layer of putty, left to dry.
- The second layer will be the finishing layer and, after drying, sand it well.
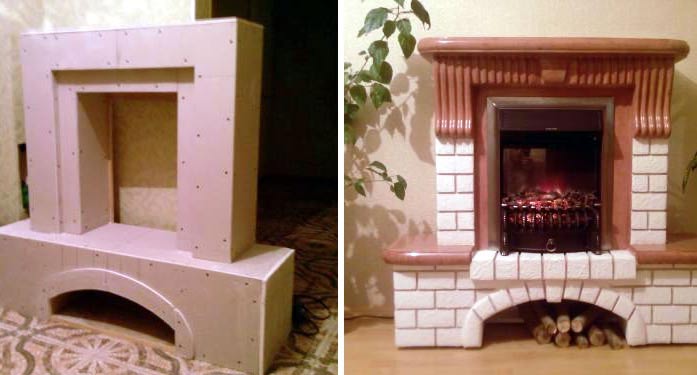
The plasterboard fireplace portal is ready for the final cladding. What type of finishing material can be selected for your fireplace, we will tell you below.
Project work
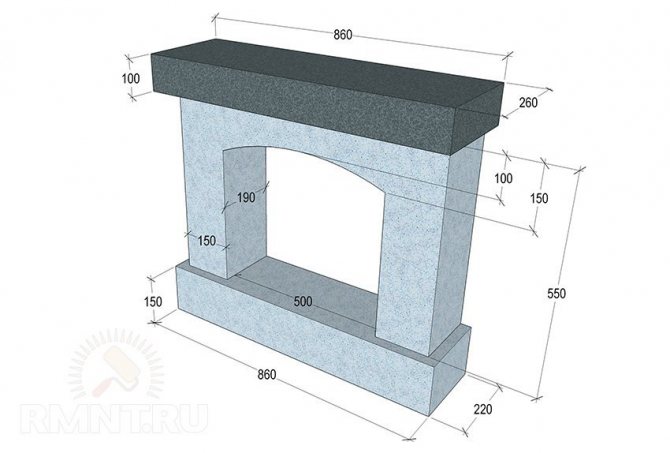
Before you make a drywall fireplace, you need to draw up a drawing of it.
Structural design requires consideration of the following issues:
- Where will the fireplace be located?
- How big will the portal be?
- What will be the shape and appearance?
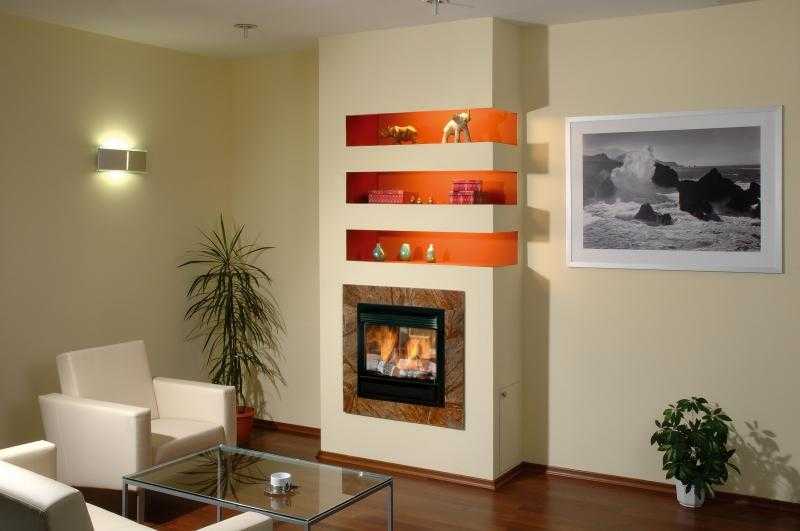
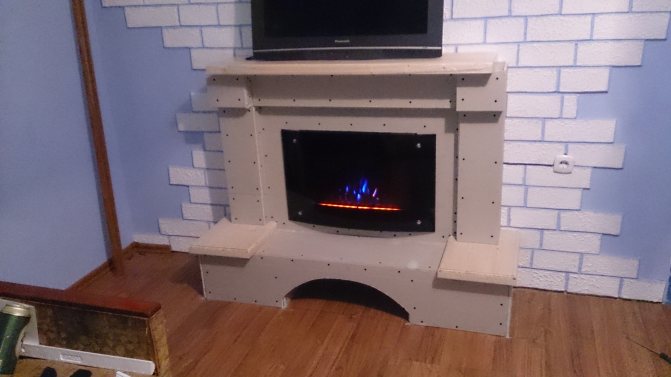
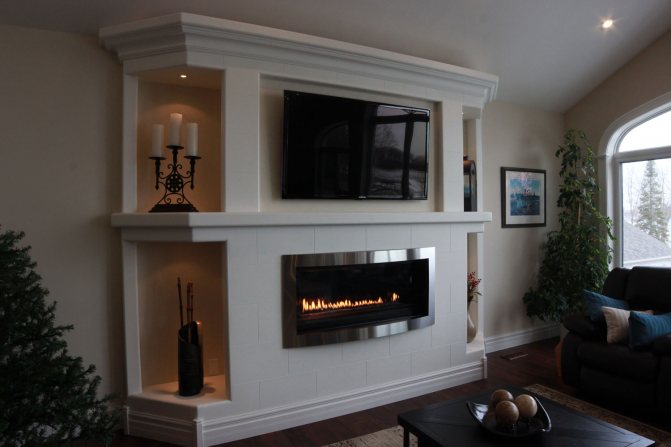
Most often, fireplaces are located in the living room: if there is enough space, then this can be the central zone of one of the walls of the room. In small rooms, it is better to choose the option with a corner imitation of a plasterboard fireplace. Due to the external similarity, a decorative fireplace is often combined with a TV area: for example, a screen can be hung over a portal. In order for the false fireplace to play not only an aesthetic, but also a practical role, shelves and boxes for storing small things can be included in its composition. Another option is to use the structure as a TV stand.
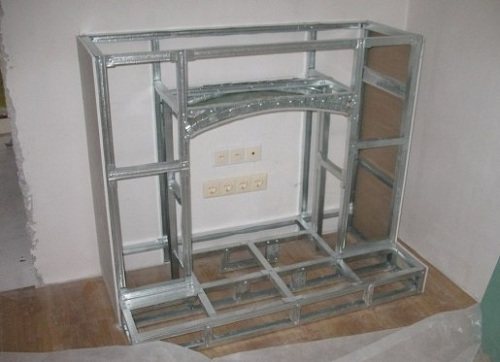
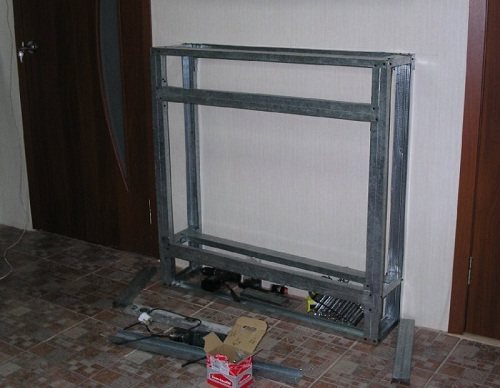
Such recommendations are not the rule - sometimes the portal and the TV are mounted on different walls. Having decided on the location of the decorative fireplace, it is necessary to calculate its dimensions and make a drawing of the product. In this case, it is not necessary to achieve structural identity with the present device. The main thing is that it should be outwardly beautiful and harmoniously fit into the overall interior design. The structure is based on a metal profile frame. The profile in this regard is very convenient, since it can be used to build any suitable structure.
Sometimes, when you independently create a drawing of a decorative plasterboard fireplace with your own hands, problems may arise. In this case, you can consider finished projects on specialized sites: ready-made drawings are allowed to be corrected, adjusting them to a specific architectural situation in your home. For example, if an electric fireplace is planned to be installed inside a decorative portal, then when constructing a structure, the dimensions of a household heater will have to be taken into account. It is most convenient when sketches with several options for the final design of a drywall fireplace with your own hands are attached to the finished project: in this case, the fireplace fits into the interior of the room as organically as possible. A detailed list of the dimensions of each part is also important.
Portal finishing - options
The entire design of the building will depend on the style. For final finishing, you can choose the following options:
- Paint the structure with any water-based paint.
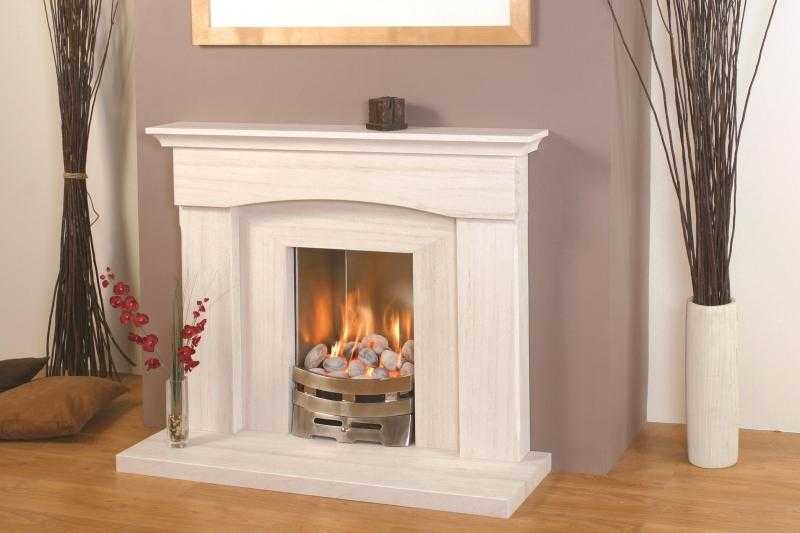
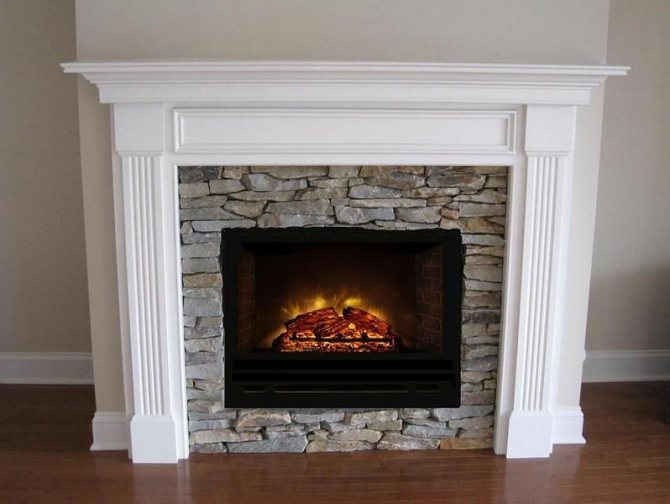
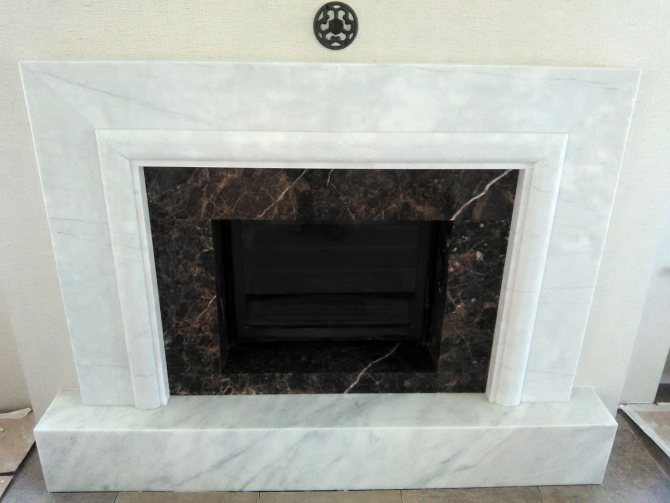
- Portals for an electric fireplace, decorated with decorative stone or tiles, look great, they are almost impossible to distinguish from real ones.
- The mosaic will give the building a chic look.
- You can make a fireplace from stucco molding, which is glued to ordinary plaster for interior use.
- The mantelpiece will add completeness and beauty to the portal. It can be made from any material, but in some cases, to save money, it is built from simple drywall.
- Any fireplace can be decorated with stucco elements, they are inexpensive, but the design becomes especially beautiful.
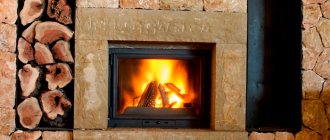
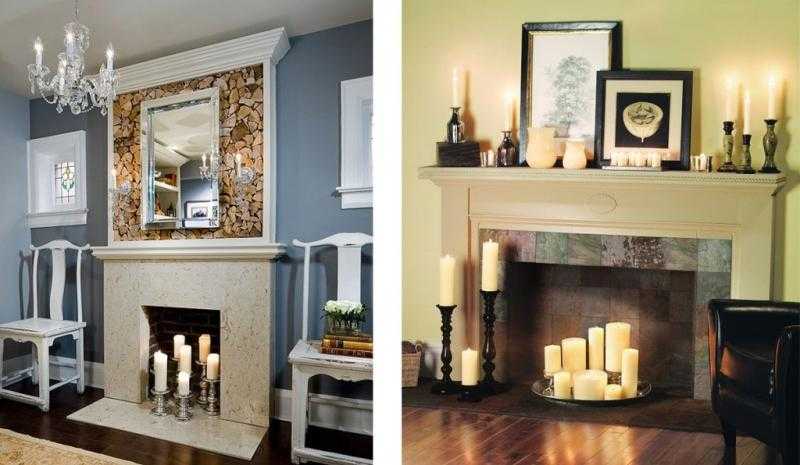
- If the fireplace is being built in a country house, then decorating the portal with a wooden shelf and finishing with decorative stone, like a brick, will not hurt. In this case, it is worth putting several natural logs in front of the false fireplace. This building looks very realistic and can become a decoration of the house.
- In the office, it is better to decorate the fireplace with decorative plaster, which will not differ in tone from the walls. In this version, there should be no bright and pretentious elements, just a few frames with photographs installed on the mantelpiece.
- Stucco molding with gilding can decorate a room in a Romanesque style. It is almost impossible to make stucco on our own, so we go to a special store and buy. The stucco molding is glued to any assembly glue, after which it can be gilded or painted in a tone contrasting with the portal.
It is worth noting that it is better not to overdo it with the decoration, since the pretentious decoration can overshadow the main decoration of any fireplace - the flame that sways beautifully in the electric fireplace.
Execution of works
The technology of creating a fireplace with your own hands requires accuracy and constant coordination with the plan.
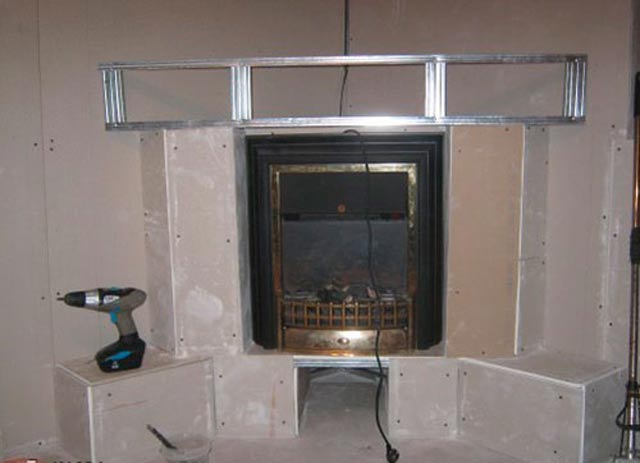
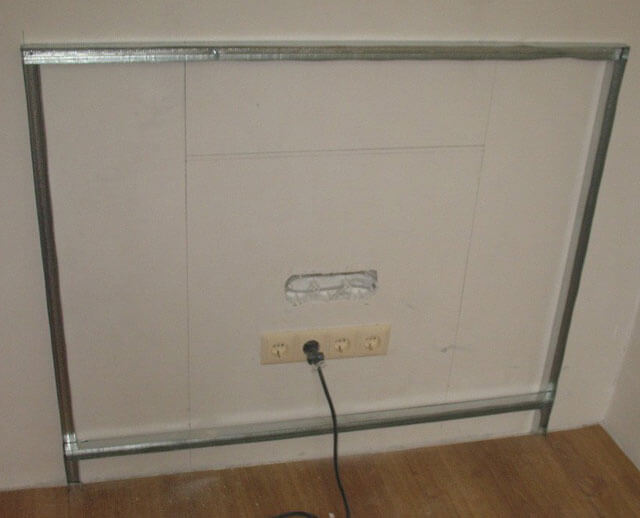
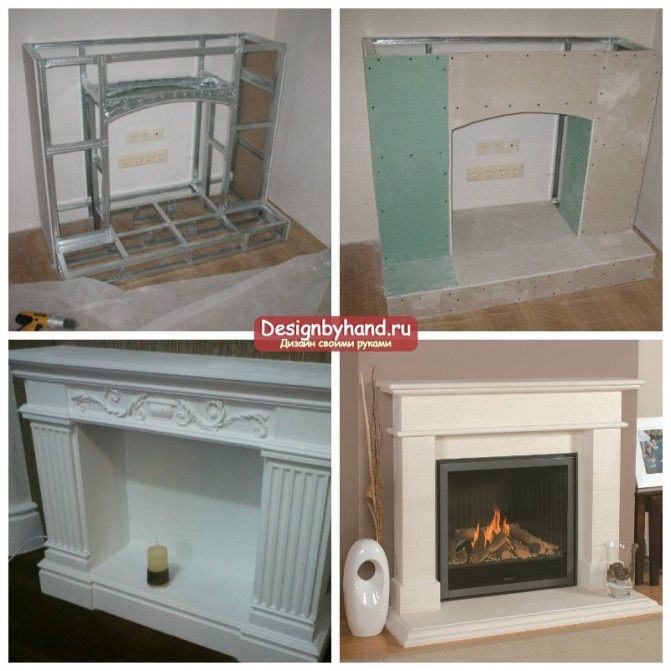
Frame installation
Step-by-step instruction:
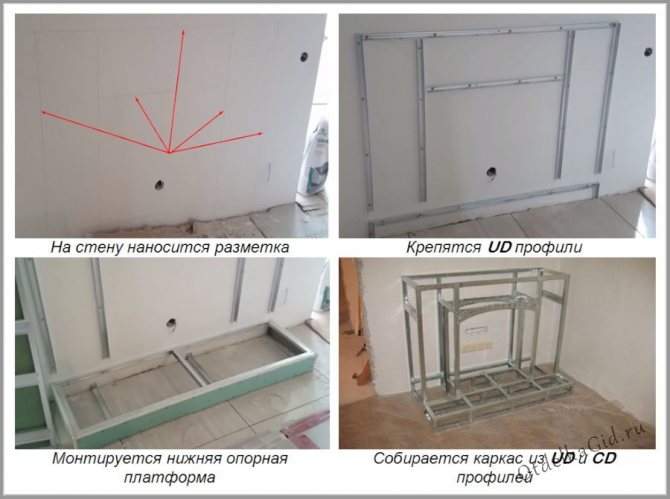
- Marking is applied. It must be fully consistent with the project.
- Parts of the required size are cut.
- The profiles are fixed to the base first, dowels are used for fastening. Everything is checked by level and among themselves.
- Vertical racks are placed, which are reinforced with jumpers with a step of 30 cm.
- A niche is equipped. If it is planned to place simulation or heating devices, then it must be made more reliable. For this, the metal parts are reinforced.
- After erection to the main frame, a protruding base can be completed.
- If the firebox has an arched appearance, then the edges of the profile fragment are cut, after which the element is bent to the desired shape and fixed.
The frame is not in vain called load-bearing, the appearance and strength of the future structure directly depends on the quality of its assembly
The complete assembly order is determined exclusively by the drawn up plan, therefore, the location of the profiles that will be mounted in the depth of the structure are thought out in advance.
Plasterboard sheathing
Step-by-step algorithm of the process:
- Details are being prepared. For this, the slab is cut to size into elements. If trimming is carried out with a construction knife, then the edges need to be reworked with a plane, so it is advisable to cut out the fragments with an electric jigsaw.
- Joints are necessarily formed between adjacent parts. It is possible to level the appearance of gaps by joining the joints: each straight seam must have a V-shape. Corner plasterboard fragments are overlapped.
- If you want to finish the arched niche of the firebox, then the simplest method is to create a stencil. An alternative method involves baiting the GCR part with a contour outlined on the seamy side.
- The fixing of the material is carried out as standard, the screws are screwed in flush. The step is chosen individually, depending on the size of the element.
If the box of metal profiles is assembled correctly, then it will not be difficult to cut and fasten the sheets of gypsum plasterboard to the base.
It is not difficult to sheathe the frame structure yourself. Finishing work is carried out according to the instructions:
- The joints are primed and covered with elastic putty, and a reinforcing tape is applied on top.
- The entire surface is treated with a deep penetration compound.
- If required, perforated corners are installed.
- A leveling mixture is applied. The layer thickness should be kept to a minimum.
This procedure simplifies the subsequent design of the fireplace by improving adhesion, and also allows you to change the finish without damaging the drywall.
Portal decoration
You can decorate the structure using various options, the choice depends on the style of the interior and individual preferences:
- Artificial stone or brick. For work, it is better to choose aged varieties. Laying is carried out depending on the shape of the structure. To enhance the entourage, the inner part of the firebox and adjacent areas are tinted dark or specially fired.
- Wallpaper. The simplest solution. Products are selected with imitation of natural materials.
- Stucco moldings and various moldings. At the moment, there are many beautiful decorative elements that have a complex structure and geometry. It is preferable to use fragments in the form of columns at the edges, and it is better to revet the protruding parts with curly details.
- Forged items. Products look interesting in the form of a contour or partial limiter for the firebox.
The cover is made separately, it can be of different thickness and shape.
In fact, there are a large number of different materials, which gives room for imagination.
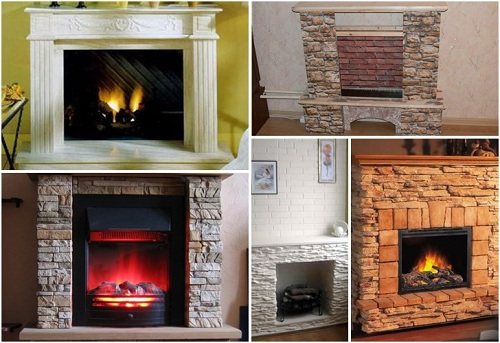
Decor options for false fireplaces
A selection of photos of ready-made portals for a plasterboard fireplace
Advantages of GKL fireplaces
Decorative models of fireplaces are designed for several reasons. The main reasons to make the structure yourself:
- Security of the premises. A real fireplace, designed for heating, is considered fire hazardous, but in principle, if you install it in an apartment, they have nothing to heat. In this situation, people acquire special devices that operate on electricity and simulate the flame of a burning fireplace. In such fireplaces there are electrical parts, so it is appropriate for them to use a material with fireproof properties.
- For the purpose of home decoration. A false fireplace perfectly decorates a room; it can act as the main decorative element, which is often accentuated. This option does not emit heat, but looks great next to the laminate on the floor. How to work with laminate, see our article. For the purpose of design, various gypsum boards are used.
For such main reasons, people decide to make a decorative plasterboard fireplace with their own hands. Regardless of the option chosen, the order of work is almost identical.
The reasons why people are increasingly giving preference to such designs:
- Fire safety. These options are not capable of operating from direct fire. And even if the fireplace still heats the room using fireproof drywall, the risk of fire is equated to zero.
- Simple construction. Due to this advantage, fireplaces can be easily constructed independently. And if you wish, you can make a complex design of decorative fireplaces.
- Large selection of shapes. Since drywall is used for the construction, any form of imitation of a fireplace can be designed. Often they make an imitation with a chimney, so the fireplace looks complete.
- Dimensions of the room. To design such a structure, the size of the room is not important, because you yourself choose the size of the finished structure.
- Facing. It is made from any finishing material. This allows it to be combined with any finishing materials in the room. Therefore, if you have already made a self-leveling floor with your own hands according to our instructions, do not worry, the fireplace will fit perfectly with it.
Many, starting from a number of advantages, decide to make a fireplace with their own hands from drywall.
Tools and materials
To assemble the structure of a drywall fireplace portal, you will need the following tools:
- A screwdriver, a perforator and a construction mixer (or a whisk for driving putty and a drill).
- Scissors for metal or grinder, construction knife, stapler.
- Roulette, building level, square, chopping thread, rule.
- Screwdriver, hammer, spatula set.
- Tray, brush and paint roller.
If all the necessary tools are not available, they can be rented or borrowed from neighbors, because the process of assembling a fireplace from drywall will take no more than 2 days.
To determine the amount of required materials, you should make an approximate drawing of the portal with the dimensions of its structural parts. After studying the technology of assembling a drywall frame, assembling a portal with your own hands is not difficult.
Materials required to create a false fireplace:
- drywall (you can use the ceiling to save money);
- metal profiles UD, CD, profile connectors (optional);
- dowels 6 × 60 mm (fungus), self-tapping screws for metal for drywall 35 mm, "fleas";
- for a hammer drill, you need a drill corresponding to the diameter of the dowels (in this case 6 mm), a cross bit for a screwdriver;
- serpyanka, perforated metal and arched plastic corners, emery mesh, staples for a stapler, replaceable blades for a knife;
- if you plan to cover the portal with a stone or tile, you need to purchase a special glue, you will also need a primer, putty, water-based paint and colors.
Practical use of building materials. Plasterboard crafts
Assembly order
It is not easy to assemble a drywall portal, but by adhering to the recommendations and applying a little ingenuity, it can be done quite quickly.
When assembling a fireplace from drywall, it is necessary to study a lot of information, but let's apply ingenuity - this can be done quickly enough
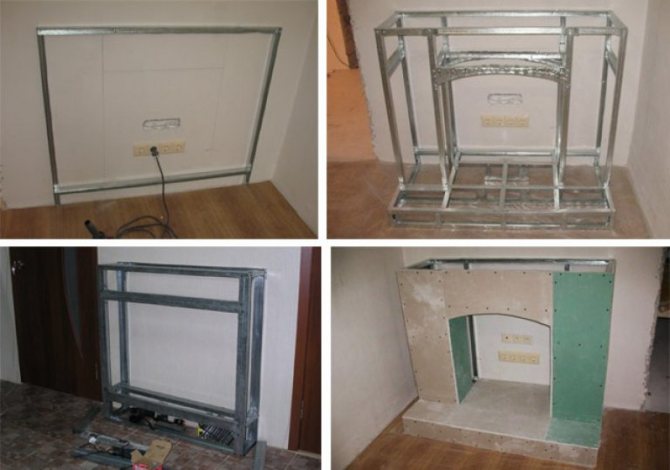
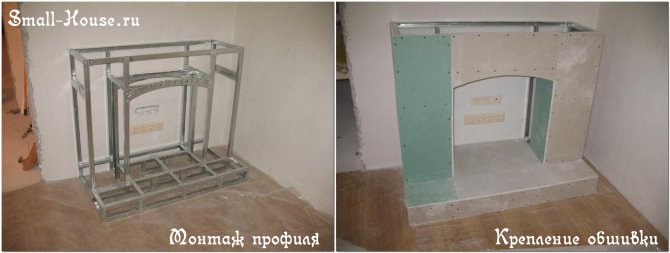
Frame installation
- According to the drawing, we begin to mark the wall and floor, determine the attachment points along the perimeter of the structure of the UD guide profiles. It is important to constantly monitor the clarity of the dimensions and the parallelism of the edges.
- Drill through the profile with a drill in order to attach it to the wall with a dowel. Hammer in the mountings with a hammer.
- Use the fleas to connect the CD and UD profiles.
- According to the drawing, it is necessary to mount a niche in which the source of "fire" will be located. Before assembling it, carefully measure the dimensions of the electric fireplace or other device that you plan to install in the niche. The size of the frame in the niche should be slightly larger than planned, since drywall and trim will still be installed there.
- The portal frame must be rigid and capable of bearing the required load. To make rounded arch elements, use the UD profile trim in 5 cm increments.
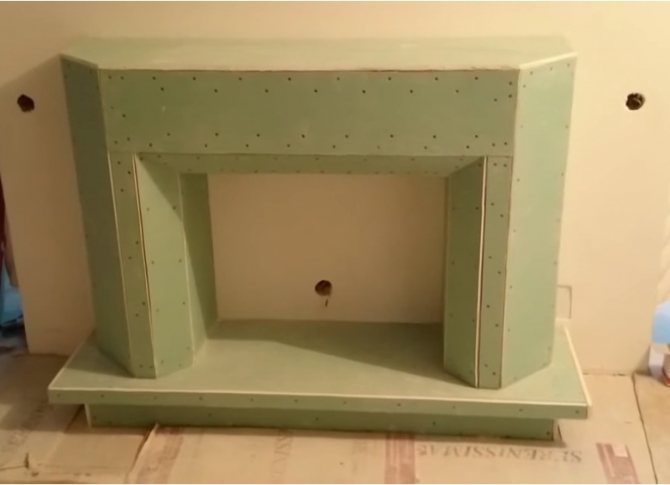
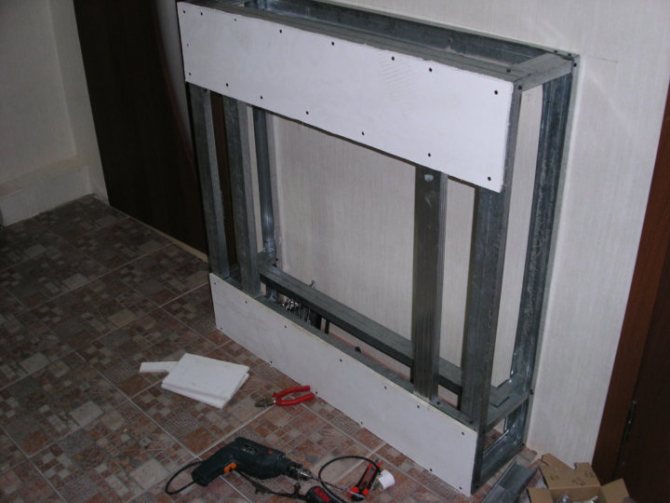
Plasterboard sheathing
Having collected the "backbone" of the future fireplace, proceed to sheathing it with plasterboard. Do not forget to turn the elements with self-tapping screws with a step between fasteners no more than 20 cm.
- Start at the back of the firebox, then sew over the sides and front.
- Drywall sheets should fit snugly, forming clear corners, without protruding parts and gaps.
- Drywall is screwed in profile with self-tapping screws. It is necessary to carefully sink the screw below the level of the cardboard, but so as not to break it.
- To sew up the bent parts, cut a piece of drywall to the correct size. On the seamy side of the sheet along the width, you need to mark the lines at a distance of 5 cm and cut the cardboard with a knife. Slightly breaking the plaster along the slots, we get the necessary element for the arched part.
When sheathing the frame with plasterboard, screw in self-tapping screws in increments of no more than 20 cm
Fireplace decoration and decoration
This is followed by plastering the frame with plasterboard. At this stage, the dimensions from the frame are transferred to the sheets of drywall, after which the necessary parts are cut out. These parts should be fixed to the box using self-tapping screws.
Stage five - decorative finishing. There are many ways to finish a raised fireplace using different materials.
The simplest and most economical is the simple painting of the entire structure. But it is worth remembering that the surface of the fireplace should be prepared before painting. This preparation includes putty and surface sanding.
The fireplace can also be simply covered with self-adhesive foil. This method is also quite economical. In addition, you can choose a film with a pattern that imitates natural stone or brick.
One of the most popular finishes is decorative plastering. Dry mixes can be purchased at almost any building materials store, they are easy to dilute and also easy to apply to any surface.
If the fireplace is decorated with ceramic tiles, then do not forget about the preliminary priming of drywall and the use of an auxiliary reinforcing mesh. It is attached to the surface of the drywall and provides a strong bond between two contacting surfaces.
You can also choose decorative polyurethane. It is mounted using special adhesive solutions and imitates classic stucco molding.
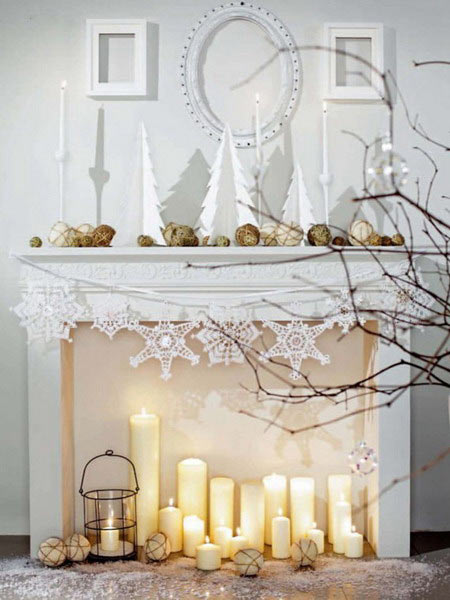
And finally, the decoration of the fireplace.A classic fireplace cannot be imagined without a mantel, therefore, very often, when making a false fireplace on your own, the structure is also supplemented with a hinged shelf. On it I have all kinds of accessories that are in harmony with the overall interior of the room. Additional accessories (in the form of a grate, artificial firewood, candles, mirrors and other decorative elements) can be additionally placed on the floor near the fireplace itself.
Thus, creating a decorative fireplace is a very simple process. Of course, it will take time, skill and patience, but the end result will delight not only the master, but all family members for many years.
Some helpful tips
Some little things in the process of work may fall out of sight. A few tips will help you not miss important points.
- All wiring must be laid between the stages of assembling the frame and the plasterboard sheathing.
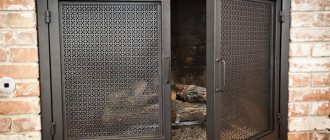
- When using candles or an electric fireplace instead of an animated fire, you need to take care of fire safety measures by choosing appropriate materials for the niche.
- The structure must be extremely static, fixed to the wall and floor.
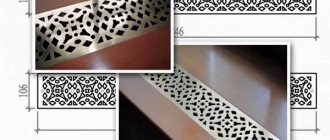
- In the middle of the upper flange of the portal, it is necessary to arrange a small ventilation hole with a diameter of 0.4 × 0.1 m.
Following the tips and recommendations given in the article, everyone can independently make a portal for a fireplace with their own hands. The beauty and comfort in the house completely depends on our desires and efforts.
Making a fireplace portal - possible options, step-by-step instructions
When choosing one or another material for making a portal for a fireplace, take into account not only personal preferences, but also the design of a particular room and available funds. In most cases, fireplaces that are equipped with portals almost do not heat up during operation, and their weight is only a few kilograms. Consequently, there are practically no special requirements for thermal stability or strength characteristics of the selected material.
You can easily take natural stone or decorative brick, plastic or glass, gypsum board, metal and even wood slabs. According to experts, only solid wood and plywood sheets should not be used for the portal, since these materials differ in that they quickly collapse in high temperatures. In addition to the options listed above, fireplace portals are often made of plaster, polyurethane.
As for the rest of the points, everything here, again, will depend on your taste. Below we have provided several detailed step-by-step instructions for building a decorative frame from the easiest to use, and therefore the most popular materials.
Fireplace portal decor
The cladding is not a completely finished work. You can make such a design that it will attract all your guests and will delight the eye for a long time.
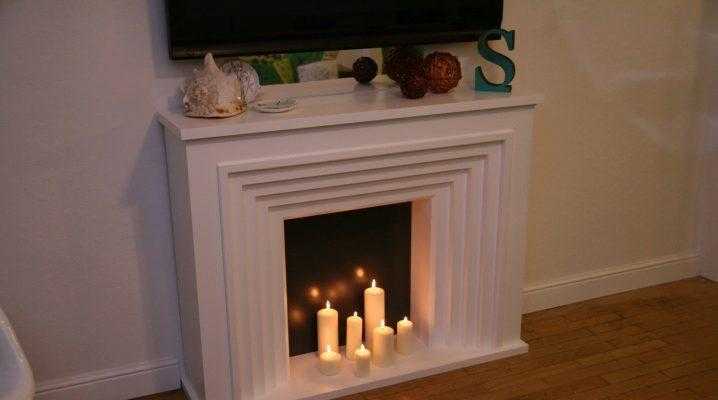
A beautiful glow can be achieved by cladding the portal with mirror panels. Inside, over the entire area of the box, you can skip the LED strip, which will be beautifully reflected in the mirrors. Several candles can also be placed there.

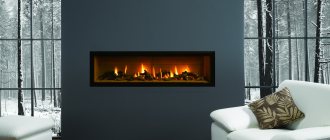
Inside the niche, you can install an LCD screen with an imitation of crackling logs and flames. If you want to provide a real flame, you can put a separate small biofireplace in the niche. It runs on biofuel, is easy to refuel and safe when used properly.
_home_store
Plants, dry twigs, cones and candles are also well suited as decor. They will create a special coziness and a festive atmosphere. On the upper niche, you can put frames with photographs, figurines or vases with interesting ornaments.
A flat TV or a picture can be placed on the wall adjacent to the unit. In a small room above it, you can place a mirror, which will visually expand the space.