Before the advent of modern building materials, people actively used natural materials with the ability to retain heat for insulating houses. For many centuries, clay and sawdust have been used to insulate houses made of stone and wood.
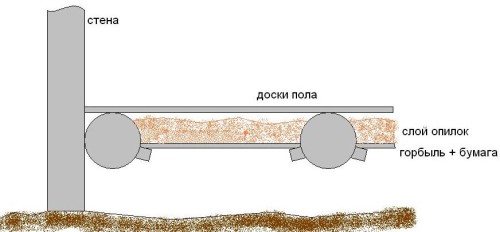
Floor insulation scheme with sawdust.
Clay with sawdust - has unique thermal insulation properties and is not only a means of insulation, but also waterproofing. The waterproofing and insulating properties of clay, supplemented with sawdust, can even be used to equip baths, since this material is not subject to destruction even in conditions of possible contact with hot steam, which not all building materials used for insulation and waterproofing can effectively cope with ...
Using clay with sawdust as insulation
The advantage of clay with sawdust as a heater is that it prevents heat loss in winter, and helps to maintain pleasant coolness in the room in summer.
One of the main advantages of such a means of insulation as clay with sawdust is that this option can be used in almost any area: both where it is hot most of the time, and where the temperature drops to critically low temperatures. Clay mixed with sawdust not only prevents heat loss in winter, but also helps to maintain pleasant coolness in the room in summer. In addition to the unique thermal and waterproofing properties, this material is very durable and at the same time environmentally friendly. Some private developers prefer clay precisely because of its environmental safety, because not all modern building materials are trustworthy in this regard and can be used to decorate the interior of the premises.
However, it should be noted that fixing a house with clay mixed with wood waste is far from the easiest way to insulate. There are many factors that influence the effectiveness of insulation using clay and sawdust. Firstly, it is very important to properly prepare the mixture, since if the proportion is violated, the finished material will not set and, accordingly, will sprinkle very quickly. Secondly, it is necessary to correctly apply the insulation to the walls in order to achieve the maximum effect.
Clay with sawdust is used mainly for ceiling insulation, that is, in an area where there will be no significant load on the coating.
If wall insulation is planned, it is better to use reeds or straw instead of small sawdust. It is believed that it is preferable to use reeds mixed with clay, as mice do not like it very much. The thing is that in this case, straw or reeds will serve as additional reinforcement, thereby increasing the bearing capacity and strength of the entire insulation layer.
Pottery lesson. Centering Clay and Creating a Cylinder
This master class is devoted to the basic principles of working with a potter's wheel.
Before starting work, I would like to add that in attached to the very end is a detailed video tutorial on centering clay and creating a cylinder.
Let's get started!
1) Clay bloom
Before starting work, the clay must be rinsed well. We take the lump in our left hand, turn it over and at the same time tap it with the palm of our right hand. It is best to form an even round ball - this will allow you to quickly create a product already when working behind a potter's wheel.
2) Bonding clay
With force we throw a lump into the center of the circle, in case we suddenly missed, then the clay can be easily moved to the required place. It is worth noting that the disc must be dry, otherwise the clay will not adhere well.
3) Centering
In order to center the lump, we make the following movements: with the lower part of the left palm we create an effort from ourselves, and with the fingers of our right hand we create an effort towards ourselves. Thus, these two efforts help us to bring the clay to the center.
Very often I am asked why, in general, alignment is needed. It's just that without it you won't be able to do anything with the clay, it will constantly beat against your hands and sooner or later it will simply burst. Therefore, it is so important to learn how to do it right. Clay can be considered centered when its center of mass moves in sync with the disc and it no longer hits your palms. My advice to you: try to close your eyes, hug the lump and feel tactilely whether you have managed to bring it into the desired state. Over time, you will begin to feel and understand clay without deep mental analysis based on feelings.
4) Cone
Now we need to create a cone. The cone serves as an additional method for compacting clay particles, removing excess air and centering. Just as when centering clay, we make the same efforts, only we also lift the mass from the bottom up in smooth movements. At this point, do not forget to be sure to wet the clay, since you can simply rip off the mass on dry. It is also worth applying even pressure with all fingers so as not to form spirals while pulling out the lump.
In order to lower the clay down, we make pressure with the left hand downward from ourselves with the lower part of the palm, and with the right hand we hold the cone so that the mass can evenly return to its previous state.
5) Create a hole
Slowly and smoothly pierce the clay with your thumb or forefinger, creating a hole. Note that the hands always move together. Separately, the movements are uneven and asymmetric. Also, the inside of the clay is always drier and denser, so the hole must be constantly wetted. The fingers should also point slightly away from you, otherwise it is quite difficult to make a vertical hole. When piercing, it is necessary to leave a distance to the disc, otherwise our cylinder will turn out without a bottom. Many potters recommend leaving 5 or 7 millimeters, but I always leave 1 centimeter, because I like to make deep legs in my work when grinding. If you do not want to make a leg, then leaving such a small distance is quite reasonable. Students often ask me how to determine the thickness of the bottom. This can be done by piercing the bottom with an awl. You will see a mark on the needle. Since I no longer have little experience in the potter, I determine the thickness tactilely with my fingers.
6) Extending the walls
There are a lot of ways to push the walls of the product, it is most convenient for me to do it with thumbs in different directions. At this moment, the most important thing is to touch the bottom with your fingertips and pull the walls, keeping your hands at the same level, otherwise the bottom will turn out with bumps. But, in fact, it is very easy to fix it if you run your finger or a sponge from the center of the bottom to the edge.
You can move the mass apart until you find it necessary, but you need to leave a supply of clay, otherwise, there will be nothing to raise the walls with.
7) Pulling out the cylinder walls
So, the first thing I would like to dwell on is that you keep the index fingers of your right and left hands at different levels. The right finger is lower and the left one is higher. This will help you to capture the clay and "drive the wave", as they say among potters.
Second: before driving the wave, it is necessary to take the required amount of mass from below. Therefore, we first press the clay with our right finger from the outside below, forming a bump, which we then clamp between two fingers and drag to the end.Very often, beginner potters at the end simply tear off the throat of the product, this is due to the fact that there is a sharp upward movement of the hands. Therefore, it is better to gently disconnect the fingers at the top to the side, inward or upward without much pressure. In this case, it is better to never rush, but to pull the clay slowly up, even, perhaps in several stages, constantly, picking it up in the right place.
Also, while stretching, check the thickness of your walls, if somewhere it turned out thinner, then adjust the clay from below to this place and the wall will become uniform. The product will always be thicker at the bottom than at the top, because otherwise the wall simply will not support the weight of the clay and will collapse.
Thanks for reading this article. I am attaching a video to you, as I promised at the beginning. There I describe in detail all the stages of work. I think that this will make everything clearer for you!
You can ask me any questions in the comments. I will be glad to answer!
What clay and sawdust is better to use for the preparation of an insulation mixture?
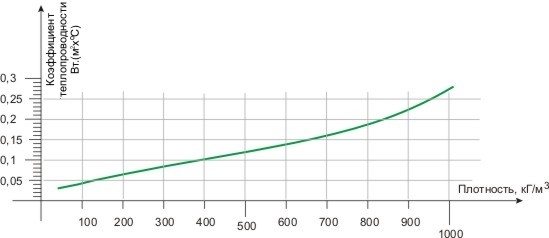
Scheme of the coefficient of thermal conductivity of sawdust.
It depends on the correct choice of the basic materials for the preparation of insulation material how well the heat in the room will remain in the future. Clay is the main binding agent. In the wetted state, clay is very plastic and very much like children's plasticine. It is believed that it is best to use red clay for preparing the mixture, since it is more plastic, hardens faster and is less susceptible to being saturated with water. However, if it is not possible to get red clay, it is quite possible to replace it with other varieties of this material, for example, white clay. This will not affect the final result so much, but the finished surface may require more careful maintenance.
Particular attention should be paid to the choice of sawdust. Oak sawdust is best suited for the manufacture of insulation mixture. Oak materials are considered the best option, since they are almost not saturated with moisture, and even if contact with moisture has occurred, there will not be much harm from this. Oak sawdust does not rot and does not increase in size due to saturation with water. If there is no way to get oak sawdust, you can use waste from sawing coniferous trees, including larch, pine or spruce. The use of sawdust from these types of trees also has its advantages. The wood of these trees contains a large amount of essential oils, which have a pronounced antibacterial and antifungal nature, which will significantly reduce the risk of mold and mildew on the surface of the material and in voids.
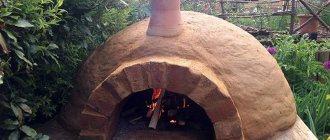
Secrets and technology of preparing a clay mixture
Before making a clay tandoor with your own hands, you need to choose the right materials for work. The Asian peoples use the local clay. To create a tandoor, kaolin clay, which has a light gray or light yellow color, is excellent. It is chamotte, as it has excellent heat-conducting and heat-insulating properties.
Type of clay for work
As noted above, kaolin clay is used to make tandoor. It is 40% silicon dioxide and 35% aluminum. It has a light gray or light yellow color, it is also called white clay. It is used due to its high thermal insulation qualities. But during the operation of the tandoor, its walls can crack. To avoid this, sheep or camel wool can be added to the clay.
Kaolin clay is very often used to make tandoor
Clay with impurities must be soaked in a barrel. Pour in twice as much water and mix. Light debris will rise on the surface of the water, and stones will settle at the bottom. After that, the water must be drained and the sediment removed.
And clean clay must be poured into a flat container.Leave to infuse for several days. If water appears on the surface, it will need to be removed. It is desirable that the liquid remains as little as possible. This will reduce the likelihood that the finished product will crack. Normal clay for tandoor should have a plastic-like consistency.
Specificity of solution preparation
When creating a clay tandoor with their own hands, craftsmen can use a variety of techniques and recipes. Some add soda to the clay solution: for 10 liters of the mixture, 1 tbsp. substances. You can also add water glass, which increases the ductility of the furnace walls, so the likelihood of cracking during temperature changes decreases.
Be sure to add animal hair - sheep or goat to the clay solution. You can replace it with straw, but in this case, the quality of the construction may be worse. It is better to take goat's wool, as it is straight and does not curl like sheep's. The amount of wool required depends on the size of the structure. For example, for a tandoor with a height of 0.8 m, approximately 1.5-2 kg of wool will be required. The clay composition must be thoroughly kneaded to make it homogeneous. Previously, kneading the mixture was carried out with your feet, but now a construction mixer is used for this purpose. The consistency of the composition should resemble thick sour cream. Then the clay must be squeezed out until a mass is obtained that resembles plasticine.
Excipients
Straw or wool is used as fillers for the mixture. This increases the heat capacity of the oven. Over time, under the influence of extreme heat, these fillers fade. Therefore, small cavities remain in the walls. They do not affect the quality of the erected structure, but they increase the thermal conductivity.
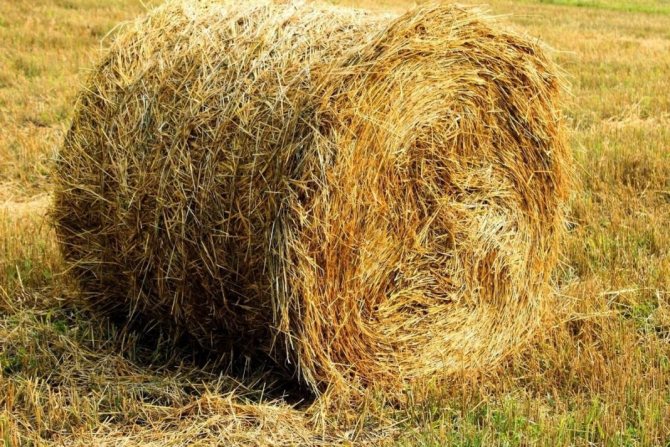
Straw is used as filler for tandoor
How to properly prepare a mixture of clay and sawdust?
It is worth saying that there are several ways to use clay with sawdust as a material for insulation, therefore, the method of preparing the mixture may differ somewhat, as well as the entire technology of further laying the finished material. If desired, you can use a still wet mixture, which is poured onto the ceiling from the side of the attic. However, there is another option, which involves the manufacture of panels from clay and sawdust, which are then laid in a dried form in about the same way as all modern panel materials intended for insulation.
First of all, it is necessary to prepare all the necessary materials that will be needed not only during the preparation of the mixture, but also during its use for insulation. The work may need the following materials and tools:
Scheme of wall and ceiling insulation with sawdust.
- Clay.
- Sawdust.
- Water.
- Bucket.
- Large trough for makeup blend.
- Hoe.
- Wooden blocks for making molds for panels.
- Plywood sheet.
In the manufacture of an insulation mixture, it is very important to correctly observe the proportions, as this will allow in the future to avoid severe cracking of the finished surface. If you plan to use a mixture intended for application in a wet state, 2/3 of a bucket of sawdust is taken for 1 bucket of clay. First of all, you need to fill the clay with water to make a thick porridge. It is difficult to say exactly how much water should be taken, since in this case it all depends on how dry the clay was originally. Clay can be saturated with water for a long time, especially if it was originally dried to a stone state. If you wish, you can speed up the process of saturating the clay with water by constantly stirring it, but even this method will not give a quick enough effect.
It is best to immediately soak the required amount of clay and let it brew for several days until it acquires the desired consistency. After diluting the clay to a liquid state, sawdust can be added.Clay and sawdust should be thoroughly mixed until a homogeneous thick mixture is obtained. You can use a garden hoe to mix clay and sawdust, but a household concrete mixer should be used whenever possible.
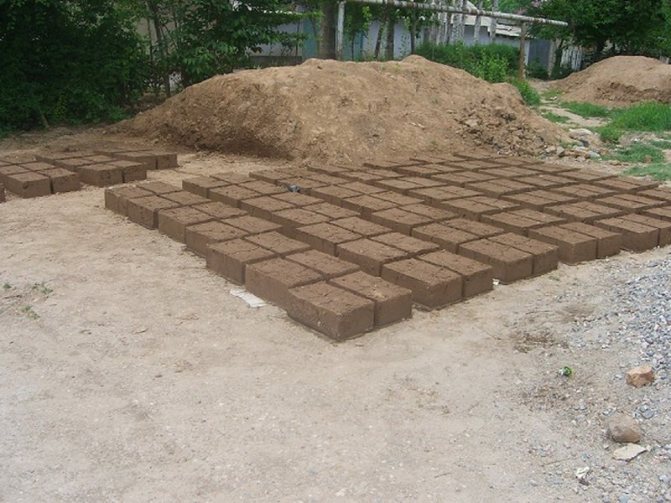
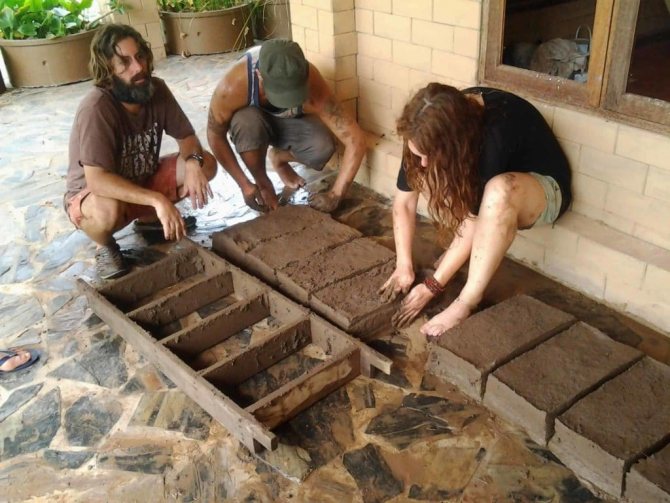
For the preparation of insulation boards, clay and sawdust are taken in equal proportions. In this case, you need to immediately prepare the molds into which the solution will be poured in the future. To make a mold, it is necessary to knock together from bars, the height of which should be at least 15 cm, a lattice with cells of at least 50x50 cm.This lattice is then placed on a plywood sheet, so that it is more convenient to pour the solution into it. In addition, the use of plywood allows the boards to have one flat sidewall. The prepared solution of clay and sawdust is poured into molds and left to solidify. After pouring the solution into the molds, it is necessary to carefully level the surface with a spatula. Do not dry the insulation panels in direct sunlight, as this will lead to severe cracking. It is necessary to make a canopy over the forms or, in extreme cases, throw grass on top to ensure a sufficient level of shading.
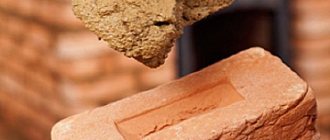
How to correctly determine the proportions of additives in clay for homemade bricks
To be sure of the necessary plasticity of the clay and calmly start your own brick production, the experiment should be continued (and who said that it would be easy and simple?). But this is only if the first tests showed that the clay is oily and requires the addition of sand. If the clay is too skinny, then you should look for a greasy clay and mix it with your preforms. In any case, it is necessary to determine the proportions of the additives.
In handicraft production, sand, chamotte (lean additives), sawdust (burn-out additives for burnt bricks), straw (for adobe bricks) are often used as additives.
The proportions, the composition of the additives in the mass will have to be determined empirically. To do this, we prepare several portions of the same volume of clay, but with a different ratio of additives. It is important here not to get confused and to write down the proportions used. Next, you should knead each sample, adding water to a plastic state.
From each sample we make a ball and a cake. After natural drying for several days, the samples that did not withstand drying and cracked did not pass the primary selection. The composition remained too bold. The second round is carried out by throwing from a height of 1 meter onto the floor those samples that did not crack during drying. In those samples that did not pass the strength test, the clay turned out to be too low in fat. Samples that have passed the drying and mechanical strength tests with dignity will serve as your benchmark for the percentage of additives.
You can read about the manufacture of each type of brick in the following articles of the block "Brick with your own hands", and our construction company reminds that with our construction team any work will progress faster. A house insulated with ecowool is always warm, cozy and environmentally friendly.
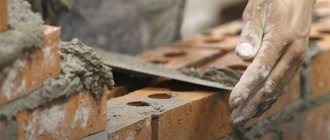
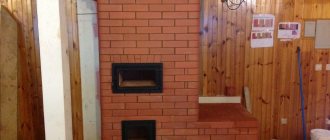
Home insulation technology using clay and sawdust
The technology of insulation, both with the help of a mixture and with the help of ready-made blocks, is quite simple. After laying and completely hardening, the surface of the insulation made of clay and sawdust becomes very hard, so you can even walk on it without fear of cracking. It is best to treat the surface to be installed with plaster or cement mortar before laying the insulation. The base layer of the plaster should be about 1 cm and be as even as possible. Insulation is laid on top of the frozen base.
If it is planned to lay a wet mixture, then it is necessary to make a wooden formwork so that the mixture is poured into boxes, the width of which should be about 1 m.The boxes will keep the mixture from spreading and will allow you to form a more reliable insulation layer. If the beams are close together, they can be used as formwork.
Next, a thick mixture of clay mixed with sawdust is poured. It is necessary to fill in the insulation progressively, box by box, along the way leveling the surface of each new fragment. After full pouring of the mixture of clay and sawdust, it is necessary to allow the surface to harden. The thickness of the insulation layer should be at least 15 cm. During drying, small cracks may appear, which should be rubbed with a clay solution. This method of arranging thermal insulation is considered acceptable at the stage of building a house, since it is rather dirty.
If the construction has already been completed, it is best to use ready-made clay and wood waste slabs to reduce the risk of contamination of the surrounding surfaces. To equip the insulation layer, you just need to lay the plates on the treated surface so that they fit snugly against each other. The joints of the slabs must be carefully processed with a clay solution in order to prevent heat loss through microcracks.
Saman and raw: making
The following types are made in artisanal conditions:
Brick molding: A - the form is placed on the floor, sprinkled with sand; B - a lump of clay is put into the mold with effort; B - excess clay is squeezed out, and the rest is compacted with a round metal pipe; G - the form is raised.
- Saman, that is, a brick that contains straw, without the firing process.
- Raw brick.
- Classic burnt.
If adobe is made according to technology and with high quality, then in its properties it will not lose to fired brick. Adobe structures can be used for up to 70 years. If the walls are thick enough, then the adobe house will be warm in winter and cool in summer.
So how to make adobe? First you need to stock up on the necessary set, which includes:
- the container in which you will mix the mixture;
- skinny clay;
- oily clay;
- straw;
- water;
- shovel shovel for mixing the mixture.
A mixture of oily and lean clay is taken in 1 part, 5 parts of chopped straw are added to them. Dry wheat stalks are excellent straws for these purposes. Add a little water to the mixture and mix thoroughly with a shovel. You need to remember a simple, but very important rule: be sure to chop the straw, in no case should you use the whole one.
After the solution is ready, you can fill out the forms with it. To make it easier to get the brick out of the mold, moisten its inner part with water and sprinkle it with either cement or fine sand. Care should be taken to complete the form. The excess solution is removed with a conventional spatula. As soon as the form is filled out, you need to install the top cover, which will then be removed. Removing the brick from the mold is quite easy by turning it over.
Perforated brick molding.
As a mold for the future brick, you can make a tooling made of plywood and boards. The dimensions are usually taken as standard: 25x12x6.5 cm. You can even make projections in the lid, which will create recesses in the brick, which during construction will give a higher degree of adhesion to the cement mortar. When making a mold, the top cover is made removable. The number of forms must be taken based on the amount of work.
Drying of workpieces should be done on shelves prepared in advance under a canopy. The shrinkage process takes about 15% from the original dimensions, which should also be taken into account. It is imperative that there is a good degree of ventilation in the place where the brick dries. But it is highly undesirable for the direct rays of the sun to fall on the product.Drying times will depend on specific conditions - humidity, temperature and even wind speed, usually about 1-2 weeks.
Raw brick is produced in a similar way with only one amendment: straw is not added, but quartz sand is taken instead (the finer, the better) in a ratio of 1: 5.
Back to the table of contents