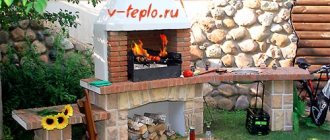
Do-it-yourself long-burning stove from a gas cylinder
Stove stoves, made from improvised means, do not lose their popularity, especially in the winter period. A potbelly stove can be made from a gas cylinder in two ways. The vertical oven is most often installed in small utility rooms and country houses. A horizontal potbelly stove is usually built for heating and cooking.
Stove heating is considered to be quite in demand, and most often it is created in such structures in which it is simply impossible to bring another heating system. If you wish and have time, you can carry out all the work on the formation of the structure with your own hands. It can run on wood or another type of fuel.
The very shape of the balloon ensures the formation of an optimal and interesting stove with a spherical firebox. The result is a long burning design. It is suitable both for a private house and for a bath. If you need to do it yourself, then it is advisable to study the instructions well and watch the training video.
Diy potbelly stove
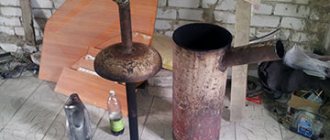
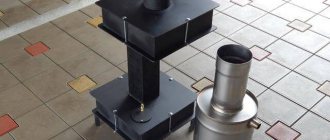
In the container with a chisel, you need to cut down the blower (or cut out with a grinder) measuring 20x40 cm. The distance from the bottom is up to 30 cm. Another hole needs to be made in the upper part of the container - it will serve as the basis for the chimney. The top of the barrel (or box) can be welded tightly (then you can cook food on this stove) or made removable. With a removable version, the chimney hole is cut from the side, 10-15 cm below the upper edge.
An effective chimney for a potbelly stove can be made from any iron pipe with a diameter of 110-150 mm or bent from roofing sheet iron. And the last hole is cut below the blower to clean the ash. Sizes - any, based on the ease of cleaning. Both the blower and the ash pan should be covered with a door or latch.
Further, a grate or grate is made. You can make one grate in the form of a thick metal sheet with cut holes for air passage, or you can make several grates from reinforcement with a thickness of 10-16 mm. Both the one and the other structure fit on special ledges-thresholds welded inside the barrel at the height of the lower level of the blower.
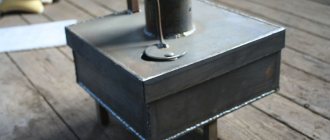
Such a potbelly stove is intended for a summer cottage or garage. It should be installed at a distance of 1-1.5 meters from walls, partitions, shelves and other items. Simple bricks can be used as a mobile foundation, or metal legs 20-40 cm high can be welded to the bottom of the potbelly stove.
Potbelly stove for giving
If the stove stove for a summer residence will work permanently, then it can be overlaid or made of brick - this technique will noticeably increase its heat transfer and thermal inertia. In suburban conditions, such a homemade stove can be used not only to heat a country house. but also for heating a bath. greenhouses or sheds with animals. Household and economical craftsmen try to make heating more efficient and economical, for which thick metal plate-accumulators are welded in the upper part of the furnace to increase heat transfer.
Since it is supposed to be at the dacha longer than in the garage, then the stove for the dacha will be operated almost around the clock. Therefore, the furnace body must be made of a thicker metal (3-4 mm). The easiest way is to weld the body from sheet metal, giving it a rectangular shape. This will not affect the efficiency, but it will add reliability. First, the side sheets are welded together, and a thick cover is welded to them.
Further in the body, the grate and the bottom are attached. It is also advisable to make a chimney for a stationary stove of thick iron or lay it in half a brick on an earthen solution.
Small stove from a small cylinder
For a small steam room with a volume of 8-10 cubic meters, it will be enough to make a stove from a small gas cylinder. Usually 27 liter cylinders are used. The wall thickness at the bottom is remarkable - 6 mm. Without a crane, their height is 500 mm, diameter is 300 mm. It turns out to be a wonderful little stove.
First, the remaining gas must be removed from the cylinder. For this, water is poured into it. Water gradually displaces all residual gases. After the cylinder is filled, you can cut off the tap and start making the furnace.
First, with a grinder, carefully, at the end where the tap was, cut a hole for the firebox door. On one of the sides, which turned out to be under the long side of the cut-out hole for the door, we arrange a kind of grate. We take a drill and cut 10 mm, drill holes every 20 mm. There are 5 rows in total.
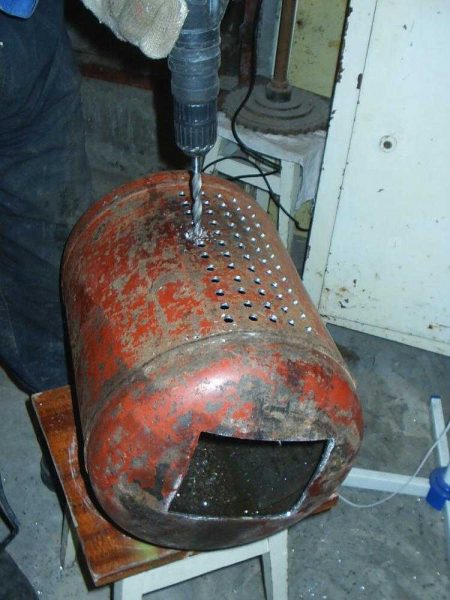
Ash pan holes should be at the bottom
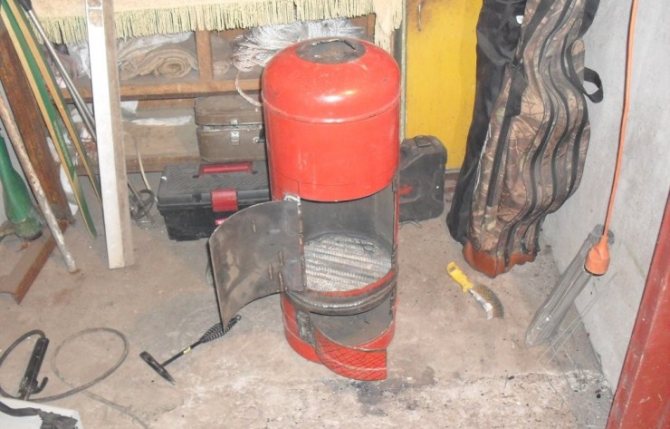
Weld a piece of channel over the holes. In our case, its width is 140 mm. We weld the back wall to the front flood and attach a door. You get an ash box. Its minus is that in this version it is not retractable. If desired, the design can be improved by making a separate box.
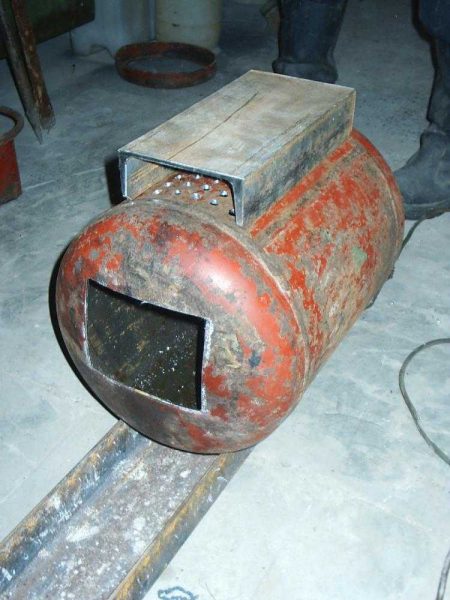
Welded channel
As a support, a protective structure was welded to the channel, which closed the tap. Economical and completely reliable.
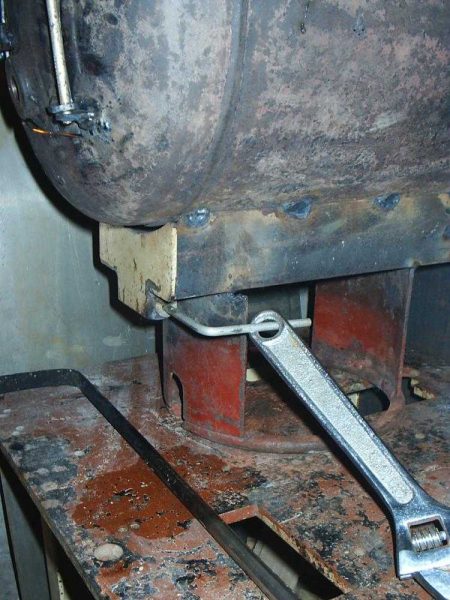
The stand is made of protective construction
The doors were fixed to the ash pan and to the firebox, a chimney pipe was welded closer to the rear of the firebox (first it was welded, then the metal was cut out inside by welding).
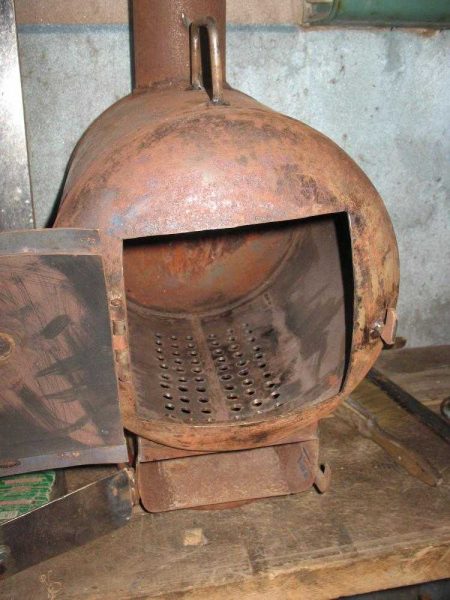
Doors are installed in place
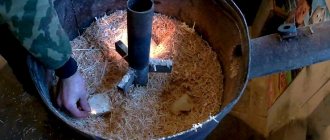
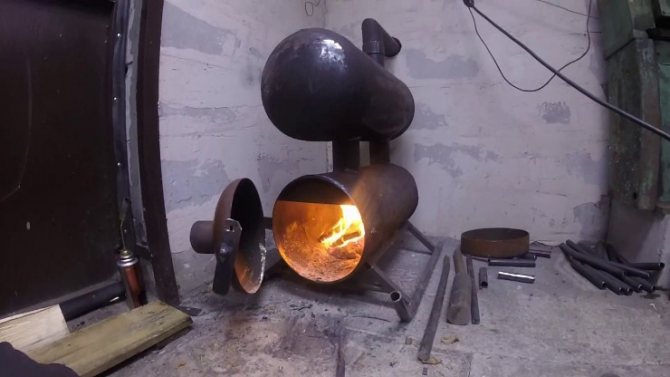
We carried out a test kindling. In the presence of a high pipe - more than 2.5 meters, the thrust is excellent.
Trial kindling
As tests have shown, a 2.5 * 2.5 * 2.3 m steam room from 3 ° C to 25 ° C was heated in less than half an hour (almost without insulation, since the bath was not completed yet). Then they stopped drowning, it is necessary to improve: too hard heat is emitted.
Read how to make a sheet metal sauna stove here.
Improvements to the homemade cylinder sauna stove
The designs of these ovens may differ slightly. Someone welds a metal plate in the upper third, increasing the path that smoke travels, someone welds grate bars inside from fittings, makes a stove - outside or inside. In general, there are a sufficient number of ways to modernize the design of the furnace, which in the simplest version is simply a stove. It is these improvements that turn the potbelly stove into a sauna stove.
The firebox of a home-made stove from a gas cylinder showed that a very strong heat was emanating from the body. There are two options: make a large grid for stones on top, or cover the stove with a brick screen. It was decided to make a heater on top. It was welded with reinforcement bars of 14 diameters.
Grid for stones on a sauna stove from a gas cylinder
As you can see, in order to protect the wall of logs from the heat, the brick wall was folded into half a brick. Its height is not lower than the laying of stones.
We offer you to familiarize yourself with the Column foundation with your own hands: step by step instructions
Even if there is a stove on top, the chimney becomes very hot during the heating. There are also options for this:
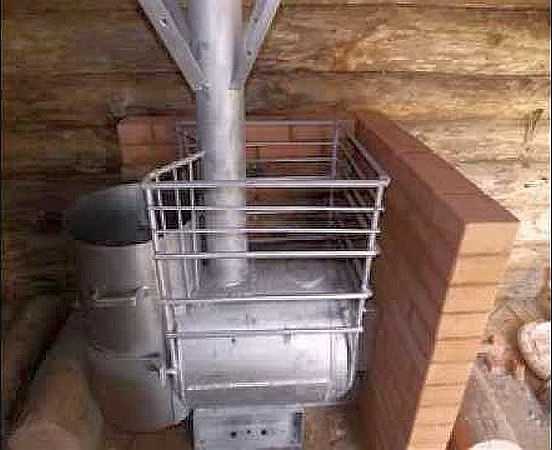
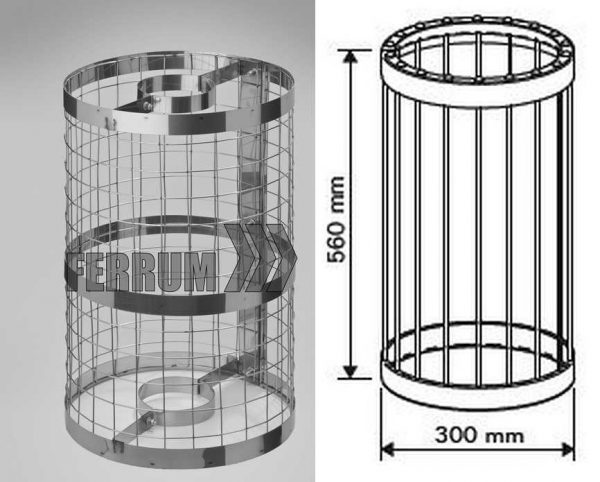
- Make a grid for stones on the chimney. This will increase the inertia of the stove, after the firewood burns out in the bath it will be warm for a long time. Hard heat will also be removed, and the temperature of the flue gases will become lower, and this will increase fire safety. The design is visible in the photo, you can use a mesh with a wire thickness of 3-4 mm or weld it from a thin bar.

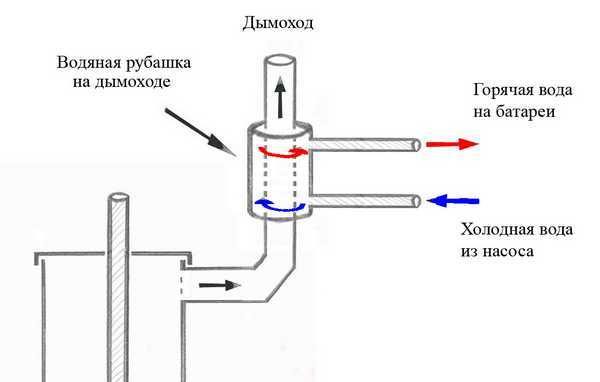
Construction of a mesh for stones on a pipe - Make a heat exchanger on the pipe. It can be in several versions: Water jacket.Make a sealed tank around the pipe with two nozzles, which are connected to a remote tank with water (you can power a pair of water heating radiators).
- Just a heat exchanger to increase heat removal. Another cylinder is simply welded around the pipe, only a long and narrow type of oxygen. Due to the larger area, heat transfer is increased.
The second cylinder - for greater heat removal and better warming up of the room - Coil on the pipe. Instead of a water jacket around the pipe, you can wind several turns of a pipe, preferably a copper one, through which to let water to the remote tank.
The principle of operation of the water jacket on the pipe
The principle of operation of the convector on the pipe at Feringer's
An ash pan in such a design as described above is inconvenient: it will have to be cleaned with a poker, raking out the coals into some kind of container. Not the best option. Retractable in this regard is more convenient. It is also used as a regulator of the intensity of combustion. They are catching up with the temperature when the ash pan is open, the combustion is active. After reaching the specified parameters, the ash pan is pushed in, little air enters, the combustion almost dies out.
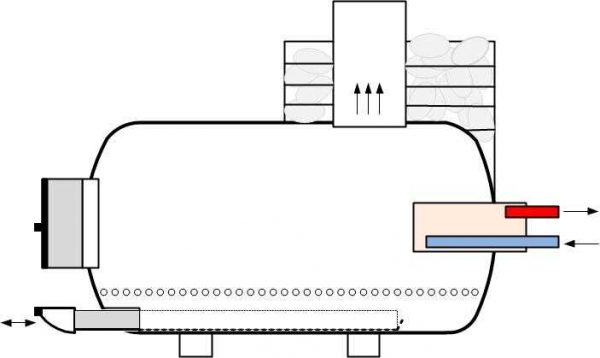
Diagram of a furnace from a cylinder with a retractable ash pan and a heat exchanger
If you need hot water in the bath, you can install a heat exchanger inside the firebox (in the photo above it is shown as a rectangle). The heat exchanger can be made in the form of a tube, bent in the form of the letter U or C - whichever best fits. This is an easier option. Sometimes it is made in the form of a small flat box with welded pipes.
Combustion control with the ash drawer is rough. You can make fine adjustments by welding a metal glass with a slide gate on the door. By turning the gate, you increase / decrease the amount of air and the intensity of combustion smoothly, achieving exactly the mode that you need at the moment.
Example of a door with a gate
This idea was taken from the Buleryan stoves. It is simple and effective. There are several photos of devices for adjusting the air supply to the firebox below.
How can you make a gate on the door
Please note that the disc of the slide gate must be made either of a smaller diameter than the inner diameter of the glass (by 5-10%) or a part is cut out in it (sector, cut off part of the circle). This condition is required. This ensures the minimum traction, and it is mandatory for safety: it carries away the combustion products, preventing people from getting burned.
How to make a sauna stove from a pipe is written here.
Content
- Choosing a cylinder
- Improvised means, materials and tools
- Creation options Create a vertical oven
- Horizontal potbelly stove device
A stove-stove is very often used for heating premises such as a garage, utility room, basement, country house, etc. For occasional heating, it is impractical to buy a boiler and install a heating system. For these purposes, many purchase stove-stoves. However, there is another, more budgetary option - to make a potbelly stove with your own hands from a gas cylinder.
An example of a handmade potbelly stove. Such a heater is often installed in summer cottages, garages and utility rooms.
The simplicity and popularity of the stove
Simplicity, mobility and omnivorousness (it runs on wood, coal, there are even modifications of waste oil stoves) made the stove popular, and this demand is still being held. Moreover, today the efficiency of stoves has increased, and interest in how a potbelly stove is constructed with your own hands still remains.
Simple as a bast shoe - it's about a potbelly stove. Therefore, a stove stove is always desirable in a garage, on a camping trip, in a country house or in a gatehouse. What attracts people to this stove so much? This is versatility and mobility - the stove can be installed without a foundation, and after cooling it can be moved by hand to another place.
The potbelly stove is designed only from metal, so all surfaces of the stove have a high heat transfer. You can build a furnace in 2-3 hours if you have material and welding. It can be anything - for example, a 50-200 liter barrel, a metal container of any configuration, or something else.
Choosing a cylinder
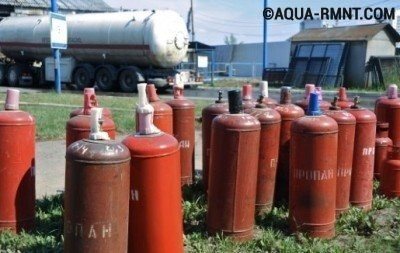
An old and unnecessary gas cylinder is a suitable body for a future oven. But in order for the potbelly stove to effectively heat the room, you need to choose the right size of the container. Five-liter cylinders are very small, their volume is not enough to create heat even in a small room. Cylinders of 12 and 27 liters can be used for heating small rooms, but such stoves will be low-powered. The most suitable option is a 50 liter gas (propane) cylinder.
Important! The dimensions of a cylinder with a volume of 50 liters have standard dimensions: diameter - 30 cm, height - 85 cm.
If a forty-liter industrial gas tank is at hand, then it can also be used as a body for a stove. However, it should be borne in mind that the walls of such a cylinder are thicker, and the diameter is smaller.
Important! Freon cylinders for the manufacture of a potbelly stove are not suitable, since they have a large mass and size.
The power and heating rate of the furnace directly depend on the size and thickness of the walls of the cylinder. The optimal volume of the tank for a potbelly stove is 50 liters.
Before using a gas cylinder, it is prepared for work, for this you need:
- unscrew the tank valve;
- leave the cylinder overnight and let the remaining gas come out;
- turn the balloon upside down;
- drain the condensate and collect it in an unnecessary container;
- fill the container with water to the very top;
- turn over and drain the water.
↓ Be sure to study the recommended material on the topic ↓
DIY mini-stove stove: on wood and working off
Important! Failure to dispose of the remaining gas in the cylinder increases the risk of explosion when welding or cutting the container. Be careful.
Before starting work on the creation of a potbelly stove, the gas cylinder is cleaned of gas residues. Otherwise, an explosion and unpleasant consequences may occur.
Gas cylinder preparation
The valve is twisted from the cylinder. This is the first and foremost condition. In a sealed cylinder, there will inevitably be gas residues and if you start cutting it, it is fraught with an explosion.

- The valve is twisted.
- An open container is rinsed with water and ventilated for at least several weeks. Only "fresh" cylinders are dangerous. If it has been ventilated for a month or more, there will be no problems.
- If there is no time for airing, more extreme methods are used. After rinsing the balloon with a thick detergent, it is filled with water "to capacity" and then cut with a grinder.
- The paint is burned in the fire.
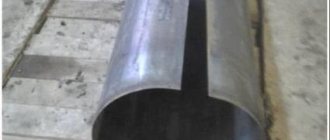
If the design of the heater requires a longitudinal cut, you need to do it first, and only then transverse.
The walls of the cylinder are energized, the metal turns abruptly and can injure a person.
Agricultural waste is an excellent and literally free fuel. It is best to use this type of fuel in the form of briquettes. A press for fuel briquettes can be made by hand.
You can find tips for making portals for a fireplace with your own hands here.
And in this topic, we will consider how to properly install a gas water heater. Instructions for dismantling old equipment and installing a new unit.
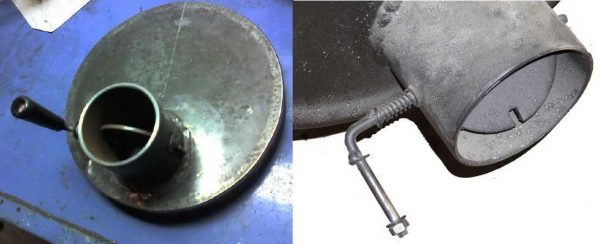
How to install a cast-iron door on a metal cylinder
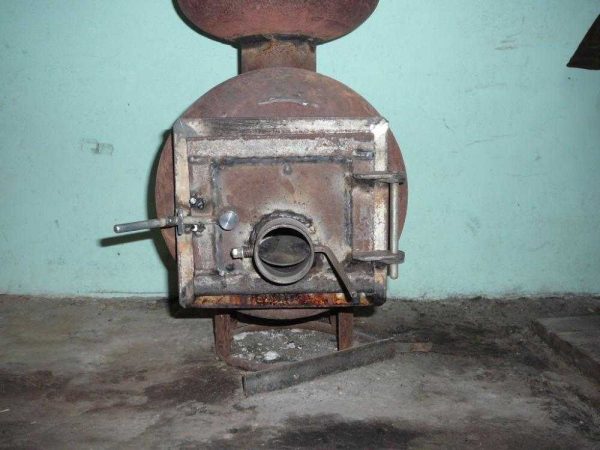
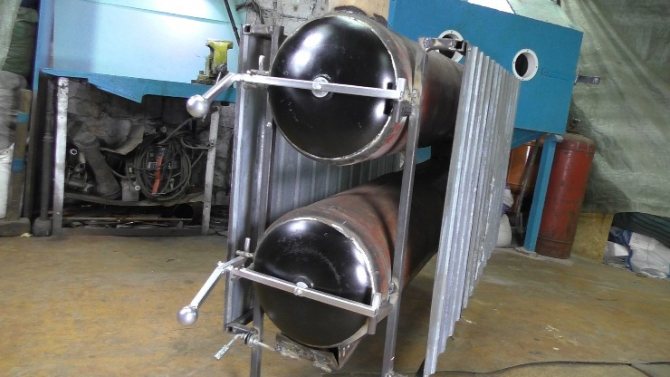
When making a stove for a bath from a gas cylinder with your own hands, it is easier to attach a ready-made casting than to cook the door yourself. Only now it is not clear how to dock two different metals. In reality, everything is simple. Buy a cast-iron door you like or of a suitable size. It comes with a frame. The same frame is cooked from a metal corner of a suitable size. It is welded to the cylinder, and the cast iron door is bolted to it.
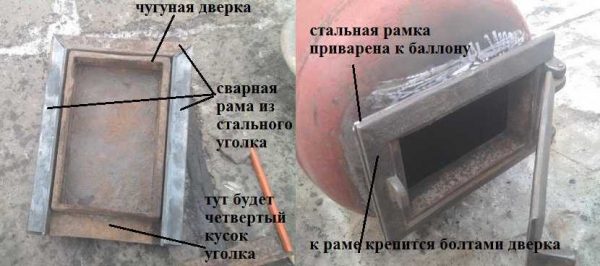
How to attach a cast-iron door to a gas cylinder
For sealing between the frames, you can lay a layer of asbestos or mineral wool cardboard (just watch that the temperatures withstand high - up to 1200 ° C minimum). You can do it differently - weld a small side 1-2 cm on the metal frame, which will cover the gap.
Choice of design
Homemade sauna stoves are made not only from pipes, but also from other suitable materials, for example, sheet metal and gas cylinders.
In most cases, a rectangular body is obtained from metal sheets, which in many respects is worse than a round pipe body.
It should be noted that it is difficult to install the furnace using metal sheets, because in the process it is necessary to cut out, make blanks and properly fasten. In the case of a stove for a bath from pipe 530, everything is much simpler, since here work is carried out on a ready-made firebox.
Advantages of the 500 pipe
Let us consider in more detail the advantages of a cylindrical pipe over other possible materials for the manufacture of a bath stove.
So:
- The round cylindrical firebox is very similar to the ideal spherical one, due to which, from the point of view of heating technology, it surpasses rectangular stoves;
- In most cases, thick-walled pipes are used for the manufacture of a sauna stove, which significantly increases the technical parameters of the structure;
- Also, thanks to the thick walls of the water pipes used, the service life of the sauna stove is quite long. At the same time, the dimensions of the mechanism allow it to be moved and transported.
Of course, this design also has very significant drawbacks, which partly stem from the same advantages, since much more materials and more powerful tools are needed to process pipes of this thickness.
Material characteristics
Before starting work on the arrangement of a homemade stove, it is important to choose the right pipe itself.
Each of them is marked, the constituent numbers of which determine the following:
- The way the pipe was made;
- Manufacturing standard;
- Pipe size;
- Steel grade.
In order to opt for a particular version of the pipe, it is necessary to find out the dimensions from its marking.
For example, the designation 500x10 tells us about the pipe diameter and wall thickness.
A homemade stove for a bath from a horizontal pipe, as well as a vertical configuration, should be warmed up as evenly as possible in the shortest period of time.
Of course, the amount of fuel spent in this case should be minimal.
The following sizes are considered the most suitable:
- The diameter of the pipe used must be no more than 550 mm;
- The optimal wall thickness is from 9 to 13 mm.
Blueprints
The first step in any construction process is drawing up drawings.
Thanks to the drawings of the stove for the bath from the pipe 530, the places for installing all the components are thought out in advance, that is, all possible risks are excluded.
Of course, if you do not have experience in such matters, you can use ready-made drawings or turn to professionals for help.
What is needed
Making a sauna stove without the help of a professional requires maximum readiness, especially in terms of consumables and required tools. For these works we need:
- A small piece of pipe;
- The main pipe section is made of metal, the length of which must be at least 150 cm and the diameter - 50 cm;
- A sheet of metal with a thickness of at least 12 mm;
- Metal rods. They are used to create grates. You can also purchase ready-made grates in specialized stores;
- Bulgarian;
- Metal doors. They can also be purchased ready-made, or made yourself;
- Metal hinges, in case the doors are made independently;
- Welding machine.
Horizontal design and manufacturing process
Before starting work, a larger pipe should be cut into two parts using a grinder.
The first piece should be 60 cm long and the second 90 cm long.
A larger section will serve as a firebox, and a smaller one - a water tank.
Next, let's go directly to the steps of making a furnace from pipes for a bath:
- At the bottom of the larger pipe, holes must be made with a height of 5 cm and a width of 20 cm. They will be used to equip the blower;
- A metal plate is attached above the blower by means of a welding machine;
- It is necessary to leave space in the ashtray for attaching the stove grate. For him, you need to prepare four ears;
- Further, a compartment for the furnace is made in the pipe;
- The completed firebox must be covered with a special metal door, for which hinges are used;
- Above the firebox, a smaller piece of pipe is fixed, intended for use under the stove;
- Half the volume of the heater is filled with large stones;
- A metal bus is attached to the top of the sauna stove, the same is done with the side of the stove;
- The upper part of the tank is closed with a metal sheet, leaving a connector for the chimney. You should also equip a door for filling water into the tank;
- Next, the chimney is attached by welding.
Vertical: manufacturing methods
Installation technology is not much different. So:
- A part with a height of 90 cm is cut from the larger pipe;
- A metal circle of the same diameter as the pipe is attached to the bottom of the pipe. Thus, the bottom of the furnace is formed;
- Also, connectors are cut out under the blower in the lower part of the vessel;
- Attach the grate so that they are above the blower;
- A rectangular connector is cut out from the top of the grate, which will later be the place for the firebox;
- Installation of a place for stones;
- Each hole is covered with a metal door. They are attached to special hooks or loops;
- A hole is cut out on top of the stove for the chimney;
- As a result, the oven is carefully sanded and painted.
Improvised means, materials and tools
In order to make a potbelly stove from a gas cylinder, you will need the following materials:
- pipe for creating a chimney;
- metal (sheets with a thickness of at least 3 mm);
- fittings;
- metal corners.
The principle of operation of a potbelly stove from a cylinder is very similar to the example of an ordinary potbelly stove in the drawing
From tools and equipment you need to prepare:
- hammer, chisel, pliers;
- welding machine;
- marker;
- grinder;
- drill and drills of the correct size.
We recommend that you study the material on how to increase the efficiency of a stove and find answers to your questions.
Advice! The stove-stove must have doors and a grate. Curtains can be made by hand from sheet metal. As a grate, you can use the bottom of the cylinder with drilled holes or fittings. If it is not possible to do it yourself, you can buy ready-made parts in the store.
For the construction of a potbelly stove from a gas cylinder, you will need metal sheets, corners, reinforcing mesh and a pipe. Many have such materials lying around in the garage or utility room idle.
Manufacturing instructions
Horizontal and vertical versions of this device have become popular with users. But there are design features that remain common to all models.
Materials (edit)
The main material list is as follows:
- Steel corners.
- Armature.
- A sheet of metal with a thickness of at least 3 millimeters.
- Chimney, so that the remnants of rocket and other types of fuel pass through it.
Four door hinges are available separately from hardware stores. From additional tools, masters will come in handy:
- Grinding machine with different types of discs.
- Drills with drill sets.
- Marker.
- Welding unit.
- Hammer, chisels, pliers. You can make the tools yourself.
The top of the propane cylinders is cut off in any case. This is where the valve is located. The locations of the firebox and ash pan with a chimney are marked with a marker. The marked areas are cut out, then they can be put aside, this is not the end of the mining process.
For the grate, the reinforcing bars are marked, cut into pieces. Workpieces are welded using a special apparatus designed to perform these works. The next stage includes the installation of hinges, with the participation of previously cut parts.
The branch pipe is welded with a hole in the chimney cylinder. Then pipes will be connected to it. Four legs are fixed from the corner, then they additionally mount everything below. The finished stove is mounted, a chimney is installed.
Installation
The main thing is to follow the fire safety rules. The minimum distance to walls is not regulated by regulations when it comes to bricks and other types of materials that do not lend themselves to combustion. 50 centimeters is the minimum required distance between the furnace body and any materials that support combustion.
Plants, external walls made of glass should also not be near the potbelly stove.
The floors must be covered with metal sheets when it comes to wood. From the side of the firebox, this part should protrude at least 700 millimeters. The nearest walls are sewn up with metal.
Tips & Tricks
Experienced craftsmen advise making a potbelly stove from a gas cylinder, taking into account the following nuances:
- The chimney must not follow the shortest route. In this case, the heat will go away along with the combustion products. The best type of chimney is a broken pipe.
The chimney is made of a broken shape so that heat does not escape from the stove along with the smoke. The curved pipe prevents heat energy from escaping. It is only important that the pipe is not made of aluminum!
- Any type of fuel can be used as fuel - coal, wood. If necessary, household waste and carpentry waste can be burned in the stove.
- You can increase heat transfer and make a stove with high efficiency by increasing the length of the chimney. Parts with straight sections or with a downward slope should be avoided.
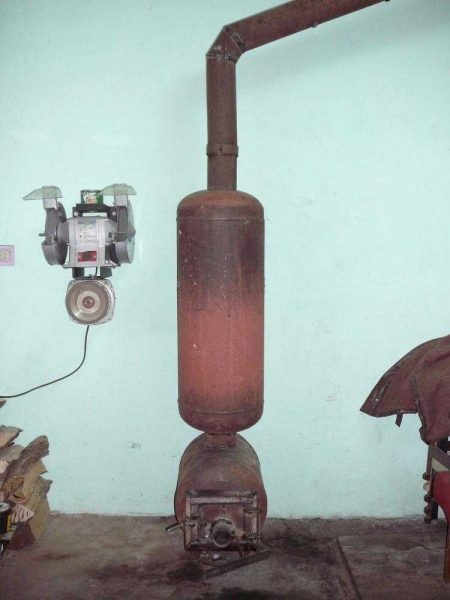
- If an additional one (in the form of a vertical pipe) is attached to the main body cylinder, then the heat can be used doubly. Such a potbelly stove from two cylinders creates good traction, combustion products and smoke will not get into the room / garage / utility room. In addition, the heat transfer of the heater will increase.
Ways to improve the heat transfer of the stove from a propane cylinder
As mentioned above, the main disadvantage of a garage oven from a gas cylinder is its low thermal efficiency, because a significant part of the heat obtained during combustion simply goes out through the chimney along with the gases.
There are several ways to improve the heat transfer of a homemade stove:
- Apply flue gas afterburning... In this case, the design of a potbelly stove will resemble a "bubafonya" or "slobozhanka" stove. This will make it possible to increase the efficiency of the device by an order of magnitude.
- Extend the chimney.In this case, part of the heat that goes outside remains inside the room. For this, a broken configuration is communicated to the pipe, without horizontal sections and negative angles.
- Use a flue pipe... On the horizontally located body of the stove from a gas cylinder on wood, another cylinder is welded in a vertical position: it will act as a smoke pipe. An improvement in heat transfer from the stove is achieved here due to an increase in the area of the heating surface. A prerequisite for avoiding the ingress of smoke into the room is a good draft.
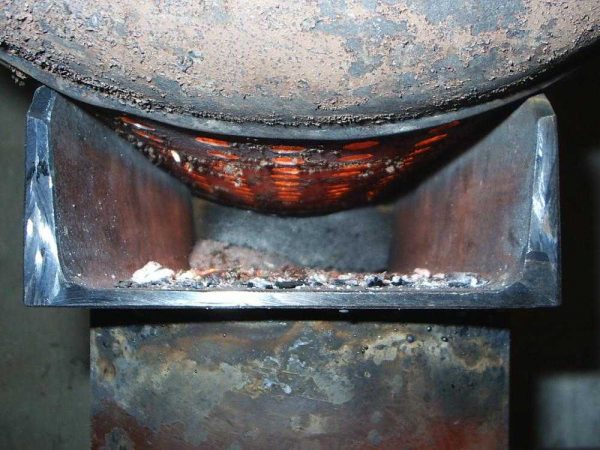
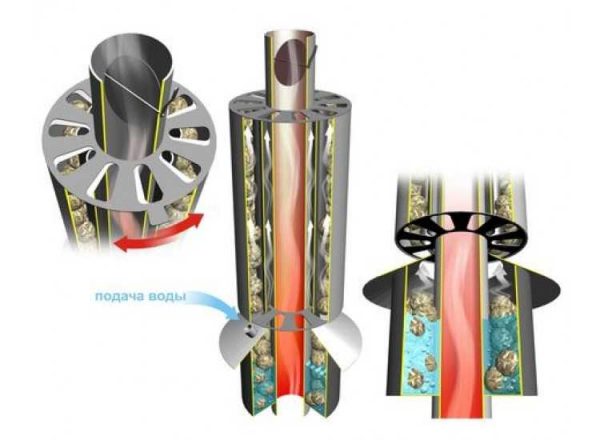
- Furnace arrangement... This technique is widely used in baths, where a bottle is used for additional heat storage. The metal chimney is equipped with a grid, into which stones are poured to remove heat from the chimney and transfer it to the room. In this case, it will take some time to warm up the stones: before that, the air will heat up with some slowdown. But in the future, the surface of the pipe will not burn, and the heated stones will evenly heat the surrounding space. Even after the firewood burns out, the accumulated heat will maintain a comfortable temperature in the room for some time.
When choosing stones for backfill, it is recommended to give preference to round river samples: it is desirable that they have a uniform color without any inclusions. Other types of stones can even be dangerous, bursting when heated, or releasing substances harmful to health.
Positive and negative parameters
The use of a gas cylinder to form this structure has certain advantages, which include:
- you can get a long burning stove with minimal costs. since you will need standard and inexpensive elements and materials;
- you can do all the processes with your own hands. therefore, you do not need to resort to the help of specialists;
- you can use the resulting equipment for a house, a bath or other structures;
- on the Internet you can find video instructions for creating a structure. therefore, you can avoid any problems during work;
- it is quite easy and convenient to use such stoves. and also there is no danger for users;
- completely different types of ovens can be made from a gas cylinder. which can have various parameters and features.
The disadvantages of this equipment include the fact that there must be competent and high-quality drawings, according to which all work will be performed. Without them, you can violate the basic principles of furnace design and make serious mistakes.
Why is such a boiler needed and how does it work?
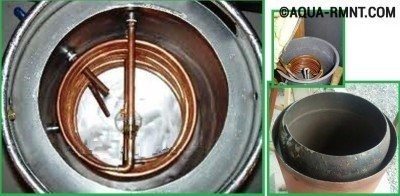
To understand how an ordinary indirect heating boiler works, it is enough to study the device of this device. It is a tank in which pipes are installed. A coolant circulates through the pipes, for example, used to heat a house. Cold water is supplied to the tank, it gradually heats up to a certain temperature and can be used for household needs.
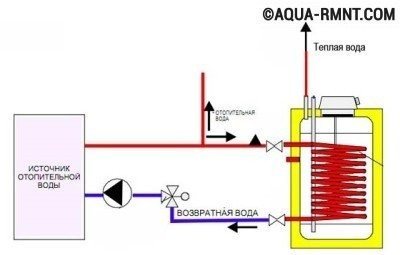
The diagram clearly shows the device of an indirect heating boiler, which consists of a water tank and pipes with a coolant inserted inside
Owners of gas water heaters and electric flow heaters are well aware of the problems associated with their operation. After the water is open, you need to wait for a while until it warms up to the desired temperature. It also happens that the temperature of the water in the shower suddenly drops if at that moment a tap in the kitchen is turned on, etc. But the indirect heating boiler eliminates these shortcomings, since the water in the device maintains a constant temperature.
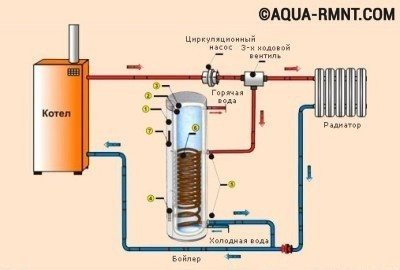
There are several types of device for a self-made indirect heating boiler:
- The most popular option is a coil made of metal pipe. The coil is placed in a tank and a coolant is passed through it.Cold water is poured into the tank, which heats up on contact with the coil.
- Pipes with a coolant can be placed not in the center of the tank, but along its walls, if it is more convenient. In this case, there are no other fundamental differences from the first version of the indirect heating boiler.
- You can do without pipes at all, and use two containers of different diameters. They are inserted into one another, water is supplied to the smaller tank for heating, and the coolant circulates in the space between the walls of the tanks.
Since the principle of operation of an indirect heating boiler is quite simple, you can come up with your own version of this design.
To create a long-burning oven with your own hands, you must choose only suitable and high-quality materials. Therefore, you need to choose an all-metal cylinder. Explosion-proof elements that are not resistant to high temperatures are not suitable. A household balloon is also not suitable, since usually such elements are too small in size.
The best solution is considered to be cylinders with a volume of 12 or 27 liters. However, for a full-fledged design of long burning, the most ideal choice is a 50-liter cylinder, the diameter of which is 300 mm. It can burn absolutely any type of fuel, and its cost is considered affordable.
Technologies for the formation of different types of furnaces
To create a long-burning furnace using a gas cylinder with your own hands, it is important to determine initially what purpose it will have, what fuel will be used to heat it up, and what other parameters it will have.
The simplest option would be to make a standard stove a potbelly stove from a cylinder. which can be intended for a home or a bath. Firewood is used as fuel for it. A cylinder with a volume of 12 or 27 liters is suitable for these purposes, but you can also choose a 50-liter element if necessary.
The operating principle of the resulting equipment will be very simple. It is important to use correct drawings during work. It is enough only to purchase a furnace door, which is installed in a cylinder, but different partitions or a grate are not needed for this design. Additionally, you will have to form a chimney elbow.
If you need to make a cooking oven, then cylinders are suitable materials for this purpose. From them you can get a grill or barbecue or even a smokehouse.
Another option is considered to be an oil stove, which is most often installed in garages. It is much more difficult to form such a structure with your own hands than an element on wood. The principle of operation of this equipment is as follows:
- The oil burns in a special fuel compartment. moreover, oxygen is supplied here in small portions with a special air throttle.
- As a result of combustion, vapors are generated, which rise into a unique reactor with re-formed walls.
- Air from the outside enters through the existing holes, which intensifies the already existing combustion of oil vapors. This leads to an increase in temperature, as a result of which the pyrolysis process begins. therefore the temperature rises even faster. This leads to the formation of nitrogen oxides, which prevents the oven from overheating.
- The gases from the reactor enter the afterburner chamber, which has two sections, separated from each other by a partition. Pyrolysis gases burn out in front of the partition, which leads to the maintenance of a high temperature. After the baffle, all the oxygen is consumed, but the temperature is still very high.
- A chimney is connected to the afterburner, through which combustion products are removed.
As a rule, such furnaces are created from sufficiently large cylinders, which are sawn into three parts. each of which has its own purpose. It is believed that this design has high efficiency and durability.A video of its creation on its own can be found on the Internet, but in order to obtain an ideal result, it is important to take into account all the nuances so as not to violate the principle of operation.
Another unique option is considered to be long-acting ovens, which are formed from 50-liter cylinders. They use wood fuel for their work. During a long burning of wood, the pyrolysis process begins, which affects the fuel, which leads to a significant increase in efficiency, and also increases the heat transfer of the entire structure as a whole.
The bubafon stove is considered quite unusual. whose drawings differ in specific nuances. It is a long-lasting construction with a distinctive feature being separate combustion. It has a special oppression, under which the fuel is rammed, and the pyrolysis process is performed.
Thus, a gas cylinder can be used to form completely different types of furnaces, differing in purpose, appearance and principle of operation. The use of this element has many positive parameters, and you can cope with all the stages and technologies on your own. The resulting structures can be used for absolutely any structures.
The main types of oven
The vertical stove is made more often, since it takes up little space and has a neat appearance.
The horizontal design is appreciated because of the large hob area. The dimensions of the ash pan and the hole for laying firewood in any device are 10 × 20 and 20 × 30 cm, respectively. Their markings are applied both to the drawings and to the balloon itself - it is easier to cut it this way. The locations of the holes are chosen arbitrarily, depending on the type of stove.
With the help of such a stove, you can heat the room and even cook food on the street.
The chimney is made of a steel pipe, cutting it into different lengths and welding them together. Additionally, you need to insulate it with mineral wool and foil. You can use a ready-made potbelly stove indoors or outdoors. If the stove is used for outdoor cooking, then it is enough to attach a low pipe for the smoke to escape.
Vertical potbelly stove
To create a vertical furnace from a propane cylinder, it is placed vertically. It is necessary to cut off the neck, with a marker draw the markings of the ash pan, chimney and firebox. The holes are cut with a grinder or cutter. Reinforcing rods are cut into identical pieces, forming grates. They are welded to the body in parallel rows or snake. Hinges for doors are fastened, doors are cut out of steel sheet or cast iron. A slide mechanism or latches are welded to them.
The hob is necessary if the oven will cook food or heat water. To create it, you need to cut out a part of a suitable size from the metal and weld it to the top of the cylinder. After that, all joints and seams are checked for tightness and strength, cleaned and polished.
The vertical oven is more popular as it takes up less space
The chimney hole should be located at the top of the cylinder or on the side, sometimes the pipe goes through the central opening. In the side part, the knee is first attached, then the chimney itself. Smoke and combustion products escape through the pipe. A metal stand or sturdy legs are attached to the bottom of the cylinder. Additionally, you can prepare the foundation for the potbelly stove.
Horizontal design
The first step is to create a sturdy stand. It is made of metal, the legs are welded, and then the body of the finished stove. Marker on the cylinder mark the places of the blower, chimney and fuel holes. The openings are cut with a chisel, grinder or cutter. Drill holes in the bottom of the case. A box-ash pan is attached from above, it is made of strong heat-resistant metal. A damper is welded to the opening, which will serve as a blower.
The door is harvested from the cut out part of the cylinder. It must be scalded and attached to the body with hinges. Although you can make a cast iron door with a latch and weld it. The chimney should come out of the upper rear part of the stove. A steel sheet is laid and secured on top of the housing to create a flat hob.
A horizontal stove will need more space - this is its main disadvantage
In the store, you can buy ready-made burners, cut a hole in steel for them and fix them. So you can make a stove from a horizontal gas cylinder, but it takes up a lot of space.